Building a Chat Application using Upstash Kafka, Redis and Next.js
Project Description
In this blog post, we will be creating a messaging application that allows users to create message clients and chat room. Additionally, users will be able to access past messages.
The project consists of two pages. The first page is dedicated to client registration, where you can create multiple clients with unique names.
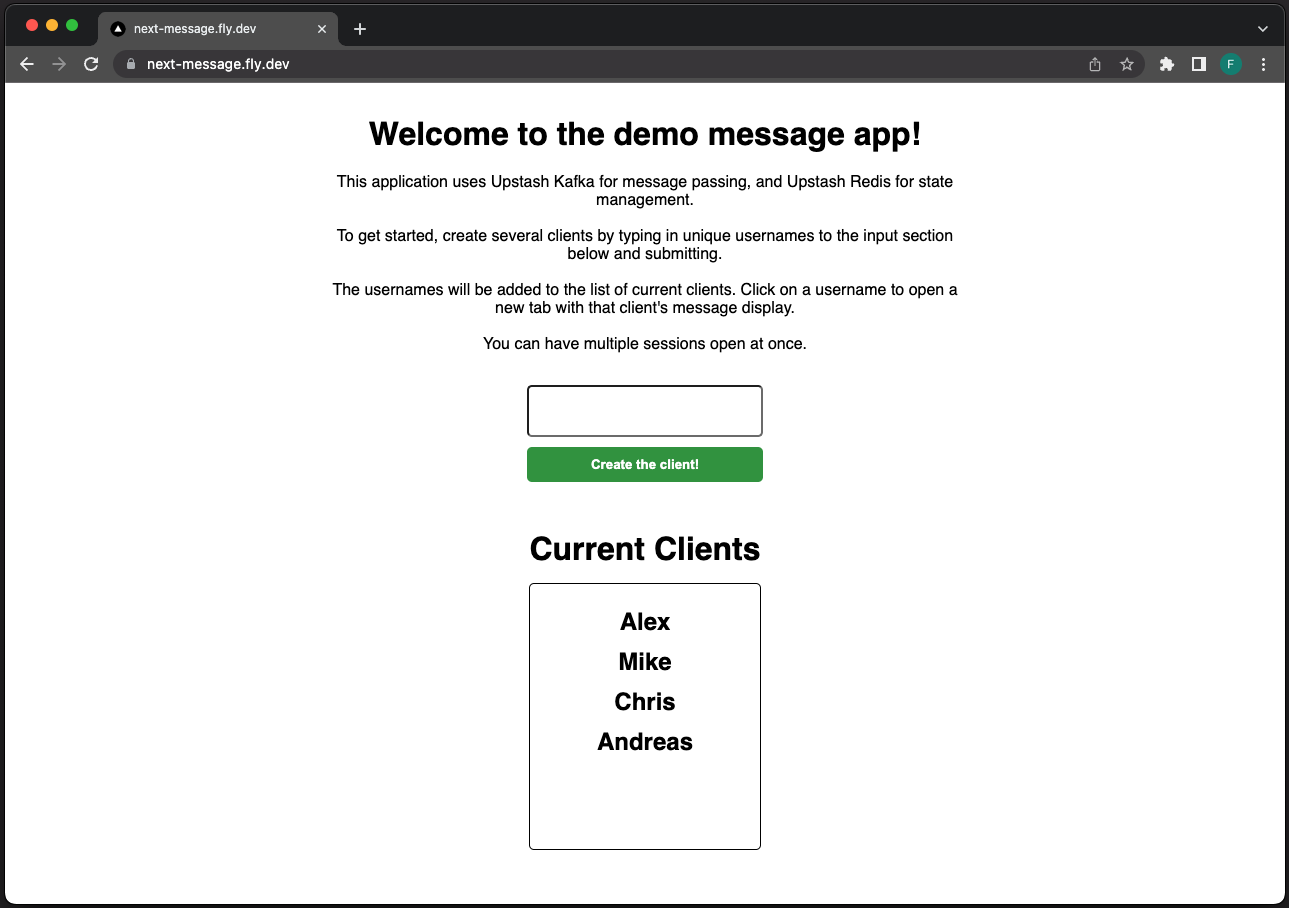
When you click on a client's username, you will be directed to the chatroom client associated with that specific user.
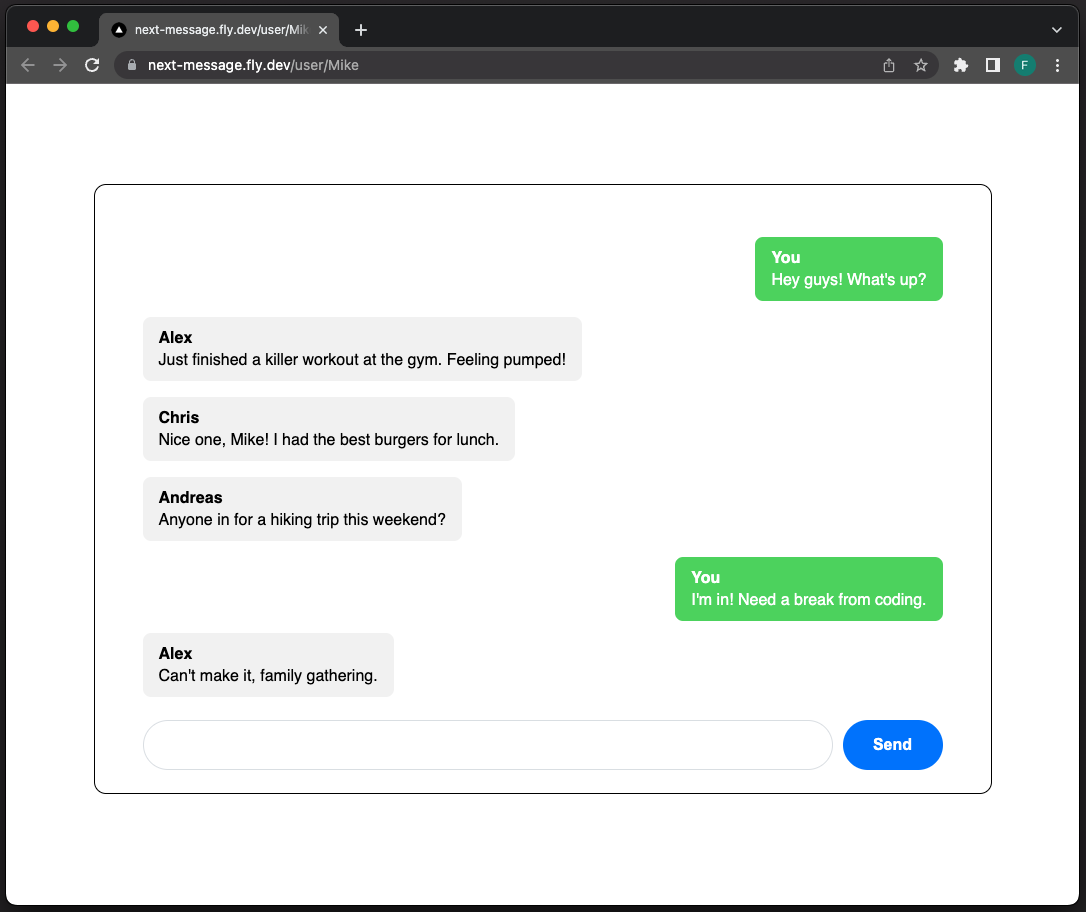
The logic of the chat application is as follows:
Users can create multiple clients on the index page, each with a unique username. Clicking on a client's username will open a new tab with a separate client with a unique path.
Each client will be connected to a message server via a WebSocket connection. When a new message is created on the client, it will be sent to the message server associated with that client.
The message servers will handle the message traffic. When a client sends a message through the WebSocket connection, the server will direct it to a Kafka Broker. Each message server will run a NodeJS thread to handle incoming messages. When a message is consumed, it will be sent to the clients through the existing WebSocket connection. To consume incoming messages on the client-side, we'll be using the react-use-websocket library.
The application will utilize Upstash Redis to store message history. When a message is produced to Kafka, it will also be persisted to the Redis database. Upon creating a new client, the old messages will be retrieved from Upstash Redis and rendered in the chat display.
Here's the general overview of the application:
Note: In our implementation, we'll create single message server for demo purposes, one can increase the number of servers to handle the message load.

Demo
You can reach the demo of the app here. Current version of the application is deployed to Fly.
Getting Started
Here are the steps for building the chat application:
- Creating Upstash Redis database
- Creating Upstash Kafka cluster
- Creating the Next application (frontend).
- Creating the WebSocket message server.
- Deploying the application to Fly.io
Creating Upstash Redis database
Navigate to the Upstash Console and login, then on the Redis tab, click Create Database button.
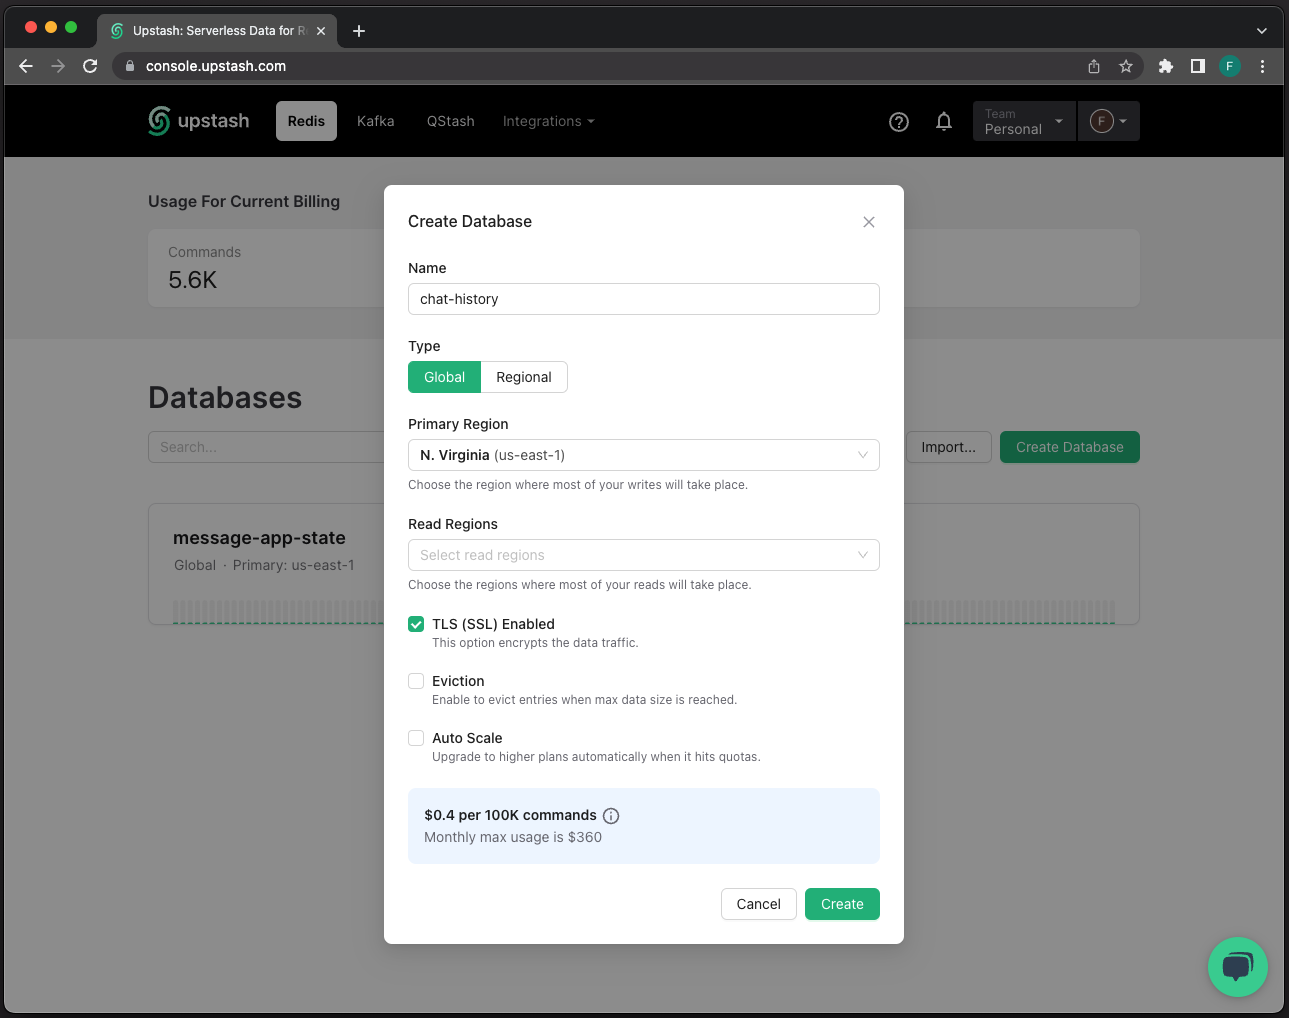
Just like that, our Redis is ready to use! We'll come back to Redis console for the credentials.
Creating Upstash Kafka cluster
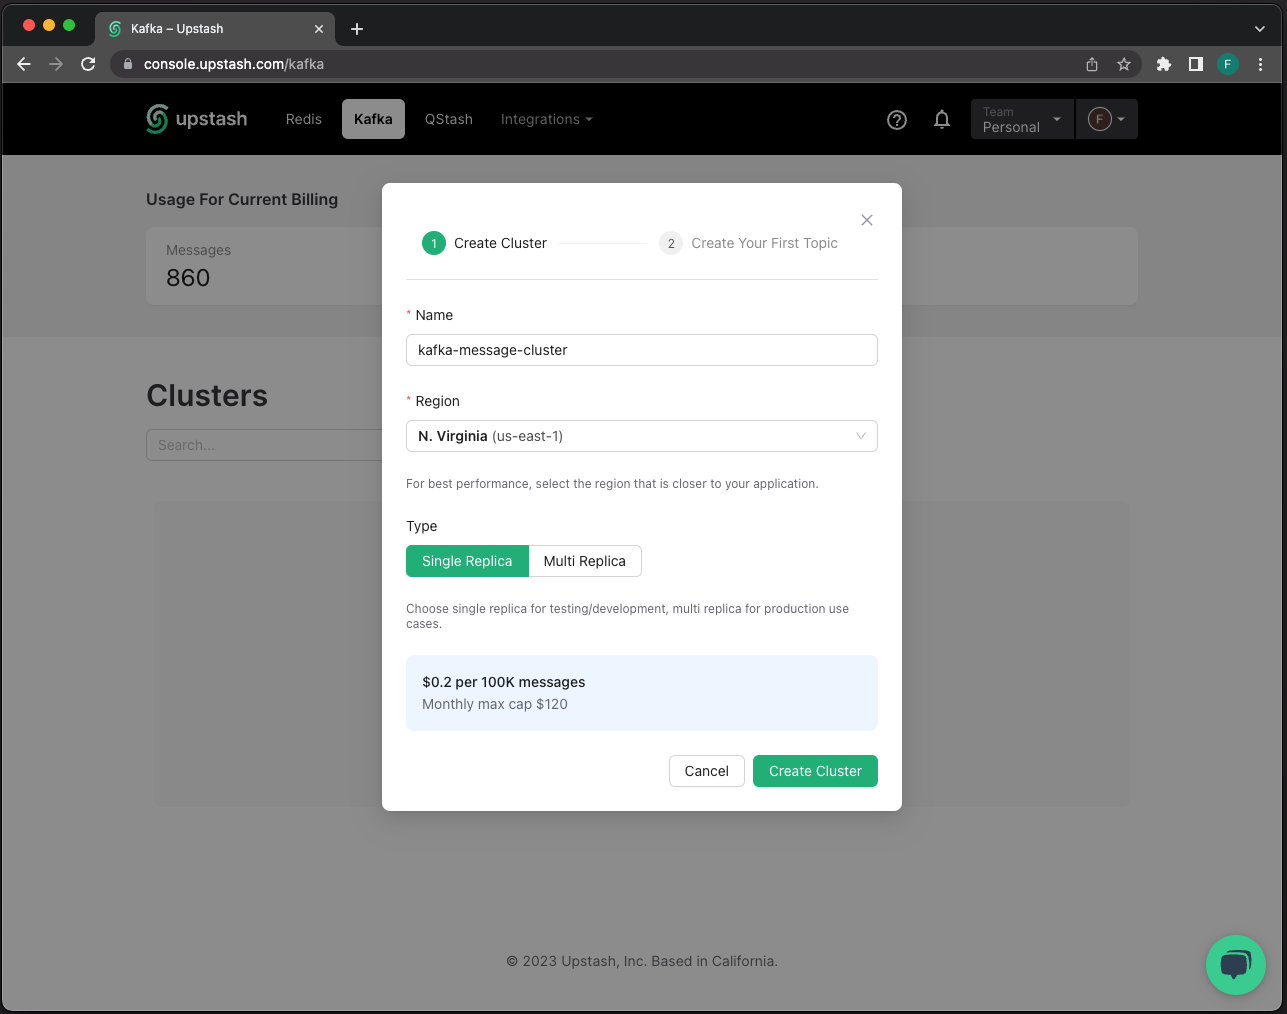
Now, switch to the Kafka Tab, and click Create Cluster button. Type in the cluster name and proceed. Then, create the Kafka topic and confirm.
Creating the Next App
First, create and navigate to the root folder of your application from your terminal. We'll keep the Next app and the server in this folder.
mkdir chat-app
cd chat-app
Then, create your next app.
$ npx create-next-app@latest

✔ What is your project named? … next-chat-app
✔ Would you like to use TypeScript? … Yes
✔ Would you like to use ESLint? … Yes
✔ Would you like to use Tailwind CSS? … No
✔ Would you like to use `src/` directory? … No
✔ Would you like to use App Router? (recommended) … No
✔ Would you like to customize the default import alias? … No
Handling Credentials
We'll create a file named .env to store the credentials. We won't need to copy and paste the credentials over and over again, we'll just import from this file.
First, create the .env file.
Then, navigate to Redis console, and copy/paste the UPSTASH_REDIS_REST_URL and UPSTASH_REDIS_REST_TOKEN credentials to .env file.
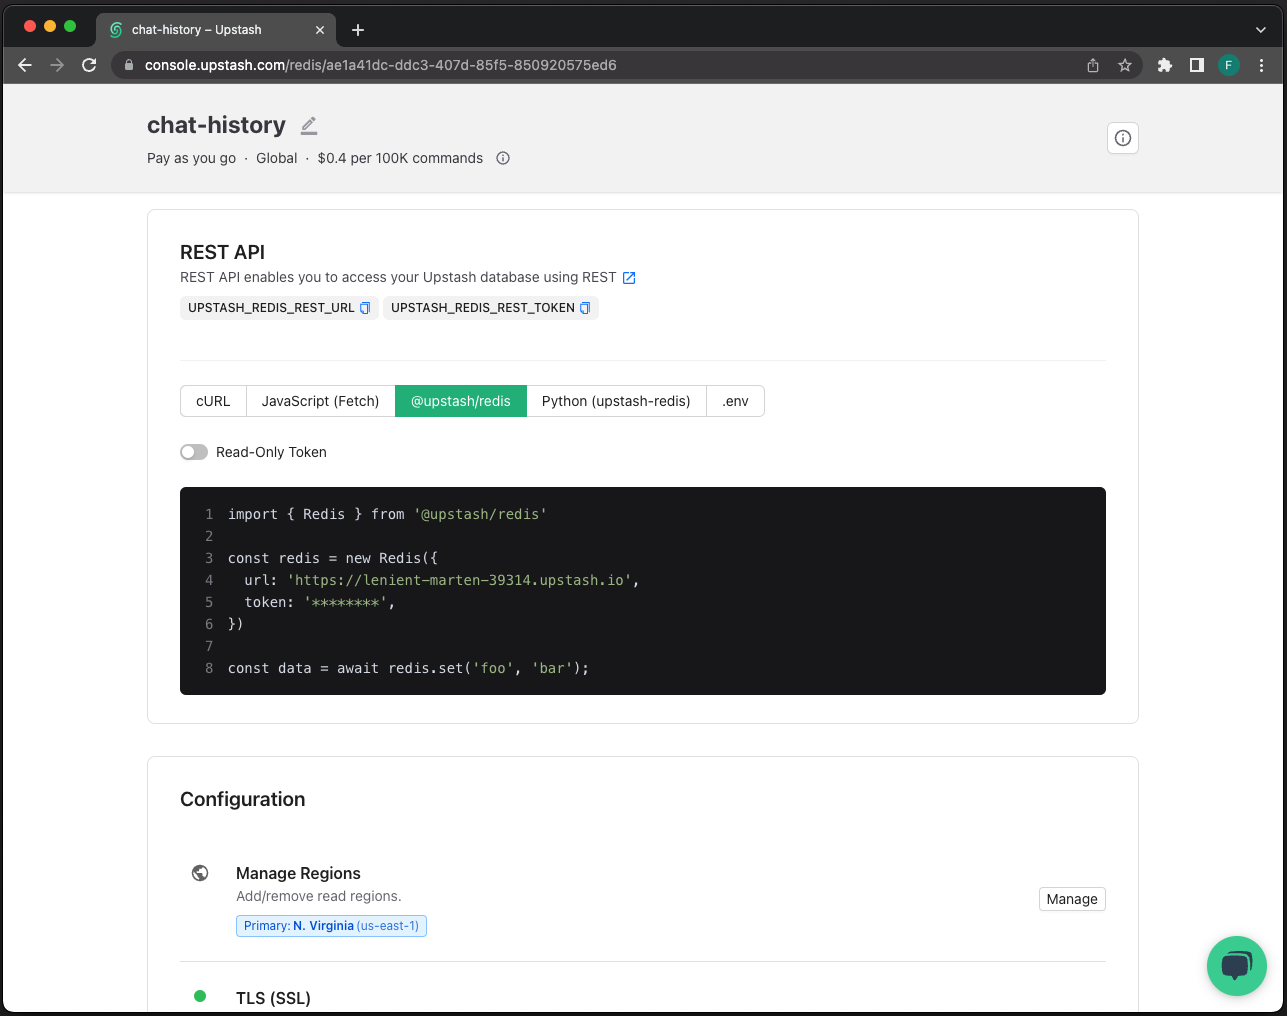
Finally, switch to Kafka console, and transfer the UPSTASH_KAFKA_REST_URL, UPSTASH_KAFKA_REST_USERNAME, UPSTASH_KAFKA_REST_PASSWORD
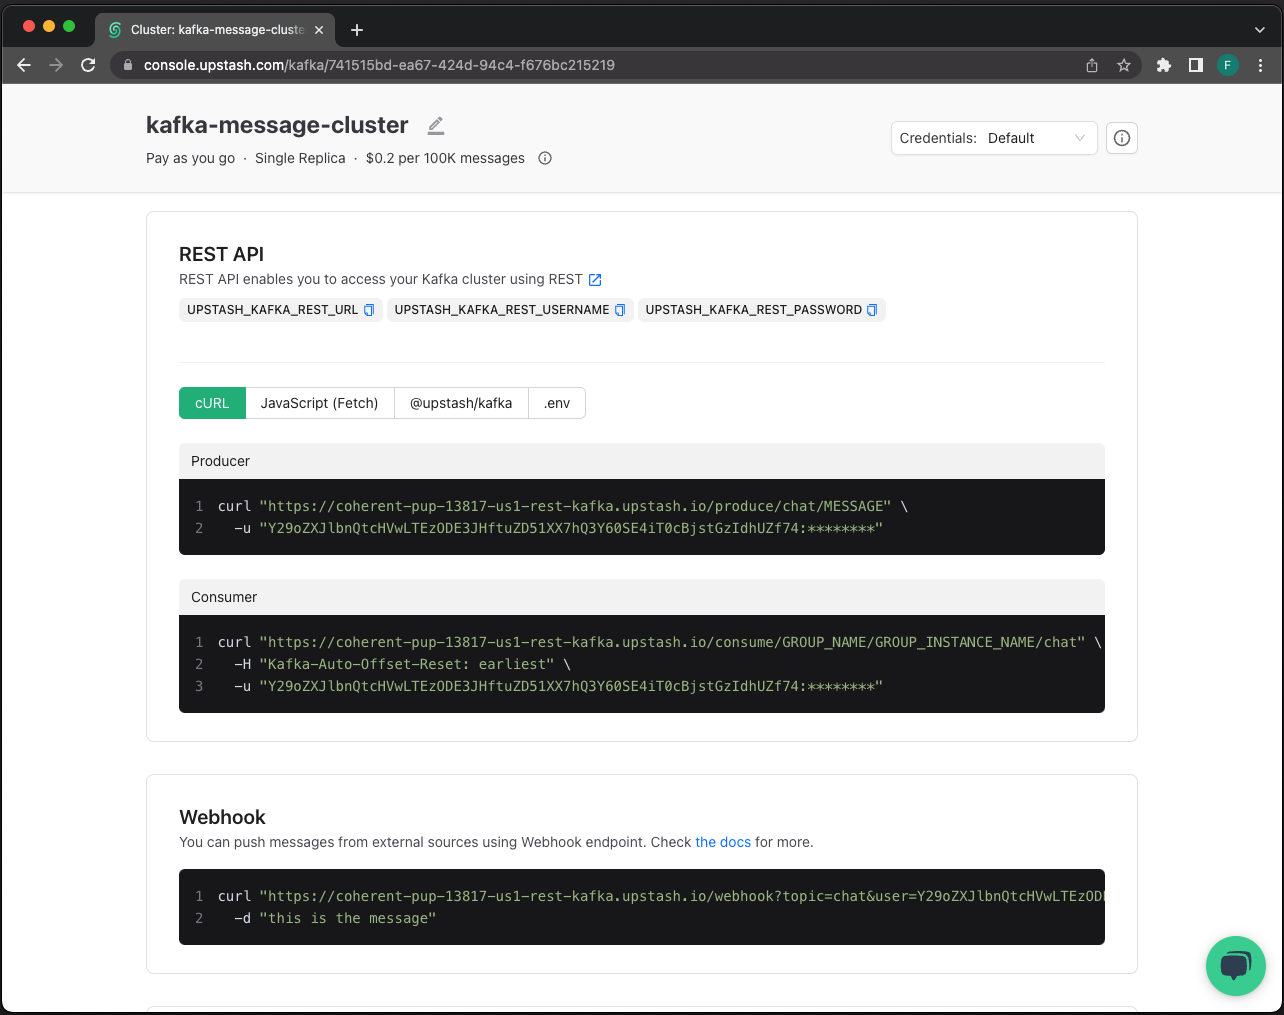
Now, your .env file should look similar
UPSTASH_REDIS_REST_URL=...
UPSTASH_REDIS_REST_TOKEN=...

UPSTASH_KAFKA_REST_URL=...
UPSTASH_KAFKA_REST_USERNAME=...
UPSTASH_KAFKA_REST_PASSWORD=...
Now that we've configured the credentials, we may proceed with the application.
Client Registration Page
Index page will contain the client registration/creation operations. When a username is submitted, a new client will be created and listed under the Current Clients table.
import { useState } from "react";
import Link from "next/link";
import { Redis } from "@upstash/redis";
import styles from "@/styles/Home.module.css";
export default function Home() {
const [usernameInput, setUsernameInput] = useState<string>("");
const [usernameList, setUsernameList] = useState<string[]>(Array<string>);
const handleInputChange = (e: React.ChangeEvent<HTMLInputElement>): void => {
const inputValue: string = e.target.value;
setUsernameInput(inputValue);
};
const addUsernameClient = (e: React.FormEvent<HTMLFormElement>): void => {
e.preventDefault();
setUsernameList([...usernameList, usernameInput]);
setUsernameInput("");
};
return (
<div className={styles.container}>
<div className={styles.welcomeSection}>
<h1>Welcome to the demo message app!</h1>
<p>
This application uses Upstash Kafka for message passing, and Upstash
Redis for state management.
<br />
<br />
To get started, create several clients by typing in unique usernames to
the input section below and submitting.
<br />
<br />
The usernames will be added to the list of current clients. Click on a
username to open a new tab with that client's message display.
<br />
<br />
You can have multiple sessions open at once.
</p>
</div>
<form className={styles.formSection} onSubmit={addUsernameClient}>
<input
type="text"
className={styles.formInput}
value={usernameInput}
onChange={handleInputChange}
></input>
<button className={styles.formSubmit} type="submit">
Create the client!
</button>
</form>
<div className={styles.clientListSection}>
<p className={styles.clientListHeader}>Current Clients</p>
<div className={styles.clientList}>
{usernameList.map((username, i) => {
return (
<Link
href={`/user/${username}`}
key={`${i}`}
className={styles.userClient}
target={"_blank"}
>
<p>{username}</p>
</Link>
);
})}
</div>
</div>
</div>
);
}If you want to reset the chat history each time the app is reloaded, you can use the following function:
export async function getServerSideProps() {
  const redis = new Redis({
    url: process.env.UPSTASH_REDIS_REST_URL,
    token: process.env.UPSTASH_REDIS_REST_TOKEN,
  });

  await redis.del("messagesList");

  return {
    props: {},
  };
}
With that, index page is ready to run. Run npm run dev command in next-chat-app folder to see the index page go live.
Message Client Page
To implement dynamic routing for the clients, we will create a folder named /pages/user/[username].tsx This folder structure will allow us to create dynamic routes for each individual client based on their username.
Here's the main component of the client. This component will hold the states for the list of messages, username etc. We are using useWebSocket hook to create message, connection and disconnection events from the WebSocket. When a message event is emitted, message will be added to message list and MessageDisplay component will be rerendered.
import { useState } from "react";
import { useRouter } from "next/router";

import { Redis } from "@upstash/redis";
import useWebSocket from "react-use-websocket";

import styles from "@/styles/Home.module.css";

type Message = {
  id: number;
  sender: string;
  text: string;
};

export default function MessageApp(props: { messagesData: Message[] }) {
  const { messagesData } = props;
  const { username } = useRouter().query;
  const [inputText, setInputText] = useState<string>("");
  const [messageList, setMessageList] = useState<Message[]>(messagesData);
  const [messageCounter, setMessageCounter] = useState<number>(0);

  const handleMessage = function (message: Message) {
    const nextMessages = [...messageList, message];
    setMessageList(nextMessages);
  };

  // handling WebSocket events
  const { sendMessage } = useWebSocket("ws://localhost:8080", {
    share: true,
    filter: () => false,
    onOpen: () => {
      console.log("WebSocket connection!");
      return "connection";
    },

    onMessage: (message) => {
      const data = JSON.parse(message.data);
      const { sender, text }: { sender: string; text: string } = data;
      const messageData: Message = {
        id: messageCounter,
        sender: sender,
        text: text,
      };
      setMessageCounter(messageCounter + 1);
      handleMessage(messageData);
      return message;
    },

    onClose: () => {
      console.log("WebSocket disconnected!");
      return "disconnected";
    },
  });

  function handleSendMessage(messageText: string) {
    const messageData = {
      sender: username,
      text: messageText,
    };

    sendMessage(JSON.stringify(messageData));
  }

  return (
    <div className={styles.Container}>
      <MessageDisplay messages={messageList} />
      <MessageInput
        inputText={inputText}
        setInputText={setInputText}
        handleSendMessage={handleSendMessage}
      />
    </div>
  );
}
Here are the MessageDisplay and MessageInput components:
const MessageDisplay = function (props: { messages: Message[] }) {
    const { messages } = props;

    return (
        <div className={styles.messageContainer}>
            {messages.map((message) => (
                <MessageBubble
                    key={message.id}
                    sender={message.sender}
                    text={message.text}
                />
            ))}
        </div>
    );
};

const MessageInput = (props: {
    inputText: string;
    setInputText: (msg: string) => void;
    handleSendMessage: (msg: string) => void;
}) => {
    const { inputText, setInputText, handleSendMessage } = props;

    const handleInputChange = (
        e: React.ChangeEvent<HTMLInputElement>
    ): void => {
        const inputValue: string = e.target.value;
        setInputText(inputValue);
    };

    const handleSubmit = (e: React.FormEvent<HTMLFormElement>): void => {
        e.preventDefault();
        handleSendMessage(inputText);
        if (inputText.trim() !== "") {
            setInputText(" ");
        }
    };

    return (
        <form className={styles.inputSection} onSubmit={handleSubmit}>
            <input
                className={styles.inputText}
                type="text"
                value={inputText}
                onChange={handleInputChange}
            ></input>
            <button className={styles.inputSendButton} type="submit">
                Send
            </button>
        </form>
    );
};

const MessageBubble = (props: {
    sender: string;
    text: string;
    key: number;
}) => {
    const { sender, text } = props;

    const { username } = useRouter().query;

    const isSender = sender === username;
    const senderClass = isSender ? "sender" : "receiver";
    return (
        <div className={`${styles["messageBubble"]} ${styles[senderClass]}`}>
            <div className={styles.messageSender}>
                {isSender ? "You" : sender}
            </div>
            <div className={styles.messageText}>{text}</div>
        </div>
    );
};
In order to provide the chat history to the client, we'll use getServerSideProps() function.
export async function getServerSideProps() {
  const redis = new Redis({
    url: process.env.UPSTASH_REDIS_REST_URL,
    token: process.env.UPSTASH_REDIS_REST_TOKEN,
  });

  const messagesData = (await redis.lrange("messagesList", 0, -1)).reverse();

  return {
    props: {
      messagesData,
    },
  };
}
Our Next.js app is now working. Refresh the page, create the clients and navigate one of them. You'll see the client page. But still, we need the message servers to handle the message flow.
Creating Message Server
Server's structure is rather simple. We're going to use Node.js, ws library, and Upstash Kafka to make it work. First, create a server folder inside the chat-app folder.
mkdir server
cd server
Inside the server folder, we'll install the requirements and configure the files.
npm install typescript ws tsc @upstash/kafka @types/ws
tsc --init
Then, we're going to create the WebSocket, Kafka Producer and Kafka Consumer clients inside /server/message_server.ts file:
import * as http from "http";

import { Kafka } from "@upstash/kafka";
import { Redis } from "@upstash/redis";
import { WebSocket } from "ws";

const server = http.createServer();
const wss = new WebSocket.Server({ server });

server.listen(8080, () => {
  console.log("Server is running on port 8080");
});

const kafka = new Kafka({
  url: process.env.UPSTASH_KAFKA_REST_URL,
  username: process.env.UPSTASH_KAFKA_REST_USERNAME,
  password: process.env.UPSTASH_KAFKA_REST_PASSWORD,
});

const redis = new Redis({
  url: process.env.UPSTASH_REDIS_REST_URL,
  token: process.env.UPSTASH_REDIS_REST_TOKEN,
});

const consumer = kafka.consumer();

const producer = kafka.producer();

const clients = new Set<WebSocket>();
In order to interact with the WebSocket, we're creating connection and message events.
wss.on("connection", async (connection, req) => {
  clients.add(connection);
  console.log(`New client connected!`);

  connection.on("message", async (message) => {
    const jsonMessage = message.toString();

    console.log("Received message:", JSON.parse(jsonMessage));

    producer.produce("chat", jsonMessage);
  });

  connection.on("close", () => {
    console.log(`Client disconnected:`);
    clients.delete(connection);
  });
});
Finally, we'll create and run the thread that consumes messages with predefined interval:
async function run() {
  while (true) {
    const messages = await consumer.consume({
      consumerGroupId: "group_1",
      instanceId: "instance_1",
      topics: ["chat"],
      autoOffsetReset: "earliest",
    });

    if (messages.length != 0) {
      for (let i = 0; i < messages.length; i++) {
        await redis.lpush("messagesList", messages[i].value);
        console.log(`Message sending: ${messages[i].value}`);

        clients.forEach((connection: WebSocket) => {
          connection.send(messages[i].value);
        });
      }
    }

    console.log("Run!");

    await new Promise((resolve) => setTimeout(resolve, 1000));
  }
}
Everything is ready. Our app should be working like a charm right now. If you run the message server on local and refresh the client page, you can see the messages transmitted between clients. The commands below will transcompile the TS file and run the server on localhost:8000
tsc message_server.ts
node message_server.js
Deployment
We'll use Fly.io for the deployment. Please create an account before we start, if you don't have it already.
Deploying the Message Server
Go to the server folder and install the flyctl CLI tool, and authorize via shell
npm install flyctl
flyctl auth login
To create the configuration files, run flyctl init. This will create a fly.toml. Go to fly.toml and insert the following lines for the WebSocket connection configurations:
[[services]]
  internal_port = 8080
  protocol = "tcp"

  [services.concurrency]
    hard_limit = 25
    soft_limit = 20

  [[services.ports]]
    handlers = ["http"]
    port = "80"

  [[services.ports]]
    handlers = ["tls", "http"]
    port = "443"

  [[services.tcp_checks]]
    interval = 10000
    timeout = 2000
Now, a final step for the servers. Run flyctl deploy, and we're ready to go! When the deployment process is completed, flyctl will provide an endpoint for your server. Please copy that endpoint. In our case, the endpoint is message-server.fly.dev.
Deploying the Next Application
Before deploying the Next.js application, we need to embed the deployment endpoint of the message server. Please replace the WebSocket URL in the pages/user/[username].tsx file from ws://localhost:8080 to the endpoint from flyctl, combined with wss:// prefix. In our case, it is wss://message-server.fly.dev.
Then, in the next-chat-app folder, run the identical commands as server. This time, we don't need to edit the fly.toml file, so we can proceed without that step.
flyctl init
flyctl deploy
We are done! If you run the flyctl open command, you'll be navigated to your deployed project.
Conclusion and Suggestions
Thank you for following along!
You can find the Github repository of the project here.
If you want to keep working on the project, here are some suggestions:
-
Currently, whenever the page is reloaded, all the stored messages in Upstash Redis are being flushed. This behavior is controlled by the code in the
pages/index.tsxfile, specifically within thegetServerSidePropsfunction. However, a critical issue arises when a user decides to reload the page, it results in the deletion of chat history for all participants in the chatroom.
To solve this issue, a recommended solution involves implementing an extension of the TTL for the chat history each time a message is sent. This improvement would ensure that chat history remains accessible and preserved even after page reloads. -
You could implement multiple chatrooms feature. To achieve this, you could create multiple Kafka topics with unique names for each chatroom. Another way is to handle it on the message server itself using the right data structures.
-
You could also implement multiple message servers, and a load balancer to apply the best system design practices.
If you have any questions, you can reach me at fahreddin@upstash.com
