Saving AI SDK v5 Chat Messages in Redis

I wrote an updated 2026 version of this article for Vercel AI SDK v6 over at xadd.dev!
In 2023, Vercel introduced the first version of their AI SDK. In their words, it started as:
"An interoperable, streaming-enabled, edge-ready software development kit for AI apps built with React and Svelte."
To me, that's a complicated and confusing tagline for an incredibly useful piece of software. It's crazy to see how fast Vercel's AI SDK has grown since then:

One of the most common things you wanna do when chatting with an AI is keeping track of the message history.
The approach they showcase in their documentation is great for demo purposes, but is not a great idea in production settings:
import { readFile } from "fs/promises";
import { UIMessage } from "ai";

export async function loadChat(id: string): Promise<UIMessage[]> {
  return JSON.parse(await readFile(getChatFile(id), "utf8"));
}

// ... rest of the file
I find Redis to be by far the easiest and fastest way to save chat messages in the ai sdk v5 (i promise they didn't make me say this because i work at upstash 💀).
Redis allows us to:
- Store message histories in AI-SDK format
- Not worry about schema migrations (like with Postgres)
- Be 100% type-safe with TypeScript types
- Load message histories very fast (after all, it's Redis)
Basically, it's the perfect tool for this job. I'll show you how this works in the newest AI SDK version 5.
The Problem: Chat Messages Live in Memory
The AI SDK's default behavior saves messages in memory. This works super well for demos and fast local setup. In real applications, users expect persistence (i know this because i've launched my side projects without persistence and got flamed for it):
- Going back to previous chats
- Sharing conversations with others
Luckily, the AI SDK v5 makes saving chat messages extremely easy for us. They have absolutely cooked with this release.
Step 1: Reducing network traffic
Because messages are kept in memory by default, the AI SDK sends the entire message history along for each chat request.
The longer the chat, the longer the array of messages we transmit for each request to our backend. Every. single. message. gets sent along for every request.
With our approach, we only need to send the current message with our request. The rest of our chat history is tracked entirely server-side.
"use client";

import { useChat } from "@ai-sdk/react";
import { DefaultChatTransport } from "ai";

const { sendMessage, messages } = useChat({
  // ...

  transport: new DefaultChatTransport({
    api: "/api/chat",
    // only send the last message to the server:
    prepareSendMessagesRequest({ messages, id }) {
      return { body: { message: messages[messages.length - 1], id } };
    },
  }),
});
When making a chat request, only the current message is transferred as payload (and automatically converted to the AI SDK format for us):
{
  "message": {
    "parts": [
      {
        "type": "text",
        "text": "hey"
      }
    ],
    "id": "VkmX11BNkeKa8WtQ",
    "role": "user"
  },
  "id": "pslHCAF1vB1PPGaU"
}
Perfect! Let's get to the server-side implementation.
Step 2: Loading a chat history
To load messages from Redis, let's set up Redis in our API route really quick:
import { Redis } from "@upstash/redis";
const redis = new Redis({
token: process.env.UPSTASH_REDIS_REST_TOKEN,
url: process.env.UPSTASH_REDIS_REST_URL,
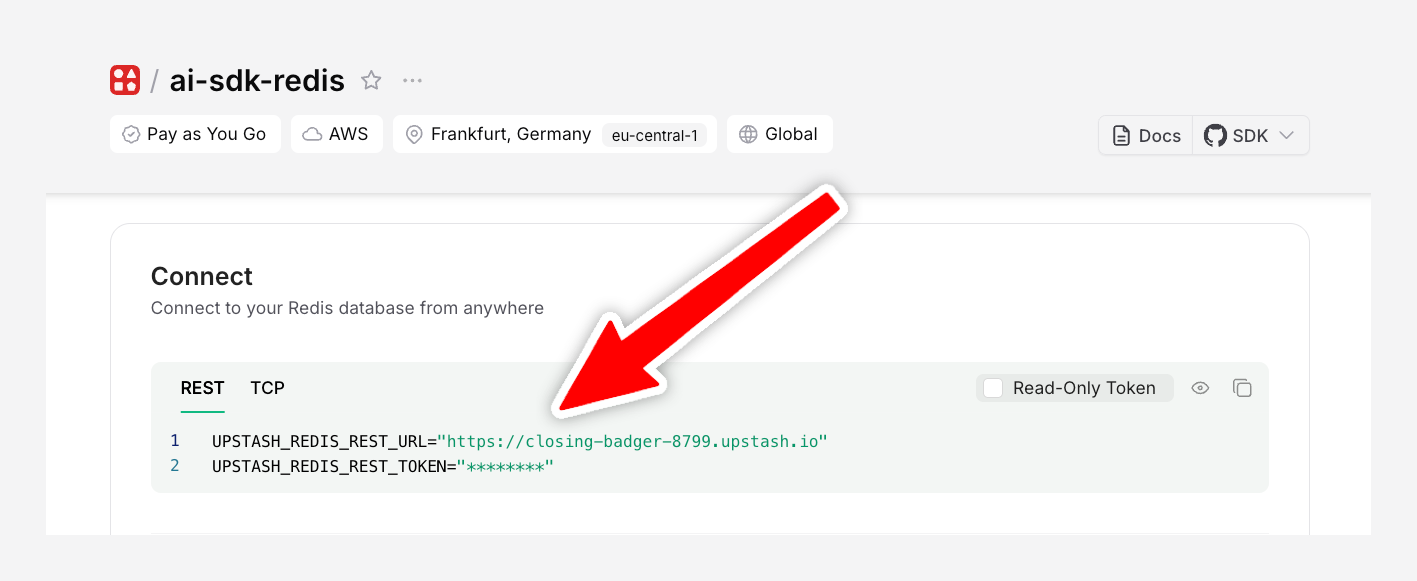
});To get these credentials, create a Redis database on Upstash and paste your credentials to your .env file:
And we're ready to load our existing history in our API route:
import { openai } from "@ai-sdk/openai";
import { Redis } from "@upstash/redis";
import { convertToModelMessages, streamText, UIMessage } from "ai";
import { NextRequest } from "next/server";

const redis = new Redis({
  token: process.env.UPSTASH_REDIS_REST_TOKEN,
  url: process.env.UPSTASH_REDIS_REST_URL,
});

export const POST = async (req: NextRequest) => {
  const body = await req.json();

  // 👇 get current message and chat id sent from client
  const { message, id } = body as { message: UIMessage; id: string };

  // 👇 get existing chat history (fully type-safe)
  const history = await redis.get<UIMessage[]>(`chat:history:${id}`);

  const messages = [...(history ?? []), message];

  const result = streamText({
    model: openai("gpt-4o"),
    messages: convertToModelMessages(messages),
  });

  return result.toUIMessageStreamResponse({
    originalMessages: messages ?? [],
    onFinish: ({ messages }) => {
      // ...
    },
  });
};
Step 3: Saving a chat history
Saving our chat history is really easy. The AI SDK has a built-in onFinish function that runs after the AI has completed its response:
// ...

return result.toUIMessageStreamResponse({
  originalMessages: messages ?? [],
  onFinish: async ({ messages }) => {
    // 👇 save chat history to redis
    await redis.set(`chat:history:${id}`, messages);
  },
});
However, we'll notice a slight problem with this approach: message IDs are not generated properly. For persistence, we need server-side generated message IDs to make sure messages are consistent across sessions and to prevent ID conflicts.
Luckily, the AI SDK has a built-in generateMessageId function that we can use to generate message IDs server-side:
//...

import { createIdGenerator } from "ai";

return result.toUIMessageStreamResponse({
  originalMessages: messages,
  // generate consistent server-side IDs for persistence:
  generateMessageId: createIdGenerator({
    prefix: "msg",
    size: 16,
  }),
  onFinish: async ({ messages }) => {
    // 👇 save chat history to redis
    await redis.set(`chat:history:${id}`, messages);
  },
});
Perfect! That's literally all we need on the backend for a fully type-safe chat history that is stored in Redis.
Step 4: Creating a minimal frontend
The code below is the most minimal frontend you could possibly get away with. It's a simple chat interface that allows you to send messages to the AI and see the response:
"use client";

import { useChat } from "@ai-sdk/react";
import { DefaultChatTransport } from "ai";
import { useState } from "react";

export default function Home() {
  const [input, setInput] = useState("");

  const { sendMessage, messages } = useChat({
    id: "my-chat",
    transport: new DefaultChatTransport({
      api: "/api/chat",
      prepareSendMessagesRequest({ messages, id }) {
        return { body: { message: messages[messages.length - 1], id } };
      },
    }),
  });

  return (
    <div>
      <div>
        {messages.map((message) => (
          <div key={message.id}>
            {message.parts.map((part) => {
              if (part.type === "text") {
                return part.text;
              }
            })}
          </div>
        ))}

        <input value={input} onChange={(e) => setInput(e.target.value)} />
        <button onClick={() => sendMessage({ text: input })}>Send</button>
      </div>
    </div>
  );
}
Step 5: Loading initial messages
To load our initial messages, we'll do a slight refactor of our existing code. We'll split our chat into two components:
Pagecomponent (server): Loads the initial messages and passes them to theChatcomponentChatcomponent (client): Handles the UI and the chat logic
For example, our main page could look like this:
import { Redis } from "@upstash/redis";
import { UIMessage } from "ai";
import { Chat } from "./components/chat";

const redis = new Redis({
  token: process.env.UPSTASH_REDIS_REST_TOKEN,
  url: process.env.UPSTASH_REDIS_REST_URL,
});

export default async function Home() {
  // 👇 you'd normally use an id from the query params here
  // e.g. http://localhost:3000/chat?id=my-chat

  // for simplicity, we're using a hardcoded id
  const messages = await redis.get<UIMessage[]>(`chat:history:my-chat`);

  return <Chat initialMessages={messages ?? []} />;
}
The AI SDK's useChat hook accepts a messages prop that allows us to load initial messages from the server. We'll use the Chat component to handle the UI and the chat logic:
"use client";

import { useChat } from "@ai-sdk/react";
import { DefaultChatTransport, UIMessage } from "ai";
import { useState } from "react";

interface ChatProps {
  initialMessages?: UIMessage[];
}

export const Chat = ({ initialMessages }: ChatProps) => {
  const [input, setInput] = useState("");

  const { sendMessage, messages } = useChat({
    id: "my-chat",
    messages: initialMessages,
    transport: new DefaultChatTransport({
      api: "/api/chat",
      prepareSendMessagesRequest({ messages, id }) {
        return { body: { message: messages[messages.length - 1], id } };
      },
    }),
  });

  return (
    <div>
      <div>
        {messages.map((message) => (
          <div key={message.id}>
            {message.parts.map((part, i) => {
              if (part.type === "text") {
                return part.text;
              }
            })}
          </div>
        ))}

        <input value={input} onChange={(e) => setInput(e.target.value)} />
        <button onClick={() => sendMessage({ text: input })}>Send</button>
      </div>
    </div>
  );
};
If you're in plain React instead of Next.js, I recommend fetching the history using useEffect or with react-queries useQuery hook. You can then update the history using the useChat hooks setMessages.
Congratulations!
If you've made it this far, congrats! You've built a fully functional chat interface that stores its history in Redis.
We don't need to send along the entire message history for every request anymore. Instead, we only send the current message and the chat ID and the entire history is managed entirely server-side.
Final thoughts
Nico, Lars and team from the Vercel AI SDK team have absolutely cooked with the v5 release.
In v4, I was super confused with all the different types, different ways to achieve the same thing, and overly verbose syntax. I found myself hacking together and overriding a lot of the internals to get things to work.
In v5, the API is so much cleaner and more intuitive. I'm really excited to see where the AI SDK goes from here.