Where Should You Store User-Uploaded Files in a Web App?
 Yusuf
Store user-uploaded files in object storage (Amazon S3, Cloudflare R2, Upstash Blob or similar) and keep only each file's key and metadata in your database. Don't save the files on your web server's disk or inside the database itself.
Things get interesting with how those bytes get up there. Browsers uploading files to the storage bucket via your own server will run up against Vercel Function's 4.5 MB request body limit, or 6 MB if you are deploying to AWS Lambda. So you need a way to let the browser upload to storage directly, only asking your server for permission.
Why not the web server's disk?
Saving files to an uploads/ folder is fine on your laptop but causes problems in production:
- Storage is ephemeral. This is particularly problematic on Heroku, where dynos run with unique filesystems, meaning any files written to the disk are discarded as soon as the dyno stops or restarts. This includes automatic restarts. Similarly, on Kubernetes, containers that crash or stop will lose any files they created.
- Ephemeral environments provide only scratch space. AWS Lambda functions have access to a
/tmpdirectory that is temporary and unique to each execution environment. Vercel directs developers who need to write files to persist them to object storage. - Disks aren't shared across servers. On Heroku, for example, files written by one dyno are not available to processes in other dynos. If a user uploads an avatar via server A, then accesses it on the next request via server B, the avatar will not be found.
Why not the database?
Storing files in a bytea or BLOB column means you store everything in one place. Databases can store small files, but there are size limits:
- PostgreSQL stores data in fixed pages of about 8 kB and moves large values to a side table. The maximum size of a single value is 1 GB.
- MySQL rejects a query larger than
max_allowed_packet, which defaults to 64 MB. This limit can be increased, but cannot exceed 1 GB.
OWASP even lists potential SQL injection as costs for storing files in the database. And any files you put in the database you also have to keep in your backups. It recommends only using the database if you have a DBA (database administrator) and can see it's an improvement.
A 2006 Microsoft Research study concluded that objects smaller than 256 KB do best in a database and objects larger than 1 MB do best in a filesystem. However, this study compared SQL Server with the Windows NTFS filesystem, so it’s only a rough guide.
Why not the webroot?
The OWASP File Upload Cheat Sheet orders the options for upload storage from best to worst as:
- External host
- Outside the webroot (admin-only access)
- Within the webroot (write-only permission)
To explain, the "webroot" is the folder that's served directly by your web server (e.g. public/ folder). This means any uploaded file saved to this folder is immediately available via a public URL without any input validation from your app. This can lead to file upload threats:
- HTML or SVG files containing scripts will be executed in other user's browsers (XSS: cross-site scripting)
- Overwrite existing files by uploading a file with the same name
- Server configuration files (e.g.
.htaccessorweb.config) can be uploaded to map benign extensions to executable extensions (if the server configuration allows per-directory overrides)
The cheat sheet also recommends:
- Create unique file names
- Use a file handler to access public files (using IDs)
- Don't trust the
Content-Typeheader as it can be spoofed by the browser
An object storage bucket is the best solution for storing file uploads on an external host, so your app is safe from uploads being executed as code.
How should the upload flow work?
The whole flow:
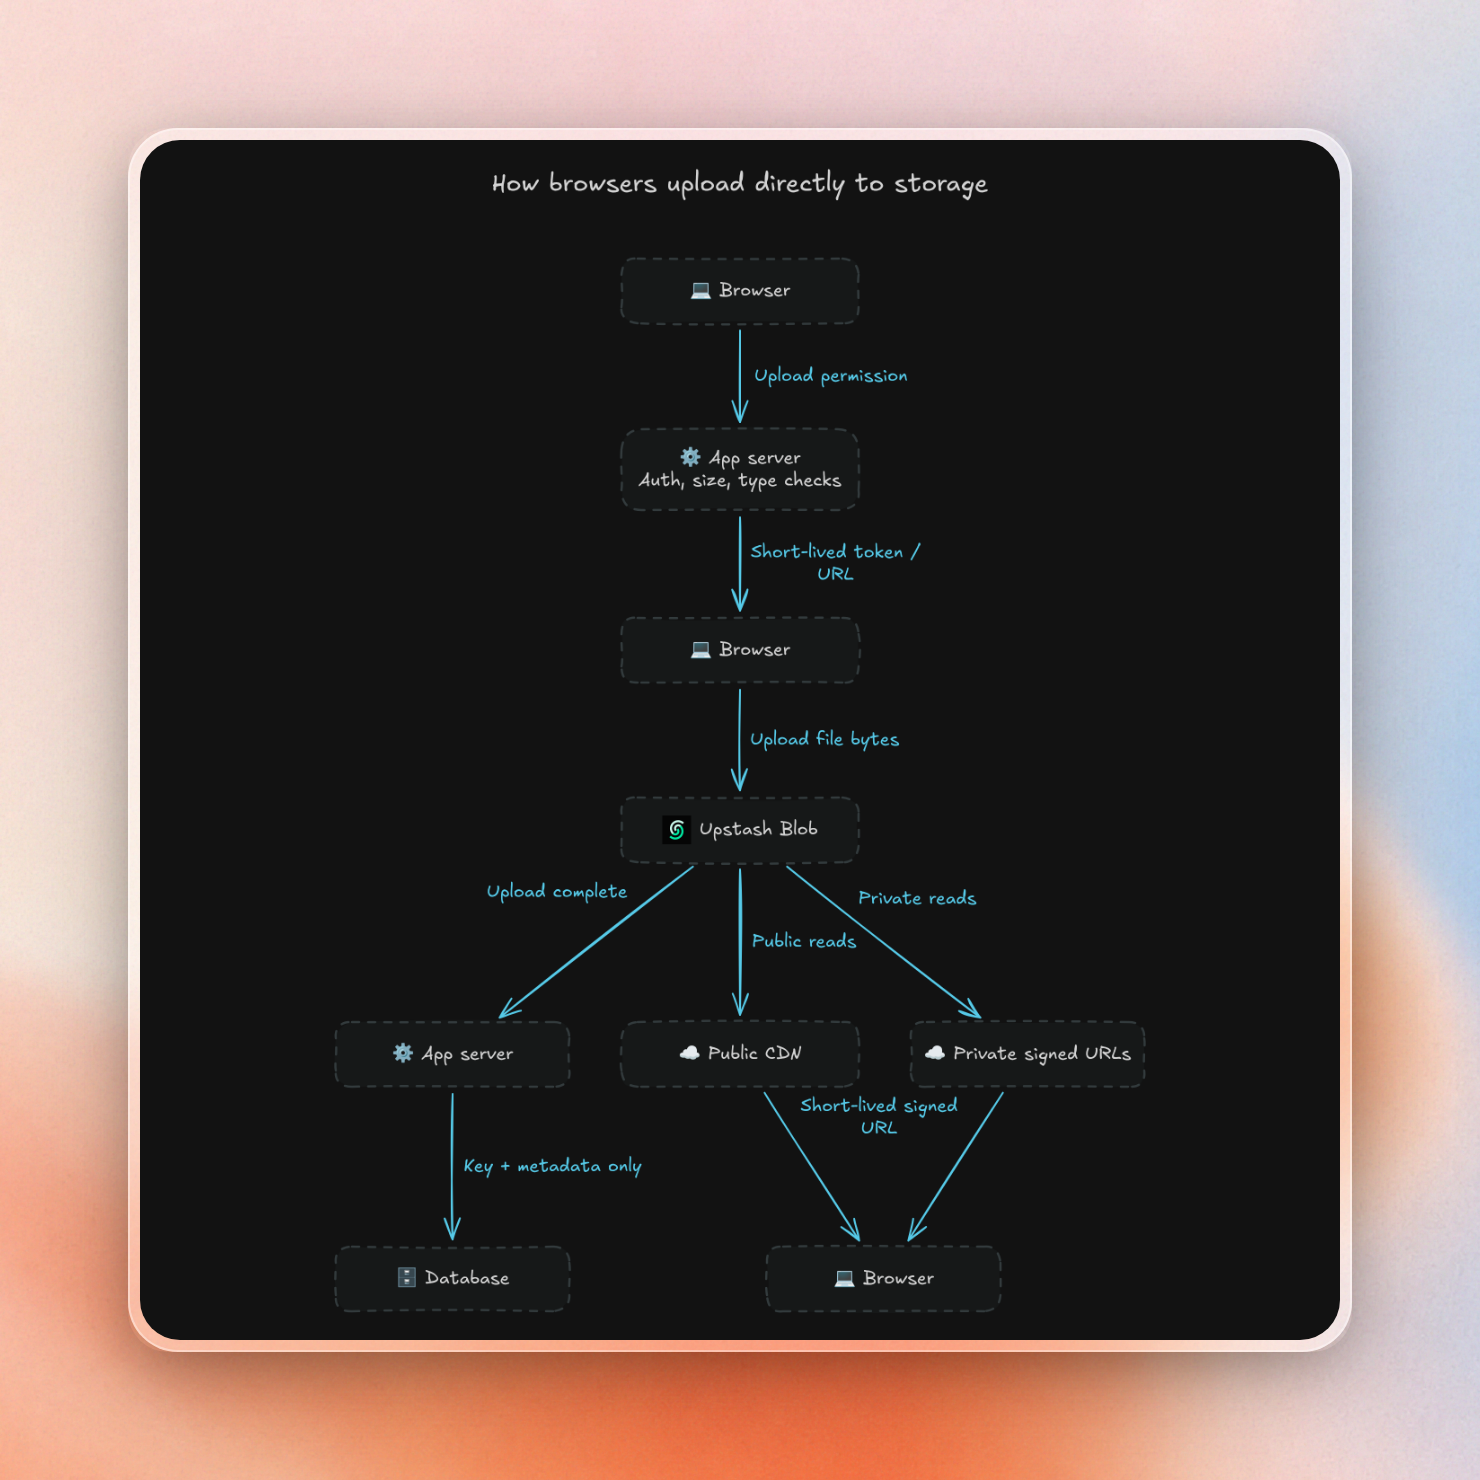
Now the file bytes travel directly from the browser to the bucket. It completely bypasses your server, which eliminates the request body size problem of serverless platforms. Meanwhile your server still controls everything.
The safe flow, step by step:
- The browser asks your server for permission to upload a file with a given name, type, and size. Your server authenticates the user.
- Your server validates the file and signs a short-lived URL. It rejects files of the wrong type or size now, before storing anything, and generates a unique key for use in your app. S3 presigned URLs can expire up to 7 days in the future, and anyone can use them, so use a short duration. Upstash Blob signs URLs for a single object and method, and includes the content type and size in the signature so the browser cannot change them.
- The browser uploads the bytes straight to storage. Your server is not involved.
- Your server confirms the upload and saves the key in a new row in your database with the key, owner, size, and type. If you want to check the file's magic bytes (the first few bytes of the file, which identify a genuine PNG, PDF, etc.), do that now (the declared content type is just the browser's word). Checking the file signature should not be used on its own, but can be used in addition to type and size limits.
- Your app serves the file. If it's a public file (like an avatar), use a CDN (content delivery network) URL. If it's private (like an invoice), keep it in a private bucket and generate a new signed read URL that expires in minutes, after your app confirms the user has access to that specific file.
- A scheduled job sweeps orphaned uploads. A user can close the tab after the bytes land but before step 4 runs, leaving a file with no row in your database. If you use multipart uploads for large files, they can also stop halfway, leaving orphaned parts. On Upstash Blob, abort those uploads to clear their parts.
For step 6, one idea is to add a pending database row in step 2 and update the row to ready in step 4. Then, have a daily cron that deletes files that have stayed in the pending state for over a day. You can also set a S3 lifecycle policy to abort incomplete multipart uploads after a set number of days. It won't delete finished objects though, so you still need to run the pending database row sweep.
Where to store user-uploaded files: options and prices
Every option below is object storage or a service built on it. Storage prices sit close together, between about $0.015 and $0.023 per GB-month. The bill for a web app is usually set by egress, the data your users download. Prices come from each official pricing page in November 2026, for standard storage in a US region:
| Option | Storage (per GB-month) | Egress (download) | Free tier | It fits |
|---|---|---|---|---|
| AWS S3 | $0.023 | $0.09/GB (first 10 TB) | 100 GB/month egress across AWS | Apps already on AWS |
| Cloudflare R2 | $0.015 | No egress charges | 10 GB storage, 1M writes, 10M reads | Very heavy downloads |
| Google Cloud Storage | $0.020 (us-central1) | $0.12/GiB (first 10 TiB) | 5 GB, 100 GB egress from 3 US regions | Apps already on Google Cloud |
| Azure Blob | From $0.0184 (Hot) | See bandwidth pricing | See pricing page | Apps already on Azure |
| Supabase Storage | $0.0213 past quota | $0.09/GB uncached, $0.03/GB cached | 1 GB storage, 5 GB egress | Apps on Supabase |
| Firebase Storage | Cloud Storage rates | Cloud Storage rates | 5 GB, 100 GB/month download (Blaze plan) | Mobile and Firebase apps |
| Upstash Blob | $0.02 | 1 TB/month free, then $0.02/GB | 1 GB storage, 10 GB egress | Most web apps |
| UploadThing | Flat plans: $10/month for 100 GB | Included in plan | 2 GB | Flat monthly price |
| Vercel Blob | $0.023 | $0.05/GB | 1 GB storage, 10 GB transfer (Hobby) | Apps on Vercel |
If you’re building a small or mid-size web app, the answer is Upstash Blob. Its storage price is one of the lowest in the table above, the first 1 TB of downloads each month is free, and there’s no bandwidth charge for uploads. It also includes the upload handler and browser client shown in the next section, which make the signed-URL flow a few lines of code.
What about the other options?
- If you already use AWS: S3. You have IAM roles, lifecycle rules, the rest of your stack, everything. See the S3 vs Upstash Blob comparison.
- If you serve many terabytes of media per month: Cloudflare R2. Upstash Blob charges $0.02/GB for downloads past the first 1 TB, whereas R2 has no egress charge at all.
- If you need to resize images, crop them, change their format, etc. on the fly: Cloudinary. Its plans use a credit system to meter transformations, storage, and bandwidth combined, from a free plan with 25 credits to $99/month for 225 credits.
- If your app already runs on Supabase or Firebase: They integrate storage with their auth and rules, so use them if you’re already using the rest of their platform.
Upstash Blob's free plan never bills you. When you hit a limit, it stops serving requests until the 30-day window resets. If you choose pay-as-you-go, the first 1 TB of egress each month is free; any additional is $0.02/GB.
For comparison, serving 1,000 GB in a month would cost about $81 on S3 (900 GB × $0.09/GB for the amount above the free 100 GB) and $0 on Upstash Blob’s pay-as-you-go.
When egress is charged, the list price for one GB of downloads looks like this:
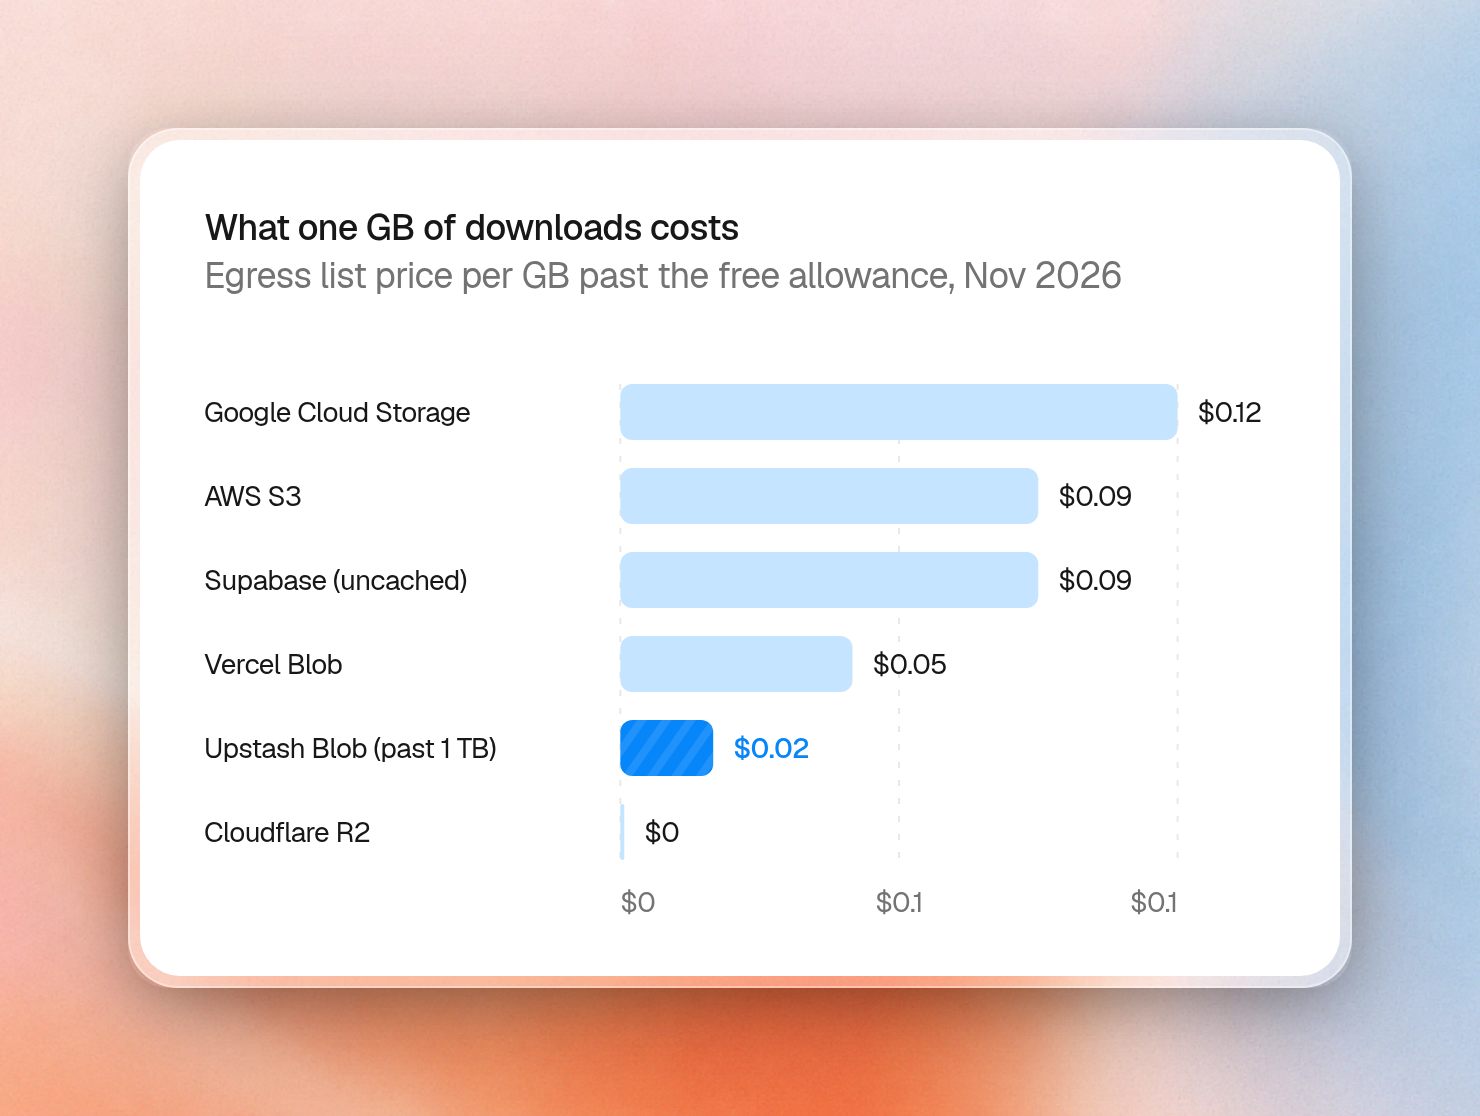
(Azure prices vary based on region and redundancy; see its pricing calculator for your setup.)
You can read more about some of the trade-offs on the best object storage for a SaaS and the React file upload pricing breakdown.
The full pattern in code with Upstash Blob
The @upstash/blob SDK combines steps 1 to 4 in a single route on the server and an upload function in the browser. It creates signed URLs, enforces limits and executes your code on completion. Create a bucket and grab the token from the quickstart.
The bucket client and a stand-in for your database table go in one file. In a real app, the Map is a Postgres or MySQL table:
import { Bucket } from '@upstash/blob'

export const bucket = Bucket.fromEnv()
export const keyPrefix = process.env.KEY_PREFIX
if (!keyPrefix || !/^[\w-]+\/$/.test(keyPrefix)) {
  throw new Error('Set KEY_PREFIX to a single directory ending in /')
}

interface FileRow {
  uploadId: string
  owner: string
  path: string
  size: number
  contentType: string
}

export const files = new Map<string, FileRow>()
The upload route does the server's whole job. onBeforeUpload checks the user and picks a unique key. The constraints reject the wrong type or size before the browser gets a URL. onUploadComplete reads the first 4 bytes of the stored file, compares them to the PNG or PDF signature, and only then records the row. If it throws, the SDK deletes the object. In Next.js this file is app/api/upload/route.ts:
import {
  BlobError, uniquePath, uploadHandler,
  type BeforeUploadArgs, type UploadCompleteArgs,
} from '@upstash/blob'
import { bucket, files, keyPrefix } from './storage.js'

function getUser(request: Request) {
  // Demo authentication: replace with a verified session in your app.
  const id = request.headers.get('x-user-id')
  return id ? { id } : undefined
}

function authorizeUpload({ request, file }: BeforeUploadArgs) {
  const user = getUser(request)
  if (!user) throw new BlobError('unauthorized')
  const name = file.name.split(/[\\/]/).pop() || 'file'
  return { path: uniquePath(`${keyPrefix}${name}`), metadata: { owner: user.id } }
}

async function verifyStoredBytes(path: string, contentType: string) {
  const { url } = await bucket.signedReadUrl(path, { expiresIn: '2m' })
  const response = await fetch(url, { headers: { Range: 'bytes=0-3' } })
  if (response.status !== 206) {
    await response.body?.cancel()
    throw new Error(`Expected a partial read, got ${response.status}`)
  }
  const bytes = new Uint8Array(await response.arrayBuffer())
  const signature = contentType === 'image/png' ? [0x89, 0x50, 0x4e, 0x47]
    : contentType === 'application/pdf' ? [0x25, 0x50, 0x44, 0x46] : []
  for (let index = 0; index < 4; index++) {
    if (signature[index] === undefined || bytes[index] !== signature[index]) {
      throw new BlobError('content_type_not_allowed', {
        message: 'Stored bytes do not match the content type',
      })
    }
  }
}

async function recordUpload({ uploadId, metadata, path, size, contentType }: UploadCompleteArgs) {
  await verifyStoredBytes(path, contentType)
  const row = { uploadId, owner: metadata.owner!, path, size, contentType }
  files.set(uploadId, row) // Upsert: completion can be delivered more than once.
  return row
}

const uploads = uploadHandler({
  bucket,
  constraints: { maxSize: '1MB', contentTypes: ['image/png', 'application/pdf'] },
  onBeforeUpload: authorizeUpload,
  onUploadComplete: recordUpload,
})

export const { GET, POST } = uploads
Because the completion step can be called multiple times for the same upload, we write the row based on the upload ID. This way, later calls will overwrite the existing row, rather than creating duplicates.
The browser side is one call. It asks the route for a signed URL, sends the bytes to the bucket and reports back when it's done:
import { upload } from '@upstash/blob/browser'

function uploadHeaders(userId: string) {
  return { 'x-user-id': userId }
}

export async function uploadFile(file: File, route: string, userId: string) {
  const task = upload(file, {
    route,
    headers: uploadHeaders.bind(null, userId),
  })
  return task.done
}
Private files go in a private bucket. On a public bucket, anyone with the plain URL can fetch the file, so the owner check and the signed URL protect nothing. With a private bucket, every read goes through your app. This function looks up the row, checks that the user owns the file and returns a signed URL that expires in 2 minutes:
import { BlobError } from '@upstash/blob'
import { bucket, files } from './storage.js'

function getUser(request: Request) {
  // Demo authentication: replace with a verified session in your app.
  const id = request.headers.get('x-user-id')
  return id ? { id } : undefined
}

export async function getFileUrl(request: Request, uploadId: string) {
  const user = getUser(request)
  if (!user) throw new BlobError('unauthorized')
  const row = files.get(uploadId)
  if (!row) throw new BlobError('not_found')
  if (row.owner !== user.id) throw new BlobError('forbidden')
  return bucket.signedReadUrl(row.path, { expiresIn: '2m' })
}
We ran this against a real bucket with the browser code in headless Chromium. The demo uploaded a valid PNG, a text file renamed to fake.png, and a .txt file, then read the PNG back as its owner and as a different user. At the end it aborted stale multipart uploads under the test prefix and deleted everything it created. Our test bucket was public, so the run shows the owner check but not a denied unsigned read; that part needs a private bucket. Signed URLs are redacted:
Prefix: article-test-cc25756f-f74d-4e9b-bddd-37082ed87b15/
GET constraints: 200 {"protocol":1,"constraints":{"contentTypes":["image/png","application/pdf"],"maxSize":1000000}}
pixel.png: begin 200 -> end 200; accepted
DB row: {"uploadId":"863ea444-d57b-427e-92fe-9792dc71cb1c","owner":"reader","path":"article-test-cc25756f-f74d-4e9b-bddd-37082ed87b15/pixel-UiFUkGJf.png","size":70,"contentType":"image/png"}
Signed read: expiresAt=2026-11-02T11:07:29.000Z; url=[REDACTED]
Signed read: status=200; bytes=70
Different user: forbidden (403)
fake.png: begin 200 -> end 400; content_type_not_allowed
Reason: Stored bytes do not match the content type
After fake upload: ["article-test-cc25756f-f74d-4e9b-bddd-37082ed87b15/pixel-UiFUkGJf.png"]; DB rows=1
notes.txt: begin 400; content_type_not_allowed
Reason: text/plain is not allowed (allowed: image/png, application/pdf)
Stale multipart uploads aborted: 0
Cleanup: prefix is empty
In the output above, we can see that:
- The
.txtfile failed the first check, so it never got an upload URL. - The fake PNG file passed the first check, because it said it was image/png.
- It was uploaded to the bucket, but the completion step did the magic-byte validation and realized it was invalid, so the SDK deleted the object from the bucket and didn't insert it into the database.
To implement step 6, we can add a daily cron job that does bucket.abortStaleMultipartUploads({ olderThan: '1d', prefix: 'uploads/' }).
For some React drag and drop and progress bar, see also the multi-file uploader with Upstash Blob.

