Building your own RAG chatbot with Upstash
In this post, I talk about how I built an open-source Custom Content RAG Chatbot with Upstash Vector, Upstash Redis, Hugging Face Inference API, Replicate LLAMA-2-70B Chat model, and Vercel. Upstash Vector helped me to insert and query vectors, dynamically creating or updating relevant context for each user message, and Upstash Redis helped me to store the chatbot conversations.
Prerequisites
You'll need the following:
- Node.js 18 or later
- An Upstash account
- A Hugging Face account
- A Replicate account
- A Vercel Account
Tech Stack
| Technology | Description |
|---|---|
| Upstash | Serverless database platform. We're using both Upstash Vector and Upstash Redis for storing vectors and conversations respectively. |
| Next.js | The React Framework for the Web. We’re using the populate shadcn/ui for rapid prototyping. |
| Replicate | Run and fine-tune open-source models. We're using LLAMA-2-70B Chat model. |
| Hugging Face | The platform where the machine learning community collaborates on models, datasets, and applications. We’re using Hugging Face Inference API for creating embeddings. |
| LangChain | Framework for developing applications powered by language models. |
| TailwindCSS | CSS framework for building custom designs. |
| Vercel | A cloud platform for deploying and scaling web applications. |
Setting up Upstash Redis
Once you have created an Upstash account and are logged in you are going to go to the Redis tab and create a database.
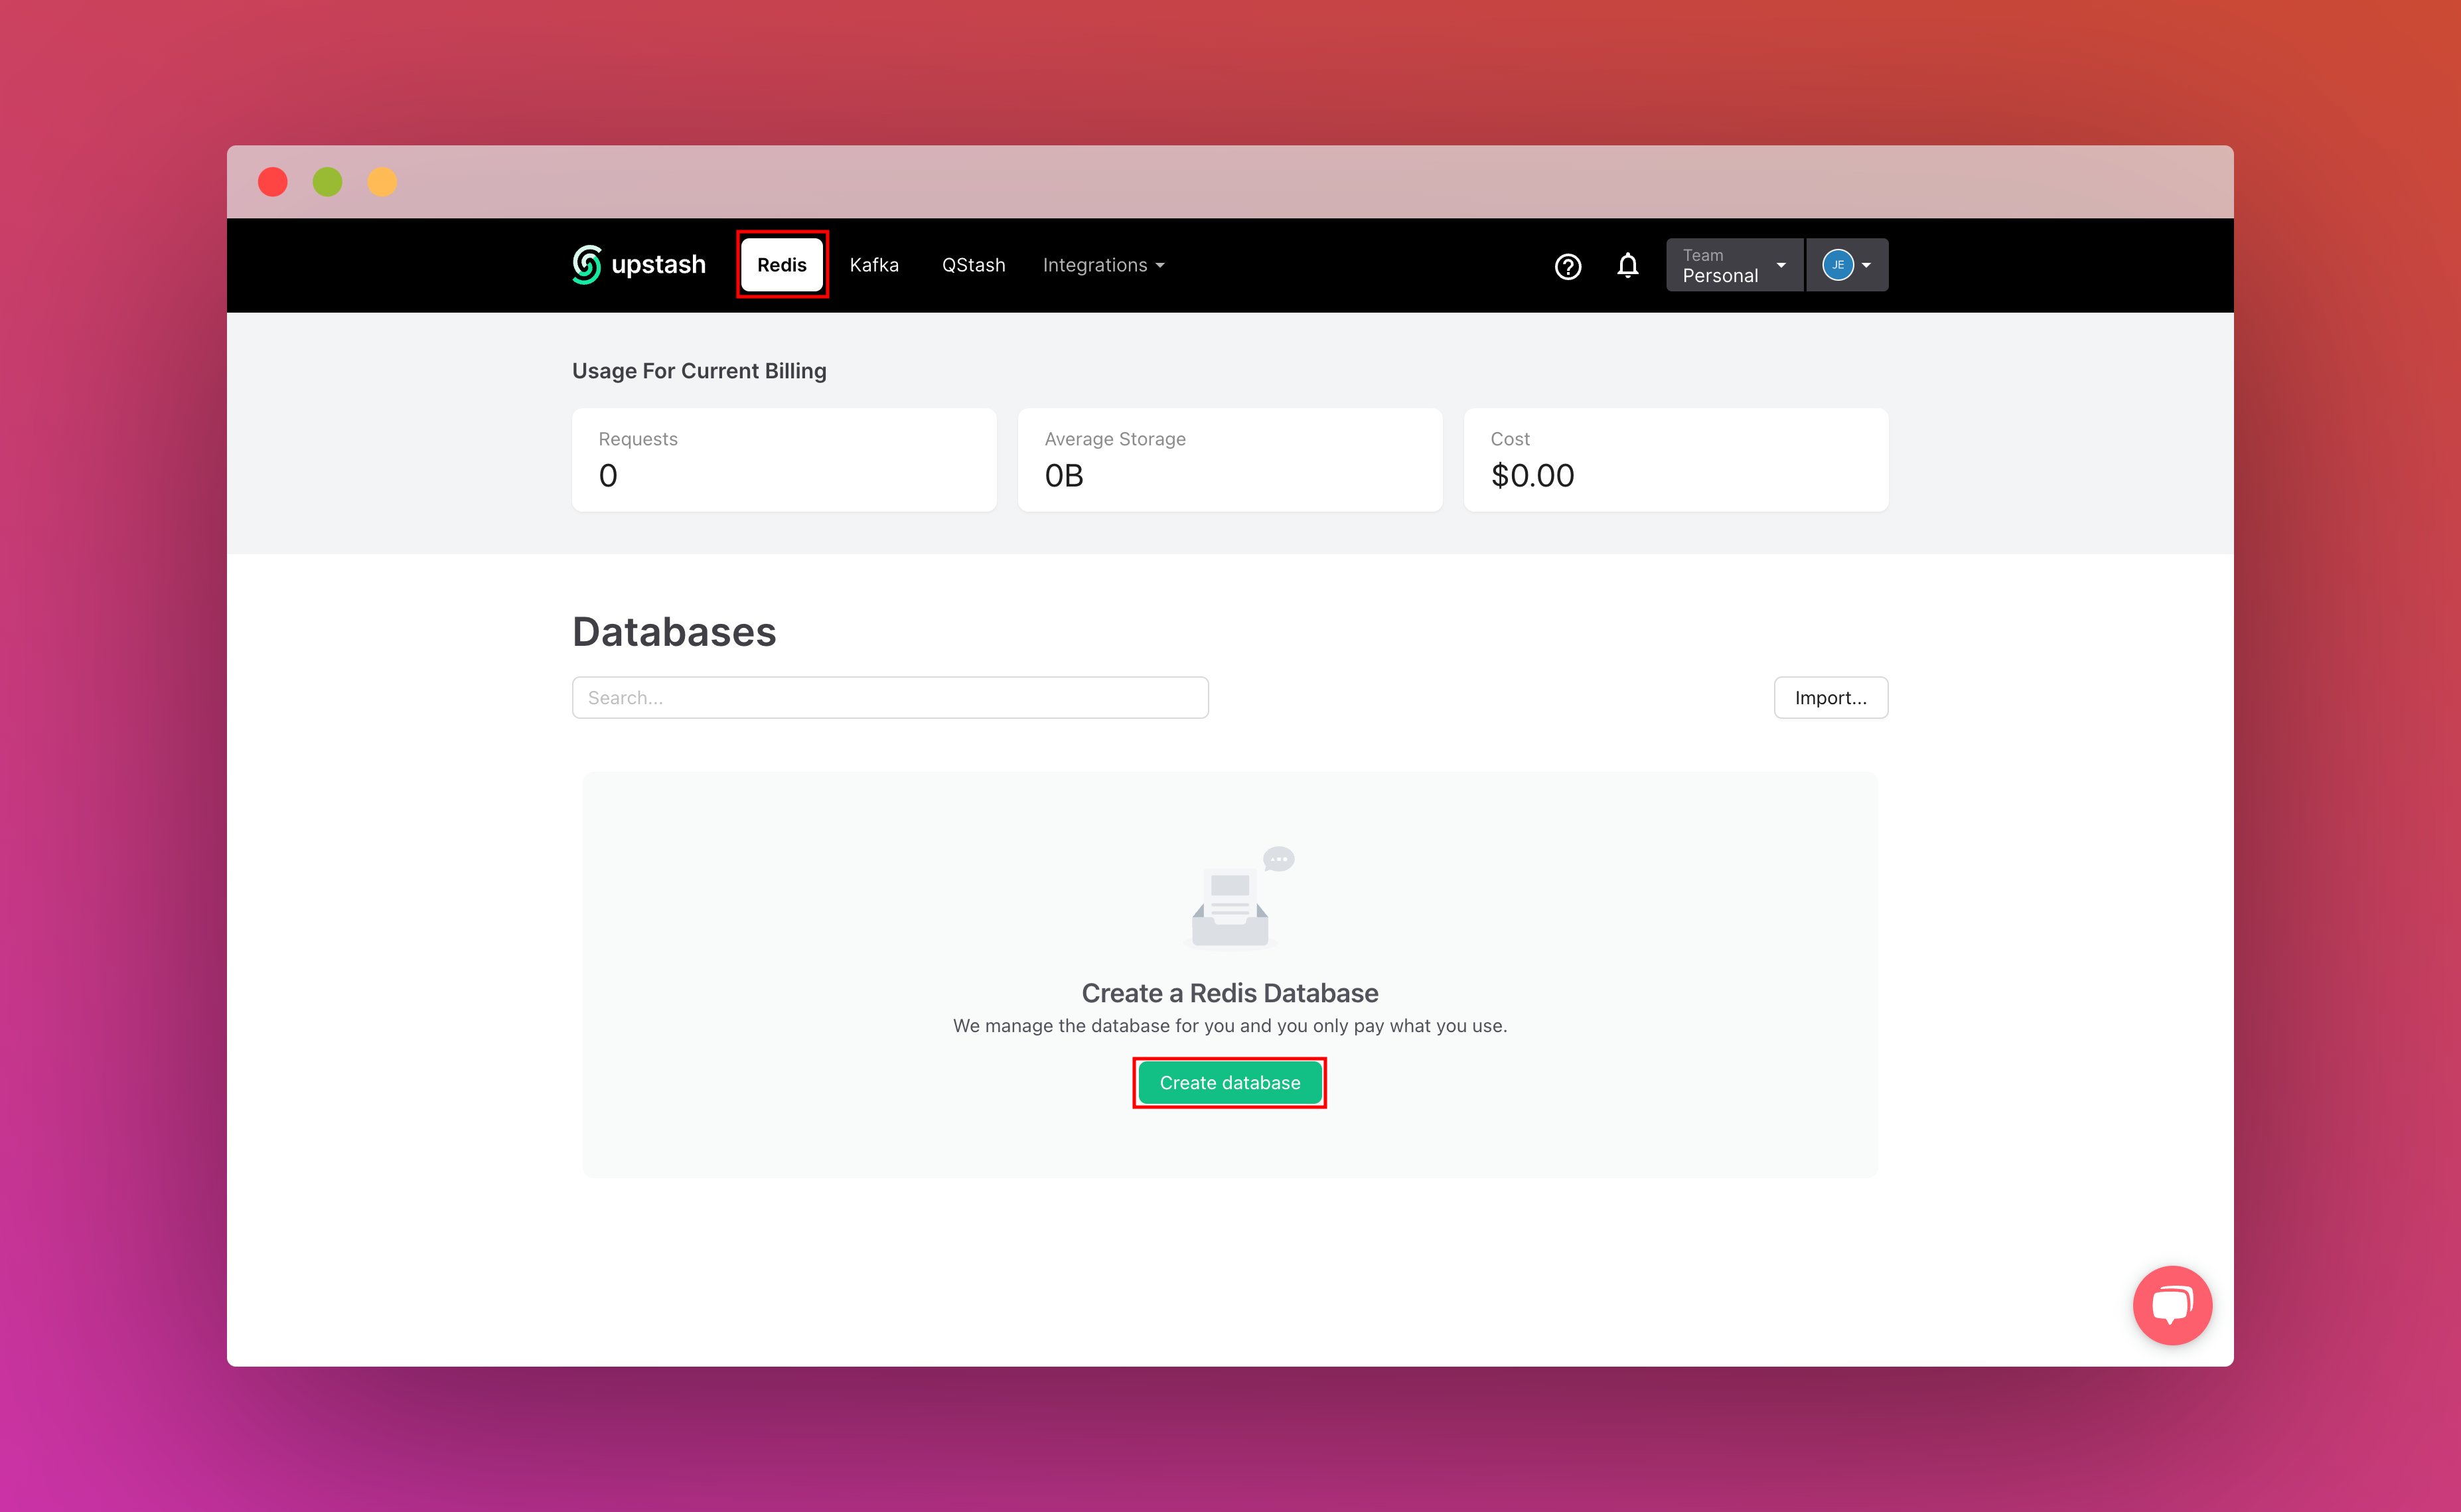
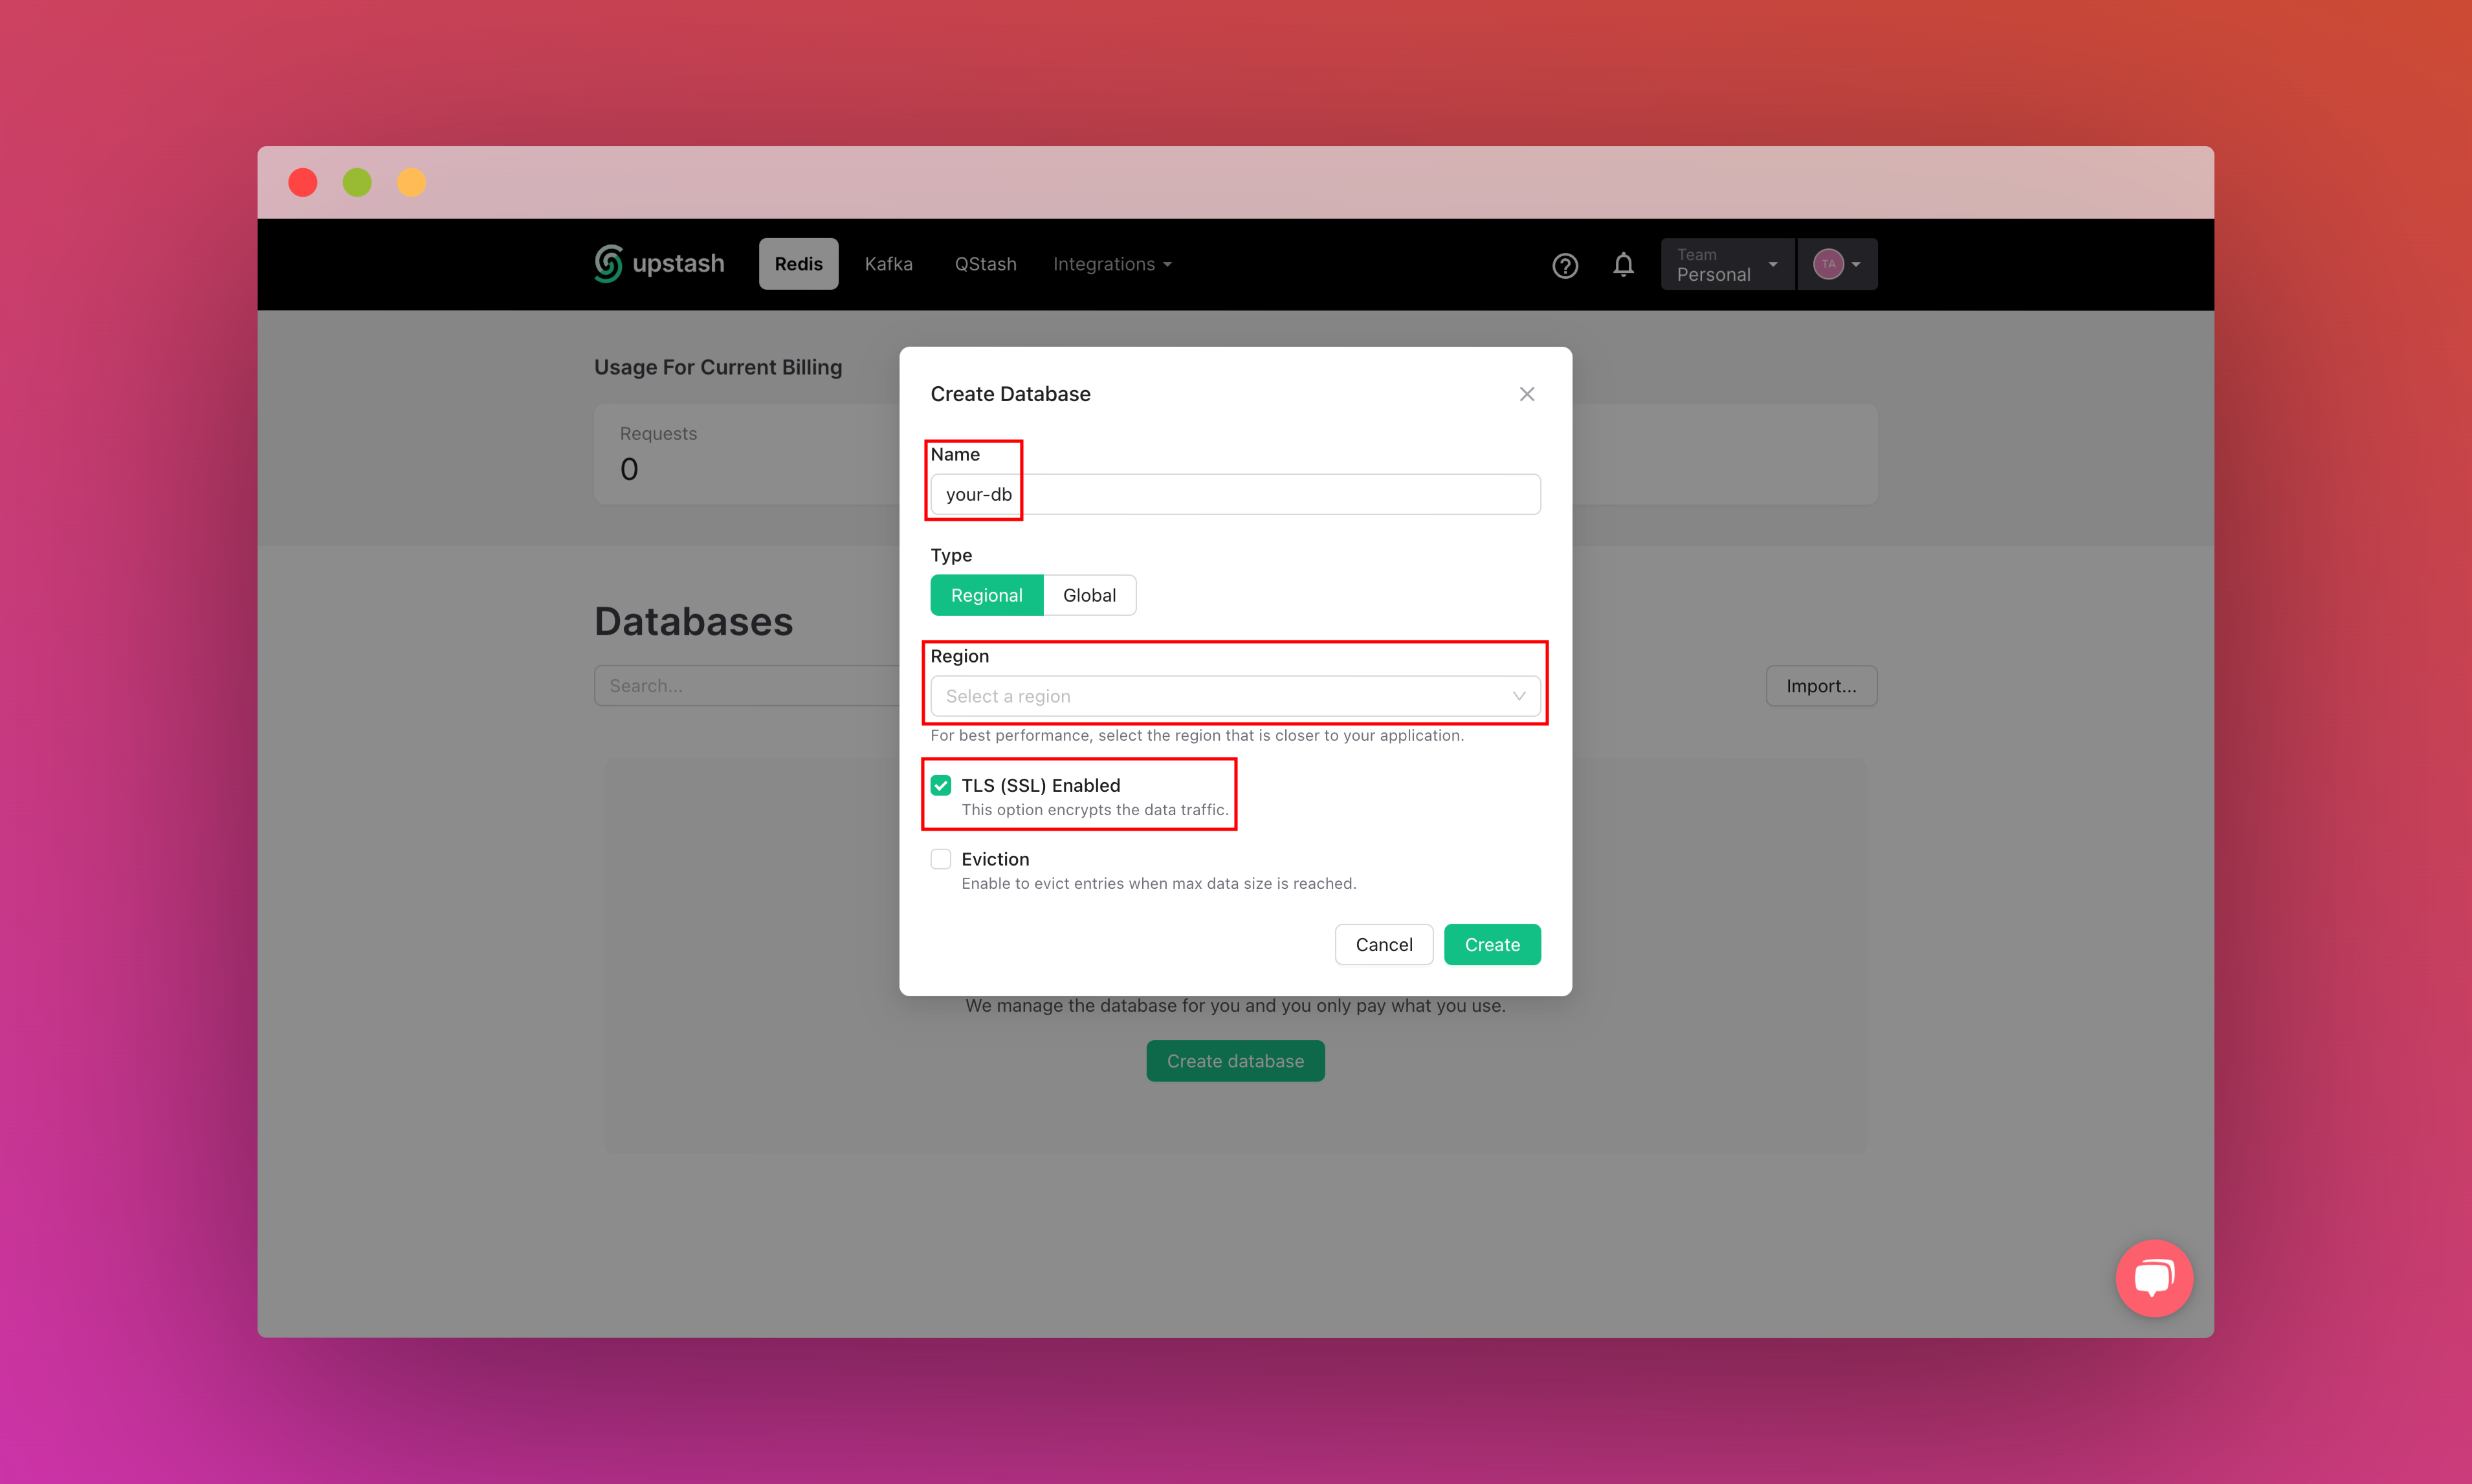
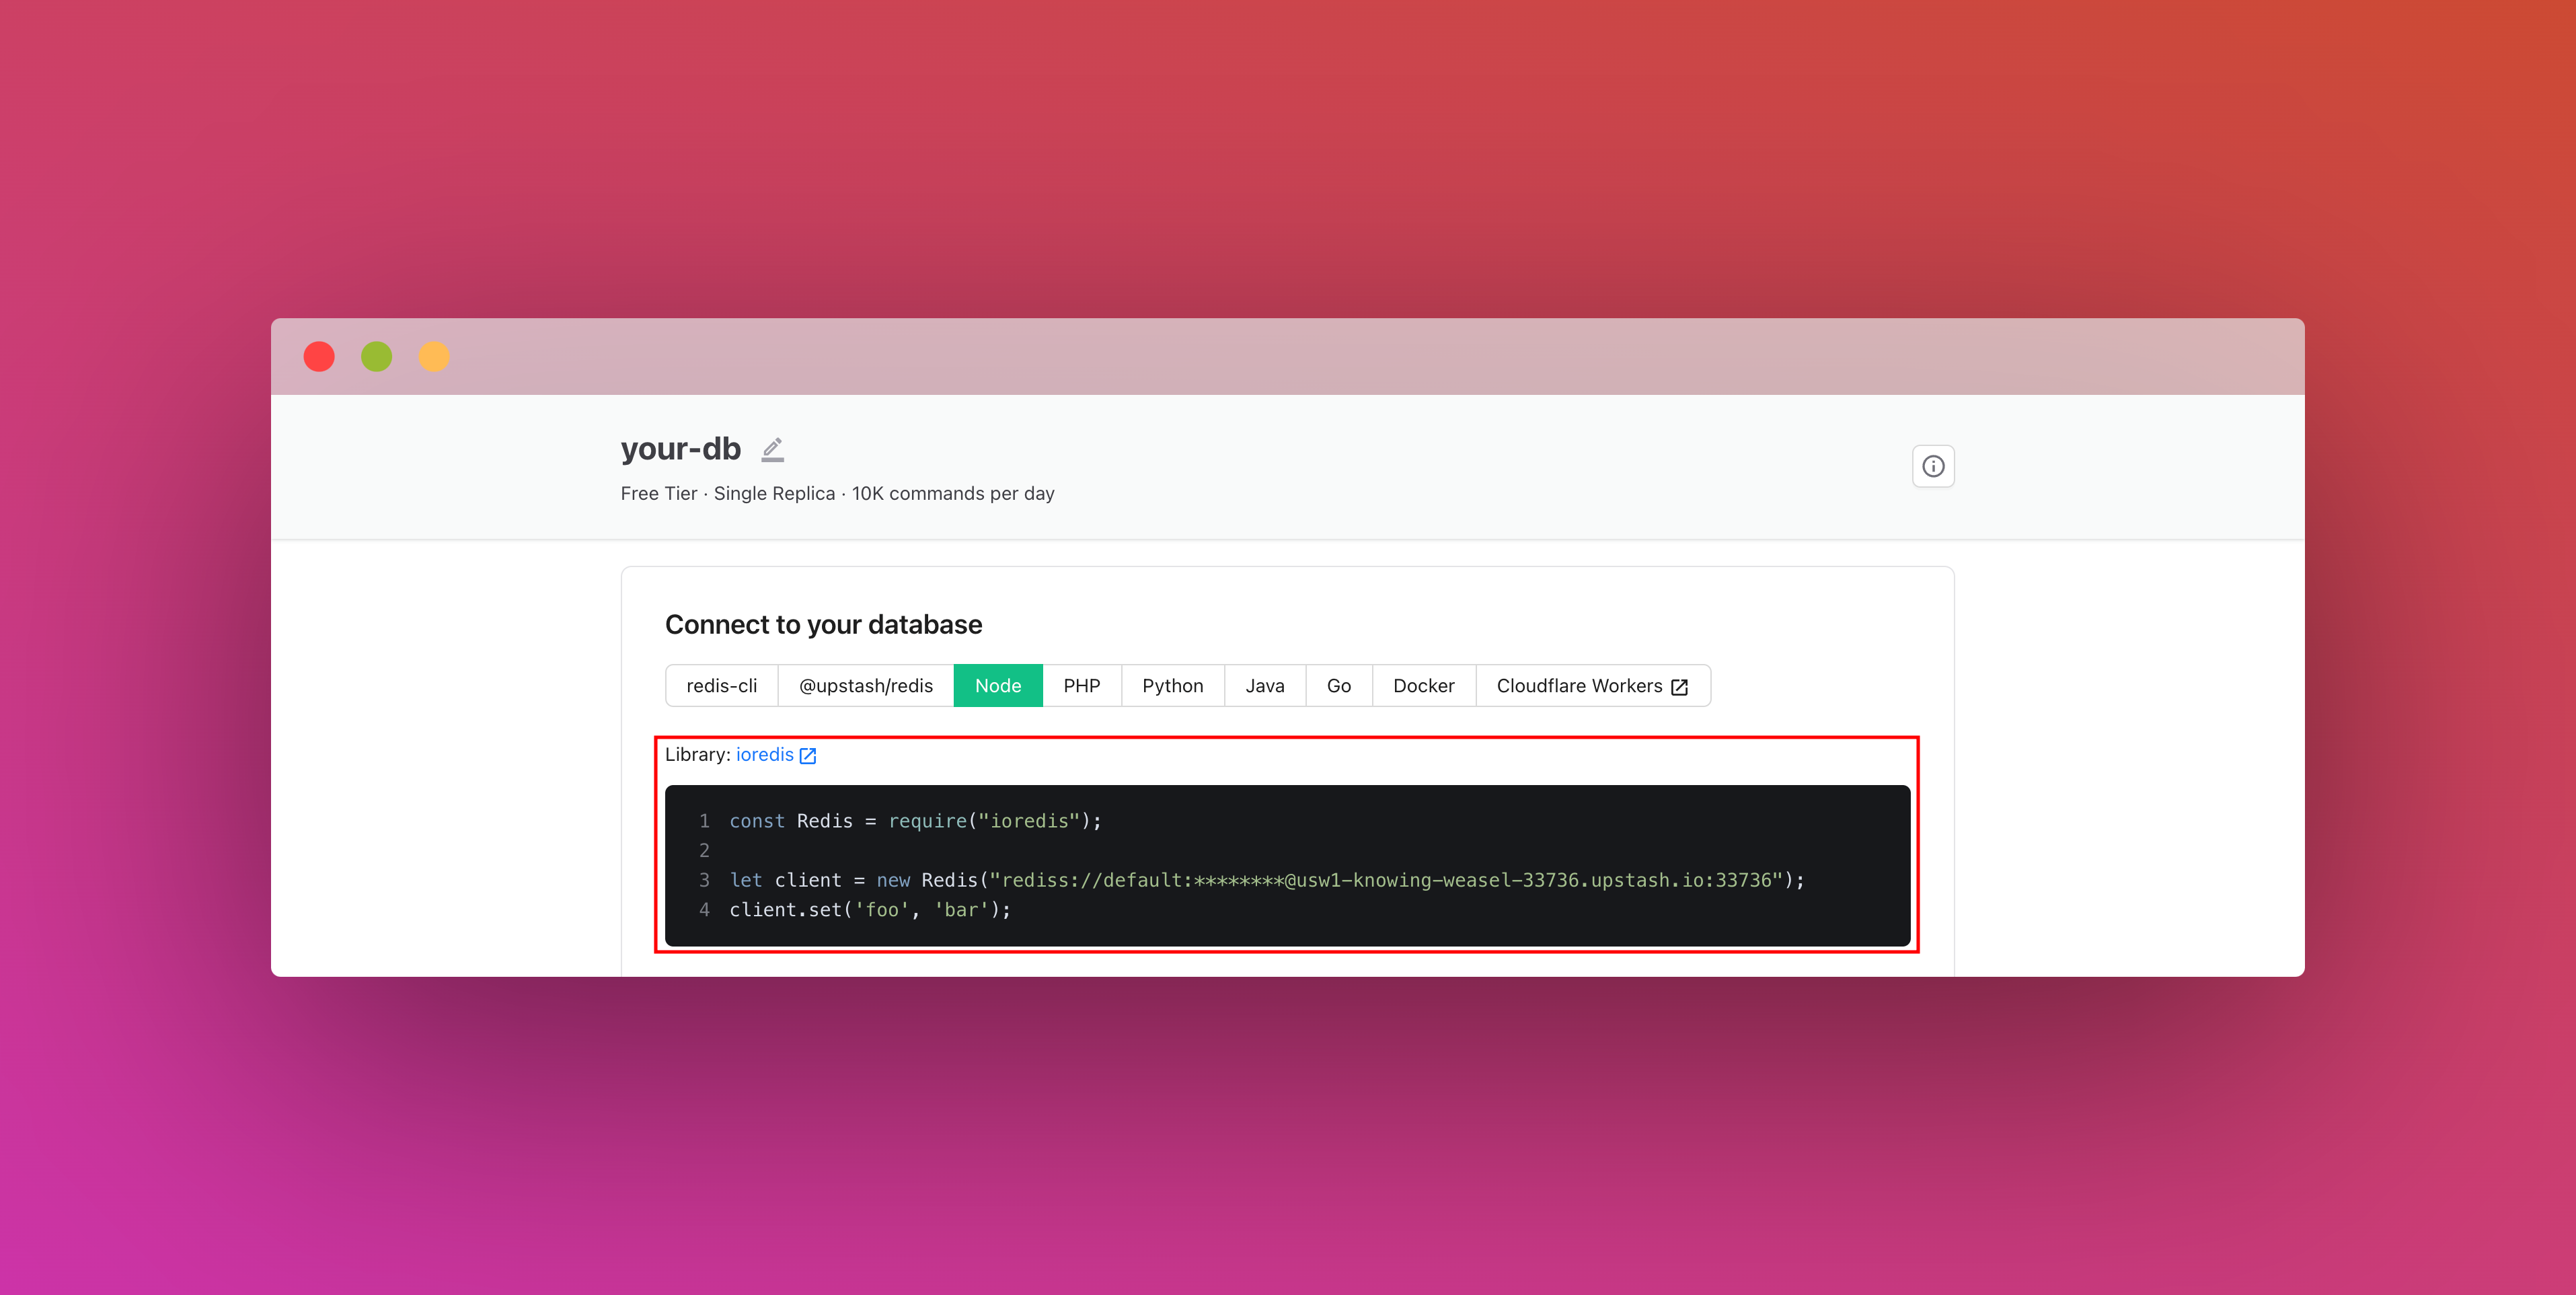
After you have created your database, you are then going to the Details tab. Scroll down until you find the Connect your database section. Copy the content and save it somewhere safe.
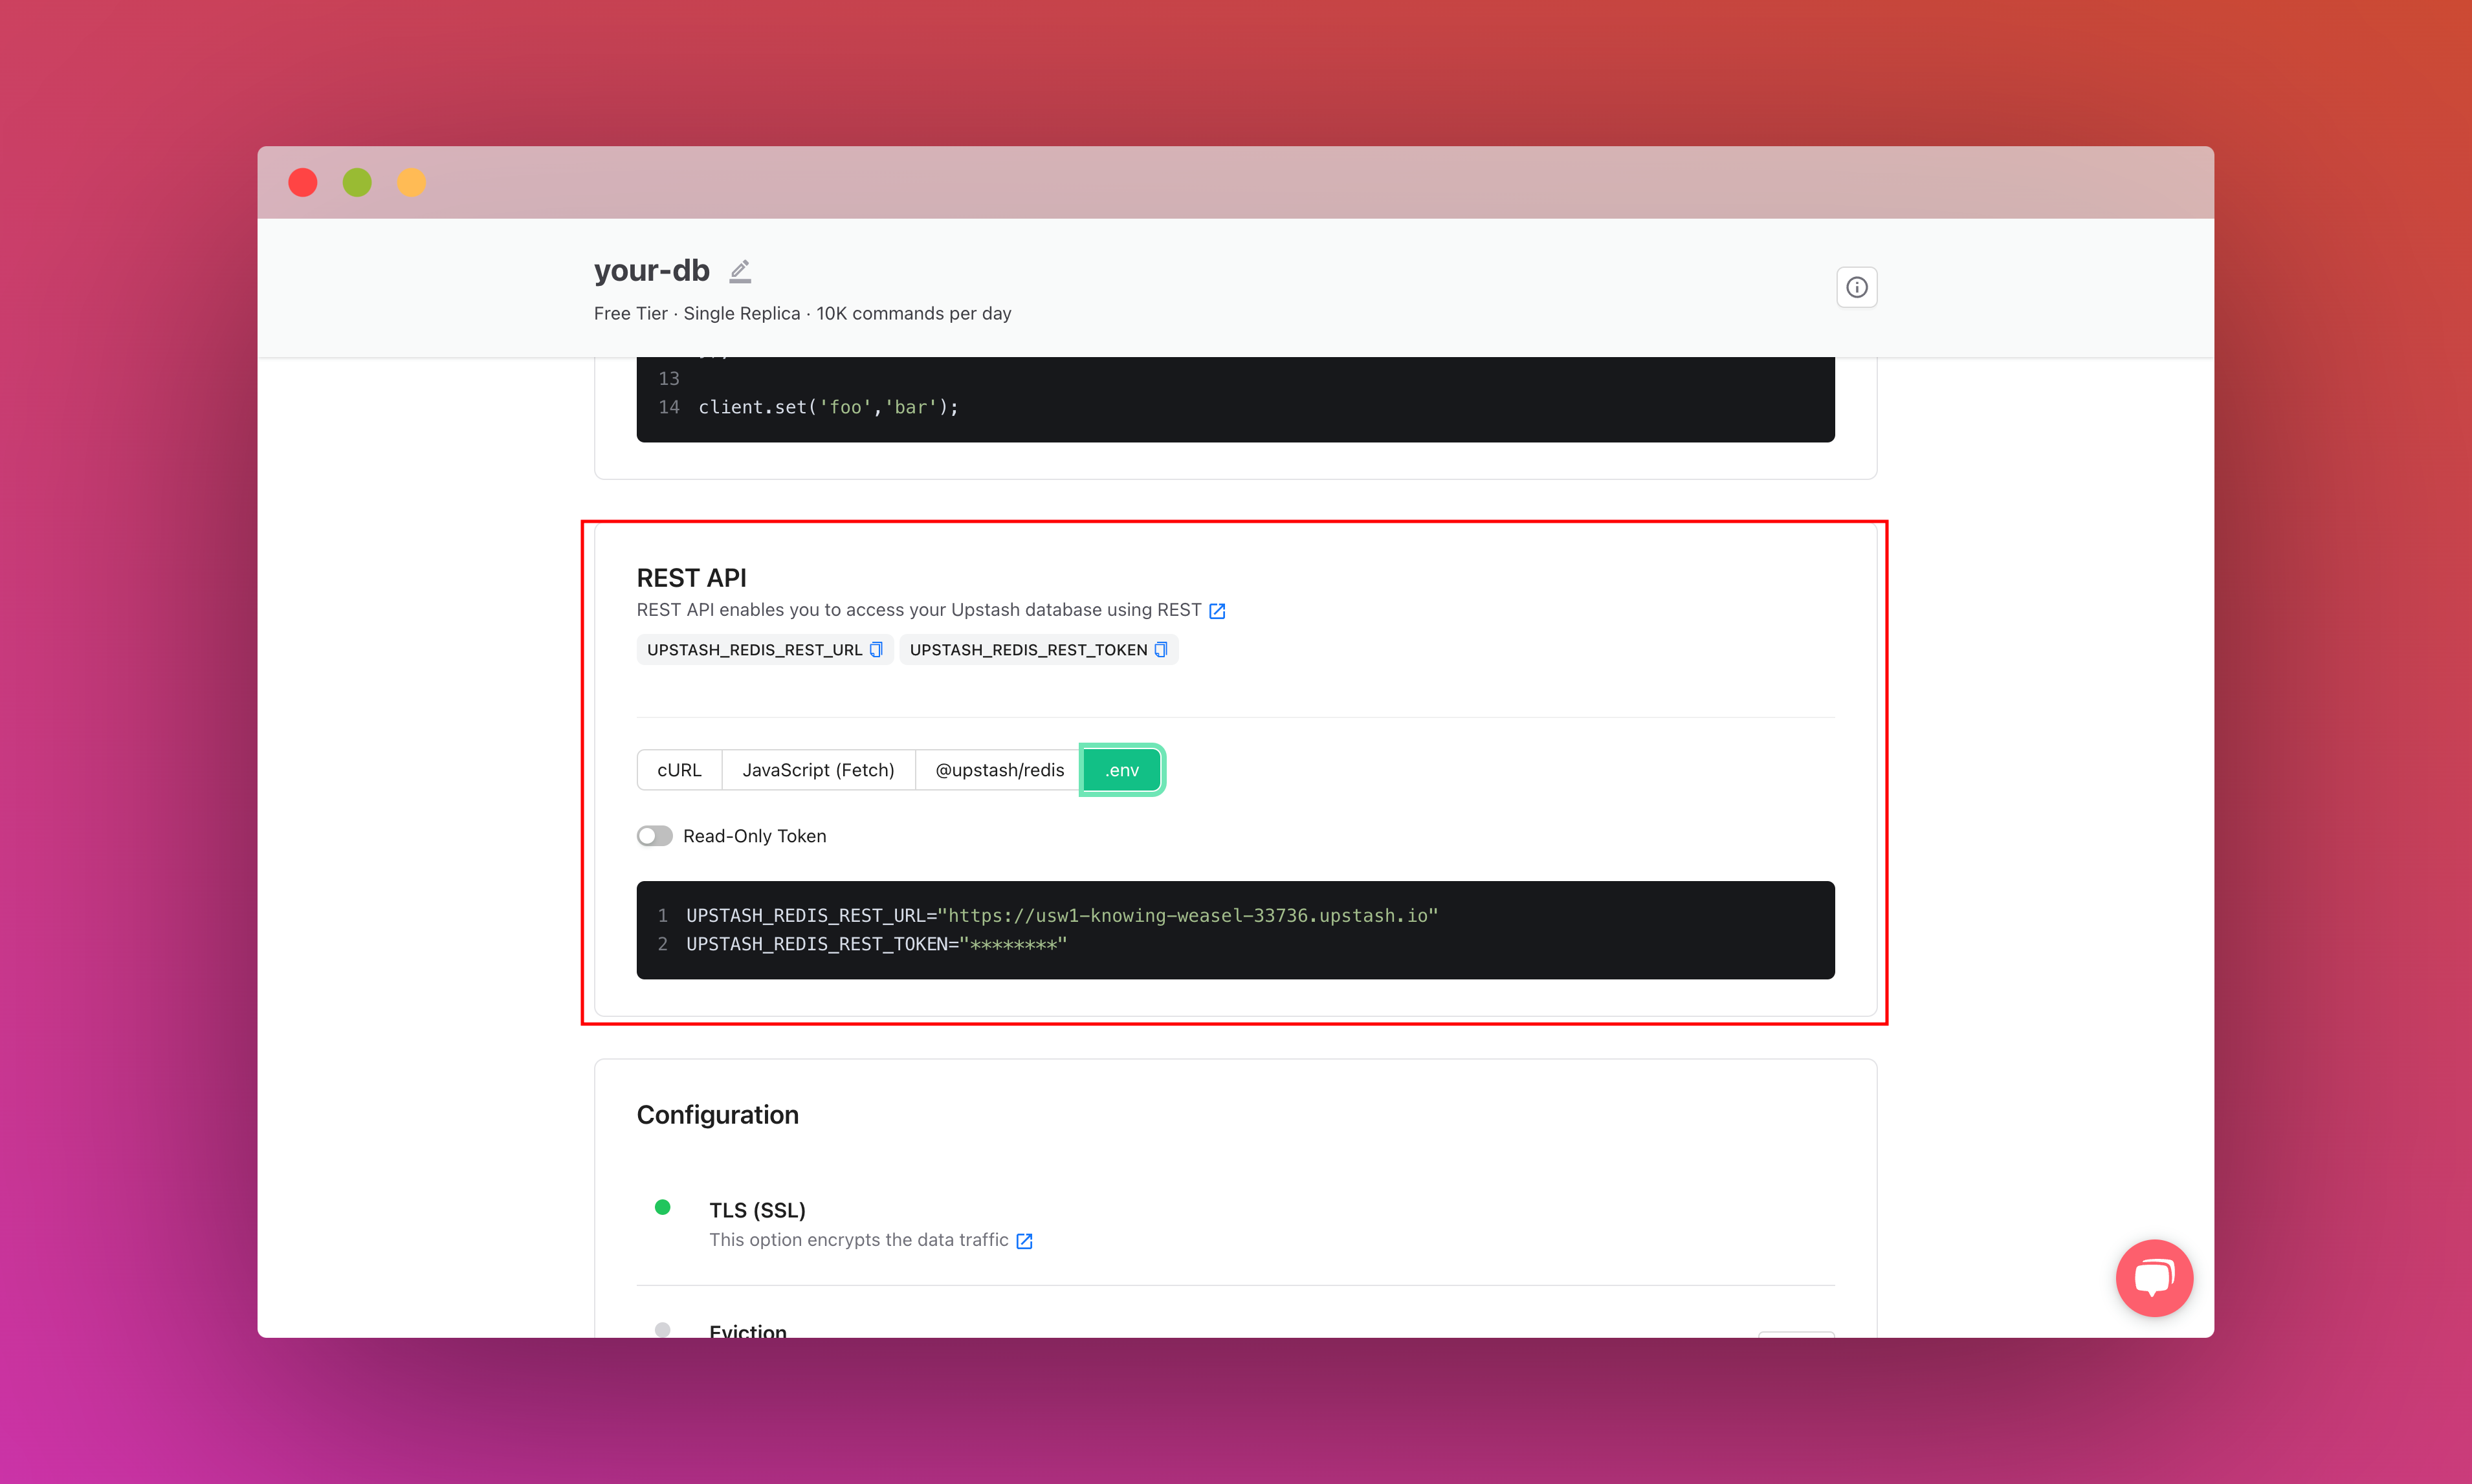
Also, scroll down until you find the REST API section and select the .env button. Copy the content and save it somewhere safe.
Setting up Upstash Vector
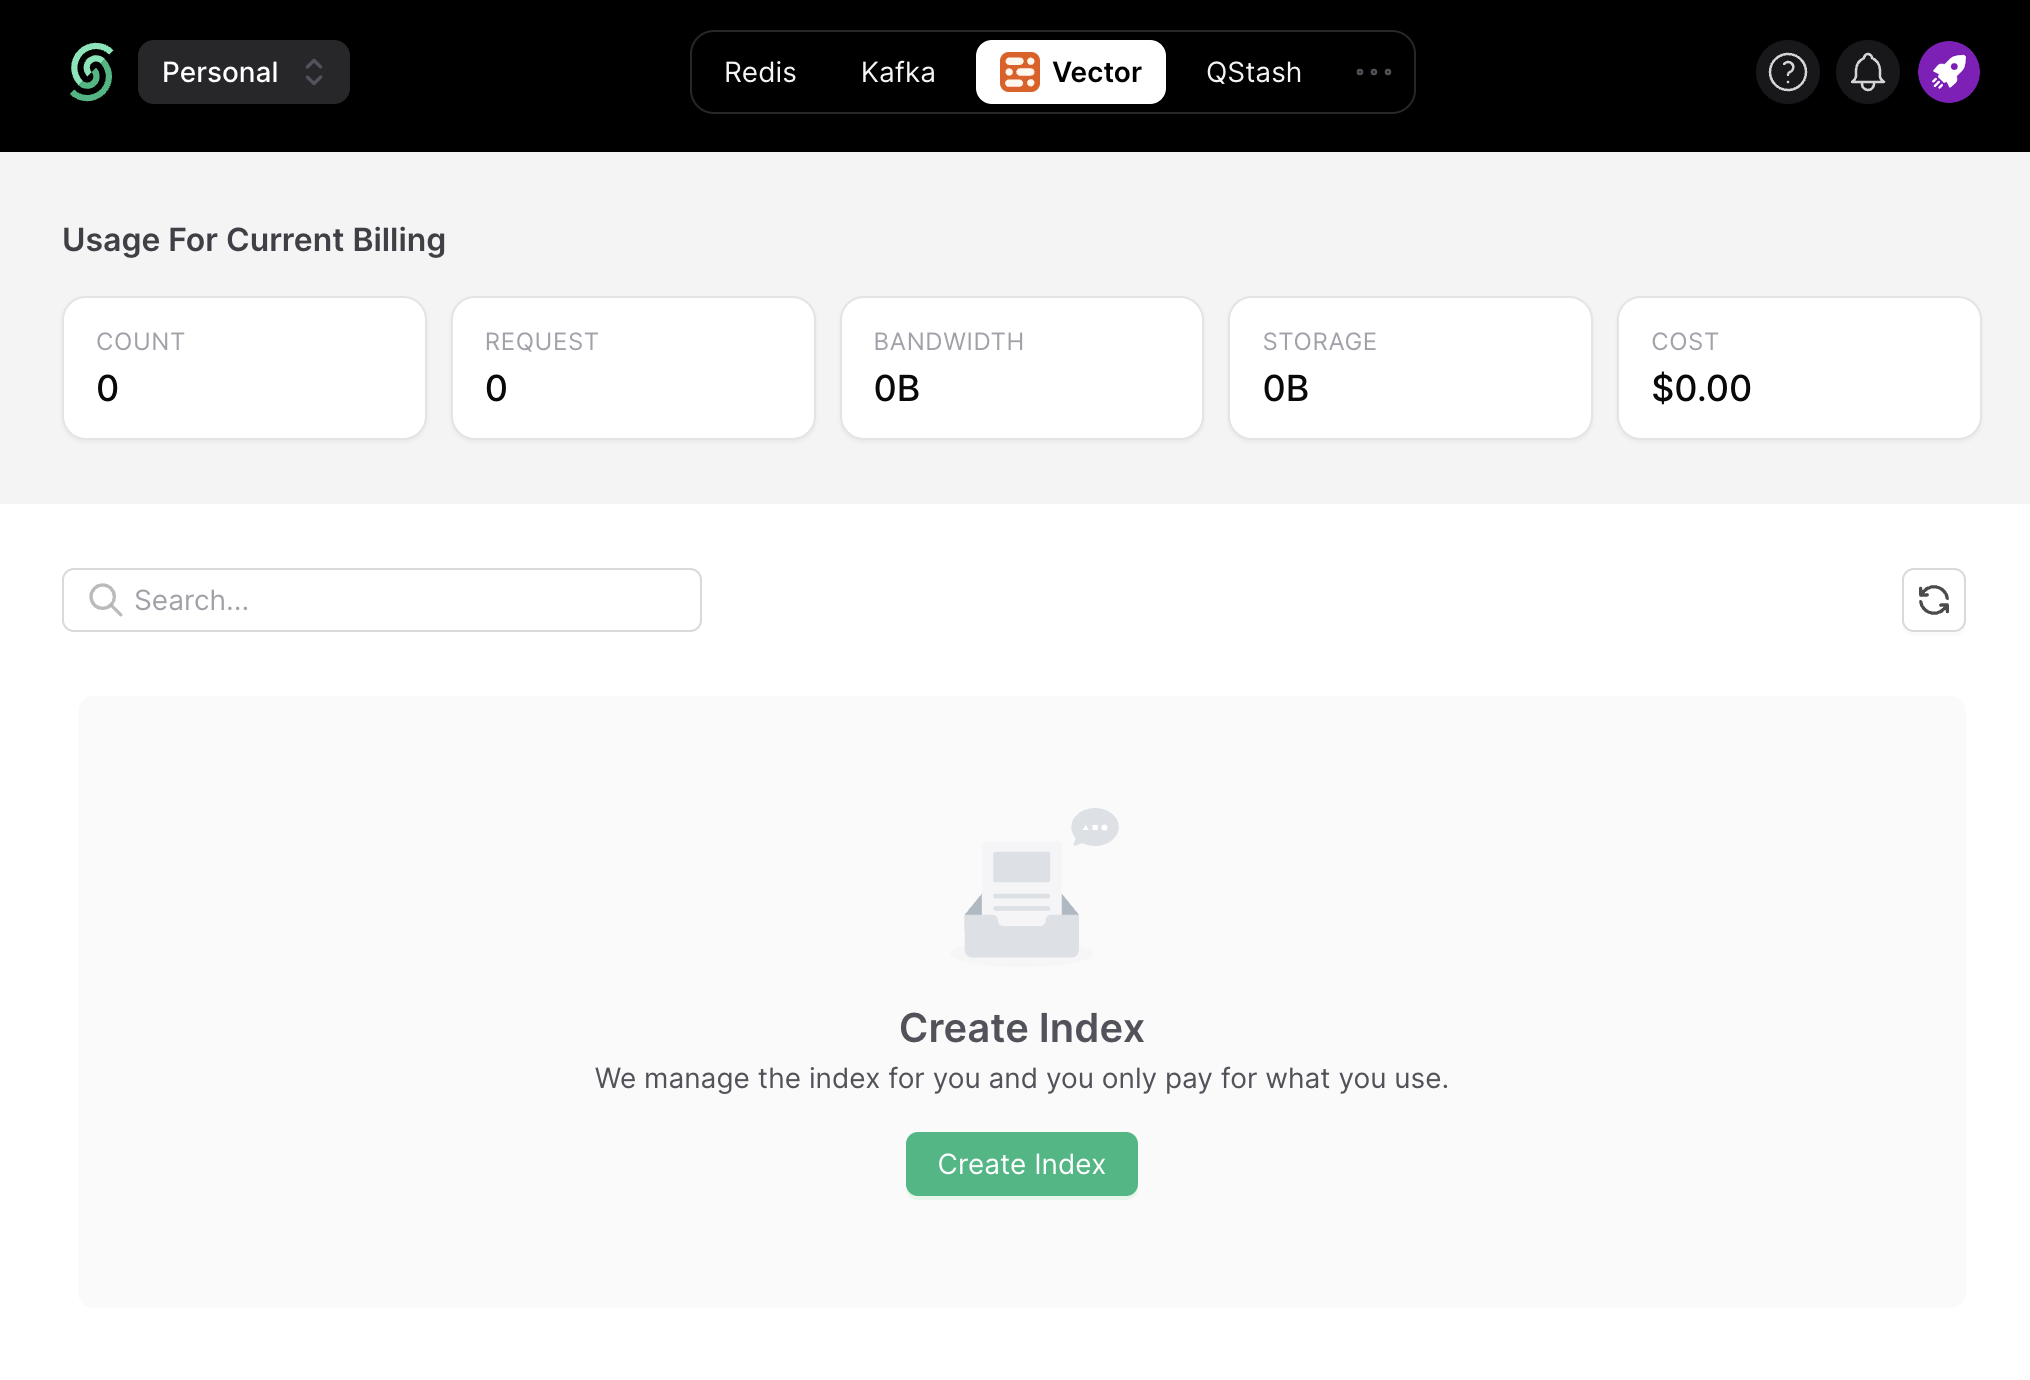
Once you have created an Upstash account and are logged in you are going to go to the Vector tab and create an Index.
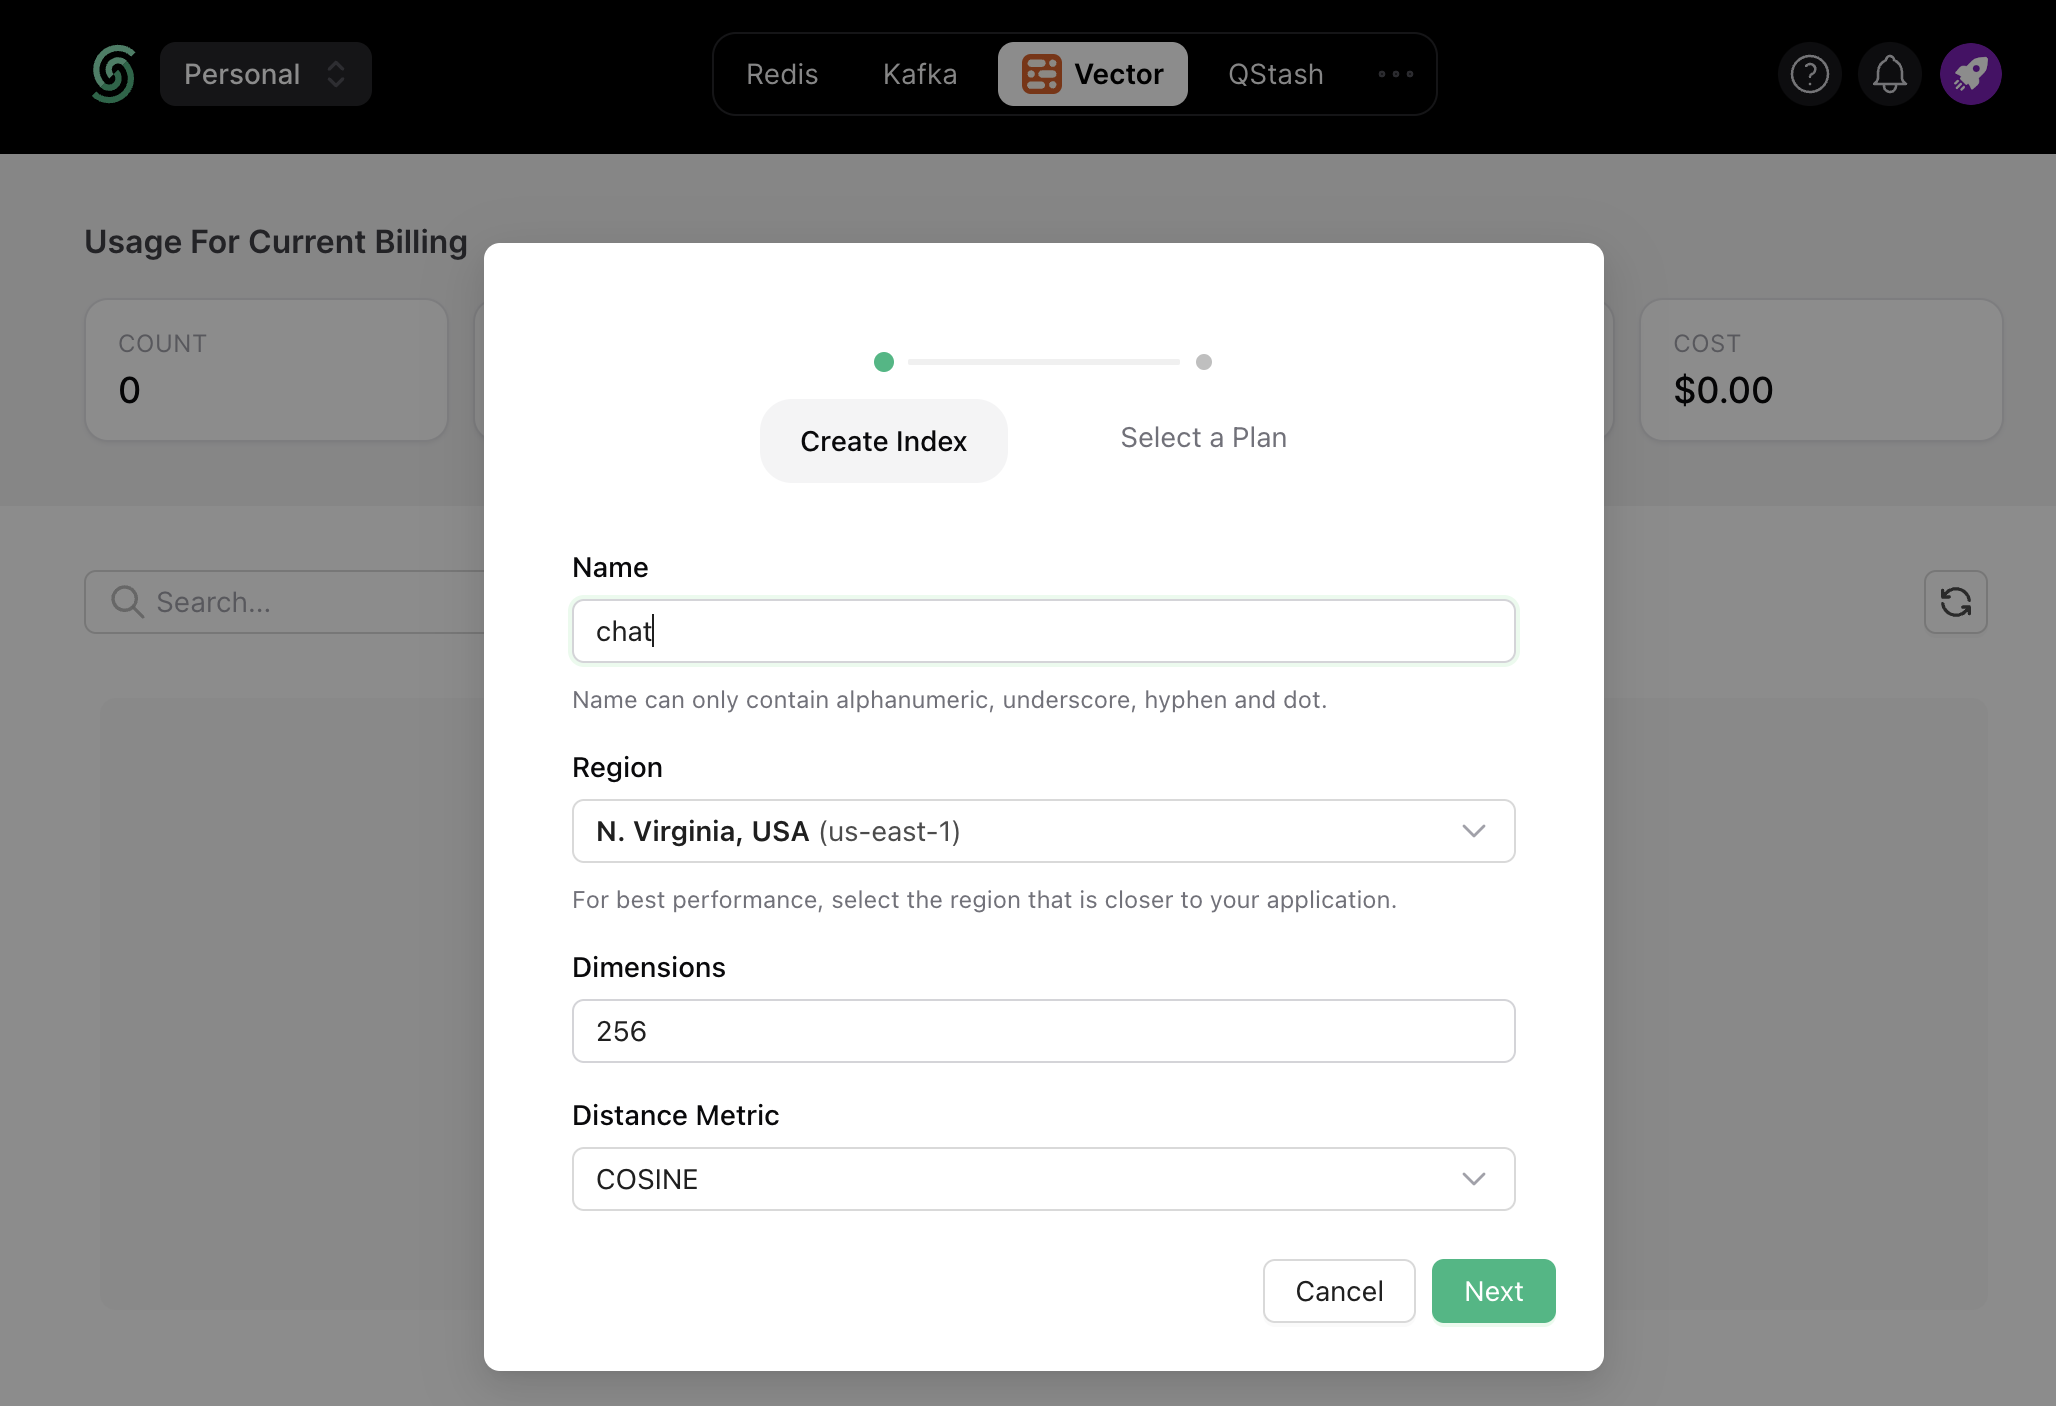
Also, scroll down until you find the Connect section and select the .env button. Copy the content and save it somewhere safe.

Setting up the project
To set up, just clone the app repo and follow this tutorial to learn everything that's in it. To fork the project, run:
git clone https://github.com/rishi-raj-jain/custom-rag-chatbot-upstash-vector
cd custom-rag-chatbot-upstash-vector
pnpm install
Once you have cloned the repo, you are going to create a .env file. You are going to add the items we saved from the above sections.
It should look something like this:
# .env

# Obtained from the steps as above

# Upstash Redis URL and Token
UPSTASH_REDIS_REST_URL="https://....upstash.io"
UPSTASH_REDIS_REST_TOKEN="..."

# Upstash Vector URL and Token
UPSTASH_VECTOR_REST_URL="https://...-vector.upstash.io"
UPSTASH_VECTOR_REST_TOKEN="..."

# Replicate API Key
REPLICATE_API_TOKEN="r8_..."

# Hugging Face Inference API Key
HUGGINGFACEHUB_API_KEY="hf_..."
After these steps, you should be able to start the local environment using the following command:
pnpm devRepository Structure
This is the main folder structure for the project. I have marked in red the files that will be discussed further in this post that deals with creating API Routes for chatting with AI trained on your custom context, and updating the context by upsert-ing vectors into the existing index.

Setup Chat Route in Next.js App Router
In this section, we talk about how we’ve setup the route: app/api/chat/route.js to sync the conversation in our serverless database, dynamically create embeddings of strings, query relevant vectors from a given index to create context, and requesting relevant predictions using LLAMA-2-70B Chat model. To simplify things, we’ll break this into further parts:
Storing Conversations
To cache the conversation taking place with Upstash Redis, we’ll make use of Redis Lists. As soon as a message comes in from a user to respond to, we conditionally push the the response from the chatbot (earlier) to the list. Then, we save the latest message from the user by pushing it to the list as well, and proceed to respond on it.
// File: app/api/chat/route.js

import { Redis } from '@upstash/redis'

// Instantiate the Upstash Redis
const upstashRedis = new Redis({
  url: process.env.UPSTASH_REDIS_REST_URL,
  token: process.env.UPSTASH_REDIS_REST_TOKEN,
})

export async function POST(req) {
  try {

    // the whole chat as array of messages
    const { messages } = await req.json()

    // assuming user - assistant chat
    // add assitant's response to the chat history
    if (messages.length > 1) {
      await upstashRedis.lpush('unique_conversation_id', JSON.stringify(messages[messages.length - 2]))
    }
    // add user's request to the chat history
    await upstashRedis.lpush('unique_conversation_id', JSON.stringify(messages[messages.length - 1]))

		// Proceed to create a response
}
Create embedding of the latest message
To reply to the user’s latest message effectively in all the given context (i.e. the custom content user supplied), we’re going to create an embedding which’ll help us retrieve the relevant context (aka similar vectors) from the existing index. We’ll use Hugging Face Inference API with LangChain to create embeddings with just an API call on the edge and slice the obtained vector to the length we configured while spinning up the Upstash Vector Index (here, 256).
// File: app/api/chat/route.js

import { HuggingFaceInferenceEmbeddings } from '@langchain/community/embeddings/hf'

// Instantiate the Hugging Face Inference API
const embeddings = new HuggingFaceInferenceEmbeddings()

export async function POST(req) {
  try {
		// ...

		// get the latest question stored in the last message of the chat array
    const userMessages = messages.filter((i) => i.role === 'user')
    const lastMessage = userMessages[userMessages.length - 1].content

    // generate embeddings of the latest question
    const queryVector = (await embeddings.embedQuery(lastMessage)).slice(0, 256)

		// Proceed to create a response
}
Retrieve relevant context vectors based on the latest message
Dynamically fetching all the context supplied by the user per message is an expensive operation. We want to use only the context relevant to the user’s latest message, and pass it to the LLAMA-2-70B Chat model as the system prompt. To fetch only the relevant context, we query the existing set of vectors to obtain the 2 most relevant vectors including their metadata and filter the results where confidence scores are greater than 70%.
// File: app/api/chat/route.js

import { Index } from '@upstash/vector'

// Instantiate the Upstash Vector Index
const upstashVectorIndex = new Index()

export async function POST(req) {
  try {
		// ...

    // query the relevant vectors from the embedding vector
    const queryResult = await upstashVectorIndex.query({
      vector: queryVector,
      // get the top 2 relevant results
      topK: 2,
      // do not include the whole set of embeddings in the response
      includeVectors: false,
      // include the meta data so that can get the description out of the index
      includeMetadata: true,
    })
    // console.log('The query result came in', queryResult.length)

    // using the resulting set of relevant vectors
    // filter the one that have score of greater than 70% match
    // and get the description we stored while training
    const queryPrompt = queryResult
      .filter((match) => match.score && match.score > 0.7)
      .map((match) => match.metadata.description)
      .join('\n')
		// console.log('The query prompt is', queryPrompt)

		// Proceed to create a response
}
Prompt LLAMA-2-70B Chat model with context for predictions
Now that we’ve obtained the relevant context as a string, the final step is to prompt the llama-2-70B chat model for responding to the user’s latest message. We use the Vercel AI SDK’s experimental_buildLlama2Prompt method which takes care of creating the suitable prompt format for llama-2-70B chat model.
// File: app/api/chat/route.js

import Replicate from 'replicate'
import { experimental_buildLlama2Prompt } from 'ai/prompts'
import { ReplicateStream, StreamingTextResponse } from 'ai'

// Instantiate the Replicate API
const replicate = new Replicate({
  auth: process.env.REPLICATE_API_TOKEN,
})

export async function POST(req) {
  try {
		// ...

		const response = await replicate.predictions.create({
      // You must enable streaming.
      stream: true,
      // The model must support streaming. See https://replicate.com/docs/streaming
      // This is the model ID for Llama 2 70b Chat
      version: '2c1608e18606fad2812020dc541930f2d0495ce32eee50074220b87300bc16e1',
      // Format the message list into the format expected by Llama 2
      // @see https://github.com/vercel/ai/blob/99cf16edf0a09405d15d3867f997c96a8da869c6/packages/core/prompts/huggingface.ts#L53C1-L78C2
      input: {
        prompt: experimental_buildLlama2Prompt([
          {
            // create a system content message to be added as
            // the llama2prompt generator will supply it as the context with the API
            role: 'system',
            content: queryPrompt.substring(0, Math.min(queryPrompt.length, 2000)),
          },
          // also, pass the whole conversation!
          ...messages,
        ]),
      },
    })

    // stream the result to the frontend
    const stream = await ReplicateStream(response)
    return new StreamingTextResponse(stream)
}
Setup Train Route in Next.js App Router
In this section, we talk about how we’ve setup the route: app/api/train/route.js to dynamically create embeddings of the strings passed in the request object, and add them into the Upstash Vector Index. To simplify things, we’ll break this into further parts:
Create embeddings of the strings
We’re going to create embeddings of the strings which’ll help us set or update the existing index. Doing so allows us to keep the context for chatbot’s future responses up to date. We’ll use Hugging Face Inference API with LangChain to create embeddings with just an API call on the edge.
// File: app/api/train/route.js

import { HuggingFaceInferenceEmbeddings } from '@langchain/community/embeddings/hf'

// Instantiate the Hugging Face Inference API
const embeddings = new HuggingFaceInferenceEmbeddings()

export async function POST(req) {
  try {

    // a default set of messages to create vector embeddings on
    let messagesToVectorize = [
      'Rishi is pretty much active on Twitter nowadays.',
      'Rishi loves writing for Upstash',
      "Rishi's recent article on building chatbot using Upstash went viral",
      'Rishi is enjoying building launchfa.st.',
    ]

    // if the POST request is of type application/json
    if (req.headers.get('Content-Type') === 'application/json') {
      // and if the request contains array of messages to train on
      const { messages } = await req.json()
      if (typeof messages !== 'string' && messages.length > 0) {
        messagesToVectorize = messages
      }
    }

    // Call the Hugging Face Inference API to get emebeddings on the messages
    const generatedEmbeddings = await Promise.all(messagesToVectorize.map((i) => embeddings.embedQuery(i)))

		// ...
}
Store vectors for relevance search
To add the generated embeddings to the vector index, we slice the obtained vectors to the length we configured while spinning up the Upstash Vector Index (here, 256) and use the upsert method to insert the embedding with the metadata, i.e. the strings themselves. This allows us to retrieve the strings when similar vectors are searched and therefore, set the knowledge base of the conversation while we call the LLAMA-2-70B Chat model to generate responses.
// File: app/api/train/route.js

import { Index } from '@upstash/vector'

// Instantiate the Upstash Vector Index
const upstashVectorIndex = new Index()

export async function POST(req) {
  try {
		// ...

		// Slice the vector into lengths of upto 256
    await Promise.all(
      generatedEmbeddings
        .map((i) => i.slice(0, 256))
        .map((vector, index) =>
          // Upsert the vector with description to be further as the context to upcoming questions
          upstashVectorIndex.upsert({
            vector,
            id: index.toString(),
            metadata: { description: messagesToVectorize[index] },
          }),
        ),
    )
    // Once done, return with a successful 200 response
    return new Response(JSON.stringify({ code: 1 }), { status: 200, headers: { 'Content-Type': 'application/json' } })
}
That was a lot of learning! You’re all done now ✨
Deploy to Vercel
The repository, is now ready to deploy to Vercel. Use the following steps to deploy 👇🏻
- Start by creating a GitHub repository containing your app's code.
- Then, navigate to the Vercel Dashboard and create a New Project.
- Link the new project to the GitHub repository you just created.
- In Settings, update the
Environment Variablesto match those in your local.envfile. - Deploy! 🚀
More Information
For more detailed insights, explore the references cited in this post.
| Resource | Link |
|---|---|
| GitHub Repo | https://github.com/rishi-raj-jain/custom-rag-chatbot-upstash-vector |
| Hugging Face Inference API | https://huggingface.co/docs/api-inference/usage |
| Replicate LLAMA-2-70B Chat | https://replicate.com/meta/llama-2-70b-chat |
| LangChain & Hugging Face | https://js.langchain.com/docs/integrations/text_embedding/hugging_face_inference |
| Vercel AI SDK for LLAMA-2-70B Context Creation | https://sdk.vercel.ai/docs/api-reference/prompts#experimental_buildllama2prompt |
Conclusion
In conclusion, this project has provided valuable experience in learning how to create embeddings, query from existing set of vectors, and use context to create relevant predictions using LLAMA-2-70B Chat model while using a service that scales with your need, i.e. Upstash.
