Building an API Key Generator with Upstash Redis
API keys are like the front-door keys to your service—they let users in while keeping things secure. In this blog, I’ll walk you through building a simple, secure API key generator using Upstash Redis for fast, serverless data storage and Cloudflare Workers to handle requests at the edge. Whether you’re setting up a new service or adding keys to an existing app, you’ll learn how to generate, store, and validate API keys to keep everything running smoothly and efficiently.
What is an API Key?
An API key is a unique code that identifies and authenticates a user or application trying to access your API. Think of it like a personal pass: when someone wants to use your service, they need to show this “key” to prove they’re allowed in. API keys help you control who can access your resources, and they’re often used to track usage, enforce limits, or prevent unauthorized access. They’re a straightforward way to manage API access and keep your data secure.
What We'll Build
In this guide, we’ll create an api key generator that provides two core functionalities:
- Generating new API keys with custom settings
- Validating API keys while retrieving their metadata
Key features will include:
- Customizable key prefixes
- Expiration dates
- Rate limiting
- Metadata storage
- Owner identification
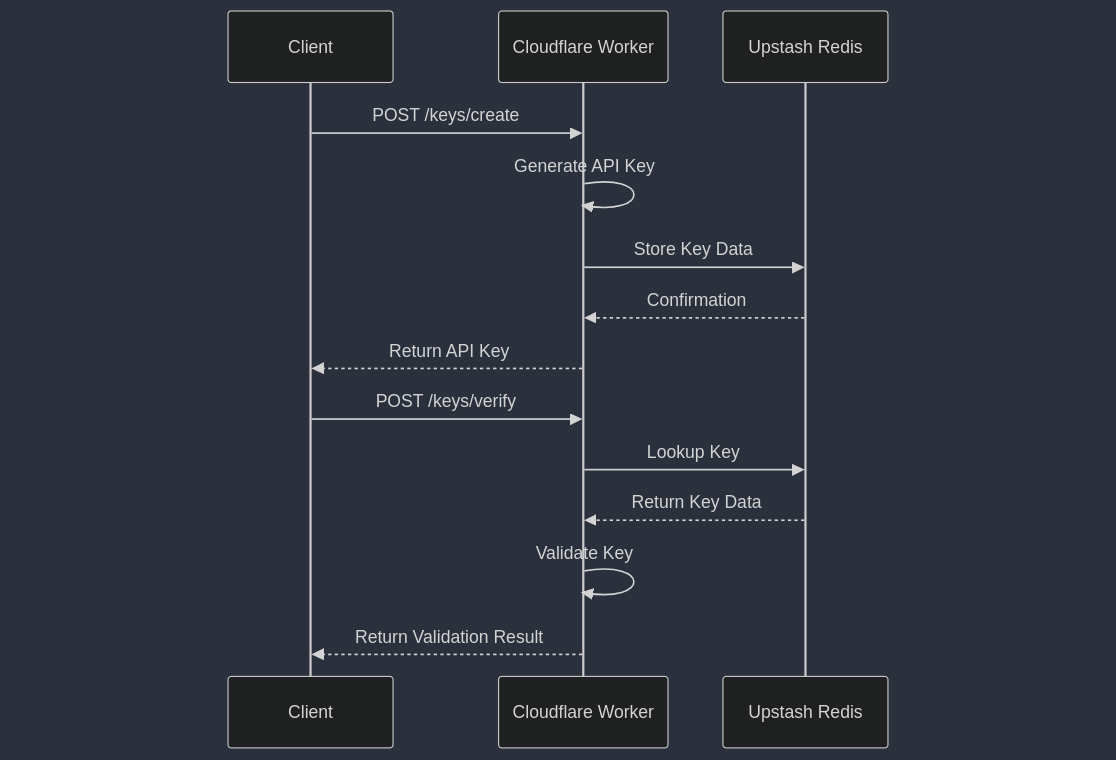
Let's visualize our API key system
This diagram illustrates the interaction between the client, our Cloudflare Worker, and Upstash Redis for both creating and validating API keys. With this overview in mind, let's start building our system.

Prerequisites
To follow along, you’ll need:
- A Cloudflare Workers account
- An Upstash account
- Node.js installed on your local machine
Project Structure
Our project will have the following structure:
folder-name/
├── src/
│   ├── config/
│   │   ├── generateApiKey.ts
│   │   └── schema-validation.ts
│   ├── lib/
│   │   └── ratelimit.ts
│   ├── routes/
│   │   ├── create.ts
│   │   └── verify.ts
│   ├── types/
│   │   └── api.ts
│   └── index.ts
├── package.json
└── wrangler.toml
Step 1: Project Setup
Let's start by setting up our project and installing the necessary dependencies.
Create a new project directory
Open your terminal and run the following commands:
mkdir keyflow
cd keyflow
npm init -y
Install dependencies
We'll need a few packages for our project:
npm install hono @upstash/redis @upstash/ratelimit @hono/zod-validator zod wrangler@upstash/redis: Upstash Redis client for serverless environments
@upstash/ratelimit: Rate limiting library for Upstash Redis
@hono/zod-validator: Request validation middleware for Hono
zod: TypeScript-first schema validation library
wrangler: Cloudflare's CLI for Workers development and deployment
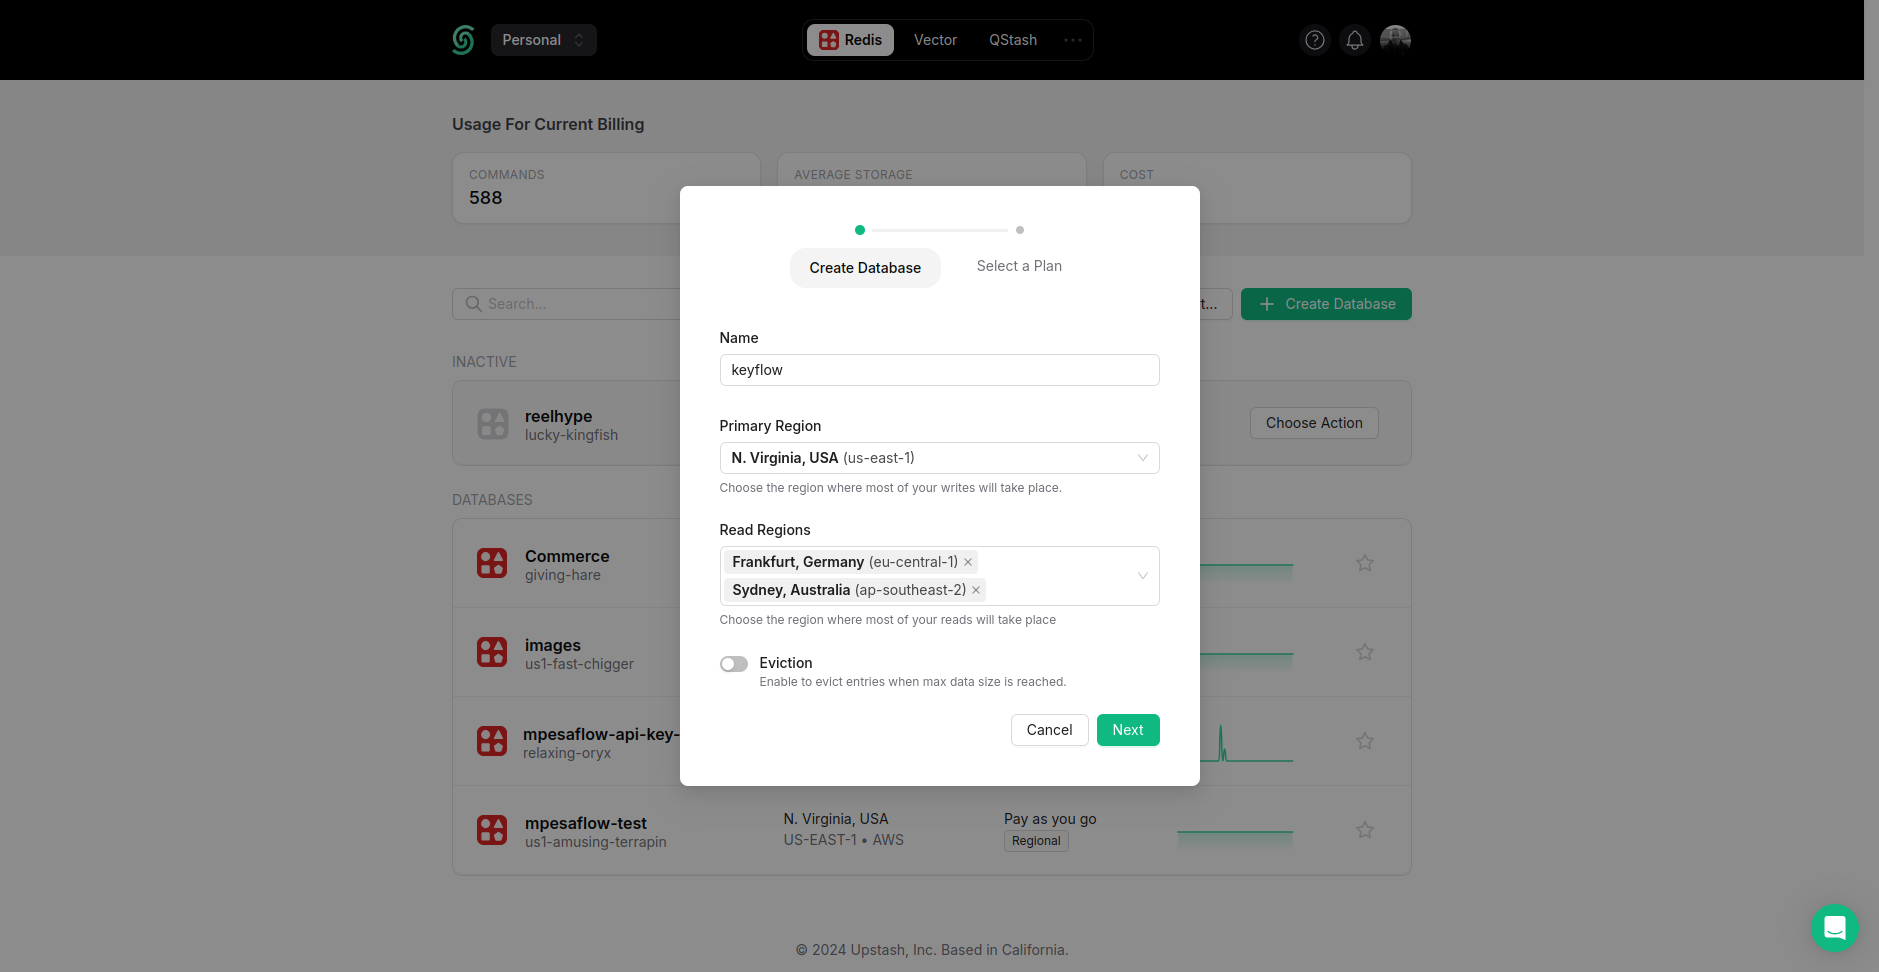
Set up Upstash Redis
- Log in to your Upstash account and create a new Redis database

- Once created, navigate to the "REST API" section

- Copy the
UPSTASH_REDIS_REST_URLandUPSTASH_REDIS_REST_TOKENin the.envsection
Configure Cloudflare Workers
Create a wrangler.toml file in your project root with the following content:
name = "keyflow"
main = "src/index.ts"
compatibility_date = "2023-05-18"

[vars]
UPSTASH_REDIS_REST_URL = "your-redis-url"
UPSTASH_REDIS_REST_TOKEN = "your-redis-token"
Replace "your-redis-url" and "your-redis-token" with the values you copied from Upstash.
Step 2: Defining API Types
Let's start by defining our TypeScript interfaces for our API requests and responses. These types will help us maintain type safety throughout our application. Create a new file src/types/api.ts:
export type CreateKeyRequest = {
  apiId: string;
  prefix?: string;
  byteLength?: number;
  ownerId?: string;
  name: string;
  meta?: Record<string, unknown>;
  expires?: number;
  ratelimit?: {
    type: "fast" | "consistent";
    limit: number;
    refillRate: number;
    refillInterval: number;
  };
};

export type CreateKeyResponse = {
  key: string;
  keyId: string;
};

export type VerifyKeyRequest = {
  key: string;
};

export type VerifyKeyResponse = {
  valid: boolean;
  ownerId?: string;
  meta?: Record<string, unknown>;
  expires?: number;
  ratelimit?: {
    limit: number;
    remaining: number;
    reset: number;
  };
};

export type Env = {
  UPSTASH_REDIS_REST_URL: string;
  UPSTASH_REDIS_REST_TOKEN: string;
};
Step 3: Implementing API Key Generation
Now, let's create a utility function to generate our API keys. Create a new file src/config/generateApiKey.ts:
export function generateApiKey(
  prefix: string | undefined,
  byteLength: number,
): string {
  const randomBytes = crypto.getRandomValues(new Uint8Array(byteLength));
  const key = btoa(String.fromCharCode(...new Uint8Array(randomBytes)))
    .replace(/\+/g, "-")
    .replace(/\//g, "_")
    .replace(/=/g, "");
  return prefix ? `${prefix}_${key}` : key;
}
This function generates a random API key using cryptographically secure random bytes, encodes it in base64, and makes it URL-safe.
Step 4: Implement Rate Limiting
Create a file src/lib/ratelimit.ts:
import { Ratelimit } from "@upstash/ratelimit";
import { Redis } from "@upstash/redis/cloudflare";
import type { Context, Next } from "hono";
import { env } from "hono/adapter";
import type { Env } from "../types/api";

// Middleware for rate limiting
export async function rateLimitMiddleware(c: Context, next: Next) {
	const { UPSTASH_REDIS_REST_TOKEN, UPSTASH_REDIS_REST_URL } = env<Env>(c);

	const redis = new Redis({
		url: UPSTASH_REDIS_REST_URL,
		token: UPSTASH_REDIS_REST_TOKEN,
	});

	const ratelimit = new Ratelimit({
		redis: redis,
		limiter: Ratelimit.slidingWindow(5, "30 s"),
	});

	const ip = c.req.header("CF-Connecting-IP") || "127.0.0.1";
	const { success, limit, remaining, reset } = await ratelimit.limit(ip);

	if (!success) {
		return c.json({ error: "Rate limit exceeded" }, 429);
	}

	c.header("X-RateLimit-Limit", limit.toString());
	c.header("X-RateLimit-Remaining", remaining.toString());
	c.header("X-RateLimit-Reset", reset.toString());

	await next();
}
Step 5: Creating the API Routes
Let's set up our main application file and create our API routes. This file sets up our Hono application with two main routes: /keys/create for generating new API keys and /keys/verify for validating existing keys with three separate files.
1. Implement Create API Key Route
Create a file src/routes/create.ts:
import { zValidator } from "@hono/zod-validator"
import { Redis } from "@upstash/redis/cloudflare"
import { Hono } from "hono"
import { generateApiKey } from "../config/generateApiKey"
import { createApiKeySchema } from "../config/schema-validation"
import type { CreateKeyRequest, CreateKeyResponse, Env } from "../types/api"

const create = new Hono<{
  Bindings: Env
}>()

create.post(
  "/create",
  zValidator("json", createApiKeySchema, (result, c) => {
    if (!result.success) {
      return c.text("Invalid!", 400)
    }
  }),
  async (c) => {
    // Initialize Redis client
    const { UPSTASH_REDIS_REST_TOKEN, UPSTASH_REDIS_REST_URL } = c.env
    const redis = new Redis({
      url: UPSTASH_REDIS_REST_URL,
      token: UPSTASH_REDIS_REST_TOKEN,
    })

    const body = await c.req.json<CreateKeyRequest>()

    // Generate unique identifier and API key
    const keyId = crypto.randomUUID()
    const key = generateApiKey(body.prefix, body.byteLength || 16)

    const keyData = {
      ...body,
      key,
      keyId,
      createdAt: Date.now(),
    }

    const encodedKey = encodeURIComponent(key)

    try {
      // Store key data and lookup reference in Redis
      await redis.set(`key:${keyId}`, JSON.stringify(keyData))
      await redis.set(`lookup:${encodedKey}`, keyId)

      return c.json<CreateKeyResponse>({ key, keyId })
    } catch (error) {
      console.error("Error in /keys/create:", error)
      return c.json({ error: "Internal Server Error" }, 500)
    }
  }
)

export default create
2. Implement Verify API Key Route
Create a file src/routes/verify.ts:
import { zValidator } from "@hono/zod-validator";
import { Redis } from "@upstash/redis/cloudflare";
import { Hono } from "hono";
import { verifyApiKeySchema } from "../config/schema-validation";
import type {
  CreateKeyRequest,
  Env,
  VerifyKeyRequest,
  VerifyKeyResponse,
} from "../types/api";

// Initialize Hono app with environment bindings
const verify = new Hono<{ Bindings: Env }>();

// Define POST route for verifying an API key
verify.post(
  "/verify",
  // Validate request body against schema
  zValidator("json", verifyApiKeySchema, (result, c) => {
    if (!result.success) {
      return c.text("Invalid!", 400); // Return 400 if validation fails
    }
  }),
  async (c) => {
    // Set up Redis with environment variables
    const { UPSTASH_REDIS_REST_TOKEN, UPSTASH_REDIS_REST_URL } = c.env;
    const redis = new Redis({
      url: UPSTASH_REDIS_REST_URL,
      token: UPSTASH_REDIS_REST_TOKEN,
    });

    const body = await c.req.json<VerifyKeyRequest>();
    if (!body.key) {
      return c.json({ error: "key is required" }, 400); // Require key in the request body
    }

    const encodedKey = encodeURIComponent(body.key);
    const keyId = await redis.get<string>(`lookup:${encodedKey}`); // Retrieve key ID using encoded key

    if (!keyId) {
      return c.json<VerifyKeyResponse>({ valid: false }); // Key not found
    }

    const keyDataString = await redis.get<string>(`key:${keyId}`); // Retrieve key data by key ID

    if (!keyDataString || typeof keyDataString !== "string") {
      return c.json<VerifyKeyResponse>({ valid: false }); // Key data missing or invalid
    }

    let keyData: CreateKeyRequest & {
      key: string;
      keyId: string;
      createdAt: number;
    };

    try {
      keyData = JSON.parse(keyDataString); // Parse key data
    } catch (parseError) {
      // Handle parse error by deleting invalid data
      console.error("Key data parse error:", parseError);
      await Promise.all([
        redis.del(`key:${keyId}`),
        redis.del(`lookup:${encodedKey}`),
      ]);
      return c.json(
        {
          error: "Invalid key data in storage",
          details: parseError instanceof Error ? parseError.message : "Unknown parse error",
          valid: false,
        },
        500,
      );
    }

    // Check if key has expired
    if (keyData.expires && keyData.expires < Date.now()) {
      await Promise.all([
        redis.del(`key:${keyId}`),
        redis.del(`lookup:${encodedKey}`),
      ]);
      return c.json<VerifyKeyResponse>({ valid: false });
    }

    // Formulate response with validation status and metadata
    const response: VerifyKeyResponse = {
      valid: true,
      ownerId: keyData.ownerId,
      meta: keyData.meta,
      expires: keyData.expires,
    };

    if (keyData.ratelimit) {
      response.ratelimit = {
        limit: keyData.ratelimit.limit,
        remaining: keyData.ratelimit.limit,
        reset: Date.now() + keyData.ratelimit.refillInterval,
      };
    }

    return c.json(response); // Return verification response
  },
);

export default verify;
3. Implement the Main file index.ts
implement the main file src/index.ts to import create.ts, verify.ts, and rateLimitMiddleWare
import { Hono } from "hono";
import { rateLimitMiddleware } from "./lib/ratelimit";
import create from "./routes/create";
import verify from "./routes/verify";
import type { Env } from "./types/api";

const app = new Hono<{
  Bindings: Env;
}>().basePath("/keys");

app.use("*", rateLimitMiddleware);

// add the create file route and verify file route
app.route("/", create);
app.route("/", verify);

export default app;
Step 6: Deployment
Deploy your Keyflow application to Cloudflare Workers:
-
Install Wrangler:
npm install -g wrangler -
Authenticate with Cloudflare:
wrangler login -
Deploy your worker:
wrangler deploy
Step 7: Deployment
Now that we have our application ready, let's deploy it to Cloudflare Workers:
-
Make sure you have the Wrangler CLI installed:
npm install -g wrangler -
Authenticate with your Cloudflare account:
wrangler login -
Deploy your worker:
wrangler deploy
Step 8: Testing Your API
Let's test our newly deployed API:
Creating a New API Key
curl -X POST https://keyflow.<your-subdomain>.workers.dev/keys/create \
  -H "Content-Type: application/json" \
  -d '{
    "apiId": "my-api",
    "prefix": "prod",
    "name": "Production API Key",
    "expires": 1735689600000,
    "meta": {
      "environment": "production",
      "team": "backend"
    }
  }'
Verifying an API Key
curl -X POST https://keyflow.<your-subdomain>.workers.dev/keys/verify \
  -H "Content-Type: application/json" \
  -d '{
    "key": "prod_AbC123XyZ..."
  }'
Replace <your-subdomain> with your Cloudflare Workers subdomain and prod_AbC123XyZ... with an actual key generated from the create endpoint.
Conclusion
Creating an API key generator is a key step in securing your application's APIs and managing who can access your services. By building a system that can generate, validate, and manage API keys, you add a strong layer of access control that helps keep your data safe and organized.
Here’s a quick rundown of what goes into a solid API key generator:
- Secure Key Generation: Unique, secure keys that include options like custom prefixes or set lengths make each key distinct and harder to guess.
- Validation and Expiration: Adding checks and expiration dates ensures each key is valid only for a set time, making it easy to control and limit access as needed.
- Metadata and Rate Limits: Storing extra information with each key and setting rate limits lets you monitor key usage, track activity, and avoid any abuse of your API.
Using tools like Upstash Redis and Cloudflare Workers makes it easy to build a serverless and globally distributed key management system that scales well and works efficiently.
With this foundation, you’re set up to keep access to your APIs secure and manageable, giving you peace of mind that your resources are protected and easy to monitor.
