Adding AI Assistant to Docs in Minutes with AI SDK & Context7

Building AI assistants for documentation used to require complex RAG pipelines, vector databases, and constant maintenance. Not anymore.
With AI SDK and Context7, you can add a production-ready AI assistant to any docs with just a few prompts.
What makes this special?
- Real-time documentation access - No outdated information
- Zero hallucination - Up-to-date docs fetched by Context7
- Production-ready - Built with Vercel AI SDK v5
Without further ado, let's dive in!
The Idea: Specialize an AI Assistant with One Prompt
The combination of Context7 MCP and AI SDK gives you a powerful pattern: keep intelligence flexible (prompt) and keep knowledge live (tools).
- One system prompt: Instruct the model as “Your product’s doc expert”
- MCP tools: Context7 exposes documentation tools (
get-library-docs,resolve-library-id). The model uses these tools on demand, so answers are grounded in current docs. - AI SDK: Tool calling, streaming and flexibility with AI models.
Step 1: Create the Assistant API Endpoint
We'll create an API route that connects to Context7's MCP server and uses it as a tool for our AI assistant. First, we will go step by step explaining building parts, then we will provide you the entire code:
Step 1.1 — Connect to Context7 MCP
Create a streaming MCP transport and client to access Context7 tools:
You can get your Context7 credentials from your account at context7.com.
import { StreamableHTTPClientTransport } from "@modelcontextprotocol/sdk/client/streamableHttp.js";
import { experimental_createMCPClient } from "ai";

const httpTransport = new StreamableHTTPClientTransport(
  new URL("https://mcp.context7.com/mcp"),
  {
    requestInit: {
      headers: { Authorization: "Bearer <your-context7-token>" },
    },
  },
);

const mcpClient = await experimental_createMCPClient({
  transport: httpTransport,
});
const mcpTools = await mcpClient.tools();
Step 1.2 — Specialize the assistant with one system prompt
Define the assistant’s role and constraints. This is where you should find the docs id in context7 and instruct the assistant to use it. The ids are presented below the source headers in the landing page of context7. (e.g. /vercel/next.js)
When you instruct the model with "use library /vercel/next.js for API and docs.", Context7 MCP server can skip the library-matching step and directly continue with retrieving docs.
This way, your agent will focus on your docs while answering the users' questions.
Also, you can modify the prompt and shape the characteristics as you will, as always.
const systemPrompt = `You are a Vercel documentation assistant. Be concise and helpful.

INSTRUCTIONS:
- Only use /vercel/next.js docs via Context7 tools, this should be your only source of information.
- Prefer deployment, routing, and API examples when relevant
- If docs are missing, suggest nearby Vercel topics and ask a clarifying question
- Politely reject the user if they ask about unrelated topics, only answer questions about programming.`;
Step 1.3 — Stream with AI SDK + tool calling
At this part, you can choose any AI provider, and can switch between them as you like.
This is the beauty that comes with AI SDK. For demo purposes we choose OpenAI. (Don't forget to add the API keys to .env file)
Wire the prompt, user messages, guard rails, and tools into streamText:
import { openai } from "@ai-sdk/openai";
import { convertToModelMessages, stepCountIs, streamText } from "ai";

const result = streamText({
  model: openai("gpt-4o-mini"), // You may choose any model based on your needs
  system: systemPrompt,
  messages: convertToModelMessages(messages),
  stopWhen: stepCountIs(3),
  tools: { ...mcpTools },
});
The Full Code For the Endpoint
import { openai } from "@ai-sdk/openai";
import { StreamableHTTPClientTransport } from "@modelcontextprotocol/sdk/client/streamableHttp.js";
import {
  convertToModelMessages,
  experimental_createMCPClient,
  stepCountIs,
  streamText,
  UIDataTypes,
  UIMessage,
} from "ai";

export type ChatMessage = UIMessage<never, UIDataTypes>;

export async function POST(req: Request) {
  try {
    const { messages }: { messages: ChatMessage[] } = await req.json();

    // Step 1.1 — Connect to Context7 MCP
    const httpTransport = new StreamableHTTPClientTransport(
      new URL("https://mcp.context7.com/mcp"),
      {
        requestInit: {
          headers: {
            Authorization: "Bearer <your-context7-token>",
          },
        },
      },
    );

    const mcpClient = await experimental_createMCPClient({
      transport: httpTransport,
    });

    const mcpTools = await mcpClient.tools();

    // Step 1.2 — Specialize with one system prompt
    const systemPrompt = `You are a Vercel documentation assistant. Be concise and helpful.
    INSTRUCTIONS:
    - Only use /vercel/next.js docs via Context7 tools, this should be your only source of information.
    - Prefer deployment, routing, and API examples when relevant
    - If docs are missing, suggest nearby Vercel topics and ask a clarifying question
    - Politely reject the user if they ask about unrelated topics, only answer questions about programming.`;

    // Step 1.3 — Stream with AI SDK + tool calling
    const result = streamText({
      model: openai("gpt-4o-mini"), // AI model
      system: systemPrompt, // our instructions
      messages: convertToModelMessages(messages),
      stopWhen: stepCountIs(3), // round trip with 2 tool calls
      tools: { ...mcpTools }, // tools extracted from context7 mcp
      onFinish: async () => {
        await mcpClient.close(); // don't forget to close the connection
      },
      onError: async (error) => {
        await mcpClient.close();
        console.error("Error during streaming:", error);
      },
    });

    return result.toUIMessageStreamResponse();
  } catch (error) {
    console.error("Error streaming chat completion:", error);
    return new Response("Failed to stream chat completion", { status: 500 });
  }
}
What's happening here?
- MCP Connection: We connect to Context7's MCP server with authentication
- Tool Registration: We get all available documentation tools from Context7
- AI Configuration: We give our AI access to these tools and specific instructions
- Streaming Response: We return a streaming response using AI SDK v5
Step 2: Connect Your Frontend
You can use the AI SDK's useChat hook to connect to your API to your frontend.
This hook abstracts all the complexity behind the scenes and provides you with some useful fields
which you can use to interact with your AI chatbot.
The design choices and implementations are up to your imagination. This setup works well with
UI-based inputs thanks to the return function toUIMessageStreamResponse() in the server and
the integrated useChat() hook in the client.
"use client";
import type { ChatMessage } from "@/app/api/vercel-agent/route";
import { useChat } from "@ai-sdk/react";
import { DefaultChatTransport } from "ai";
export default function ChatPage() {
const { messages, sendMessage, status, error, stop } = useChat<ChatMessage>({
transport: new DefaultChatTransport({
api: "/api/vercel-agent", // the file path to the api route
}),
});
return <div>...</div>;
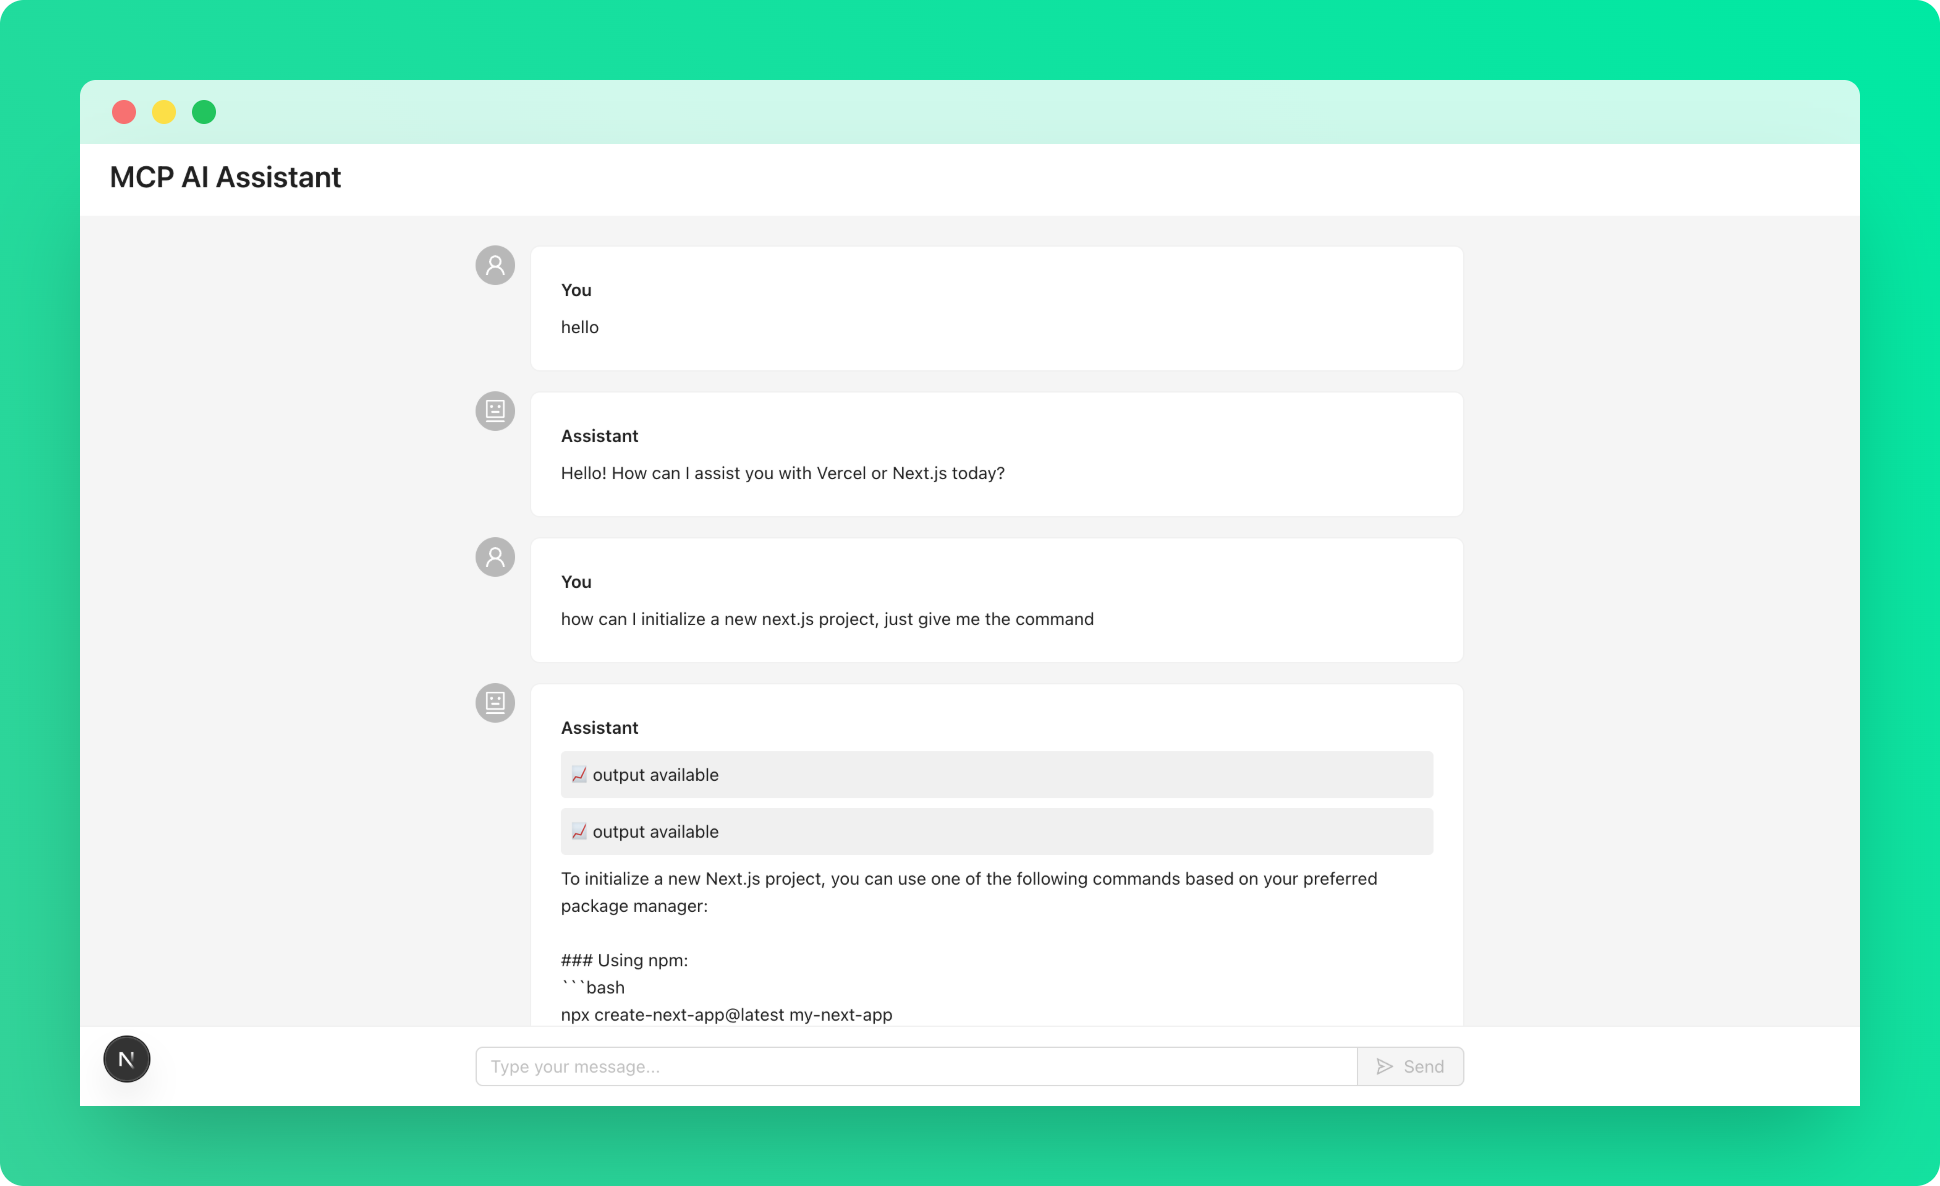
}Here is an example UI for testing purposes:
"use client";

import type { ChatMessage } from "@/app/api/vercel-agent/route";
import { useChat } from "@ai-sdk/react";
import {
  RobotOutlined,
  SendOutlined,
  StopOutlined,
  UserOutlined,
} from "@ant-design/icons";
import { DefaultChatTransport } from "ai";
import {
  Avatar,
  Button,
  Card,
  Input,
  Layout,
  message,
  Space,
  Spin,
  Typography,
} from "antd";
import { useState } from "react";

const { Header, Content } = Layout;
const { Title, Text } = Typography;

export default function MCPToolsChatPage() {
  const [input, setInput] = useState("");

  const { messages, sendMessage, status, error, stop } = useChat<ChatMessage>({
    transport: new DefaultChatTransport({
      api: "/api/vercel-agent",
    }),
  });

  const handleSubmit = () => {
    if (!input.trim()) return;
    sendMessage({ text: input });
    setInput("");
  };

  if (error) {
    message.error(error.message);
  }

  return (
    <Layout style={{ minHeight: "100vh" }}>
      <Header style={{ backgroundColor: "#fff", padding: "0 24px" }}>
        <Title level={3} style={{ margin: 0, lineHeight: "64px" }}>
          MCP AI Assistant
        </Title>
      </Header>

      <Content style={{ padding: "24px", marginBottom: "80px" }}>
        <div style={{ maxWidth: "800px", margin: "0 auto" }}>
          {messages.map((message) => (
            <div
              key={message.id}
              style={{ marginBottom: "16px", display: "flex", gap: "12px" }}
            >
              <Avatar
                icon={
                  message.role === "user" ? <UserOutlined /> : <RobotOutlined />
                }
              />
              <Card style={{ flex: 1 }}>
                <Text strong>
                  {message.role === "user" ? "You" : "Assistant"}
                </Text>
                {message.parts.map((part, index) => (
                  <div key={index}>
                    {part.type === "text" && (
                      <div style={{ marginTop: "8px", whiteSpace: "pre-wrap" }}>
                        {part.text}
                      </div>
                    )}
                    {part.type === "dynamic-tool" && (
                      <div
                        style={{
                          marginTop: "8px",
                          padding: "8px",
                          backgroundColor: "#f0f0f0",
                          borderRadius: "4px",
                        }}
                      >
                        📈 {part.state.replace("-", " ")}
                      </div>
                    )}
                  </div>
                ))}
              </Card>
            </div>
          ))}

          {status === "submitted" && (
            <div style={{ display: "flex", gap: "12px", marginBottom: "16px" }}>
              <Avatar icon={<RobotOutlined />} />
              <Card style={{ flex: 1 }}>
                <Space>
                  <Spin size="small" />
                  <Text>Thinking...</Text>
                </Space>
              </Card>
            </div>
          )}
        </div>
      </Content>

      <div
        style={{
          position: "fixed",
          bottom: 0,
          left: 0,
          right: 0,
          backgroundColor: "#fff",
          padding: "16px",
          borderTop: "1px solid #f0f0f0",
        }}
      >
        <div style={{ maxWidth: "800px", margin: "0 auto" }}>
          <Space.Compact style={{ width: "100%" }}>
            <Input
              value={input}
              onChange={(e) => setInput(e.target.value)}
              placeholder="Type your message..."
              onPressEnter={handleSubmit}
              disabled={status === "submitted" || status === "streaming"}
            />
            {status === "submitted" || status === "streaming" ? (
              <Button icon={<StopOutlined />} onClick={stop} danger>
                Stop
              </Button>
            ) : (
              <Button
                type="primary"
                icon={<SendOutlined />}
                onClick={handleSubmit}
                disabled={!input.trim()}
              >
                Send
              </Button>
            )}
          </Space.Compact>
        </div>
      </div>
    </Layout>
  );
}
Step 3: Test Your Documentation Assistant
Try asking questions like:
- "How do I create API routes in Next.js?"
- "What's the difference between pages and app router?"
- "How do I deploy to Vercel?"
- "Show me how to handle forms in Next.js"
Your AI assistant will automatically search the Vercel/Next.js documentation and provide accurate, up-to-date answers!
How It Works Under the Hood
Here's what happens when a user asks a question:
- User Input: User types a question
- AI Processing: GPT-4 analyzes the question
- Tool Selection: AI decides which documentation tools to use
- Live Documentation Search: Context7 searches current Vercel/Next.js docs
- Response Generation: AI synthesizes an answer based on fresh documentation
- Streaming: Answer streams back to the user in real-time
Customizing for Your Own Documentation
Want to create an assistant for your own docs or different libraries? Here's how:
1. Change the Library
Replace /vercel/next.js with any library Context7 supports:
const systemPrompt = `You are a React documentation assistant.

INSTRUCTIONS:
- Use library <your-doc-id> for API and docs.
- Focus on React hooks, components, and best practices
// ... rest of your instructions
`;
2. Multiple Libraries
You can even support multiple libraries:
const systemPrompt = `You are a full-stack documentation assistant.

INSTRUCTIONS:
- For frontend questions, use /vercel/next.js
- For backend questions, use /nodejs/node
- For database questions, use /mongodb/docs
// ... rest of your instructions
`;
3. Custom Instructions
Update the system prompt to match your company's tone:
const systemPrompt = `You are YourCompany's documentation assistant.

INSTRUCTIONS:
- Always mention YourCompany when relevant
- Use a professional but friendly tone
- Focus on our specific implementation patterns
// ... rest of your instructions
`;
Production Considerations
Before deploying to production, consider these enhancements:
Rate Limiting
Protect your API from abuse with rate limiting. This prevents users from overwhelming your service and helps control costs.
References:
Caching
Implement response caching to reduce API costs and improve response times.
References:
Next Steps
Congratulations! You've built a production-ready AI documentation assistant in just a few minutes. In this blog, we provided a simple implementation to get a working ai chatbot, but it can be improved further with many modifications and additions. So take this as a starting step, and feel free to put on top of it.
Further Readings: