> ## Documentation Index
> Fetch the complete documentation index at: https://upstash.com/docs/llms.txt
> Use this file to discover all available pages before exploring further.
# Flask
You can find the project source code on GitHub.
This guide provides detailed, step-by-step instructions on how to use Upstash Workflow with Flask. You can also explore [the source code](https://github.com/upstash/workflow-py/tree/master/examples/flask) for a detailed, end-to-end example and best practices.
## Prerequisites
1. An Upstash QStash API key.
2. Python and pip installed.
If you haven't obtained your QStash API key yet, you can do so by [signing up](https://console.upstash.com/auth/sign-in) for an Upstash account and navigating to your QStash dashboard.
## Step 1: Installation
First, create a new directory and set up a virtual environment:
```bash theme={"system"}
python -m venv venv
source venv/bin/activate
```
Then, install the Workflow SDK and Flask:
```bash theme={"system"}
pip install fastapi uvicorn upstash-workflow
```
## Step 2: Configure Environment Variables
Create a `.env` file in your project root and add your QStash token. This token is used to authenticate your application with the QStash service.
```bash Terminal theme={"system"}
touch .env
```
Upstash Workflow is powered by [QStash](/qstash/overall/getstarted), which requires access to your endpoint to execute workflows. When your app is deployed, QStash will use the app's URL. However, for local development, you have two main options: [use a local QStash server or set up a local tunnel](/workflow/howto/local-development/development-server).
### Option 1: Local QStash Server
To start the local QStash server, run:
```bash theme={"system"}
npx @upstash/qstash-cli dev
```
Once the command runs successfully, you’ll see `QSTASH_URL` and `QSTASH_TOKEN` values in the console. Add these values to your `.env` file:
```bash .env theme={"system"}
export QSTASH_URL="http://127.0.0.1:8080"
export QSTASH_TOKEN=""
```
This approach allows you to test workflows locally without affecting your billing. However, runs won't be logged in the Upstash Console.
### Option 2: Local Tunnel
Alternatively, you can set up a local tunnel. For this option:
1. Copy the `QSTASH_TOKEN` from the Upstash Console.
2. Update your `.env` file with the following:
```bash .env theme={"system"}
export QSTASH_TOKEN="***"
export UPSTASH_WORKFLOW_URL=""
```
* Replace `***` with your actual QStash token.
* Set `UPSTASH_WORKFLOW_URL` to the public URL provided by your local tunnel.
Here’s where you can find your QStash token:
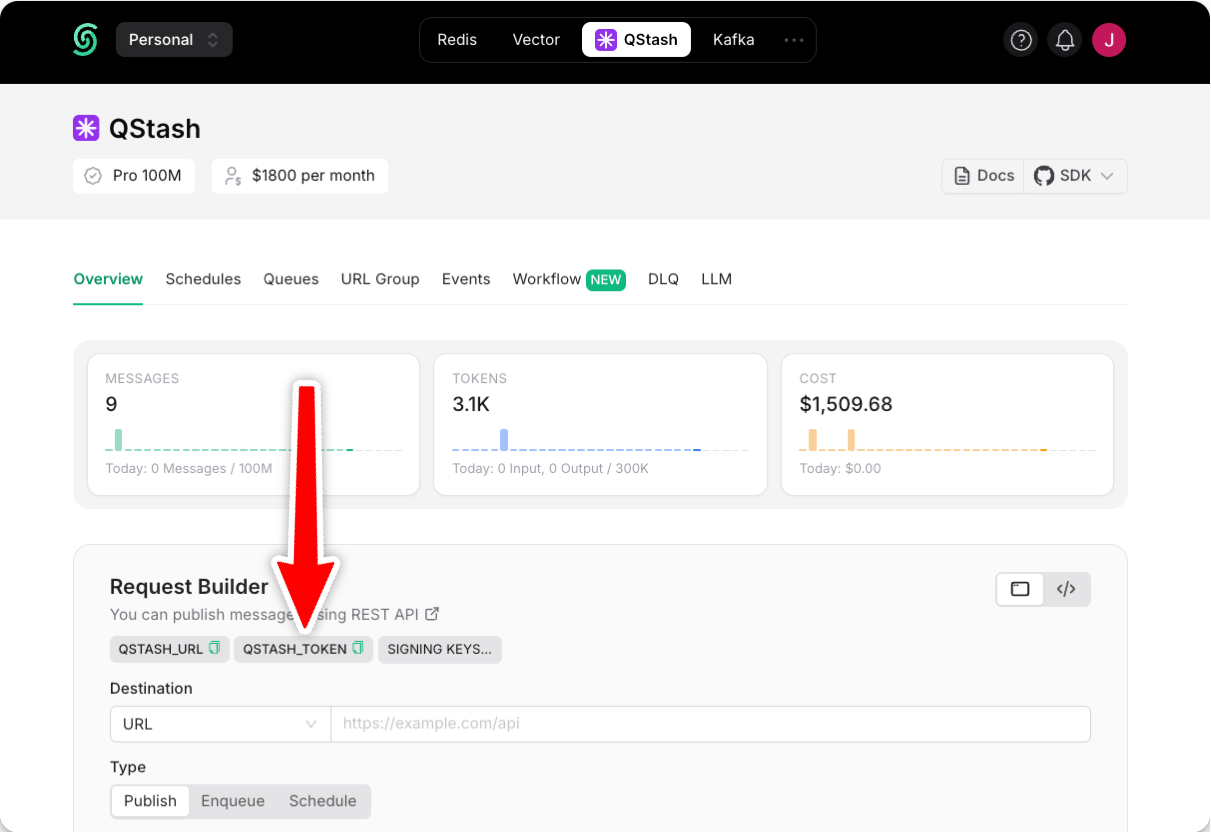 Using a local tunnel connects your endpoint to the production QStash, enabling you to view workflow logs in the Upstash Console.
## Step 3: Create a Workflow Endpoint
A workflow endpoint allows you to define a set of steps that, together, make up a workflow. Each step contains a piece of business logic that is automatically retried on failure, with easy monitoring via our visual workflow dashboard.
To define a workflow endpoint in a Flask project, create a `main.py` file that contains your workflow:
```python main.py theme={"system"}
from flask import Flask
from upstash_workflow.flask import Serve
app = Flask(__name__)
serve = Serve(app)
@serve.route("/api/workflow")
def workflow(context) -> None:
def _step1() -> None:
print("initial step ran")
context.run("initial-step", _step1)
def _step2() -> None:
print("second step ran")
context.run("second-step", _step2)
```
```python main.py theme={"system"}
from flask import Flask
import time
from upstash_workflow.flask import Serve
from upstash_workflow import WorkflowContext
app = Flask(__name__)
serve = Serve(app)
def some_work(input: str) -> str:
return f"processed '{input}'"
@serve.route("/sleep")
def sleep(context: WorkflowContext[str]) -> None:
input = context.request_payload
def _step1() -> str:
output = some_work(input)
print("step 1 input", input, "output", output)
return output
result1: str = context.run("step1", _step1)
context.sleep_until("sleep1", time.time() + 3)
def _step2() -> str:
output = some_work(result1)
print("step 2 input", result1, "output", output)
return output
result2: str = context.run("step2", _step2)
context.sleep("sleep2", 2)
def _step3() -> None:
output = some_work(result2)
print("step 3 input", result2, "output", output)
context.run("step3", _step3)
```
```python main.py theme={"system"}
from flask import Flask
from typing import Dict
from upstash_workflow.flask import Serve
from upstash_workflow import WorkflowContext, CallResponse
app = Flask(__name__)
serve = Serve(app)
def some_work(input: str) -> str:
return f"processed '{input}'"
@app.route("/get-data", methods=["POST"])
def get_data() -> Dict[str, str]:
return {"message": "get data response"}
@serve.route("/call")
def call(context: WorkflowContext[str]) -> None:
input = context.request_payload
def _step1() -> str:
output = some_work(input)
print("step 1 input", input, "output", output)
return output
result1: str = context.run("step1", _step1)
response: CallResponse[Dict[str, str]] = context.call(
"get-data",
url=f"{context.env.get('UPSTASH_WORKFLOW_URL', 'http://localhost:8000')}/get-data",
method="POST",
body={"message": result1},
)
def _step2() -> str:
output = some_work(response.body["message"])
print("step 2 input", response, "output", output)
return output
context.run("step2", _step2)
```
```python main.py theme={"system"}
from flask import Flask
from upstash_workflow.flask import Serve
from upstash_workflow import WorkflowContext
app = Flask(__name__)
serve = Serve(app)
def some_work(input: str) -> str:
return f"processed '{input}'"
@serve.route("/auth")
def auth(context: WorkflowContext[str]) -> None:
if context.headers.get("Authentication") != "Bearer secret_password":
print("Authentication failed.")
return
def _step1() -> str:
return "output 1"
context.run("step1", _step1)
def _step2() -> str:
return "output 2"
context.run("step2", _step2)
```
## Step 4: Run the Workflow Endpoint
Don't forget to source your environment file to set your environment variables:
```bash Terminal theme={"system"}
source .env
```
After setting your live URL as the environment variable or `base_url` option, trigger your workflow by first starting your Flask app:
```bash Terminal theme={"system"}
flask --app main run -p 8000
```
and then making a POST request to your workflow endpoint. For each workflow run, a unique workflow run ID is returned:
```bash Terminal theme={"system"}
curl -X POST https://localhost:8000/api/workflow
# result: {"workflowRunId":"wfr_xxxxxx"}
```
See the [documentation on starting a workflow](/workflow/howto/start) for other ways you can start your workflow.
Using a local tunnel connects your endpoint to the production QStash, enabling you to view workflow logs in the Upstash Console.
## Step 3: Create a Workflow Endpoint
A workflow endpoint allows you to define a set of steps that, together, make up a workflow. Each step contains a piece of business logic that is automatically retried on failure, with easy monitoring via our visual workflow dashboard.
To define a workflow endpoint in a Flask project, create a `main.py` file that contains your workflow:
```python main.py theme={"system"}
from flask import Flask
from upstash_workflow.flask import Serve
app = Flask(__name__)
serve = Serve(app)
@serve.route("/api/workflow")
def workflow(context) -> None:
def _step1() -> None:
print("initial step ran")
context.run("initial-step", _step1)
def _step2() -> None:
print("second step ran")
context.run("second-step", _step2)
```
```python main.py theme={"system"}
from flask import Flask
import time
from upstash_workflow.flask import Serve
from upstash_workflow import WorkflowContext
app = Flask(__name__)
serve = Serve(app)
def some_work(input: str) -> str:
return f"processed '{input}'"
@serve.route("/sleep")
def sleep(context: WorkflowContext[str]) -> None:
input = context.request_payload
def _step1() -> str:
output = some_work(input)
print("step 1 input", input, "output", output)
return output
result1: str = context.run("step1", _step1)
context.sleep_until("sleep1", time.time() + 3)
def _step2() -> str:
output = some_work(result1)
print("step 2 input", result1, "output", output)
return output
result2: str = context.run("step2", _step2)
context.sleep("sleep2", 2)
def _step3() -> None:
output = some_work(result2)
print("step 3 input", result2, "output", output)
context.run("step3", _step3)
```
```python main.py theme={"system"}
from flask import Flask
from typing import Dict
from upstash_workflow.flask import Serve
from upstash_workflow import WorkflowContext, CallResponse
app = Flask(__name__)
serve = Serve(app)
def some_work(input: str) -> str:
return f"processed '{input}'"
@app.route("/get-data", methods=["POST"])
def get_data() -> Dict[str, str]:
return {"message": "get data response"}
@serve.route("/call")
def call(context: WorkflowContext[str]) -> None:
input = context.request_payload
def _step1() -> str:
output = some_work(input)
print("step 1 input", input, "output", output)
return output
result1: str = context.run("step1", _step1)
response: CallResponse[Dict[str, str]] = context.call(
"get-data",
url=f"{context.env.get('UPSTASH_WORKFLOW_URL', 'http://localhost:8000')}/get-data",
method="POST",
body={"message": result1},
)
def _step2() -> str:
output = some_work(response.body["message"])
print("step 2 input", response, "output", output)
return output
context.run("step2", _step2)
```
```python main.py theme={"system"}
from flask import Flask
from upstash_workflow.flask import Serve
from upstash_workflow import WorkflowContext
app = Flask(__name__)
serve = Serve(app)
def some_work(input: str) -> str:
return f"processed '{input}'"
@serve.route("/auth")
def auth(context: WorkflowContext[str]) -> None:
if context.headers.get("Authentication") != "Bearer secret_password":
print("Authentication failed.")
return
def _step1() -> str:
return "output 1"
context.run("step1", _step1)
def _step2() -> str:
return "output 2"
context.run("step2", _step2)
```
## Step 4: Run the Workflow Endpoint
Don't forget to source your environment file to set your environment variables:
```bash Terminal theme={"system"}
source .env
```
After setting your live URL as the environment variable or `base_url` option, trigger your workflow by first starting your Flask app:
```bash Terminal theme={"system"}
flask --app main run -p 8000
```
and then making a POST request to your workflow endpoint. For each workflow run, a unique workflow run ID is returned:
```bash Terminal theme={"system"}
curl -X POST https://localhost:8000/api/workflow
# result: {"workflowRunId":"wfr_xxxxxx"}
```
See the [documentation on starting a workflow](/workflow/howto/start) for other ways you can start your workflow.
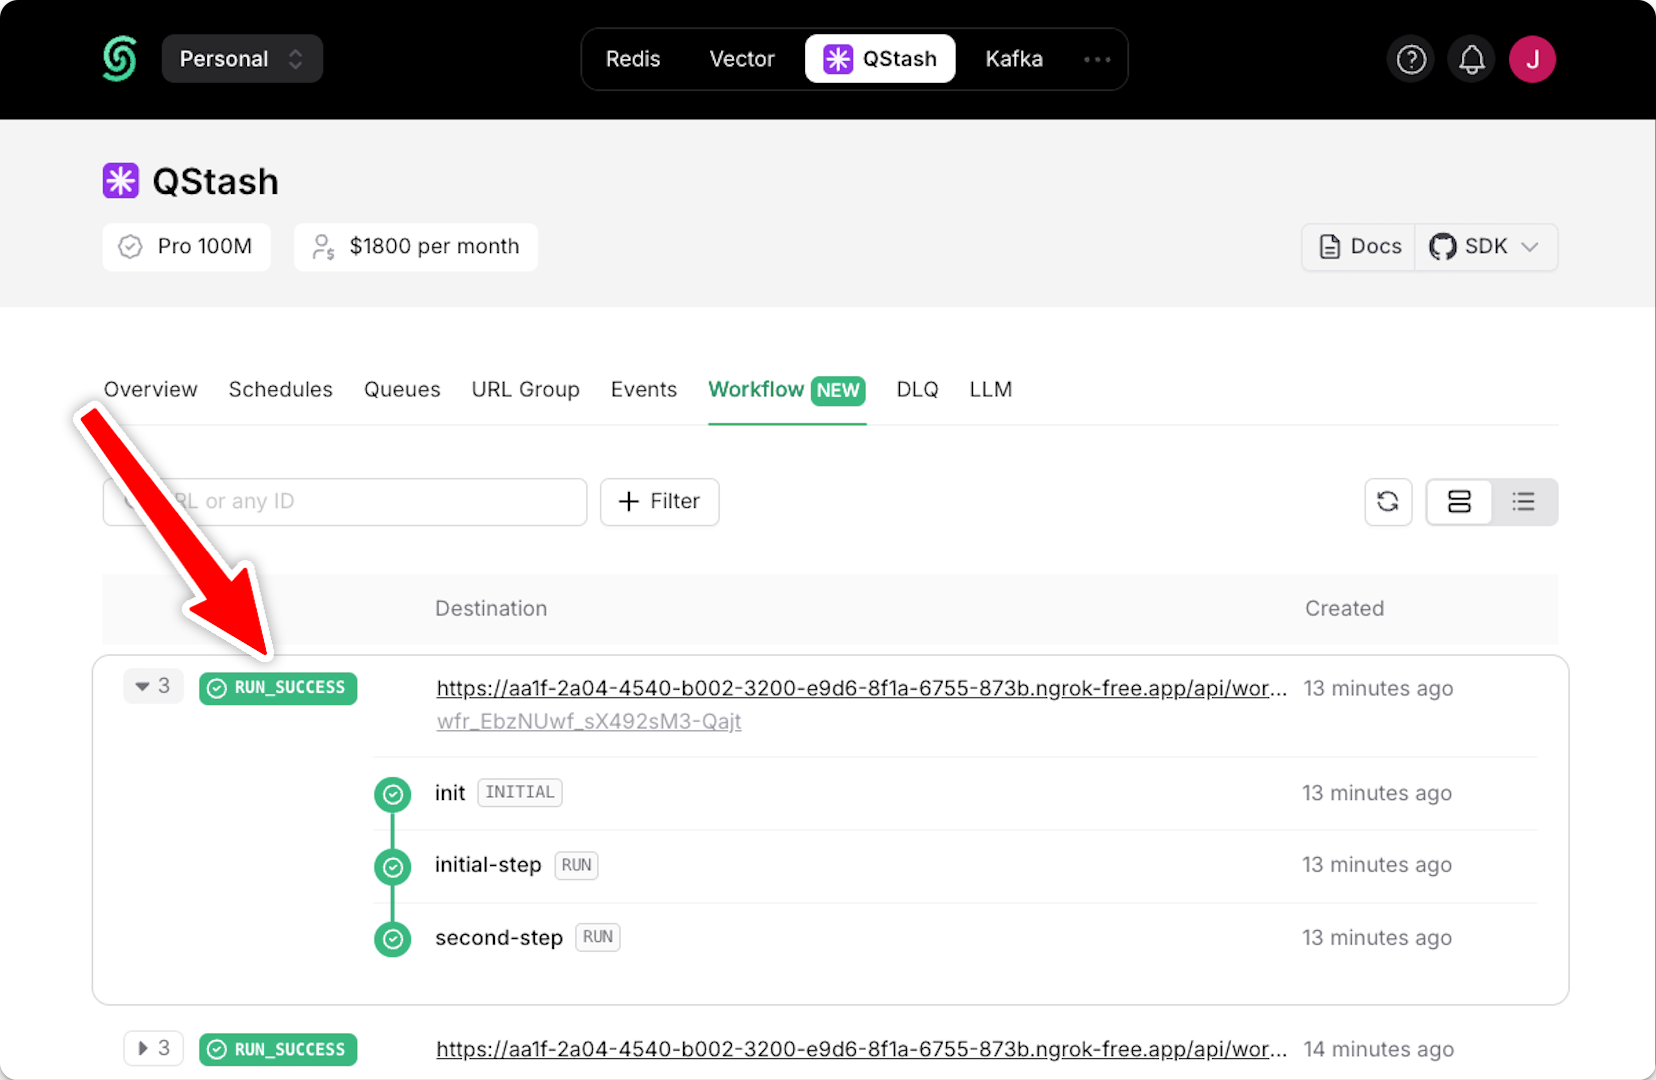
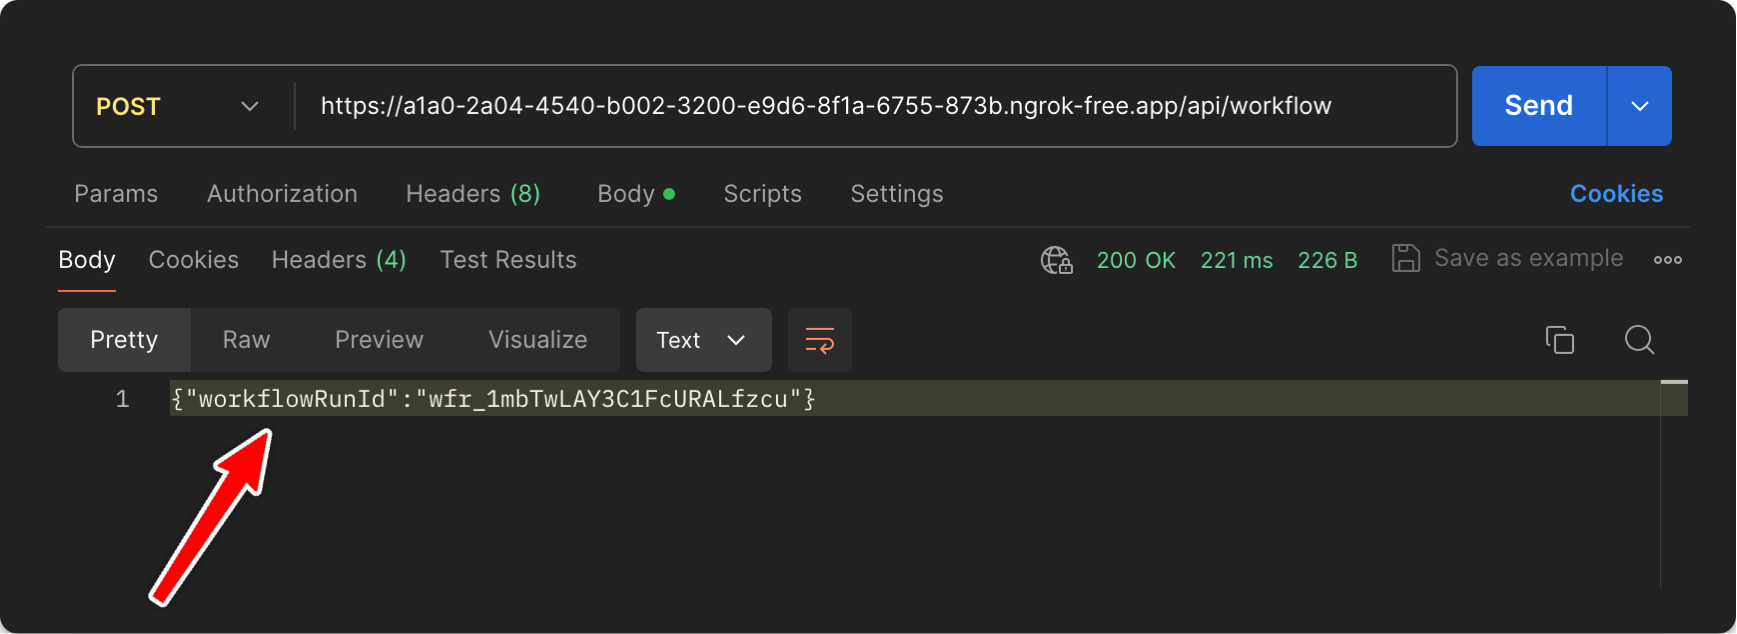 If you are using a local tunnel, you can use this ID to track the workflow run and see its status in your QStash workflow dashboard. All steps are listed with their statuses, headers, and body for a detailed overview of your workflow from start to finish. Click on a step to see its detailed logs.
 ## Next Steps
1. Learn how to protect your workflow endpoint from unauthorized access by [securing your workflow endpoint](/workflow/howto/security).
2. Explore our [the source code](https://github.com/upstash/workflow-py/tree/master/examples/flask) for a detailed, end-to-end example and best practices.
3. For setting up and testing your workflows in a local environment, check out our [local development guide](/workflow/howto/local-development/development-server).
## Next Steps
1. Learn how to protect your workflow endpoint from unauthorized access by [securing your workflow endpoint](/workflow/howto/security).
2. Explore our [the source code](https://github.com/upstash/workflow-py/tree/master/examples/flask) for a detailed, end-to-end example and best practices.
3. For setting up and testing your workflows in a local environment, check out our [local development guide](/workflow/howto/local-development/development-server).