> ## Documentation Index
> Fetch the complete documentation index at: https://upstash.com/docs/llms.txt
> Use this file to discover all available pages before exploring further.
# Integration with Third Parties & Partnerships
 ## Introduction
In this guideline we will outline the steps to integrate Upstash into your platform (GUI or Web App) and allow your users to create and manage Upstash databases without leaving your interfaces. We will explain how to use OAuth2.0 as the underlying foundation to enable this access seamlessly.
If your product or service offering utilizes Redis, Vector or QStash or if there is a common use case that your end users enable by leveraging these database resources, we invite you to be a partner with us. By integrating Upstash into your platform, you can offer a more complete package for your customers and become a one stop shop. This will also position yourself at the forefront of innovative cloud computing trends such as serverless and expand your customer base.
This is the most commonly used partnership integration model that can be easily implemented by following this guideline. Recently [Cloudflare workers integration](https://blog.cloudflare.com/cloudflare-workers-database-integration-with-upstash/) is implemented through this methodology. For any further questions or partnership discussions please send us an email at [partnerships@upstash.com](mailto:partnerships@upstash.com)
Before starting development to integrate Upstash into your product, please
send an email to [partnerships@upstash.com](mailto:partnerships@upstash.com) for further assistance and guidance.
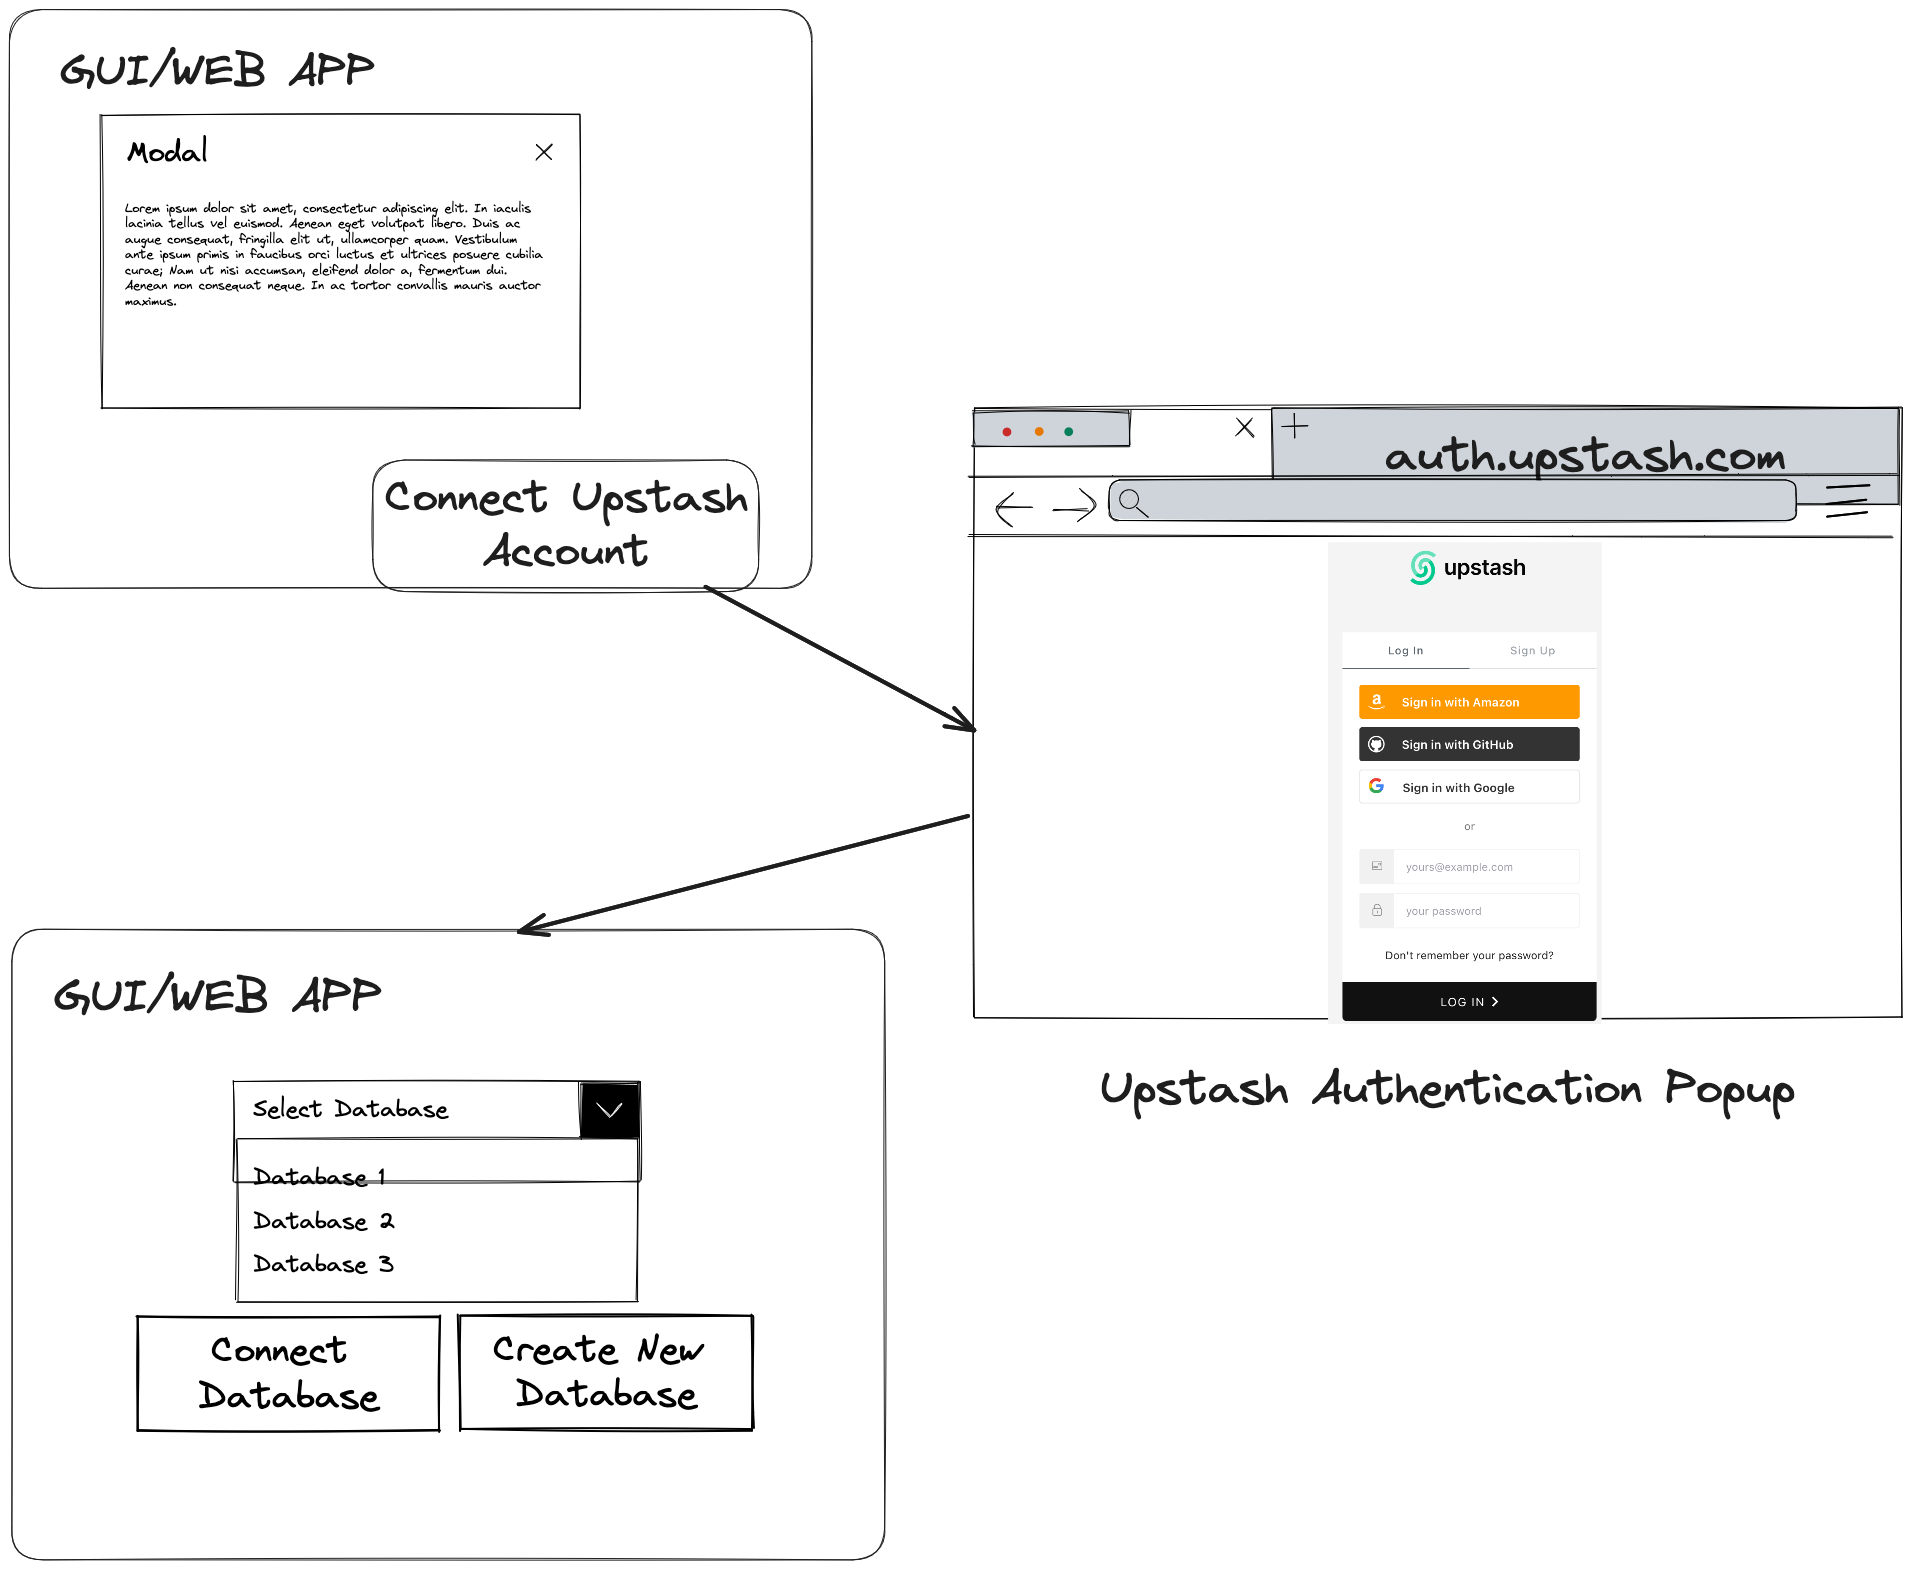
**General Flow (High level user flow)**
1. User clicks **`Connect Upstash`** button on your platform’s surface (GUI, Web App)
2. This initiates the OAuth 2.0 flow, which opens a new browser page displaying the **`Upstash Login Page`**.
3. If this is an existing user, user logins with their Upstash credentials otherwise they can directly sign up for a new Upstash account.
4. Browser window redirects to **`Your account has been connected`** page and authentication window automatically closes.
5. After the user returns to your interface, they see their Upstash Account is now connected.
## Technical Design (SPA - Regular Web Application)
1. Users click `Connect Upstash` button from Web App.
2. Web App initiate Upstash OAuth 2.0 flow. Web App can use
[Auth0 native libraries](https://auth0.com/docs/libraries).
Please reach [partnerships@upstash.com](mailto:partnerships@upstash.com) to receive client id and callback url.
3. After user returns from OAuth 2.0 flow then web app will have JWT token. Web
App can generate Developer Api key:
```bash theme={"system"}
curl -XPOST https://api.upstash.com/apikey \
-H "Authorization: Bearer JWT_KEY" \
-H "Content-Type: application/json" \
-d '{ "name": "APPNAME_API_KEY_TIMESTAMP" }'
```
4. Web App need to save Developer Api Key to the backend.
## Technical Design ( GUI Apps )
## Introduction
In this guideline we will outline the steps to integrate Upstash into your platform (GUI or Web App) and allow your users to create and manage Upstash databases without leaving your interfaces. We will explain how to use OAuth2.0 as the underlying foundation to enable this access seamlessly.
If your product or service offering utilizes Redis, Vector or QStash or if there is a common use case that your end users enable by leveraging these database resources, we invite you to be a partner with us. By integrating Upstash into your platform, you can offer a more complete package for your customers and become a one stop shop. This will also position yourself at the forefront of innovative cloud computing trends such as serverless and expand your customer base.
This is the most commonly used partnership integration model that can be easily implemented by following this guideline. Recently [Cloudflare workers integration](https://blog.cloudflare.com/cloudflare-workers-database-integration-with-upstash/) is implemented through this methodology. For any further questions or partnership discussions please send us an email at [partnerships@upstash.com](mailto:partnerships@upstash.com)
Before starting development to integrate Upstash into your product, please
send an email to [partnerships@upstash.com](mailto:partnerships@upstash.com) for further assistance and guidance.
**General Flow (High level user flow)**
1. User clicks **`Connect Upstash`** button on your platform’s surface (GUI, Web App)
2. This initiates the OAuth 2.0 flow, which opens a new browser page displaying the **`Upstash Login Page`**.
3. If this is an existing user, user logins with their Upstash credentials otherwise they can directly sign up for a new Upstash account.
4. Browser window redirects to **`Your account has been connected`** page and authentication window automatically closes.
5. After the user returns to your interface, they see their Upstash Account is now connected.
## Technical Design (SPA - Regular Web Application)
1. Users click `Connect Upstash` button from Web App.
2. Web App initiate Upstash OAuth 2.0 flow. Web App can use
[Auth0 native libraries](https://auth0.com/docs/libraries).
Please reach [partnerships@upstash.com](mailto:partnerships@upstash.com) to receive client id and callback url.
3. After user returns from OAuth 2.0 flow then web app will have JWT token. Web
App can generate Developer Api key:
```bash theme={"system"}
curl -XPOST https://api.upstash.com/apikey \
-H "Authorization: Bearer JWT_KEY" \
-H "Content-Type: application/json" \
-d '{ "name": "APPNAME_API_KEY_TIMESTAMP" }'
```
4. Web App need to save Developer Api Key to the backend.
## Technical Design ( GUI Apps )
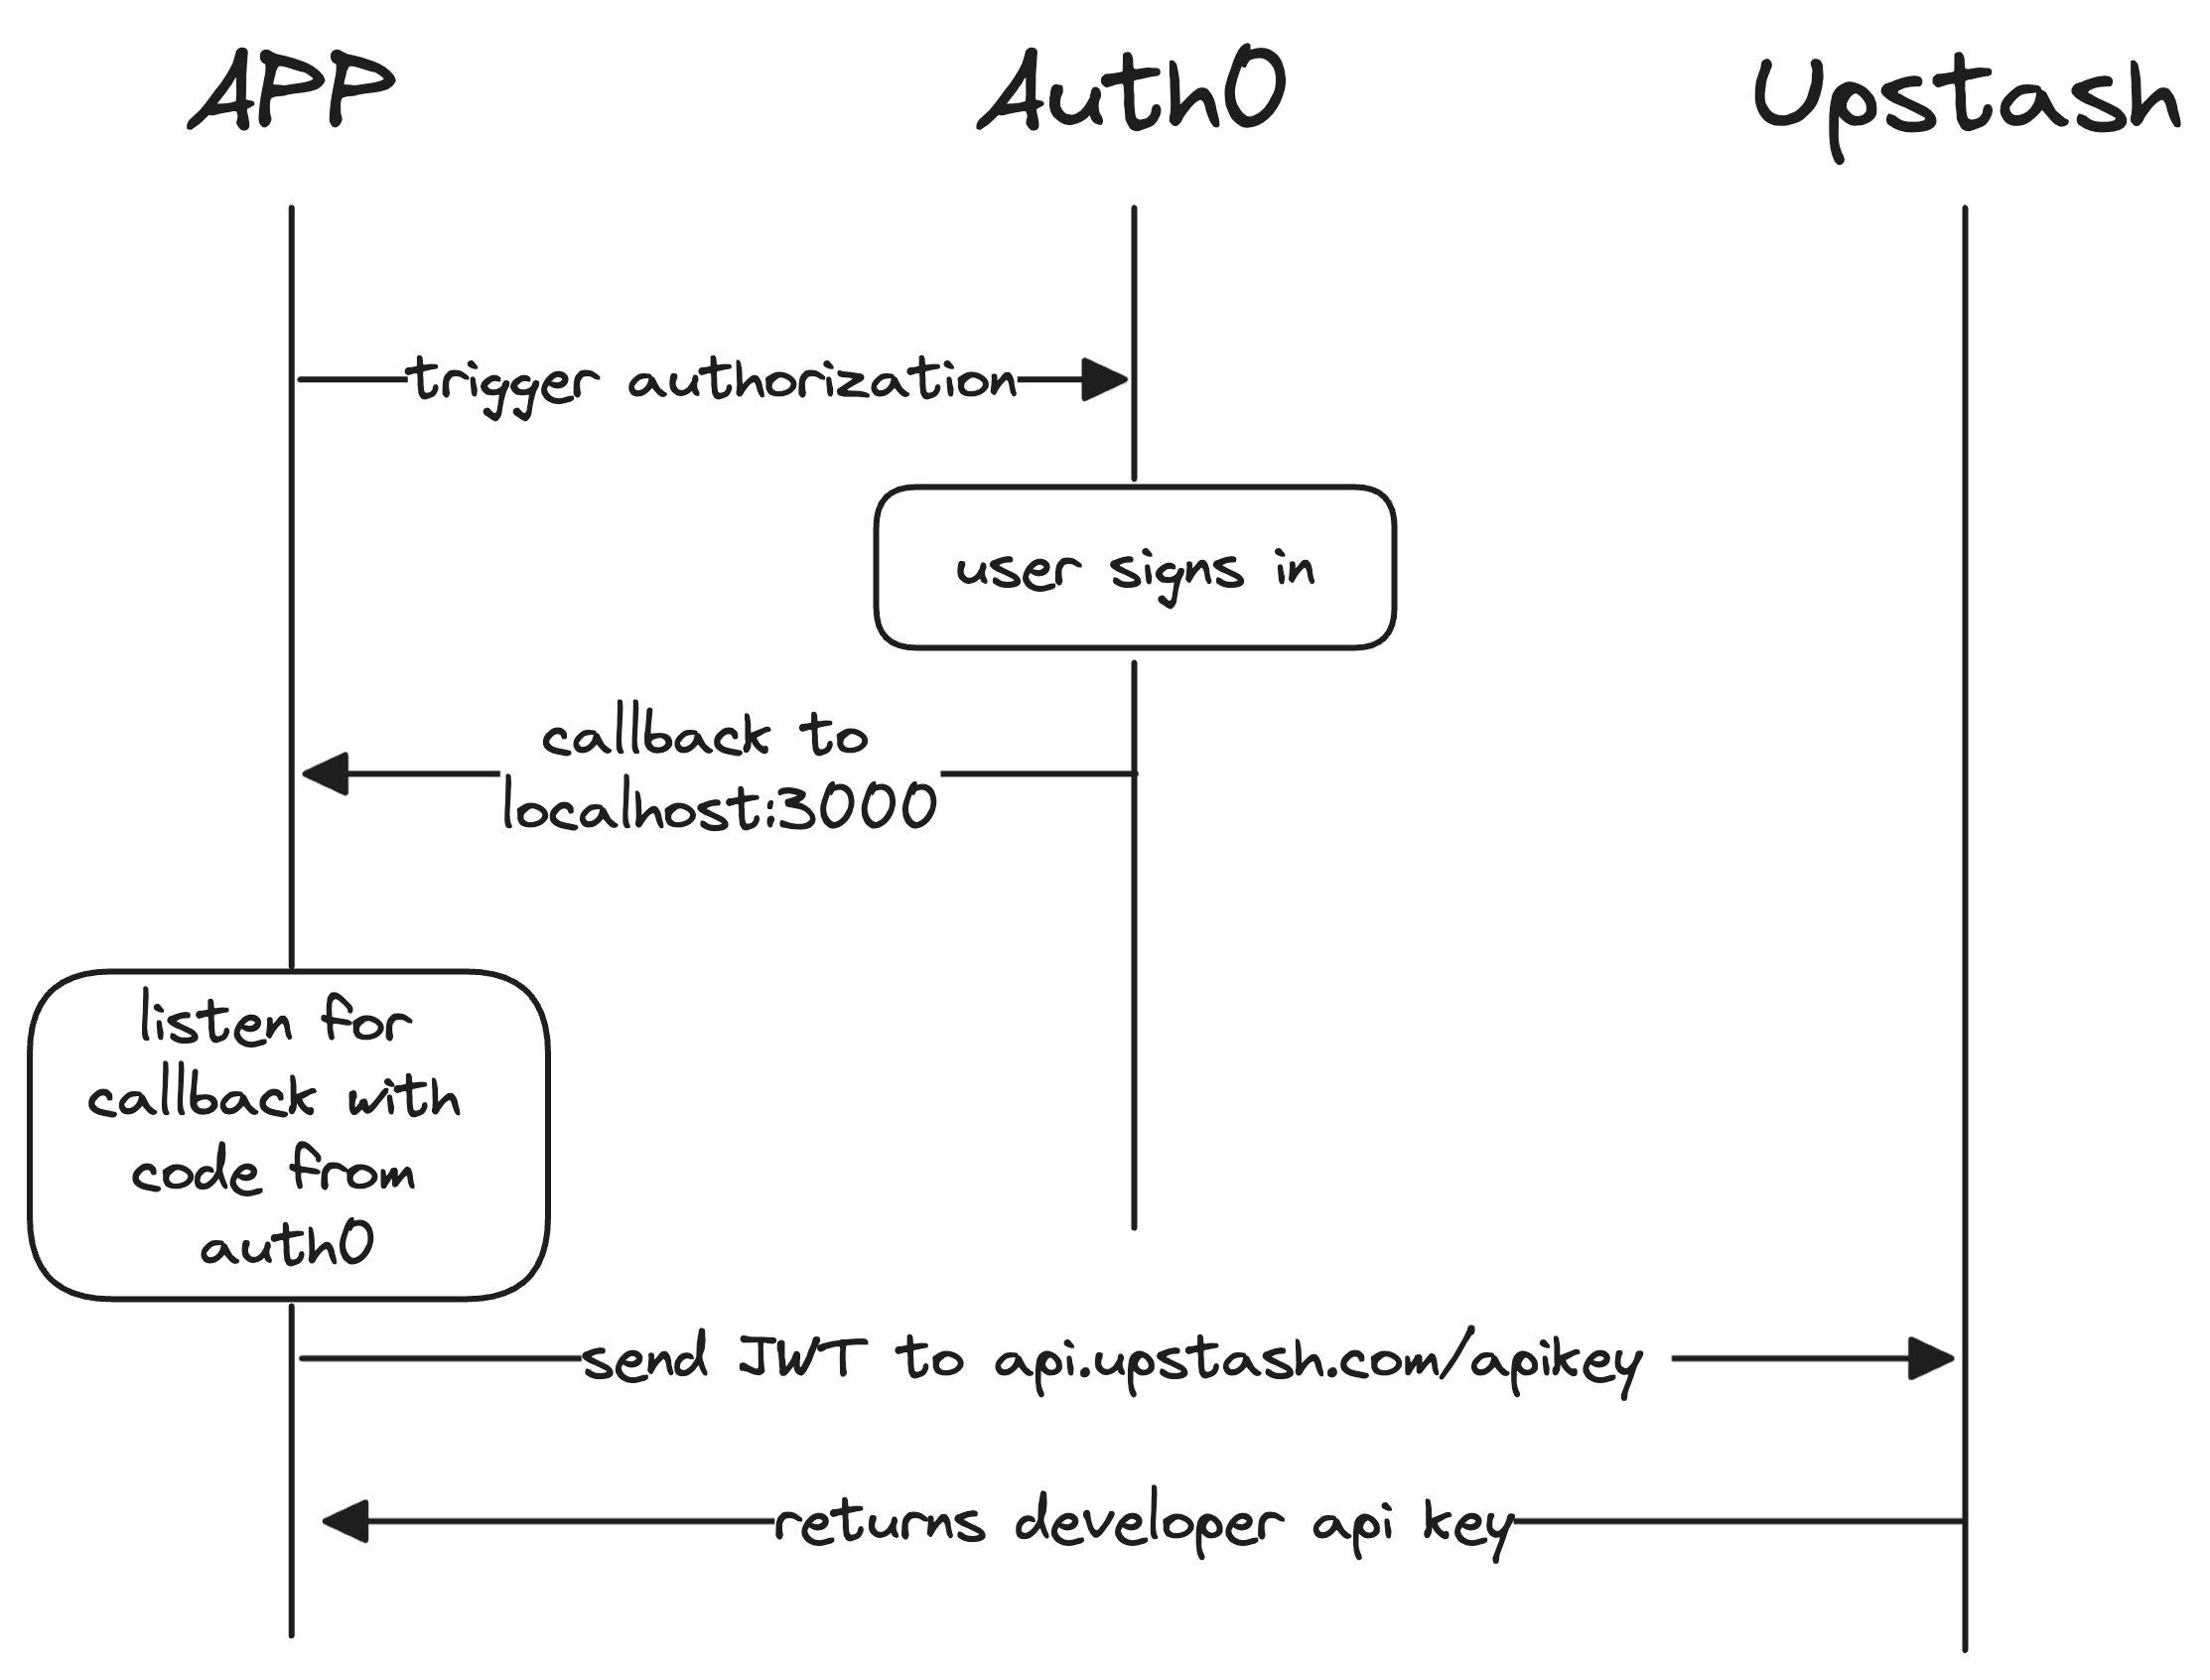 1. User clicks **`Connect Upstash`** button from web app.
2. Web app initiates Upstash OAuth 2.0 flow and it can use **[Auth0 native libraries](https://auth0.com/docs/libraries)**.
3. App will open new browser:
```
https://auth.upstash.com/authorize?response_type=code&audience=upstash-api&scope=offline_access&client_id=XXXXXXXXXX&redirect_uri=http%3A%2F%2Flocalhost:3000
```
Please reach [partnerships@upstash.com](mailto:partnerships@upstash.com) to receive client id.
4. After user authenticated Auth0 will redirect user to
`localhost:3000/?code=XXXXXX`
5. APP can return some nice html response when Auth0 returns to `localhost:3000`
6. After getting `code` parameter from the URL query, GUI App will make http
call to the Auth0 code exchange api. Example CURL request
```bash theme={"system"}
curl -XPOST 'https://auth.upstash.com/oauth/token' \
--header 'content-type: application/x-www-form-urlencoded' \
--data 'grant_type=authorization_code --data audience=upstash-api' \
--data 'client_id=XXXXXXXXXXX' \
--data 'code=XXXXXXXXXXXX' \
--data 'redirect_uri=localhost:3000'
```
Response:
```json theme={"system"}
{
"access_token": "XXXXXXXXXX",
"refresh_token": "XXXXXXXXXXX",
"scope": "offline_access",
"expires_in": 172800,
"token_type": "Bearer"
}
```
7. After 6th Step the response will include `access_token`, it has 3 days TTL.
GUI App will call Upstash API to get a developer api key:
```bash theme={"system"}
curl https://api.upstash.com/apikey -H "Authorization: Bearer JWT_KEY" -d '{ "name" : "APPNAME_API_KEY_TIMESTAMP" }'
```
8. GUI App will save Developer Api key locally. Then GUI App can call any
Upstash Developer API [developer.upstash.com/](https://developer.upstash.com/)
## Managing Resources
After obtaining Upstash Developer Api key, your platform surface (web or GUI) can call Upstash API. For example **[Create Database](https://developer.upstash.com/#create-database-global)**, **[List Database](https://developer.upstash.com/#list-databases)**
In this flow, you can ask users for region information and name of the database then can call Create Database API to complete the task
Example CURL request:
```bash theme={"system"}
curl -X POST \
https://api.upstash.com/v2/redis/database \
-u 'EMAIL:API_KEY' \
-d '{"name":"myredis", "region":"global", "primary_region":"us-east-1", "read_regions":["us-west-1","us-west-2"], "tls": true}'
```
1. User clicks **`Connect Upstash`** button from web app.
2. Web app initiates Upstash OAuth 2.0 flow and it can use **[Auth0 native libraries](https://auth0.com/docs/libraries)**.
3. App will open new browser:
```
https://auth.upstash.com/authorize?response_type=code&audience=upstash-api&scope=offline_access&client_id=XXXXXXXXXX&redirect_uri=http%3A%2F%2Flocalhost:3000
```
Please reach [partnerships@upstash.com](mailto:partnerships@upstash.com) to receive client id.
4. After user authenticated Auth0 will redirect user to
`localhost:3000/?code=XXXXXX`
5. APP can return some nice html response when Auth0 returns to `localhost:3000`
6. After getting `code` parameter from the URL query, GUI App will make http
call to the Auth0 code exchange api. Example CURL request
```bash theme={"system"}
curl -XPOST 'https://auth.upstash.com/oauth/token' \
--header 'content-type: application/x-www-form-urlencoded' \
--data 'grant_type=authorization_code --data audience=upstash-api' \
--data 'client_id=XXXXXXXXXXX' \
--data 'code=XXXXXXXXXXXX' \
--data 'redirect_uri=localhost:3000'
```
Response:
```json theme={"system"}
{
"access_token": "XXXXXXXXXX",
"refresh_token": "XXXXXXXXXXX",
"scope": "offline_access",
"expires_in": 172800,
"token_type": "Bearer"
}
```
7. After 6th Step the response will include `access_token`, it has 3 days TTL.
GUI App will call Upstash API to get a developer api key:
```bash theme={"system"}
curl https://api.upstash.com/apikey -H "Authorization: Bearer JWT_KEY" -d '{ "name" : "APPNAME_API_KEY_TIMESTAMP" }'
```
8. GUI App will save Developer Api key locally. Then GUI App can call any
Upstash Developer API [developer.upstash.com/](https://developer.upstash.com/)
## Managing Resources
After obtaining Upstash Developer Api key, your platform surface (web or GUI) can call Upstash API. For example **[Create Database](https://developer.upstash.com/#create-database-global)**, **[List Database](https://developer.upstash.com/#list-databases)**
In this flow, you can ask users for region information and name of the database then can call Create Database API to complete the task
Example CURL request:
```bash theme={"system"}
curl -X POST \
https://api.upstash.com/v2/redis/database \
-u 'EMAIL:API_KEY' \
-d '{"name":"myredis", "region":"global", "primary_region":"us-east-1", "read_regions":["us-west-1","us-west-2"], "tls": true}'
```