> ## Documentation Index
> Fetch the complete documentation index at: https://upstash.com/docs/llms.txt
> Use this file to discover all available pages before exploring further.
# AWS Lambda (Python)
[Source Code](https://github.com/upstash/qstash-examples/tree/main/aws-lambda/python-example)
This is a step by step guide on how to receive webhooks from QStash in your
Lambda function on AWS.
### 1. Create a new project
Let's create a new folder called `aws-lambda` and initialize a new project by
creating `lambda_function.py` This example uses Makefile, but the scripts can
also be written for `Pipenv`.
```bash theme={"system"}
mkdir aws-lambda
cd aws-lambda
touch lambda_function.py
```
### 2. Dependencies
We are using `PyJwt` for decoding the JWT token in our code. We will install the
package in the zipping stage.
### 3. Creating the handler function
In this example we will show how to receive a webhook from QStash and verify the
signature.
First, let's import everything we need:
```python theme={"system"}
import json
import os
import hmac
import hashlib
import base64
import time
import jwt
```
Now, we create the handler function. In the handler we will prepare all
necessary variables that we need for verification. This includes the signature,
the signing keys and the url of the lambda function. Then we try to verify the
request using the current signing key and if that fails we will try the next
one. If the signature could be verified, we can start processing the request.
```python theme={"system"}
def lambda_handler(event, context):
# parse the inputs
current_signing_key = os.environ['QSTASH_CURRENT_SIGNING_KEY']
next_signing_key = os.environ['QSTASH_NEXT_SIGNING_KEY']
headers = event['headers']
signature = headers['upstash-signature']
url = "https://{}{}".format(event["requestContext"]["domainName"], event["rawPath"])
body = None
if 'body' in event:
body = event['body']
# check verification now
try:
verify(signature, current_signing_key, body, url)
except Exception as e:
print("Failed to verify signature with current signing key:", e)
try:
verify(signature, next_signing_key, body, url)
except Exception as e2:
return {
"statusCode": 400,
"body": json.dumps({
"error": str(e2),
}),
}
# Your logic here...
return {
"statusCode": 200,
"body": json.dumps({
"message": "ok",
}),
}
```
The `verify` function will handle the actual verification of the signature. The
signature itself is actually a [JWT](https://jwt.io) and includes claims about
the request. See [here](/qstash/features/security#claims).
```python theme={"system"}
# @param jwt_token - The content of the `upstash-signature` header
# @param signing_key - The signing key to use to verify the signature (Get it from Upstash Console)
# @param body - The raw body of the request
# @param url - The public URL of the lambda function
def verify(jwt_token, signing_key, body, url):
split = jwt_token.split(".")
if len(split) != 3:
raise Exception("Invalid JWT.")
header, payload, signature = split
message = header + '.' + payload
generated_signature = base64.urlsafe_b64encode(hmac.new(bytes(signing_key, 'utf-8'), bytes(message, 'utf-8'), digestmod=hashlib.sha256).digest()).decode()
if generated_signature != signature and signature + "=" != generated_signature :
raise Exception("Invalid JWT signature.")
decoded = jwt.decode(jwt_token, options={"verify_signature": False})
sub = decoded['sub']
iss = decoded['iss']
exp = decoded['exp']
nbf = decoded['nbf']
decoded_body = decoded['body']
if iss != "Upstash":
raise Exception("Invalid issuer: {}".format(iss))
if sub.rstrip("/") != url.rstrip("/"):
raise Exception("Invalid subject: {}".format(sub))
now = time.time()
if now > exp:
raise Exception("Token has expired.")
if now < nbf:
raise Exception("Token is not yet valid.")
if body != None:
while decoded_body[-1] == "=":
decoded_body = decoded_body[:-1]
m = hashlib.sha256()
m.update(bytes(body, 'utf-8'))
m = m.digest()
generated_hash = base64.urlsafe_b64encode(m).decode()
if generated_hash != decoded_body and generated_hash != decoded_body + "=" :
raise Exception("Body hash doesn't match.")
```
You can find the complete file
[here](https://github.com/upstash/qstash-examples/tree/main/aws-lambda/python-example/lambda_function.py).
That's it, now we can create the function on AWS and test it.
### 4. Create a Lambda function on AWS
Create a new Lambda function from scratch by going to the
[AWS console](https://us-east-1.console.aws.amazon.com/lambda/home?region=us-east-1#/create/function).
(Make sure you select your desired region)
Give it a name and select `Python 3.8` as runtime, then create the function.
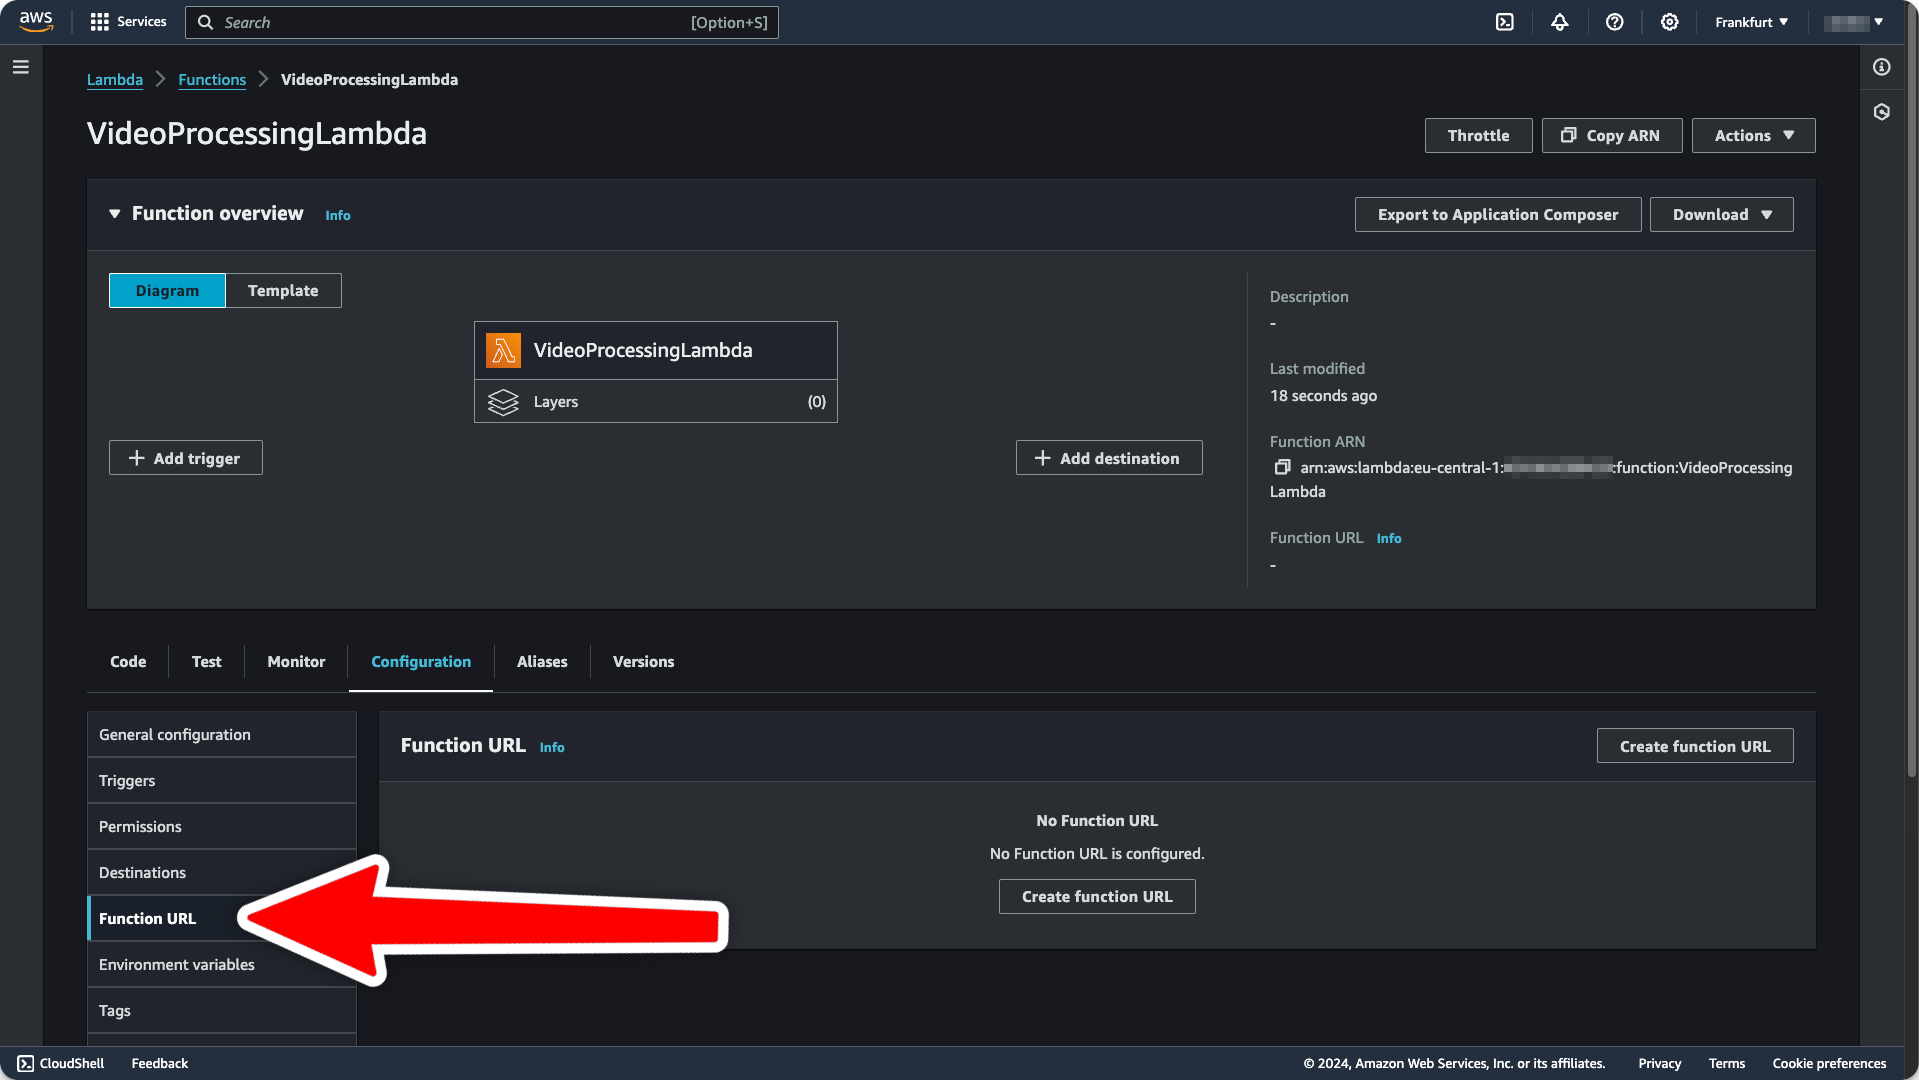
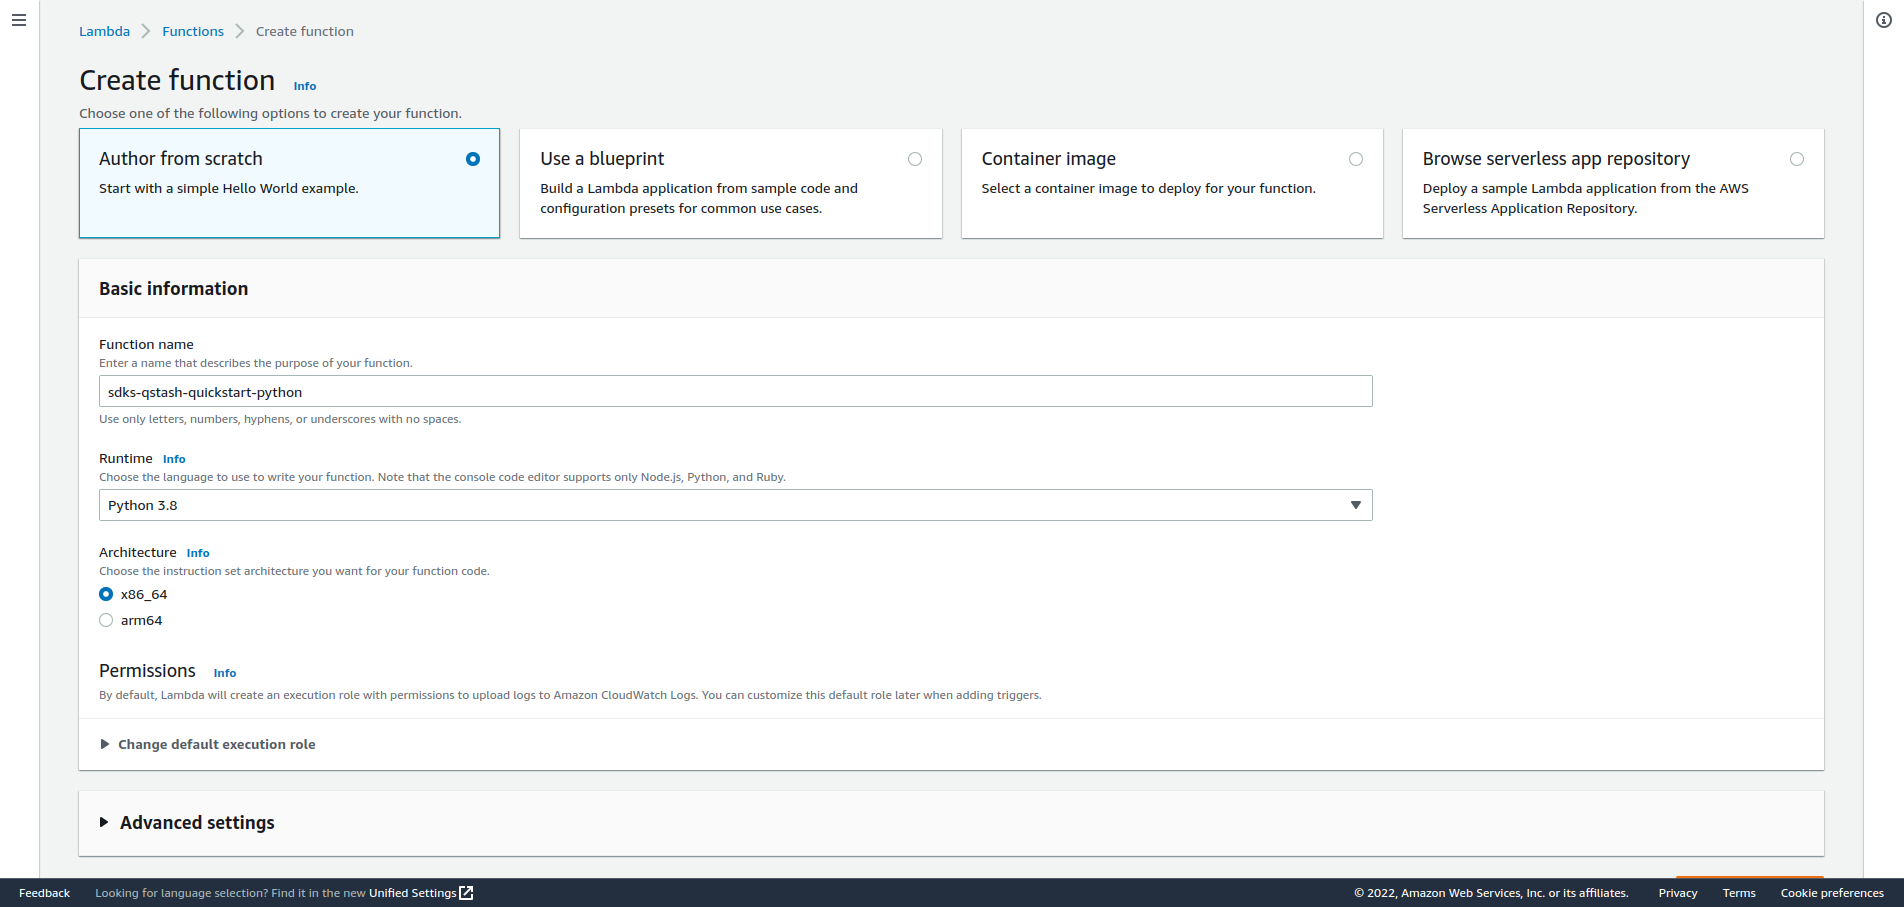 Afterwards we will add a public URL to this lambda by going to the
`Configuration` tab:
Afterwards we will add a public URL to this lambda by going to the
`Configuration` tab:
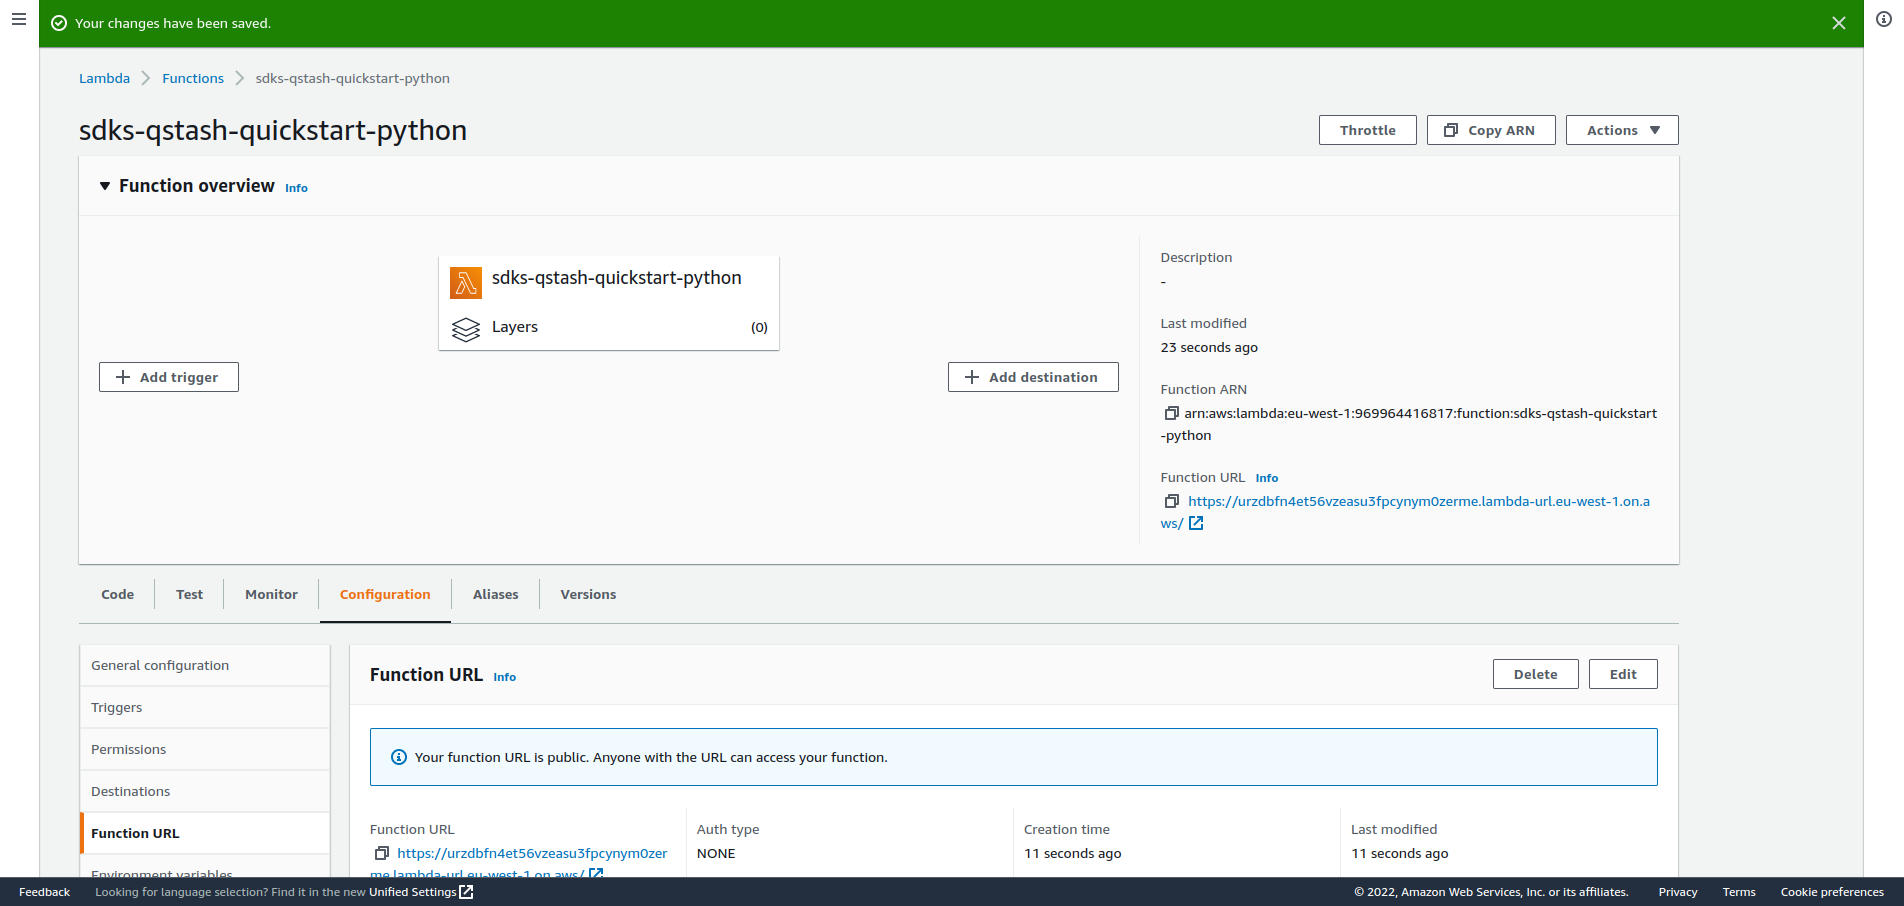
 Select `Auth Type = NONE` because we are handling authentication ourselves.
After creating the url, you should see it on the right side of the overview of
your function:
Select `Auth Type = NONE` because we are handling authentication ourselves.
After creating the url, you should see it on the right side of the overview of
your function:
 ### 5. Set Environment Variables
Get your current and next signing key from the
[Upstash Console](https://console.upstash.com/qstash)
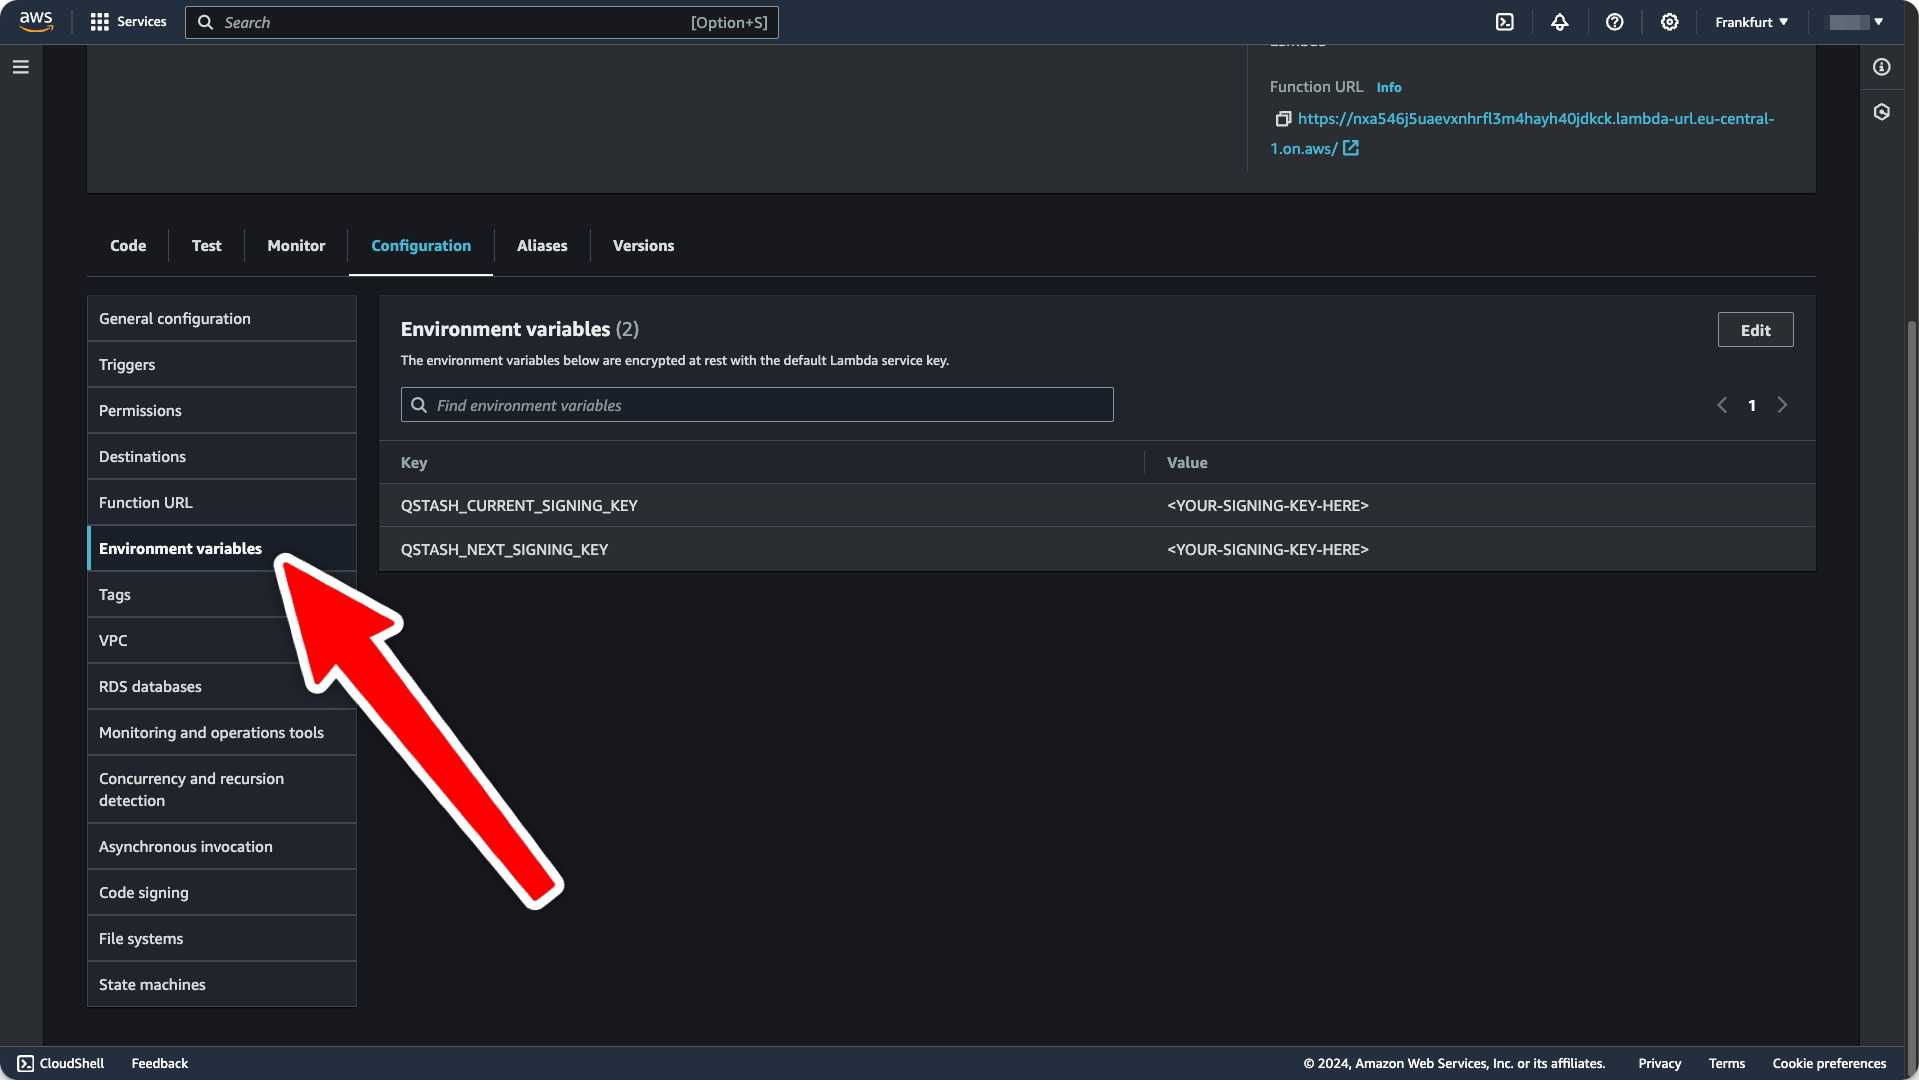
On the same `Configuration` tab from earlier, we will now set the required
environment variables:
### 5. Set Environment Variables
Get your current and next signing key from the
[Upstash Console](https://console.upstash.com/qstash)
On the same `Configuration` tab from earlier, we will now set the required
environment variables:
 ### 6. Deploy your Lambda function
We need to bundle our code and zip it to deploy it to AWS.
Add the following script to your `Makefile` file (or corresponding pipenv
script):
```yaml theme={"system"}
zip:
rm -rf dist
pip3 install --target ./dist pyjwt
cp lambda_function.py ./dist/lambda_function.py
cd dist && zip -r lambda.zip .
mv ./dist/lambda.zip ./
```
When calling `make zip` this will install PyJwt and zip the code.
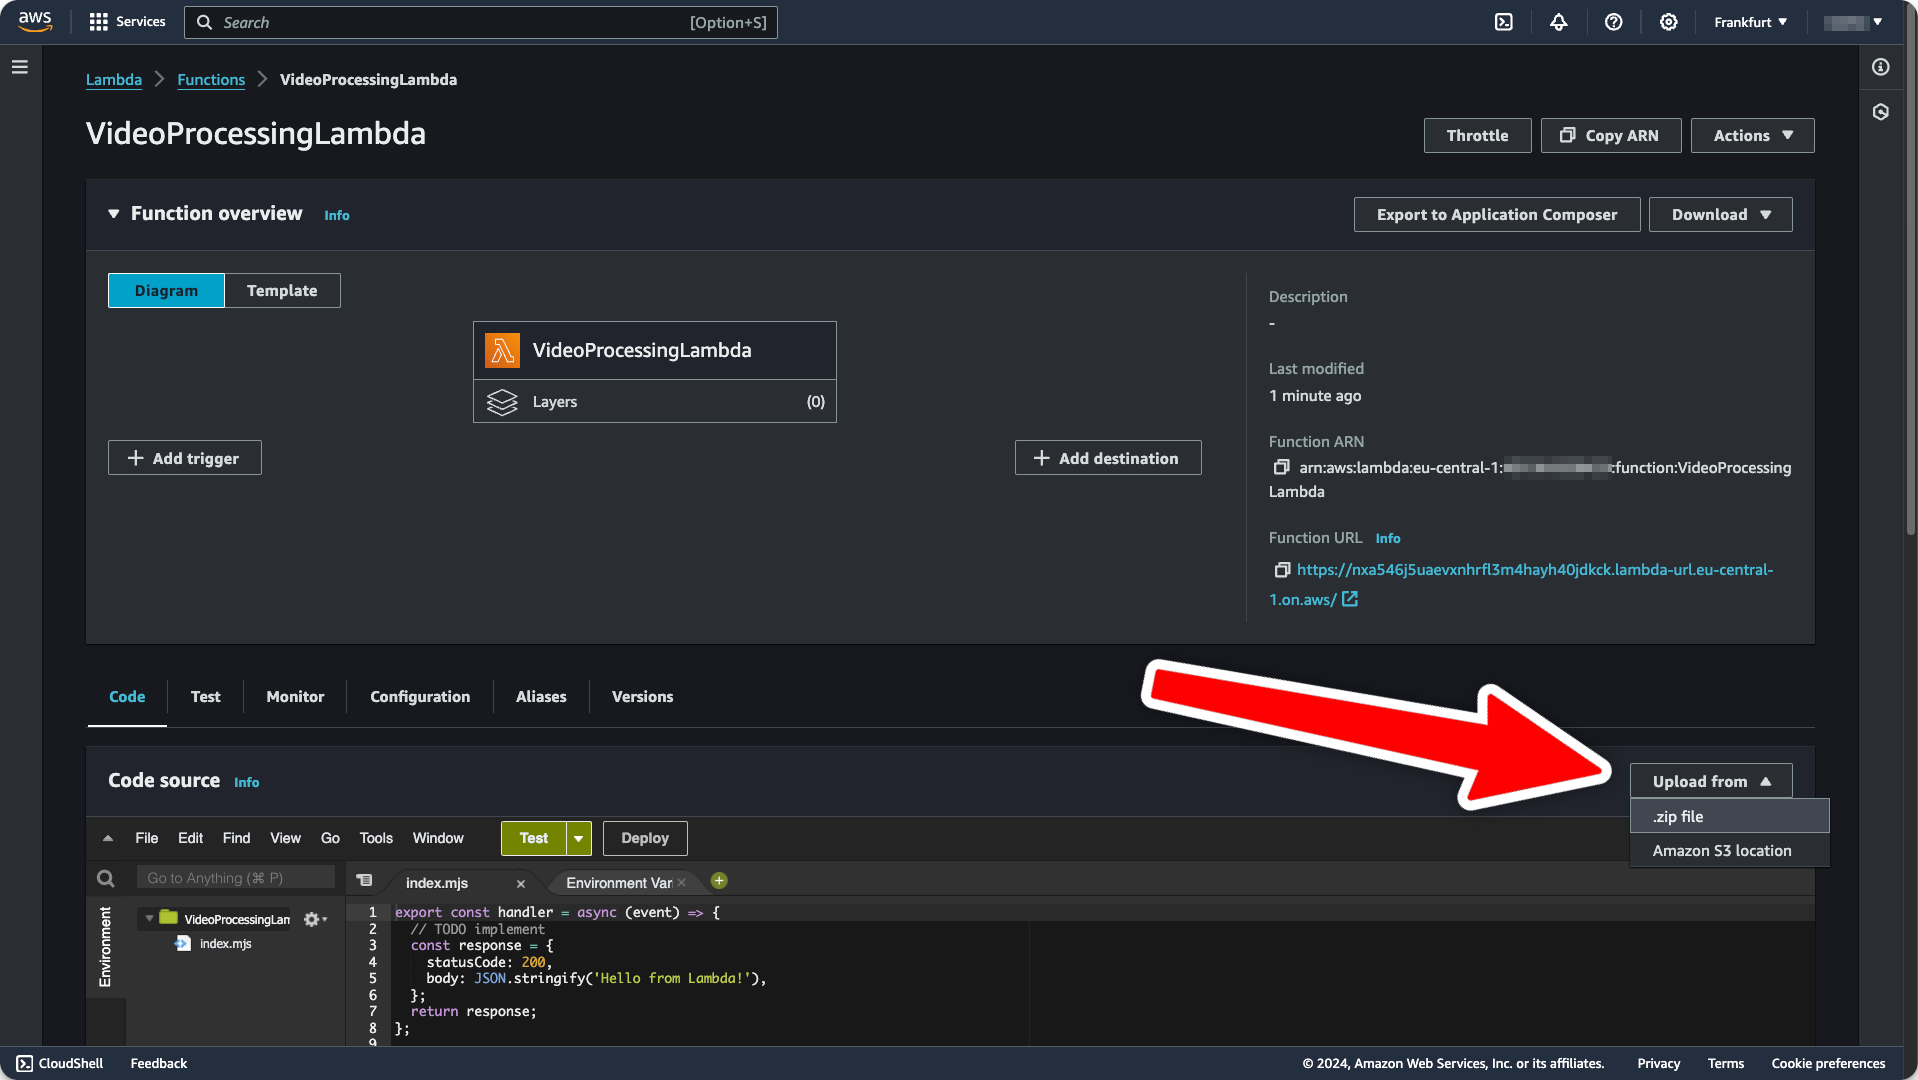
Afterwards we can click the `Upload from` button in the lower right corner and
deploy the code to AWS. Select `lambda.zip` as upload file.
### 6. Deploy your Lambda function
We need to bundle our code and zip it to deploy it to AWS.
Add the following script to your `Makefile` file (or corresponding pipenv
script):
```yaml theme={"system"}
zip:
rm -rf dist
pip3 install --target ./dist pyjwt
cp lambda_function.py ./dist/lambda_function.py
cd dist && zip -r lambda.zip .
mv ./dist/lambda.zip ./
```
When calling `make zip` this will install PyJwt and zip the code.
Afterwards we can click the `Upload from` button in the lower right corner and
deploy the code to AWS. Select `lambda.zip` as upload file.
 ### 7. Publish a message
Open a different terminal and publish a message to QStash. Note the destination
url is the URL from step 4.
```bash theme={"system"}
curl --request POST "https://qstash.upstash.io/v2/publish/https://urzdbfn4et56vzeasu3fpcynym0zerme.lambda-url.eu-west-1.on.aws" \
-H "Authorization: Bearer " \
-H "Content-Type: application/json" \
-d "{ \"hello\": \"world\"}"
```
## Next Steps
That's it, you have successfully created a secure AWS lambda function, that
receives and verifies incoming webhooks from qstash.
Learn more about publishing a message to qstash [here](/qstash/howto/publishing)
### 7. Publish a message
Open a different terminal and publish a message to QStash. Note the destination
url is the URL from step 4.
```bash theme={"system"}
curl --request POST "https://qstash.upstash.io/v2/publish/https://urzdbfn4et56vzeasu3fpcynym0zerme.lambda-url.eu-west-1.on.aws" \
-H "Authorization: Bearer " \
-H "Content-Type: application/json" \
-d "{ \"hello\": \"world\"}"
```
## Next Steps
That's it, you have successfully created a secure AWS lambda function, that
receives and verifies incoming webhooks from qstash.
Learn more about publishing a message to qstash [here](/qstash/howto/publishing)