> ## Documentation Index
> Fetch the complete documentation index at: https://upstash.com/docs/llms.txt
> Use this file to discover all available pages before exploring further.
# Background Jobs
## When do you need background jobs
Background jobs are essential for executing tasks that are too time-consuming to run in the
main execution thread without affecting the user experience.
These tasks might include data processing, sending batch emails, performing scheduled maintenance,
or any other operations that are not immediately required to respond to user requests.
Utilizing background jobs allows your application to remain responsive and scalable, handling more requests simultaneously by offloading
heavy lifting to background processes.
In Serverless frameworks, your hosting provider will likely have a limit for how long each task can last. Try searching
for the maximum execution time for your hosting provider to find out more.
## How to use QStash for background jobs
QStash provides a simple and efficient way to run background jobs, you can understand it as a 2 step process:
1. **Public API** Create a public API endpoint within your application. The endpoint should contain the logic for the background job.
QStash requires a public endpoint to trigger background jobs, which means it cannot directly access localhost APIs.
To get around this, you have two options:
* Run QStash [development server](/qstash/howto/local-development) locally
* Set up a [local tunnel](/qstash/howto/local-tunnel) for your API
2. **QStash Request** Invoke QStash to start/schedule the execution of the API endpoint.
Here's what this looks like in a simple Next.js application:
```tsx app/page.tsx theme={"system"}
"use client"
export default function Home() {
async function handleClick() {
// Send a request to our server to start the background job.
// For proper error handling, refer to the quick start.
// Note: This can also be a server action instead of a route handler
await fetch("/api/start-email-job", {
method: "POST",
body: JSON.stringify({
users: ["a@gmail.com", "b@gmail.com", "c.gmail.com"]
}),
})
}
return (
);
}
```
```typescript app/api/start-email-job/route.ts theme={"system"}
import { Client } from "@upstash/qstash";
const qstashClient = new Client({
token: "YOUR_TOKEN",
});
export async function POST(request: Request) {
const body = await request.json();
const users: string[] = body.users;
// If you know the public URL of the email API, you can use it directly
const rootDomain = request.url.split('/').slice(0, 3).join('/');
const emailAPIURL = `${rootDomain}/api/send-email`; // ie: https://yourapp.com/api/send-email
// Tell QStash to start the background job.
// For proper error handling, refer to the quick start.
await qstashClient.publishJSON({
url: emailAPIURL,
body: {
users
}
});
return new Response("Job started", { status: 200 });
}
```
```typescript app/api/send-email/route.ts theme={"system"}
// This is a public API endpoint that will be invoked by QStash.
// It contains the logic for the background job and may take a long time to execute.
import { sendEmail } from "your-email-library";
export async function POST(request: Request) {
const body = await request.json();
const users: string[] = body.users;
// Send emails to the users
for (const user of users) {
await sendEmail(user);
}
return new Response("Job started", { status: 200 });
}
```
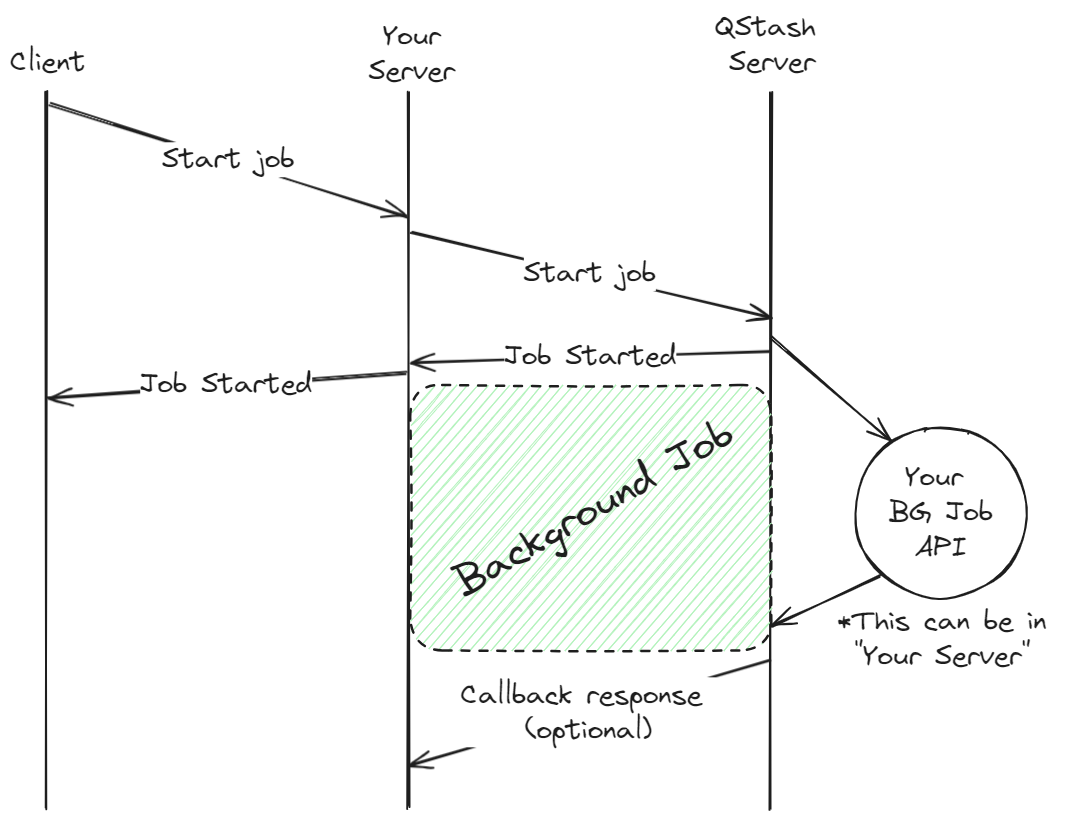
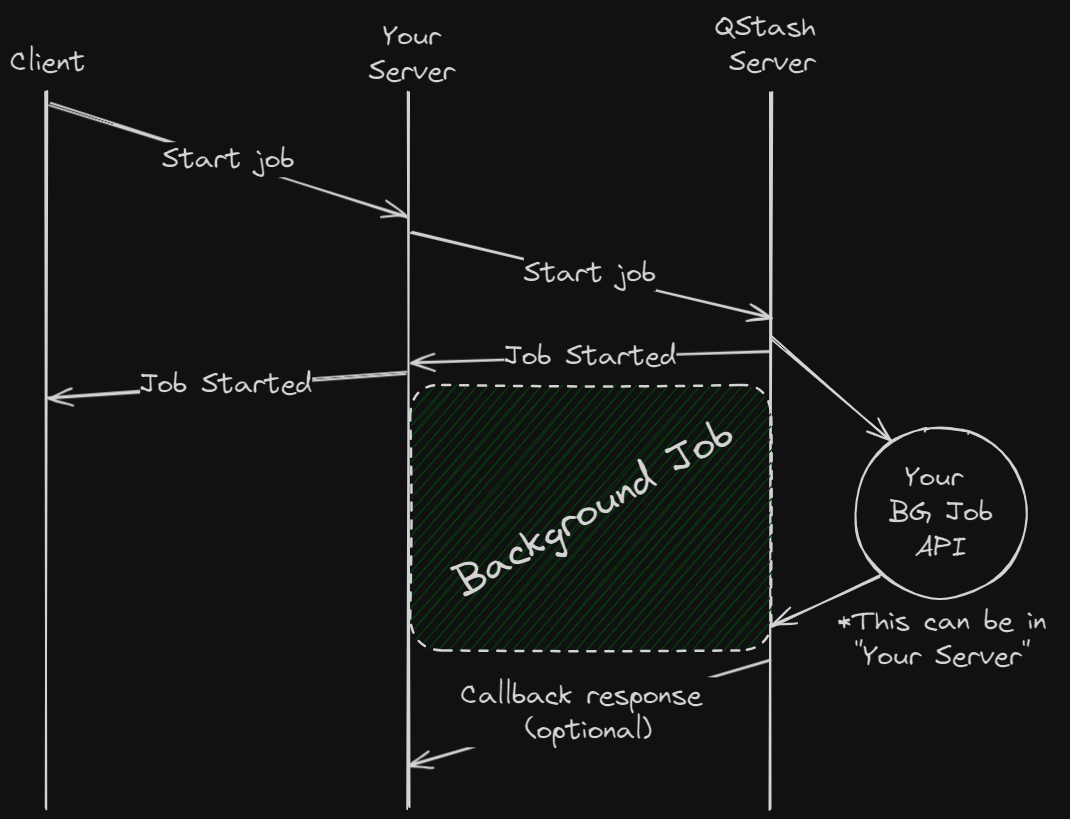
To better understand the application, let's break it down:
1. **Client**: The client application contains a button that, when clicked, sends a request to the server to start the background job.
2. **Next.js server**: The first endpoint, `/api/start-email-job`, is invoked by the client to start the background job.
3. **QStash**: The QStash client is used to invoke the `/api/send-email` endpoint, which contains the logic for the background job.
Here is a visual representation of the process:
To view a more detailed Next.js quick start guide for setting up QStash, refer to the [quick start](/qstash/quickstarts/vercel-nextjs) guide.
It's also possible to schedule a background job to run at a later time using [schedules](/qstash/features/schedules).
If you'd like to invoke another endpoint when the background job is complete, you can use [callbacks](/qstash/features/callbacks).
 To view a more detailed Next.js quick start guide for setting up QStash, refer to the [quick start](/qstash/quickstarts/vercel-nextjs) guide.
It's also possible to schedule a background job to run at a later time using [schedules](/qstash/features/schedules).
If you'd like to invoke another endpoint when the background job is complete, you can use [callbacks](/qstash/features/callbacks).
To view a more detailed Next.js quick start guide for setting up QStash, refer to the [quick start](/qstash/quickstarts/vercel-nextjs) guide.
It's also possible to schedule a background job to run at a later time using [schedules](/qstash/features/schedules).
If you'd like to invoke another endpoint when the background job is complete, you can use [callbacks](/qstash/features/callbacks).