# null
Source: https://upstash.com/docs/README
# Mintlify Starter Kit
Click on `Use this template` to copy the Mintlify starter kit. The starter kit
contains examples including
* Guide pages
* Navigation
* Customizations
* API Reference pages
* Use of popular components
### 👩💻 Development
Install the [Mintlify CLI](https://www.npmjs.com/package/mintlify) to preview
the documentation changes locally. To install, use the following command
```
npm i -g mintlify
```
Run the following command at the root of your documentation (where mint.json is)
```
mintlify dev
```
### 😎 Publishing Changes
Changes will be deployed to production automatically after pushing to the
default branch.
You can also preview changes using PRs, which generates a preview link of the
docs.
#### Troubleshooting
* Mintlify dev isn't running - Run `mintlify install` it'll re-install
dependencies.
* Page loads as a 404 - Make sure you are running in a folder with `mint.json`
# Add a Payment Method
Source: https://upstash.com/docs/common/account/addapaymentmethod
Upstash does not require a credit card for Free databases. However, for paid databases, you need to add at least one payment method. To add a payment method, follow these steps:
1. Click on your profile at the top right.
2. Select `Account` from the dropdown menu.
3. Navigate to the `Billing` tab.
4. On the screen, click the `Add Your Card` button.
5. Enter your name and credit card information in the following form:
You can enter multiple credit cards and set one of them as the default one. The
payments will be charged from the default credit card.
## Payment Security
Upstash does not store users' credit card information in its servers. We use
Stripe Inc payment processing company to handle payments. You can read more
about payment security in Stripe
[here](https://stripe.com/docs/security/stripe).
# Audit Logs
Source: https://upstash.com/docs/common/account/auditlogs
Audit logs give you a chronological set of activity records that have affected
your databases and Upstash account. You can see the list of all activities on a
single page. You can access your audit logs under `Account > Audit Logs` in your
console:
Here the `Source` column shows if the action has been called by the console or via
an API key. The `Entity` column gives you the name of the resource that has been
affected by the action. For example, when you delete a database, the name of the
database will be shown here. Also, you can see the IP address which performed the
action.
## Security
You can track your audit logs to detect any unusual activity on your account and
databases. When you suspect any security breach, you should delete the API key
related to suspicious activity and inform us by emailing
[support@upstash.com](mailto:support@upstash.com)
## Retention period
After the retention period, the audit logs are deleted. The retention period for free databases is 7 days, for pay-as-you-go databases, it is 30 days, and for the Pro tier, it is one year.
# AWS Marketplace
Source: https://upstash.com/docs/common/account/awsmarketplace
**Prerequisite**
You need an Upstash account before subscribing on AWS, create one
[here](https://console.upstash.com).
Upstash is available on the AWS Marketplace, which is particularly beneficial for users who already get other services from AWS Marketplace and can consolidate Upstash under a single bill.
You can search "Upstash" on AWS Marketplace or just click [here](https://aws.amazon.com/marketplace/pp/prodview-fssqvkdcpycco).
Once you click subscribe, you will be prompted to select which personal or team account you wish to link with your AWS Subscription.
Once your account is linked, regardless of which Upstash product you use, all of your usage will be billed to your AWS Account. You can also upgrade or downgrade your subscription through Upstash console.
# Cost Explorer
Source: https://upstash.com/docs/common/account/costexplorer
The Cost Explorer pages allow you to view your current and previous months’ costs. To access the Cost Explorer, navigate to the left menu and select Account > Cost Explorer. Below is an example report:
You can select a specific month to view the cost breakdown for that period. Here's the explanation of the fields in the report:
**Request:** This represents the total number of requests sent to the database.
**Storage:** This indicates the average size of the total storage consumed. Upstash database includes a persistence layer for data durability. For example, if you have 1 GB of data in your database throughout the entire month, this value will be 1 GB. Even if your database is empty for the first 29 days of the month and then expands to 30 GB on the last day, this value will still be 1 GB.
**Cost:** This field represents the total cost of your database in US Dollars.
> The values for the current month is updated hourly, so values can be stale up
> to 1 hour.
# Create an Account
Source: https://upstash.com/docs/common/account/createaccount
You can sign up for Upstash using your Amazon, Github or Google accounts. Alternatively, if you prefer not to use these authentication providers or want to sign up with a corporate email address, you can also sign up using email and password.
We do not access your information other than:
* Your email
* Your name
* Your profile picture and we never share your information with third parties.
# Developer API
Source: https://upstash.com/docs/common/account/developerapi
Using Upstash API, you can develop applications that can create and manage
Upstash databases and Upstash kafka clusters. You can automate everything that
you can do in the console. To use developer API, you need to create an API key
in the console.
See [DevOps](/devops) for details.
# Account and Billing FAQ
Source: https://upstash.com/docs/common/account/faq
## How can I delete my account?
You can delete your account from `Account` > `Settings` > `Delete Account`. You should first delete all your databases and clusters. After you delete your account, all your data and payment information will be deleted and you will not be able to recover it.
## How can I delete my credit card?
You can delete your credit card from `Account` > `Billing` page. However, you should first add a new credit card to be able to delete the existing one. If you want to delete all of your payment information, you should delete your account.
## How can I change my email address?
You can change your account e-mail address in `Account` > `Settings` page. In order to change your billing e-mail adress, please see `Account` > `Billing` page. If you encounter any issues, please contact us at [support@upstash.com](mailto:support@upstash.com) to change your email address.
## Can I set an upper spending limit, so I don't get surprises after an unexpected amount of high traffic?
On Pay as You Go model, you can set a budget for your Redis instances. When your monthly cost reaches the max budget, we send an email to inform you and throttle your instance. You will not be charged beyond your set budget.
To set the budget, you can go to the "Usage" tab of your Redis instance and click "Change Budget" under the cost metric.
## What happens if my payment fails?
If a payment failure occurs, we will retry the payment three more times before suspending the account. During this time, you will receive email notifications about the payment failure. If the account is suspended, all resources in the account will be inaccessible. If you add a valid payment method after the account suspension, your account will be automatically unsuspended during the next payment attempt.
## What happens if I unsubscribe from AWS Marketplace but I don't have any other payment methods?
We send a warning email three times before suspending an account. If no valid payment method is added, we suspend the account. Once the account is suspended, all resources within the account will be inaccessible. If you add a valid payment method after the account suspension, your account will be automatically unsuspended during the next system check.
## I have a question about my bill, who should I contact?
Please contact us at [support@upstash.com](mailto:support@upstash.com).
# Payment History
Source: https://upstash.com/docs/common/account/paymenthistory
The Payment History page gives you information about your payments. You can open your
payment history in the left menu under Account > Payment History. Here an example
report:
You can download receipt. If one of your payments failed, you can retry your
payment on this page.
# Teams and Users
Source: https://upstash.com/docs/common/account/teams
Team management enables collaboration with other users. You can create a team and invite people to join by using their email addresses. Team members will have access to databases created under the team based on their assigned roles.
## Create Team
You can create a team using the menu `Account > Teams`
> A user can create up to 5 teams. You can be part of even more teams but only
> be the owner of 5 teams. If you need to own more teams please email us at
> [support@upstash.com](mailto:support@upstash.com).
You can still continue using your personal account or switch to a team.
> The databases in your personal account are not shared with anyone. If you want
> your database to be accessible by other users, you need to create it under a
> team.
## Switch Team
You need to switch to the team to create databases shared with other team
members. You can switch to the team via the switch button in the team table. Or
you can click your profile pic in the top right and switch to any team listed
there.
## Add/Remove Team Member
After switching to a team, if you are the Owner or an Admin of the team, you can add team members by navigating to `Account > Teams`. Simply enter their email addresses.It's not an issue if the email addresses are not yet registered with Upstash. Once the user registers with that email, they will gain access to the team. We do not send invitations; when you add a member, they become a member directly. You can also remove members from the same page.
> Only Admins or the Owner can add/remove users.
## Roles
While adding a team member, you will need to select a role. Here are the access rights associated with each role:
* Admin: This role has full access, including the ability to add and remove members, manage databases, and payment methods.
* Dev: This role can create, manage, and delete databases but cannot manage users or payment methods.
* Finance: This role is limited to managing payment methods and cannot manage databases or users.
* Owner: The Owner role has all the access rights of an Admin and, in addition to having the ability to delete the team. This role is automatically assigned to the user who created the team, and you cannot assign it to other members.
> If you want to change a user's role, you will need to delete and re-add them with the desired access rights.
## Delete Team
Only the original creator (owner) can delete a team. Also the team should not
have any active databases, namely all databases under the team should be deleted
first. To delete your team, first you need to switch your personal account then
you can delete your team in the team list under `Account > Teams`.
# Access Anywhere
Source: https://upstash.com/docs/common/concepts/access-anywhere
Upstash has integrated REST APIs into all its products to facilitate access from various runtime environments. This integration is particularly beneficial for edge runtimes like Cloudflare Workers and Vercel Edge, which do not permit TCP connections, and for serverless functions such as AWS Lambda, which are stateless and do not retain connection information between invocations.
### Rationale
The absence of TCP connection support in edge runtimes and the stateless nature of serverless functions necessitate a different approach for persistent connections typically used in traditional server setups. The stateless REST API provided by Upstash addresses this gap, enabling consistent and reliable communication with data stores from these platforms.
### REST API Design
The REST APIs for Upstash services are thoughtfully designed to align closely with the conventions of each product. This ensures that users who are already familiar with these services will find the interactions intuitive and familiar. Our API endpoints are self-explanatory, following standard REST practices to guarantee ease of use and seamless integration.
### SDKs for Popular Languages
To enhance the developer experience, Upstash is developing SDKs in various popular programming languages. These SDKs simplify the process of integrating Upstash services with your applications by providing straightforward methods and functions that abstract the underlying REST API calls.
### Resources
[Redis REST API Docs](https://upstash.com/docs/redis/features/restapi)
[Kafka REST API Docs](https://upstash.com/docs/kafka/rest/restintro)
[QStash REST API Docs](https://upstash.com/docs/qstash/api/authentication)
[Redis SDK - Typescript](https://github.com/upstash/upstash-redis)
[Redis SDK - Python](https://github.com/upstash/redis-python)
[Kafka SDK - Typescript](https://github.com/upstash/upstash-kafka)
[QStash SDK - Typescript](https://github.com/upstash/sdk-qstash-ts)
# Global Replication
Source: https://upstash.com/docs/common/concepts/global-replication
Fast anywhere.
Upstash Redis replicates your data to user-selected regions. You can add or remove regions from a running cluster without experiencing downtime. Think of each region as a replica that maintains a copy of your data, ensuring low latency and high availability.
## Designed for the Edge Functions
Edge runtimes, such as Cloudflare Workers and Vercel Edge, enhance speed by executing your code at locations closest to your users. However, if your use case involves data storage, it's crucial to position your data store near your users to achieve optimal performance. Upstash Global tackles this need by replicating your data across multiple regions. While edge runtimes come with certain limitations, Upstash provides a HTTP-based Redis® client designed and tested to integrate seamlessly with popular edge runtimes, including Vercel, Cloudflare, Fastly, and Deno.
## Read Regions Everywhere, Low Latency Anywhere
The global database is designed to minimize latency for read operations. It consists of a single primary replica and multiple read replicas. Write commands are sent to and processed by the primary replica, then replicated across all read replicas. When a client issues a read command, it retrieves the response from the nearest read replica based on the region. Conversely, all write requests are directed to the primary replica to maintain consistency.
Our tests indicate sub-millisecond latency for clients located in the same AWS region as the Redis® instance.
**Read operations are processed at the the nearest replica.**
**Writes are processed at the primary replica.**
## Choose your regions
The global database requires you to choose primary and read regions:
→ Choose a primary region where your write operations will take place to ensure faster write speeds.
→ Select read regions that are closest to the majority of your user base for optimized read speeds.
Below are the supported regions:
* AWS US-East-1 (North Virginia)
* AWS US-West-1 (North California)
* AWS US-West-2 (Oregon)
* AWS EU-West-1 (Ireland)
* AWS EU-Central-1 (Frankfurt)
* AWS AP-Southeast-1 (Singapore)
* AWS AP-Southeast-2 (Sydney)
* AWS SA-East-1 (São Paulo)
Check out [our blog post](https://upstash.com/blog/global-database) to learn more about. Also see our [live benchmark](https://latency.upstash.com/) to check the latency number from different locations.
# Scale to Zero
Source: https://upstash.com/docs/common/concepts/scale-to-zero
Only pay for what you really use.
Traditionally, cloud services required users to predict their resource needs and provision servers or instances based on those predictions. This often led to over-provisioning to handle potential peak loads, resulting in paying for unused resources during periods of low demand.
By *scaling to zero*, our pricing model aligns more closely with actual usage.
## Pay for usage
You're only charged for the resources you actively use. When your application experiences low activity or no incoming requests, the system automatically scales down resources to a minimal level. This means you're no longer paying for idle capacity, resulting in cost savings.
## Flexibility
"Scaling to zero" offers flexibility in scaling both up and down. As your application experiences traffic spikes, the system scales up resources to meet demand. Conversely, during quiet periods, resources scale down.
## Focus on Innovation
Developers can concentrate on building and improving the application without constantly worrying about resource optimization. Upstash handles the scaling, allowing developers to focus on creating features that enhance user experiences.
In essence, this aligns pricing with actual utilization, increases cost efficiency, and promotes a more sustainable approach to resource consumption. This model empowers businesses to leverage cloud resources without incurring unnecessary expenses, making cloud computing more accessible and attractive to a broader range of organizations.
# Serverless
Source: https://upstash.com/docs/common/concepts/serverless
What do we mean by serverless?
Upstash is a modern serverless data platform. But what do we mean by serverless?
## No Server Management
In a serverless setup, developers don't need to worry about configuring or managing servers. We take care of server provisioning, scaling, and maintenance.
## Automatic Scaling
As traffic or demand increases, Upstash automatically scales the required resources to handle the load. This means applications can handle sudden spikes in traffic without manual intervention.
## Granular Billing
We charge based on the actual usage of resources rather than pre-allocated capacity. This can lead to more cost-effective solutions, as users only pay for what they consume. [Read more](/common/concepts/scale-to-zero)
## Stateless Functions
In serverless architectures, functions are typically stateless. However, the traditional approach involves establishing long-lived connections to databases, which can lead to issues in serverless environments if connections aren't properly managed after use. Additionally, there are scenarios where TCP connections may not be feasible. Upstash addresses this issue by offering access via HTTP, a universally available protocol across all platforms.
## Rapid Deployment
Fast iteration is the key to success in today's competitive environment. You can create a new Upstash database in seconds, with minimal required configuration.
# Account & Teams
Source: https://upstash.com/docs/common/help/account
## Create an Account
You can sign up to Upstash using your Amazon, Github or Google accounts. Alternatively you can sign up using
email/password registration if you don't want to use these auth providers, or you
want to sign up using a corporate email address.
We do not access your information other than:
* Your email
* Your name
* Your profile picture and we never share your information with third parties.
Team management allows you collaborate with other users. You can create a team
and invite people to the team by email addresses. The team members will have
access to the databases created under the team depending on their roles.
## Teams
### Create Team
You can create a team using the menu `Account > Teams`
> A user can create up to 5 teams. You can be part of even more teams but only
> be the owner of 5 teams. If you need to own more teams please email us at
> [support@upstash.com](mailto:support@upstash.com).
You can still continue using your personal account or switch to a team.
> The databases in your personal account are not shared with anyone. If you want
> your database to be accessible by other users, you need to create it under a
> team.
### Switch Team
You need to switch to the team to create databases shared with other team
members. You can switch to the team via the switch button in the team table. Or
you can click your profile pic in the top right and switch to any team listed
there.
### Add/Remove Team Member
Once you switched to a team, you can add team members in `Account > Teams` if
you are Owner or Admin for of the team. Entering email will be enough. The email
may not registered to Upstash yet, it is not a problem. Once the user registers
with that email, he/she will be able to switch to the team. We do not send
invitation, so when you add a member, he/she becomes a member directly. You can
remove the members from the same page.
> Only Admins or the Owner can add/remove users.
### Roles
While adding a team member you need to select a role. Here the privileges of
each role:
* Admin: This role has full access including adding removing members, databases,
payment methods.
* Dev: This role can create, manage and delete databases. It can not manage
users and payment methods.
* Finance: This role can only manage payment methods. It can not manage the
databases and users.
* Owner: Owner has all the privileges that admin has. In addition he is the only
person who can delete the team. This role is assigned to the user who created
the team. So you can not create a member with Owner role.
> If you want change role of a user, you need to delete and add again.
### Delete Team
Only the original creator (owner) can delete a team. Also the team should not
have any active databases, namely all databases under the team should be deleted
first. To delete your team, first you need to switch your personal account then
you can delete your team in the team list under `Account > Teams`.
# Announcements
Source: https://upstash.com/docs/common/help/announcements
Upstash Announcements!
Removal of GraphQL API and edge caching (Redis) (October 1, 2022) These two
features have been already deprecated. We are planning to deactivate them
completely on November 1st. We recommend use of REST API to replace GraphQL API
and Global databases instead of Edge caching.
Removal of strong consistency (Redis) (October 1, 2022) Upstash supported Strong
Consistency mode for the single region databases. We decided to deprecate this
feature because its effect on latency started to conflict with the performance
expectations of Redis use cases. Moreover, we improved the consistency of
replication to guarantee Read-Your-Writes consistency. Strong consistency will
be disabled on existing databases on November 1st.
#### Redis pay-as-you-go usage cap (October 1, 2022)
We are increasing the max usage cap to \$160 from \$120 as of October 1st. This
update is needed because of the increasing infrastructure cost due to
replicating all databases to multiple instances. After your database exceeds the
max usage cost, your database might be rate limited.
#### Replication is enabled (Sep 29, 2022)
All new and existing paid databases will be replicated to multiple replicas.
Replication enables high availability in case of system and infrastructure
failures. Starting from October 1st, we will gradually upgrade all databases
without downtime. Free databases will stay single replica.
#### QStash Price Decrease (Sep 15, 2022)
The price is \$1 per 100K requests.
#### [Pulumi Provider is available](https://upstash.com/blog/upstash-pulumi-provider) (August 4, 2022)
#### [QStash is released and announced](https://upstash.com/blog/qstash-announcement) (July 18, 2022)
#### [Announcing Upstash CLI](https://upstash.com/blog/upstash-cli) (May 16, 2022)
#### [Introducing Redis 6 Compatibility](https://upstash.com/blog/redis-6) (April 10, 2022)
#### Strong Consistency Deprecated (March 29, 2022)
We have deprecated Strong Consistency mode for Redis databases due to its
performance impact. This will not be available for new databases. We are
planning to disable it on existing databases before the end of 2023. The
database owners will be notified via email.
#### [Announcing Upstash Redis SDK v1.0.0](https://upstash.com/blog/upstash-redis-sdk-v1) (March 14, 2022)
#### Support for Kafka (Nov 29, 2021)
Kafka Support is released. Check the
[the blog post](https://blog.upstash.com/serverless-kafka-launch).
#### Support for Google Cloud (June 8, 2021)
Google Cloud is available for Upstash Redis databases. We initially support
US-Central-1 (Iowa) region. Check the
[get started guide](https://docs.upstash.com/redis/howto/getstartedgooglecloudfunctions).
#### Support for AWS Japan (March 1, 2021)
こんにちは日本
Support for AWS Tokyo Region was the most requested feature by our users. Now
our users can create their database in AWS Asia Pacific (Tokyo) region
(ap-northeast-1). In addition to Japan, Upstash is available in the regions
us-west-1, us-east-1, eu-west-1.
Click [here](https://console.upstash.com) to start your database for free.
Click [here](https://roadmap.upstash.com) to request new regions to be
supported.
#### Vercel Integration (February 22, 2021)
Upstash\&Vercel integration has been released. Now you are able to integrate
Upstash to your project easily. We believe Upstash is the perfect database for
your applications thanks to its:
* Low latency data
* Per request pricing
* Durable storage
* Ease of use
Below are the resources about the integration:
See [how to guide](https://docs.upstash.com/redis/howto/vercelintegration).
See [integration page](https://vercel.com/integrations/upstash).
See
[Roadmap Voting app](https://github.com/upstash/roadmap)
as a showcase for the integration.
# Compliance
Source: https://upstash.com/docs/common/help/compliance
## Upstash Legal & Security Documents
* [Upstash Terms of Service](https://upstash.com/static/trust/terms.pdf)
* [Upstash Privacy Policy](https://upstash.com/static/trust/privacy.pdf)
* [Upstash Data Processing Agreement](https://upstash.com/static/trust/dpa.pdf)
* [Upstash Technical and Organizational Security Measures](https://upstash.com/static/trust/security-measures.pdf)
* [Upstash Subcontractors](https://upstash.com/static/trust/subprocessors.pdf)
## Is Upstash SOC2 Compliant?
Upstash Redis databases under Pro and Enterprise support plans are SOC2 compliant. Check our [trust page](https://trust.upstash.com/) for details.
## Is Upstash ISO-27001 Compliant?
We are in process of getting this certification. Contact us
([support@upstash.com](mailto:support@upstash.com)) to learn about the expected
date.
## Is Upstash GDPR Compliant?
Yes. For more information, see our
[Privacy Policy](https://upstash.com/static/trust/privacy.pdf). We acquire DPAs
from each [subcontractor](https://upstash.com/static/trust/subprocessors.pdf)
that we work with.
## Is Upstash HIPAA Compliant?
We are in process of getting this certification. Contact us
([support@upstash.com](mailto:support@upstash.com)) to learn about the expected
date.
## Is Upstash PCI Compliant?
Upstash does not store personal credit card information. We use Stripe for
payment processing. Stripe is a certified PCI Service Provider Level 1, which is
the highest level of certification in the payments industry.
## Does Upstash conduct vulnerability scanning and penetration tests?
Yes, we use third party tools and work with pen testers. We share the results
with Enterprise customers. Contact us
([support@upstash.com](mailto:support@upstash.com)) for more information.
## Does Upstash take backups?
Yes, we take regular snapshots of the data cluster to the AWS S3 platform.
## Does Upstash encrypt data?
Customers can enable TLS when creating a database or cluster, and we recommend this for production environments. Additionally, we encrypt data at rest upon customer request.
# Integration with Third Parties & Partnerships
Source: https://upstash.com/docs/common/help/integration
## Introduction
In this guideline we will outline the steps to integrate Upstash into your platform (GUI or Web App) and allow your users to create and manage Upstash databases without leaving your interfaces. We will explain how to use OAuth2.0 as the underlying foundation to enable this access seamlessly.
If your product or service offering utilizes Redis, Kafka or QStash or if there is a common use case that your end users enable by leveraging these database resources, we invite you to be a partner with us. By integrating Upstash into your platform, you can offer a more complete package for your customers and become a one stop shop. This will also position yourself at the forefront of innovative cloud computing trends such as serverless and expand your customer base.
This is the most commonly used partnership integration model that can be easily implemented by following this guideline. Recently [Cloudflare workers integration](https://blog.cloudflare.com/cloudflare-workers-database-integration-with-upstash/) is implemented through this methodology. For any further questions or partnership discussions please send us an email at [partnerships@upstash.com](mailto:partnerships@upstash.com)
Before starting development to integrate Upstash into your product, please
send an email to [partnerships@upstash.com](mailto:partnerships@upstash.com) for further assistance and guidance.
**General Flow (High level user flow)**
1. User clicks **`Connect Upstash`** button on your platform’s surface (GUI, Web App)
2. This initiates the OAuth 2.0 flow, which opens a new browser page displaying the **`Upstash Login Page`**.
3. If this is an existing user, user logins with their Upstash credentials otherwise they can directly sign up for a new Upstash account.
4. Browser window redirects to **`Your account has been connected`** page and authentication window automatically closes.
5. After the user returns to your interface, they see their Upstash Account is now connected.
## Technical Design (SPA - Regular Web Application)
1. Users click `Connect Upstash` button from Web App.
2. Web App initiate Upstash OAuth 2.0 flow. Web App can use
[Auth0 native libraries](https://auth0.com/docs/libraries).
Please reach [partnerships@upstash.com](mailto:partnerships@upstash.com) to receive client id and callback url.
3. After user returns from OAuth 2.0 flow then web app will have JWT token. Web
App can generate Developer Api key:
```bash
curl -XPOST https://api.upstash.com/apikey \
-H "Authorization: Bearer JWT_KEY" \
-H "Content-Type: application/json" \
-d '{ "name": "APPNAME_API_KEY_TIMESTAMP" }'
```
4. Web App need to save Developer Api Key to the backend.
## Technical Design ( GUI Apps )
1. User clicks **`Connect Upstash`** button from web app.
2. Web app initiates Upstash OAuth 2.0 flow and it can use **[Auth0 native libraries](https://auth0.com/docs/libraries)**.
3. App will open new browser:
```
https://auth.upstash.com/authorize?response_type=code&audience=upstash-api&scope=offline_access&client_id=XXXXXXXXXX&redirect_uri=http%3A%2F%2Flocalhost:3000
```
Please reach [partnerships@upstash.com](mailto:partnerships@upstash.com) to receive client id.
4. After user authenticated Auth0 will redirect user to
`localhost:3000/?code=XXXXXX`
5. APP can return some nice html response when Auth0 returns to `localhost:3000`
6. After getting `code` parameter from the URL query, GUI App will make http
call to the Auth0 code exchange api. Example CURL request
```bash
curl -XPOST 'https://auth.upstash.com/oauth/token' \
--header 'content-type: application/x-www-form-urlencoded' \
--data 'grant_type=authorization_code --data audience=upstash-api' \
--data 'client_id=XXXXXXXXXXX' \
--data 'code=XXXXXXXXXXXX' \
--data 'redirect_uri=localhost:3000'
```
Response:
```json
{
"access_token": "XXXXXXXXXX",
"refresh_token": "XXXXXXXXXXX",
"scope": "offline_access",
"expires_in": 172800,
"token_type": "Bearer"
}
```
7. After 6th Step the response will include `access_token`, it has 3 days TTL.
GUI App will call Upstash API to get a developer api key:
```bash
curl https://api.upstash.com/apikey -H "Authorization: Bearer JWT_KEY" -d '{ "name" : "APPNAME_API_KEY_TIMESTAMP" }'
```
8. GUI App will save Developer Api key locally. Then GUI App can call any
Upstash Developer API [developer.upstash.com/](https://developer.upstash.com/)
## Managing Resources
After obtaining Upstash Developer Api key, your platform surface (web or GUI) can call Upstash API. For example **[Create Database](https://developer.upstash.com/#create-database-global)**, **[List Database](https://developer.upstash.com/#list-databases)**
In this flow, you can ask users for region information and name of the database then can call Create Database API to complete the task
Example CURL request:
```bash
curl -X POST \
https://api.upstash.com/v2/redis/database \
-u 'EMAIL:API_KEY' \
-d '{"name":"myredis", "region":"global", "primary_region":"us-east-1", "read_regions":["us-west-1","us-west-2"], "tls": true}'
```
# Legal
Source: https://upstash.com/docs/common/help/legal
## Upstash Legal Documents
* [Upstash Terms of Service](https://upstash.com/trust/terms.pdf)
* [Upstash Privacy Policy](https://upstash.com/trust/privacy.pdf)
* [Upstash Subcontractors](https://upstash.com/trust/subprocessors.pdf)
# Professional Support
Source: https://upstash.com/docs/common/help/prosupport
For all Upstash products, we manage everything for you and let you focus on more important things. If you ever need further help, our dedicated Professional Support team are here to ensure you get the most out of our platform, whether you’re just starting or scaling to new heights.
Professional Support is strongly recommended especially for customers who use Upstash as part of their production systems.
# Expert Guidance
Get direct access to our team of specialists who can provide insights, troubleshooting, and best practices tailored to your unique use case. In any urgent incident you might have, our Support team will be standing by and ready to join you for troubleshooting.
Professional Support package includes:
* **Guaranteed Response Time:** Rapid Response Time SLA to urgent support requests, ensuring your concerns are addressed promptly with a **24/7 coverage**.
* **Customer Onboarding:** A personalized session to guide you through utilizing our support services and reviewing your specific use case for a seamless start.
* **Quarterly Use Case Review & Health Check:** On-request sessions every quarter to review your use case and ensure optimal performance.
* **Dedicated Slack Channel:** Direct access to our team via a private Slack channel, so you can reach out whenever you need assistance.
* **Incident Support:** Video call support during critical incidents to provide immediate help and resolution.
* **Root Cause Analysis:** Comprehensive investigation and post-mortem analysis of critical incidents to identify and address the root cause.
# Response Time SLA
We understand that timely assistance is critical for production workloads, so your access to our Support team comes with 24/7 coverage and below SLA:
| Severity | Response Time |
| ------------------------------- | ------------- |
| P1 - Production system down | 30 minutes |
| P2 - Production system impaired | 2 hours |
| P3 - Minor issue | 12 hours |
| P4 - General guidance | 24 hours |
## How to Reach Out?
As a Professional Support Customer, below are the **two methods** to reach out to Upstash Support Team, in case you need to utilize our services:
#### Starting a Chat
You will see a chatbox on the bottom right when viewing Upstash console, docs and website. Once you initiate a chat, Professional Support customers will be prompted to select a severity level:
To be able to see these options in chat, remember to sign into your Upstash Account first.
If you select "P1 - Production down, no workaround", or "P2 - Production impaired with workaround" options, you will be triggering an alert for our team to urgently step in.
#### Sending an Email
Sending an email with details to [support@upstash.com](mailto:support@upstash.com) is another way to submit a support request. In case of an urgency, sending an email with details by using "urgent" keyword in email subject is another alternative to alert our team about a possible incident.
# Pricing
For pricing and further details about Professional Support, please contact us at [support@upstash.com](mailto:support@upstash.com)
# Uptime SLA
Source: https://upstash.com/docs/common/help/sla
This Service Level Agreement ("SLA") applies to the use of the Upstash services,
offered under the terms of our Terms of Service or other agreement with us
governing your use of Upstash. This SLA does not apply to Upstash services in
the Upstash Free and Pay-as-you-go Tier. It is clarified that this SLA is subject to the terms of
the Agreement, and does not derogate therefrom (capitalized terms, unless
otherwise indicated herein, have the meaning specified in the Agreement).
Upstash reserves the right to change the terms of this SLA by publishing updated
terms on its website, such change to be effective as of the date of publication.
### Upstash Database SLA
Upstash will use commercially reasonable efforts to make
databases available with a Monthly Uptime Percentage of at least 99.99%.
In the event any of the services do not meet the SLA, you will be eligible to
receive a Service Credit as described below.
| Monthly Uptime Percentage | Service Credit Percentage |
| --------------------------------------------------- | ------------------------- |
| Less than 99.99% but equal to or greater than 99.0% | 10% |
| Less than 99.0% but equal to or greater than 95.0% | 30% |
| Less than 95.0% | 60% |
### SLA Credits
Service Credits are calculated as a percentage of the monthly bill (excluding
one-time payments such as upfront payments) for the service in the affected
region that did not meet the SLA.
Uptime percentages are recorded and published in the
[Upstash Status Page](https://status.upstash.com).
To receive a Service Credit, you should submit a claim by sending an email to
[support@upstash.com](mailto:support@upstash.com). Your credit request should be
received by us before the end of the second billing cycle after the incident
occurred.
We will apply any service credits against future payments for the applicable
services. At our discretion, we may issue the Service Credit to the credit card
you used. Service Credits will not entitle you to any refund or other payment. A
Service Credit will be applicable and issued only if the credit amount for the
applicable monthly billing cycle is greater than one dollar (\$1 USD). Service
Credits may not be transferred or applied to any other account.
# Support & Contact Us
Source: https://upstash.com/docs/common/help/support
## Community
[Upstash Discord Channel](https://upstash.com/discord) is the best way to
interact with the community.
## Team
Regardless of your subscription plan, you can contact the team
via [support@upstash.com](mailto:support@upstash.com) for technical support as
well as questions and feedback.
## Follow Us
Follow us on [X](https://x.com/upstash).
## Bugs & Issues
You can help us improve Upstash by reporting issues, suggesting new features and
giving general feedback in
our [Community Github Repo](https://github.com/upstash/issues/issues/new).
## Enterprise Support
Get [Enterprise Support](/common/help/prosupport) for your organization from the Upstash team.
# Uptime Monitor
Source: https://upstash.com/docs/common/help/uptime
## Status Page
You can track the uptime status of Upstash databases in
[Upstash Status Page](https://status.upstash.com)
## Latency Monitor
You can see the average latencies for different regions in
[Upstash Latency Monitoring](https://latency.upstash.com) page
# Trials
Source: https://upstash.com/docs/common/trials
If you want to try Upstash paid and pro plans, we can offer **Free
Trials**. Email us at [support@upstash.com](mailto:support@upstash.com)
# Overview
Source: https://upstash.com/docs/devops/cli/overview
Manage Upstash resources in your terminal or CI.
You can find the Github Repository [here](https://github.com/upstash/cli).
# Installation
## npm
You can install upstash's cli directly from npm
```bash
npm i -g @upstash/cli
```
It will be added as `upstash` to your system's path.
## Compiled binaries:
`upstash` is also available from the
[releases page](https://github.com/upstash/cli/releases/latest) compiled
for windows, linux and mac (both intel and m1).
# Usage
```bash
> upstash
Usage: upstash
Version: development
Description:
Official cli for Upstash products
Options:
-h, --help - Show this help.
-V, --version - Show the version number for this program.
-c, --config - Path to .upstash.json file
Commands:
auth - Login and logout
redis - Manage redis database instances
kafka - Manage kafka clusters and topics
team - Manage your teams and their members
Environment variables:
UPSTASH_EMAIL - The email you use on upstash
UPSTASH_API_KEY - The api key from upstash
```
## Authentication
When running `upstash` for the first time, you should log in using
`upstash auth login`. Provide your email and an api key.
[See here for how to get a key.](https://docs.upstash.com/redis/howto/developerapi#api-development)
As an alternative to logging in, you can provide `UPSTASH_EMAIL` and
`UPSTASH_API_KEY` as environment variables.
## Usage
Let's create a new redis database:
```
> upstash redis create --name=my-db --region=eu-west-1
Database has been created
database_id a3e25299-132a-45b9-b026-c73f5a807859
database_name my-db
database_type Pay as You Go
region eu-west-1
type paid
port 37090
creation_time 1652687630
state active
password 88ae6392a1084d1186a3da37fb5f5a30
user_email andreas@upstash.com
endpoint eu1-magnetic-lacewing-37090.upstash.io
edge false
multizone false
rest_token AZDiASQgYTNlMjUyOTktMTMyYS00NWI5LWIwMjYtYzczZjVhODA3ODU5ODhhZTYzOTJhMTA4NGQxMTg2YTNkYTM3ZmI1ZjVhMzA=
read_only_rest_token ApDiASQgYTNlMjUyOTktMTMyYS00NWI5LWIwMjYtYzczZjVhODA3ODU5O_InFjRVX1XHsaSjq1wSerFCugZ8t8O1aTfbF6Jhq1I=
You can visit your database details page: https://console.upstash.com/redis/a3e25299-132a-45b9-b026-c73f5a807859
Connect to your database with redis-cli: redis-cli -u redis://88ae6392a1084d1186a3da37fb5f5a30@eu1-magnetic-lacewing-37090.upstash.io:37090
```
## Output
Most commands support the `--json` flag to return the raw api response as json,
which you can parse and automate your system.
```bash
> upstash redis create --name=test2113 --region=us-central1 --json | jq '.endpoint'
"gusc1-clean-gelding-30208.upstash.io"
```
# Authentication
Source: https://upstash.com/docs/devops/developer-api/authentication
Authentication for the Upstash Developer API
The Upstash API requires API keys to authenticate requests. You can view and
manage API keys at the Upstash Console.
Upstash API uses HTTP Basic authentication. You should pass `EMAIL` and
`API_KEY` as basic authentication username and password respectively.
With a client such as `curl`, you can pass your credentials with the `-u`
option, as the following example shows:
```curl
curl https://api.upstash.com/v2/redis/database -u EMAIL:API_KEY
```
Replace `EMAIL` and `API_KEY` with your email and API key.
# HTTP Status Codes
Source: https://upstash.com/docs/devops/developer-api/http_status_codes
The Upstash API uses the following HTTP Status codes:
| Code | Description | |
| ---- | ------------------------- | ------------------------------------------------------------------------------- |
| 200 | **OK** | Indicates that a request completed successfully and the response contains data. |
| 400 | **Bad Request** | Your request is invalid. |
| 401 | **Unauthorized** | Your API key is wrong. |
| 403 | **Forbidden** | The kitten requested is hidden for administrators only. |
| 404 | **Not Found** | The specified kitten could not be found. |
| 405 | **Method Not Allowed** | You tried to access a kitten with an invalid method. |
| 406 | **Not Acceptable** | You requested a format that isn't JSON. |
| 429 | **Too Many Requests** | You're requesting too many kittens! Slow down! |
| 500 | **Internal Server Error** | We had a problem with our server. Try again later. |
| 503 | **Service Unavailable** | We're temporarily offline for maintenance. Please try again later. |
# Getting Started
Source: https://upstash.com/docs/devops/developer-api/introduction
Using Upstash API, you can develop applications that can create and manage
Upstash databases and Upstash kafka clusters. You can automate everything that
you can do in the console. To use developer API, you need to create an API key
in the console.
### Create an API key
1. Log in to the console then in the left menu click the
`Account > Management API` link.
2. Click the `Create API Key` button.
3. Enter a name for your key. You can not use the same name for multiple keys.
You need to download or copy/save your API key. Upstash does not remember or
keep your API for security reasons. So if you forget your API key, it becomes
useless; you need to create a new one.
You can create multiple keys. It is recommended to use different keys in
different applications. By default one user can create up to 37 API keys. If you
need more than that, please send us an email at
[support@upstash.com](mailto:support@upstash.com)
### Deleting an API key
When an API key is exposed (e.g. accidentally shared in a public repository) or
not being used anymore; you should delete it. You can delete the API keys in
`Account > API Keys` screen.
### Roadmap
**Role based access:** You will be able to create API keys with specific
privileges. For example you will be able to create a key with read-only access.
**Stats:** We will provide reports based on usage of your API keys.
# Create Kafka Cluster
Source: https://upstash.com/docs/devops/developer-api/kafka/clusters/create
POST https://api.upstash.com/v2/kafka/cluster
This endpoint creates a new kafka cluster.
## Request Parameters
Name of the new Kafka cluster
The region the cluster will be deployed in
**Options:** `eu-west-1` or `us-east-1`
Set true to enable multi-zone replication
## Response Parameters
ID of the created kafka cluster
Name of the kafka cluster
The region the kafka cluster is deployed in
Shows whether the cluster is free or paid
Whether the multizone replication is enabled for the cluster or not
TCP endpoint to connect to the kafka cluster
REST endpoint to connect to the kafka cluster
Current state of the cluster(active, deleted)
Username to be used in authenticating to the cluster
Password to be used in authenticating to the cluster
Max retention size will be allowed to topics in the cluster
Max retention time will be allowed to topics in the cluster
Max messages allowed to be produced per second
Cluster creation timestamp
Max message size will be allowed in topics in the cluster
Max total number of partitions allowed in the cluster
```shell curl
curl -X POST \
https://api.upstash.com/v2/kafka/cluster \
-u 'EMAIL:API_KEY' \
-d '{"name":"mykafkacluster","region":"eu-west-1","multizone":true}'
```
```python Python
import requests
data = '{"name":"mykafkacluster","region":"eu-west-1","multizone":true}'
response = requests.post('https://api.upstash.com/v2/kafka/cluster', data=data, auth=('EMAIL', 'API_KEY'))
response.content
```
```go Go
client := &http.Client{}
var data = strings.NewReader(`{
"name": "test_kafka_cluster_4",
"region": "eu-west-1",
"multizone": true
}`)
req, err := http.NewRequest("POST", "https://api.upstash.com/v2/kafka/cluster", data)
if err != nil {
log.Fatal(err)
}
req.SetBasicAuth("email", "api_key")
resp, err := client.Do(req)
if err != nil {
log.Fatal(err)
}
bodyText, err := ioutil.ReadAll(resp.Body)
if err != nil {
log.Fatal(err)
}
fmt.Printf("%s\n", bodyText);
}
req.SetBasicAuth("email", "api_key")
resp, err := client.Do(req)
if err != nil {
log.Fatal(err)
}
bodyText, err := ioutil.ReadAll(resp.Body)
if err != nil {
log.Fatal(err)
}
fmt.Printf("%s\n", bodyText);
```
```json 200 OK
{
"cluster_id": "9bc0e897-cbd3-4997-895a-fd77ad00aec9",
"name": "mykafkacluster",
"region": "eu-west-1",
"type": "paid",
"multizone": true,
"tcp_endpoint": "sharing-mastodon-12819-eu1-kafka.upstashdev.com",
"rest_endpoint": "sharing-mastodon-12819-eu1-rest-kafka.upstashdev.com",
"state": "active",
"username": "c2hhcmluZy1tYXN0b2Rvbi0xMjgxOSRV1ipriSBOwd0PHzw2KAs_cDrTXzvUKIs",
"password": "zlQgc0nbgcqF6MxOqnh7tKjJsGnSgLFS89uS-FXzMVqhL2dgFbmHwB-IXAAsOYXzUYj40g==",
"max_retention_size": 1073741824000,
"max_retention_time": 2592000000,
"max_messages_per_second": 1000,
"creation_time": 1643978975,
"max_message_size": 1048576,
"max_partitions": 100
}
```
# Delete Kafka Cluster
Source: https://upstash.com/docs/devops/developer-api/kafka/clusters/delete
DELETE https://api.upstash.com/v2/kafka/cluster/{id}
This endpoint deletes a kafka cluster.
## URL Parameters
The ID of the Kafka cluster to be deleted
```shell curl
curl -X DELETE \
https://api.upstash.com/v2/kafka/cluster/:id \
-u 'EMAIL:API_KEY'
```
```python Python
import requests
response = requests.delete('https://api.upstash.com/v2/kafka/cluster/:id' auth=('EMAIL', 'API_KEY'))
response.content
```
```go Go
client := &http.Client{}
req, err := http.NewRequest("DELETE", "https://api.upstash.com/v2/kafka/cluster/:id", nil)
if err != nil {
log.Fatal(err)
}
req.SetBasicAuth("email", "api_key")
resp, err := client.Do(req)
if err != nil {
log.Fatal(err)
}
bodyText, err := ioutil.ReadAll(resp.Body)
if err != nil {
log.Fatal(err)
}
fmt.Printf("%s\n", bodyText);
```
```json 200 OK
"OK"
```
# Get Kafka Cluster
Source: https://upstash.com/docs/devops/developer-api/kafka/clusters/get
GET https://api.upstash.com/v2/Kafka/cluster/{id}
This endpoint gets details of a Kafka cluster.
## URL Parameters
The ID of the Kafka cluster
## Response Parameters
ID of the created Kafka cluster
Name of the Kafka cluster
The region the Kafka cluster is deployed in
Shows whether the cluster is free or paid
Whether the multizone replication is enabled for the cluster or not
TCP endpoint to connect to the Kafka cluster
REST endpoint to connect to the Kafka cluster
Current state of the cluster(active, deleted)
Username to be used in authenticating to the cluster
Password to be used in authenticating to the cluster
Max retention size will be allowed to topics in the cluster
Max retention time will be allowed to topics in the cluster
Max messages allowed to be produced per second
Cluster creation timestamp
Max message size will be allowed in topics in the cluster
Max total number of partitions allowed in the cluster
```shell curl
curl -X GET \
https://api.upstash.com/v2/kafka/cluster/:id \
-u 'EMAIL:API_KEY'
```
```python Python
import requests
response = requests.get('https://api.upstash.com/v2/kafka/cluster/:id', auth=('EMAIL', 'API_KEY'))
response.content
```
```go Go
client := &http.Client{}
req, err := http.NewRequest("GET", "https://api.upstash.com/v2/kafka/cluster/:id", nil)
if err != nil {
log.Fatal(err)
}
req.SetBasicAuth("email", "api_key")
resp, err := client.Do(req)
if err != nil {
log.Fatal(err)
}
bodyText, err := ioutil.ReadAll(resp.Body)
if err != nil {
log.Fatal(err)
}
fmt.Printf("%s\n", bodyText);
```
```json 200 OK
{
"cluster_id": "9bc0e897-cbd3-4997-895a-fd77ad00aec9",
"name": "test_kafka_cluster",
"region": "eu-west-1",
"type": "paid",
"multizone": true,
"tcp_endpoint": "sharing-mastodon-12819-eu1-kafka.upstashdev.com",
"rest_endpoint": "sharing-mastodon-12819-eu1-rest-kafka.upstashdev.com",
"state": "active",
"username": "c2hhcmluZy1tYXN0b2Rvbi0xMjgxOSRV1ipriSBOwd0PHzw2KAs_cDrTXzvUKIs",
"password": "zlQgc0nbgcqF6MxOqnh7tKjJsGnSgLFS89uS-FXzMVqhL2dgFbmHwB-IXAAsOYXzUYj40g==",
"max_retention_size": 1073741824000,
"max_retention_time": 2592000000,
"max_messages_per_second": 1000,
"creation_time": 1643978975,
"max_message_size": 1048576,
"max_partitions": 100
}
```
# List Kafka Clusters
Source: https://upstash.com/docs/devops/developer-api/kafka/clusters/list
GET https://api.upstash.com/v2/kafka/clusters
This endpoint lists all kafka clusters of user.
## Response Parameters
ID of the created kafka cluster
Name of the kafka cluster
The region the kafka cluster is deployed in
Shows whether the cluster is free or paid
Whether the multizone replication is enabled for the cluster or not
TCP endpoint to connect to the kafka cluster
REST endpoint to connect to the kafka cluster
Current state of the cluster(active, deleted)
Username to be used in authenticating to the cluster
Password to be used in authenticating to the cluster
Max retention size will be allowed to topics in the cluster
Max retention time will be allowed to topics in the cluster
Max messages allowed to be produced per second
Cluster creation timestamp
Max message size will be allowed in topics in the cluster
Max total number of partitions allowed in the cluster
```shell curl
curl -X GET \
https://api.upstash.com/v2/kafka/clusters \
-u 'EMAIL:API_KEY'
```
```python Python
import requests
response = requests.get('https://api.upstash.com/v2/kafka/clusters', auth=('EMAIL', 'API_KEY'))
response.content
```
```go Go
client := &http.Client{}
req, err := http.NewRequest("GET", "https://api.upstash.com/v2/kafka/clusters", nil)
if err != nil {
log.Fatal(err)
}
req.SetBasicAuth("email", "api_key")
resp, err := client.Do(req)
if err != nil {
log.Fatal(err)
}
bodyText, err := ioutil.ReadAll(resp.Body)
if err != nil {
log.Fatal(err)
}
fmt.Printf("%s\n", bodyText);
```
```json 200 OK
[
{
"cluster_id": "9bc0e897-cbd3-4997-895a-fd77ad00aec9",
"name": "test_kafka_cluster",
"region": "eu-west-1",
"type": "paid",
"multizone": true,
"tcp_endpoint": "sharing-mastodon-12819-eu1-kafka.upstashdev.com",
"rest_endpoint": "sharing-mastodon-12819-eu1-rest-kafka.upstashdev.com",
"state": "active",
"username": "c2hhcmluZy1tYXN0b2Rvbi0xMjgxOSRV1ipriSBOwd0PHzw2KAs_cDrTXzvUKIs",
"password": "zlQgc0nbgcqF6MxOqnh7tKjJsGnSgLFS89uS-FXzMVqhL2dgFbmHwB-IXAAsOYXzUYj40g==",
"max_retention_size": 1073741824000,
"max_retention_time": 2592000000,
"max_messages_per_second": 1000,
"creation_time": 1643978975,
"max_message_size": 1048576,
"max_partitions": 100
}
]
```
# Rename Kafka Cluster
Source: https://upstash.com/docs/devops/developer-api/kafka/clusters/rename
POST https://api.upstash.com/v2/kafka/rename-cluster/{id}
This endpoint gets details of a Kafka cluster.
## URL Parameters
The ID of the Kafka cluster
## Request Parameters
The new name of the kafka cluster
## Response Parameters
ID of the created Kafka cluster
Name of the Kafka cluster
The region the Kafka cluster is deployed in
Shows whether the cluster is free or paid
Whether the multizone replication is enabled for the cluster or not
TCP endpoint to connect to the Kafka cluster
REST endpoint to connect to the Kafka cluster
Current state of the cluster(active, deleted)
Username to be used in authenticating to the cluster
Password to be used in authenticating to the cluster
Max retention size will be allowed to topics in the cluster
Max retention time will be allowed to topics in the cluster
Max messages allowed to be produced per second
Cluster creation timestamp
Max message size will be allowed in topics in the cluster
Max total number of partitions allowed in the cluster
```shell curl
curl -X POST \
https://api.upstash.com/v2/kafka/rename-cluster/:id \
-u 'EMAIL:API_KEY' \
-d '{"name":"mykafkacluster-2"}'
```
```python Python
import requests
data = '{"name":"mykafkacluster-2"}'
response = requests.post('https://api.upstash.com/v2/kafka/rename-cluster/:id', data=data, auth=('EMAIL', 'API_KEY'))
response.content
```
```go Go
client := &http.Client{}
var data = strings.NewReader(`{
"name":"mykafkacluster-2"
}`)
req, err := http.NewRequest("POST", "https://api.upstash.com/v2/kafka/rename-cluster/:id", data)
if err != nil {
log.Fatal(err)
}
req.SetBasicAuth("email", "api_key")
resp, err := client.Do(req)
if err != nil {
log.Fatal(err)
}
bodyText, err := ioutil.ReadAll(resp.Body)
if err != nil {
log.Fatal(err)
}
fmt.Printf("%s\n", bodyText);
```
```json 200 OK
{
"cluster_id": "9bc0e897-cbd3-4997-895a-fd77ad00aec9",
"name": "mykafkacluster-2",
"region": "eu-west-1",
"type": "paid",
"multizone": true,
"tcp_endpoint": "sharing-mastodon-12819-eu1-kafka.upstashdev.com",
"rest_endpoint": "sharing-mastodon-12819-eu1-rest-kafka.upstashdev.com",
"state": "active",
"username": "c2hhcmluZy1tYXN0b2Rvbi0xMjgxOSRV1ipriSBOwd0PHzw2KAs_cDrTXzvUKIs",
"password": "zlQgc0nbgcqF6MxOqnh7tKjJsGnSgLFS89uS-FXzMVqhL2dgFbmHwB-IXAAsOYXzUYj40g==",
"max_retention_size": 1073741824000,
"max_retention_time": 2592000000,
"max_messages_per_second": 1000,
"creation_time": 1643978975,
"max_message_size": 1048576,
"max_partitions": 100
}
```
# Reset Kafka Cluster Password
Source: https://upstash.com/docs/devops/developer-api/kafka/clusters/reset_password
POST https://api.upstash.com/v2/kafka/reset-password/{id}
This endpoint updates the password of a kafka cluster
## URL Parameters
The ID of the Kafka cluster to reset password
## Response Parameters
ID of the created Kafka cluster
Name of the Kafka cluster
The region the Kafka cluster is deployed in
Shows whether the cluster is free or paid
Whether the multizone replication is enabled for the cluster or not
TCP endpoint to connect to the Kafka cluster
REST endpoint to connect to the Kafka cluster
Current state of the cluster(active, deleted)
Username to be used in authenticating to the cluster
Password to be used in authenticating to the cluster
Max retention size will be allowed to topics in the cluster
Max retention time will be allowed to topics in the cluster
Max messages allowed to be produced per second
Cluster creation timestamp
Max message size will be allowed in topics in the cluster
Max total number of partitions allowed in the cluster
```shell curl
curl -X POST \
https://api.upstash.com/v2/kafka/reset-password/:id \
-u 'EMAIL:API_KEY'
```
```python Python
import requests
response = requests.post('https://api.upstash.com/v2/kafka/reset-password/:id', auth=('EMAIL', 'API_KEY'))
response.content
```
```go Go
client := &http.Client{}
req, err := http.NewRequest("POST", "https://api.upstash.com/v2/kafka/reset-password/:id", nil)
if err != nil {
log.Fatal(err)
}
req.SetBasicAuth("email", "api_key")
resp, err := client.Do(req)
if err != nil {
log.Fatal(err)
}
bodyText, err := ioutil.ReadAll(resp.Body)
if err != nil {
log.Fatal(err)
}
fmt.Printf("%s\n", bodyText);
```
```json 200 OK
{
"cluster_id": "9bc0e897-cbd3-4997-895a-fd77ad00aec9",
"name": "mykafkacluster-2",
"region": "eu-west-1",
"type": "paid",
"multizone": true,
"tcp_endpoint": "sharing-mastodon-12819-eu1-kafka.upstashdev.com",
"rest_endpoint": "sharing-mastodon-12819-eu1-rest-kafka.upstashdev.com",
"state": "active",
"username": "c2hhcmluZy1tYXN0b2Rvbi0xMjgxOSRV1ipriSBOwd0PHzw2KAs_cDrTXzvUKIs",
"password": "7ea02715ceeb4fd3ba1542a5f3bf758e",
"max_retention_size": 1073741824000,
"max_retention_time": 2592000000,
"max_messages_per_second": 1000,
"creation_time": 1643978975,
"max_message_size": 1048576,
"max_partitions": 100
}
```
# Get Kafka Cluster Stats
Source: https://upstash.com/docs/devops/developer-api/kafka/clusters/stats
GET https://api.upstash.com/v2/kafka/stats/topic/{id}
This endpoint gets detailed stats of a database.
## URL Parameters
The ID of the Kafka cluster
## Response Parameters
Timestamp indicating when the measurement was taken.
Number of monthly messages in kafka cluster
Timestamp indicating when the measurement was taken.
Number of monthly messages produced in kafka cluster
Timestamp indicating when the measurement was taken.
Number of monthly messages consumed in kafka cluster
Timestamp indicating when the measurement was taken.
Total disk usage of the kafka cluster
String representation of last 5 days of the week starting from the current day
Last 5 days daily produced message count in kafka cluster
Last 5 days daily consumed message count in kafka cluster
Average storage size of the kafka cluster in the current month
Total cost of the kafka cluster in current month
Total number of produced message in current month
Total number of consumed message in current month
```shell curl
curl -X GET \
https://api.upstash.com/v2/kafka/stats/cluster/:id \
-u 'EMAIL:API_KEY'
```
```python Python
import requests
response = requests.get('https://api.upstash.com/v2/kafka/stats/cluster/:id', auth=('EMAIL', 'API_KEY'))
response.content
```
```go Go
client := &http.Client{}
req, err := http.NewRequest("GET", "https://api.upstash.com/v2/kafka/stats/cluster/:id", nil)
if err != nil {
log.Fatal(err)
}
req.SetBasicAuth("email", "api_key")
resp, err := client.Do(req)
if err != nil {
log.Fatal(err)
}
bodyText, err := ioutil.ReadAll(resp.Body)
if err != nil {
log.Fatal(err)
}
fmt.Printf("%s\n", bodyText);
```
```json 200 OK
{
"throughput": [
{
"x": "2022-02-07 11:30:28",
"y": 0
}
...
],
"produce_throughput": [
{
"x": "2022-02-07 11:30:28",
"y": 0
}
...
],
"consume_throughput": [
{
"x": "2022-02-07 11:30:28",
"y": 0
}
...
],
"diskusage": [
{
"x": "2022-02-07 11:45:28",
"y": 0
}
...
],
"days": [
"Thursday",
"Friday",
"Saturday",
"Sunday",
"Monday"
],
"dailyproduce": [
{
"x": "2022-02-07 11:30:28.937259962 +0000 UTC",
"y": 0
}
...
],
"dailyconsume": [
{
"x": "2022-02-07 11:30:28.937256776 +0000 UTC",
"y": 0
}
...
],
"total_monthly_storage": 0,
"total_monthly_billing": 0,
"total_monthly_produce": 0,
"total_monthly_consume": 0
}
```
# Create Kafka Connector
Source: https://upstash.com/docs/devops/developer-api/kafka/connectors/create
POST https://api.upstash.com/v2/kafka/connector
This endpoint creates a new kafka connector in a cluster.
## Request Parameters
Name of the new kafka topic
ID of the cluster the topic will be deployed in
Properties of the connector. Custom config for different types of connectors.
## Response Parameters
ID of the new kafka connector
Name of the new kafka connector
Owner of the connector
ID of the kafka cluster of the connector
Creation time of the topic
Creation time of the topic
State of the connector
Error message, if the connector failed
State of the connector
Tasks for the connector
Topics that are given with properties config
Class of the created connector
Encoded username for the connector
Time to live for connector
```shell curl
curl -X POST \
https://api.upstash.com/v2/kafka/connector \
-u 'EMAIL:API_KEY' \
-d '{"name":"connectorName","cluster_id":"7568431c-88d5-4409-a808-2167f22a7133", "properties":{"connector.class": "com.mongodb.kafka.connect.MongoSourceConnector","connection.uri": "connection-uri"}}'
```
```python Python
import requests
data = '{"name":"connectorName","cluster_id":"7568431c-88d5-4409-a808-2167f22a7133", "properties":{"connector.class": "com.mongodb.kafka.connect.MongoSourceConnector","connection.uri": "connection-uri"}}'
response = requests.post('https://api.upstash.com/v2/kafka/connector', data=data, auth=('EMAIL', 'API_KEY'))
response.content
```
```go Go
client := &http.Client{}
var data = strings.NewReader(`{
"name": "connectorName",
"cluster_id": "7568431c-88d5-4409-a808-2167f22a7133",
"properties":{"connector.class": "com.mongodb.kafka.connect.MongoSourceConnector","connection.uri": "connection-uri"}
}`)
req, err := http.NewRequest("POST", "https://api.upstash.com/v2/kafka/connector", data)
if err != nil {
log.Fatal(err)
}
req.SetBasicAuth("email", "api_key")
resp, err := client.Do(req)
if err != nil {
log.Fatal(err)
}
bodyText, err := ioutil.ReadAll(resp.Body)
if err != nil {
log.Fatal(err)
}
fmt.Printf("%s\n", bodyText);
```
```json 200 OK
{
"connector_id":"431ec970-b59d-4b00-95fe-5f3abcc52c2f",
"name":"connectorName",
"customer_id":"EMAIL",
"cluster_id":"7568431c-88d5-4409-a808-2167f22a7133",
"creation_time":1684369147,
"deletion_time":0,
"state":"pending",
"state_error_message":"",
"connector_state":"",
"tasks":[],
"topics":[],
"connector_class":"com.mongodb.kafka.connect.MongoSourceConnector",
"encoded_username":"YXBwYXJlbnQta2l0ZS0xMTMwMiTIqFhTItzgDdE56au6LgnnbtlN7ITzh4QATDw",
"TTL":1684370947
}
```
# Delete Kafka Connector
Source: https://upstash.com/docs/devops/developer-api/kafka/connectors/delete
DELETE https://api.upstash.com/v2/kafka/connector/{id}
This endpoint deletes a Kafka Connector.
## URL Parameters
The ID of the Kafka Connector to be deleted
```shell curl
curl -X DELETE \
https://api.upstash.com/v2/kafka/connector/:id \
-u 'EMAIL:API_KEY'
```
```python Python
import requests
response = requests.delete('https://api.upstash.com/v2/kafka/connector/:id' auth=('EMAIL', 'API_KEY'))
response.content
```
```go Go
client := &http.Client{}
req, err := http.NewRequest("DELETE", "https://api.upstash.com/v2/kafka/connector/:id", nil)
if err != nil {
log.Fatal(err)
}
req.SetBasicAuth("email", "api_key")
resp, err := client.Do(req)
if err != nil {
log.Fatal(err)
}
bodyText, err := ioutil.ReadAll(resp.Body)
if err != nil {
log.Fatal(err)
}
fmt.Printf("%s\n", bodyText);
```
```json 200 OK
"OK"
```
# Get Kafka Connector
Source: https://upstash.com/docs/devops/developer-api/kafka/connectors/get
GET https://api.upstash.com/v2/kafka/connector/{id}
This endpoint gets details of a kafka connector.
## URL Parameters
The ID of the Kafka Connector
## Response Parameters
ID of the Kafka connector
Name of the Kafka connector
ID of the kafka cluster of the connector
Creation time of the topic
Owner of the connector
State of the connector
Error message, if the connector failed
State of the connector
Tasks for the connector
Topics that are given with properties config
Class of the created connector
Properties that the connector was configured with
Encoded username for the connector
```shell curl
curl -X GET \
https://api.upstash.com/v2/kafka/connector/:id \
-u 'EMAIL:API_KEY'
```
```python Python
import requests
response = requests.get('https://api.upstash.com/v2/kafka/connector/:id', auth=('EMAIL', 'API_KEY'))
response.content
```
```go Go
client := &http.Client{}
req, err := http.NewRequest("GET", "https://api.upstash.com/v2/kafka/connector/:id", nil)
if err != nil {
log.Fatal(err)
}
req.SetBasicAuth("email", "api_key")
resp, err := client.Do(req)
if err != nil {
log.Fatal(err)
}
bodyText, err := ioutil.ReadAll(resp.Body)
if err != nil {
log.Fatal(err)
}
fmt.Printf("%s\n", bodyText);
```
```json 200 OK
{
"connector_id": "431ec970-b59d-4b00-95fe-5f3abcc52c2f",
"name": "connectorName",
"customer_id": "EMAIL",
"cluster_id": "7568431c-88d5-4409-a808-2167f22a7133",
"creation_time": 1684369147,
"deletion_time": 0,
"state": "failed",
"state_error_message": "Connector configuration is invalid and contains the following 1 error(s):\nInvalid value connection-uri-update for configuration connection.uri: The connection string is invalid. Connection strings must start with either 'mongodb://' or 'mongodb+srv://\n",
"connector_state": "",
"tasks": [],
"topics": [],
"connector_class": "com.mongodb.kafka.connect.MongoSourceConnector",
"properties": {
"connection.uri": "connection-uri-update",
"connector.class": "com.mongodb.kafka.connect.MongoSourceConnector"
},
"encoded_username": "YXBwYXJlbnQta2l0ZS0xMTMwMiTIqFhTItzgDdE56au6LgnnbtlN7ITzh4QATDw"
}
```
# List Kafka Connectors in Cluster
Source: https://upstash.com/docs/devops/developer-api/kafka/connectors/list
GET https://api.upstash.com/v2/kafka/connectors/{id}
This endpoint lists kafka connectors in a cluster.
## URL Parameters
The ID of the Kafka Cluster
## Response Parameters
ID of the Kafka connector
Name of the Kafka connector
ID of the kafka cluster of the connector
Creation time of the topic
Owner of the connector
State of the connector
Error message, if the connector failed
State of the connector
Tasks for the connector
Topics that are given with properties config
Class of the created connector
Properties that the connector was configured with
Encoded username for the connector
Time to live for connector
```shell curl
curl -X GET \
https://api.upstash.com/v2/kafka/connectors/:id \
-u 'EMAIL:API_KEY'
```
```python Python
import requests
response = requests.get('https://api.upstash.com/v2/kafka/connectors/:id', auth=('EMAIL', 'API_KEY'))
response.content
```
```go Go
client := &http.Client{}
req, err := http.NewRequest("GET", "https://api.upstash.com/v2/kafka/connectors/:id", nil)
if err != nil {
log.Fatal(err)
}
req.SetBasicAuth("email", "api_key")
resp, err := client.Do(req)
if err != nil {
log.Fatal(err)
}
bodyText, err := ioutil.ReadAll(resp.Body)
if err != nil {
log.Fatal(err)
}
fmt.Printf("%s\n", bodyText);
```
```json 200 OK
[
{
"connector_id": "431ec970-b59d-4b00-95fe-5f3abcc52c2f",
"name": "connectorName",
"customer_id": "EMAIL",
"cluster_id": "7568431c-88d5-4409-a808-2167f22a7133",
"creation_time": 1684369147,
"deletion_time": 0,
"state": "failed",
"state_error_message": "Connector configuration is invalid and contains the following 1 error(s):\nInvalid value connection-uri-update for configuration connection.uri: The connection string is invalid. Connection strings must start with either 'mongodb://' or 'mongodb+srv://\n",
"connector_state": "",
"tasks": [],
"topics": [],
"connector_class": "com.mongodb.kafka.connect.MongoSourceConnector",
"properties": {
"connection.uri": "connection-uri-update",
"connector.class": "com.mongodb.kafka.connect.MongoSourceConnector"
},
"encoded_username": "YXBwYXJlbnQta2l0ZS0xMTMwMiTIqFhTItzgDdE56au6LgnnbtlN7ITzh4QATDw",
"TTL": 1684370947
}
]
```
# Pause Kafka Connector
Source: https://upstash.com/docs/devops/developer-api/kafka/connectors/pause
POST https://api.upstash.com/v2/kafka/connector/{id}/pause
This endpoint pauses an existing connector.
## URL Parameters
The ID of the Kafka Connector to be paused
```shell curl
curl -X POST \
https://api.upstash.com/v2/kafka/connector/:id/pause \
-u 'EMAIL:API_KEY'
```
```python Python
import requests
response = requests.post('https://api.upstash.com/v2/kafka/connector/:id/start', auth=('EMAIL', 'API_KEY'))
response.content
```
```go Go
client := &http.Client{}
req, err := http.NewRequest("POST", "https://api.upstash.com/v2/kafka/connector/:id/start", nil)
if err != nil {
log.Fatal(err)
}
req.SetBasicAuth("email", "api_key")
resp, err := client.Do(req)
if err != nil {
log.Fatal(err)
}
bodyText, err := ioutil.ReadAll(resp.Body)
if err != nil {
log.Fatal(err)
}
fmt.Printf("%s\n", bodyText);
```
```json 200 OK
"OK"
```
# Reconfigure Kafka Connector
Source: https://upstash.com/docs/devops/developer-api/kafka/connectors/reconfigure
POST https://api.upstash.com/v2/kafka/update-connector/{id}
This endpoint reconfigures an existing kafka connector.
## Request Parameters
The ID of the Kafka Connector
## Request Parameters
Custom property values, depending on the connector type. Given values will be
changed on the connector. You can check the documentation of the related
connector.
## Response Parameters
ID of the Kafka connector
Name of the Kafka connector
ID of the kafka cluster of the connector
Creation time of the topic
Owner of the connector
State of the connector
Error message, if the connector failed
State of the connector
Tasks for the connector
Topics that are given with properties config
Class of the created connector
Encoded username for the connector
Time to live for connector
```shell curl
curl -X POST \
https://api.upstash.com/v2/kafka/update-connector/:id \
-u 'EMAIL:API_KEY' \
-d '{"connector.class": "com.mongodb.kafka.connect.MongoSourceConnector","connection.uri": "connection-uri-update"}'
```
```python Python
import requests
data = '{"connector.class": "com.mongodb.kafka.connect.MongoSourceConnector","connection.uri": "connection-uri-update"}'
response = requests.post('https://api.upstash.com/v2/kafka/update-connector/:id', data=data, auth=('EMAIL', 'API_KEY'))
response.content
```
```go Go
client := &http.Client{}
var data = strings.NewReader(`{
"connector.class": "com.mongodb.kafka.connect.MongoSourceConnector",
"connection.uri": "connection-uri-update"
}`)
req, err := http.NewRequest("POST", "https://api.upstash.com/v2/kafka/update-connector/:id", data)
if err != nil {
log.Fatal(err)
}
req.SetBasicAuth("email", "api_key")
resp, err := client.Do(req)
if err != nil {
log.Fatal(err)
}
bodyText, err := ioutil.ReadAll(resp.Body)
if err != nil {
log.Fatal(err)
}
fmt.Printf("%s\n", bodyText);
```
```json 200 OK
{
"connector_id": "431ec970-b59d-4b00-95fe-5f3abcc52c2f",
"name": "connectorName",
"customer_id": "EMAIL",
"cluster_id": "7568431c-88d5-4409-a808-2167f22a7133",
"creation_time": 1684369147,
"deletion_time": 0,
"state": "failed",
"state_error_message": "Connector configuration is invalid and contains the following 1 error(s):\nInvalid value connection-uri-update for configuration connection.uri: The connection string is invalid. Connection strings must start with either 'mongodb://' or 'mongodb+srv://\n",
"connector_state": "",
"tasks": [],
"topics": [],
"connector_class": "com.mongodb.kafka.connect.MongoSourceConnector",
"encoded_username": "YXBwYXJlbnQta2l0ZS0xMTMwMiTIqFhTItzgDdE56au6LgnnbtlN7ITzh4QATDw",
"TTL": 1684370947
}
```
# Restart Kafka Connector
Source: https://upstash.com/docs/devops/developer-api/kafka/connectors/restart
POST https://api.upstash.com/v2/kafka/connector/{id}/restart
This endpoint restarts an existing connector.
## URL Parameters
The ID of the Kafka Connector to be restarted
```shell curl
curl -X POST \
https://api.upstash.com/v2/kafka/connector/:id/restart \
-u 'EMAIL:API_KEY'
```
```python Python
import requests
response = requests.post('https://api.upstash.com/v2/kafka/connector/:id/restart', auth=('EMAIL', 'API_KEY'))
response.content
```
```go Go
client := &http.Client{}
req, err := http.NewRequest("POST", "https://api.upstash.com/v2/kafka/connector/:id/restart", nil)
if err != nil {
log.Fatal(err)
}
req.SetBasicAuth("email", "api_key")
resp, err := client.Do(req)
if err != nil {
log.Fatal(err)
}
bodyText, err := ioutil.ReadAll(resp.Body)
if err != nil {
log.Fatal(err)
}
fmt.Printf("%s\n", bodyText);
```
```json 200 OK
"OK"
```
# Start Kafka Connector
Source: https://upstash.com/docs/devops/developer-api/kafka/connectors/start
POST https://api.upstash.com/v2/kafka/connector/{id}/start
This endpoint starts an existing connector.
## URL Parameters
The ID of the Kafka Connector to be started
```shell curl
curl -X POST \
https://api.upstash.com/v2/kafka/connector/:id/start \
-u 'EMAIL:API_KEY'
```
```python Python
import requests
response = requests.post('https://api.upstash.com/v2/kafka/connector/:id/start', auth=('EMAIL', 'API_KEY'))
response.content
```
```go Go
client := &http.Client{}
req, err := http.NewRequest("POST", "https://api.upstash.com/v2/kafka/connector/:id/start", nil)
if err != nil {
log.Fatal(err)
}
req.SetBasicAuth("email", "api_key")
resp, err := client.Do(req)
if err != nil {
log.Fatal(err)
}
bodyText, err := ioutil.ReadAll(resp.Body)
if err != nil {
log.Fatal(err)
}
fmt.Printf("%s\n", bodyText);
```
```json 200 OK
"OK"
```
# Create Kafka Credential
Source: https://upstash.com/docs/devops/developer-api/kafka/credentials/create
POST https://api.upstash.com/v2/kafka/credential
This endpoint creates a kafka credential.
## Request Parameters
The ID of the kafka topic
ID of the kafka cluster
Name of the kafka topic the credential will be used for
Permission scope of the credential
**Options:** `ALL`, `PRODUCE` or `CONSUME`
## Response Parameters
ID of the created Kafka credential
Name of the created Kafka credential
Name of the topic of the created Kafka credential
Permission scope given to the kafka credential
ID of the kafka cluster
Username to be used for the kafka credential
Creation time of the credential
Password to be used in authenticating to the cluster
State of the credential\ `active` or `deleted`
```shell curl
curl -X POST \
https://api.upstash.com/v2/kafka/credential \
-u 'EMAIL:API_KEY' \
-d '{"credential_name": "mycreds", "cluster_id":"1793bfa1-d96e-46de-99ed-8f91f083209d", "topic": "testtopic", "permissions": "ALL"}'
```
```python Python
import requests
data = '{"credential_name": "mycreds", "cluster_id":"1793bfa1-d96e-46de-99ed-8f91f083209d", "topic": "testtopic", "permissions": "ALL"}'
response = requests.post('https://api.upstash.com/v2/credential', data=data, auth=('EMAIL', 'API_KEY'))
response.content
```
```go Go
client := &http.Client{}
var data = strings.NewReader(`{
"credential_name": "mycreds",
"cluster_id":"1793bfa1-d96e-46de-99ed-8f91f083209d",
"topic": "testopic",
"permissions": "ALL"
}`)
req, err := http.NewRequest("POST", "https://api.upstash.com/v2/kafka/credential", data)
if err != nil {
log.Fatal(err)
}
req.SetBasicAuth("email", "api_key")
resp, err := client.Do(req)
if err != nil {
log.Fatal(err)
}
bodyText, err := ioutil.ReadAll(resp.Body)
if err != nil {
log.Fatal(err)
}
fmt.Printf("%s\n", bodyText);
```
```json 200 OK
{
"credential_id": "27172269-da05-471b-9e8e-8fe4195871bc",
"credential_name": "mycreds",
"topic": "testtopic",
"permissions": "ALL",
"cluster_id": "1793bfa1-d96e-46de-99ed-8f91f083209d",
"cluster_slug":"easy-haddock-7753",
"username":"ZWFzeS1oYWRkb2NrLTc3NTMkeeOs0FG4DZ3GxK99cArT0slAC37KLJgbe0fs7dA",
"creation_time": 1655886853,
"password": "xE1ypRHMq50jAhpbzu8qBb8jHNAxzezn6bkuRUvc2RZr7X1sznbhampm9p-feT61jnz6ewHJjUd5N6cQHhs84zCjQiP5somCY17FTQ7t6n0uPhWeyf-Fcw==",
"state": "active"
}
```
# Delete Kafka Credential
Source: https://upstash.com/docs/devops/developer-api/kafka/credentials/delete
DELETE https://api.upstash.com/v2/kafka/credential/{id}
This endpoint deletes a kafka credential.
## URL Parameters
The ID of the kafka credential to delete
```shell curl
curl -X DELETE \
https://api.upstash.com/v2/kafka/credential/:id \
-u 'EMAIL:API_KEY'
```
```python Python
import requests
response = requests.delete('https://api.upstash.com/v2/kafka/credential/:id' auth=('EMAIL', 'API_KEY'))
response.content
```
```go Go
client := &http.Client{}
req, err := http.NewRequest("DELETE", "https://api.upstash.com/v2/kafka/credential/:id", nil)
if err != nil {
log.Fatal(err)
}
req.SetBasicAuth("email", "api_key")
resp, err := client.Do(req)
if err != nil {
log.Fatal(err)
}
bodyText, err := ioutil.ReadAll(resp.Body)
if err != nil {
log.Fatal(err)
}
fmt.Printf("%s\n", bodyText);
```
```json 200 OK
"OK"
```
# List Kafka Credentials
Source: https://upstash.com/docs/devops/developer-api/kafka/credentials/list
GET https://api.upstash.com/v2/kafka/credentials
This endpoint lists created kafka credentials other than the default one.
## Request Parameters
## Response Parameters
ID of the created Kafka credential
Name of the created Kafka credential
Name of the topic of the created Kafka credential
Permission scope given to the kafka credential
ID of the kafka cluster
ID of the kafka cluster
Username to be used for the kafka credential
Creation time of the credential
Password to be used in authenticating to the cluster
State of the credential\ `active` or `deleted`
```shell curl
curl -X GET \
https://api.upstash.com/v2/kafka/credentials \
-u 'EMAIL:API_KEY'
```
```python Python
import requests
response = requests.get('https://api.upstash.com/v2/kafka/credentials', auth=('EMAIL', 'API_KEY'))
response.content
```
```go Go
client := &http.Client{}
req, err := http.NewRequest("GET", "https://api.upstash.com/v2/kafka/credentials", nil)
if err != nil {
log.Fatal(err)
}
req.SetBasicAuth("email", "api_key")
resp, err := client.Do(req)
if err != nil {
log.Fatal(err)
}
bodyText, err := ioutil.ReadAll(resp.Body)
if err != nil {
log.Fatal(err)
}
fmt.Printf("%s\n", bodyText);
```
```json 200 OK
[
{
"credential_id": "27172269-da05-471b-9e8e-8fe4195871bc",
"credential_name": "mycreds",
"topic": "testopic",
"permissions": "ALL",
"cluster_id": "1793bfa1-d96e-46de-99ed-8f91f083209d",
"cluster_slug":"noted-hamster-9151",
"username":"bm90ZWQtaGFtc3Rlci05MTUxJPGKdKDkmwdObf8yMzmJ8jUqhmN1UQ7VmDe1xkk",
"creation_time": 1655886853,
"password": "xE1ypRHMq50jAhpbzu8qBb8jHNAxzezn6bkuRUvc2RZr7X1sznbhampm9p-feT61jnz6ewHJjUd5N6cQHhs84zCjQiP5somCY17FTQ7t6n0uPhWeyf-Fcw==",
"state": "active"
}
]
```
# Create Kafka Topic
Source: https://upstash.com/docs/devops/developer-api/kafka/topics/create
POST https://api.upstash.com/v2/kafka/topic
This endpoint creates a new kafka topic in a cluster.
## Request Parameters
Name of the new kafka topic
The number of partitions the topic will have
Retention time of messsages in the topic `-1` for highest possible value
Retention size of the messages in the topic `-1` for highest possible value
Max message size in the topic `-1` for highest possible value
Cleanup policy will be used in the topic `compact` or `delete`
ID of the cluster the topic will be deployed in
## Response Parameters
ID of the new kafka topic
Name of the new kafka topic
ID of the created Kafka cluster
Name of the Kafka cluster
The region the Kafka cluster is deployed in
Shows whether the cluster is free or paid
Whether the multizone replication is enabled for the cluster or not
TCP endpoint to connect to the Kafka cluster
REST endpoint to connect to the Kafka cluster
Current state of the cluster(active, deleted)
Username to be used in authenticating to the cluster
Password to be used in authenticating to the cluster
Max retention size will be allowed to topics in the cluster
Max retention time will be allowed to topics in the cluster
Max messages allowed to be produced per second
Cluster creation timestamp
Max message size will be allowed in topics in the cluster
Max total number of partitions allowed in the cluster
```shell curl
curl -X POST \
https://api.upstash.com/v2/kafka/topic \
-u 'EMAIL:API_KEY' \
-d '{"name":"test-kafka-topic","partitions":1,"retention_time":1234,"retention_size":4567,"max_message_size":8912,"cleanup_policy":"delete","cluster_id":"9bc0e897-cbd3-4997-895a-fd77ad00aec9"}'
```
```python Python
import requests
data = '{"name":"test-kafka-topic","partitions":1,"retention_time":1234,"retention_size":4567,"max_message_size":8912,"cleanup_policy":"delete","cluster_id":"9bc0e897-cbd3-4997-895a-fd77ad00aec9"}'
response = requests.post('https://api.upstash.com/v2/kafka/topic', data=data, auth=('EMAIL', 'API_KEY'))
response.content
```
```go Go
client := &http.Client{}
var data = strings.NewReader(`{
"name": "test-kafka-topic",
"partitions": 1,
"retention_time": 1234,
"retention_size": 4567,
"max_message_size": 8912,
"cleanup_policy": "delete",
"cluster_id": "9bc0e897-cbd3-4997-895a-fd77ad00aec9"
}`)
req, err := http.NewRequest("POST", "https://api.upstash.com/v2/kafka/topic", data)
if err != nil {
log.Fatal(err)
}
req.SetBasicAuth("email", "api_key")
resp, err := client.Do(req)
if err != nil {
log.Fatal(err)
}
bodyText, err := ioutil.ReadAll(resp.Body)
if err != nil {
log.Fatal(err)
}
fmt.Printf("%s\n", bodyText);
```
```json 200 OK
{
"topic_id": "0f458c88-2dc6-4f69-97bb-05060e0be934",
"topic_name": "test-kafka-topic",
"cluster_id": "9bc0e897-cbd3-4997-895a-fd77ad00aec9",
"region": "eu-west-1",
"creation_time": 1643981720,
"state": "active",
"partitions": 1,
"multizone": true,
"tcp_endpoint": "sharing-mastodon-12819-eu1-kafka.upstashdev.com",
"rest_endpoint": "sharing-mastodon-12819-eu1-rest-kafka.upstashdev.com",
"username": "c2hhcmluZy1tYXN0b2Rvbi0xMjgxOSRV1ipriSBOwd0PHzw2KAs_cDrTXzvUKIs",
"password": "eu8K3rYRS-ma0AsINDo7MMemmHjjRSldHJcG3c1LUMZkFfdSf9u_Kd4xCWO9_oQc",
"cleanup_policy": "delete",
"retention_size": 4567,
"retention_time": 1234,
"max_message_size": 8912
}
```
# Delete Kafka Topic
Source: https://upstash.com/docs/devops/developer-api/kafka/topics/delete
DELETE https://api.upstash.com/v2/kafka/topic/{id}
This endpoint deletes a kafka topic in a cluster.
## URL Parameters
The ID of the Kafka Topic to be deleted
```shell curl
curl -X DELETE \
https://api.upstash.com/v2/kafka/topic/:id \
-u 'EMAIL:API_KEY'
```
```python Python
import requests
response = requests.delete('https://api.upstash.com/v2/kafka/topic/:id' auth=('EMAIL', 'API_KEY'))
response.content
```
```go Go
client := &http.Client{}
req, err := http.NewRequest("DELETE", "https://api.upstash.com/v2/kafka/topic/:id", nil)
if err != nil {
log.Fatal(err)
}
req.SetBasicAuth("email", "api_key")
resp, err := client.Do(req)
if err != nil {
log.Fatal(err)
}
bodyText, err := ioutil.ReadAll(resp.Body)
if err != nil {
log.Fatal(err)
}
fmt.Printf("%s\n", bodyText);
```
```json 200 OK
"OK"
```
# Get Kafka Topic
Source: https://upstash.com/docs/devops/developer-api/kafka/topics/get
GET https://api.upstash.com/v2/kafka/topic/{id}
This endpoint gets details of a kafka topic.
## URL Parameters
The ID of the kafka topic
## Response Parameters
ID of the new kafka topic
Name of the new kafka topic
ID of the created Kafka cluster
The region the Kafka cluster is deployed in
Cluster creation timestamp
State of the topic\ `active` or `deleted`
Number of partitions the topic has
Whether the multizone replication is enabled for the cluster or not
TCP endpoint to connect to the Kafka cluster
REST endpoint to connect to the Kafka cluster
Cleanup policy to be used in the topic\ `compact` or `delete`
Password to be used in authenticating to the cluster
Max total number of partitions allowed in the cluster
Max retention size will be allowed to topics in the cluster
Max retention time will be allowed to topics in the cluster
Max message size will be allowed in topics in the cluster
```shell curl
curl -X POST \
https://api.upstash.com/v2/kafka/topic \
-u 'EMAIL:API_KEY' \
-d '{"name":"test-kafka-topic","partitions":1,"retention_time":1234,"retention_size":4567,"max_message_size":8912,"cleanup_policy":"delete","cluster_id":"9bc0e897-cbd3-4997-895a-fd77ad00aec9"}'
```
```python Python
import requests
data = '{"name":"test-kafka-topic","partitions":1,"retention_time":1234,"retention_size":4567,"max_message_size":8912,"cleanup_policy":"delete","cluster_id":"9bc0e897-cbd3-4997-895a-fd77ad00aec9"}'
response = requests.post('https://api.upstash.com/v2/kafka/topic', data=data, auth=('EMAIL', 'API_KEY'))
response.content
```
```go Go
client := &http.Client{}
var data = strings.NewReader(`{
"name": "test-kafka-topic",
"partitions": 1,
"retention_time": 1234,
"retention_size": 4567,
"max_message_size": 8912,
"cleanup_policy": "delete",
"cluster_id": "9bc0e897-cbd3-4997-895a-fd77ad00aec9"
}`)
req, err := http.NewRequest("POST", "https://api.upstash.com/v2/kafka/topic", data)
if err != nil {
log.Fatal(err)
}
req.SetBasicAuth("email", "api_key")
resp, err := client.Do(req)
if err != nil {
log.Fatal(err)
}
bodyText, err := ioutil.ReadAll(resp.Body)
if err != nil {
log.Fatal(err)
}
fmt.Printf("%s\n", bodyText);
```
```json 200 OK
{
"topic_id": "0f458c88-2dc6-4f69-97bb-05060e0be934",
"topic_name": "test-kafka-topic",
"cluster_id": "9bc0e897-cbd3-4997-895a-fd77ad00aec9",
"region": "eu-west-1",
"creation_time": 1643981720,
"state": "active",
"partitions": 1,
"multizone": true,
"tcp_endpoint": "sharing-mastodon-12819-eu1-kafka.upstashdev.com",
"rest_endpoint": "sharing-mastodon-12819-eu1-rest-kafka.upstashdev.com",
"username": "c2hhcmluZy1tYXN0b2Rvbi0xMjgxOSRV1ipriSBOwd0PHzw2KAs_cDrTXzvUKIs",
"password": "eu8K3rYRS-ma0AsINDo7MMemmHjjRSldHJcG3c1LUMZkFfdSf9u_Kd4xCWO9_oQc",
"cleanup_policy": "delete",
"retention_size": 4567,
"retention_time": 1234,
"max_message_size": 8912
}
```
# List Kafka Topics in Cluster
Source: https://upstash.com/docs/devops/developer-api/kafka/topics/list
GET https://api.upstash.com/v2/kafka/topics/{id}
This endpoint list kafka topics in a cluster.
## URL Parameters
The ID of the Kafka cluster
## Response Parameters
ID of the new kafka topic
Name of the new kafka topic
ID of the created Kafka cluster
The region the Kafka cluster is deployed in
Cluster creation timestamp
State of the topic\ **Options**: `active` or `deleted`
Number of partitions the topic has
Whether the multizone replication is enabled for the cluster or not
TCP endpoint to connect to the Kafka cluster
REST endpoint to connect to the Kafka cluster
Cleanup policy to be used in the topic\ **Options**: `compact` or `delete`
Password to be used in authenticating to the cluster
Max total number of partitions allowed in the cluster
Max retention size will be allowed to topics in the cluster
Max retention time will be allowed to topics in the cluster
Max message size will be allowed in topics in the cluster
```shell curl
curl -X GET \
https://api.upstash.com/v2/kafka/topics/:id \
-u 'EMAIL:API_KEY'
```
```python Python
import requests
response = requests.get('https://api.upstash.com/v2/kafka/topics/:id', auth=('EMAIL', 'API_KEY'))
response.content
```
```go Go
client := &http.Client{}
req, err := http.NewRequest("GET", "https://api.upstash.com/v2/kafka/topics/:id", nil)
if err != nil {
log.Fatal(err)
}
req.SetBasicAuth("email", "api_key")
resp, err := client.Do(req)
if err != nil {
log.Fatal(err)
}
bodyText, err := ioutil.ReadAll(resp.Body)
if err != nil {
log.Fatal(err)
}
fmt.Printf("%s\n", bodyText);
```
```json 200 OK
[
{
"topic_id": "0f458c88-2dc6-4f69-97bb-05060e0be934",
"topic_name": "test-kafka-topic",
"cluster_id": "9bc0e897-cbd3-4997-895a-fd77ad00aec9",
"region": "eu-west-1",
"creation_time": 1643981720,
"state": "active",
"partitions": 1,
"multizone": true,
"tcp_endpoint": "sharing-mastodon-12819-eu1-kafka.upstashdev.com",
"rest_endpoint": "sharing-mastodon-12819-eu1-rest-kafka.upstashdev.com",
"username": "c2hhcmluZy1tYXN0b2Rvbi0xMjgxOSRV1ipriSBOwd0PHzw2KAs_cDrTXzvUKIs",
"password": "eu8K3rYRS-ma0AsINDo7MMemmHjjRSldHJcG3c1LUMZkFfdSf9u_Kd4xCWO9_oQc",
"cleanup_policy": "delete",
"retention_size": 4568,
"retention_time": 1235,
"max_message_size": 8913
}
]
```
# Reconfigure Kafka Topic
Source: https://upstash.com/docs/devops/developer-api/kafka/topics/reconfigure
POST https://api.upstash.com/v2/kafka/update-topic/{id}
This endpoint reconfigures an existing kafka topic.
## URL Parameters
The unique ID of the topic
## Request Parameters
Retention time of messsages in the topic\ `-1` for highest possible value
Retention size of the messages in the topic\ `-1` for highest possible value
Max message size in the topic\\
## Response Parameters
ID of the new kafka topic
Name of the new kafka topic
ID of the created Kafka cluster
The region the Kafka cluster is deployed in
Cluster creation timestamp
State of the topic\ `active` or `deleted`
Number of partitions the topic has
Whether the multizone replication is enabled for the cluster or not
TCP endpoint to connect to the Kafka cluster
REST endpoint to connect to the Kafka cluster
Cleanup policy to be used in the topic\ `compact` or `delete`
Password to be used in authenticating to the cluster
Max total number of partitions allowed in the cluster
Max retention size will be allowed to topics in the cluster
Max retention time will be allowed to topics in the cluster
Max message size will be allowed in topics in the cluster
```shell curl
curl -X POST \
https://api.upstash.com/v2/kafka/update-topic/:id \
-u 'EMAIL:API_KEY' \
-d '{"retention_time":1235,"retention_size":4568,"max_message_size":8913}'
```
```python Python
import requests
data = '{"retention_time":1235,"retention_size":4568,"max_message_size":8913}'
response = requests.post('https://api.upstash.com/v2/kafka/update-topic/:id', data=data, auth=('EMAIL', 'API_KEY'))
response.content
```
```go Go
client := &http.Client{}
var data = strings.NewReader(`{
"retention_time": 1235,
"retention_size": 4568,
"max_message_size": 8913
}`)
req, err := http.NewRequest("POST", "https://api.upstash.com/v2/kafka/update-topic/:id", data)
if err != nil {
log.Fatal(err)
}
req.SetBasicAuth("email", "api_key")
resp, err := client.Do(req)
if err != nil {
log.Fatal(err)
}
bodyText, err := ioutil.ReadAll(resp.Body)
if err != nil {
log.Fatal(err)
}
fmt.Printf("%s\n", bodyText);
```
```json 200 OK
{
"topic_id": "0f458c88-2dc6-4f69-97bb-05060e0be934",
"topic_name": "test-kafka-topic",
"cluster_id": "9bc0e897-cbd3-4997-895a-fd77ad00aec9",
"region": "eu-west-1",
"creation_time": 1643981720,
"state": "active",
"partitions": 1,
"multizone": true,
"tcp_endpoint": "sharing-mastodon-12819-eu1-kafka.upstashdev.com",
"rest_endpoint": "sharing-mastodon-12819-eu1-rest-kafka.upstashdev.com",
"username": "c2hhcmluZy1tYXN0b2Rvbi0xMjgxOSRV1ipriSBOwd0PHzw2KAs_cDrTXzvUKIs",
"password": "eu8K3rYRS-ma0AsINDo7MMemmHjjRSldHJcG3c1LUMZkFfdSf9u_Kd4xCWO9_oQc",
"cleanup_policy": "delete",
"retention_size": 4568,
"retention_time": 1235,
"max_message_size": 8913
}
```
# Get Kafka Topic Stats
Source: https://upstash.com/docs/devops/developer-api/kafka/topics/stats
GET https://api.upstash.com/v2/Kafka/stats/topic/{id}
This endpoint gets detailed stats of a Kafka cluster.
## URL Parameters
The ID of the Kafka topic
## Response Parameters
Timestamp indicating when the measurement was taken.
Number of monthly messages in Kafka topic
Timestamp indicating when the measurement was taken.
Number of monthly messages produced in Kafka topic
Timestamp indicating when the measurement was taken.
Number of monthly messages consumed in Kafka topic
Timestamp indicating when the measurement was taken.
Total disk usage of the Kafka topic
Average storage size of the Kafka topic in the current month
Total number of monthly produced messages to the Kafka topic
Total number of monthly consumed messages from the Kafka topic
```shell curl
curl -X GET \
https://api.upstash.com/v2/kafka/stats/topic/:id \
-u 'EMAIL:API_KEY'
```
```python Python
import requests
response = requests.get('https://api.upstash.com/v2/kafka/stats/topic/:id', auth=('EMAIL', 'API_KEY'))
response.content
```
```go Go
client := &http.Client{}
req, err := http.NewRequest("GET", "https://api.upstash.com/v2/kafka/stats/topic/:id", nil)
if err != nil {
log.Fatal(err)
}
req.SetBasicAuth("email", "api_key")
resp, err := client.Do(req)
if err != nil {
log.Fatal(err)
}
bodyText, err := ioutil.ReadAll(resp.Body)
if err != nil {
log.Fatal(err)
}
fmt.Printf("%s\n", bodyText);
```
```json 200 OK
{
"throughput": [
{
"x": "2022-02-07 12:05:11",
"y": 0
}
...
],
"produce_throughput": [
{
"x": "2022-02-07 12:05:11",
"y": 0
}
...
],
"consume_throughput": [
{
"x": "2022-02-07 12:05:11",
"y": 0
}
...
],
"diskusage": [
{
"x": "2022-02-07 12:20:11",
"y": 0
}
...
],
"total_monthly_storage": 0,
"total_monthly_produce": 0,
"total_monthly_consume": 0
}
```
# null
Source: https://upstash.com/docs/devops/developer-api/redis/autoscaling
# Create Backup
Source: https://upstash.com/docs/devops/developer-api/redis/backup/create_backup
POST https://api.upstash.com/v2/redis/create-backup/{id}
This endpoint creates a backup for a Redis database.
## URL Parameters
The ID of the Redis database
## Request Parameters
Name of the backup
```shell curl
curl -X POST \
https://api.upstash.com/v2/redis/create-backup/{id} \
-u 'EMAIL:API_KEY' \
-d '{"name" : "backup_name"}'
```
```python Python
import requests
data = '{"name" : "backup_name"}'
response = requests.post('https://api.upstash.com/v2/redis/create-backup/{id}', data=data, auth=('EMAIL', 'API_KEY'))
response.content
```
```go Go
client := &http.Client{}
var data = strings.NewReader(`{
"name":"backup_name"
}`)
req, err := http.NewRequest("POST", "https://api.upstash.com/v2/redis/create-backup/{id}", data)
if err != nil {
log.Fatal(err)
}
req.SetBasicAuth("email", "api_key")
resp, err := client.Do(req)
if err != nil {
log.Fatal(err)
}
bodyText, err := ioutil.ReadAll(resp.Body)
if err != nil {
log.Fatal(err)
}
fmt.Printf("%s
", bodyText);
```
```json 200 OK
"OK"
```
# Delete Backup
Source: https://upstash.com/docs/devops/developer-api/redis/backup/delete_backup
DELETE https://api.upstash.com/v2/redis/delete-backup/{id}/{backup_id}
This endpoint deletes a backup of a Redis database.
## URL Parameters
The ID of the Redis database
The ID of the backup to delete
```shell curl
curl -X DELETE \
https://api.upstash.com/v2/redis/delete-backup/:id/:backup_id \
-u 'EMAIL:API_KEY'
```
```python Python
import requests
response = requests.delete('https://api.upstash.com/v2/redis/delete-backup/:id/:backup_id', auth=('EMAIL', 'API_KEY'))
response.content
```
```go Go
client := &http.Client{}
req, err := http.NewRequest("DELETE", "https://api.upstash.com/v2/redis/delete-backup/:id/:backup_id", nil)
if err != nil {
log.Fatal(err)
}
req.SetBasicAuth("email", "api_key")
resp, err := client.Do(req)
if err != nil {
log.Fatal(err)
}
bodyText, err := ioutil.ReadAll(resp.Body)
if err != nil {
log.Fatal(err)
}
fmt.Printf("%s
", bodyText);
```
```json 200 OK
"OK"
```
# Disable Daily Backup
Source: https://upstash.com/docs/devops/developer-api/redis/backup/disable_dailybackup
PATCH https://api.upstash.com/v2/redis/disable-dailybackup/{id}
This endpoint disables daily backup for a Redis database.
## URL Parameters
The ID of the Redis database
```shell curl
curl -X PATCH \
https://api.upstash.com/v2/redis/disable-dailybackup/{id} \
-u 'EMAIL:API_KEY'
```
```python Python
import requests
response = requests.patch('https://api.upstash.com/v2/redis/disable-dailybackup/{id}', auth=('EMAIL', 'API_KEY'))
response.content
```
```go Go
client := &http.Client{}
req, err := http.NewRequest("PATCH", "https://api.upstash.com/v2/redis/disable-dailybackup/{id}", nil)
if err != nil {
log.Fatal(err)
}
req.SetBasicAuth("email", "api_key")
resp, err := client.Do(req)
if err != nil {
log.Fatal(err)
}
bodyText, err := ioutil.ReadAll(resp.Body)
if err != nil {
log.Fatal(err)
}
fmt.Printf("%s
", bodyText);
```
```json 200 OK
"OK"
```
# Enable Daily Backup
Source: https://upstash.com/docs/devops/developer-api/redis/backup/enable_dailybackup
PATCH https://api.upstash.com/v2/redis/enable-dailybackup/{id}
This endpoint enables daily backup for a Redis database.
## URL Parameters
The ID of the Redis database
```shell curl
curl -X PATCH \
https://api.upstash.com/v2/redis/enable-dailybackup/{id} \
-u 'EMAIL:API_KEY'
```
```python Python
import requests
response = requests.patch('https://api.upstash.com/v2/redis/enable-dailybackup/{id}', auth=('EMAIL', 'API_KEY'))
response.content
```
```go Go
client := &http.Client{}
req, err := http.NewRequest("PATCH", "https://api.upstash.com/v2/redis/enable-dailybackup/{id}", nil)
if err != nil {
log.Fatal(err)
}
req.SetBasicAuth("email", "api_key")
resp, err := client.Do(req)
if err != nil {
log.Fatal(err)
}
bodyText, err := ioutil.ReadAll(resp.Body)
if err != nil {
log.Fatal(err)
}
fmt.Printf("%s
", bodyText);
```
```json 200 OK
"OK"
```
# List Backup
Source: https://upstash.com/docs/devops/developer-api/redis/backup/list_backup
GET https://api.upstash.com/v2/redis/list-backup/{id}
This endpoint lists all backups for a Redis database.
## URL Parameters
The ID of the Redis database
## Response Parameters
ID of the database
Customer ID
Name of the backup
ID of the backup
Creation time of the backup as Unix time
State of the backup (e.g., completed)
Size of the backup
Daily backup status
Hourly backup status
```shell curl
curl -X GET \
https://api.upstash.com/v2/redis/list-backup/{id} \
-u 'EMAIL:API_KEY'
```
```python Python
import requests
response = requests.get('https://api.upstash.com/v2/redis/list-backup/{id}', auth=('EMAIL', 'API_KEY'))
response.content
```
```go Go
client := &http.Client{}
req, err := http.NewRequest("GET", "https://api.upstash.com/v2/redis/list-backup/{id}", nil)
if err != nil {
log.Fatal(err)
}
req.SetBasicAuth("email", "api_key")
resp, err := client.Do(req)
if err != nil {
log.Fatal(err)
}
bodyText, err := ioutil.ReadAll(resp.Body)
if err != nil {
log.Fatal(err)
}
fmt.Printf("%s
", bodyText);
```
```json 200 OK
[
{
"database_id":"6gceaafd-9627-4fa5-8g71-b3359g19a5g4",
"customer_id":"customer_id",
"name":"test2",
"backup_id":"1768e55b-c137-4339-b46e-449dcd33a62e",
"creation_time":1720186545,
"state":"completed",
"backup_size":0,
"daily_backup":"false",
"hourly_backup":"false"
},
{
"database_id":"6gceaafd-9627-4fa5-8g71-b3359g19a5g4",
"customer_id":"customer_id",
"name":"test1",
"backup_id":"39310b84-21b3-45c3-5318-403553a2466d",
"creation_time":1720096600,
"state":"completed",
"backup_size":0,
"daily_backup":"false",
"hourly_backup":"false"
}
]
```
# Restore Backup
Source: https://upstash.com/docs/devops/developer-api/redis/backup/restore_backup
POST https://api.upstash.com/v2/redis/restore-backup/{id}
This endpoint restores data from an existing backup.
## URL Parameters
The ID of the Redis database
## Request Parameters
ID of the backup to restore
```shell curl
curl -X POST \
https://api.upstash.com/v2/redis/restore-backup/{id} \
-u 'EMAIL:API_KEY'
-d '{"backup_id" : "backup_id"}'
```
```python Python
import requests
data = '{"backup_id" : "backup_id"}'
response = requests.post('https://api.upstash.com/v2/redis/restore-backup/{id}', data=data, auth=('EMAIL', 'API_KEY'))
response.content
```
```go Go
client := &http.Client{}
var data = strings.NewReader(`{
"backup_id":"backup_id"
}`)
req, err := http.NewRequest("POST", "https://api.upstash.com/v2/redis/restore-backup/{id}", data)
if err != nil {
log.Fatal(err)
}
req.SetBasicAuth("email", "api_key")
resp, err := client.Do(req)
if err != nil {
log.Fatal(err)
}
bodyText, err := ioutil.ReadAll(resp.Body)
if err != nil {
log.Fatal(err)
}
fmt.Printf("%s
", bodyText);
```
```json 200 OK
"OK"
```
# Create a Redis Database (Regional - DEPRECATED)
Source: https://upstash.com/docs/devops/developer-api/redis/create_database
POST https://api.upstash.com/v2/redis/database
This endpoint creates a new regional Redis database. This behaviour is deprecated in favor of Global databases and support for it will be removed in the upcoming releases.
## Request Parameters
Name of the database
Region of the database.\ **Options:** `eu-west-1`, `us-east-1`, `us-west-1`,
`ap-northeast-1` or `us-central1`
Set true to enable tls.
## Response Parameters
ID of the created database
Name of the database
Type of the database in terms of pricing model(Free, Pay as You Go or
Enterprise)
The region where database is hosted
Database port for clients to connect
Creation time of the database as Unix time
State of database (active or deleted)
Password of the database
Email or team id of the owner of the database
Endpoint URL of the database
TLS/SSL is enabled or not
```shell curl
curl -X POST \
https://api.upstash.com/v2/redis/database \
-u 'EMAIL:API_KEY' \
-d '{"name":"myredis","region":"eu-west-1","tls": true}'
```
```python Python
import requests
data = '{"name":"myredis","region":"eu-west-1","tls":true}'
response = requests.post('https://api.upstash.com/v2/redis/database', data=data, auth=('EMAIL', 'API_KEY'))
response.content
```
```go Go
client := &http.Client{}
var data = strings.NewReader(`{
"name":"myredis",
"region":"eu-west-1",
"tls": true
}`)
req, err := http.NewRequest("POST", "https://api.upstash.com/v2/redis/database", data)
if err != nil {
log.Fatal(err)
}
req.SetBasicAuth("email", "api_key")
resp, err := client.Do(req)
if err != nil {
log.Fatal(err)
}
bodyText, err := ioutil.ReadAll(resp.Body)
if err != nil {
log.Fatal(err)
}
fmt.Printf("%s\n", bodyText);
```
```json 200 OK
{
"database_id": "96ad0856-03b1-4ee7-9666-e81abd0349e1",
"database_name": "MyRedis",
"database_type": "Pay as You Go",
"region": "eu-central-1",
"port": 30143,
"creation_time": 1658909671,
"state": "active",
"password": "038a8e27c45e43068d5f186085399884",
"user_email": "example@upstash.com",
"endpoint": "eu2-sought-mollusk-30143.upstash.io",
"tls": true,
"rest_token": "AXW_ASQgOTZhZDA4NTYtMDNiMS00ZWU3LTk2NjYtZTgxYWJkMDM0OWUxMDM4YThlMjdjNDVlNDMwNjhkNWYxODYwODUzOTk4ODQ=",
"read_only_rest_token": "AnW_ASQgOTZhZDA4NTYtMDNiMS00ZWU3LTk2NjYtZTgxYWJkMDM0OWUx8sbmiEcMm9u7Ks5Qx-kHNiWr_f-iUXSIH8MlziKMnpY="
}
```
# Create a Redis Database (Global)
Source: https://upstash.com/docs/devops/developer-api/redis/create_database_global
POST https://api.upstash.com/v2/redis/database
This endpoint creates a new Redis database.
## Request Parameters
Name of the database
Region of the database. Only valid option is `global`.
Primary Region of the Global Database.
Available regions: `us-east-1`, `us-west-1`, `us-west-2`, `eu-west-1`,
`eu-central-1`, `ap-southeast-1`, `ap-southeast-2`, `sa-east-1`
Array of Read Regions of
the Database.
Available regions: `us-east-1`, `us-west-1`, `us-west-2`, `eu-west-1`,
`eu-central-1`, `ap-southeast-1`, `ap-southeast-2`, `ap-northeast-1`, `sa-east-1`
## Response Parameters
ID of the created database
Name of the database
Type of the database in terms of pricing model(Free, Pay as You Go or
Enterprise)
The region where database is hosted
Database port for clients to connect
Creation time of the database as Unix time
State of database (active or deleted)
Password of the database
Email or team id of the owner of the database
Endpoint URL of the database
TLS is always enabled for new databases
```shell curl
curl -X POST \
https://api.upstash.com/v2/redis/database \
-u 'EMAIL:API_KEY' \
-d '{"name":"myredis", "region":"global", "primary_region":"us-east-1", "read_regions":["us-west-1","us-west-2"], "tls": true}'
```
```python Python
import requests
data = '{"name":"myredis", "region":"global", "primary_region":"us-east-1", "read_regions":["us-west-1","us-west-2"], "tls":true}'
response = requests.post('https://api.upstash.com/v2/redis/database', data=data, auth=('EMAIL', 'API_KEY'))
response.content
```
```go Go
client := &http.Client{}
var data = strings.NewReader(`{
"name":"myredis",
"region":"global",
"primary_region"":"us-east-1",
"read_regions":["us-west-1","us-west-2"],
"tls": true
}`)
req, err := http.NewRequest("POST", "https://api.upstash.com/v2/redis/database", data)
if err != nil {
log.Fatal(err)
}
req.SetBasicAuth("email", "api_key")
resp, err := client.Do(req)
if err != nil {
log.Fatal(err)
}
bodyText, err := ioutil.ReadAll(resp.Body)
if err != nil {
log.Fatal(err)
}
fmt.Printf("%s\n", bodyText);
```
```json 200 OK
{
"database_id": "93e3a3e-342c-4683-ba75-344c08ae143b",
"database_name": "global-test",
"database_type": "Pay as You Go",
"region": "global",
"type": "paid",
"port": 32559,
"creation_time": 1674596896,
"state": "active",
"password": "dd1803832a2746309e118373549e574d",
"user_email": "support@upstash.com",
"endpoint": "steady-stud-32559.upstash.io",
"tls": false,
"rest_token": "AX8vACQgOTMyY2UyYy00NjgzLWJhNzUtMzQ0YzA4YWUxNDNiZMyYTI3NDYzMDllMTE4MzczNTQ5ZTU3NGQ=",
"read_only_rest_token": "An8vACQg2UtMzQyYy00NjgzLWJhNzUtMzQ0YzA4YBVsUsyn19xDnTAvjbsiq79GRDrURNLzIYIOk="
}
```
# Delete Database
Source: https://upstash.com/docs/devops/developer-api/redis/delete_database
DELETE https://api.upstash.com/v2/redis/database/{id}
This endpoint deletes a database.
## URL Parameters
The ID of the database to be deleted
```shell curl
curl -X DELETE \
https://api.upstash.com/v2/redis/database/:id \
-u 'EMAIL:API_KEY'
```
```python Python
import requests
response = requests.delete('https://api.upstash.com/v2/redis/database/:id' auth=('EMAIL', 'API_KEY'))
response.content
```
```go Go
client := &http.Client{}
req, err := http.NewRequest("DELETE", "https://api.upstash.com/v2/redis/database/:id", nil)
if err != nil {
log.Fatal(err)
}
req.SetBasicAuth("email", "api_key")
resp, err := client.Do(req)
if err != nil {
log.Fatal(err)
}
bodyText, err := ioutil.ReadAll(resp.Body)
if err != nil {
log.Fatal(err)
}
fmt.Printf("%s\n", bodyText);
```
```json 200 OK
"OK"
```
# Disable Auto Upgrade
Source: https://upstash.com/docs/devops/developer-api/redis/disable_autoscaling
POST https://api.upstash.com/v2/redis/disable-autoupgrade/{id}
This endpoint disables Auto Upgrade for given database.
## URL Parameters
The ID of the database to disable auto upgrade
```shell curl
curl -X POST \
https://api.upstash.com/v2/redis/disable-autoupgrade/:id \
-u 'EMAIL:API_KEY'
```
```python Python
import requests
response = requests.post('https://api.upstash.com/v2/redis/disable-autoupgrade/:id', auth=('EMAIL', 'API_KEY'))
response.content
```
```go Go
client := &http.Client{}
req, err := http.NewRequest("POST", "https://api.upstash.com/v2/redis/disable-autoupgrade/:id", nil)
if err != nil {
log.Fatal(err)
}
req.SetBasicAuth("email", "api_key")
resp, err := client.Do(req)
if err != nil {
log.Fatal(err)
}
bodyText, err := ioutil.ReadAll(resp.Body)
if err != nil {
log.Fatal(err)
}
fmt.Printf("%s\n", bodyText);
```
`json 200 OK "OK" `
# Disable Eviction
Source: https://upstash.com/docs/devops/developer-api/redis/disable_eviction
POST https://api.upstash.com/v2/redis/disable-eviction/{id}
This endpoint disables eviction for given database.
## URL Parameters
The ID of the database to disable eviction
```shell curl
curl -X POST \
https://api.upstash.com/v2/redis/disable-eviction/:id \
-u 'EMAIL:API_KEY'
```
```python Python
import requests
response = requests.post('https://api.upstash.com/v2/redis/disable-eviction/:id', auth=('EMAIL', 'API_KEY'))
response.content
```
```go Go
client := &http.Client{}
req, err := http.NewRequest("POST", "https://api.upstash.com/v2/redis/disable-eviction/:id", nil)
if err != nil {
log.Fatal(err)
}
req.SetBasicAuth("email", "api_key")
resp, err := client.Do(req)
if err != nil {
log.Fatal(err)
}
bodyText, err := ioutil.ReadAll(resp.Body)
if err != nil {
log.Fatal(err)
}
fmt.Printf("%s\n", bodyText);
```
```json 200 OK
"OK"
```
# Enable Auto Upgrade
Source: https://upstash.com/docs/devops/developer-api/redis/enable_autoscaling
POST https://api.upstash.com/v2/redis/enable-autoupgrade/{id}
This endpoint enables Auto Upgrade for given database.
## URL Parameters
The ID of the database to enable auto upgrade
```shell curl
curl -X POST \
https://api.upstash.com/v2/redis/enable-autoupgrade/:id \
-u 'EMAIL:API_KEY'
```
```python Python
import requests
response = requests.post('https://api.upstash.com/v2/redis/enable-autoupgrade/:id', auth=('EMAIL', 'API_KEY'))
response.content
```
```go Go
client := &http.Client{}
req, err := http.NewRequest("POST", "https://api.upstash.com/v2/redis/enable-autoupgrade/:id", nil)
if err != nil {
log.Fatal(err)
}
req.SetBasicAuth("email", "api_key")
resp, err := client.Do(req)
if err != nil {
log.Fatal(err)
}
bodyText, err := ioutil.ReadAll(resp.Body)
if err != nil {
log.Fatal(err)
}
fmt.Printf("%s\n", bodyText);
```
```json 200 OK
"OK"
```
# Enable Eviction
Source: https://upstash.com/docs/devops/developer-api/redis/enable_eviction
POST https://api.upstash.com/v2/redis/enable-eviction/{id}
This endpoint enables eviction for given database.
## URL Parameters
The ID of the database to enable eviction
```shell curl
curl -X POST \
https://api.upstash.com/v2/redis/enable-eviction/:id \
-u 'EMAIL:API_KEY'
```
```python Python
import requests
response = requests.post('https://api.upstash.com/v2/redis/enable-eviction/:id', auth=('EMAIL', 'API_KEY'))
response.content
```
```go Go
client := &http.Client{}
req, err := http.NewRequest("POST", "https://api.upstash.com/v2/redis/enable-eviction/:id", nil)
if err != nil {
log.Fatal(err)
}
req.SetBasicAuth("email", "api_key")
resp, err := client.Do(req)
if err != nil {
log.Fatal(err)
}
bodyText, err := ioutil.ReadAll(resp.Body)
if err != nil {
log.Fatal(err)
}
fmt.Printf("%s\n", bodyText);
```
```json 200 OK
"OK"
```
# Enable TLS
Source: https://upstash.com/docs/devops/developer-api/redis/enable_tls
POST https://api.upstash.com/v2/redis/enable-tls/{id}
This endpoint enables tls on a database.
## URL Parameters
The ID of the database to rename
## Response Parameters
ID of the created database
Name of the database
Type of the database in terms of pricing model\ `Free`, `Pay as You Go` or
`Enterprise`
The region where database is hosted
Database port for clients to connect
Creation time of the database as Unix time
State of database\ `active` or `deleted`
Password of the database
Email or team id of the owner of the database
Endpoint URL of the database
TLS/SSL is enabled or not
```shell curl
curl -X POST \
https://api.upstash.com/v2/redis/enable-tls/:id \
-u 'EMAIL:API_KEY'
```
```python Python
import requests
response = requests.post('https://api.upstash.com/v2/redis/enable-tls/:id', auth=('EMAIL', 'API_KEY'))
response.content
```
```go Go
client := &http.Client{}
req, err := http.NewRequest("POST", "https://api.upstash.com/v2/redis/enable-tls/:id", nil)
if err != nil {
log.Fatal(err)
}
req.SetBasicAuth("email", "api_key")
resp, err := client.Do(req)
if err != nil {
log.Fatal(err)
}
bodyText, err := ioutil.ReadAll(resp.Body)
if err != nil {
log.Fatal(err)
}
fmt.Printf("%s\n", bodyText);
```
```json 200 OK
{
"database_id": "96ad0856-03b1-4ee7-9666-e81abd0349e1",
"cluster_id": "dea1f974",
"database_name": "MyRedis",
"database_type": "Pay as You Go",
"region": "eu-central-1",
"port": 30143,
"creation_time": 1658909671,
"state": "active",
"password": "49665a1710f3434d8be008aab50f38d2",
"user_email": "example@upstash.com",
"endpoint": "eu2-sought-mollusk-30143.upstash.io",
"tls": true,
}
```
# Get Database
Source: https://upstash.com/docs/devops/developer-api/redis/get_database
GET https://api.upstash.com/v2/redis/database/{id}
This endpoint gets details of a database.
## Request
The ID of the database to reset password
Set to `hide` to remove credentials from the response.
## Response
ID of the created database
Name of the database
Type of the database in terms of pricing model(Free, Pay as You Go or
Enterprise)
The region where database is hosted
Database port for clients to connect
Creation time of the database as Unix time
State of database (active or deleted)
Password of the database
Email or team id of the owner of the database
Endpoint URL of the database
TLS/SSL is enabled or not
Token for rest based communication with the database
Read only token for rest based communication with the database
Max number of concurrent clients can be opened on this database currently
Max size of a request that will be accepted by the database currently(in
bytes)
Total disk size limit that can be used for the database currently(in bytes)
Max size of an entry that will be accepted by the database currently(in bytes)
Max size of a memory the database can use(in bytes)
Max daily bandwidth can be used by the database(in bytes)
Max number of commands can be sent to the database per second
Total number of commands can be sent to the database
```shell curl
curl -X GET \
https://api.upstash.com/v2/redis/database/:id \
-u 'EMAIL:API_KEY'
```
```python Python
import requests
response = requests.get('https://api.upstash.com/v2/redis/database/:id', auth=('EMAIL', 'API_KEY'))
response.content
```
```go Go
client := &http.Client{}
req, err := http.NewRequest("GET", "https://api.upstash.com/v2/redis/database/:id", nil)
if err != nil {
log.Fatal(err)
}
req.SetBasicAuth("email", "api_key")
resp, err := client.Do(req)
if err != nil {
log.Fatal(err)
}
bodyText, err := ioutil.ReadAll(resp.Body)
if err != nil {
log.Fatal(err)
}
fmt.Printf("%s\n", bodyText);
```
```json 200 OK
{
"database_id": "96ad0856-03b1-4ee7-9666-e81abd0349e1",
"database_name": "MyRedis",
"database_type": "Pay as You Go",
"region": "eu-central-1",
"port": 30143,
"creation_time": 1658909671,
"state": "active",
"password": "038a8e27c45e43068d5f186085399884",
"user_email": "example@upstash.com",
"endpoint": "eu2-sought-mollusk-30143.upstash.io",
"tls": true,
"rest_token": "AXW_ASQgOTZhZDA4NTYtMDNiMS00ZWU3LTk2NjYtZTgxYWJkMDM0OWUxMDM4YThlMjdjNDVlNDMwNjhkNWYxODYwODUzOTk4ODQ=",
"read_only_rest_token": "AnW_ASQgOTZhZDA4NTYtMDNiMS00ZWU3LTk2NjYtZTgxYWJkMDM0OWUx8sbmiEcMm9u7Ks5Qx-kHNiWr_f-iUXSIH8MlziKMnpY=",
"db_max_clients": 1000,
"db_max_request_size": 1048576,
"db_disk_threshold": 107374182400,
"db_max_entry_size": 104857600,
"db_memory_threshold": 1073741824,
"db_daily_bandwidth_limit": 53687091200,
"db_max_commands_per_second": 1000,
"db_request_limit": 9223372036854775808
}
```
# Get Database Stats
Source: https://upstash.com/docs/devops/developer-api/redis/get_database_stats
GET https://api.upstash.com/v2/redis/stats/{id}
This endpoint gets detailed stats of a database.
## URL Parameters
The ID of the database
## Response Parameters
Timestamp indicating when the measurement was taken.
Total number of connections momentarily
Timestamp indicating when the measurement was taken.
Total number keys exists in the database
Timestamp indicating when the measurement was taken.
Throughput seen on the database connections
Timestamp indicating when the measurement was taken.
Throughput seen on the database connections for write requests
Timestamp indicating when the measurement was taken.
Throughput seen on the database connections for read requests
Timestamp indicating when the measurement was taken.
Total amount of this usage of the database
Timestamp indicating when the measurement was taken.
Maximum server latency observed in the last hour
Timestamp indicating when the measurement was taken.
Minimum server latency observed in the last hour
Timestamp indicating when the measurement was taken.
The average read latency value measured in the last hour
Timestamp indicating when the measurement was taken.
The 99th percentile server read latency observed in the last hour
Timestamp indicating when the measurement was taken.
The average write latency value measured in the last hour
Timestamp indicating when the measurement was taken.
The 99th percentile server write latency observed in the last hour
Timestamp indicating when the measurement was taken.
Total number requests made to the database that are hit
Timestamp indicating when the measurement was taken.
Total number requests made to the database that are miss
Timestamp indicating when the measurement was taken.
Total number read requests made to the database
Timestamp indicating when the measurement was taken.
Total number write requests made to the database
Timestamp indicating when the measurement was taken.
Total number requests made to the database on the corresponding day
The total daily bandwidth usage (in bytes).
Timestamp indicating when the measurement was taken.
The total bandwidth size for that specific timestamp
A list of the days of the week for the measurement
Timestamp indicating when the measurement was taken.
The billing amount for that specific date.
Total number of daily produced commands
Total number of daily consumed commands
The total number of requests made in the current month.
The total number of read requests made in the current month.
The total number of write requests made in the current month.
The total amount of storage used (in bytes) in the current month.
Total cost of the database in the current month
Total number of produce commands in the current month
Total number of consume commands in the current month
```shell curl
curl -X GET \
https://api.upstash.com/v2/redis/stats/:id \
-u 'EMAIL:API_KEY'
```
```python Python
import requests
response = requests.get('https://api.upstash.com/v2/redis/stats/:id', auth=('EMAIL', 'API_KEY'))
response.content
```
```go Go
client := &http.Client{}
req, err := http.NewRequest("GET", "https://api.upstash.com/v2/redis/stats/:id", nil)
if err != nil {
log.Fatal(err)
}
req.SetBasicAuth("email", "api_key")
resp, err := client.Do(req)
if err != nil {
log.Fatal(err)
}
bodyText, err := ioutil.ReadAll(resp.Body)
if err != nil {
log.Fatal(err)
}
fmt.Printf("%s\n", bodyText);
```
```json 200 OK
{
"connection_count": [
{
"x": "2023-05-22 10:59:23.426 +0000 UTC",
"y": 320
},
...
],
"keyspace": [
{
"x": "2023-05-22 10:59:23.426 +0000 UTC",
"y": 344725564
},
...
],
"throughput": [
{
"x": "2023-05-22 11:00:23.426 +0000 UTC",
"y": 181.88333333333333
},
...
],
"produce_throughput": null,
"consume_throughput": null,
"diskusage": [
{
"x": "2023-05-22 10:59:23.426 +0000 UTC",
"y": 532362818323
},
...
],
"latencymean": [
{
"x": "2023-05-22 10:59:23.426 +0000 UTC",
"y": 0.176289
},
...
],
"read_latency_mean": [
{
"x": "2023-05-22 11:00:23.426 +0000 UTC",
"y": 0
},
...
],
"read_latency_99": [
{
"x": "2023-05-22 11:00:23.426 +0000 UTC",
"y": 0
},
...
],
"write_latency_mean": [
{
"x": "2023-05-22 11:00:23.426 +0000 UTC",
"y": 0
},
...
],
"write_latency_99": [
{
"x": "2023-05-22 11:00:23.426 +0000 UTC",
"y": 0
},
...
],
"hits": [
{
"x": "2023-05-22 11:00:23.426 +0000 UTC",
"y": 0
},
...
],
"misses": [
{
"x": "2023-05-22 11:00:23.426 +0000 UTC",
"y": 0
},
...
],
"read": [
{
"x": "2023-05-22 11:00:23.426 +0000 UTC",
"y": 82.53333333333333
},
...
],
"write": [
{
"x": "2023-05-22 11:00:23.426 +0000 UTC",
"y": 99.35
},
...
],
"dailyrequests": [
{
"x": "2023-05-18 11:58:23.534505371 +0000 UTC",
"y": 68844080
},
...
],
"days": [
"Thursday",
"Friday",
"Saturday",
"Sunday",
"Monday"
],
"dailybilling": [
{
"x": "2023-05-18 11:58:23.534505371 +0000 UTC",
"y": 145.72694911244588
},
...
],
"dailybandwidth": 50444740913,
"bandwidths": [
{
"x": "2023-05-18 11:58:23.534505371 +0000 UTC",
"y": 125391861729
},
...
],
"dailyproduce": null,
"dailyconsume": null,
"total_monthly_requests": 1283856937,
"total_monthly_read_requests": 1034567002,
"total_monthly_write_requests": 249289935,
"total_monthly_storage": 445942383672,
"total_monthly_billing": 222.33902763855485,
"total_monthly_produce": 0,
"total_monthly_consume": 0
}
```
# List Databases
Source: https://upstash.com/docs/devops/developer-api/redis/list_databases
GET https://api.upstash.com/v2/redis/databases
This endpoint list all databases of user.
## Response Parameters
ID of the database
Name of the database
Type of the database in terms of pricing model\ `Free`, `Pay as You Go` or
`Enterprise`
The region where database is hosted
Database port for clients to connect
Creation time of the database as Unix time
State of database\ `active` or `deleted`
Password of the database
Email or team id of the owner of the database
Endpoint URL of the database
TLS/SSL is enabled or not
Token for rest based communication with the database
Read only token for rest based communication with the database
```shell curl
curl -X GET \
https://api.upstash.com/v2/redis/databases \
-u 'EMAIL:API_KEY'
```
```python Python
import requests
response = requests.get('https://api.upstash.com/v2/redis/databases', auth=('EMAIL', 'API_KEY'))
response.content
```
```go Go
client := &http.Client{}
req, err := http.NewRequest("GET", "https://api.upstash.com/v2/redis/databases", nil)
if err != nil {
log.Fatal(err)
}
req.SetBasicAuth("email", "api_key")
resp, err := client.Do(req)
if err != nil {
log.Fatal(err)
}
bodyText, err := ioutil.ReadAll(resp.Body)
if err != nil {
log.Fatal(err)
}
fmt.Printf("%s\n", bodyText);
```
```json 200 OK
[
{
"database_id": "96ad0856-03b1-4ee7-9666-e81abd0349e1",
"database_name": "MyRedis",
"database_type": "Pay as You Go",
"region": "eu-central-1",
"port": 30143,
"creation_time": 1658909671,
"state": "active",
"password": "038a8e27c45e43068d5f186085399884",
"user_email": "example@upstash.com",
"endpoint": "eu2-sought-mollusk-30143.upstash.io",
"tls": true,
"rest_token": "AXW_ASQgOTZhZDA4NTYtMDNiMS00ZWU3LTk2NjYtZTgxYWJkMDM0OWUxMDM4YThlMjdjNDVlNDMwNjhkNWYxODYwODUzOTk4ODQ=",
"read_only_rest_token": "AnW_ASQgOTZhZDA4NTYtMDNiMS00ZWU3LTk2NjYtZTgxYWJkMDM0OWUx8sbmiEcMm9u7Ks5Qx-kHNiWr_f-iUXSIH8MlziKMnpY="
}
]
```
# Move To Team
Source: https://upstash.com/docs/devops/developer-api/redis/moveto_team
POST https://api.upstash.com/v2/redis/move-to-team
This endpoint moves database under a target team
## URL Parameters
The ID of the target team
The ID of the database to be moved
```shell curl
curl -X POST \
https://api.upstash.com/v2/redis/move-to-team \
-u 'EMAIL:API_KEY' \
-d '{"team_id": "6cc32556-0718-4de5-b69c-b927693f9282","database_id": "67b6af16-acb2-4f00-9e38-f6cb9bee800d"}'
```
```python Python
import requests
data = '{"team_id": "6cc32556-0718-4de5-b69c-b927693f9282","database_id": "67b6af16-acb2-4f00-9e38-f6cb9bee800d"}'
response = requests.post('https://api.upstash.com/v2/redis/move-to-team', data=data, auth=('EMAIL', 'API_KEY'))
response.content
```
```go Go
client := &http.Client{}
var data = strings.NewReader(`{
"team_id": "6cc32556-0718-4de5-b69c-b927693f9282",
"database_id": "67b6af16-acb2-4f00-9e38-f6cb9bee800d"
}`)
req, err := http.NewRequest("POST", "https://api.upstash.com/v2/redis/move-to-team", data)
if err != nil {
log.Fatal(err)
}
req.SetBasicAuth("email", "api_key")
resp, err := client.Do(req)
if err != nil {
log.Fatal(err)
}
bodyText, err := ioutil.ReadAll(resp.Body)
if err != nil {
log.Fatal(err)
}
fmt.Printf("%s\n", bodyText);
```
`json 200 OK "OK" `
# Rename Database
Source: https://upstash.com/docs/devops/developer-api/redis/rename_database
POST https://api.upstash.com/v2/redis/rename/{id}
This endpoint renames a database.
## URL Parameters
The ID of the database to be renamed
## Request Parameters
The new name of the database
## Response Parameters
ID of the created database
New name of the database
Type of the database in terms of pricing model\ `Free`, `Pay as You Go` or
`Enterprise`
The region where database is hosted
Database port for clients to connect
Creation time of the database as Unix time
State of database\ `active` or `deleted`
Password of the database
Email or team id of the owner of the database
Endpoint URL of the database
TLS/SSL is enabled or not
```shell curl
curl -X POST \
https://api.upstash.com/v2/redis/reset-password/:id \
-u 'EMAIL:API_KEY'
```
```python Python
import requests
response = requests.post('https://api.upstash.com/v2/redis/reset-password/:id', auth=('EMAIL', 'API_KEY'))
response.content
```
```go Go
client := &http.Client{}
req, err := http.NewRequest("POST", "https://api.upstash.com/v2/redis/reset-password/:id", nil)
if err != nil {
log.Fatal(err)
}
req.SetBasicAuth("email", "api_key")
resp, err := client.Do(req)
if err != nil {
log.Fatal(err)
}
bodyText, err := ioutil.ReadAll(resp.Body)
if err != nil {
log.Fatal(err)
}
fmt.Printf("%s\n", bodyText);
```
```json 200 OK
{
"database_id": "96ad0856-03b1-4ee7-9666-e81abd0349e1",
"cluster_id": "dea1f974",
"database_name": "MyRedis",
"database_type": "Pay as You Go",
"region": "eu-central-1",
"port": 30143,
"creation_time": 1658909671,
"state": "active",
"password": "49665a1710f3434d8be008aab50f38d2",
"user_email": "example@upstash.com",
"endpoint": "eu2-sought-mollusk-30143.upstash.io",
"tls": true,
}
```
```
```
# Reset Password
Source: https://upstash.com/docs/devops/developer-api/redis/reset_password
POST https://api.upstash.com/v2/redis/reset-password/{id}
This endpoint updates the password of a database.
## Request
The ID of the database to reset password
## Response
ID of the created database
Name of the database
Type of the database in terms of pricing model\ `Free`, `Pay as You Go` or
`Enterprise`
The region where database is hosted
Database port for clients to connect
Creation time of the database as Unix time
State of database\ `active` or `deleted`
Password of the database
Email or team id of the owner of the database
Endpoint URL of the database
TLS/SSL is enabled or not
```shell curl
curl -X POST \
https://api.upstash.com/v2/redis/reset-password/:id \
-u 'EMAIL:API_KEY'
```
```python Python
import requests
response = requests.post('https://api.upstash.com/v2/redis/reset-password/:id', auth=('EMAIL', 'API_KEY'))
response.content
```
```go Go
client := &http.Client{}
req, err := http.NewRequest("POST", "https://api.upstash.com/v2/redis/reset-password/:id", nil)
if err != nil {
log.Fatal(err)
}
req.SetBasicAuth("email", "api_key")
resp, err := client.Do(req)
if err != nil {
log.Fatal(err)
}
bodyText, err := ioutil.ReadAll(resp.Body)
if err != nil {
log.Fatal(err)
}
fmt.Printf("%s\n", bodyText);
```
```json 200 OK
{
"database_id": "96ad0856-03b1-4ee7-9666-e81abd0349e1",
"cluster_id": "dea1f974",
"database_name": "MyRedis",
"database_type": "Pay as You Go",
"region": "eu-central-1",
"port": 30143,
"creation_time": 1658909671,
"state": "active",
"password": "49665a1710f3434d8be008aab50f38d2",
"user_email": "example@upstash.com",
"endpoint": "eu2-sought-mollusk-30143.upstash.io",
"tls": true,
"consistent": false,
"pool_id": "f886c7f3",
"rest_token": "AXW_ASQgOTZhZDA4NTYtMDNiMS00ZWU3LTk2NjYtZTgxYWJkMDM0OWUxNDk2NjVhMTcxMGYzNDM0ZDhiZTAwOGFhYjUwZjM4ZDI=",
"read_only_rest_token": "AnW_ASQgOTZhZDA4NTYtMDNiMS00ZWU3LTk2NjYtZTgxYWJkMDM0OWUxB5sRhCROkPsxozFcDzDgVGRAxUI7UUr0Y6uFB7jMIOI="
}
```
# Update Regions (Global)
Source: https://upstash.com/docs/devops/developer-api/redis/update_regions
POST https://api.upstash.com/v2/redis/update-regions/{id}
Update the regions of global database
## Request
The ID of your database
Array of read regions of the database
**Options:** `us-east-1`, `us-west-1`, `us-west-2`, `eu-west-1`, `eu-central-1`,
`ap-southeast-1`, `ap-southeast-2`, `sa-east-1`
```shell curl
curl -X POST \
https://api.upstash.com/v2/redis/update-regions/:id \
-u 'EMAIL:API_KEY' \
-d '{ "read_regions":["us-west-1"] }'
```
```python Python
import requests
data = '{"read_regions":["eu-west-1"]}'
response = requests.post('https://api.upstash.com/v2/redis/database', data=data, auth=('EMAIL', 'API_KEY'))
response.content
```
```go Go
client := &http.Client{}
var data = strings.NewReader(`{,
"read_regions":["us-west-1"]
}`)
req, err := http.NewRequest("POST", "https://api.upstash.com/v2/redis/read-regions/:id", data)
if err != nil {
log.Fatal(err)
}
req.SetBasicAuth("email", "api_key")
resp, err := client.Do(req)
if err != nil {
log.Fatal(err)
}
bodyText, err := ioutil.ReadAll(resp.Body)
if err != nil {
log.Fatal(err)
}
fmt.Printf("%s\n", bodyText);
```
```json 200 OK
"OK"
```
# Add Team Member
Source: https://upstash.com/docs/devops/developer-api/teams/add_team_member
POST https://api.upstash.com/v2/teams/member
This endpoint adds a new team member to the specified team.
## Request Parameters
Id of the team to add the member to
Email of the new team member
Role of the new team member
**Options:** `admin`, `dev` or `finance`
## Response Parameters
ID of the created team
Name of the created team
Email of the new team member
Role of the new team member
```shell curl
curl -X POST \
https://api.upstash.com/v2/teams/member \
-u 'EMAIL:API_KEY' \
-d '{"team_id":"95849b27-40d0-4532-8695-d2028847f823","member_email":"example@upstash.com","member_role":"dev"}'
```
```python Python
import requests
data = '{"team_id":"95849b27-40d0-4532-8695-d2028847f823","member_email":"example@upstash.com","member_role":"dev"}'
response = requests.post('https://api.upstash.com/v2/teams/member', data=data, auth=('EMAIL', 'API_KEY'))
response.content
```
```go Go
client := &http.Client{}
var data = strings.NewReader(`{
"team_id":"95849b27-40d0-4532-8695-d2028847f823",
"member_email":"example@upstash.com",
"member_role":"dev"
}`)
req, err := http.NewRequest("POST", "https://api.upstash.com/v2/teams/member", data)
if err != nil {
log.Fatal(err)
}
req.SetBasicAuth("email", "api_key")
resp, err := client.Do(req)
if err != nil {
log.Fatal(err)
}
bodyText, err := ioutil.ReadAll(resp.Body)
if err != nil {
log.Fatal(err)
}
fmt.Printf("%s\n", bodyText);
```
```json 200 OK
{
"team_id": "95849b27-40d0-4532-8695-d2028847f823",
"team_name": "test_team_name",
"member_email": "example@upstash.com",
"member_role": "dev"
}
```
# Create Team
Source: https://upstash.com/docs/devops/developer-api/teams/create_team
POST https://api.upstash.com/v2/team
This endpoint creates a new team.
## Request Parameters
Name of the new team
Whether to copy existing credit card information to team or not\ Options:
`true` or `false`
## Response Parameters
ID of the created team
Name of the created team
Whether creditcard information added to team during creation or not
```shell curl
curl -X POST \
https://api.upstash.com/v2/team \
-u 'EMAIL:API_KEY' \
-d '{"team_name":"myteam","copy_cc":true}'
```
```python Python
import requests
data = '{"team_name":"myteam","copy_cc":true}'
response = requests.post('https://api.upstash.com/v2/team', data=data, auth=('EMAIL', 'API_KEY'))
response.content
```
```go Go
client := &http.Client{}
var data = strings.NewReader(`{
"team_name":"myteam",
"copy_cc":true
}`)
req, err := http.NewRequest("POST", "https://api.upstash.com/v2/team", data)
if err != nil {
log.Fatal(err)
}
req.SetBasicAuth("email", "api_key")
resp, err := client.Do(req)
if err != nil {
log.Fatal(err)
}
bodyText, err := ioutil.ReadAll(resp.Body)
if err != nil {
log.Fatal(err)
}
fmt.Printf("%s\n", bodyText);
```
```json 200 OK
{
"team_id": "75b471f2-15a1-47b0-8ce5-12a57682bfc9",
"team_name": "test_team_name_2",
"copy_cc": true
}
```
# Delete Team
Source: https://upstash.com/docs/devops/developer-api/teams/delete_team
DELETE https://api.upstash.com/v2/team/{id}
This endpoint deletes a team.
## URL Parameters
The ID of the team to delete
## Response Parameters
"OK"
```shell curl
curl -X DELETE \
https://api.upstash.com/v2/team/:id \
-u 'EMAIL:API_KEY'
```
```python Python
import requests
response = requests.delete('https://api.upstash.com/v2/team/:id' auth=('EMAIL', 'API_KEY'))
response.content
```
```go Go
client := &http.Client{}
req, err := http.NewRequest("DELETE", "https://api.upstash.com/v2/team/:id", nil)
if err != nil {
log.Fatal(err)
}
req.SetBasicAuth("email", "api_key")
resp, err := client.Do(req)
if err != nil {
log.Fatal(err)
}
bodyText, err := ioutil.ReadAll(resp.Body)
if err != nil {
log.Fatal(err)
}
fmt.Printf("%s\n", bodyText);
```
```json 200 OK
"OK"
```
# Delete Team Member
Source: https://upstash.com/docs/devops/developer-api/teams/delete_team_member
DELETE https://api.upstash.com/v2/teams/member
This endpoint deletes a team member from the specified team.
## Request Parameters
Id of the team to add the member to
Email of the new team member
## Response Parameters
"OK"
```shell curl
curl -X DELETE \
https://api.upstash.com/v2/teams/member \
-u 'EMAIL:API_KEY' \
-d '{"team_id":"95849b27-40d0-4532-8695-d2028847f823","member_email":"example@upstash.com"}'
```
```python Python
import requests
data = '{"team_id":"95849b27-40d0-4532-8695-d2028847f823","member_email":"example@upstash.com"}'
response = requests.delete('https://api.upstash.com/v2/teams/member', data=data, auth=('EMAIL', 'API_KEY'))
response.content
```
```go Go
client := &http.Client{}
var data = strings.NewReader(`{
"team_id":"95849b27-40d0-4532-8695-d2028847f823",
"member_email":"example@upstash.com"
}`)
req, err := http.NewRequest("DELETE", "https://api.upstash.com/v2/teams/member", data)
if err != nil {
log.Fatal(err)
}
req.SetBasicAuth("email", "api_key")
resp, err := client.Do(req)
if err != nil {
log.Fatal(err)
}
bodyText, err := ioutil.ReadAll(resp.Body)
if err != nil {
log.Fatal(err)
}
fmt.Printf("%s\n", bodyText);
```
```json 200 OK
"OK"
```
# Get Team Members
Source: https://upstash.com/docs/devops/developer-api/teams/get_team_members
GET https://api.upstash.com/v2/teams/{team_id}
This endpoint list all members of a team.
## Request Parameters
ID of the team
## Response Parameters
ID of the team
Name of the team
Email of the team member
Role of the team member
```shell curl
curl -X GET \
https://api.upstash.com/v2/teams/:id \
-u 'EMAIL:API_KEY'
```
```python Python
import requests
response = requests.get('https://api.upstash.com/v2/teams/:id', auth=('EMAIL', 'API_KEY'))
response.content
```
```go Go
client := &http.Client{}
req, err := http.NewRequest("GET", "https://api.upstash.com/v2/teams/:id", nil)
if err != nil {
log.Fatal(err)
}
req.SetBasicAuth("email", "api_key")
resp, err := client.Do(req)
if err != nil {
log.Fatal(err)
}
bodyText, err := ioutil.ReadAll(resp.Body)
if err != nil {
log.Fatal(err)
}
fmt.Printf("%s\n", bodyText);
```
```json 200 OK
[
{
"team_id": "3423cb72-e50d-43ec-a9c0-f0f359941223",
"team_name": "test_team_name_2",
"member_email": "example@upstash.com",
"member_role": "dev"
},
{
"team_id": "3423cb72-e50d-43ec-a9c0-f0f359941223",
"team_name": "test_team_name_2",
"member_email": "example_2@upstash.com",
"member_role": "owner"
}
]
```
# List Teams
Source: https://upstash.com/docs/devops/developer-api/teams/list_teams
GET https://api.upstash.com/v2/teams
This endpoint lists all teams of user.
## Response Parameters
ID of the created team
Role of the user in this team
Name of the created team
Whether creditcard information added to team during creation or not
```shell curl
url -X GET \
https://api.upstash.com/v2/teams \
-u 'EMAIL:API_KEY'
```
```python Python
import requests
response = requests.get('https://api.upstash.com/v2/teams', auth=('EMAIL', 'API_KEY'))
response.content
```
```go Go
client := &http.Client{}
req, err := http.NewRequest("GET", "https://api.upstash.com/v2/teams", nil)
if err != nil {
log.Fatal(err)
}
req.SetBasicAuth("email", "api_key")
resp, err := client.Do(req)
if err != nil {
log.Fatal(err)
}
bodyText, err := ioutil.ReadAll(resp.Body)
if err != nil {
log.Fatal(err)
}
fmt.Printf("%s\n", bodyText);
```
```json 200 OK
[
{
"team_id": "95849b27-40d0-4532-8695-d2028847f823",
"team_name": "test_team_name",
"member_role": "owner",
"copy_cc": true
}
]
```
# Create Index
Source: https://upstash.com/docs/devops/developer-api/vector/create_index
POST https://api.upstash.com/v2/vector/index
This endpoint creates an index.
## Request Parameters
Name of the index.
Region of the database.\
**Options:** `eu-west-1`, `us-east-1`,
Similarity function that's used to calculate the distance between two
vectors.\
**Options:** `COSINE`, `EUCLIDIAN`, `DOT_PRODUCT`
The amount of values in a single vector.
The payment plan of your index.\
**Options:** `payg`, `fixed`
The payment plan of your index.\
**Options:** `BGE_SMALL_EN_V1_5`, `BGE_BASE_EN_V1_5`, `BGE_LARGE_EN_V1_5`, `BGE_M3`, `BERT_BASE_UNCASED`, `UAE_Large_V1`, `ALL_MINILM_L6_V2`, `MXBAI_EMBED_LARGE_V1`
## Response Parameters
The associated ID of the owner of the index
Unique ID of the index
The name of the index.
Similarity function that's used to calculate the distance between two
vectors
The amount of values in a single vector
The REST endpoint of the index
The REST authentication token for the index
The REST authentication read only token for the index
The payment plan of the index
The region where the index is currently deployed.
The number of maximum that your index can contain.
The number of maximum update operations you can perform in a day. Only upsert operations are included in update count.
The number of maximum query operations you can perform in a day. Only query operations are included in query count.
The maximum amount of monthly bandwidth for the index. Unit is bytes. `-1` if the limit is unlimited.
The number of maximum write operations you can perform per second. Only upsert operations are included in write count.
The number of maximum query operations you can perform per second. Only query operations are included in query count.
The number of maximum vectors in a read operation. Query and fetch operations are included in read operations.
The number of maximum vectors in a write operation. Only upsert operations are included in write operations.
The amount of maximum size for the total metadata sizes in your index.
Monthly pricing of your index. Only available for fixed and pro plans.
The creation time of the vector index in UTC as unix timestamp.
The predefined embedding model to vectorize your plain text.
```shell curl
curl -X POST https://api.upstash.com/v2/vector/index \
-u 'EMAIL:API_KEY' \
-d '{
"name": "myindex",
"region": "eu-west-1",
"similarity_function": "COSINE",
"dimension_count": 1536
}' \
```
```javascript JavaScript
const axios = require('axios');
const postData = {
name: "myindex",
region: "eu-west-1",
similarity_function: "COSINE",
dimension_count: 1536,
};
const config = {
auth: {
username: 'EMAIL',
password: 'API_KEY',
},
headers: {
'Content-Type': 'application/json',
},
};
axios.post('https://api.upstash.com/v2/vector/index', postData, config)
.then((response) => {
console.log('Response:', response.data);
})
.catch((error) => {
console.error('Error:', error);
});
```
```python Python
import requests
data = '{"name":"myindex","region":"eu-west-1","similarity_function":"COSINE","dimension_count":1536}'
response = requests.post('https://api.upstash.com/v2/vector/index', data=data, auth=('EMAIL', 'API_KEY'))
response.content
```
```go Go
client := &http.Client{}
var data = strings.NewReader('{
"name":"myindex",
"region":"eu-west-1",
"similarity_function":"COSINE",
"dimension_count":1536}'
)
req, err := http.NewRequest("POST", "https://api.upstash.com/v2/vector/index", data)
if err != nil {
log.Fatal(err)
}
req.SetBasicAuth("email", "api_key")
resp, err := client.Do(req)
if err != nil {
log.Fatal(err)
}
bodyText, err := ioutil.ReadAll(resp.Body)
if err != nil {
log.Fatal(err)
}
fmt.Printf("%s\n", bodyText);
```
```json 200 OK
{
"customer_id": "test@upstash.com",
"id": "0639864f-ece6-429c-8118-86a287b0e808",
"name": "myindex",
"similarity_function": "COSINE",
"dimension_count": 5,
"embedding_model": "BGE_SMALL_EN_V1_5"
"endpoint": "test-index-3814-eu1-vector.upstash.io",
"token": "QkZGMk5heGltdW0tdXBkYXRlZC0zNzM1LWV1MkFkbWlOeGZGZ1J5Wm1GdE5tTXhNQzB1TmpsbExUb3hOekF0TVRJbFpqMTJORFUxTm1GZw==",
"read_only_token": "QkZGRk1heGltdW0tdXBkYXRlZC0zNzM1LWV1MnJlYWRvbmx5TmtaZ05qS3JNWVV0Wm1aZ01pMDBOV1poTHRob05qY3RNR0U0TkRjejNqazJU"
"type": "paid",
"region": "eu-west-1",
"max_vector_count": 400000000,
"max_daily_updates": -1,
"max_daily_queries": -1,
"max_monthly_bandwidth": -1,
"max_writes_per_second": 1000,
"max_query_per_second": 1000,
"max_reads_per_request": 1000,
"max_writes_per_request": 1000,
"max_total_metadata_size": 53687091200,
"creation_time": 1707313165
}
```
# Delete Index
Source: https://upstash.com/docs/devops/developer-api/vector/delete_index
DELETE https://api.upstash.com/v2/vector/index/{id}
This endpoint deletes an index.
## Request Parameters
The unique ID of the index to be deleted.
## Response Parameters
`"OK"` on successfull deletion operation.
```shell curl
curl -X DELETE https://api.upstash.com/v2/vector/index/0639864f-ece6-429c-8118-86a287b0e808 \
-u 'EMAIL:API_KEY'
```
```javascript JavaScript
const axios = require('axios');
const config = {
auth: {
username: 'EMAIL',
password: 'API_KEY',
},
};
const url = 'https://api.upstash.com/v2/vector/index/0639864f-ece6-429c-8118-86a287b0e808';
axios.delete(url, config)
.then((response) => {
console.log('Deleted successfully', response.data);
})
.catch((error) => {
console.error('Error:', error);
});
```
```python Python
import requests
id="0639864f-ece6-429c-8118-86a287b0e808"
response = requests.delete(f"https://api.upstash.com/v2/vector/index/{id}", auth=('EMAIL', 'API_KEY'))
response.content
```
```go Go
client := &http.Client{}
req, err := http.NewRequest("DELETE", "https://api.upstash.com/v2/vector/index/0639864f-ece6-429c-8118-86a287b0e808", data)
if err != nil {
log.Fatal(err)
}
req.SetBasicAuth("email", "api_key")
resp, err := client.Do(req)
if err != nil {
log.Fatal(err)
}
bodyText, err := ioutil.ReadAll(resp.Body)
if err != nil {
log.Fatal(err)
}
fmt.Printf("%s\n", bodyText);
```
```json 200 OK
"OK"
```
# Get Index
Source: https://upstash.com/docs/devops/developer-api/vector/get_index
GET https://api.upstash.com/v2/vector/index/{id}
This endpoint returns the data associated to a index.
## Request Parameters
The unique ID of the index to fetch.
## Response Parameters
The associated ID of the owner of the index
Unique ID of the index
The name of the index.
Similarity function that's used to calculate the distance between two
vectors
The amount of values in a single vector
The REST endpoint of the index
The REST authentication token for the index
The REST authentication read only token for the index
The payment plan of the index
The region where the index is currently deployed.
The number of maximum that your index can contain.
The number of maximum update operations you can perform in a day. Only upsert operations are included in update count.
The number of maximum query operations you can perform in a day. Only query operations are included in query count.
The maximum amount of monthly bandwidth for the index. Unit is bytes. `-1` if the limit is unlimited.
The number of maximum write operations you can perform per second. Only upsert operations are included in write count.
The number of maximum query operations you can perform per second. Only query operations are included in query count.
The number of maximum vectors in a read operation. Query and fetch operations are included in read operations.
The number of maximum vectors in a write operation. Only upsert operations are included in write operations.
The amount of maximum size for the total metadata sizes in your index.
Monthly pricing of your index. Only available for fixed and pro plans.
The creation time of the vector index in UTC as unix timestamp.
```shell curl
curl -X GET https://api.upstash.com/v2/vector/index/0639864f-ece6-429c-8118-86a287b0e808 \
-u 'EMAIL:API_KEY' \
```
```javascript JavaScript
const axios = require('axios');
const config = {
auth: {
username: 'EMAIL',
password: 'API_KEY',
},
};
const url = 'https://api.upstash.com/v2/vector/index/0639864f-ece6-429c-8118-86a287b0e808';
axios.get(url, config)
.then((response) => {
console.log(response.data);
})
.catch((error) => {
console.error('Error:', error);
});
```
```python Python
import requests
id = "0639864f-ece6-429c-8118-86a287b0e808"
response = requests.post(f"https://api.upstash.com/v2/vector/index/{id}", auth=('EMAIL', 'API_KEY'))
response.content
```
```go Go
client := &http.Client{}
req, err := http.NewRequest("POST", "https://api.upstash.com/v2/vector/index/0639864f-ece6-429c-8118-86a287b0e808", data)
if err != nil {
log.Fatal(err)
}
req.SetBasicAuth("email", "api_key")
resp, err := client.Do(req)
if err != nil {
log.Fatal(err)
}
bodyText, err := ioutil.ReadAll(resp.Body)
if err != nil {
log.Fatal(err)
}
fmt.Printf("%s\n", bodyText);
```
```json 200 OK
{
"customer_id": "test@upstash.com",
"id": "0639864f-ece6-429c-8118-86a287b0e808",
"name": "myindex",
"similarity_function": "COSINE",
"dimension_count": 5,
"endpoint": "test-index-3814-eu1-vector.upstash.io",
"token": "QkZGMk5heGltdW0tdXBkYXRlZC0zNzM1LWV1MkFkbWlOeGZGZ1J5Wm1GdE5tTXhNQzB1TmpsbExUb3hOekF0TVRJbFpqMTJORFUxTm1GZw==",
"read_only_token": "QkZGRk1heGltdW0tdXBkYXRlZC0zNzM1LWV1MnJlYWRvbmx5TmtaZ05qS3JNWVV0Wm1aZ01pMDBOV1poTHRob05qY3RNR0U0TkRjejNqazJU"
"type": "paid",
"region": "eu-west-1",
"max_vector_count": 400000000,
"max_daily_updates": -1,
"max_daily_queries": -1,
"max_monthly_bandwidth": -1,
"max_writes_per_second": 1000,
"max_query_per_second": 1000,
"max_reads_per_request": 1000,
"max_writes_per_request": 1000,
"max_total_metadata_size": 53687091200,
"creation_time": 1707313165
}
```
# List Indices
Source: https://upstash.com/docs/devops/developer-api/vector/list_indices
GET https://api.upstash.com/v2/vector/index/
This endpoint returns the data related to all indices of an account as a list.
## Request Parameters
This endpoint doesn't require any additional data.
## Response Parameters
The associated ID of the owner of the index
Unique ID of the index
The name of the index.
Similarity function that's used to calculate the distance between two
vectors
The amount of values in a single vector
The REST endpoint of the index
The payment plan of the index
The region where the index is currently deployed.
The number of maximum that your index can contain.
The number of maximum update operations you can perform in a day. Only upsert operations are included in update count.
The number of maximum query operations you can perform in a day. Only query operations are included in query count.
The maximum amount of monthly bandwidth for the index. Unit is bytes. `-1` if the limit is unlimited.
The number of maximum write operations you can perform per second. Only upsert operations are included in write count.
The number of maximum query operations you can perform per second. Only query operations are included in query count.
The number of maximum vectors in a read operation. Query and fetch operations are included in read operations.
The number of maximum vectors in a write operation. Only upsert operations are included in write operations.
The amount of maximum size for the total metadata sizes in your index.
Monthly pricing of your index. Only available for fixed and pro plans.
The creation time of the vector index in UTC as unix timestamp.
```shell curl
curl -X GET \
https://api.upstash.com/v2/vector/index \
-u 'EMAIL:API_KEY' \
```
```javascript JavaScript
const axios = require('axios');
const config = {
auth: {
username: 'EMAIL',
password: 'API_KEY',
},
};
const url = 'https://api.upstash.com/v2/vector/index';
axios.get(url, config)
.then((response) => {
console.log(response.data);
})
.catch((error) => {
console.error('Error:', error);
});
```
```python Python
import requests
response = requests.get('https://api.upstash.com/v2/vector/index', auth=('EMAIL', 'API_KEY'))
response.content
```
```go Go
client := &http.Client{}
req, err := http.NewRequest("GET", "https://api.upstash.com/v2/vector/index")
if err != nil {
log.Fatal(err)
}
req.SetBasicAuth("email", "api_key")
resp, err := client.Do(req)
if err != nil {
log.Fatal(err)
}
bodyText, err := ioutil.ReadAll(resp.Body)
if err != nil {
log.Fatal(err)
}
fmt.Printf("%s\n", bodyText);
```
```json 200 OK
[
{
"customer_id": "test@upstash.com",
"id": "0639864f-ece6-429c-8118-86a287b0e808",
"name": "myindex",
"similarity_function": "COSINE",
"dimension_count": 5,
"endpoint": "test-index-3814-eu1-vector.upstash.io",
"token": "QkZGMk5heGltdW0tdXBkYXRlZC0zNzM1LWV1MkFkbWlOeGZGZ1J5Wm1GdE5tTXhNQzB1TmpsbExUb3hOekF0TVRJbFpqMTJORFUxTm1GZw==",
"read_only_token": "QkZGRk1heGltdW0tdXBkYXRlZC0zNzM1LWV1MnJlYWRvbmx5TmtaZ05qS3JNWVV0Wm1aZ01pMDBOV1poTHRob05qY3RNR0U0TkRjejNqazJU"
"type": "paid",
"region": "eu-west-1",
"max_vector_count": 400000000,
"max_daily_updates": -1,
"max_daily_queries": -1,
"max_monthly_bandwidth": -1,
"max_writes_per_second": 1000,
"max_query_per_second": 1000,
"max_reads_per_request": 1000,
"max_writes_per_request": 1000,
"max_total_metadata_size": 53687091200,
"creation_time": 1707313165
}
]
```
# Rename Index
Source: https://upstash.com/docs/devops/developer-api/vector/rename_index
POST https://api.upstash.com/v2/vector/index/{id}/rename
This endpoint is used to change the name of an index.
## Request Parameters
The unique ID of the index to be deleted.
The new name of the index.
## Response Parameters
`"OK"` on successfull deletion operation.
```shell curl
curl -X POST \
https://api.upstash.com/v2/vector/index/14841111-b834-4788-925c-04ab156d1123/rename \
-u 'EMAIL:API_KEY' \
-d '{"name":"myindex"}'
```
```javascript JavaScript
const axios = require('axios');
const postData = {
name: "myindex",
};
const config = {
auth: {
username: 'EMAIL',
password: 'API_KEY',
},
headers: {
'Content-Type': 'application/json',
},
};
const url = 'https://api.upstash.com/v2/vector/index/14841111-b834-4788-925c-04ab156d1123/rename';
axios.post(url, postData, config)
.then((response) => {
console.log('Rename successful:', response.data);
})
.catch((error) => {
console.error('Error:', error);
});
```
```python Python
import requests
data = '{"name":"myindex"}'
response = requests.post('https://api.upstash.com/v2/vector/index/14841111-b834-4788-925c-04ab156d1123/rename', data=data, auth=('EMAIL', 'API_KEY'))
response.content
```
```go Go
client := &http.Client{}
var data = strings.NewReader(`{
"name":"myindex",
}`)
req, err := http.NewRequest("POST", "https://api.upstash.com/v2/vector/index/14841111-b834-4788-925c-04ab156d1123/rename", data)
if err != nil {
log.Fatal(err)
}
req.SetBasicAuth("email", "api_key")
resp, err := client.Do(req)
if err != nil {
log.Fatal(err)
}
bodyText, err := ioutil.ReadAll(resp.Body)
if err != nil {
log.Fatal(err)
}
fmt.Printf("%s\n", bodyText);
```
```json 200 OK
"OK"
```
# Reset Index Passwords
Source: https://upstash.com/docs/devops/developer-api/vector/reset_index_passwords
POST https://api.upstash.com/v2/vector/index/{id}/reset-password
This endpoint is used to reset regular and readonly tokens of an index.
## Request Parameters
The unique ID of the index to reset the password for..
## Response Parameters
`"OK"` on successfull deletion operation.
```shell curl
curl -X POST \
https://api.upstash.com/v2/vector/index/14841111-b834-4788-925c-04ab156d1123/reset-password \
-u 'EMAIL:API_KEY' \
```
```javascript JavaScript
const axios = require('axios');
const config = {
auth: {
username: 'EMAIL',
password: 'API_KEY',
},
headers: {
'Content-Type': 'application/json',
},
};
const url = 'https://api.upstash.com/v2/vector/index/14841111-b834-4788-925c-04ab156d1123/reset-password';
axios.post(url, {}, config) // Sending an empty object as data since no payload is required.
.then((response) => {
console.log('Operation successful:', response.data);
})
.catch((error) => {
console.error('Error:', error);
});
```
```python Python
import requests
response = requests.post('https://api.upstash.com/v2/vector/index/14841111-b834-4788-925c-04ab156d1123/reset-password', auth=('EMAIL', 'API_KEY'))
response.content
```
```go Go
client := &http.Client{}
req, err := http.NewRequest("POST", "https://api.upstash.com/v2/vector/index/14841111-b834-4788-925c-04ab156d1123/reset-password")
if err != nil {
log.Fatal(err)
}
req.SetBasicAuth("email", "api_key")
resp, err := client.Do(req)
if err != nil {
log.Fatal(err)
}
bodyText, err := ioutil.ReadAll(resp.Body)
if err != nil {
log.Fatal(err)
}
fmt.Printf("%s\n", bodyText);
```
```json 200 OK
"OK"
```
# Set Index Plan
Source: https://upstash.com/docs/devops/developer-api/vector/set_index_plan
POST https://api.upstash.com/v2/vector/index/{id}/setplan
This endpoint is used to change the plan of an index.
## Request Parameters
The unique ID of the index to be deleted.
The new plan for the index.
## Response Parameters
`"OK"` on successfull deletion operation.
```shell curl
curl -X POST \
https://api.upstash.com/v2/vector/index/14841111-b834-4788-925c-04ab156d1123/setplan \
-u 'EMAIL:API_KEY' \
-d '{"target_plan":"fixed"}'
```
```javascript JavaScript
const axios = require('axios');
const postData = {
target_plan: "fixed",
};
const config = {
auth: {
username: 'EMAIL',
password: 'API_KEY',
},
headers: {
'Content-Type': 'application/json',
},
};
const url = 'https://api.upstash.com/v2/vector/index/14841111-b834-4788-925c-04ab156d1123/setplan';
axios.post(url, postData, config)
.then((response) => {
console.log('Plan set successfully:', response.data);
})
.catch((error) => {
console.error('Error:', error);
});
```
```python Python
import requests
data = '{"target_plan":"fixed"}'
response = requests.post('https://api.upstash.com/v2/vector/index/14841111-b834-4788-925c-04ab156d1123/setplan', data=data, auth=('EMAIL', 'API_KEY'))
response.content
```
```go Go
client := &http.Client{}
var data = strings.NewReader(`{
"target_plan":"fixed",
}`)
req, err := http.NewRequest("POST", "https://api.upstash.com/v2/vector/index/14841111-b834-4788-925c-04ab156d1123/setplan", data)
if err != nil {
log.Fatal(err)
}
req.SetBasicAuth("email", "api_key")
resp, err := client.Do(req)
if err != nil {
log.Fatal(err)
}
bodyText, err := ioutil.ReadAll(resp.Body)
if err != nil {
log.Fatal(err)
}
fmt.Printf("%s\n", bodyText);
```
```json 200 OK
"OK"
```
# Transfer Index
Source: https://upstash.com/docs/devops/developer-api/vector/transfer_index
POST https://api.upstash.com/v2/vector/index/{id}/transfer
This endpoint is used to transfer an index to another team.
## Request Parameters
The unique ID of the index to be deleted.
The ID of the target account. If the target is a team, then use the format `team:`, else if the target is your personal account use the format ``.
## Response Parameters
`"OK"` on successfull deletion operation.
```shell curl
curl -X POST \
https://api.upstash.com/v2/vector/index/14841111-b834-4788-925c-04ab156d1123/transfer \
-u 'EMAIL:API_KEY' \
-d '{"target_account":"team:team-id-1"}'
```
```javascript JavaScript
const axios = require('axios');
const postData = {
target_account: "team:team-id-1",
};
const config = {
auth: {
username: 'EMAIL',
password: 'API_KEY',
},
headers: {
'Content-Type': 'application/json',
},
};
const url = 'https://api.upstash.com/v2/vector/index/14841111-b834-4788-925c-04ab156d1123/transfer';
axios.post(url, postData, config)
.then((response) => {
console.log('Transfer successful:', response.data);
})
.catch((error) => {
console.error('Error:', error);
});
```
```python Python
import requests
data = '{"target_account":"team:team-id-1"}'
response = requests.post('https://api.upstash.com/v2/vector/index/14841111-b834-4788-925c-04ab156d1123/transfer', data=data, auth=('EMAIL', 'API_KEY'))
response.content
```
```go Go
client := &http.Client{}
var data = strings.NewReader(`{
"target_account":"team:team-id-1",
}`)
req, err := http.NewRequest("POST", "https://api.upstash.com/v2/vector/index/14841111-b834-4788-925c-04ab156d1123/transfer", data)
if err != nil {
log.Fatal(err)
}
req.SetBasicAuth("email", "api_key")
resp, err := client.Do(req)
if err != nil {
log.Fatal(err)
}
bodyText, err := ioutil.ReadAll(resp.Body)
if err != nil {
log.Fatal(err)
}
fmt.Printf("%s\n", bodyText);
```
```json 200 OK
"OK"
```
# Overview
Source: https://upstash.com/docs/devops/pulumi/overview
The Upstash Pulumi Provider lets you manage [Upstash](https://upstash.com) Redis and Kafka resources programmatically.
You can find the Github Repository [here](https://github.com/upstash/pulumi-upstash).
## Installing
This package is available for several languages/platforms:
### Node.js (JavaScript/TypeScript)
To use from JavaScript or TypeScript in Node.js, install using either `npm`:
```bash
npm install @upstash/pulumi
```
or `yarn`:
```bash
yarn add @upstash/pulumi
```
### Python
To use from Python, install using `pip`:
```bash
pip install upstash_pulumi
```
### Go
To use from Go, use `go get` to grab the latest version of the library:
```bash
go get github.com/upstash/pulumi-upstash/sdk/go/...
```
## Configuration
The following configuration points are available for the `upstash` provider:
* `upstash:apiKey` (environment: `UPSTASH_API_KEY`) - the API key for `upstash`. Can be obtained from the [console](https://console.upstash.com).
* `upstash:email` (environment: `UPSTASH_EMAIL`) - owner email of the resources
## Some Examples
### TypeScript:
```typescript
import * as pulumi from "@pulumi/pulumi";
import * as upstash from "@upstash/pulumi";
// multiple redis databases in a single for loop
for (let i = 0; i < 5; i++) {
new upstash.RedisDatabase("mydb" + i, {
databaseName: "pulumi-ts-db" + i,
region: "eu-west-1",
tls: true,
});
}
```
### Go:
```go
package main
import (
"github.com/pulumi/pulumi/sdk/v3/go/pulumi"
"github.com/upstash/pulumi-upstash/sdk/go/upstash"
)
func main() {
pulumi.Run(func(ctx *pulumi.Context) error {
createdTeam, err := upstash.NewTeam(ctx, "exampleTeam", &upstash.TeamArgs{
TeamName: pulumi.String("pulumi go team"),
CopyCc: pulumi.Bool(false),
TeamMembers: pulumi.StringMap{
"": pulumi.String("owner"),
"": pulumi.String("dev"),
},
})
if err != nil {
return err
}
return nil
})
}
```
### Python:
```python
import pulumi
import upstash_pulumi as upstash
created_cluster = upstash.KafkaCluster(
resource_name="myCluster",
cluster_name="pulumi-python-cluster",
multizone=False,
region="eu-west-1"
)
```
# null
Source: https://upstash.com/docs/devops/terraform
# upstash_kafka_cluster_data
Source: https://upstash.com/docs/devops/terraform/data_sources/upstash_kafka_cluster_data
```hcl example.tf
data "upstash_kafka_cluster_data" "clusterData" {
cluster_id = resource.upstash_kafka_cluster.exampleCluster.cluster_id
}
```
## Schema
### Required
Unique Cluster ID for requested cluster
### Read-Only
Name of the cluster
Creation time of the cluster
The ID of this resource.
Max Message Size for the cluster
Max Messages Per Second for the cluster
Max Partitions for the cluster
Max Retention Size of the cluster
Max Retention Time of the cluster
Whether multizone replication is enabled
Password for the cluster
Region of the cluster. Possible values (may change) are: `eu-west-1`,
`us-east-1`
Name of the cluster
Current state of the cluster
Possible values: `active` or `deleted`
TCP Endpoint of the cluster
Type of the cluster
Base64 encoded username for the cluster
# upstash_kafka_connector_data
Source: https://upstash.com/docs/devops/terraform/data_sources/upstash_kafka_connector_data
```hcl example.tf
data "upstash_kafka_connector_data" "kafkaConnectorData" {
topic_id = resource.upstash_kafka_connector.exampleKafkaConnector.connector_id
}
```
## Schema
### Required
Unique Connector ID for created connector
### Read-Only
Unique Cluster ID for cluster that the connector is tied to
Connector class of the connector
State error message of the connector
Creation time of the connector
Encoded username for the connector
The ID of this resource.
Name of the connector
Properties of the connector. Custom config for different types of connectors.
Encrypted properties for the connector
State of the connector
State error message of the connector
Tasks of the connector
Topics for the connector
TTL for the connector
User password for the connector
# upstash_kafka_credential_data
Source: https://upstash.com/docs/devops/terraform/data_sources/upstash_kafka_credential_data
```hcl example.tf
data "upstash_kafka_credential_data" "kafkaCredentialData" {
credential_id = upstash_kafka_credential.exampleKafkaCredential.credential_id
}
```
## Schema
### Required
Unique ID of the kafka credential
### Read-Only
ID of the kafka cluster
Creation time of the credential
Name of the kafka credential
The ID of this resource.
Password to be used in authenticating to the cluster
Permission scope given to the kafka credential
State of the credential. `active` or `deleted`
Name of the kafka topic
Username to be used for the kafka credential
# upstash_kafka_topic_data
Source: https://upstash.com/docs/devops/terraform/data_sources/upstash_kafka_topic_data
```hcl example.tf
data "upstash_kafka_topic_data" "kafkaTopicData" {
topic_id = resource.upstash_kafka_topic.exampleKafkaTopic.topic_id
}
```
## Schema
### Required
Unique Topic ID for requested kafka topic
### Read-Only
Cleanup policy will be used in the topic (`compact` or `delete`)
ID of the cluster the topic will be deployed in
Creation time of the topic
The ID of this resource.
Max message size in the topic
Whether multizone replication is enabled
The number of partitions the topic will have
Password to be used in authenticating to the cluster
Region of the kafka topic. Possible values (may change) are: `eu-west-1`,
`us-east-1`
REST Endpoint of the kafka topic
The number of partitions the topic will have
Retention time of messages in the topic
State of the credential. `active` or `deleted`
TCP Endpoint of the kafka topic
Unique Cluster ID for created topic
Base64 encoded username to be used in authenticating to the cluster
# upstash_qstash_endpoint_data
Source: https://upstash.com/docs/devops/terraform/data_sources/upstash_qstash_endpoint_data
```hcl example.tf
data "upstash_qstash_endpoint_data" "exampleQStashEndpointData" {
endpoint_id = resource.upstash_qstash_endpoint.exampleQStashEndpoint.endpoint_id
}
```
## Schema
### Required
Topic Id that the endpoint is added to
### Read-Only
Unique QStash Endpoint ID
The ID of this resource.
Unique QStash Topic Name for Endpoint
# upstash_qstash_schedule_data
Source: https://upstash.com/docs/devops/terraform/data_sources/upstash_qstash_schedule_data
```hcl example.tf
data "upstash_qstash_schedule_data" "exampleQStashScheduleData" {
schedule_id = resource.upstash_qstash_schedule.exampleQStashSchedule.schedule_id
}
```
## Schema
### Required
Unique QStash Schedule ID for requested schedule
### Read-Only
Body to send for the POST request in string format. Needs escaping () double
quotes.
Creation time for QStash Schedule
Cron string for QStash Schedule
Destination for QStash Schedule. Either Topic ID or valid URL
Forward headers to your API
The ID of this resource.
Start time for QStash Scheduling.
Retries for QStash Schedule requests.
# upstash_qstash_topic_data
Source: https://upstash.com/docs/devops/terraform/data_sources/upstash_qstash_topic_data
```hcl example.tf
data "upstash_qstash_topic_data" "exampleQstashTopicData" {
topic_id = resource.upstash_qstash_topic.exampleQstashTopic.topic_id
}
```
## Schema
### Required
Unique QStash Topic ID for requested topic
### Read-Only
Endpoints for the QStash Topic
The ID of this resource.
Name of the QStash Topic
# upstash_redis_database_data
Source: https://upstash.com/docs/devops/terraform/data_sources/upstash_redis_database_data
```hcl example.tf
data "upstash_redis_database_data" "exampleDBData" {
database_id = resource.upstash_redis_database.exampleDB.database_id
}
```
## Schema
### Required
Unique Database ID for created database
### Read-Only
Upgrade to higher plans automatically when it hits quotas
Creation time of the database
Name of the database
Type of the database
Daily bandwidth limit for the database
Disk threshold for the database
Max clients for the database
Max commands per second for the database
Max entry size for the database
Max request size for the database
Memory threshold for the database
Database URL for connection
The ID of this resource.
Password of the database
Port of the endpoint
Primary region for the database (Only works if region='global'. Can be one of
\[us-east-1, us-west-1, us-west-2, eu-central-1, eu-west-1, sa-east-1,
ap-southeast-1, ap-southeast-2])
Rest Token for the database.
Read regions for the database (Only works if region='global' and
primary\_region is set. Can be any combination of \[us-east-1, us-west-1,
us-west-2, eu-central-1, eu-west-1, sa-east-1, ap-southeast-1,
ap-southeast-2], excluding the one given as primary.)
Region of the database. Possible values are: `global`, `eu-west-1`,
`us-east-1`, `us-west-1`, `ap-northeast-1` , `eu-central1`
Rest Token for the database.
State of the database
When enabled, data is encrypted in transit. (If changed to false from true,
results in deletion and recreation of the resource)
User email for the database
# upstash_team_data
Source: https://upstash.com/docs/devops/terraform/data_sources/upstash_team_data
```hcl example.tf
data "upstash_team_data" "teamData" {
team_id = resource.upstash_team.exampleTeam.team_id
}
```
## Schema
### Required
Unique Cluster ID for created cluster
### Read-Only
Whether Credit Card is copied
The ID of this resource.
Members of the team. (Owner must be specified, which is the owner of the api
key.)
Name of the team
# Overview
Source: https://upstash.com/docs/devops/terraform/overview
The Upstash Terraform Provider lets you manage Upstash Redis and Kafka resources programmatically.
You can find the Github Repository for the Terraform Provider [here](https://github.com/upstash/terraform-provider-upstash).
## Installation
```hcl
terraform {
required_providers {
upstash = {
source = "upstash/upstash"
version = "x.x.x"
}
}
}
provider "upstash" {
email = var.email
api_key = var.api_key
}
```
`email` is your registered email in Upstash.
`api_key` can be generated from Upstash Console. For more information please check our [docs](https://docs.upstash.com/howto/developerapi).
## Create Database Using Terraform
Here example code snippet that creates database:
```hcl
resource "upstash_redis_database" "redis" {
database_name = "db-name"
region = "eu-west-1"
tls = "true"
multi_zone = "false"
}
```
## Import Resources From Outside of Terraform
To import resources created outside of the terraform provider, simply create the resource in .tf file as follows:
```hcl
resource "upstash_redis_database" "redis" {}
```
after this, you can run the command:
```
terraform import upstash_redis_database.redis
```
Above example is given for an Upstash Redis database. You can import all of the resources by changing the resource type and providing the resource id.
You can check full spec and [doc from here](https://registry.terraform.io/providers/upstash/upstash/latest/docs).
## Support, Bugs Reports, Feature Requests
If you need support then you can ask your questions Upstash Team in [upstash.com](https://upstash.com) chat widget.
There is also discord channel available for community. [Please check here](https://docs.upstash.com/help/support) for more information.
# upstash_kafka_cluster
Source: https://upstash.com/docs/devops/terraform/resources/upstash_kafka_cluster
Create and manage Kafka clusters on Upstash.
```hcl example.tf
resource "upstash_kafka_cluster" "exampleCluster" {
cluster_name = "TerraformCluster"
region = "eu-west-1"
multizone = false
}
```
## Schema
### Required
Name of the cluster
Region of the cluster. Possible values (may change) are: `eu-west-1`,
`us-east-1`
### Optional
Whether cluster has multizone attribute
### Read-Only
Unique cluster ID for created cluster
Creation time of the cluster
The ID of this resource.
Max message size for the cluster
Max messages per second for the cluster
Max partitions for the cluster
Max retention size of the cluster
Max retention time of the cluster
Password for the cluster
REST endpoint of the cluster
State, where the cluster is originated
TCP endpoint of the cluster
Type of the cluster
Base64 encoded username for the cluster
# upstash_kafka_connector
Source: https://upstash.com/docs/devops/terraform/resources/upstash_kafka_connector
Create and manage Kafka Connectors.
```hcl example.tf
# Not necessary if the topic belongs to an already created cluster.
resource "upstash_kafka_cluster" "exampleKafkaCluster" {
cluster_name = "Terraform_Upstash_Cluster"
region = "eu-west-1"
multizone = false
}
resource "upstash_kafka_topic" "exampleKafkaTopic" {
topic_name = "TerraformTopic"
partitions = 1
retention_time = 625135
retention_size = 725124
max_message_size = 829213
cleanup_policy = "delete"
# Here, you can use the newly created kafka_cluster resource (above) named exampleKafkaCluster.
# And use its ID so that the topic binds to it.
# Alternatively, provide the ID of an already created cluster.
cluster_id = resource.upstash_kafka_cluster.exampleKafkaCluster.cluster_id
}
resource "upstash_kafka_connector" "exampleKafkaConnector" {
name = var.connector_name
cluster_id = upstash_kafka_cluster.exampleKafkaCluster.cluster_id
properties = {
"collection": "user123",
"connection.uri": "mongodb+srv://test:test@cluster0.fohyg7p.mongodb.net/?retryWrites=true&w=majority",
"connector.class": "com.mongodb.kafka.connect.MongoSourceConnector",
"database": "myshinynewdb2",
"topics": "${upstash_kafka_topic.exampleKafkaTopic.topic_name}"
}
# OPTIONAL: change between restart-running-paused
# running_state = "running"
}
```
## Schema
### Required
Unique cluster ID related to the connector
Name of the connector
Properties that the connector will have. Please check the documentation of the
related connector.
### Optional
Running state of the connector
### Read-Only
Unique connector ID for created connector
Creation of the connector
The ID of this resource.
# upstash_kafka_credential
Source: https://upstash.com/docs/devops/terraform/resources/upstash_kafka_credential
Create and manage credentials for a kafka cluster.
```hcl example.tf
resource "upstash_kafka_cluster" "exampleKafkaCluster" {
cluster_name = var.cluster_name
region = var.region
multizone = var.multizone
}
resource "upstash_kafka_topic" "exampleKafkaTopic" {
topic_name = var.topic_name
partitions = var.partitions
retention_time = var.retention_time
retention_size = var.retention_size
max_message_size = var.max_message_size
cleanup_policy = var.cleanup_policy
cluster_id = resource.upstash_kafka_cluster.exampleKafkaCluster.cluster_id
}
resource "upstash_kafka_credential" "exampleKafkaCredential" {
cluster_id = upstash_kafka_cluster.exampleKafkaCluster.cluster_id
credential_name = "credentialFromTerraform"
topic = upstash_kafka_topic.exampleKafkaTopic.topic_name
permissions = "ALL"
}
resource "upstash_kafka_credential" "exampleKafkaCredentialAllTopics" {
cluster_id = upstash_kafka_cluster.exampleKafkaCluster.cluster_id
credential_name = "credentialFromTerraform"
topic = "*"
permissions = "ALL"
}
```
## Schema
### Required
Name of the cluster
Name of the kafka credential
Properties that the connector will have. Please check the documentation of the
related connector.
Name of the kafka topic
### Read-Only
Creation time of the credential
Unique ID of the kafka credential
The ID of this resource.
Password to be used in authenticating to the cluster
State of the credential. `active` or `deleted`
Username to be used for the kafka credential
# upstash_kafka_topic
Source: https://upstash.com/docs/devops/terraform/resources/upstash_kafka_topic
Create and manage Kafka topics in Upstash.
```hcl example.tf
# Not necessary if the topic belongs to an already created cluster.
resource "upstash_kafka_cluster" "exampleKafkaCluster" {
cluster_name = "Terraform_Upstash_Cluster"
region = "eu-west-1"
multizone = false
}
resource "upstash_kafka_topic" "exampleKafkaTopic" {
topic_name = "TerraformTopic"
partitions = 1
retention_time = 625135
retention_size = 725124
max_message_size = 829213
cleanup_policy = "delete"
# Here, you can use the newly created kafka_cluster resource (above) named exampleKafkaCluster.
# And use its ID so that the topic binds to it.
# Alternatively, provide the ID of an already created cluster.
cluster_id = resource.upstash_kafka_cluster.exampleKafkaCluster.cluster_id
}
```
## Schema
### Required
Cleanup policy will be used in the topic. `compact` or `delete`
ID of the cluster the topic will be deployed in
Max message size in the topic
The number of partitions the topic will have
Retention size of the messages in the topic
Retention time of messages in the topic
Name of the topic
### Read-Only
Creation time of the topic
The ID of this resource.
Whether multizone replication is enabled
Password to be used in authenticating to the cluster
Region of the kafka topic
REST endpoint of the kafka topic
State of the credential. `active` or `deleted`
TCP endpoint of the kafka topic
Unique cluster ID for created topic
Base64 encoded username to be used in authenticating to the cluster
# upstash_qstash_endpoint
Source: https://upstash.com/docs/devops/terraform/resources/upstash_qstash_endpoint
Create and manage QStash endpoints.
```hcl example.tf
resource "upstash_qstash_endpoint" "exampleQStashEndpoint" {
url = "https://***.***"
topic_id = resource.upstash_qstash_topic.exampleQstashTopic.topic_id
}
```
## Schema
### Required
Topic ID that the endpoint is added to
URL of the endpoint
### Read-Only
Unique QStash endpoint ID
The ID of this resource.
Unique QStash topic name for endpoint
# upstash_qstash_schedule
Source: https://upstash.com/docs/devops/terraform/resources/upstash_qstash_schedule
Create and manage QStash schedules.
```hcl example.tf
resource "upstash_qstash_schedule" "exampleQStashSchedule" {
destination = resource.upstash_qstash_topic.exampleQstashTopic.topic_id
cron = "* * * * */2"
# or simply provide a link
# destination = "https://***.***"
}
```
## Schema
### Required
Cron string for QStash Schedule
Destination for QStash Schedule. Either Topic ID or valid URL
### Optional
Body to send for the POST request in string format. Needs escaping () double
quotes.
Callback URL for QStash Schedule.
Content based deduplication for QStash Scheduling.
Content type for QStash Scheduling.
Deduplication ID for QStash Scheduling.
Delay for QStash Schedule.
Forward headers to your API
Start time for QStash Scheduling.
Retries for QStash Schedule requests.
### Read-Only
Creation time for QStash Schedule.
The ID of this resource.
Unique QStash Schedule ID for requested schedule
# upstash_qstash_topic
Source: https://upstash.com/docs/devops/terraform/resources/upstash_qstash_topic
Create and manage QStash topics
```hcl example.tf
resource "upstash_qstash_topic" "exampleQStashTopic" {
name = "exampleQStashTopicName"
}
```
## Schema
### Required
Name of the QStash topic
### Read-Only
Endpoints for the QStash topic
The ID of this resource.
Unique QStash topic ID for requested topic
# upstash_redis_database
Source: https://upstash.com/docs/devops/terraform/resources/upstash_redis_database
Create and manage Upstash Redis databases.
```hcl example.tf
resource "upstash_redis_database" "exampleDB" {
database_name = "Terraform DB6"
region = "eu-west-1"
tls = "true"
multizone = "true"
}
```
## Schema
### Required
Name of the database
Region of the database. Possible values are: `global`, `eu-west-1`,
`us-east-1`, `us-west-1`, `ap-northeast-1` , `eu-central1`
### Optional
Upgrade to higher plans automatically when it hits quotas
Enable eviction, to evict keys when your database reaches the max size
Primary region for the database (Only works if region='global'. Can be one of
\[us-east-1, us-west-1, us-west-2, eu-central-1, eu-west-1, sa-east-1,
ap-southeast-1, ap-southeast-2])
Read regions for the database (Only works if region='global' and
primary\_region is set. Can be any combination of \[us-east-1, us-west-1,
us-west-2, eu-central-1, eu-west-1, sa-east-1, ap-southeast-1,
ap-southeast-2], excluding the one given as primary.)
When enabled, data is encrypted in transit. (If changed to false from true,
results in deletion and recreation of the resource)
### Read-Only
Creation time of the database
Unique Database ID for created database
Type of the database
Daily bandwidth limit for the database
Disk threshold for the database
Max clients for the database
Max commands per second for the database
Max entry size for the database
Max request size for the database
Memory threshold for the database
Database URL for connection
The ID of this resource.
Password of the database
Port of the endpoint
Rest Token for the database.
Rest Token for the database.
State of the database
User email for the database
# upstash_team
Source: https://upstash.com/docs/devops/terraform/resources/upstash_team
Create and manage teams on Upstash.
```hcl example.tf
resource "upstash_team" "exampleTeam" {
team_name = "TerraformTeam"
copy_cc = false
team_members = {
# Owner is the owner of the api_key.
"X@Y.Z": "owner",
"A@B.C": "dev",
"E@E.F": "finance",
}
}
```
## Schema
### Required
Whether Credit Card is copied
Members of the team. (Owner must be specified, which is the owner of the api
key.)
Name of the team
### Read-Only
The ID of this resource.
Unique Cluster ID for created cluster
# Get Started
Source: https://upstash.com/docs/introduction
Create a Redis Database within seconds
Create a Vector Database for AI & LLMs
Publish your first message
Write durable serverless functions
## Concepts
Upstash is serverless. You don't need to provision any infrastructure. Just
create a database and start using it.
Price scales to zero. You don't pay for idle or unused resources. You pay
only for what you use.
Upstash Redis replicates your data for the best latency all over the world.
Upstash REST APIs enable access from all types of runtimes.
## Get In touch
Follow us on X for the latest news and updates.
Join our Discord Community and ask your questions to the team and other
developers.
Raise an issue on GitHub.
# Aiven Http Sink Connector
Source: https://upstash.com/docs/kafka/connect/aivenhttpsink
Aiven Http Sink Connector calls a given http endpoint for each item published to
your Kafka Topics.
In this guide, we will walk you through creating an Aiven Http Sink Connector.
## Get Started
### Create a Kafka Cluster
If you do not have a Kafka cluster and/or topic already, follow [these
steps](../overall/getstarted) to create one.
### Prepare the Test Environment
If you already have an HTTP endpoint that you will call, you can skip this step and continue from the [Create The Connector](#create-the-connector) section.
We will use [webhook.site](https://webhook.site/) to verify if the connector is
working. Go to [webhook.site](https://webhook.site/) and copy the unique url to
pass it in the connector config later.
### Create the Connector
Go to the Connectors tab, and create your first connector by clicking the **New
Connector** button.
Choose your connector as **Aiven Http Sink Connector**
Enter the required properties.
The advanced screen is for any other configuration that the selected connector
supports. At the top of this screen, you can find a link to related
documentation. We can proceed with what we have and click the **Connect** button
directly.
Congratulations! You have created an Aiven Http Sink Connector.
As you put data into your selected topics, the requests should be visible in
[webhook.site](https://webhook.site/)
# Supported Drivers
Source: https://upstash.com/docs/kafka/connect/aivenjdbcdrivers
These are the currently supported databases and JDBC drivers:
| Database | JDBC Driver |
| ------------- | ----------------------------- |
| PostgreSQL | postgresql-42.3.3 |
| MySQL | mysql-connector-java-8.0.28 |
| MS SQL Server | mssql-jdbc-10.2.0 |
| Snowflake | snowflake-jdbc-3.13.16 |
| ClickHouse | clickhouse-jdbc-0.3.2-patch11 |
| SQLite | sqlite-jdbc-3.36.0.3 |
# Aiven JDBC Sink Connector
Source: https://upstash.com/docs/kafka/connect/aivenjdbcsink
Aiven JDBC Sink Connector allows you to continuously store the data from your
Kafka Topics in any sql dialect relational database like Mysql,PostgreSql etc.
In this guide, we will walk you through creating an Aiven JDBC Sink Connector.
## Get Started
### Create a Kafka Cluster
If you do not have a Kafka cluster and/or topic already, follow [these
steps](../overall/getstarted) to create one.
### Create the Connector
Go to the Connectors tab, and create your first connector by clicking the **New
Connector** button.
Choose your connector as **Aiven JDBC Connector Sink**
Enter the required properties.
The advanced screen is for any other configuration that the selected connector
supports. At the top of this screen, you can find a link to related
documentation. We can proceed with what we have and click the **Connect** button
directly.
Congratulations! You have created an Aiven JDBC Sink Connector.
As you put data into your selected topics, the data will be written into your
relational database.
## Supported Databases
# Aiven JDBC Source Connector
Source: https://upstash.com/docs/kafka/connect/aivenjdbcsource
Aiven JDBC Source Connector allows you to capture any changes in your SQL
dialect relational databases and store them as messages on your Kafka topics. In
this guide, we will walk you through creating the Aiven JDBC Source Connector.
## Get Started
### Create a Kafka Cluster
If you do not have a Kafka cluster and/or topic already, follow [these
steps](../overall/getstarted) to create one.
### Create the Connector
Go to the Connectors tab, and create your first connector by clicking the **New
Connector** button.
Choose your connector as **Aiven JDBC Connector Source**
Enter the required properties.
The advanced screen is for any other configuration that the selected connector
supports. At the top of this screen, you can find a link to related
documentation. We can proceed with what we have and click the **Connect** button
directly.
Congratulations! You have created an Aiven JDBC Source Connector. As you put
data into your relational database, your topics will be created and populated
with new data.
You can go to the **Messages** section to see latest events as they are coming
from Kafka.
## Supported Databases
# Aiven OpenSearch Sink Connector
Source: https://upstash.com/docs/kafka/connect/aivenopensearchsink
Aiven OpenSearch Sink Connector allows you to continuously store the data from
your Kafka Topics in any OpenSearch compatible product like Amazon OpenSearch,
Elasticsearch, etc.
In this guide, we will walk you through creating an Aiven OpenSearch Sink
Connector with Elasticsearch.
## Get Started
### Create a Kafka Cluster
If you do not have a Kafka cluster and/or topic already, follow [these
steps](../overall/getstarted) to create one.
### Prepare the Elasticsearch Environment
If you already have an Elasticsearch environment with the following information,
skip this step and continue from the
[Create The Connector](#create-the-connector) section.
* `connection.url`
* `connection.username`
* `connection.password`
Go to [Elastic Cloud](https://cloud.elastic.co/deployments) Create or a
deployment. Aside from the name, default configurations should be fine for this
guide.
Don't forget to save the deployment credentials. We need them to create the
connector later.
Lastly, we need the connection endpoint. Click on your deployment to see the
details and click to the "Copy Endpoint" of Elasticsearch in Applications
section.
These three(username, password, and endpoint) should be enough to create the
connector.
### Create the Connector
Go to the Connectors tab, and create your first connector by clicking the **New
Connector** button.
Choose your connector as **Aiven OpenSearch Sink Connector**
Enter the required properties.
The advanced screen is for any other configuration that the selected connector
supports. At the top of this screen, you can find a link to related
documentation. We can proceed with what we have and click the **Connect** button
directly.
Congratulations! You have created an OpenSearch Sink Connector.
As you put data into your selected topics, the data will be written into
ElasticSearch.
# Aiven Amazon S3 Sink Connector
Source: https://upstash.com/docs/kafka/connect/aivens3sink
Aiven Amazon S3 Sink Connector allows you to continuously store the data from
your Kafka Topics in Amazon S3. In this guide, we will walk you through creating
a Amazon S3 Sink Connector.
## Get Started
### Create a Kafka Cluster
If you do not have a Kafka cluster and/or topic already, follow [these
steps](../overall/getstarted) to create one.
### Prepare the Amazon S3 Environment
If you already have a Amazon S3 environment with the following information, skip
this step and continue from the [Create The Connector](#create-the-connector)
section. Note that the user with the given access keys, should have permission
to modify the given bucket.
* `aws.access.key.id`
* `aws.secret.access.key`
* `aws.s3.bucket.name`
* `aws.s3.region`
Go to [AWS S3 Console](https://s3.console.aws.amazon.com/s3/) Create or select a
bucket. Note that this bucket name will be used later to configure the
connector.
To make this guide simple, we will allow public access to this bucket(not
recommended in production).
You can disable public access and allow only following IP's coming from Upstash
:
```
52.48.149.7
52.213.40.91
174.129.75.41
34.195.190.47
52.58.175.235
18.158.44.120
63.34.151.162
54.247.137.96
3.78.151.126
3.124.80.204
34.236.200.33
44.195.74.73
```
Aside from bucket name and public access changes, default configurations should
be fine for this guide.
Next, we will create a user account with permissions to modify S3 buckets Go to
[AWS IAM](https://console.aws.amazon.com/iam) , then "Access Management" and
"Users". Click on "Add Users".
Give a name to the user and continue with the next screen.
On the "Set Permissions" screen, we will give the "AmazonFullS3Access" to this
user.
This gives more permissions than needed. You can create a custom policy with
following json for more restrictive policy.
```
{
"Version": "2012-10-17",
"Statement": [
{
"Sid": "VisualEditor0",
"Effect": "Allow",
"Action": [
"s3:PutObject",
"s3:GetObject",
"s3:ListBucketMultipartUploads",
"s3:AbortMultipartUpload",
"s3:ListMultipartUploadParts"
],
"Resource": "*"
}
]
}
```
After creating the user, we will go into the details of that user to create a
key. Click on the user, then go to the "Security Credentials". An the "Access
Keys" section, click on the "Create access key" button.
We will choose "Application running outside AWS" and create the access key.
Don't forget to store access key id and secret key. We will use these two when
creating the connector.
### Create the Connector
Go to the Connectors tab, and create your first connector by clicking the **New
Connector** button.
Choose your connector as **Aiven Amazon S3 Connector**
Enter the required properties.
The advanced screen is for any other configuration that the selected connector
supports. At the top of this screen, you can find a link to related
documentation. We can proceed with what we have and click the **Connect** button
directly.
Congratulations! You have created an Aiven Amazon S3 Sink Connector.
As you put data into your selected topics, the data will be written into Amazon
S3. You can see the data coming from your related bucket in the Amazon Console.
# Google BigQuery Sink Connector
Source: https://upstash.com/docs/kafka/connect/bigquerysink
Google BigQuery Sink Connector allows you to continuously store the data from
your Kafka Topics in Google BigQuery. In this guide, we will walk you through
creating a Google BigQuery Sink Connector.
## Get Started
### Create a Kafka Cluster
If you do not have a Kafka cluster and/or topic already, follow [these
steps](../overall/getstarted) to create one.
### Prepare the Google BigQuery Environment
If you already have a Google BigQuery environment with the following
information, skip this step and continue from the
[Create The Connector](#create-the-connector) section.
* project name
* a data set
* an associated google service account with permission to modify the google big
query dataset.
Go to [Google Cloud BigQuery](https://console.cloud.google.com/bigquery). Create
or select a project. Note that this project name will be used later to configure
the connector.
Create a dataset for the project. Note that this dataset name will be used later
to configure the connector.
Default configurations should be fine for this guide.
Next, we will create a service account which later we will connect to this
project. Go to [Google Cloud Console](https://console.cloud.google.com/), then
"IAM & admin" and "Service accounts"
Click on "Create Service Account".
Give a name to your service account.
Configure permissions for the service account. To keep it simple, we will make
this service account "Owner" to allow everything. You may want to be more
specific.
The rest of the config can be left empty. After creating the service account, we
will go to its settings to attach a key to it. Go to the "Actions" tab, and
select "Manage keys".
Then create a new key, if you don't have one already. We will select the "JSON"
key type as recommended.
We will use the content of this JSON file when creating the connector. For
reference it should look something like this:
```json
{
"type": "service_account",
"project_id": "bigquerysinkproject",
"private_key_id": "b5e8b29ed62171aaaa2b5045f04826635bcf78c4",
"private_key": "-----BEGIN PRIVATE A_LONG_PRIVATE_KEY_WILL_BE_HERE PRIVATE KEY-----\n",
"client_email": "serviceforbigquerysink@bigquerysinkproject.iam.gserviceaccount.com",
"client_id": "109444138898162952667",
"auth_uri": "https://accounts.google.com/o/oauth2/auth",
"token_uri": "https://oauth2.googleapis.com/token",
"auth_provider_x509_cert_url": "https://www.googleapis.com/oauth2/v1/certs",
"client_x509_cert_url": "https://www.googleapis.com/robot/v1/metadata/x509/serviceforbigquerysink%40bigquerysinkproject.iam.gserviceaccount.com"
}
```
Then we need to give permission to this service account from the dataset that we
created. From [BigQuery Console](https://console.cloud.google.com/bigquery) go
to your dataset settings and click share.
The "Dataset Permissions" view will open. Click to "Add Principal" We will add
the service account we have created as a principal here. And we will assign the
"Owner" role to it to make this example simple. You may want to be more specific
here.
With this step, the BigQuery dataset should be ready to use with the connector.
### Create the Connector
Go to the Connectors tab, and create your first connector by clicking the **New
Connector** button.
Choose your connector as **Google BigQuery Sink Connector**
Enter the required properties.
Note that the Google BigQuery Connector expects the data to have a schema. That
is why we choose JsonConvertor with schema included. Alternatively AvroConvertor
with SchemaRegistry can be used as well.
The advanced screen is for any other configuration that the selected connector
supports. At the top of this screen, you can find a link to related
documentation. We can proceed with what we have and click the **Connect** button
directly.
Congratulations! You have created a Google BigQuery Sink Connector.
As you put data into your selected topics, the data will be written into Google
BigQuery. You can view it from the Google BigQuery Console.
# Supported Connect Plugins
Source: https://upstash.com/docs/kafka/connect/connectplugins
You can use several types of plugins together with your connectors.
Here are all the supported plugins supported.
# Common Plugins supported by all connectors
## Transforms
Related documentation: [https://kafka.apache.org/documentation/#connect\_transforms](https://kafka.apache.org/documentation/#connect_transforms)
org.apache.kafka.connect.transforms.Cast\$Key
org.apache.kafka.connect.transforms.Cast\$Value
org.apache.kafka.connect.transforms.DropHeaders
org.apache.kafka.connect.transforms.ExtractField\$Key
org.apache.kafka.connect.transforms.ExtractField\$Value
org.apache.kafka.connect.transforms.Filter
org.apache.kafka.connect.transforms.Flatten\$Key
org.apache.kafka.connect.transforms.Flatten\$Value
org.apache.kafka.connect.transforms.HeaderFrom\$Key
org.apache.kafka.connect.transforms.HeaderFrom\$Value
org.apache.kafka.connect.transforms.HoistField\$Key
org.apache.kafka.connect.transforms.HoistField\$Value
org.apache.kafka.connect.transforms.InsertField\$Key
org.apache.kafka.connect.transforms.InsertField\$Value
org.apache.kafka.connect.transforms.InsertHeader
org.apache.kafka.connect.transforms.MaskField\$Key
org.apache.kafka.connect.transforms.MaskField\$Value
org.apache.kafka.connect.transforms.RegexRouter
org.apache.kafka.connect.transforms.ReplaceField\$Key
org.apache.kafka.connect.transforms.ReplaceField\$Value
org.apache.kafka.connect.transforms.SetSchemaMetadata\$Key
org.apache.kafka.connect.transforms.SetSchemaMetadata\$Value
org.apache.kafka.connect.transforms.TimestampConverter\$Key
org.apache.kafka.connect.transforms.TimestampConverter\$Value
org.apache.kafka.connect.transforms.TimestampRouter
org.apache.kafka.connect.transforms.ValueToKey
## Predicates
Related documentation: [https://kafka.apache.org/documentation/#connect\_predicates](https://kafka.apache.org/documentation/#connect_predicates)
org.apache.kafka.connect.transforms.predicates.HasHeaderKey
org.apache.kafka.connect.transforms.predicates.RecordIsTombstone
org.apache.kafka.connect.transforms.predicates.TopicNameMatches
## Converters
org.apache.kafka.connect.converters.ByteArrayConverter
org.apache.kafka.connect.converters.DoubleConverter
org.apache.kafka.connect.converters.FloatConverter
org.apache.kafka.connect.converters.IntegerConverter
org.apache.kafka.connect.converters.LongConverter
org.apache.kafka.connect.converters.ShortConverter
org.apache.kafka.connect.json.JsonConverter
org.apache.kafka.connect.storage.StringConverter
org.apache.kafka.connect.storage.SimpleHeaderConverter
io.confluent.connect.avro.AvroConverter
# Plugins Supported By Only Debezium Connectors
## Transforms
Related documentation: [https://debezium.io/documentation/reference/stable/transformations/index.html](https://debezium.io/documentation/reference/stable/transformations/index.html)
io.debezium.connector.mongodb.transforms.ExtractNewDocumentState
io.debezium.connector.mongodb.transforms.outbox.MongoEventRouter
io.debezium.connector.mysql.transforms.ReadToInsertEvent
io.debezium.transforms.ByLogicalTableRouter
io.debezium.transforms.ExtractChangedRecordState
io.debezium.transforms.ExtractNewRecordState
io.debezium.transforms.HeaderToValue
io.debezium.transforms.UnwrapFromEnvelope
io.debezium.transforms.outbox.EventRouter
io.debezium.transforms.partitions.ComputePartition
io.debezium.transforms.partitions.PartitionRouting
## Converters
io.debezium.converters.BinaryDataConverter
io.debezium.converters.ByteArrayConverter
io.debezium.converters.ByteBufferConverter
io.debezium.converters.CloudEventsConverter
# Plugins Supported By Only Debezium Mongo Connector
## Transforms
Related documentation: [https://debezium.io/documentation/reference/stable/transformations/index.html](https://debezium.io/documentation/reference/stable/transformations/index.html)
io.debezium.connector.mongodb.transforms.ExtractNewDocumentState
io.debezium.connector.mongodb.transforms.outbox.MongoEventRouter
# Plugins Supported By Only Snowflake Sink Connector
## Converters
com.snowflake.kafka.connector.records.SnowflakeAvroConverter
com.snowflake.kafka.connector.records.SnowflakeAvroConverterWithoutSchemaRegistry
com.snowflake.kafka.connector.records.SnowflakeJsonConverter
# Troubleshooting
Source: https://upstash.com/docs/kafka/connect/connecttroubleshoot
# Allowlist (whitelist) Upstash IP addresses
For security purposes, some external services may require adding the upstash IP addresses to be listed in their systems.
Here is the complete IP list that Upstash will send traffic from:
```
52.48.149.7
52.213.40.91
174.129.75.41
34.195.190.47
52.58.175.235
18.158.44.120
63.34.151.162
54.247.137.96
3.78.151.126
3.124.80.204
34.236.200.33
44.195.74.73
```
# Debezium MongoDB Source Connector
Source: https://upstash.com/docs/kafka/connect/debeziummongo
Debezium MongoDB Source Connector allows you to capture any changes in your
MongoDB database and store them as messages in your Kafka topics. In this guide,
we will walk you through creating a Debezium MongoDB Source Connector with
MongoDB database to Upstash Kafka.
## Get Started
### Create a Kafka Cluster
If you do not have a Kafka cluster and/or topic already, follow [these
steps](../overall/getstarted) to create one.
### Create the Connector
Go to the Connectors tab, and create your first connector by clicking the **New
Connector** button.
Choose **Debezium MongoDB Connector**
Enter a connector name and MongoDB URI(connection string). Other configurations
are optional. We will skip them for now.
The advanced screen is for any other configuration that the selected connector
supports. At the top of this screen, you can find a link to related
documentation.
If your MongoDB database is SSL enabled, don't forget to add
`"mongodb.ssl.enabled": true` at this step. For example, MongoDB Atlas is
always SSL enabled.
After that we can continue by clicking **Connect**.
Congratulations! You have created a Debezium MongoDB Source Connector to Kafka.
Note that no topics will be created until some data is available on the MongoDB
database.
You can go to **Messages** section of the related topic to see latest events as
they are coming from Kafka.
# Debezium Mysql Source Connector
Source: https://upstash.com/docs/kafka/connect/debeziummysql
Debezium Mysql Source Connector allows you to capture any changes on your Mysql
DB and store them as messages on your Kafka topics. In this guide, we will walk
you through creating Debezium Mysql Source Connector.
## Get Started
### Create a Kafka Cluster
If you do not have a Kafka cluster and/or topic already, follow [these
steps](../overall/getstarted) to create one.
### Create the Connector
Go to the Connectors tab, and create your first connector by clicking the **New
Connector** button.
Choose your connector as **Debezium Mysql Connector** for this example
Enter the required properties.
The advanced screen is for any other configuration that the selected connector
supports. At the top of this screen, you can find a link to related
documentation. We can proceed with what we have and click the **Connect** button
directly.
Congratulations! You have created a Debezium Mysql Source Connector. As you put
data into your Mysql DB, you will see that topics prefixed with given **Server
Name** will be created and populated with new data.
You can go to **Messages** section to see latest events as they are coming from
Kafka.
# Debezium PostgreSQL Source Connector
Source: https://upstash.com/docs/kafka/connect/debeziumpsql
Debezium PostgreSQL Source Connector allows you to capture any changes on your
PostgreSQL DB and store them as messages on your Kafka topics. In this guide, we
will walk you through creating Debezium PostgreSQL Source Connector.
## Get Started
### Create a Kafka Cluster
If you do not have a Kafka cluster and/or topic already, follow [these
steps](../overall/getstarted) to create one.
### Create the Connector
Go to the Connectors tab, and create your first connector by clicking the **New
Connector** button.
Choose your connector as **Debezium PostgreSQL Connector** for this example
Enter the required properties.
The advanced screen is for any other configuration that the selected connector
supports. At the top of this screen, you can find a link to related
documentation. We can proceed with what we have and click the **Connect** button
directly.
Congratulations! You have created a Debezium PostgreSQL Source Connector. As you
put data into your PostgreSQL DB, you will see that related topics will be
created and populated with new data.
You can go to **Messages** section to see latest events as they are coming from
Kafka.
# Deprecation Notice
Source: https://upstash.com/docs/kafka/connect/deprecation
As of April 2024, Kafka Connectors are deprecated and will be removed in October, 1st 2024. Please check our [blog post](https://upstash.com/blog/kafka-connectors-deprecation) for more information.
If you were previously using Kafka Connect provided by Upstash, please follow [this guide](https://github.com/upstash/kafka-connectors?tab=readme-ov-file#migration-guide-from-upstash-kafka-connect) to migrate to your own self-hosted Kafka Connect.
If you have any questions or need further assistance, reach out to us at [support@upstash.com](mailto:support@upstash.com) or join our community on [Discord](https://upstash.com/discord).
# Introduction
Source: https://upstash.com/docs/kafka/connect/intro
Kafka Connect is a tool for streaming data between Apache Kafka and other
systems without writing a single line of code. Via Kafka Sink Connectors, you
can export your data into any other storage. Via Kafka Source Connectors, you
can pull data to your Kafka topics from other systems.
Kafka Connectors can be self hosted but it requires you to setup and maintain
extra processes/machines. Upstash provides hosted versions of connectors for
your Kafka cluster. This will remove the burden of maintaining an extra system and also improve performance, as it will be closer to your cluster.
## Pricing
Connectors are **free** to use. We don't charge anything extra for connectors
other than per message pricing of Kafka topics. Check out
[Pricing](https://upstash.com/pricing/kafka) for details on our per message pricing.
## Get Started
We will create a MongoDB source connector as an example. You can find examples
for all supported connectors on the left side bar under `Connectors` section.
### Create a Kafka Cluster
If you do not have a Kafka cluster and/or topic already, follow [these
steps](../overall/getstarted) to create one.
### Create a MongoDB Database
Let's prepare our MongoDB Atlas Database. Go to
[MongoDB Atlas](https://www.mongodb.com/cloud/atlas/register) and register.
Select `Build Database` and choose the `Free Shared` option for this example.
Proceed with `Create Cluster` as the defaults should be fine. If this is
your first time, you will see `Security Quickstart` screen.
Choose a username and password. You will need these later to put it in
connection string to MongoDB.
You will be allowing Upstash to connect to your MongoDB database in the next
screen. So be careful in this step.
Select Cloud Environment and then IP Access List. Enter following static Upstash
IP addresses to IP Access List.
```
52.48.149.7
52.213.40.91
174.129.75.41
34.195.190.47
52.58.175.235
18.158.44.120
63.34.151.162
54.247.137.96
3.78.151.126
3.124.80.204
34.236.200.33
44.195.74.73
```
From here, you will be redirected to Database Deployments screen. Go to
`Connect` and select `Connect your application` to find the MongoDB
URI(connection string). Copy this string to use later when creating our Kafka
Connector. Don't forget to replace the password that you selected earlier for
your MongoDB user.
### Create the Connector
Head over to [console.upstash.com](https://console.upstash.com) and select
your Kafka cluster. Go the Connectors tab, and create your first connector with
`New Connector` button.
Then choose your connector as `MongoDB Connector Source` for this example.
Choose a connector name and enter MongoDB URI(connection string) that we
prepared earlier in Config screen. Other configurations are optional. We will
skip them for now.
Advanced screen is for any other configuration that selected Connector supports.
At the top of this screen, you can find a link to related documentation. For
this example, we can proceed with what we have and click `Connect` button
directly.
Congratulations you have created your first source connector to Kafka. Note that
no topics will be created until some data is available on the MongoDB.
### See It In Action
With this setup, anything that you have introduced in your MongoDB will be
available on your Kafka topic immediately.
Lets go to MongoDB and populate it with some data.
From main `Database` screen, choose `Browse Collections` , and then click
`Add My Own Data`. Create your database in the next screen.
Select `Insert Document` on the right.
And lets put some data here.
Shortly, we should see a topic created in Upstash Console Kafka with
`DATABASE_NAME.COLLECTION_NAME` in MongoDB database.
After selecting the topic, you can go to `Messages` section to see latest events
as they are coming from Kafka.
## Next
Check our list of available connectors and how to use them from following links:
* [MongoDB Source Connector](./mongosource)
* [MongoDB Sink Connector](./mongosink)
* [Debezium MongoDB Source Connector](./debeziummongo)
* [Debezium MysqlDB Source Connector](./debeziummysql)
* [Debezium PostgreSql Source Connector](./debeziumpsql)
* [Aiven JDBC Source Connector](./aivenjdbcsource)
* [Aiven JDBC Sink Connector](./aivenjdbcsink)
* [Google BigQuery Sink Connector](./bigquerysink)
* [Aiven Amazon S3 Sink Connector](./aivens3sink)
* [Aiven OpenSearch(Elasticsearch) Sink Connector](./aivenopensearchsink)
* [Aiven Http Sink Connector](./aivenhttpsink)
* [Snowflake Sink Connector](./snowflakesink)
If the connector that you need is not in this list, please add a request to our
[Road Map](https://roadmap.upstash.com/)
# MongoDB Sink Connector
Source: https://upstash.com/docs/kafka/connect/mongosink
MongoDB Sink Connector allows you to continuously store the data that appears in your
Kafka Topics to MongoDB database. In this guide, we will walk you through
creating DB Sink Connector with MongoDB database to Upstash Kafka.
## Get Started
### Create a Kafka Cluster
If you do not have a Kafka cluster and/or topic already, follow [these
steps](../overall/getstarted) to create one.
### Create the Connector
Go to the Connectors tab, and create your first connector by clicking the **New
Connector** button.
Choose **MongoDB Connector Sink**
Enter a connector name and MongoDB URI(connection string). Select single or
multiple topics from existing topics to read data from.
Enter Database and Collection that the selected topics are written into. We
entered "new" as Database and "test" as Collection. It is not required for this
database and collection to exist on MongoDB database. They will be created
automatically.
The advanced screen is for any other configuration that the selected connector
supports. At the top of this screen, you can find a link to related
documentation. We can proceed with what we have and click the **Connect** button
directly.
Congratulations! You have created your MongoDB Sink Connector. As you put data
into your selected topics, the data will be written into your MongoDB database.
# MongoDB Source Connector
Source: https://upstash.com/docs/kafka/connect/mongosource
MongoDB Source Connector allows you to capture any changes in your MongoDB and
store them as messages on your Kafka topics. In this guide, we will walk you
through creating MongoDB Source Connector with MongoDB database to Upstash
Kafka.
## Get Started
### Create a Kafka Cluster
If you do not have a Kafka cluster and/or topic already, follow [these
steps](../overall/getstarted) to create one.
### Create the Connector
Go to the Connectors tab, and create your first connector by clicking the **New
Connector** button.
Choose **MongoDB Connector Source**
Enter a connector name and MongoDB URI(connection string). Other configurations
are optional. We will skip them for now.
The advanced screen is for any other configuration that the selected connector
supports. At the top of this screen, you can find a link to related
documentation. We can proceed with what we have and click the **Connect** button
directly.
Congratulations! You have created your MongoDB Source Connector to Kafka. Note
that no topics will be created until some data is available on the MongoDB
database.
You can go to **Messages** section of your topic to see latest events as they
are coming from Kafka.
# Snowflake Sink Connector
Source: https://upstash.com/docs/kafka/connect/snowflakesink
The Snowflake Sink Connector allows you to continuously store the data from your
Kafka Topics to Snowflake.
In this guide, we will walk you through creating a Snowflake Sink Connector.
## Get Started
### Create a Kafka Cluster
If you do not have a Kafka cluster and/or topic already, follow [these
steps](../overall/getstarted) to create one.
### Prepare the Snowflake Environment
From the snowflake console, the following configurations need to be obtained:
1. `snowflake.url.name`
2. `snowflake.user.name`
3. `snowflake.private.key`
4. `snowflake.database.name`
5. `snowflake.schema.name`
If you already have these and configured the required roles and keys for the
database and the user, you can skip to the
[Create The Connector](#create-the-connector) section.
For more detailed configurations see
[the snowflake connector documentation](https://docs.snowflake.com/en/user-guide/kafka-connector-install#kafka-configuration-properties)
#### snowflake.url.name
`snowflake.url.name` can be found at the home page of
[the snowflake app](https://app.snowflake.com). Click on the account identifier
and navigate to `copy account URL` as shown below.
A URL similar to [https://mn93536.eu-central-1.snowflakecomputing.com](https://mn93536.eu-central-1.snowflakecomputing.com) will be
copied. We need to append port 443 while passing it to the connector. At the end
`snowflake.url.name` will look like the following.
```
https://mn93536.eu-central-1.snowflakecomputing.com:443
```
#### snowflake.user.name
`snowflake.user.name` can be seen on the profile view. To open the profile view,
go to the top left and click on the profile as shown below.
#### snowflake.private.key
`snowflake.private.key` will be generated by you locally. A pair of private and
public keys need to be generated. `public.key` will be set to the user on the
snowflake and the private key will be set to the connector as
`snowflake.private.key`.
See
[the following document](https://docs.snowflake.com/en/user-guide/kafka-connector-install#using-key-pair-authentication-key-rotation)
to learn how to generate the keys and set the public key to snowflake.
#### snowflake.database.name & snowflake.schema.name
From [the snowflake app](https://app.snowflake.com), create a database and a
schema. To be able to use this schema and connector we need to create and assign
a custom role to the database and the schema. You can follow
[this document](https://docs.snowflake.com/en/user-guide/kafka-connector-install#creating-a-role-to-use-the-kafka-connector)
to see how to do it.
Make sure that the script described in the document above is running on the
desired database and schema by selecting them at the top of the script as
follows:
Now, everything should be ready on the snowflake side. We can move on the
creating the connector.
### Create the Connector
Go to the Connectors tab, and create your first connector by clicking the **New
Connector** button.
Choose your connector as **Snowflake Connector**
Enter the required properties.
The advanced screen is for any other configuration that the selected connector
supports. At the top of this screen, you can find a link to related
documentation. We can proceed with what we have and click the **Connect** button
directly.
Congratulations! You have created a Snowflake Sink Connector.
As you put data into your selected topics, the data will be written into
Snowflake. You should see the data in
[the snowflake app](https://app.snowflake.com) as follows:
# Compliance
Source: https://upstash.com/docs/kafka/help/compliance
## Upstash Legal & Security Documents
* [Upstash Terms of Service](https://upstash.com/static/trust/terms.pdf)
* [Upstash Privacy Policy](https://upstash.com/static/trust/privacy.pdf)
* [Upstash Data Processing Agreement](https://upstash.com/static/trust/dpa.pdf)
* [Upstash Technical and Organizational Security Measures](https://upstash.com/static/trust/security-measures.pdf)
* [Upstash Subcontractors](https://upstash.com/static/trust/subprocessors.pdf)
## Is Upstash SOC2 Compliant?
As of July 2023, Upstash Redis and Kafka are SOC2 compliant. Check our [trust page](https://trust.upstash.com/) for details.
## Is Upstash ISO-27001 Compliant?
We are in process of getting this certification. Contact us
([support@upstash.com](mailto:support@upstash.com)) to learn about the expected
date.
## Is Upstash GDPR Compliant?
Yes. For more information, see our
[Privacy Policy](https://upstash.com/static/trust/privacy.pdf). We acquire DPAs
from each [subcontractor](https://upstash.com/static/trust/subprocessors.pdf)
that we work with.
## Is Upstash HIPAA Compliant?
Upstash is currently not HIPAA compliant. Contact us
([support@upstash.com](mailto:support@upstash.com)) if HIPAA is important for
you and we can share more details.
## Is Upstash PCI Compliant?
Upstash does not store personal credit card information. We use Stripe for
payment processing. Stripe is a certified PCI Service Provider Level 1, which is
the highest level of certification in the payments industry.
## Does Upstash conduct vulnerability scanning and penetration tests?
Yes, we use third party tools and work with pen testers. We share the results
with Enterprise customers. Contact us
([support@upstash.com](mailto:support@upstash.com)) for more information.
## Does Upstash take backups?
Yes, we take regular snapshots of the data cluster to the AWS S3 platform.
## Does Upstash encrypt data?
Customers can enable TLS while creating database/cluster, and we recommend it
for production databases/clusters. Also we encrypt data at rest at request of
customers.
# Integration with Third Parties & Partnerships
Source: https://upstash.com/docs/kafka/help/integration
## Introduction
In this guideline we will outline the steps to integrate Upstash into your platform (GUI or Web App) and allow your users to create and manage Upstash databases without leaving your interfaces. We will explain how to use OAuth2.0 as the underlying foundation to enable this access seamlessly.
If your product or service offering utilizes Redis, Kafka or QStash or if there is a common use case that your end users enable by leveraging these database resources, we invite you to be a partner with us. By integrating Upstash into your platform, you can offer a more complete package for your customers and become a one stop shop. This will also position yourself at the forefront of innovative cloud computing trends such as serverless and expand your customer base.
This is the most commonly used partnership integration model that can be easily implemented by following this guideline. Recently [Cloudflare workers integration](https://blog.cloudflare.com/cloudflare-workers-database-integration-with-upstash/) is implemented through this methodology. For any further questions or partnership discussions please send us an email at [partnerships@upstash.com](mailto:partnerships@upstash.com)
Before starting development to integrate Upstash into your product, please
send an email to [partnerships@upstash.com](mailto:partnerships@upstash.com) for further assistance and guidance.
**General Flow (High level user flow)**
1. User clicks **`Connect Upstash`** button on your platform’s surface (GUI, Web App)
2. This initiates the OAuth 2.0 flow, which opens a new browser page displaying the **`Upstash Login Page`**.
3. If this is an existing user, user logins with their Upstash credentials otherwise they can directly sign up for a new Upstash account.
4. Browser window redirects to **`Your account has been connected`** page and authentication window automatically closes.
5. After the user returns to your interface, they see their Upstash Account is now connected.
## Technical Design (SPA - Regular Web Application)
1. Users click `Connect Upstash` button from Web App.
2. Web App initiate Upstash OAuth 2.0 flow. Web App can use
[Auth0 native libraries](https://auth0.com/docs/libraries).
Please reach [partnerships@upstash.com](mailto:partnerships@upstash.com) to receive client id and callback url.
3. After user returns from OAuth 2.0 flow then web app will have JWT token. Web
App can generate Developer Api key:
```bash
curl -XPOST https://api.upstash.com/apikey \
-H "Authorization: Bearer JWT_KEY" \
-H "Content-Type: application/json" \
-d '{ "name": "APPNAME_API_KEY_TIMESTAMP" }'
```
4. Web App need to save Developer Api Key to the backend.
## Technical Design ( GUI Apps )
1. User clicks **`Connect Upstash`** button from web app.
2. Web app initiates Upstash OAuth 2.0 flow and it can use **[Auth0 native libraries](https://auth0.com/docs/libraries)**.
3. App will open new browser:
```
https://auth.upstash.com/authorize?response_type=code&audience=upstash-api&scope=offline_access&client_id=XXXXXXXXXX&redirect_uri=http%3A%2F%2Flocalhost:3000
```
Please reach [partnerships@upstash.com](mailto:partnerships@upstash.com) to receive client id.
4. After user authenticated Auth0 will redirect user to
`localhost:3000/?code=XXXXXX`
5. APP can return some nice html response when Auth0 returns to `localhost:3000`
6. After getting `code` parameter from the URL query, GUI App will make http
call to the Auth0 code exchange api. Example CURL request
```bash
curl -XPOST 'https://auth.upstash.com/oauth/token' \
--header 'content-type: application/x-www-form-urlencoded' \
--data 'grant_type=authorization_code --data audience=upstash-api' \
--data 'client_id=XXXXXXXXXXX' \
--data 'code=XXXXXXXXXXXX' \
--data 'redirect_uri=localhost:3000'
```
Response:
```json
{
"access_token": "XXXXXXXXXX",
"refresh_token": "XXXXXXXXXXX",
"scope": "offline_access",
"expires_in": 172800,
"token_type": "Bearer"
}
```
7. After 6th Step the response will include `access_token`, it has 3 days TTL.
GUI App will call Upstash API to get a developer api key:
```bash
curl https://api.upstash.com/apikey -H "Authorization: Bearer JWT_KEY" -d '{ "name" : "APPNAME_API_KEY_TIMESTAMP" }'
```
8. GUI App will save Developer Api key locally. Then GUI App can call any
Upstash Developer API [developer.upstash.com/](https://developer.upstash.com/)
## Managing Resources
After obtaining Upstash Developer Api key, your platform surface (web or GUI) can call Upstash API. For example **[Create Database](https://developer.upstash.com/#create-database-global)**, **[List Database](https://developer.upstash.com/#list-databases)**
In this flow, you can ask users for region information and name of the database then can call Create Database API to complete the task
Example CURL request:
```bash
curl -X POST \
https://api.upstash.com/v2/redis/database \
-u 'EMAIL:API_KEY' \
-d '{"name":"myredis", "region":"global", "primary_region":"us-east-1", "read_regions":["us-west-1","us-west-2"], "tls": true}'
```
# Legal
Source: https://upstash.com/docs/kafka/help/legal
## Upstash Legal Documents
* [Upstash Terms of Service](https://upstash.com/trust/terms.pdf)
* [Upstash Privacy Policy](https://upstash.com/trust/privacy.pdf)
* [Upstash Subcontractors](https://upstash.com/trust/subprocessors.pdf)
# Enterprise Support
Source: https://upstash.com/docs/kafka/help/prosupport
Enterprise Support is recommended for customers who use Upstash as part of
their production systems.
Enterprise Support includes the following services:
* Response time SLA
* Dedicated Slack/Discord Channels
* Dedicated real time support: We reserve our engineers for you to help you for
cases like architecture review, product launch or data migration. Max 10 hours
per / month.
### Response Time SLA
* General guidance: 24 hours
* System impaired: \< 12 hours
* Production system impaired: \< 4 hours
* Production system down: \< 1 hour
### Pricing
To purchase or learn more about Enterprise Support, please contact us at [support@upstash.com](mailto:support@upstash.com)
# Uptime SLA
Source: https://upstash.com/docs/kafka/help/sla
This Service Level Agreement ("SLA") applies to the use of the Upstash services,
offered under the terms of our Terms of Service or other agreement with us
governing your use of Upstash. This SLA does not apply to Upstash services in
the Upstash Free Tier. It is clarified that this SLA is subject to the terms of
the Agreement, and does not derogate therefrom (capitalized terms, unless
otherwise indicated herein, have the meaning specified in the Agreement).
Upstash reserves the right to change the terms of this SLA by publishing updated
terms on its website, such change to be effective as of the date of publication.
### Regional and Global Database SLA
Upstash will use commercially reasonable efforts to make regional and global
databases available with a Monthly Uptime Percentage of at least 99.99%.
In the event any of the services do not meet the SLA, you will be eligible to
receive a Service Credit as described below.
| Monthly Uptime Percentage | Service Credit Percentage |
| --------------------------------------------------- | ------------------------- |
| Less than 99.99% but equal to or greater than 99.0% | 10% |
| Less than 99.0% but equal to or greater than 95.0% | 30% |
| Less than 95.0% | 60% |
### SLA Credits
Service Credits are calculated as a percentage of the monthly bill (excluding
one-time payments such as upfront payments) for the service in the affected
region that did not meet the SLA.
Uptime percentages are recorded and published in the
[Upstash Status Page](https://status.upstash.com).
To receive a Service Credit, you should submit a claim by sending an email to
[support@upstash.com](mailto:support@upstash.com). Your credit request should be
received by us before the end of the second billing cycle after the incident
occurred.
We will apply any service credits against future payments for the applicable
services. At our discretion, we may issue the Service Credit to the credit card
you used. Service Credits will not entitle you to any refund or other payment. A
Service Credit will be applicable and issued only if the credit amount for the
applicable monthly billing cycle is greater than one dollar (\$1 USD). Service
Credits may not be transferred or applied to any other account.
# Support & Contact Us
Source: https://upstash.com/docs/kafka/help/support
## Community
The [Upstash Discord Channel](https://upstash.com/discord) is the best way to
interact with the community.
## Team
You can contact the team
via [support@upstash.com](mailto:support@upstash.com) for technical support as
well as for questions and feedback.
## Follow Us
Follow us on [X](https://x.com/upstash).
## Bugs & Issues
You can help us improve Upstash by reporting issues, suggesting new features, and
giving general feedback in
our [Community GitHub Repo](https://github.com/upstash/issues/issues/new).
## Enterprise Support
Get [Enterprise Support](/common/help/prosupport) from the Upstash team.
# Uptime Monitor
Source: https://upstash.com/docs/kafka/help/uptime
## Status Page
You can track the uptime status of Upstash databases in
[Upstash Status Page](https://status.upstash.com)
## Latency Monitor
You can see the average latencies for different regions in
[Upstash Latency Monitoring](https://latency.upstash.com) page
# Connect Using Kafka Clients
Source: https://upstash.com/docs/kafka/howto/connectwithclients
Connecting to Upstash Kafka using any Kafka client is very straightforward. If
you do not have a Kafka cluster and/or topic already, follow
[these steps](../overall/getstarted) to create one.
After creating a cluster and a topic, just go to cluster details page on the
[Upstash Console](https://console.upstash.com) and copy bootstrap endpoint,
username and password.
Then replace following parameters in the code snippets of your favourite Kafka
client or language below.
* `{{ BOOTSTRAP_ENDPOINT }}`
* `{{ UPSTASH_KAFKA_USERNAME }}`
* `{{ UPSTASH_KAFKA_PASSWORD }}`
* `{{ TOPIC_NAME }}`
## Create a Topic
```typescript TypeScript
const { Kafka } = require("kafkajs");
const kafka = new Kafka({ brokers: ["{{ BOOTSTRAP_ENDPOINT }}"], sasl: {
mechanism: "scram-sha-512", username: "{{ UPSTASH_KAFKA_USERNAME }}", password:
"{{ UPSTASH_KAFKA_PASSWORD }}", }, ssl: true, });
const admin = kafka.admin();
const createTopic = async () => { await admin.connect(); await
admin.createTopics({ validateOnly: false, waitForLeaders: true, topics: [ {
topic: "{{ TOPIC_NAME }}", numPartitions: partitions, replicationFactor:
replicationFactor, }, ], }); await admin.disconnect(); }; createTopic();
```
```py Python
from kafka import KafkaAdminClient
from kafka.admin import NewTopic
admin = KafkaAdminClient(
bootstrap_servers=['{{ BOOTSTRAP_ENDPOINT }}'],
sasl_mechanism='SCRAM-SHA-512',
security_protocol='SASL_SSL',
sasl_plain_username='{{ UPSTASH_KAFKA_USERNAME }}',
sasl_plain_password='{{ UPSTASH_KAFKA_PASSWORD }}',
)
admin.create_topics([NewTopic(name='{{ TOPIC_NAME }}', num_partitions=partitions, replication_factor=replicationFactor)])
admin.close()
```
```java Java
class CreateTopic {
public static void main(String[] args) throws Exception {
var props = new Properties();
props.put("bootstrap.servers", "{{ BOOTSTRAP_ENDPOINT }}");
props.put("sasl.mechanism", "SCRAM-SHA-512");
props.put("security.protocol", "SASL_SSL");
props.put("sasl.jaas.config", "org.apache.kafka.common.security.scram.ScramLoginModule required " +
"username=\"{{ UPSTASH_KAFKA_USERNAME }}\" " +
"password=\"{{ UPSTASH_KAFKA_PASSWORD }}\";");
try (var admin = Admin.create(props)) {
admin.createTopics(
Set.of(new NewTopic("{{ TOPIC_NAME }}", partitions, replicationFactor))
).all().get();
}
}
}
```
```go Go
import (
"context"
"crypto/tls"
"log"
"github.com/segmentio/kafka-go"
"github.com/segmentio/kafka-go/sasl/scram"
)
func main() {
mechanism, err := scram.Mechanism(scram.SHA512,
"{{ UPSTASH_KAFKA_USERNAME }}", "{{ UPSTASH_KAFKA_PASSWORD }}")
if err != nil {
log.Fatalln(err)
}
dialer := &kafka.Dialer{
SASLMechanism: mechanism,
TLS: &tls.Config{},
}
conn, err := dialer.Dial("tcp", "{{ BOOTSTRAP_ENDPOINT }}")
if err != nil {
log.Fatalln(err)
}
defer conn.Close()
controller, err := conn.Controller()
if err != nil {
log.Fatalln(err)
}
controllerConn, err := dialer.Dial("tcp", net.JoinHostPort(controller.Host, strconv.Itoa(controller.Port)))
if err != nil {
log.Fatalln(err)
}
defer controllerConn.Close()
err = controllerConn.CreateTopics(kafka.TopicConfig{
Topic: "{{ TOPIC_NAME }}",
NumPartitions: partitions,
ReplicationFactor: replicationFactor,
})
if err != nil {
log.Fatalln(err)
}
}
```
## Produce a Message
```typescript TypeScript
const { Kafka } = require("kafkajs");
const kafka = new Kafka({
brokers: ["{{ BOOTSTRAP_ENDPOINT }}"],
sasl: {
mechanism: "scram-sha-512",
username: "{{ UPSTASH_KAFKA_USERNAME }}",
password: "{{ UPSTASH_KAFKA_PASSWORD }}",
},
ssl: true,
});
const producer = kafka.producer();
const produce = async () => {
await producer.connect();
await producer.send({
topic: "{{ TOPIC_NAME }}",
messages: [{ value: "Hello Upstash!" }],
});
await producer.disconnect();
};
produce();
```
```py Python
from kafka import KafkaProducer
producer = KafkaProducer(
bootstrap_servers=['{{ BOOTSTRAP_ENDPOINT }}'],
sasl_mechanism='SCRAM-SHA-512',
security_protocol='SASL_SSL',
sasl_plain_username='{{ UPSTASH_KAFKA_USERNAME }}',
sasl_plain_password='{{ UPSTASH_KAFKA_PASSWORD }}',
)
future = producer.send('{{ TOPIC_NAME }}', b'Hello Upstash!')
record_metadata = future.get(timeout=10)
print (record_metadata)
producer.close()
```
```java Java
class Produce {
public static void main(String[] args) throws Exception {
var props = new Properties();
props.put("bootstrap.servers", "{{ BOOTSTRAP_ENDPOINT }}");
props.put("sasl.mechanism", "SCRAM-SHA-512");
props.put("security.protocol", "SASL_SSL");
props.put("sasl.jaas.config", "org.apache.kafka.common.security.scram.ScramLoginModule required " +
"username=\"{{ UPSTASH_KAFKA_USERNAME }}\" " +
"password=\"{{ UPSTASH_KAFKA_PASSWORD }}\";");
props.put("key.serializer", "org.apache.kafka.common.serialization.StringSerializer");
props.put("value.serializer", "org.apache.kafka.common.serialization.StringSerializer");
try (var producer = new KafkaProducer(props)) {
producer.send(new ProducerRecord("{{ TOPIC_NAME }}", "Hello Upstash!"));
producer.flush();
}
}
}
```
```go Go
import (
"context"
"crypto/tls"
"log"
"github.com/segmentio/kafka-go"
"github.com/segmentio/kafka-go/sasl/scram"
)
func main() {
mechanism, err := scram.Mechanism(scram.SHA512,
"{{ UPSTASH_KAFKA_USERNAME }}", "{{ UPSTASH_KAFKA_PASSWORD }}")
if err != nil {
log.Fatalln(err)
}
dialer := &kafka.Dialer{
SASLMechanism: mechanism,
TLS: &tls.Config{},
}
w := kafka.NewWriter(kafka.WriterConfig{
Brokers: []string{"{{ BOOTSTRAP_ENDPOINT }}"},
Topic: "{{ TOPIC_NAME }}",
Dialer: dialer,
})
defer w.Close()
err = w.WriteMessages(context.Background(),
kafka.Message{
Value: []byte("Hello Upstash!"),
},
)
if err != nil {
log.Fatalln("failed to write messages:", err)
}
}
```
## Consume Messages
```typescript TypeScript
const { Kafka } = require("kafkajs");
const kafka = new Kafka({
brokers: ["{{ BOOTSTRAP_ENDPOINT }}"],
sasl: {
mechanism: "scram-sha-512",
username: "{{ UPSTASH_KAFKA_USERNAME }}",
password: "{{ UPSTASH_KAFKA_PASSWORD }}",
},
ssl: true,
});
const consumer = kafka.consumer({ groupId: "{{ GROUP_NAME }}" });
const consume = async () => {
await consumer.connect();
await consumer.subscribe({
topic: "{{ TOPIC_NAME }}",
fromBeginning: true,
});
await consumer.run({
eachMessage: async ({ topic, partition, message }) => {
console.log({
topic: topic,
partition: partition,
message: JSON.stringify(message),
});
},
});
};
consume();
```
```py Python
from kafka import KafkaConsumer
consumer = KafkaConsumer(
bootstrap_servers=['{{ BOOTSTRAP_ENDPOINT }}'],
sasl_mechanism='SCRAM-SHA-512',
security_protocol='SASL_SSL',
sasl_plain_username='{{ UPSTASH_KAFKA_USERNAME }}',
sasl_plain_password='{{ UPSTASH_KAFKA_PASSWORD }}',
group_id='{{ GROUP_NAME }}',
auto_offset_reset='earliest',
)
consumer.subscribe(['{{ TOPIC_NAME }}'])
records = consumer.poll(timeout_ms=10000)
print(records)
consumer.close()
```
```java Java
class Consume {
public static void main(String[] args) throws Exception {
var props = new Properties();
props.put("bootstrap.servers", "{{ BOOTSTRAP_ENDPOINT }}");
props.put("sasl.mechanism", "SCRAM-SHA-512");
props.put("security.protocol", "SASL_SSL");
props.put("sasl.jaas.config", "org.apache.kafka.common.security.scram.ScramLoginModule required " +
"username=\"{{ UPSTASH_KAFKA_USERNAME }}\" " +
"password=\"{{ UPSTASH_KAFKA_PASSWORD }}\";");
props.put("key.deserializer", "org.apache.kafka.common.serialization.StringDeserializer");
props.put("value.deserializer", "org.apache.kafka.common.serialization.StringDeserializer");
props.put("auto.offset.reset", "earliest");
props.put("group.id", "{{ GROUP_NAME }}");
try(var consumer = new KafkaConsumer(props)) {
consumer.subscribe(Collections.singleton("{{ TOPIC_NAME }}"));
var records = consumer.poll(Duration.ofSeconds(10));
for (var record : records) {
System.out.println(record);
}
}
}
}
```
```go Go
import (
"context"
"crypto/tls"
"log"
"time"
"github.com/segmentio/kafka-go"
"github.com/segmentio/kafka-go/sasl/scram"
)
func main() {
mechanism, err := scram.Mechanism(scram.SHA512,
"{{ UPSTASH_KAFKA_USERNAME }}", "{{ UPSTASH_KAFKA_PASSWORD }}")
if err != nil {
log.Fatalln(err)
}
dialer := &kafka.Dialer{
SASLMechanism: mechanism,
TLS: &tls.Config{},
}
r := kafka.NewReader(kafka.ReaderConfig{
Brokers: []string{"{{ BOOTSTRAP_ENDPOINT }}"},
GroupID: "{{ GROUP_NAME }}",
Topic: "{{ TOPIC_NAME }}",
Dialer: dialer,
})
defer r.Close()
ctx, cancel := context.WithTimeout(context.Background(), time.Second*10)
defer cancel()
m, err := r.ReadMessage(ctx)
if err != nil {
log.Fatalln(err)
}
log.Printf("%+v\n", m)
}
```
# Connect Using kaf CLI
Source: https://upstash.com/docs/kafka/howto/connectwithkaf
[kaf](https://github.com/birdayz/kaf) is a modern CLI for Apache Kafka. You can
connect to your Upstash Kafka cluster using `kaf`.
If you do not have a Kafka cluster and/or topic already, follow [these
steps](../overall/getstarted) to create one.
In the cluster details section of the
[Upstash Console](https://console.upstash.com) copy bootstrap endpoint, username
and password. Then replace following parameters in the code snippets below with
the actual values you copied earlier.
* `$BOOTSTRAP_ENDPOINT`
* `$UPSTASH_KAFKA_USERNAME`
* `$UPSTASH_KAFKA_PASSWORD`
* `$GROUP_ID`
* `$TOPIC_NAME`
Initially we should add cluster configuration to `kaf`'s config file, which
should be located in `~/.kaf/config`. Open config file if it exists or create an
empty one and insert following config:
```yaml
clusters:
- name: $CLUSTER_NAME
brokers:
- $BOOTSTRAP_ENDPOINT
SASL:
mechanism: SCRAM-SHA-512
username: $UPSTASH_KAFKA_USERNAME
password: $UPSTASH_KAFKA_PASSWORD
security-protocol: SASL_SSL
```
`$CLUSTER_NAME` is a logical name, which is used to identify different Kafka
cluster. You can use your Upstash cluster name.
To select the cluster configuration to use, run:
```shell
kaf config use-cluster $CLUSTER_NAME
```
At this point you should be able to connect to your Kafka cluster using `kaf`.
**List Brokers and Topics:**
```shell
kaf nodes
```
```shell
kaf topics
```
**Produce a message:**
```shell
echo "Hello Upstash!" | kaf produce $TOPIC_NAME
```
**Fetch messages:**
```shell
kaf consume $TOPIC_NAME
```
**Consume messages using consumer groups:**
```shell
kaf consume $TOPIC_NAME -g $GROUP_ID --offset oldest
```
For more information see [kaf](https://github.com/birdayz/kaf) repository.
# Connect Using kcat CLI
Source: https://upstash.com/docs/kafka/howto/connectwithkcat
[kcat](https://github.com/edenhill/kcat) is a generic command line non-JVM
producer and consumer for Apache Kafka. You can connect to your Upstash Kafka
cluster using `kcat`.
If you do not have a Kafka cluster and/or topic already, follow [these
steps](../overall/getstarted) to create one.
In the cluster details section of the
[Upstash Console](https://console.upstash.com) copy bootstrap endpoint, username
and password. Then replace following parameters in the code snippets below with
the actual values you copied earlier.
* `$BOOTSTRAP_ENDPOINT`
* `$UPSTASH_KAFKA_USERNAME`
* `$UPSTASH_KAFKA_PASSWORD`
* `$GROUP_ID`
* `$TOPIC_NAME`
**Query cluster metadata:**
```shell
kcat -b $BOOTSTRAP_ENDPOINT -X security.protocol=SASL_SSL \
-X sasl.mechanisms=SCRAM-SHA-512 \
-X sasl.username=$UPSTASH_KAFKA_USERNAME \
-X sasl.password=$UPSTASH_KAFKA_PASSWORD \
-L
```
**Produce a message:**
```shell
echo "Hello Upstash!" | kcat -b $BOOTSTRAP_ENDPOINT
-X security.protocol=SASL_SSL \
-X sasl.mechanisms=SCRAM-SHA-512 \
-X sasl.username=$UPSTASH_KAFKA_USERNAME \
-X sasl.password=$UPSTASH_KAFKA_PASSWORD \
-P -t $TOPIC_NAME
```
**Fetch messages:**
```shell
kcat -b $BOOTSTRAP_ENDPOINT -X security.protocol=SASL_SSL \
-X sasl.mechanisms=SCRAM-SHA-512 \
-X sasl.username=$UPSTASH_KAFKA_USERNAME \
-X sasl.password=$UPSTASH_KAFKA_PASSWORD \
-C -t $TOPIC_NAME
```
**Consume messages using consumer groups:**
```shell
kcat -b $BOOTSTRAP_ENDPOINT -X security.protocol=SASL_SSL \
-X sasl.mechanisms=SCRAM-SHA-512 \
-X sasl.username=$UPSTASH_KAFKA_USERNAME \
-X sasl.password=$UPSTASH_KAFKA_PASSWORD \
-o beginning -G $GROUP_ID $TOPIC_NAME
```
For more information see [kcat](https://github.com/edenhill/kcat) repository.
# Connect with upstash-kafka
Source: https://upstash.com/docs/kafka/howto/connectwithupstashkafka
[upstash-kafka](https://github.com/upstash/upstash-kafka/blob/master/README.md)
is an HTTP/REST based Kafka client built on top of
[Upstash Kafka REST API](https://docs.upstash.com/kafka/rest).
It is the only connectionless (HTTP based) Kafka client and designed to work
with:
* Serverless functions (AWS Lambda ...)
* Cloudflare Workers (see
[the example](https://github.com/upstash/upstash-kafka/tree/main/examples/cloudflare-workers))
* Fastly Compute\@Edge
* Next.js Edge, Remix, Nuxt ...
* Client side web/mobile applications
* WebAssembly
* and other environments where HTTP is preferred over TCP.
## Quick Start
### Install
```bash
npm install @upstash/kafka
```
### Authenticate
Copy URL, username and password from
[Upstash Console](https://console.upstash.com)
```typescript
import { Kafka } from "@upstash/kafka";
const kafka = new Kafka({
url: "",
username: "",
password: "",
});
```
### Produce
```typescript
const p = kafka.producer();
const message = { hello: "world" }; // Objects will get serialized using `JSON.stringify`
const response = await p.produce("TOPIC", message);
const response2 = await p.produce("TOPIC", message, {
partition: 1,
timestamp: 4567,
key: "KEY",
headers: [{ key: "TRACE-ID", value: "32h67jk" }],
});
```
### Produce Many
```javascript
const p = kafka.producer();
const res = await p.produceMany([
{
topic: "TOPIC",
value: "MESSAGE",
// ...options
},
{
topic: "TOPIC-2",
value: "MESSAGE-2",
// ...options
},
]);
```
### Consume
When a new consumer instance is created, it may return empty messages until
consumer group coordination is completed.
```javascript
const c = kafka.consumer();
const messages = await c.consume({
consumerGroupId: "group_1",
instanceId: "instance_1",
topics: ["test.topic"],
autoOffsetReset: "earliest",
});
```
## Commit
While `consume` commits automatically, you can commit manually as below:
```typescript
const consumerGroupId = "mygroup";
const instanceId = "myinstance";
const topic = "my.topic";
const c = kafka.consumer();
const messages = await c.consume({
consumerGroupId,
instanceId,
topics: [topic],
autoCommit: false,
});
for (const message of messages) {
// message handling logic
await c.commit({
consumerGroupId,
instanceId,
offset: {
topic: message.topic,
partition: message.partition,
offset: message.offset,
},
});
}
```
## Fetch
```typescript
const c = kafka.consumer();
const messages = await c.fetch({
topic: "greeting",
partition: 3,
offset: 42,
timeout: 1000,
});
```
## Examples
See [here](https://github.com/upstash/upstash-kafka/tree/main/examples) for more
examples.
# Consume Messages Using REST API
Source: https://upstash.com/docs/kafka/howto/consumewithrest
If you do not have a Kafka cluster and/or topic already, follow [these
steps](../overall/getstarted) to create one.
In the cluster details section of the
[Upstash Console](https://console.upstash.com), scroll down the **REST API**
section and and copy `UPSTASH_KAFKA_REST_URL`, `UPSTASH_KAFKA_REST_USERNAME` and
`UPSTASH_KAFKA_REST_PASSWORD` using the copy icons next to them.
We will use a `Node.js` sample code to show how to consume messages using the
REST API. Our sample will use a topic named `cities` and consume previously
produced city names from this topic using Kafka consumer groups and automatic
offset committing.
Replace following parameters in the code snippets below with your actual values.
```js
const address = "https://tops-stingray-7863-eu1-rest-kafka.upstash.io";
const user = "G9wcy1zdGluZ3JheS03ODYzJMUX";
const pass = "eUmYCkAlxEhihIc7Hooi2IA2pz2fw==";
const auth = Buffer.from(`${user}:${pass}`).toString("base64");
const topic = "cities";
```
Following code will consume city names using `mygroup` consumer group id and
`myconsumer` consumer id from the topic starting from the latest offset and
print the consumed messages and their offsets to the console:
```js
async function consumeTopic(groupId, consumerId, topic) {
const response = await fetch(
`${address}/consume/${groupId}/${consumerId}/${topic}`,
{
headers: { Authorization: `Basic ${auth}` },
}
);
const messages = await response.json();
messages.forEach((m) => {
console.log(`Message: ${m.value}, Offset: ${m.offset}`);
});
}
consumeTopic("mygroup", "myconsumer", topic);
```
By default consume API starts consuming from the latest offset. It's also
possible to start from the earliest offset by passing
`Kafka-Auto-Offset-Reset: earliest` request header:
```js
async function consumeTopic(groupId, consumerId, topic, offsetReset) {
const response = await fetch(
`${address}/consume/${groupId}/${consumerId}/${topic}`,
{
headers: {
Authorization: `Basic ${auth}`,
"Kafka-Auto-Offset-Reset": offsetReset,
},
}
);
const messages = await response.json();
messages.forEach((m) => {
console.log(`Message: ${m.value}, Offset: ${m.offset}`);
});
}
consumeTopic("mygroup", "myconsumer", topic, "earliest");
```
We can also go deeper and turn off auto-commit behaviour of the consumer to
manually commit the offsets later. To turn off auto commit, we should send
`Kafka-Enable-Auto-Commit: false` header. This allows us to commit the offsets
only when all messages processed successfully.
```js
async function consumeTopicWithoutCommit(
groupId,
consumerId,
topic,
offsetReset
) {
const response = await fetch(
`${address}/consume/${groupId}/${consumerId}/${topic}`,
{
headers: {
Authorization: `Basic ${auth}`,
"Kafka-Auto-Offset-Reset": offsetReset,
"Kafka-Enable-Auto-Commit": "false",
},
}
);
const messages = await response.json();
messages.forEach((m) => {
console.log(`Message: ${m.value}, Offset: ${m.offset}`);
});
}
async function commitOffsetsFor(groupId, consumerId) {
const response = await fetch(`${address}/commit/${groupId}/${consumerId}`, {
headers: { Authorization: `Basic ${auth}` },
});
const resp = await response.json();
console.log(
`Result: ${resp.result}, Error: ${resp.error}, Status: ${resp.status}`
);
}
consumeTopicWithoutCommit("mygroup", "myconsumer", topic, "earliest");
commitOffsetsFor("mygroup", "myconsumer");
```
For more info about using the REST API see
[Kafka REST Consume API](../rest/restconsumer#consume-api) section.
# Use Serverless Kafka as an Event Source For AWS Lambda
Source: https://upstash.com/docs/kafka/howto/eventsourceawslambda
In this tutorial we will implement a serverless message processing pipeline
using Upstash Kafka and AWS Lambda. We will use Upstash Kafka as a source for an
AWS Lambda function. The produced messages will trigger AWS Lambda, so your
Lambda function will process the messages.
Because Upstash Kafka is a true serverless product, the whole pipeline will be
serverless. You pay only when your pipeline is actively processing messages.
### Create Upstash Kafka
First, create an Upstash Kafka cluster and topic following
[those steps.](../overall/getstarted) You will need the endpoint, username and
password in the following steps.
### Create AWS Lambda Function
Now let’s create an AWS Lambda function. For the best performance, select the
same region with Upstash Kafka cluster. We will use Node.js runtime.
You can use Serverless Framework or AWS SAM for this step.
### Lambda Function Code
Update your function's code as below:
```javascript
exports.handler = async (event) => {
if (!event.records) {
return { response: "no kafka event" };
}
for (let messages of Object.values(event.records)) {
for (let msg of messages) {
let buff = Buffer.from(msg.value, "base64");
let text = buff.toString("ascii");
// process the message
console.log(text);
}
}
return { response: "success" };
};
```
The above code parses the Kafka message from the event parameter. AWS encodes
the message using `base64` so we decode the message and log it to the console.
### Create AWS Secret
AWS Lambda trigger needs the Kafka credentials to be bundled as a secret. So we
will create a secret in
[AWS Secrets Manager](https://console.aws.amazon.com/secretsmanager/home?region=us-east-1#!/newSecret?step=selectSecret).
Select `Other type of secret`. Enter your Kafka cluster's username and password
as key/value pairs as below:
In the next screen give a name to your secret.
### Edit AWS Lambda Role
Now we need to configure the Lambda function’s role to access the secrets.
On the AWS Lambda function’s page, click on `Configuration` tab and
`Permissions`. Click to the link just below the `Role name` label.
The IAM management console will be opened in a new tab. On the `Permissions` tab
click on the link which starts with `AWSLambdaBasicExecutionRole-....`
Click on the `Edit Policy` button and add this configuration in the JSON tab:
```json
{
"Effect": "Allow",
"Action": ["secretsmanager:GetSecretValue"],
"Resource": ["REPLACE_THE_ARN_OF_THE_SECRET"]
}
```
You need to replace the ARN of the secret that you created in the previous step.
### Create the Trigger
Go back to your Lambda functions page and click the `Add trigger` button. Select
`Apache Kafka` from the menu and fill in the inputs.
Bootstrap servers: copy/paste endpoint from Upstash console.
Topic name: enter your topic’s name
Click on the `Add` button under Authentication. Select `SASL_SCRAM_256_AUTH` and
select the secret that you created in the previous step.
Check the `Enable trigger` checkbox and you can leave the remaining inputs as
they are.
### Testing
Now let’s produce messages and see if AWS Lambda is processing the messages.
Copy the curl URL to produce a message from
[Upstash Console](https://console.upstash.com).
```shell
➜ curl https://full-mantis-14289-us1-rest-kafka.upstash.io/produce/newtopic/newmessage -u ZnVsbC1tYW50aXMtMTQyODkkimaEsuUsiT9TGk3OFdjveYHBV9Jjzow03SnUtRQ:4-R-fmtoalXnoeu9TjQBOOL4njfSKwEsE10YvHMiW63hFljqUrrq5_yAq4TPGd9c6JbqfQ==
{
"topic" : "newtopic",
"partition" : 0,
"offset" : 48,
"timestamp" : 1639522675505
}
```
Check the cloudwatch **(Lambda > Monitor > View logs in CloudWatch)**. You
should see the messages you produced are logged by Lambda function.
# Fetch Messages Using REST API
Source: https://upstash.com/docs/kafka/howto/fetchwithrest
If you do not have a Kafka cluster and/or topic already, follow [these
steps](../overall/getstarted) to create one.
In the cluster details section of the
[Upstash Console](https://console.upstash.com), scroll down the **REST API**
section and and copy `UPSTASH_KAFKA_REST_URL`, `UPSTASH_KAFKA_REST_USERNAME` and
`UPSTASH_KAFKA_REST_PASSWORD` using the copy icons next to them.
We will use a `Node.js` sample code to show how to fetch messages using the REST
API. Our sample will use a topic named `cities` and fetch previously produced
city names from this topic without using Kafka consumer groups.
Replace following parameters in the code snippets below with your actual values.
```js
const address = "https://tops-stingray-7863-eu1-rest-kafka.upstash.io";
const user = "G9wcy1zdGluZ3JheS03ODYzJMUX";
const pass = "eUmYCkAlxEhihIc7Hooi2IA2pz2fw==";
const auth = Buffer.from(`${user}:${pass}`).toString("base64");
const topic = "cities";
```
Following code will fetch city names from `0th` partition of the topic starting
from `1st` offset and print the fetched messages and their offsets to the
console:
```js
async function fetchTopic(topic, partition, offset) {
const request = {
topic: topic,
partition: partition,
offset: offset,
};
const response = await fetch(`${address}/fetch/`, {
headers: { Authorization: `Basic ${auth}` },
method: "POST",
body: JSON.stringify(request),
});
const messages = await response.json();
messages.forEach((m) => {
console.log(`Message: ${m.value}, Offset: ${m.offset}`);
});
}
fetchTopic(topic, 0, 1);
```
For more info about using the REST API see
[Kafka REST Fetch API](../rest/restconsumer#consume-api) section.
# Use Serverless Kafka to Produce Events in Cloudflare Workers
Source: https://upstash.com/docs/kafka/howto/kafkaproduceincloudflareworkers
In this tutorial, we will produce events to Upstash Kafka from a Cloudflare
Workers function.
### Create Kafka
First, create an Upstash Kafka cluster and topic following
[those steps.](https://docs.upstash.com/kafka) You will need the endpoint,
username and password in the following steps.
### Create Project
We will use
[Wrangler](https://developers.cloudflare.com/workers/get-started/guide) to
create the application. After installing and configuring wrangler, create a
folder for your project inside the folder run: `wrangler init`
It will create `wrangler.toml`. Paste your account id to the toml which is
logged by wrangler.
Copy and paste the Upstash Kafka URL, topic name, username and password to the
toml.
```toml
name = "produce-in-cloudflare-workers"
type = 'webpack'
account_id = 'REPLACE_HERE'
route = ''
zone_id = ''
usage_model = ''
workers_dev = true
target_type = "webpack"
[vars]
UPSTASH_KAFKA_REST_URL = "REPLACE_HERE"
UPSTASH_KAFKA_REST_USERNAME = "REPLACE_HERE"
UPSTASH_KAFKA_REST_PASSWORD = "REPLACE_HERE"
```
### Implement the Function
Init a node project and install @upstash/kafka:
```
npm init
npm install @upstash/kafka
```
Add the index.js as below:
```javascript
import { Kafka } from "@upstash/kafka";
addEventListener("fetch", (event) => {
event.respondWith(handleRequest(event.request));
});
async function handleRequest(request) {
console.log("START", request);
const kafka = new Kafka({
url: UPSTASH_KAFKA_REST_URL,
username: UPSTASH_KAFKA_REST_USERNAME,
password: UPSTASH_KAFKA_REST_PASSWORD,
});
const { pathname } = new URL(request.url);
if (pathname.startsWith("/favicon")) {
return fetch(request);
}
const p = kafka.producer();
const message = { hello: "world" }; // Objects will get serialized using `JSON.stringify`
const response = await p.produce("mytopic", message);
return new Response(JSON.stringify(response));
}
```
The above code simply sends the message to Kafka. If your message is more
complicated then you can send it in the request body as explained
[here](./producewithrest).
### Run and Deploy the Function
Run the function locally: `wrangler dev`
Deploy your function to Cloudflare by running:
```
wrangler publish
```
This command will output your URL. The output of the URL should be something
like this:
```json
{
"topic": "newtopic",
"partition": 0,
"offset": 278,
"timestamp": 1640728294879
}
```
### Test the Function
Now let’s validate that the messages are pushed to Kafka. We can consume the
Kafka topic using the REST API. You can copy the curl code to consume from the
Upstash Console.
```
produce-in-lambda git:(master) ✗ curl https://full-mantis-14289-us1-rest-kafka.upstash.io/consume/GROUP_NAME/GROUP_INSTANCE_NAME/mytopic -u REPLACE_USER_NAME:REPLACE_PASSWORD
[ {
"topic" : "newtopic",
"partition" : 0,
"offset" : 282,
"timestamp" : 1639610767445,
"key" : "",
"value" : "hello",
"headers" : [ ]
} ]%
```
### upstash-kafka vs other Kafka Clients
Upstash also supports native Kafka clients (e.g. KafkaJS). But Cloudflare
Workers runtime does not allow TCP connections.
[upstash-kafka](https://github.com/upstash/upstash-kafka) is HTTP based. That's
why we use [upstash-kafka](https://github.com/upstash/upstash-kafka) in our
Cloudflare examples.
# Use Serverless Kafka to Produce Events in AWS Lambda
Source: https://upstash.com/docs/kafka/howto/kafkaproduceinlambda
In this tutorial, we will produce events to Upstash Kafka from an AWS Lambda
function.
### Create Kafka
First, create an Upstash Kafka cluster and topic following
[those steps.](../overall/getstarted) You will need the endpoint, username and
password in the following steps.
### Create Project
We will use Serverless Framework to create the application.
```shell
kafka-examples git:(master) serverless
What do you want to make? AWS - Node.js - HTTP API
What do you want to call this project? produce-in-lambda
Downloading "aws-node-http-api" template...
Project successfully created in produce-in-lambda folder
```
Then we will initialize a node project and install axios dependency.
```shell
npm init
npm install axios
```
### Implement the Lambda Function
Open the handler.js and update as below:
```javascript
const fetch = require("axios").default;
module.exports.hello = async (event) => {
const msg = "Hello";
const address = "https://REPLACE_YOUR_ENDPOINT";
const user = "REPLACE YOUR USERNAME";
const pass = "REPLACE YOUR PASSWORD";
const auth = Buffer.from(`${user}:${pass}`).toString("base64");
const response = await fetch(`${address}/produce/newtopic/${msg}}`, {
headers: {
Authorization: `Basic ${auth}`,
},
});
const res = response.data;
return {
statusCode: 200,
body: JSON.stringify(
{
header: "Pushed this message to Upstash Kafka with REST API!",
message: msg,
response: res,
},
null,
2
),
};
};
```
You need to replace the endpoint, username and password above with the values
that you copy from the [Upstash Console](https://console.upstash.com).
The above code simply creates a producer and sends the message to Kafka.
### Deploy the Lambda Function
You can deploy your function to AWS by running:
```
serverless deploy
```
This command will output your URL. The output should be something like this:
```json
{
"header": "Pushed this message to Upstash Kafka!",
"message": {
"value": "Hello message"
}
}
```
### Test the Function
Now let’s validate that the messages are pushed to Kafka. We can consume the
Kafka topic using the REST API. You can copy the curl code to consume from the
Upstash Console.
```
produce-in-lambda git:(master) ✗ curl https://full-mantis-14289-us1-rest-kafka.upstash.io/consume/GROUP_NAME/GROUP_INSTANCE_NAME/newtopic -u REPLACE_USER_NAME:REPLACE_PASSWORD
[ {
"topic" : "newtopic",
"partition" : 0,
"offset" : 98,
"timestamp" : 1639610767445,
"key" : "",
"value" : "Hello message",
"headers" : [ ]
} ]%
```
### REST vs Kafka Client
We can also use a native Kafka client (e.g. KafkaJS) to access our Kafka
cluster. See
[the repo](https://github.com/upstash/kafka-examples/tree/master/produce-in-lambda)
for both examples. But there is a latency overhead if connecting (and
disconnecting) to the Kafka with each function invocation. In our tests, the
latency of the function with REST is about 10ms whereas it goes up to 50ms when
KafkaJS is used. Kafka client's performance could be improved by caching the
client outside the function but it can cause other problems as explained
[here](https://blog.upstash.com/serverless-database-connections).
**Troubleshooting:** If Lambda function outputs `internal error`, check the
cloudwatch log **(Lambda > Monitor > View logs in CloudWatch)**.
# Monitoring Upstash Kafka Cluster with AKHQ
Source: https://upstash.com/docs/kafka/howto/monitorwith_akhq
[AKHQ](https://akhq.io) is a GUI for monitoring & managing Apache Kafka topics,
topics data, consumers group etc. You can connect and monitor your Upstash Kafka
cluster using [AKHQ](https://akhq.io).
To be able to use [AKHQ](https://akhq.io), first you should create a yaml
configuration file:
```yaml
akhq:
connections:
my-cluster:
properties:
bootstrap.servers: "tops-stingray-7863-eu1-rest-kafka.upstash.io:9092"
sasl.mechanism: SCRAM-SHA-512
security.protocol: SASL_SSL
sasl.jaas.config: org.apache.kafka.common.security.scram.ScramLoginModule required username="ZmlycG9iZXJtYW4ZHtSXVwmyJQ" password="J6ocnQfe25vUsI8AX-XxA==";
```
You should replace `bootstrap.servers` and `sasl.jaas.config` attributes with
your cluster endpoint and credentials.
You can start [AKHQ](https://akhq.io) application directly using `jar` file.
First download the latest release from
[releases page](https://github.com/tchiotludo/akhq/releases). Then launch the
application using following command:
```shell
java -Dmicronaut.config.files=application.yml -jar akhq.jar
```
Alternatively you can start using Docker:
```shell
docker run -p 8080:8080 -v ~/akhq/application.yml:/app/application.yml tchiotludo/akhq
```
After launching the [AKHQ](https://akhq.io) app, just go to
[http://localhost:8080](http://localhost:8080) to access UI.
For more information see
[AKHQ documentation](https://akhq.io/docs/#installation).
# Monitoring Upstash Kafka Cluster with Conduktor
Source: https://upstash.com/docs/kafka/howto/monitorwith_conduktor
[Conduktor](https://www.conduktor.io/) is a quite powerful application to
monitor and manage Apache Kafka clusters. You can connect and monitor your
Upstash Kafka cluster using [Conduktor](https://www.conduktor.io/). Conduktor
has a free for development and testing.
### Install Conduktor
Conduktor is a desktop application. So you need to
[download](https://www.conduktor.io/download/) it first. If you are using a Mac,
you can install it using `brew` too.
```shell
brew tap conduktor/brew
brew install conduktor
```
### Connect Your Cluster
Once you install Conduktor and
[create an Upstash Kafka cluster and topic](../overall/getstarted), you can
connect your cluster to Conduktor. Open Conduktor and click on
`New Kafka Cluster` button.
* You can set any name as `Cluster Name`.
* Copy Kafka endpoint from [Upstash console](https://console.upstash.com) and
paste to `Bootstrap Servers` field.
* In Upstash console, copy the properties from the `Properties` tab. Paste it to
the `Additional Properties` field on Conduktor.
Once you connected to the cluster, now you can produce and consume to your
topics using Conduktor.
# Monitoring Upstash Kafka Cluster with kafka-ui
Source: https://upstash.com/docs/kafka/howto/monitorwith_kafkaui
[kafka-ui](https://github.com/provectus/kafka-ui) is a GUI for monitoring Apache
Kafka. From their description:
> Kafka UI for Apache Kafka is a simple tool that makes your data flows
> observable, helps find and troubleshoot issues faster and deliver optimal
> performance. Its lightweight dashboard makes it easy to track key metrics of
> your Kafka clusters - Brokers, Topics, Partitions, Production, and
> Consumption.
You can connect and monitor your Upstash Kafka cluster using
[kafka-ui](https://github.com/provectus/kafka-ui).
To be able to use [kafka-ui](https://github.com/provectus/kafka-ui), first you
should create a yaml configuration file:
```yaml
kafka:
clusters:
- name: my-cluster
bootstrapServers: "tops-stingray-7863-eu1-rest-kafka.upstash.io:9092"
properties:
sasl.mechanism: SCRAM-SHA-512
security.protocol: SASL_SSL
sasl.jaas.config: org.apache.kafka.common.security.scram.ScramLoginModule required username="ZmlycG9iZXJtYW4ZHtSXVwmyJQ" password="J6ocnQfe25vUsI8AX-XxA==";
```
You should replace `bootstrap.servers` and `sasl.jaas.config` attributes with
your cluster endpoint and credentials.
You can start [kafka-ui](https://github.com/provectus/kafka-ui) application
directly using `jar` file. First download the latest release from
[releases page](https://github.com/provectus/kafka-ui/releases). Then launch the
application using following command in the same directory with `application.yml`
file:
```shell
java -jar kafka-ui-api-X.Y.Z.jar
```
Alternatively you can start using Docker:
```shell
docker run -p 8080:8080 -v ~/kafka-ui/application.yml:/application.yml provectuslabs/kafka-ui:latest
```
After launching the [kafka-ui](https://github.com/provectus/kafka-ui) app, just
go to [http://localhost:8080](http://localhost:8080) to access UI.
For more information see
[kafka-ui documentation](https://github.com/provectus/kafka-ui/blob/master/README.md).
# Produce Messages Using REST API
Source: https://upstash.com/docs/kafka/howto/producewithrest
If you do not have a Kafka cluster and/or topic already, follow [these
steps](../overall/getstarted) to create one.
In the cluster details section of the
[Upstash Console](https://console.upstash.com), scroll down the **REST API**
section and and copy `UPSTASH_KAFKA_REST_URL`, `UPSTASH_KAFKA_REST_USERNAME` and
`UPSTASH_KAFKA_REST_PASSWORD` using the copy icons next to them.
We will use a `Node.js` sample code to show how to produce message(s) using the
REST API. Our sample will use a topic named `cities` and send a few city names
to this topic.
Replace following parameters in the code snippets below with your actual values.
```js
const address = "https://tops-stingray-7863-eu1-rest-kafka.upstash.io";
const user = "G9wcy1zdGluZ3JheS03ODYzJMUX";
const pass = "eUmYCkAlxEhihIc7Hooi2IA2pz2fw==";
const auth = Buffer.from(`${user}:${pass}`).toString("base64");
const topic = "cities";
```
Following code will produce three city names to a topic:
```js
async function produce(topic, msg) {
const response = await fetch(`${address}/produce/${topic}/${msg}`, {
headers: { Authorization: `Basic ${auth}` },
});
const metadata = await response.json();
console.log(
`Topic: ${metadata.topic}, Partition: ${metadata.partition}, Offset: ${metadata.offset}`
);
}
produce(topic, "Tokyo");
produce(topic, "Istanbul");
produce(topic, "London");
```
Alternatively we can post all cities using a single request, instead of
producing them one-by-one. Note that in this case, URL does not have the message
argument but instead all messages are posted in the request body.
```js
async function produceMulti(topic, ...messages) {
let data = messages.map((msg) => {
return { value: msg };
});
const response = await fetch(`${address}/produce/${topic}`, {
headers: { Authorization: `Basic ${auth}` },
method: "POST",
body: JSON.stringify(data),
});
const metadata = await response.json();
metadata.forEach((m) => {
console.log(
`Topic: ${m.topic}, Partition: ${m.partition}, Offset: ${m.offset}`
);
});
}
produceMulti(topic, "Tokyo", "Istanbul", "London");
```
For more info about using the REST API see
[Kafka REST Produce API](../rest/restproducer) section.
# Clickhouse
Source: https://upstash.com/docs/kafka/integrations/clickhouse
This tutorial shows how to set up a pipeline to stream traffic events to Upstash Kafka and analyse with Clickhouse
In this tutorial series, we will show how to build an end to end real time
analytics system. We will stream the traffic (click) events from our web
application to Upstash Kafka then we will analyse it on real time. We will
implement one simply query with different stream processing tools:
```sql
SELECT city, count() FROM page_views where event_time > now() - INTERVAL 15 MINUTE group by city
```
Namely, we will query the number of page views from different cities in last 15
minutes. We keep the query and scenario intentionally simple to make the series
easy to understand. But you can easily extend the model for your more complex
realtime analytics scenarios.
If you do not have already set up Kafka pipeline, see
[the first part of series](./cloudflare_workers) where we
did the set up our pipeline including Upstash Kafka and Cloudflare Workers (or
Vercel).
In this part of the series, we will showcase how to use ClickHouse to run a
query on a Kafka topic.
## Clickhouse Setup
You can create a managed service from
[Clickhouse Cloud](https://clickhouse.cloud/) with a 30 days free trial.
Select your region and enter a name for your service. For simplicity, you can
allow access to the service from anywhere. If you want to restrict to the IP
addresses here is the list of Upstash addresses that needs permission:
```text
52.48.149.7
52.213.40.91
174.129.75.41
34.195.190.47
52.58.175.235
18.158.44.120
63.34.151.162
54.247.137.96
3.78.151.126
3.124.80.204
34.236.200.33
44.195.74.73
```
### Create a table
On Clickhouse service screen click on `Open SQL console`. Click on `+` to open a
new query window and run the following query to create a table:
```sql
CREATE TABLE page_views
(
country String,
city String,
region String,
url String,
ip String,
event_time DateTime DEFAULT now()
)
ORDER BY (event_time)
```
## Kafka Setup
We will create an [Upstash Kafka cluster](https://console.upstash.com/kafka).
Upstash offers serverless Kafka cluster with per message pricing. Select the
same (or nearest) region with region of Clickhouse for the best performance.
Also create a topic whose messages will be streamed to Clickhouse.
## Connector Setup
We will create a connector on
[Upstash console](https://console.upstash.com/kafka). Select your cluster and
click on `Connectors` tab. Select `Aiven JDBC Connector - Sink`
Click next to skip the Config step as we will enter the configuration manually
at the third (Advanced) step.
In the third step. copy paste the below config to the text editor:
```json
{
"name": "kafka-clickhouse",
"properties": {
"auto.create": false,
"auto.evolve": false,
"batch.size": 10,
"connection.password": "KqVQvD4HWMng",
"connection.url": "jdbc:clickhouse://a8mo654iq4e.eu-central-1.aws.clickhouse.cloud:8443/default?ssl=true",
"connection.user": "default",
"connector.class": "io.aiven.connect.jdbc.JdbcSinkConnector",
"errors.deadletterqueue.topic.name": "dlqtopic",
"insert.mode": "insert",
"key.converter": "org.apache.kafka.connect.storage.StringConverter",
"key.converter.schemas.enable": false,
"pk.mode": "none",
"table.name.format": "page_views",
"topics": "mytopic",
"value.converter": "org.apache.kafka.connect.json.JsonConverter",
"value.converter.schemas.enable": true
}
}
```
Replace the following attributes:
* "name" : Name your connector.
* "connection.password": Copy this from your Clickhouse dashboard. (`Connect` >
`View connection string`)
* "connection.url": Copy this from your Clickhouse dashboard. (`Connect` >
`View connection string`)
* "connection.user": Copy this from your Clickhouse dashboard. (`Connect` >
`View connection string`)
* "errors.deadletterqueue.topic.name": Give a name for your dead letter topic.
It will be auto created.
* "topics": Enter the name of the topic that you have created.
Note that there should be `?ssl=true` as a parameter for the connection.url.
Click the `Connect` button to create the connector.
## Test and Run
Clickhouse expects a schema together with the message payload. We need to go
back to [the set up step](./cloudflare_workers) and update
the message object to include schema as below:
```js
const message = {
schema: {
type: "struct",
optional: false,
version: 1,
fields: [
{
field: "country",
type: "string",
optional: false,
},
{
field: "city",
type: "string",
optional: false,
},
{
field: "region",
type: "string",
optional: false,
},
{
field: "url",
type: "string",
optional: false,
},
{
field: "ip",
type: "string",
optional: false,
},
],
},
payload: {
country: req.geo?.country,
city: req.geo?.city,
region: req.geo?.region,
url: req.url,
ip: req.headers.get("x-real-ip"),
mobile: req.headers.get("sec-ch-ua-mobile"),
platform: req.headers.get("sec-ch-ua-platform"),
useragent: req.headers.get("user-agent"),
},
};
```
It is not ideal to send the schema together with payload. Schema registry is a
solution. Upstash will launch managed schema registry service soon.
After deploying the changes (Cloudflare Workers or Vercel function), visit your
web app to generate traffic to Kafka.
Now, go to the Clickhouse console. `Connect` > `Open SQL console`. Click on
`page_views` (your table's name) on the left menu. You should see the table is
populated like below:
Also run the following query to get most popular cities in last 15 minutes:
```shell
SELECT city, count() FROM page_views where event_time > now() - INTERVAL 15 MINUTE group by city
```
It should return something like below:
# Cloudflare Workers
Source: https://upstash.com/docs/kafka/integrations/cloudflare_workers
As a tutorial for this integration, we'll implement a real time analytics system. We'll stream the traffic (click) events from our web application to Upstash Kafka. Here's the implementation for this simple query:
```sql
SELECT city, count() FROM kafka_topic_page_views where timestamp > now() - INTERVAL 15 MINUTE group by city
```
Namely, we will query the number of page views from different cities in last 15 minutes. We keep the query and scenario intentionally simple to make the series easy to understand. But you can easily extend the model for your more complex realtime analytics scenarios.
We'll use Clouflare Workers to intercept incoming requests to the website, and run a serverless function.
### Kafka Setup
Create an Upstash Kafka cluster and a topic as explained
[here](https://docs.upstash.com/kafka).
### Project Setup
We will use **C3 (create-cloudflare-cli)** command-line tool to create our application. You can open a new terminal window and run C3 using the prompt below.
```shell npm
npm create cloudflare@latest
```
```shell yarn
yarn create cloudflare@latest
```
This will install the `create-cloudflare` package, and lead you through setup. C3 will also install Wrangler in projects by default, which helps us testing and deploying the application.
```text
➜ npm create cloudflare@latest
Need to install the following packages:
create-cloudflare@2.1.0
Ok to proceed? (y) y
using create-cloudflare version 2.1.0
╭ Create an application with Cloudflare Step 1 of 3
│
├ In which directory do you want to create your application?
│ dir ./cloudflare_starter
│
├ What type of application do you want to create?
│ type "Hello World" Worker
│
├ Do you want to use TypeScript?
│ yes typescript
│
├ Copying files from "hello-world" template
│
├ Do you want to use TypeScript?
│ yes typescript
│
├ Retrieving current workerd compatibility date
│ compatibility date 2023-08-07
│
├ Do you want to use git for version control?
│ yes git
│
╰ Application created
```
We will also install the **Upstash Kafka SDK** to connect to Kafka.
```bash
npm install @upstash/kafka
```
### The Code
You can update the `src/index.ts` file with the code below:
```ts src/index.ts
import { Kafka } from "@upstash/kafka";
export interface Env {
UPSTASH_KAFKA_REST_URL: string;
UPSTASH_KAFKA_REST_USERNAME: string;
UPSTASH_KAFKA_REST_PASSWORD: string;
}
export default {
async fetch(
request: Request,
env: Env,
ctx: ExecutionContext
): Promise {
if (new URL(request.url).pathname == "/favicon.ico") {
return new Response(null, { status: 200 });
}
let message = {
country: request.cf?.country,
city: request.cf?.city,
region: request.cf?.region,
url: request.url,
ip: request.headers.get("x-real-ip"),
mobile: request.headers.get("sec-ch-ua-mobile"),
platform: request.headers.get("sec-ch-ua-platform"),
useragent: request.headers.get("user-agent"),
};
const kafka = new Kafka({
url: env.UPSTASH_KAFKA_REST_URL,
username: env.UPSTASH_KAFKA_REST_USERNAME,
password: env.UPSTASH_KAFKA_REST_PASSWORD,
});
const p = kafka.producer();
// Please update the topic according to your configuration
const topic = "mytopic";
ctx.waitUntil(p.produce(topic, JSON.stringify(message)));
// if you use CF Workers to intercept your existing site, uncomment below
// return await fetch(request);
return new Response("My website");
},
};
```
```js src/index.js
import { Kafka } from "@upstash/kafka";
export default {
async fetch(request, env, ctx) {
if (new URL(request.url).pathname == "/favicon.ico") {
return new Response(null, { status: 200 });
}
let message = {
country: request.cf?.country,
city: request.cf?.city,
region: request.cf?.region,
url: request.url,
ip: request.headers.get("x-real-ip"),
mobile: request.headers.get("sec-ch-ua-mobile"),
platform: request.headers.get("sec-ch-ua-platform"),
useragent: request.headers.get("user-agent"),
};
const kafka = new Kafka({
url: env.UPSTASH_KAFKA_REST_URL,
username: env.UPSTASH_KAFKA_REST_USERNAME,
password: env.UPSTASH_KAFKA_REST_PASSWORD,
});
const p = kafka.producer();
// Please update the topic according to your configuration
const topic = "mytopic";
ctx.waitUntil(p.produce(topic, JSON.stringify(message)));
// if you use CF Workers to intercept your existing site, uncomment below
// return await fetch(request);
return new Response("My website");
},
};
```
Above, we simply parse the request object and send the useful information to Upstash Kafka. You may add/remove information depending on your own requirements.
### Configure Credentials
There are two methods for setting up the credentials for Upstash Kafka client. The recommended way is to use Cloudflare Upstash Integration. Alternatively, you can add the credentials manually.
#### Using the Cloudflare Integration
Access to the [Cloudflare Dashboard](https://dash.cloudflare.com) and login with the same account that you've used while setting up the Worker application. Then, navigate to **Workers & Pages > Overview** section on the sidebar. Here, you'll find your application listed.
Clicking on the application will direct you to the application details page, where you can perform the integration process. Switch to the **Settings** tab in the application details, and proceed to **Integrations** section. You will see various Worker integrations listed. To proceed, click the **Add Integration** button associated with the Upstash Kafka.
On the Integration page, connect to your Upstash account. Then, select the related cluster from the dropdown menu. Finalize the process by pressing **Add Integration** button.
#### Setting up Manually
Navigate to [Upstash Console](https://console.upstash.com) and copy/paste your `UPSTASH_KAFKA_REST_URL`, `UPSTASH_KAFKA_REST_USERNAME` and `UPSTASH_KAFKA_REST_PASSWORD` credentials to your `wrangler.toml` as below.
```yaml
[vars]
UPSTASH_KAFKA_REST_URL="REPLACE_HERE"
UPSTASH_KAFKA_REST_USERNAME="REPLACE_HERE"
UPSTASH_KAFKA_REST_PASSWORD="REPLACE_HERE"
```
### Test and Deploy
You can test the function locally with `npx wrangler dev`
Deploy your function to Cloudflare with `npx wrangler deploy`
Once the deployment is done, the endpoint of the function will be provided to you.
You can check if logs are collected in Kafka by copying the `curl` expression from the console:
```shell
curl https:///consume/GROUP_NAME/GROUP_INSTANCE_NAME/TOPIC \
-H "Kafka-Auto-Offset-Reset: earliest" -u \
REPLACE_HERE
```
# Decodable
Source: https://upstash.com/docs/kafka/integrations/decodable
This tutorial shows how to integrate Upstash Kafka with Decodable
[Decodable](https://www.decodable.co/product?utm_source=upstash) is a platform
which enables developers to build data pipelines using SQL. It is built on
Apache Flink under the hood to provide a seamless experience, while abstracting
away the underlying complexity. In this post, we will show how to connect an
Upstash Kafka topic to Decodable to streamline messages from Kafka to Decodable.
## Upstash Kafka Setup
Create a Kafka cluster using
[Upstash Console](https://console.upstash.com/kafka) or
[Upstash CLI](https://github.com/upstash/cli) by following
[Getting Started](https://docs.upstash.com/kafka).
## Decodable Setup
Just like Upstash, Decodable is a managed service that means you do not need to
host or provision anything. You can easily register for free and start using it.
After creating your account, click on `Connections` and `New Connection`. Select
`Apache Kafka`. Then:
* Select Source as connection type.
* Select **SASL\_SSL** as security protocol and **SCRAM-SHA-256** as SASL
mechanism.
* Enter your topic, SASL username, SASL password. You can find all those from
Upstash console.
* Value format should be JSON.
In the next step, click on `New Stream` and give a name to it.
In the schema screen, add `country`, `city`, `region` and `url` with `string`
type.
Give a name to your connection and click `Create Connection`. In the next screen
click on Start.
## Test the Setup
Now, let's some events to our Kafka topic. Go to Upstash console, click on your
cluster then `Topics`, click `mytopic`. Select `Messages` tab then click
`Produce a new message`. Send a message in JSON format like the below:
```json
{
"country": "US",
"city": "San Jose",
"region": "CA",
"url": "https://upstash.com"
}
```
Now, go back to Decodable console, click Streams and select the one you have
created. Then click `Run Preview`. You should see something like:
## Links
[Decodable documentation](https://docs.decodable.co/docs)
[Decodable console](https://app.decodable.co/)
[Upstash console](https://console.upstash.com/kafka)
# EMQX Cloud
Source: https://upstash.com/docs/kafka/integrations/emqx
This tutorial shows how to integrate Upstash Kafka with EMQX Cloud
EMQX, a robust open-source MQTT message broker, is engineered for scalable, distributed environments, prioritizing high availability, throughput, and minimal latency. As a preferred protocol in the IoT landscape, MQTT (Message Queuing Telemetry Transport) excels in enabling devices to effectively publish and subscribe to messages.
Offered by EMQ, EMQX Cloud is a comprehensively managed MQTT service in the cloud, inherently scalable and secure. Its design is particularly advantageous for IoT applications, providing dependable MQTT messaging services.
This guide elaborates on streaming MQTT data to Upstash by establishing data integration. This process allows clients to route temperature and humidity metrics to EMQX Cloud using MQTT protocol, and subsequently channel these data streams into a Kafka topic within Upstash.
## Initiating Kafka Clusters on Upstash
Begin your journey with Upstash by visiting [Upstash](https://upstash.com/) and registering for an account.
### Kafka Cluster Creation
1. After logging in, initiate the creation of a Kafka cluster by selecting the **Create Cluster** button.
2. Input an appropriate name and select your desired deployment region, ideally close to your EMQX Cloud deployment for optimized performance.
3. Choose your cluster type: opt for a single replica for development/testing or a multi-replica setup for production scenarios.
4. Click **Create Cluster** to establish your serverless Kafka cluster.
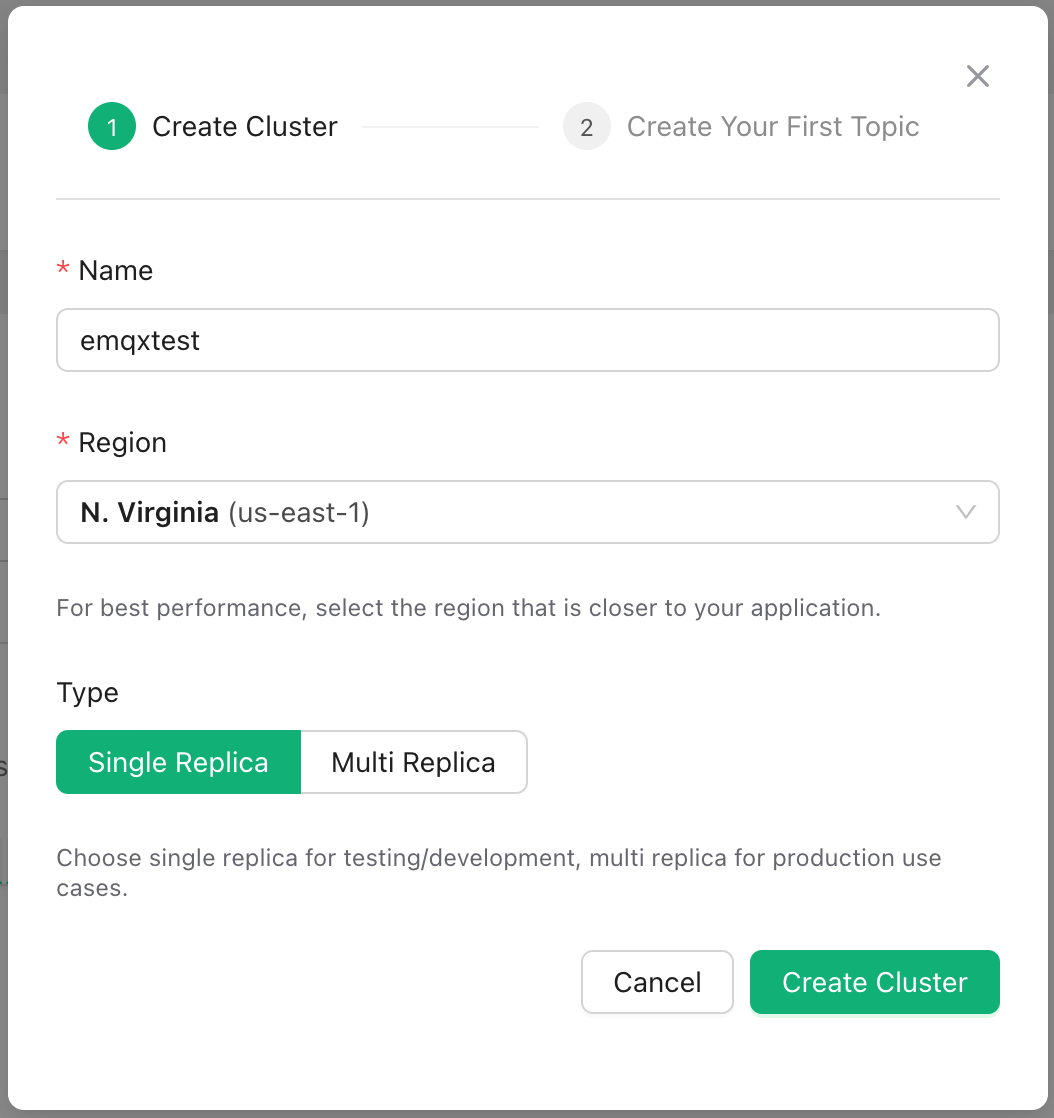
### Topic Configuration
1. Inside the Cluster console, navigate to **Topics** and proceed with **Create Topic**.
2. Enter `emqx` in the **Topic name** field, maintaining default settings, then finalize with **Create**.
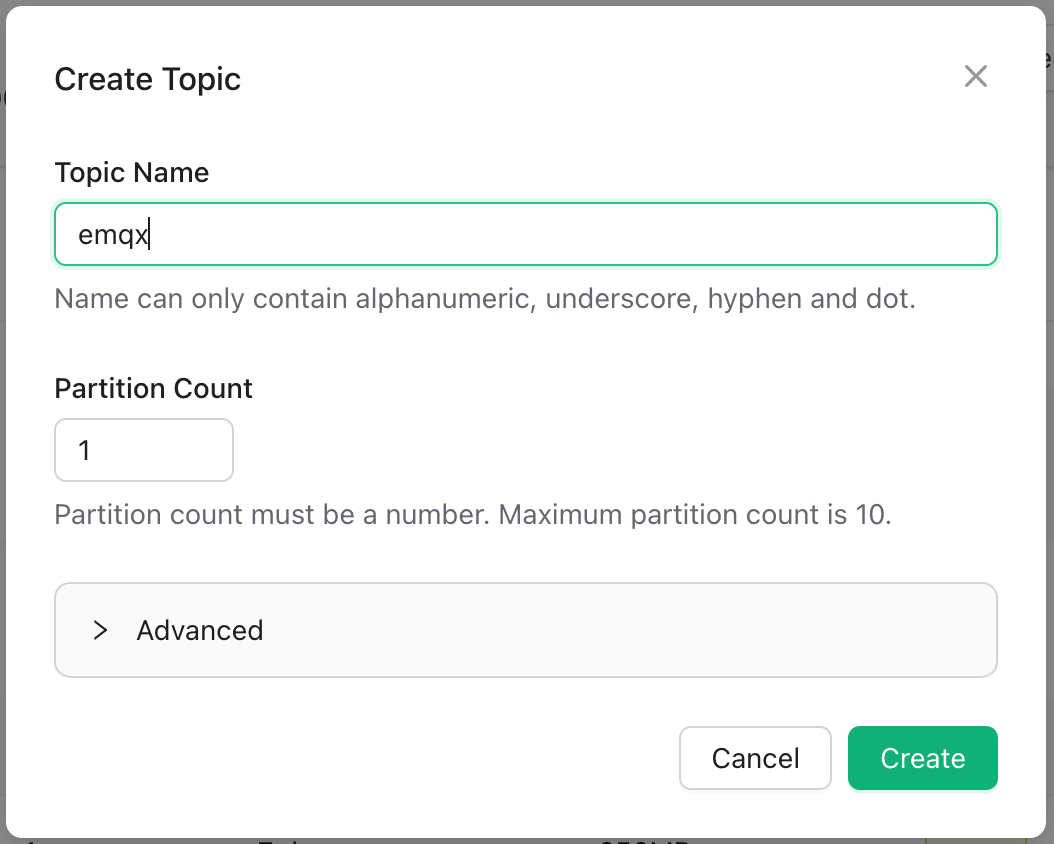
### Setting Up Credentials
1. Go to **Credentials** in the navigation menu and choose **New Credentials**.
2. Here, you can customize the topic and permissions for the credential. Default settings will be used in this tutorial.
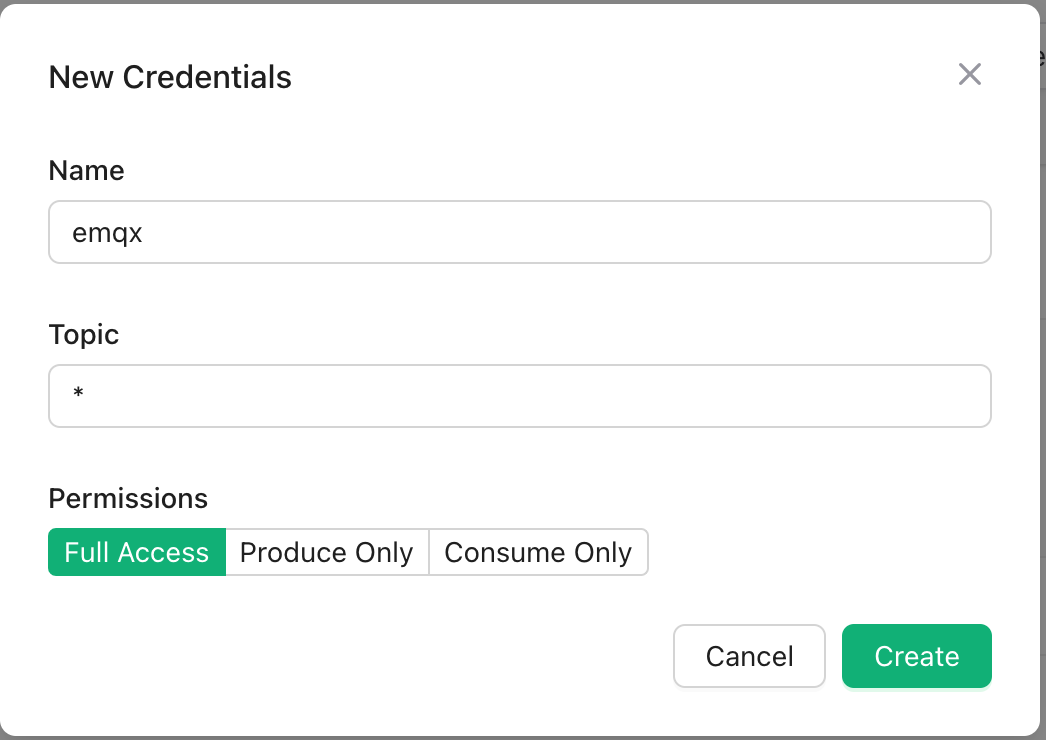
With these steps, we have laid the groundwork for Upstash.
## Establishing Data Integration with Upstash
### Enabling EMQX Cloud's NAT Gateway
1. Sign in to the EMQX Cloud console and visit the deployment overview page.
2. Click on the **NAT Gateway** section at the bottom of the page and opt for **Subscribe Now**.
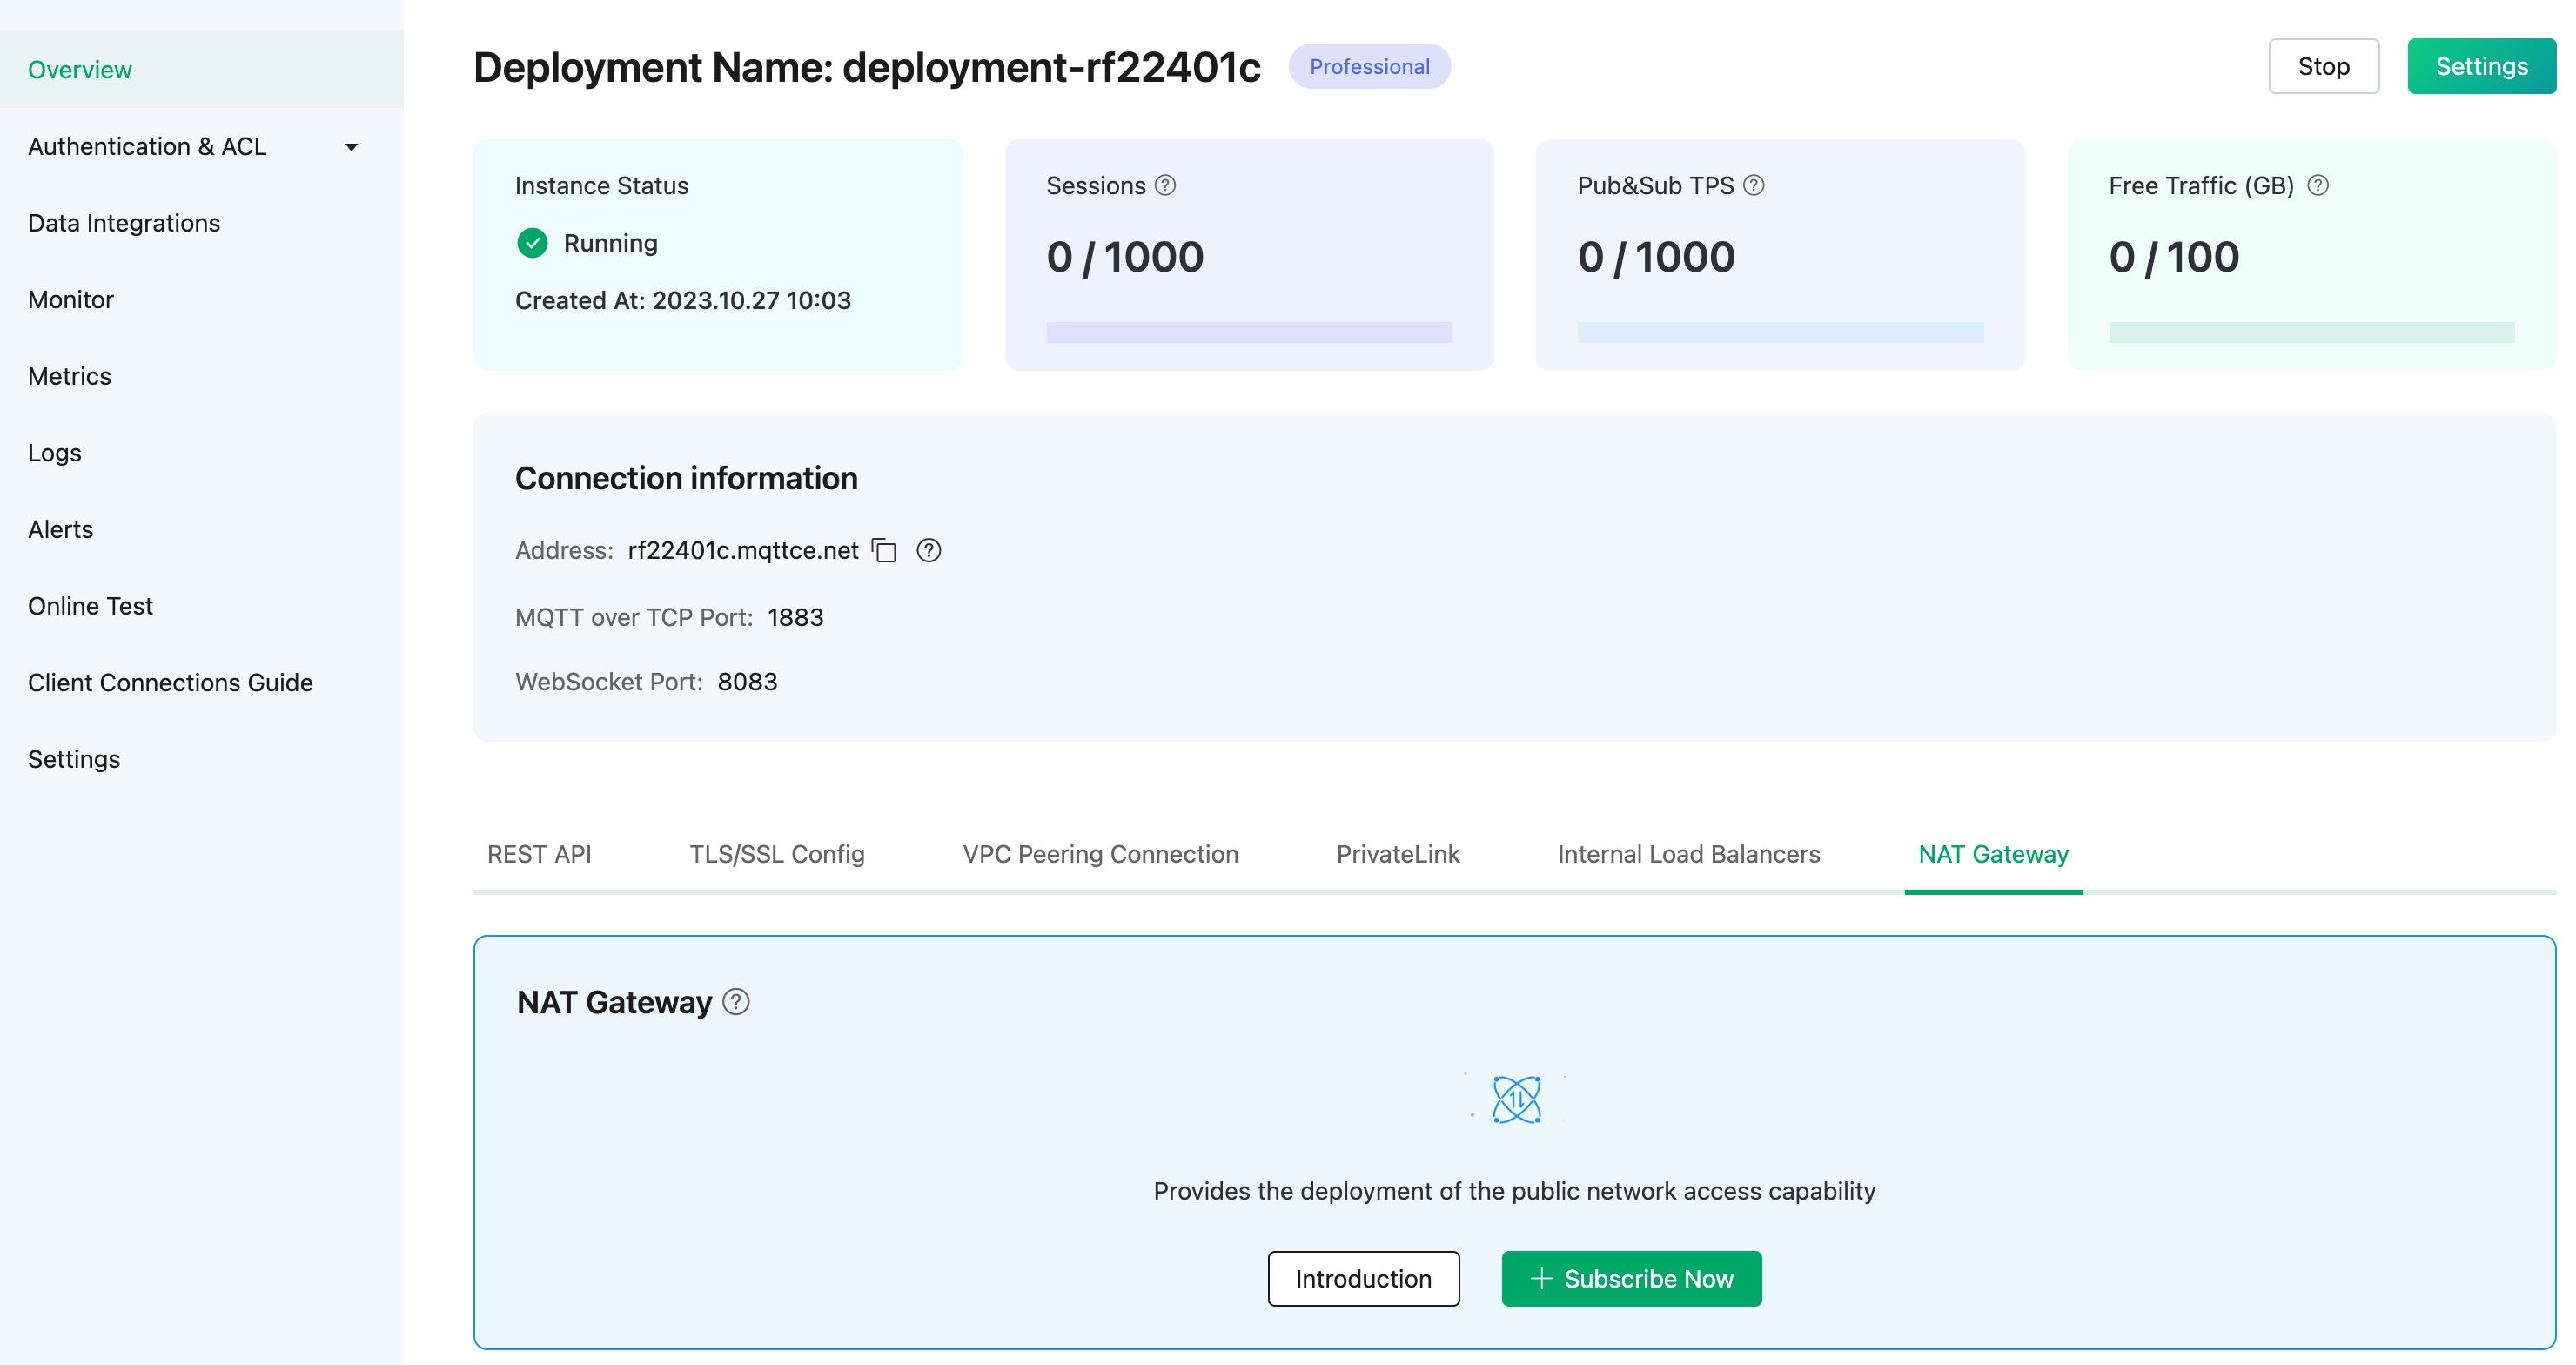
### Data Integration Setup
1. In the EMQX Cloud console, under your deployment, go to **Data Integrations** and select **Upstash for Kafka**.
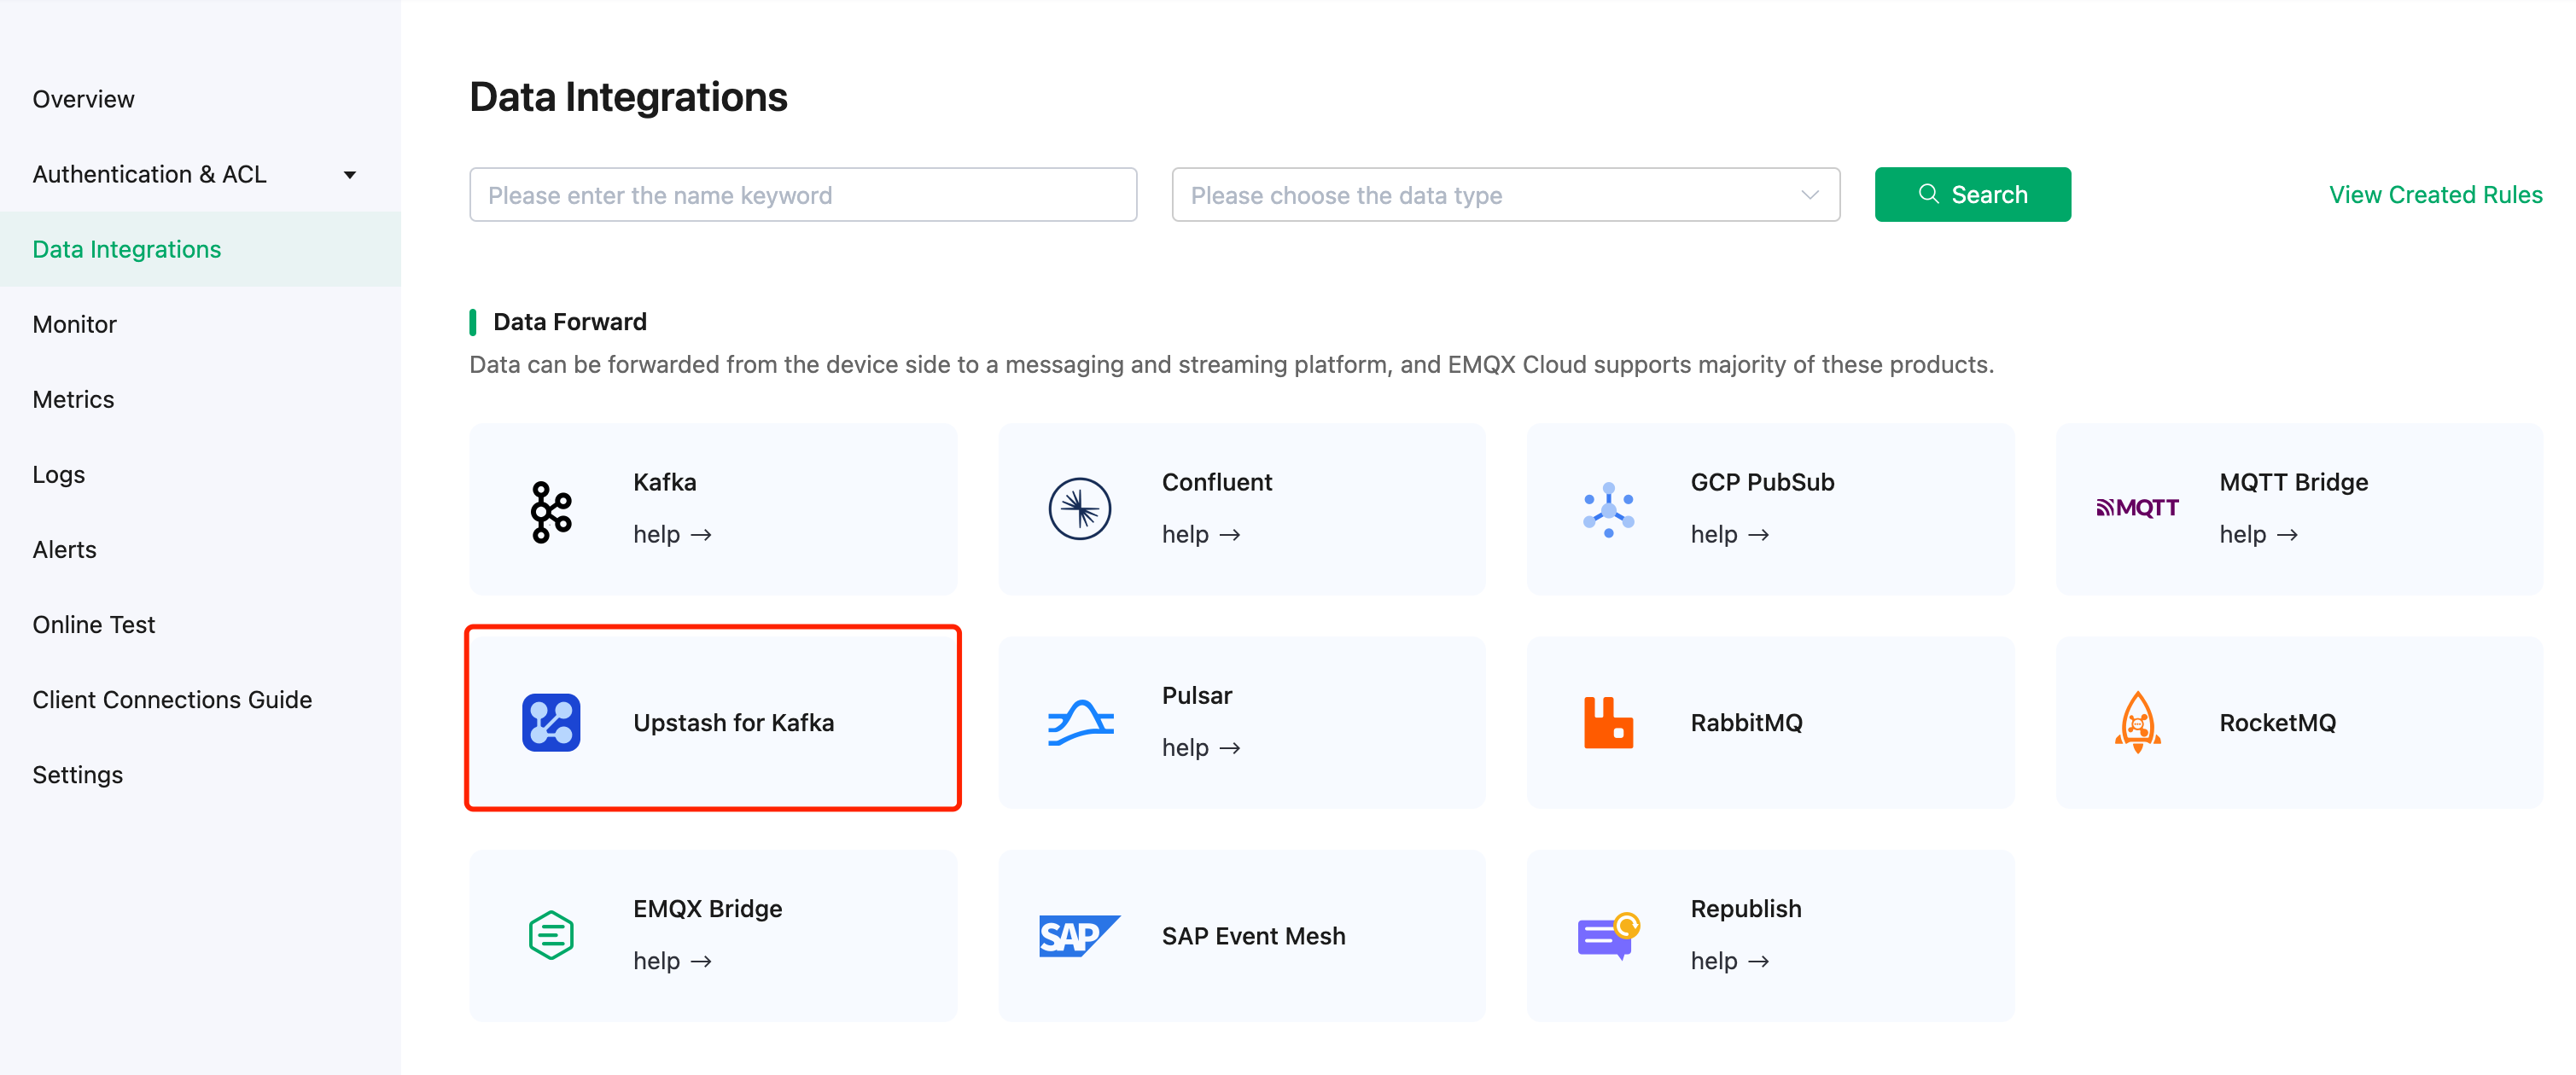
2. Fill in the **Endpoints** details from the Upstash Cluster details into the **Kafka Server** fields. Insert the username and password created in Create Credentials into the respective fields and click **Test** to confirm the connection.
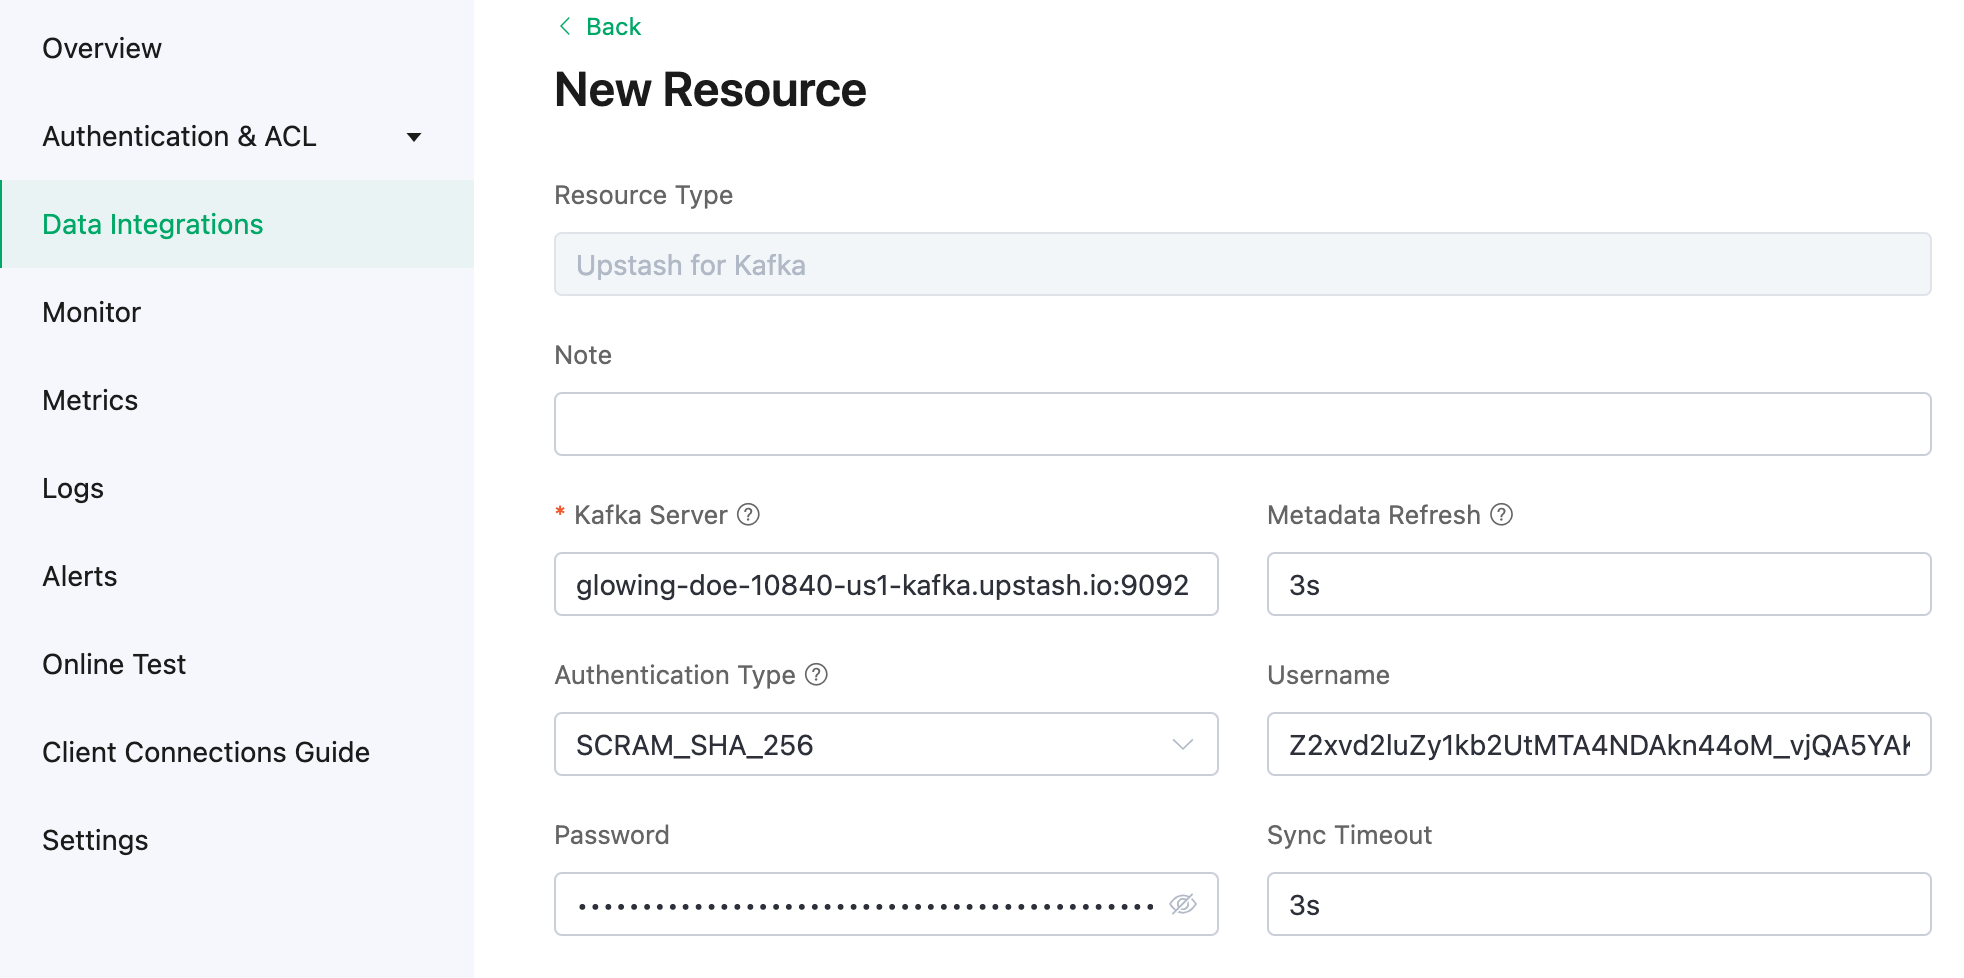
3. Opt for **New** to add a Kafka resource. You'll see your newly created Upstash for Kafka listed under **Configured Resources**.
4. Formulate a new SQL rule. Input the following SQL command in the **SQL** field. This rule will process messages from the `temp_hum/emqx` topic and append details like client\_id, topic, and timestamp.
```sql
SELECT
timestamp as up_timestamp,
clientid as client_id,
payload.temp as temp,
payload.hum as hum
FROM
"temp_hum/emqx"
```
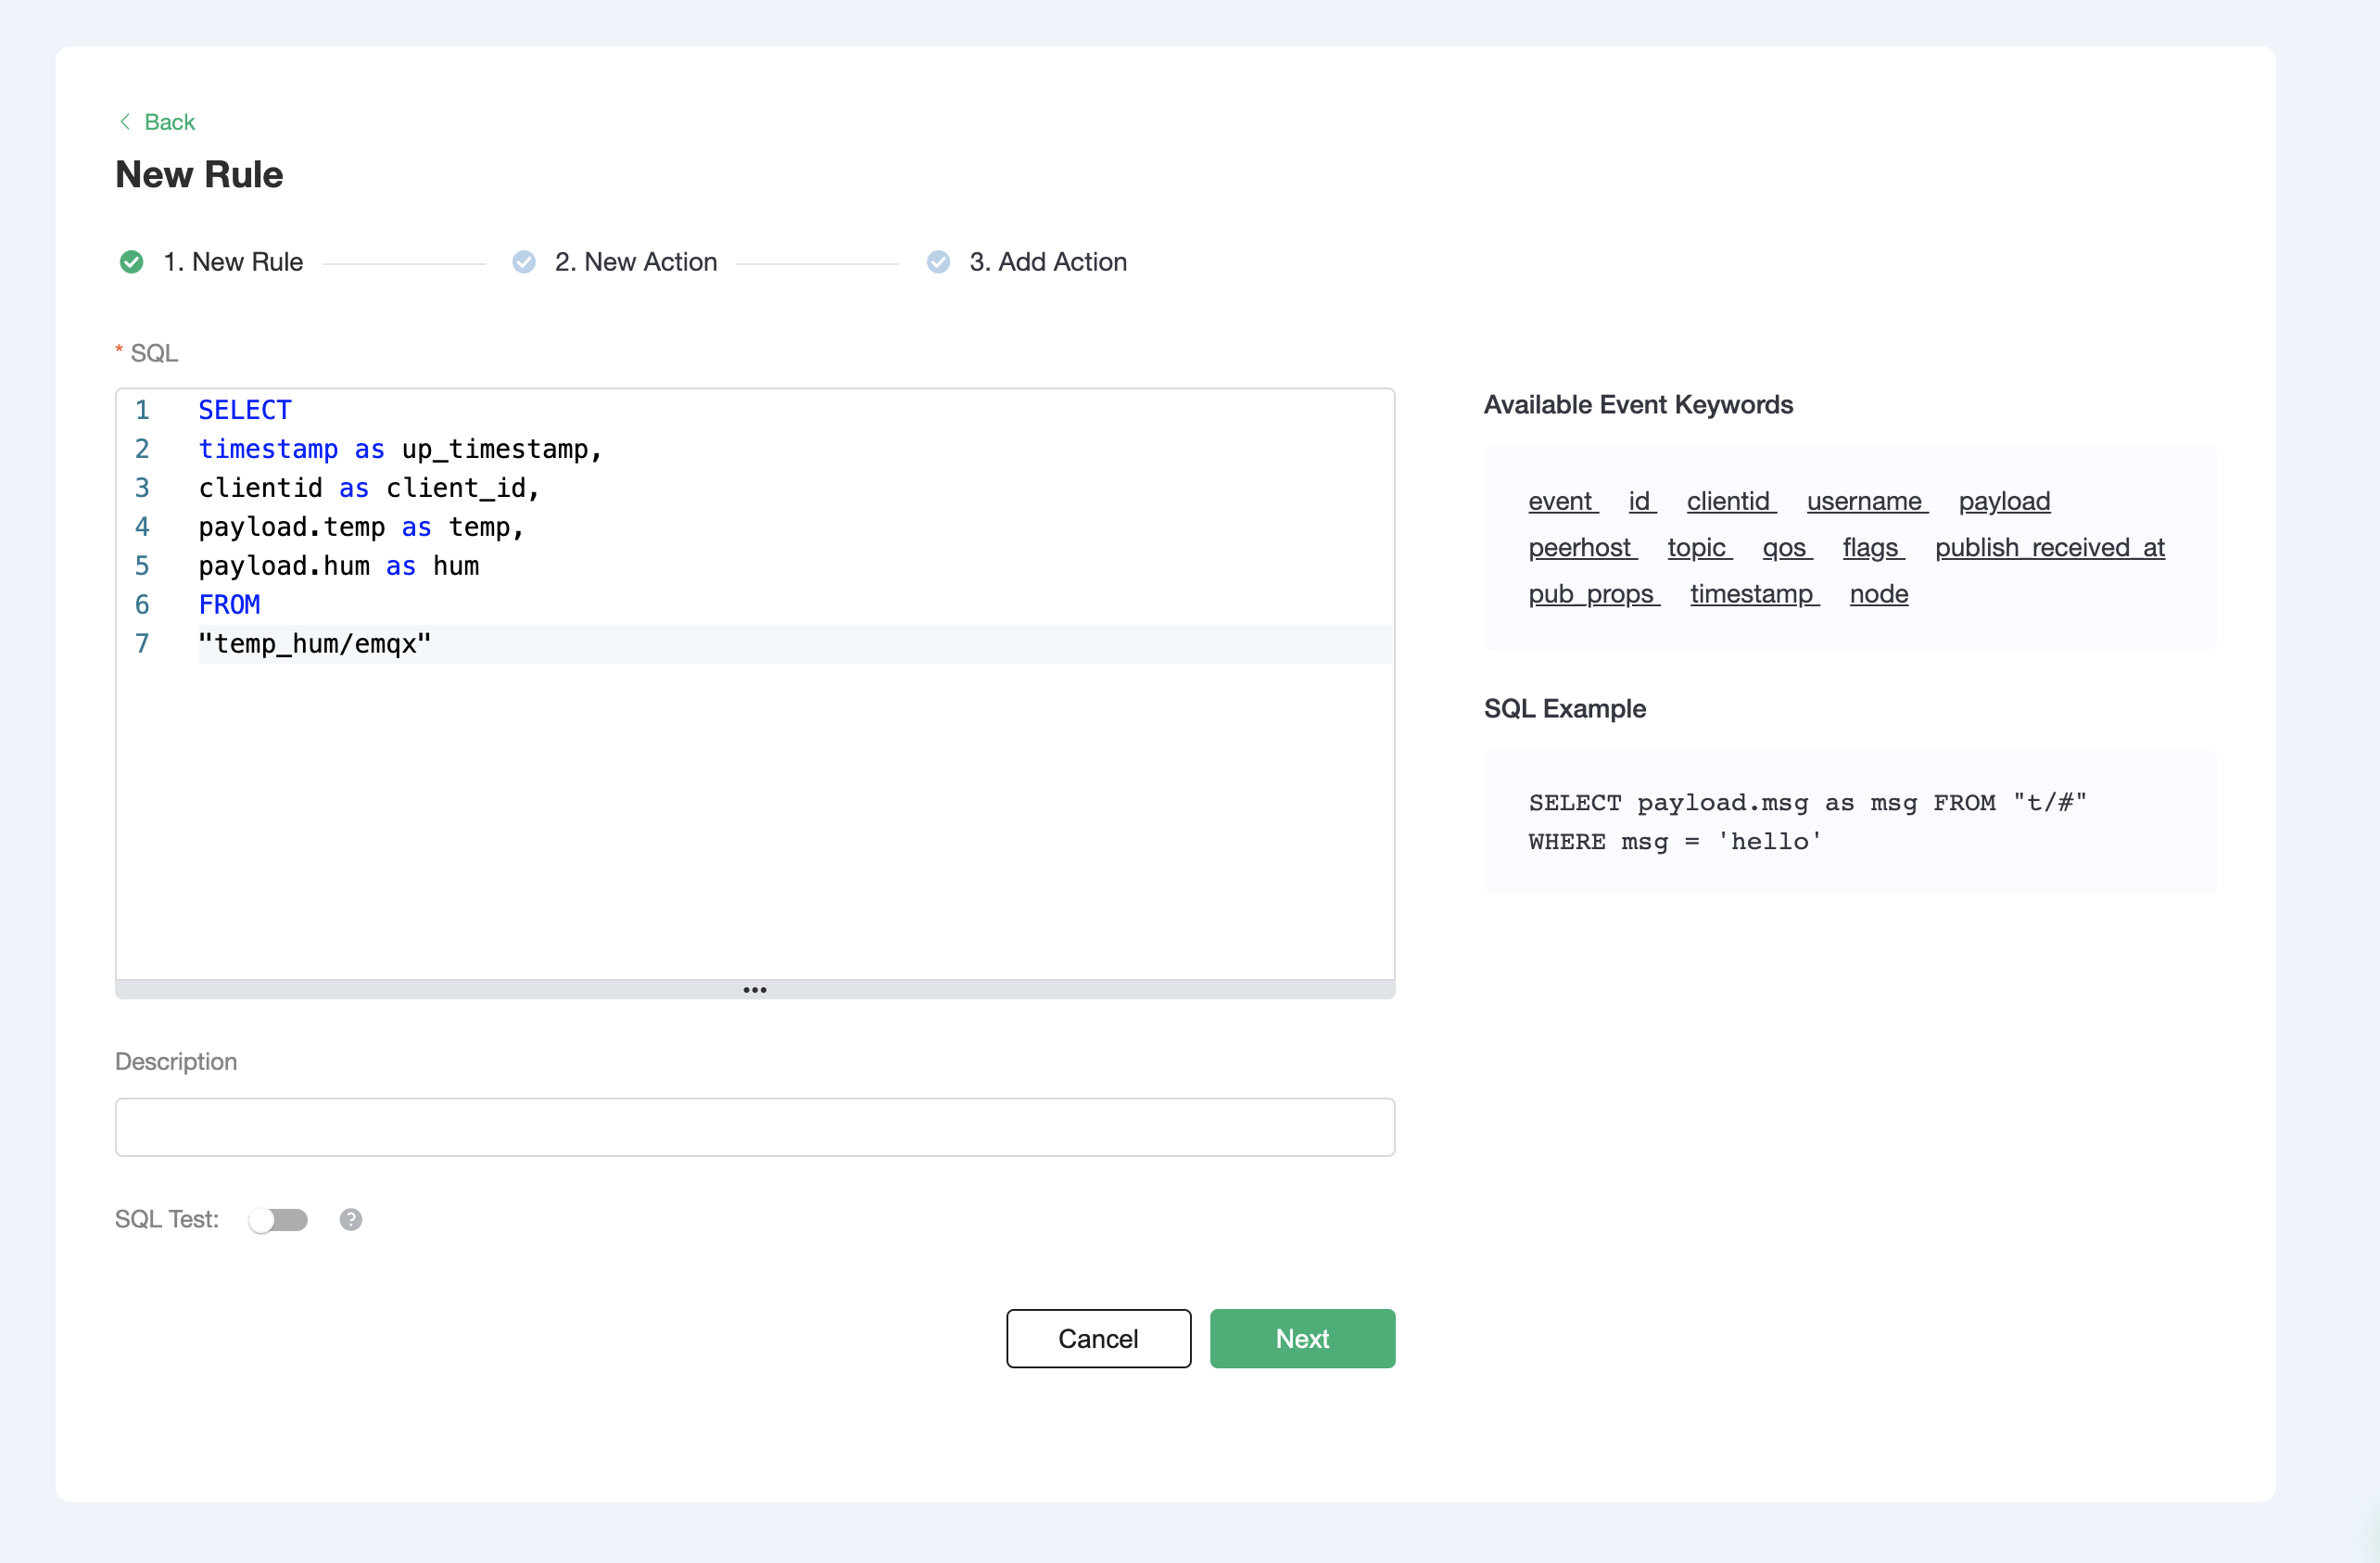
5. Conduct an SQL test by inputting the test payload, topic, and client data. Success is indicated by results similar to the example below.
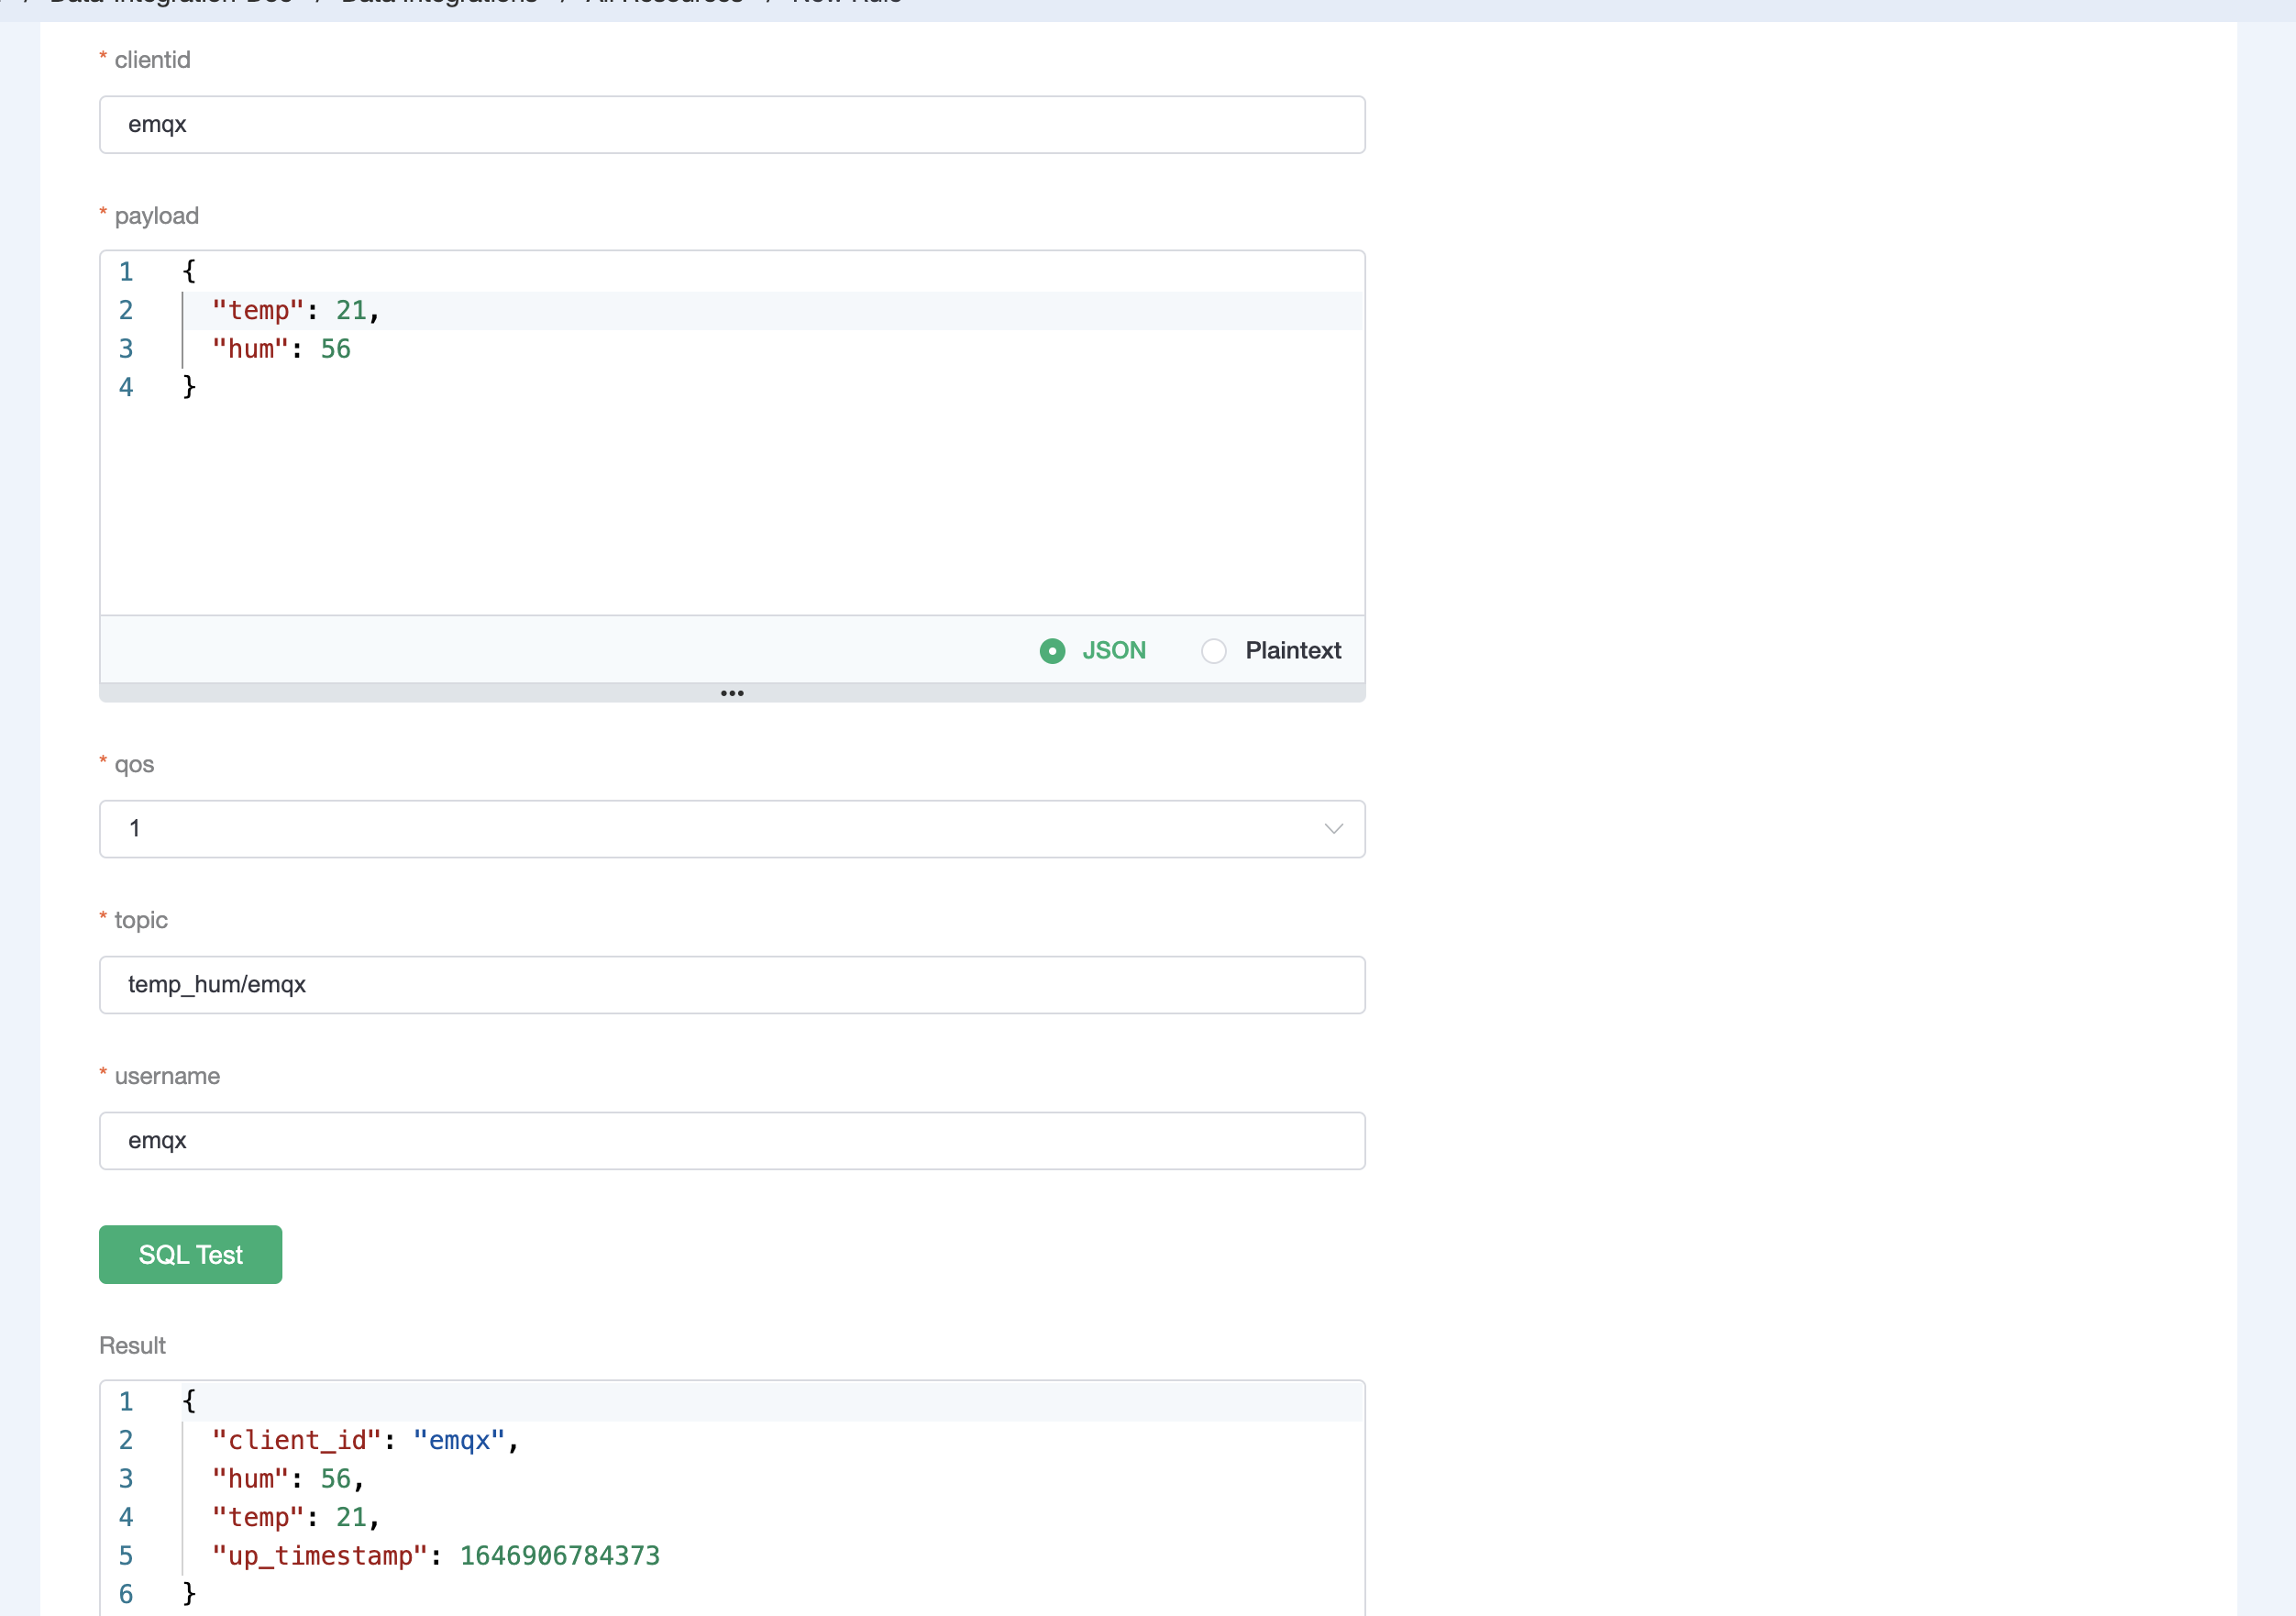
6. Advance to **Next** to append an action to the rule. Specify the Kafka topic and message format, then confirm.
```bash
# kafka topic
emqx
# kafka message template
{"up_timestamp": ${up_timestamp}, "client_id": ${client_id}, "temp": ${temp}, "hum": ${hum}}
```
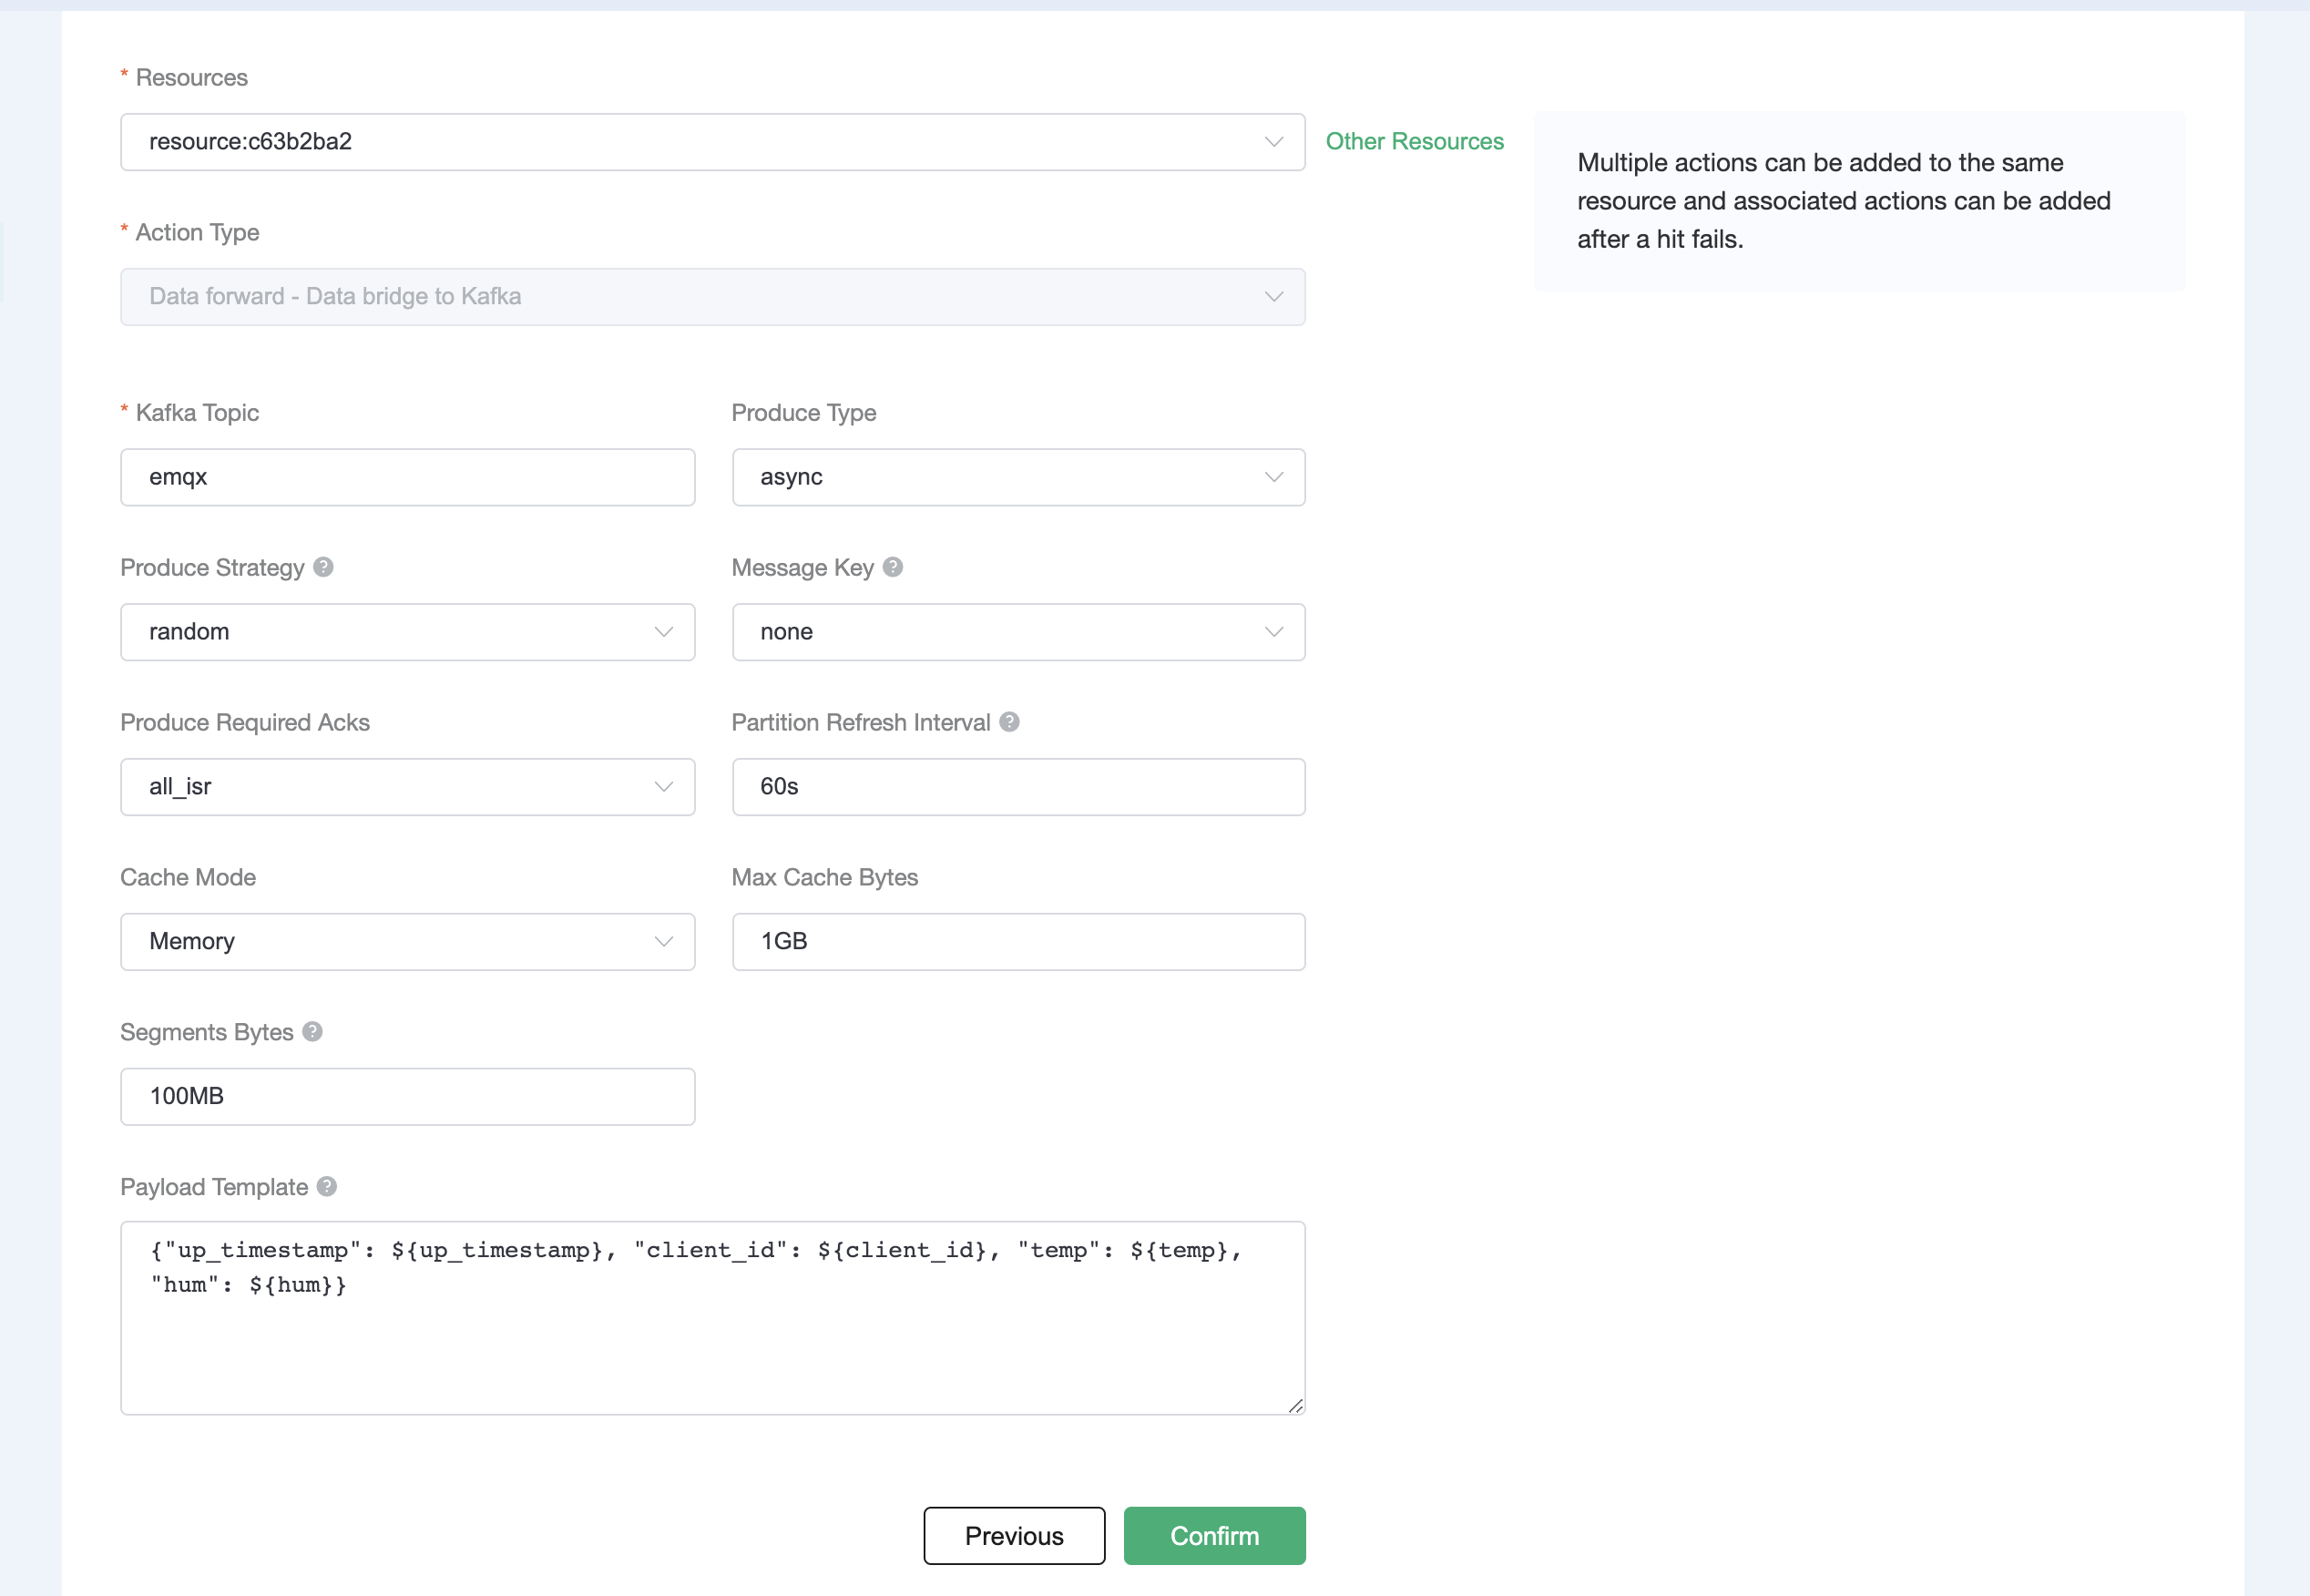
7. View the rule SQL statement and bound actions by clicking **View Details** after successfully adding the action.
8. To review created rules, click **View Created Rules** on the Data Integrations
# Apache Flink
Source: https://upstash.com/docs/kafka/integrations/flink
This tutorial shows how to integrate Upstash Kafka with Apache Flink
[Apache Flink](https://flink.apache.org/) is a distributed processing engine
which can process streaming data.
### Upstash Kafka Setup
Create a Kafka cluster using [Upstash Console](https://console.upstash.com) or
[Upstash CLI](https://github.com/upstash/cli) by following
[Getting Started](https://docs.upstash.com/kafka).
Create two topics by following the creating topic
[steps](https://docs.upstash.com/kafka#create-a-topic). Let’s name first topic
“input”, since we are going to stream this topic to other one, which we can name
it as “output”.
### Project Setup
If you already have a project and want to implement Upstash Kafka and Apache
Flink integration into it, you can skip this section and continue with [Add
Apache Flink and Kafka into the
Project](#add-apache-flink-and-kafka-into-the-project).
Install Maven to your machine by following [Maven Installation Guide](https://maven.apache.org/guides/getting-started/maven-in-five-minutes.html).
Run `mvn –version` in a terminal or in a command prompt to make sure you have
Maven downloaded.
It should print out the version of the Maven you have:
```
Apache Maven 3.6.3 (cecedd343002696d0abb50b32b541b8a6ba2883f)
Maven home: D:\apache-maven-3.6.3\apache-maven\bin\..
Java version: 1.8.0_232, vendor: AdoptOpenJDK, runtime: C:\Program Files\AdoptOpenJDK\jdk-8.0.232.09-hotspot\jre
Default locale: en_US, platform encoding: Cp1250
OS name: "windows 10", version: "10.0", arch: "amd64", family: "windows"
```
To create the Maven project;
Go into the folder that you want to create the project in your terminal or
command prompt by running `cd `
Run the following command:
```
mvn archetype:generate -DgroupId=com.kafkaflinkinteg.app -DartifactId=kafkaflinkinteg-app -DarchetypeArtifactId=maven-archetype-quickstart -DarchetypeVersion=1.4 -DinteractiveMode=false
```
### Add Apache Flink and Kafka into the Project
Open the project folder by using an IDE which has maven plugin such as Intellij,
Visual Studio, Eclipse etc. Add following Apache Flink dependencies into the
dependencies tag in `pom.xml` file.
```xml
org.apache.flinkflink-connector-kafka1.16.0org.apache.flinkflink-connector-base1.16.0org.apache.flinkflink-streaming-java1.16.0org.apache.flinkflink-clients1.16.0
```
### Streaming From One Topic to Another Topic
You need to create 2 more classes (LineSplitter, CustomSerializationSchema) for
word count example.
#### LineSplitter
This class will be custom implementation of FlatMapFunction from Apache Flink
client library. It takes a sentence, splits into words and returns a
two-dimensional Tuple in format: `(, 1)`.
Create LineSplitter class as following.
```java
package com.kafkaflinkinteg.app;
import org.apache.flink.api.common.functions.FlatMapFunction;
import org.apache.flink.api.java.tuple.Tuple2;
import org.apache.flink.util.Collector;
/**
* Implements the string tokenizer that splits sentences into words as a user-defined * FlatMapFunction. The function takes a line (String) and splits it into * multiple pairs in the form of "(word,1)" (Tuple2).
*/
public class LineSplitter implements FlatMapFunction> {
@Override
public void flatMap(String value, Collector> out) {
// normalize and split the line
String[] tokens = value.toLowerCase().split("\\W+");
// emit the pairs
for (String token : tokens) {
if (token.length() > 0) {
out.collect(new Tuple2(token, 1));
}
}
}
}
```
#### CustomSerializationSchema
This class will be a custom implementation of KafkaRecordSerializationSchema
from Apache Flink Kafka connector library. It will provide a schema for
serializing and converting data from two-dimensional Tuple, which will be the
output of word counting process, to Kafka record format.
Create CustomSerializationSchema class as following:
```java
package com.kafkaflinkinteg.app;
import org.apache.flink.api.common.serialization.SerializationSchema;
import org.apache.flink.api.java.tuple.Tuple2;
import org.apache.flink.connector.kafka.sink.KafkaRecordSerializationSchema;
import org.apache.flink.shaded.jackson2.com.fasterxml.jackson.core.JsonProcessingException;
import org.apache.flink.shaded.jackson2.com.fasterxml.jackson.databind.ObjectMapper;
import org.apache.kafka.clients.producer.ProducerRecord;
public class CustomSerializationSchema implements KafkaRecordSerializationSchema> {
private String topic;
private ObjectMapper mapper;
public CustomSerializationSchema(String topic) {
this.topic = topic;
}
@Override
public void open(SerializationSchema.InitializationContext context, KafkaSinkContext sinkContext) throws Exception {
KafkaRecordSerializationSchema.super.open(context, sinkContext);
}
@Override
public ProducerRecord serialize(Tuple2 stringIntegerTuple2, KafkaSinkContext kafkaSinkContext, Long aLong) {
byte[] k = null;
byte[] v = null;
if (mapper == null) {
mapper = new ObjectMapper();
}
try {
k = mapper.writeValueAsBytes(stringIntegerTuple2.f0);
v = mapper.writeValueAsBytes(stringIntegerTuple2.f1);
} catch ( JsonProcessingException e) {
// error
}
return new ProducerRecord<>(topic, k,v);
}
}
```
#### Integration
Import the following packages first:
```java
package com.kafkaflinkinteg.app;
import org.apache.flink.api.common.eventtime.WatermarkStrategy;
import org.apache.flink.api.common.serialization.SimpleStringSchema;
import org.apache.flink.api.java.tuple.Tuple2;
import org.apache.flink.connector.base.DeliveryGuarantee;
import org.apache.flink.connector.kafka.sink.KafkaSink;
import org.apache.flink.connector.kafka.source.KafkaSource;
import org.apache.flink.connector.kafka.source.enumerator.initializer.OffsetsInitializer;
import org.apache.flink.streaming.api.datastream.DataStream;
import org.apache.flink.streaming.api.environment.StreamExecutionEnvironment;
import org.apache.flink.streaming.api.windowing.assigners.TumblingProcessingTimeWindows;
import org.apache.flink.streaming.api.windowing.time.Time;
import java.util.Properties;
```
Define the names of the topics you are going to work on:
```java
String inputTopic = "input";
String outputTopic = "output";
```
Create the following properties for Apache Flink Kafka connector and replace
`UPSTASH-KAFKA-*` placeholders with your cluster information.
```java
Properties props = new Properties();
props.put("transaction.timeout.ms", "90000"); // e.g., 2 hours
props.put("bootstrap.servers", "UPSTASH-KAFKA-ENDPOINT:9092");
props.put("sasl.mechanism", "SCRAM-SHA-256");
props.put("security.protocol", "SASL_SSL");
props.put("sasl.jaas.config", "org.apache.kafka.common.security.scram.ScramLoginModule required username=\"UPSTASH-KAFKA-USERNAME\" password=\"UPSTASH-KAFKA-PASSWORD\";");
```
Get the stream execution environment to create and execute the pipeline in it.
```java
StreamExecutionEnvironment env = StreamExecutionEnvironment.getExecutionEnvironment();
```
Create the Kafka consumer.
```java
KafkaSource source = KafkaSource.builder()
.setStartingOffsets(OffsetsInitializer.earliest())
.setProperties(props)
.setTopics(inputTopic)
.setGroupId("my-group")
.setValueOnlyDeserializer(new SimpleStringSchema())
.build();
```
Implement the stream processing part, which will take the input sentence from
source and count words.
```java
DataStream> stream = env.fromSource(source, WatermarkStrategy.noWatermarks(), "Kafka Source")
.flatMap(new LineSplitter())
.keyBy(value -> value.f0)
.window(TumblingProcessingTimeWindows.of(Time.seconds(5)))
.sum(1);
```
You can see the output by printing the data stream.
```java
stream.print();
```
If you produce message to the input topic from your
[console](https://console.upstash.com), you will see the output like this:
```
2> (This,1)
1> (an,1)
3> (is,1)
2> (sentence,1)
4> (example,1)
```
Next, create a Kafka producer to sink the data stream to output Kafka topic.
```java
KafkaSink sink = KafkaSink.builder()
.setKafkaProducerConfig(props)
.setDeliveryGuarantee(DeliveryGuarantee.EXACTLY_ONCE)
.setTransactionalIdPrefix("integ")
.setRecordSerializer(new CustomSerializationSchema(outputTopic))
.build();
stream.sinkTo(sink);
```
Finally, execute the Stream execution environment that was retrieved and run it.
```java
env.execute();
```
# Upstash Kafka with Decodable
Source: https://upstash.com/docs/kafka/integrations/kafka-decodable
This tutorial shows how to integrate Upstash Kafka with Decodable
[Decodable](https://www.decodable.co/product?utm_source=upstash) is a platform
which enables developers to build data pipelines using SQL. It is built on
Apache Flink under the hood to provide a seamless experience, while abstracting
away the underlying complexity. In this post, we will show how to connect an
Upstash Kafka topic to Decodable to streamline messages from Kafka to Decodable.
## Upstash Kafka Setup
Create a Kafka cluster using
[Upstash Console](https://console.upstash.com/kafka) or
[Upstash CLI](https://github.com/upstash/cli) by following
[Getting Started](https://docs.upstash.com/kafka).
## Decodable Setup
Just like Upstash, Decodable is a managed service that means you do not need to
host or provision anything. You can easily register for free and start using it.
After creating your account, click on `Connections` and `New Connection`. Select
`Apache Kafka`. Then:
* Select Source as connection type.
* Select **SASL\_SSL** as security protocol and **SCRAM-SHA-256** as SASL
mechanism.
* Enter your topic, SASL username, SASL password. You can find all those from
Upstash console.
* Value format should be JSON.
In the next step, click on `New Stream` and give a name to it.
In the schema screen, add `country`, `city`, `region` and `url` with `string`
type.
Give a name to your connection and click `Create Connection`. In the next screen
click on Start.
## Test the Setup
Now, let's some events to our Kafka topic. Go to Upstash console, click on your
cluster then `Topics`, click `mytopic`. Select `Messages` tab then click
`Produce a new message`. Send a message in JSON format like the below:
```json
{
"country": "US",
"city": "San Jose",
"region": "CA",
"url": "https://upstash.com"
}
```
Now, go back to Decodable console, click Streams and select the one you have
created. Then click `Run Preview`. You should see something like:
## Links
[Decodable documentation](https://docs.decodable.co/docs)
[Decodable console](https://app.decodable.co/)
[Upstash console](https://console.upstash.com/kafka)
# Upstash Kafka with Apache Flink
Source: https://upstash.com/docs/kafka/integrations/kafkaflink
This tutorial shows how to integrate Upstash Kafka with Apache Flink
[Apache Flink](https://flink.apache.org/) is a distributed processing engine
which can process streaming data.
### Upstash Kafka Setup
Create a Kafka cluster using [Upstash Console](https://console.upstash.com) or
[Upstash CLI](https://github.com/upstash/cli) by following
[Getting Started](https://docs.upstash.com/kafka).
Create two topics by following the creating topic
[steps](https://docs.upstash.com/kafka#create-a-topic). Let’s name first topic
“input”, since we are going to stream this topic to other one, which we can name
it as “output”.
### Project Setup
If you already have a project and want to implement Upstash Kafka and Apache
Flink integration into it, you can skip this section and continue with [Add
Apache Flink and Kafka into the
Project](#add-apache-flink-and-kafka-into-the-project).
Install Maven to your machine by following [Maven Installation Guide](https://maven.apache.org/guides/getting-started/maven-in-five-minutes.html).
Run `mvn –version` in a terminal or in a command prompt to make sure you have
Maven downloaded.
It should print out the version of the Maven you have:
```
Apache Maven 3.6.3 (cecedd343002696d0abb50b32b541b8a6ba2883f)
Maven home: D:\apache-maven-3.6.3\apache-maven\bin\..
Java version: 1.8.0_232, vendor: AdoptOpenJDK, runtime: C:\Program Files\AdoptOpenJDK\jdk-8.0.232.09-hotspot\jre
Default locale: en_US, platform encoding: Cp1250
OS name: "windows 10", version: "10.0", arch: "amd64", family: "windows"
```
To create the Maven project;
Go into the folder that you want to create the project in your terminal or
command prompt by running `cd `
Run the following command:
```
mvn archetype:generate -DgroupId=com.kafkaflinkinteg.app -DartifactId=kafkaflinkinteg-app -DarchetypeArtifactId=maven-archetype-quickstart -DarchetypeVersion=1.4 -DinteractiveMode=false
```
### Add Apache Flink and Kafka into the Project
Open the project folder by using an IDE which has maven plugin such as Intellij,
Visual Studio, Eclipse etc. Add following Apache Flink dependencies into the
dependencies tag in `pom.xml` file.
```xml
org.apache.flinkflink-connector-kafka1.16.0org.apache.flinkflink-connector-base1.16.0org.apache.flinkflink-streaming-java1.16.0org.apache.flinkflink-clients1.16.0
```
### Streaming From One Topic to Another Topic
You need to create 2 more classes (LineSplitter, CustomSerializationSchema) for
word count example.
#### LineSplitter
This class will be custom implementation of FlatMapFunction from Apache Flink
client library. It takes a sentence, splits into words and returns a
two-dimensional Tuple in format: `(, 1)`.
Create LineSplitter class as following.
```java
package com.kafkaflinkinteg.app;
import org.apache.flink.api.common.functions.FlatMapFunction;
import org.apache.flink.api.java.tuple.Tuple2;
import org.apache.flink.util.Collector;
/**
* Implements the string tokenizer that splits sentences into words as a user-defined * FlatMapFunction. The function takes a line (String) and splits it into * multiple pairs in the form of "(word,1)" (Tuple2).
*/
public class LineSplitter implements FlatMapFunction> {
@Override
public void flatMap(String value, Collector> out) {
// normalize and split the line
String[] tokens = value.toLowerCase().split("\\W+");
// emit the pairs
for (String token : tokens) {
if (token.length() > 0) {
out.collect(new Tuple2(token, 1));
}
}
}
}
```
#### CustomSerializationSchema
This class will be a custom implementation of KafkaRecordSerializationSchema
from Apache Flink Kafka connector library. It will provide a schema for
serializing and converting data from two-dimensional Tuple, which will be the
output of word counting process, to Kafka record format.
Create CustomSerializationSchema class as following:
```java
package com.kafkaflinkinteg.app;
import org.apache.flink.api.common.serialization.SerializationSchema;
import org.apache.flink.api.java.tuple.Tuple2;
import org.apache.flink.connector.kafka.sink.KafkaRecordSerializationSchema;
import org.apache.flink.shaded.jackson2.com.fasterxml.jackson.core.JsonProcessingException;
import org.apache.flink.shaded.jackson2.com.fasterxml.jackson.databind.ObjectMapper;
import org.apache.kafka.clients.producer.ProducerRecord;
public class CustomSerializationSchema implements KafkaRecordSerializationSchema> {
private String topic;
private ObjectMapper mapper;
public CustomSerializationSchema(String topic) {
this.topic = topic;
}
@Override
public void open(SerializationSchema.InitializationContext context, KafkaSinkContext sinkContext) throws Exception {
KafkaRecordSerializationSchema.super.open(context, sinkContext);
}
@Override
public ProducerRecord serialize(Tuple2 stringintTuple2, KafkaSinkContext kafkaSinkContext, Long aLong) {
byte[] k = null;
byte[] v = null;
if (mapper == null) {
mapper = new ObjectMapper();
}
try {
k = mapper.writeValueAsBytes(stringintTuple2.f0);
v = mapper.writeValueAsBytes(stringintTuple2.f1);
} catch ( JsonProcessingException e) {
// error
}
return new ProducerRecord<>(topic, k,v);
}
}
```
#### Integration
Import the following packages first:
```java
package com.kafkaflinkinteg.app;
import org.apache.flink.api.common.eventtime.WatermarkStrategy;
import org.apache.flink.api.common.serialization.SimpleStringSchema;
import org.apache.flink.api.java.tuple.Tuple2;
import org.apache.flink.connector.base.DeliveryGuarantee;
import org.apache.flink.connector.kafka.sink.KafkaSink;
import org.apache.flink.connector.kafka.source.KafkaSource;
import org.apache.flink.connector.kafka.source.enumerator.initializer.OffsetsInitializer;
import org.apache.flink.streaming.api.datastream.DataStream;
import org.apache.flink.streaming.api.environment.StreamExecutionEnvironment;
import org.apache.flink.streaming.api.windowing.assigners.TumblingProcessingTimeWindows;
import org.apache.flink.streaming.api.windowing.time.Time;
import java.util.Properties;
```
Define the names of the topics you are going to work on:
```java
String inputTopic = "input";
String outputTopic = "output";
```
Create the following properties for Apache Flink Kafka connector and replace
`UPSTASH-KAFKA-*` placeholders with your cluster information.
```java
Properties props = new Properties();
props.put("transaction.timeout.ms", "90000"); // e.g., 2 hours
props.put("bootstrap.servers", "UPSTASH-KAFKA-ENDPOINT:9092");
props.put("sasl.mechanism", "SCRAM-SHA-256");
props.put("security.protocol", "SASL_SSL");
props.put("sasl.jaas.config", "org.apache.kafka.common.security.scram.ScramLoginModule required username=\"UPSTASH-KAFKA-USERNAME\" password=\"UPSTASH-KAFKA-PASSWORD\";");
```
Get the stream execution environment to create and execute the pipeline in it.
```java
StreamExecutionEnvironment env = StreamExecutionEnvironment.getExecutionEnvironment();
```
Create the Kafka consumer.
```java
KafkaSource source = KafkaSource.builder()
.setStartingOffsets(OffsetsInitializer.earliest())
.setProperties(props)
.setTopics(inputTopic)
.setGroupId("my-group")
.setValueOnlyDeserializer(new SimpleStringSchema())
.build();
```
Implement the stream processing part, which will take the input sentence from
source and count words.
```java
DataStream> stream = env.fromSource(source, WatermarkStrategy.noWatermarks(), "Kafka Source")
.flatMap(new LineSplitter())
.keyBy(value -> value.f0)
.window(TumblingProcessingTimeWindows.of(Time.seconds(5)))
.sum(1);
```
You can see the output by printing the data stream.
```java
stream.print();
```
If you produce message to the input topic from your
[console](https://console.upstash.com), you will see the output like this:
```
2> (This,1)
1> (an,1)
3> (is,1)
2> (sentence,1)
4> (example,1)
```
Next, create a Kafka producer to sink the data stream to output Kafka topic.
```java
KafkaSink sink = KafkaSink.builder()
.setKafkaProducerConfig(props)
.setDeliveryGuarantee(DeliveryGuarantee.EXACTLY_ONCE)
.setTransactionalIdPrefix("integ")
.setRecordSerializer(new CustomSerializationSchema(outputTopic))
.build();
stream.sinkTo(sink);
```
Finally, execute the Stream execution environment that was retrieved and run it.
```java
env.execute();
```
# Upstash Kafka with ksqlDB
Source: https://upstash.com/docs/kafka/integrations/kafkaksqldb
This tutorial shows how to integrate Upstash Kafka with ksqlDB
[ksqlDB](https://www.confluent.io/product/ksqldb) is a SQL interface for
performing stream processing over the Kafka environment.
## Upstash Kafka Setup
Create a Kafka cluster using [Upstash Console](https://console.upstash.com) or
[Upstash CLI](https://github.com/upstash/cli) by following
[Getting Started](https://docs.upstash.com/kafka).
## ksqlDB Setup
Upstash does not have a managed ksqlDB. Therefore, set up ksqlDB on a docker
container and replace UPSTASH-KAFKA-\* placeholders with your cluster
information.
First, download and install [Docker](https://www.docker.com/).
Create a `docker-compose.yml` file as below:
```yml
version: "2"
services:
ksqldb-server:
image: confluentinc/ksqldb-server:0.28.2
hostname: ksqldb-server
container_name: ksqldb-server
ports:
- "8088:8088"
environment:
KSQL_LISTENERS: "http://0.0.0.0:8088"
KSQL_BOOTSTRAP_SERVERS: "UPSTASH_KAFKA_ENDPOINT"
KSQL_SASL_MECHANISM: "SCRAM-SHA-256"
KSQL_SECURITY_PROTOCOL: "SASL_SSL"
KSQL_SASL_JAAS_CONFIG: 'org.apache.kafka.common.security.scram.ScramLoginModule required username="UPSTASH_KAFKA_USERNAME" password="UPSTASH_KAFKA_PASSWORD";'
KSQL_KSQL_LOGGING_PROCESSING_STREAM_AUTO_CREATE: "true"
KSQL_KSQL_LOGGING_PROCESSING_TOPIC_AUTO_CREATE: "true"
ksqldb-cli:
image: confluentinc/ksqldb-cli:0.28.2
container_name: ksqldb-cli
depends_on:
- ksqldb-server
entrypoint: /bin/sh
tty: true
```
Open your CLI, navigate to the folder that includes the docker-compose.yml file
you created and start ksqlDB by running `docker-compose up`.
When you check your Kafka cluster from
[console](https://console.upstash.com/kafka), you will see new topics created
after you start ksqlDB.
## Streaming From One Topic to Another Topic
Implementing a word count example project can be done with both ksqlDB CLI and
Java client. In both ways, it is going to be done by consecutive streams. The
operations of the process will be as
`receive input > split into array > convert to rows > count occurrences`.
### Using ksqlDB CLI
Start the ksqlDB CLI by running the following command:
```
docker exec -it ksqldb-cli ksql http://ksqldb-server:8088
```
Create the first stream, which reads from the "input" topic:
```
ksql> CREATE STREAM source_stream (sentence VARCHAR) WITH (kafka_topic='input', value_format='json', partitions=1);
```
Create the second stream, which reads from source\_stream, splits the string to
an array, and writes to the split\_stream topic.
```
ksql> CREATE STREAM split_stream AS SELECT regexp_split_to_array(sentence, ' ') as word_array FROM source_stream EMIT CHANGES;
```
Next, create the third stream, which reads from split\_stream created above,
converts word\_array to rows, and writes to explode\_stream.
```
ksql> CREATE STREAM explode_stream AS SELECT explode(word_array) as words FROM split_stream EMIT CHANGES;
```
Lastly, create a table, which will count the words’ occurrences and write it to
the "OUTPUT" topic.
```
ksql> CREATE TABLE output AS SELECT words as word, count(words) as occurrence FROM explode_stream GROUP BY words EMIT CHANGES;
```
You can check what you have created so far by running the following commands on
ksqlDB CLI.
```
ksql> show tables;
Table Name | Kafka Topic | Key Format | Value Format | Windowed
--------------------------------------------------------------------
OUTPUT | OUTPUT | KAFKA | JSON | false
--------------------------------------------------------------------
ksql> show streams;
Stream Name | Kafka Topic | Key Format | Value Format | Windowed
------------------------------------------------------------------------------------------
EXPLODE_STREAM | EXPLODE_STREAM | KAFKA | JSON | false
KSQL_PROCESSING_LOG | default_ksql_processing_log | KAFKA | JSON | false
SOURCE_STREAM | input | KAFKA | JSON | false
SPLIT_STREAM | SPLIT_STREAM | KAFKA | JSON | false
------------------------------------------------------------------------------------------
```
### Using Java Client
#### Project Setup
> :pushpin: **Note** If you already have a project and want to implement Upstash
> Kafka and ksqlDB integration into it, you can skip this section and continue
> with
> [Add Ksqldb and Kafka into the Project](#add-ksqldb-and-kafka-into-the-project).
Install Maven to your machine by following
[Maven Installation Guide](https://maven.apache.org/guides/getting-started/maven-in-five-minutes.html)
Run `mvn –version` in a terminal or a command prompt to make sure you have Maven
downloaded.
It should print out the version of the Maven you have:
```
Apache Maven 3.6.3 (cecedd343002696d0abb50b32b541b8a6ba2883f)
Maven home: D:\apache-maven-3.6.3\apache-maven\bin\..
Java version: 1.8.0_232, vendor: AdoptOpenJDK, runtime: C:\Program Files\AdoptOpenJDK\jdk-8.0.232.09-hotspot\jre
Default locale: en_US, platform encoding: Cp1250
OS name: "windows 10", version: "10.0", arch: "amd64", family: "windows"
```
To create the Maven project;
Go into the folder that you want to create the project in your terminal or
command prompt by running `cd `
Run the following command:
```
mvn archetype:generate -DgroupId=com.kafkaksqldbinteg.app -DartifactId=kafkaksqldbinteg-app -DarchetypeArtifactId=maven-archetype-quickstart -DarchetypeVersion=1.4 -DinteractiveMode=false
```
#### Add ksqlDB and Kafka into the Project
Open the project folder using an IDE with maven plugins such as Intellij, Visual
Studio, Eclipse, etc. Add ksqlDB into the `pom.xml` file.
```xml
confluentconfluent-repohttp://packages.confluent.io/maven/io.confluent.ksqlksqldb-api-client7.3.0
```
#### Streaming
Import the following packages.
```java
import io.confluent.ksql.api.client.Client;
import io.confluent.ksql.api.client.ClientOptions;
import io.confluent.ksql.api.client.ExecuteStatementResult;
import java.util.concurrent.CompletableFuture;
```
Create a ksqlDB client first.
```java
String KSQLDB_SERVER_HOST = "localhost";
int KSQLDB_SERVER_HOST_PORT = 8088;
ClientOptions options = ClientOptions.create()
.setHost(KSQLDB_SERVER_HOST)
.setPort(KSQLDB_SERVER_HOST_PORT);
Client client = Client.create(options);
```
Create the first stream, which reads from "input" topic:
```java
String SOURCE_STREAM = "CREATE STREAM IF NOT EXISTS source_stream (sentence VARCHAR)" +
" WITH (kafka_topic='input', value_format='json', partitions=1);";
CompletableFuture result =
client.executeStatement(SOURCE_STREAM);
System.out.println(result);
```
Create the second stream, which reads from source\_stream, split the string to an
array, and writes to the split\_stream topic.
```java
String SPLIT_STREAM = "CREATE STREAM IF NOT EXISTS split_stream " +
"AS SELECT regexp_split_to_array(sentence, ' ') " +
"as word_array FROM source_stream EMIT CHANGES;";
CompletableFuture result1 =
client.executeStatement(SPLIT_STREAM);System.out.println(result1);
```
Next, create the third stream, which reads from split\_stream created above,
converts word\_array to rows, and writes to explode\_stream.
```java
String EXPLODE_STREAM = "CREATE STREAM IF NOT EXISTS explode_stream " +
"AS SELECT explode(word_array) " +
"as words FROM split_stream EMIT CHANGES;";
CompletableFuture result2 =
client.executeStatement(EXPLODE_STREAM);System.out.println(result2);
```
Lastly, create a table, which will count the words’ occurrences and write it to
the "OUTPUT" topic.
```java
String OUTPUT_TABLE = "CREATE TABLE output " +
"AS SELECT words as word, count(words) " +
"as occurrence FROM explode_stream GROUP BY words EMIT CHANGES;";
CompletableFuture result3 =
client.executeStatement(OUTPUT_TABLE);System.out.println(result3);
```
## Results
The word count stream we created above is taking input sentences in JSON format
from the "input" topic and sends word count results to the "OUTPUT" topic.
You can both send input and observe the output on
[console](https://console.upstash.com/kafka).
Send the input sentence to the "input" topic. The key can be a random string,
but since we defined "sentence" as a field while creating the `source_stream`,
the value must be a JSON that includes “sentence” as a key for this use case:
```json
{
“sentence”: “This is an example sentence”
}
```
Once you send this message to "input" topic, you can observe the result at
"OUTPUT" topic as following:
```
Timestamp Key Value
2022-12-06 23:39:56 This {"OCCURRENCE":1}
2022-12-06 23:39:56 is {"OCCURRENCE":1}
2022-12-06 23:39:56 an {"OCCURRENCE":1}
2022-12-06 23:39:56 example {"OCCURRENCE":1}
2022-12-06 23:39:56 sentence {"OCCURRENCE":1}
```
# Upstash Kafka with Materialize
Source: https://upstash.com/docs/kafka/integrations/kafkamaterialize
This tutorial shows how to integrate Upstash Kafka with Materialize
[Materialize](https://materialize.com/docs/get-started/) is a PostgreSQL
wire-compatible stream database for low latency applications.
## Upstash Kafka Setup
Create a Kafka cluster using [Upstash Console](https://console.upstash.com) or
[Upstash CLI](https://github.com/upstash/cli) by following
[Getting Started](https://docs.upstash.com/kafka).
Create two topics by following the creating topic
[steps](https://docs.upstash.com/kafka#create-a-topic). Let’s name first topic
`materialize_input`, since we are going to stream from this topic to Materialize
database. Name of the second topic can be `materialize_output`. This one is
going to receive stream from Materialize.
## Materialize Setup
Materialize is `wire-compatible` with PostgreSQL, that’s why it can be used with
most of the SQL clients.
[Sign up](https://materialize.com/register) and complete activation of your
Materialize account first.
Once you completed your activation, you can sign in and enable the region to run
Materialize database. It can provide better performance if you enable the same
region with location of your Upstash Kafka cluster.
Region setup takes a few minutes. During that time, create a new app password
from `Connect` tab for your project. This step will generate a password and
display it just once. You should copy that password to somewhere safe before it
disappears.
To interact with your Materialize database, you need to download one of the
PostgreSQL installers mentioned
[here](https://materialize.com/docs/get-started/quickstart/#before-you-begin).
After installing a PostgreSQL on your machine, open SQL shell, run the command
appeared on Connect tab to connect SQL Shell to Materialize database. You will
need to enter the app password to log in.
Now you are connected to your Materialize!
## Connect Materialize to Upstash Kafka
You first need to save Upstash username and password to Materialize’s secret
management system to be able to connect Materialize to Upstash Kafka.
To do this, run the following command from the psql terminal by replacing
`` and `` with the username and password you
see on your Upstash Kafka cluster:
```sql
CREATE SECRET upstash_username AS '';
CREATE SECRET upstash_password AS '';
```
`CREATE SECRET` command stores a sensitive value with the name assigned to it as
identifier. Once you define name and corresponding value with this command, you
will then be able to use the sensitive value by calling its name.
As the next step, we need to create a connection between Materialize and Upstash
Kafka by running following command from the psql terminal:
```sql
CREATE CONNECTION TO KAFKA (
BROKER '',
SASL MECHANISMS = 'SCRAM-SHA-256',
SASL USERNAME = SECRET upstash_username,
SASL PASSWORD = SECRET upstash_password
);
```
`` is the going to be used as the name of the connection. You
can name it as you wish.
`` is the endpoint of your Kafka. You can copy it from your
Upstash console.
Your connection is now established between Upstash Kafka and Materialize!
## Create Source
Source means streaming from external data source or pipeline to Materialize
database. By creating source, the message you add to the topic is going to be
streamed from Upstash Kafka to Materialize source.
You can create a source from SQL Shell first by running the following command:
```sql
CREATE SOURCE
FROM KAFKA CONNECTION (TOPIC '')
FORMAT BYTES
WITH (SIZE = '3xsmall');
```
In this tutorial, we are going to use connection we established in the previous
section and use “materialized\_input” as source topic.
Once you created source, you can see it:
```sql
materialize=> SHOW SOURCES;
name | type | size
------------------------+-----------+---------
upstash_source | kafka | 3xsmall
upstash_source_progress | subsource |
(2 rows)
```
To test this source, go to your
[Upstash console](https://console.upstash.com/kafka), open `materialize_input`
topic in your Kafka cluster.
Produce a message in this topic.
The message you sent to this topic should be streamed to Materialize source.
Query the Materialize source from SQL Shell by converting it to a readable form
since we defined the source format as “BYTE” while creating the source.
```sql
materialize=> SELECT convert_from(data, 'utf8') as data from upstash_source;
data
-----------------------------
"This is my test sentence."
(1 row)
```
## Create Sink
Sink means streaming from Materialize database to external data stores or
pipelines. By creating a sink, the data you inserted to Materialize table or
source will be streamed to the Upstash Kafka topic.
For testing purposes, let's create a new table. This table will be streamed to
the Upstash Kafka sink topic.
```sql
materialize=> CREATE TABLE mytable (name text, age int);
CREATE TABLE
materialize=> SELECT * FROM mytable;
name | age
-----+-----
(0 rows)
```
Create a sink from SQL Shell by running the following command:
```sql
CREATE SINK
FROM
INTO KAFKA CONNECTION (TOPIC '')
FORMAT JSON
ENVELOPE DEBEZIUM
WITH (SIZE = '3xsmall');
```
We are going to use the connection we created and “materialize\_output” as sink
topic. We can also use the table named “mytable” we have just created.
Once you created sink, you can see it:
```sql
materialize=> SHOW SINKS;
name | type | size
-------------+-------+---------
upstash_sink | kafka | 3xsmall
(1 row)
```
To test this sink, go to your
[Upstash console](https://console.upstash.com/kafka), open the output topic in
your Kafka cluster. Open messages tab to see incoming messages.
Now insert a new row to the table to be streamed:
```sql
materialize=> INSERT INTO mytable VALUES ('Noah', 1);
INSERT 0 1
materialize=> SELECT * FROM mytable;
name | age
-----+-----
Noah | 1
(1 row)
```
You can see this row streamed to the Upstash Kafka output topic on your Upstash
console.
# Upstash Kafka with Apache Pinot
Source: https://upstash.com/docs/kafka/integrations/kafkapinot
This tutorial shows how to integrate Upstash Kafka with Apache Pinot
[Apache Pinot](https://pinot.apache.org/) is a real-time distributed OLAP
(Online Analytical Processing) data store. It aims to make users able to execute
OLAP queries with low latency. It can consume the data from batch data sources
or streaming sources, which can be Upstash Kafka.
## Upstash Kafka Setup
Create a Kafka cluster using
[Upstash Console](https://console.upstash.com/kafka) or
[Upstash CLI](https://github.com/upstash/cli) by following
[Getting Started](https://docs.upstash.com/kafka).
Create one topic by following the creating topic
[steps](https://docs.upstash.com/kafka#create-a-topic). This topic is going to
be source for Apache Pinot table. Let’s name it “transcript” for this example
tutorial.
## Apache Pinot Setup
You need a host to run Apache Pinot. For this quick setup, you can run it on
your local machine.
First, download [Docker](https://www.docker.com/). Running in docker container
is much better option for running Apache Pinot than running it locally.
Once you have docker on your machine, you can follow the steps on
[Getting Started](https://docs.pinot.apache.org/basics/getting-started/running-pinot-in-docker)
run Apache Pinot in docker.
In short, you will need to pull the Apache Pinot image by running following
command.
```
docker pull apachepinot/pinot:latest
```
Create a file named docker-compose.yml with the following content.
```yml
version: "3.7"
services:
pinot-zookeeper:
image: zookeeper:3.5.6
container_name: pinot-zookeeper
ports:
- "2181:2181"
environment:
ZOOKEEPER_CLIENT_PORT: 2181
ZOOKEEPER_TICK_TIME: 2000
pinot-controller:
image: apachepinot/pinot:0.12.0
command: "StartController -zkAddress pinot-zookeeper:2181"
container_name: pinot-controller
restart: unless-stopped
ports:
- "9000:9000"
environment:
JAVA_OPTS: "-Dplugins.dir=/opt/pinot/plugins -Xms1G -Xmx4G -XX:+UseG1GC -XX:MaxGCPauseMillis=200 -Xloggc:gc-pinot-controller.log"
depends_on:
- pinot-zookeeper
pinot-broker:
image: apachepinot/pinot:0.12.0
command: "StartBroker -zkAddress pinot-zookeeper:2181"
restart: unless-stopped
container_name: "pinot-broker"
ports:
- "8099:8099"
environment:
JAVA_OPTS: "-Dplugins.dir=/opt/pinot/plugins -Xms4G -Xmx4G -XX:+UseG1GC -XX:MaxGCPauseMillis=200 -Xloggc:gc-pinot-broker.log"
depends_on:
- pinot-controller
pinot-server:
image: apachepinot/pinot:0.12.0
command: "StartServer -zkAddress pinot-zookeeper:2181"
restart: unless-stopped
container_name: "pinot-server"
ports:
- "8098:8098"
environment:
JAVA_OPTS: "-Dplugins.dir=/opt/pinot/plugins -Xms4G -Xmx16G -XX:+UseG1GC -XX:MaxGCPauseMillis=200 -Xloggc:gc-pinot-server.log"
depends_on:
- pinot-broker
```
Go into the directory from your terminal and run the following command to start
Pinot.
```
docker-compose --project-name pinot-demo up
```
Now, Apache Pinot should be up and running. You can check it by running:
```
docker container ls
```
You should see the output like this:
```
CONTAINER ID IMAGE COMMAND CREATED STATUS PORTS NAMES
ba5cb0868350 apachepinot/pinot:0.9.3 "./bin/pinot-admin.s…" About a minute ago Up About a minute 8096-8099/tcp, 9000/tcp pinot-server
698f160852f9 apachepinot/pinot:0.9.3 "./bin/pinot-admin.s…" About a minute ago Up About a minute 8096-8098/tcp, 9000/tcp, 0.0.0.0:8099->8099/tcp, :::8099->8099/tcp pinot-broker
b1ba8cf60d69 apachepinot/pinot:0.9.3 "./bin/pinot-admin.s…" About a minute ago Up About a minute 8096-8099/tcp, 0.0.0.0:9000->9000/tcp, :::9000->9000/tcp pinot-controller
54e7e114cd53 zookeeper:3.5.6 "/docker-entrypoint.…" About a minute ago Up About a minute 2888/tcp, 3888/tcp, 0.0.0.0:2181->2181/tcp, :::2181->2181/tcp, 8080/tcp pinot-zookeeper
```
Now, you should add table to your Pinot to store the data streamed from Kafka
topic.
You need to open [http://localhost:9000/](http://localhost:9000/) on your
browser.
Click on “Tables” section.
First, click on “Add Schema” and fill it until you see the following JSON as
your schema config.
```json
{
"schemaName": "transcript",
"dimensionFieldSpecs": [
{
"name": "studentID",
"dataType": "INT"
},
{
"name": "firstName",
"dataType": "STRING"
},
{
"name": "lastName",
"dataType": "STRING"
},
{
"name": "gender",
"dataType": "STRING"
},
{
"name": "subject",
"dataType": "STRING"
}
],
"metricFieldSpecs": [
{
"name": "score",
"dataType": "FLOAT"
}
],
"dateTimeFieldSpecs": [
{
"name": "timestamp",
"dataType": "LONG",
"format": "1:MILLISECONDS:EPOCH",
"granularity": "1:MILLISECONDS"
}
]
}
```
Click save and click to “Add Realtime Table” since we will stream the data
real-time.
On this page, table name must be the same name with the schema name, which is
“transcript” in this case.
Then, go below on this page and replace “segmentsConfig” and “tableIndexConfig”
sections in the table config on your browser with the following JSON. Do not
forget to replace UPSTASH-KAFKA-\* placeholders with your cluster information.
```json
{
"segmentsConfig": {
"timeColumnName": "timestampInEpoch",
"timeType": "MILLISECONDS",
"schemaName": "transcript",
"replicasPerPartition": "1",
"replication": "1"
},
"tableIndexConfig": {
"loadMode": "MMAP",
"streamConfigs": {
"streamType": "kafka",
"stream.kafka.consumer.type": "lowlevel",
"stream.kafka.topic.name": "transcript",
"stream.kafka.decoder.class.name": "org.apache.pinot.plugin.stream.kafka.KafkaJSONMessageDecoder",
"stream.kafka.consumer.factory.class.name": "org.apache.pinot.plugin.stream.kafka20.KafkaConsumerFactory",
"stream.kafka.broker.list": "UPSTASH-KAFKA-ENDPOINT:9092",
"security.protocol": "SASL_SSL",
"sasl.jaas.config": "org.apache.kafka.common.security.scram.ScramLoginModule required username=\"UPSTASH-KAFKA-USERNAME\" password=\"UPSTASH-KAFKA-PASSWORD\";",
"sasl.mechanism": "SCRAM-SHA-256",
"realtime.segment.flush.threshold.rows": "0",
"realtime.segment.flush.threshold.time": "24h",
"realtime.segment.flush.threshold.segment.size": "50M",
"stream.kafka.consumer.prop.auto.offset.reset": "smallest"
}
}
}
```
## Test the Setup
Now, let's create some events to our Kafka topic. Go to Upstash console, click
on your cluster then Topics, click “transcript”. Select Messages tab then click
Produce a new message. Send a message in JSON format like the below:
```json
{
"studentID": 205,
"firstName": "Natalie",
"lastName": "Jones",
"gender": "Female",
"subject": "Maths",
"score": 3.8,
"timestampInEpoch": 1571900400000
}
```
Now, go back to your Pinot console on your browser. Navigate to “Query Console”
from the left side bar. When you click on “transcript” table, you will see the
result of the following query automatically.
```sql
select * from transcript limit 10
```
The query result should be as following:
## Links
[Running Pinot in Docker](https://docs.pinot.apache.org/basics/getting-started/running-pinot-in-docker)
[Apache Pinot Stream Ingestion](https://docs.pinot.apache.org/basics/data-import/pinot-stream-ingestion)
# Upstash Kafka with Apache Spark
Source: https://upstash.com/docs/kafka/integrations/kafkaspark
This tutorial shows how to integrate Upstash Kafka with Apache Spark
[Apache Spark](https://spark.apache.org/) is a multi-language engine for
executing data engineering, data science, and machine learning on single-node
machines or clusters.
### Upstash Kafka Setup
Create a Kafka cluster using [Upstash Console](https://console.upstash.com/) or
[Upstash CLI](https://github.com/upstash/cli) by following
[Getting Started](https://docs.upstash.com/kafka).
Create a topic by following the creating topic
[steps](https://docs.upstash.com/kafka#create-a-topic). Let’s name the topic
“sentence”.
### Project Setup
If you already have a project and want to implement Upstash Kafka and Apache
Spark integration into it, you can skip this section and continue with [Add
Spark and Kafka into the Project](#add-spark-and-kafka-into-the-project).
Install Maven to your machine by following [Maven Installation Guide](https://maven.apache.org/guides/getting-started/maven-in-five-minutes.html).
Run `mvn –version` in a terminal or in a command prompt to make sure you have
Maven downloaded.
It should print out the version of the Maven you have:
```
Apache Maven 3.6.3 (cecedd343002696d0abb50b32b541b8a6ba2883f)
Maven home: D:\apache-maven-3.6.3\apache-maven\bin\..
Java version: 1.8.0_232, vendor: AdoptOpenJDK, runtime: C:\Program Files\AdoptOpenJDK\jdk-8.0.232.09-hotspot\jre
Default locale: en_US, platform encoding: Cp1250
OS name: "windows 10", version: "10.0", arch: "amd64", family: "windows"
```
To create the Maven project;
Go into the folder that you want to create the project in your terminal or
command prompt by running `cd `
Run the following command:
```
mvn archetype:generate -DgroupId=com.kafkasparkinteg.app -DartifactId=kafkasparkinteg-app -DarchetypeArtifactId=maven-archetype-quickstart -DarchetypeVersion=1.4 -DinteractiveMode=false
```
### Add Spark and Kafka into the Project
Open the project folder by using an IDE which has maven plugin such as Intellij,
Visual Studio, Eclipse etc. Add following Spark dependencies into the
dependencies tag in `pom.xml` file.
```xml
org.apache.sparkspark-core_2.123.3.1org.apache.sparkspark-streaming_2.123.3.1org.apache.sparkspark-sql_2.123.3.1org.apache.sparkspark-streaming-kafka-0-10_2.123.3.1org.apache.sparkspark-sql-kafka-0-10_2.123.3.1
```
### Using Apache Spark as Producer
Import the following packages first:
```java
import org.apache.spark.api.java.function.FlatMapFunction;
import org.apache.spark.sql.*;
import org.apache.spark.sql.types.DataTypes;
import org.apache.spark.sql.types.StructType;
import java.util.*;
```
To send messages to Kafka from Spark, use the following code after replacing the
`UPSTASH-KAFKA-*` placeholders with your cluster information:
```java
SparkSession spark = SparkSession.builder()
.appName("quickstart")
.config("spark.master", "local")
.getOrCreate();
StructType structType = new StructType();
structType = structType.add("key", DataTypes.StringType, false);
structType = structType.add("value", DataTypes.StringType, false);
List rows = new ArrayList();
rows.add(RowFactory.create("test key", "This is an example sentence"));
Dataset sentenceDF = spark.createDataFrame(rows, structType);
sentenceDF.selectExpr("CAST(key AS STRING)", "CAST(value AS STRING)")
.write()
.format("kafka")
.option("kafka.bootstrap.servers", "UPSTASH-KAFKA-ENDPOINT:9092")
.option("kafka.sasl.mechanism", "SCRAM-SHA-256")
.option("kafka.security.protocol", "SASL_SSL")
.option("kafka.sasl.jaas.config", "org.apache.kafka.common.security.scram.ScramLoginModule required username=\"UPSTASH-KAFKA-USERNAME\" password=\"UPSTASH-KAFKA-PASSWORD\";")
.option("topic", "sentence")
.save();
```
Before running the project, open the messages of the topic from
[console](https://console.upstash.com).
You can observe new message coming to the topic on Upstash console when you run
your project.
### Using Apache Spark as Consumer
If the following packages are not imported, import them first:
```java
import org.apache.spark.api.java.function.FlatMapFunction;
import org.apache.spark.sql.*;
import org.apache.spark.sql.types.DataTypes;
import org.apache.spark.sql.types.StructType;
import java.util.*;
```
To receive the messages from Kafka topic by Apache Spark and to process, use the
following code after replacing the UPSTASH-KAFKA-\* placeholders with your
cluster information:
```java
SparkSession spark = SparkSession.builder()
.appName("quickstart")
.config("spark.master", "local")
.getOrCreate();
Dataset lines = spark
.read()
.format("kafka")
.option("kafka.bootstrap.servers", "UPSTASH-KAFKA-ENDPOINT:9092")
.option("kafka.sasl.mechanism", "SCRAM-SHA-256")
.option("kafka.security.protocol", "SASL_SSL")
.option("kafka.sasl.jaas.config", "org.apache.kafka.common.security.scram.ScramLoginModule required username=\"UPSTASH-KAFKA-USERNAME\" password=\"UPSTASH-KAFKA-PASSWORD\";")
.option("startingOffsets", "earliest")
.option("subscribe", "sentence")
.load()
.selectExpr("CAST(key AS STRING)", "CAST(value AS STRING)");
// PROCESS RECEIVED MESSAGE - Word counting part
Dataset words = lines.select("value")
.as(Encoders.STRING())
.flatMap( new FlatMapFunction() { @Override public Iterator call(String x) { return Arrays.asList(x.split(" ")).iterator(); }
}, Encoders.STRING()); Dataset wordCounts = words.groupBy("value").count(); wordCounts.show();
```
You can verify that you can see the sentence, which you sent, on your console
with number of word occurrences:
```
+--------+-----+
| value|count|
+--------+-----+
| example| 1|
| is| 1|
|sentence| 1|
| an| 1|
| This| 1|
+--------+-----+
```
# Upstash Kafka with StarTree
Source: https://upstash.com/docs/kafka/integrations/kafkastartree
This tutorial shows how to integrate Upstash Kafka with StarTree
[StarTree](https://startree.ai/) provides a fully managed, Apache Pinot based
real-time analytics database on its cloud environment.
## Upstash Kafka Setup
Create a Kafka cluster using [Upstash Console](https://console.upstash.com) or
[Upstash CLI](https://github.com/upstash/cli) by following
[Getting Started](https://docs.upstash.com/kafka).
Create one topic by following the creating topic
[steps](https://docs.upstash.com/kafka#create-a-topic). This topic will be the
source for the Apache Pinot table running on StarTree. Let’s name it
“transcript” for this example tutorial.
## StarTree Setup
To be able to use StarTree cloud, you first need to
[create an account](https://startree.ai/saas-signup).
There are two steps to initialize the cloud environment on StarTree. First, you
need to create an organization. Next, you need to create a workspace under this
new organization.
For these setup steps, you can also follow
[StarTree quickstart](https://dev.startree.ai/docs/startree-enterprise-edition/startree-cloud/getting-started/saas/how-to-guide).
## Connect StarTree Cloud to Upstash Kafka
Once you created your workspace, open Data Manager under the `Services` section
in your workspace. Data Manager is where we will connect Upstash Kafka and work
on the Pinot table.
To connect Upstash Kafka with StarTree, create a new connection in Data Manager.
As the connection type, select Kafka.
In Kafka connection settings, fill the following options:
* Connection Name: It can be anything. It is up to you.
* Broker Url: This should be the endpoint of your Upstash Kafka cluster. You can
find it in the details section in your
[Upstash Kafka cluster](https://console.upstash.com/kafka).
* Authentication Type: `SASL`
* Security Protocol: `SASL_SSL`
* SASL Mechanism: `SCRAM-SHA-256`
* Username: This should be the username given in the details section in your
[Upstash Kafka cluster](https://console.upstash.com/kafka).
* Password: This should be the password given in the details section in your
[Upstash Kafka cluster](https://console.upstash.com/kafka).
To proceed, you need to test the connection first. Once the test connection is
successful, then you can create the connection.
Now you have a connection between Upstash Kafka and StarTree Cloud! The next
step is to create a dataset to store data streamed from Upstash Kafka.
Let’s return to the Data Manager overview page and create a new dataset.
As the connection type, select Kafka again.
Now you can select the Kafka connection you created for connecting Upstash
Kafka.
In the next step, you need to name your dataset, provide the Kafka topic to be
the source of this new dataset and define the data format. We can give
“transcript” as the topic and select JSON as the data format.
To proceed to the next step, we must first produce a message in our Kafka topic.
StarTree doesn’t allow us to go to the next step before it validates the
connection is working, and data is being streamed correctly.
To make StarTree validate our connection, let’s turn back to the Upstash console
and create some events for our Kafka topic. To do this, click on your Kafka
cluster on Upstash console and go to the “Topics” section. Open the source
topic, which is “transcript” in this case. Select the Messages tab, then click
Produce a new message. Send a message in JSON format like the one below:
```json
{
"studentID": 205,
"firstName": "Natalie",
"lastName": "Jones",
"gender": "Female",
"subject": "Maths",
"score": 3.8,
"timestampInEpoch": 1571900400000
}
```
Now go back to the dataset details steps on StarTree Data Manager.
After you click next, StarTree will consume the message in the source Kafka
topic to verify the connection. Once it consumes the message, the message will
be displayed.
In the next step, StarTree extracts the data model from the message you sent.
If there is any additional configuration about the model of the data coming from
the source topic, you can add it here.
To keep things simple, we will click next without changing anything.
The last step is for more configuration of your dataset. We will click next
again and proceed to review. Click “Create Dataset” to finalize the dataset.
## Query Data
Open the dataset you created on StarTree Data Manager and navigate to the query
console.
You will be redirected to Pinot Query Console running on StarTree cloud.
When you run the following SQL Query, you will see the data that came from
Upstash Kafka into your dataset.
```sql
select * from limit 10
```
# Upstash Kafka with Kafka Streams
Source: https://upstash.com/docs/kafka/integrations/kafkastreams
This tutorial shows how to integrate Upstash Kafka with Kafka Streams
[Kafka Streams](https://kafka.apache.org/documentation/streams/) is a client
library, which streams data from one Kafka topic to another.
### Upstash Kafka Setup
Create a Kafka cluster using [Upstash Console](https://console.upstash.com) or
[Upstash CLI](https://github.com/upstash/cli) by following
[Getting Started](https://docs.upstash.com/kafka).
Create two topics by following the creating topic
[steps](https://docs.upstash.com/kafka#create-a-topic). Let’s name first topic
“input”, since we are going to stream this topic to other one, which we can name
it as “output”.
### Project Setup
If you already have a project and want to use Kafka Streams with Upstash Kafka
in it, you can skip this section and continue with [Add Kafka Streams into the
Project](#add-kafka-streams-into-the-project).
Install Maven to your machine by following [Maven Installation Guide](https://maven.apache.org/guides/getting-started/maven-in-five-minutes.html).
Run `mvn –version` in a terminal or in a command prompt to make sure you have
Maven downloaded.
It should print out the version of the Maven you have:
```
Apache Maven 3.6.3 (cecedd343002696d0abb50b32b541b8a6ba2883f)
Maven home: D:\apache-maven-3.6.3\apache-maven\bin\..
Java version: 1.8.0_232, vendor: AdoptOpenJDK, runtime: C:\Program Files\AdoptOpenJDK\jdk-8.0.232.09-hotspot\jre
Default locale: en_US, platform encoding: Cp1250
OS name: "windows 10", version: "10.0", arch: "amd64", family: "windows"
```
To create the Maven project;
Go into the folder that you want to create the project in your terminal or
command prompt by running `cd `
Run the following command:
```
mvn archetype:generate -DgroupId=com.kafkastreamsinteg.app -DartifactId=kafkastreamsinteg-app -DarchetypeArtifactId=maven-archetype-quickstart -DarchetypeVersion=1.4 -DinteractiveMode=false
```
### Add Kafka Streams into the Project
Open the project folder by using an IDE which has maven plugin such as Intellij,
Visual Studio, Eclipse etc. Add following dependencies into the dependencies tag
in `pom.xml` file.
```xml
org.apache.kafkakafka-streams3.3.1org.slf4jslf4j-reload4j2.0.3
```
### Streaming From One Topic to Another Topic
Import the following packages first:
```java
import org.apache.kafka.common.config.SaslConfigs;
import org.apache.kafka.common.config.TopicConfig;
import org.apache.kafka.common.serialization.Serdes;
import org.apache.kafka.common.utils.Bytes;
import org.apache.kafka.streams.KafkaStreams;
import org.apache.kafka.streams.StreamsBuilder;
import org.apache.kafka.streams.StreamsConfig;
import org.apache.kafka.streams.Topology;
import org.apache.kafka.streams.kstream.Grouped;
import org.apache.kafka.streams.kstream.KStream;
import org.apache.kafka.streams.kstream.Materialized;
import org.apache.kafka.streams.kstream.Produced;
import org.apache.kafka.streams.state.KeyValueStore;
import java.util.Arrays;
import java.util.Properties;
import java.util.concurrent.CountDownLatch;
import java.util.regex.Pattern;
```
Define the names of the topics you are going to work on:
```java
String inputTopic = "input";
String outputTopic = "output";
```
Create the following properties for Kafka Streams and replace UPSTASH-KAFKA-\*
placeholders with your cluster information.
```java
final Properties props = new Properties();
props.put(StreamsConfig.BOOTSTRAP_SERVERS_CONFIG, "UPSTASH-KAFKA-ENDPOINT:9092");
props.put(SaslConfigs.SASL_MECHANISM, "SCRAM-SHA-256");
props.put(StreamsConfig.SECURITY_PROTOCOL_CONFIG, "SASL_SSL");
props.put(StreamsConfig.APPLICATION_ID_CONFIG,"myLastNewProject");
props.put(SaslConfigs.SASL_JAAS_CONFIG, "org.apache.kafka.common.security.scram.ScramLoginModule username=\"UPSTASH-KAFKA-USERNAME\" password=\"UPSTASH-KAFKA-PASSWORD\";");
props.put(StreamsConfig.DEFAULT_KEY_SERDE_CLASS_CONFIG, Serdes.String().getClass());
props.put(StreamsConfig.DEFAULT_VALUE_SERDE_CLASS_CONFIG, Serdes.String().getClass());
props.put(StreamsConfig.topicPrefix(TopicConfig.RETENTION_MS_CONFIG), 604800000); // 7 days for internal repartition topic retention period
props.put(StreamsConfig.topicPrefix(TopicConfig.CLEANUP_POLICY_CONFIG), TopicConfig.CLEANUP_POLICY_DELETE); // delete cleanup policy for internal repartition topic
props.put(StreamsConfig.topicPrefix(TopicConfig.RETENTION_BYTES_CONFIG), 268435456); // 256 MB for internal repartition topic retention size
```
Start the builder for streaming and assign input topic as the source:
```java
StreamsBuilder builder = new StreamsBuilder();
KStream source = builder.stream(inputTopic);
```
Apply the following steps to count the words in the sentence sent to input topic
and stream the results to the output topic:
```java
Pattern pattern = Pattern.compile("\\W+", Pattern.UNICODE_CHARACTER_CLASS);
Materialized> materialized = Materialized.as("countMapping");
materialized.withLoggingDisabled();
source.flatMapValues(value -> Arrays.asList(pattern.split(value.toLowerCase())))
.groupBy((key, word) -> word, Grouped.as("groupMapping"))
.count(materialized).toStream().mapValues(Object::toString)
.to(outputTopic, Produced.with(Serdes.String(), Serdes.String()));
```
Since “groupby” function causing repartition and creation of a new internal
topic to store the groups intermediately, be sure that there is enough partition
capacity on your Upstash Kafka. For detailed information about the max partition
capacity of Kafka cluster, check [plans](https://upstash.com/#section-pricing).
Just to be sure, you can check from topic section on
[console](https://console.upstash.com) if the internal repartition topic created
successfully when you run your application and send data to input topic. For
reference, naming convention for internal repartition topics:
```
```
Next, finalize and build the streams builder. Create a topology of your process.
It can be viewed by printing.
```java
final Topology topology = builder.build();
System.out.println(topology.describe());
```
Here is the example topology in this scenario:
```
Topologies:
Sub-topology: 0
Source: KSTREAM-SOURCE-0000000000 (topics: [input])
--> KSTREAM-FLATMAPVALUES-0000000001
Processor: KSTREAM-FLATMAPVALUES-0000000001 (stores: [])
--> groupMapping
<-- KSTREAM-SOURCE-0000000000
Processor: groupMapping (stores: [])
--> groupMapping-repartition-filter
<-- KSTREAM-FLATMAPVALUES-0000000001
Processor: groupMapping-repartition-filter (stores: [])
--> groupMapping-repartition-sink
<-- groupMapping
Sink: groupMapping-repartition-sink (topic: groupMapping-repartition)
<-- groupMapping-repartition-filter
Sub-topology: 1
Source: groupMapping-repartition-source (topics: [groupMapping-repartition])
--> KSTREAM-AGGREGATE-0000000003
Processor: KSTREAM-AGGREGATE-0000000003 (stores: [countMapping])
--> KTABLE-TOSTREAM-0000000007
<-- groupMapping-repartition-source
Processor: KTABLE-TOSTREAM-0000000007 (stores: [])
--> KSTREAM-MAPVALUES-0000000008
<-- KSTREAM-AGGREGATE-0000000003
Processor: KSTREAM-MAPVALUES-0000000008 (stores: [])
--> KSTREAM-SINK-0000000009
<-- KTABLE-TOSTREAM-0000000007
Sink: KSTREAM-SINK-0000000009 (topic: output)
<-- KSTREAM-MAPVALUES-0000000008
```
Finally, start the Kafka Streams that was built and run it.
```java
final KafkaStreams streams = new KafkaStreams(topology, props);
final CountDownLatch latch = new CountDownLatch(1);
try {
streams.start();
System.out.println("streams started");
latch.await();
} catch (final Throwable e) {
System.exit(1);
}
Runtime.getRuntime().addShutdownHook(new Thread("streams-word-count") {
@Override
public void run() {
streams.close();
latch.countDown();
}
});
```
# ksqlDB
Source: https://upstash.com/docs/kafka/integrations/ksqldb
This tutorial shows how to integrate Upstash Kafka with ksqlDB
[ksqlDB](https://www.confluent.io/product/ksqldb) is a SQL interface for
performing stream processing over the Kafka environment.
## Upstash Kafka Setup
Create a Kafka cluster using [Upstash Console](https://console.upstash.com) or
[Upstash CLI](https://github.com/upstash/cli) by following
[Getting Started](https://docs.upstash.com/kafka).
## ksqlDB Setup
Upstash does not have a managed ksqlDB. Therefore, set up ksqlDB on a docker
container and replace UPSTASH-KAFKA-\* placeholders with your cluster
information.
First, download and install [Docker](https://www.docker.com/).
Create a `docker-compose.yml` file as below:
```yml
version: "2"
services:
ksqldb-server:
image: confluentinc/ksqldb-server:0.28.2
hostname: ksqldb-server
container_name: ksqldb-server
ports:
- "8088:8088"
environment:
KSQL_LISTENERS: "http://0.0.0.0:8088"
KSQL_BOOTSTRAP_SERVERS: "UPSTASH_KAFKA_ENDPOINT"
KSQL_SASL_MECHANISM: "SCRAM-SHA-256"
KSQL_SECURITY_PROTOCOL: "SASL_SSL"
KSQL_SASL_JAAS_CONFIG: 'org.apache.kafka.common.security.scram.ScramLoginModule required username="UPSTASH_KAFKA_USERNAME" password="UPSTASH_KAFKA_PASSWORD";'
KSQL_KSQL_LOGGING_PROCESSING_STREAM_AUTO_CREATE: "true"
KSQL_KSQL_LOGGING_PROCESSING_TOPIC_AUTO_CREATE: "true"
ksqldb-cli:
image: confluentinc/ksqldb-cli:0.28.2
container_name: ksqldb-cli
depends_on:
- ksqldb-server
entrypoint: /bin/sh
tty: true
```
Open your CLI, navigate to the folder that includes the docker-compose.yml file
you created and start ksqlDB by running `docker-compose up`.
When you check your Kafka cluster from
[console](https://console.upstash.com/kafka), you will see new topics created
after you start ksqlDB.
## Streaming From One Topic to Another Topic
Implementing a word count example project can be done with both ksqlDB CLI and
Java client. In both ways, it is going to be done by consecutive streams. The
operations of the process will be as
`receive input > split into array > convert to rows > count occurrences`.
### Using ksqlDB CLI
Start the ksqlDB CLI by running the following command:
```
docker exec -it ksqldb-cli ksql http://ksqldb-server:8088
```
Create the first stream, which reads from the "input" topic:
```
ksql> CREATE STREAM source_stream (sentence VARCHAR) WITH (kafka_topic='input', value_format='json', partitions=1);
```
Create the second stream, which reads from source\_stream, splits the string to
an array, and writes to the split\_stream topic.
```
ksql> CREATE STREAM split_stream AS SELECT regexp_split_to_array(sentence, ' ') as word_array FROM source_stream EMIT CHANGES;
```
Next, create the third stream, which reads from split\_stream created above,
converts word\_array to rows, and writes to explode\_stream.
```
ksql> CREATE STREAM explode_stream AS SELECT explode(word_array) as words FROM split_stream EMIT CHANGES;
```
Lastly, create a table, which will count the words’ occurrences and write it to
the "OUTPUT" topic.
```
ksql> CREATE TABLE output AS SELECT words as word, count(words) as occurrence FROM explode_stream GROUP BY words EMIT CHANGES;
```
You can check what you have created so far by running the following commands on
ksqlDB CLI.
```
ksql> show tables;
Table Name | Kafka Topic | Key Format | Value Format | Windowed
--------------------------------------------------------------------
OUTPUT | OUTPUT | KAFKA | JSON | false
--------------------------------------------------------------------
ksql> show streams;
Stream Name | Kafka Topic | Key Format | Value Format | Windowed
------------------------------------------------------------------------------------------
EXPLODE_STREAM | EXPLODE_STREAM | KAFKA | JSON | false
KSQL_PROCESSING_LOG | default_ksql_processing_log | KAFKA | JSON | false
SOURCE_STREAM | input | KAFKA | JSON | false
SPLIT_STREAM | SPLIT_STREAM | KAFKA | JSON | false
------------------------------------------------------------------------------------------
```
### Using Java Client
#### Project Setup
> :pushpin: **Note** If you already have a project and want to implement Upstash
> Kafka and ksqlDB integration into it, you can skip this section and continue
> with
> [Add Ksqldb and Kafka into the Project](#add-ksqldb-and-kafka-into-the-project).
Install Maven to your machine by following
[Maven Installation Guide](https://maven.apache.org/guides/getting-started/maven-in-five-minutes.html)
Run `mvn –version` in a terminal or a command prompt to make sure you have Maven
downloaded.
It should print out the version of the Maven you have:
```
Apache Maven 3.6.3 (cecedd343002696d0abb50b32b541b8a6ba2883f)
Maven home: D:\apache-maven-3.6.3\apache-maven\bin\..
Java version: 1.8.0_232, vendor: AdoptOpenJDK, runtime: C:\Program Files\AdoptOpenJDK\jdk-8.0.232.09-hotspot\jre
Default locale: en_US, platform encoding: Cp1250
OS name: "windows 10", version: "10.0", arch: "amd64", family: "windows"
```
To create the Maven project;
Go into the folder that you want to create the project in your terminal or
command prompt by running `cd `
Run the following command:
```
mvn archetype:generate -DgroupId=com.kafkaksqldbinteg.app -DartifactId=kafkaksqldbinteg-app -DarchetypeArtifactId=maven-archetype-quickstart -DarchetypeVersion=1.4 -DinteractiveMode=false
```
#### Add ksqlDB and Kafka into the Project
Open the project folder using an IDE with maven plugins such as Intellij, Visual
Studio, Eclipse, etc. Add ksqlDB into the `pom.xml` file.
```xml
confluentconfluent-repohttp://packages.confluent.io/maven/io.confluent.ksqlksqldb-api-client7.3.0
```
#### Streaming
Import the following packages.
```java
import io.confluent.ksql.api.client.Client;
import io.confluent.ksql.api.client.ClientOptions;
import io.confluent.ksql.api.client.ExecuteStatementResult;
import java.util.concurrent.CompletableFuture;
```
Create a ksqlDB client first.
```java
String KSQLDB_SERVER_HOST = "localhost";
int KSQLDB_SERVER_HOST_PORT = 8088;
ClientOptions options = ClientOptions.create()
.setHost(KSQLDB_SERVER_HOST)
.setPort(KSQLDB_SERVER_HOST_PORT);
Client client = Client.create(options);
```
Create the first stream, which reads from "input" topic:
```java
String SOURCE_STREAM = "CREATE STREAM IF NOT EXISTS source_stream (sentence VARCHAR)" +
" WITH (kafka_topic='input', value_format='json', partitions=1);";
CompletableFuture result =
client.executeStatement(SOURCE_STREAM);
System.out.println(result);
```
Create the second stream, which reads from source\_stream, split the string to an
array, and writes to the split\_stream topic.
```java
String SPLIT_STREAM = "CREATE STREAM IF NOT EXISTS split_stream " +
"AS SELECT regexp_split_to_array(sentence, ' ') " +
"as word_array FROM source_stream EMIT CHANGES;";
CompletableFuture result1 =
client.executeStatement(SPLIT_STREAM);System.out.println(result1);
```
Next, create the third stream, which reads from split\_stream created above,
converts word\_array to rows, and writes to explode\_stream.
```java
String EXPLODE_STREAM = "CREATE STREAM IF NOT EXISTS explode_stream " +
"AS SELECT explode(word_array) " +
"as words FROM split_stream EMIT CHANGES;";
CompletableFuture result2 =
client.executeStatement(EXPLODE_STREAM);System.out.println(result2);
```
Lastly, create a table, which will count the words’ occurrences and write it to
the "OUTPUT" topic.
```java
String OUTPUT_TABLE = "CREATE TABLE output " +
"AS SELECT words as word, count(words) " +
"as occurrence FROM explode_stream GROUP BY words EMIT CHANGES;";
CompletableFuture result3 =
client.executeStatement(OUTPUT_TABLE);System.out.println(result3);
```
## Results
The word count stream we created above is taking input sentences in JSON format
from the "input" topic and sends word count results to the "OUTPUT" topic.
You can both send input and observe the output on
[console](https://console.upstash.com/kafka).
Send the input sentence to the "input" topic. The key can be a random string,
but since we defined "sentence" as a field while creating the `source_stream`,
the value must be a JSON that includes “sentence” as a key for this use case:
```json
{
“sentence”: “This is an example sentence”
}
```
Once you send this message to "input" topic, you can observe the result at
"OUTPUT" topic as following:
```
Timestamp Key Value
2022-12-06 23:39:56 This {"OCCURRENCE":1}
2022-12-06 23:39:56 is {"OCCURRENCE":1}
2022-12-06 23:39:56 an {"OCCURRENCE":1}
2022-12-06 23:39:56 example {"OCCURRENCE":1}
2022-12-06 23:39:56 sentence {"OCCURRENCE":1}
```
# Materialize
Source: https://upstash.com/docs/kafka/integrations/materialize
This tutorial shows how to integrate Upstash Kafka with Materialize
[Materialize](https://materialize.com/docs/get-started/) is a PostgreSQL
wire-compatible stream database for low latency applications.
## Upstash Kafka Setup
Create a Kafka cluster using [Upstash Console](https://console.upstash.com) or
[Upstash CLI](https://github.com/upstash/cli) by following
[Getting Started](https://docs.upstash.com/kafka).
Create two topics by following the creating topic
[steps](https://docs.upstash.com/kafka#create-a-topic). Let’s name first topic
`materialize_input`, since we are going to stream from this topic to Materialize
database. Name of the second topic can be `materialize_output`. This one is
going to receive stream from Materialize.
## Materialize Setup
Materialize is `wire-compatible` with PostgreSQL, that’s why it can be used with
most of the SQL clients.
[Sign up](https://materialize.com/register) and complete activation of your
Materialize account first.
Once you completed your activation, you can sign in and enable the region to run
Materialize database. It can provide better performance if you enable the same
region with location of your Upstash Kafka cluster.
Region setup takes a few minutes. During that time, create a new app password
from `Connect` tab for your project. This step will generate a password and
display it just once. You should copy that password to somewhere safe before it
disappears.
To interact with your Materialize database, you need to download one of the
PostgreSQL installers mentioned
[here](https://materialize.com/docs/get-started/quickstart/#before-you-begin).
After installing a PostgreSQL on your machine, open SQL shell, run the command
appeared on Connect tab to connect SQL Shell to Materialize database. You will
need to enter the app password to log in.
Now you are connected to your Materialize!
## Connect Materialize to Upstash Kafka
You first need to save Upstash username and password to Materialize’s secret
management system to be able to connect Materialize to Upstash Kafka.
To do this, run the following command from the psql terminal by replacing
`` and `` with the username and password you
see on your Upstash Kafka cluster:
```sql
CREATE SECRET upstash_username AS '';
CREATE SECRET upstash_password AS '';
```
`CREATE SECRET` command stores a sensitive value with the name assigned to it as
identifier. Once you define name and corresponding value with this command, you
will then be able to use the sensitive value by calling its name.
As the next step, we need to create a connection between Materialize and Upstash
Kafka by running following command from the psql terminal:
```sql
CREATE CONNECTION TO KAFKA (
BROKER '',
SASL MECHANISMS = 'SCRAM-SHA-256',
SASL USERNAME = SECRET upstash_username,
SASL PASSWORD = SECRET upstash_password
);
```
`` is the going to be used as the name of the connection. You
can name it as you wish.
`` is the endpoint of your Kafka. You can copy it from your
Upstash console.
Your connection is now established between Upstash Kafka and Materialize!
## Create Source
Source means streaming from external data source or pipeline to Materialize
database. By creating source, the message you add to the topic is going to be
streamed from Upstash Kafka to Materialize source.
You can create a source from SQL Shell first by running the following command:
```sql
CREATE SOURCE
FROM KAFKA CONNECTION (TOPIC '')
FORMAT BYTES
WITH (SIZE = '3xsmall');
```
In this tutorial, we are going to use connection we established in the previous
section and use “materialized\_input” as source topic.
Once you created source, you can see it:
```sql
materialize=> SHOW SOURCES;
name | type | size
------------------------+-----------+---------
upstash_source | kafka | 3xsmall
upstash_source_progress | subsource |
(2 rows)
```
To test this source, go to your
[Upstash console](https://console.upstash.com/kafka), open `materialize_input`
topic in your Kafka cluster.
Produce a message in this topic.
The message you sent to this topic should be streamed to Materialize source.
Query the Materialize source from SQL Shell by converting it to a readable form
since we defined the source format as “BYTE” while creating the source.
```sql
materialize=> SELECT convert_from(data, 'utf8') as data from upstash_source;
data
-----------------------------
"This is my test sentence."
(1 row)
```
## Create Sink
Sink means streaming from Materialize database to external data stores or
pipelines. By creating a sink, the data you inserted to Materialize table or
source will be streamed to the Upstash Kafka topic.
For testing purposes, let's create a new table. This table will be streamed to
the Upstash Kafka sink topic.
```sql
materialize=> CREATE TABLE mytable (name text, age int);
CREATE TABLE
materialize=> SELECT * FROM mytable;
name | age
-----+-----
(0 rows)
```
Create a sink from SQL Shell by running the following command:
```sql
CREATE SINK
FROM
INTO KAFKA CONNECTION (TOPIC '')
FORMAT JSON
ENVELOPE DEBEZIUM
WITH (SIZE = '3xsmall');
```
We are going to use the connection we created and “materialize\_output” as sink
topic. We can also use the table named “mytable” we have just created.
Once you created sink, you can see it:
```sql
materialize=> SHOW SINKS;
name | type | size
-------------+-------+---------
upstash_sink | kafka | 3xsmall
(1 row)
```
To test this sink, go to your
[Upstash console](https://console.upstash.com/kafka), open the output topic in
your Kafka cluster. Open messages tab to see incoming messages.
Now insert a new row to the table to be streamed:
```sql
materialize=> INSERT INTO mytable VALUES ('Noah', 1);
INSERT 0 1
materialize=> SELECT * FROM mytable;
name | age
-----+-----
Noah | 1
(1 row)
```
You can see this row streamed to the Upstash Kafka output topic on your Upstash
console.
# Apache Pinot
Source: https://upstash.com/docs/kafka/integrations/pinot
This tutorial shows how to integrate Upstash Kafka with Apache Pinot
[Apache Pinot](https://pinot.apache.org/) is a real-time distributed OLAP
(Online Analytical Processing) data store. It aims to make users able to execute
OLAP queries with low latency. It can consume the data from batch data sources
or streaming sources, which can be Upstash Kafka.
## Upstash Kafka Setup
Create a Kafka cluster using
[Upstash Console](https://console.upstash.com/kafka) or
[Upstash CLI](https://github.com/upstash/cli) by following
[Getting Started](https://docs.upstash.com/kafka).
Create one topic by following the creating topic
[steps](https://docs.upstash.com/kafka#create-a-topic). This topic is going to
be source for Apache Pinot table. Let’s name it “transcript” for this example
tutorial.
## Apache Pinot Setup
You need a host to run Apache Pinot. For this quick setup, you can run it on
your local machine.
First, download [Docker](https://www.docker.com/). Running in docker container
is much better option for running Apache Pinot than running it locally.
Once you have docker on your machine, you can follow the steps on
[Getting Started](https://docs.pinot.apache.org/basics/getting-started/running-pinot-in-docker)
run Apache Pinot in docker.
In short, you will need to pull the Apache Pinot image by running following
command.
```
docker pull apachepinot/pinot:latest
```
Create a file named docker-compose.yml with the following content.
```yml
version: "3.7"
services:
pinot-zookeeper:
image: zookeeper:3.5.6
container_name: pinot-zookeeper
ports:
- "2181:2181"
environment:
ZOOKEEPER_CLIENT_PORT: 2181
ZOOKEEPER_TICK_TIME: 2000
pinot-controller:
image: apachepinot/pinot:0.12.0
command: "StartController -zkAddress pinot-zookeeper:2181"
container_name: pinot-controller
restart: unless-stopped
ports:
- "9000:9000"
environment:
JAVA_OPTS: "-Dplugins.dir=/opt/pinot/plugins -Xms1G -Xmx4G -XX:+UseG1GC -XX:MaxGCPauseMillis=200 -Xloggc:gc-pinot-controller.log"
depends_on:
- pinot-zookeeper
pinot-broker:
image: apachepinot/pinot:0.12.0
command: "StartBroker -zkAddress pinot-zookeeper:2181"
restart: unless-stopped
container_name: "pinot-broker"
ports:
- "8099:8099"
environment:
JAVA_OPTS: "-Dplugins.dir=/opt/pinot/plugins -Xms4G -Xmx4G -XX:+UseG1GC -XX:MaxGCPauseMillis=200 -Xloggc:gc-pinot-broker.log"
depends_on:
- pinot-controller
pinot-server:
image: apachepinot/pinot:0.12.0
command: "StartServer -zkAddress pinot-zookeeper:2181"
restart: unless-stopped
container_name: "pinot-server"
ports:
- "8098:8098"
environment:
JAVA_OPTS: "-Dplugins.dir=/opt/pinot/plugins -Xms4G -Xmx16G -XX:+UseG1GC -XX:MaxGCPauseMillis=200 -Xloggc:gc-pinot-server.log"
depends_on:
- pinot-broker
```
Go into the directory from your terminal and run the following command to start
Pinot.
```
docker-compose --project-name pinot-demo up
```
Now, Apache Pinot should be up and running. You can check it by running:
```
docker container ls
```
You should see the output like this:
```
CONTAINER ID IMAGE COMMAND CREATED STATUS PORTS NAMES
ba5cb0868350 apachepinot/pinot:0.9.3 "./bin/pinot-admin.s…" About a minute ago Up About a minute 8096-8099/tcp, 9000/tcp pinot-server
698f160852f9 apachepinot/pinot:0.9.3 "./bin/pinot-admin.s…" About a minute ago Up About a minute 8096-8098/tcp, 9000/tcp, 0.0.0.0:8099->8099/tcp, :::8099->8099/tcp pinot-broker
b1ba8cf60d69 apachepinot/pinot:0.9.3 "./bin/pinot-admin.s…" About a minute ago Up About a minute 8096-8099/tcp, 0.0.0.0:9000->9000/tcp, :::9000->9000/tcp pinot-controller
54e7e114cd53 zookeeper:3.5.6 "/docker-entrypoint.…" About a minute ago Up About a minute 2888/tcp, 3888/tcp, 0.0.0.0:2181->2181/tcp, :::2181->2181/tcp, 8080/tcp pinot-zookeeper
```
Now, you should add table to your Pinot to store the data streamed from Kafka
topic.
You need to open [http://localhost:9000/](http://localhost:9000/) on your
browser.
Click on “Tables” section.
First, click on “Add Schema” and fill it until you see the following JSON as
your schema config.
```json
{
"schemaName": "transcript",
"dimensionFieldSpecs": [
{
"name": "studentID",
"dataType": "INT"
},
{
"name": "firstName",
"dataType": "STRING"
},
{
"name": "lastName",
"dataType": "STRING"
},
{
"name": "gender",
"dataType": "STRING"
},
{
"name": "subject",
"dataType": "STRING"
}
],
"metricFieldSpecs": [
{
"name": "score",
"dataType": "FLOAT"
}
],
"dateTimeFieldSpecs": [
{
"name": "timestamp",
"dataType": "LONG",
"format": "1:MILLISECONDS:EPOCH",
"granularity": "1:MILLISECONDS"
}
]
}
```
Click save and click to “Add Realtime Table” since we will stream the data
real-time.
On this page, table name must be the same name with the schema name, which is
“transcript” in this case.
Then, go below on this page and replace “segmentsConfig” and “tableIndexConfig”
sections in the table config on your browser with the following JSON. Do not
forget to replace UPSTASH-KAFKA-\* placeholders with your cluster information.
```json
{
"segmentsConfig": {
"timeColumnName": "timestampInEpoch",
"timeType": "MILLISECONDS",
"schemaName": "transcript",
"replicasPerPartition": "1",
"replication": "1"
},
"tableIndexConfig": {
"loadMode": "MMAP",
"streamConfigs": {
"streamType": "kafka",
"stream.kafka.consumer.type": "lowlevel",
"stream.kafka.topic.name": "transcript",
"stream.kafka.decoder.class.name": "org.apache.pinot.plugin.stream.kafka.KafkaJSONMessageDecoder",
"stream.kafka.consumer.factory.class.name": "org.apache.pinot.plugin.stream.kafka20.KafkaConsumerFactory",
"stream.kafka.broker.list": "UPSTASH-KAFKA-ENDPOINT:9092",
"security.protocol": "SASL_SSL",
"sasl.jaas.config": "org.apache.kafka.common.security.scram.ScramLoginModule required username=\"UPSTASH-KAFKA-USERNAME\" password=\"UPSTASH-KAFKA-PASSWORD\";",
"sasl.mechanism": "SCRAM-SHA-256",
"realtime.segment.flush.threshold.rows": "0",
"realtime.segment.flush.threshold.time": "24h",
"realtime.segment.flush.threshold.segment.size": "50M",
"stream.kafka.consumer.prop.auto.offset.reset": "smallest"
}
}
}
```
## Test the Setup
Now, let's create some events to our Kafka topic. Go to Upstash console, click
on your cluster then Topics, click “transcript”. Select Messages tab then click
Produce a new message. Send a message in JSON format like the below:
```json
{
"studentID": 205,
"firstName": "Natalie",
"lastName": "Jones",
"gender": "Female",
"subject": "Maths",
"score": 3.8,
"timestampInEpoch": 1571900400000
}
```
Now, go back to your Pinot console on your browser. Navigate to “Query Console”
from the left side bar. When you click on “transcript” table, you will see the
result of the following query automatically.
```sql
select * from transcript limit 10
```
The query result should be as following:
## Links
[Running Pinot in Docker](https://docs.pinot.apache.org/basics/getting-started/running-pinot-in-docker)
[Apache Pinot Stream Ingestion](https://docs.pinot.apache.org/basics/data-import/pinot-stream-ingestion)
# Proton
Source: https://upstash.com/docs/kafka/integrations/proton
This tutorial shows how to integrate Upstash Kafka with Proton
[Proton](https://github.com/timeplus-io/proton) is a unified streaming SQL processing engine which can connect to historical data processing in one single binary. It helps data engineers and platform engineers solve complex real-time analytics use cases, and powers the [Timeplus](https://timeplus.com) streaming analytics platform.
Both Timeplus and Proton can be integrated with Upstash Kafka. Timeplus provides intuitive web UI to minimize the SQL typing and clicks. Proton provides SQL interface to read/write data for Upstash.
## Upstash Kafka Setup
Create a Kafka cluster using [Upstash Console](https://console.upstash.com) or [Upstash CLI](https://github.com/upstash/cli) by following [Getting Started](https://docs.upstash.com/kafka).
Create two topics by following the creating topic [steps](https://docs.upstash.com/kafka#create-a-topic). Let’s name the first topic `input`, since we are going to stream from this topic to Proton. The name of the second topic can be `output`. This one is going to receive the stream from Proton.
## Setup Proton
Proton is a single binary for Linux/Mac, also available as a Docker image. You can download/install it via various options:
* ghcr.io/timeplus-io/proton:latest
* brew tap timeplus-io/timeplus; brew install proton
* curl -sSf [https://raw.githubusercontent.com/timeplus-io/proton/develop/install.sh](https://raw.githubusercontent.com/timeplus-io/proton/develop/install.sh) | sh
* or download the binary for Linux/Mac via [https://github.com/timeplus-io/proton/releases/tag/v1.3.31](https://github.com/timeplus-io/proton/releases/tag/v1.3.31)
With Docker engine installed on your local machine, pull and run the latest version of the Proton Docker image.
```shell
docker run -d --pull always --name proton ghcr.io/timeplus-io/proton:latest
```
Connect to your proton container and run the proton-client tool to connect to the local Proton server:
```shell
docker exec -it proton proton-client -n
```
## Create an External Stream to read Kafka data
[External Stream](https://docs.timeplus.com/proton-kafka#connect-upstash) is the key way for Proton to connect to Kafka cluster and read/write data.
```sql
CREATE EXTERNAL STREAM input(
requestedUrl string,
method string,
ipAddress string,
requestDuration int)
SETTINGS type='kafka',
brokers='grizzly-1234-us1-kafka.upstash.io:9092',
topic='input',
data_format='JSONEachRow',
security_protocol='SASL_SSL',
sasl_mechanism='SCRAM-SHA-256',
username='..',
password='..'
```
## Run Streaming SQL
Then you can run the following streaming SQL:
```sql
select * from input where _tp_time>earliest_ts()
```
Let's go to Upstash UI and post a JSON message in `input` topic:
```json
{
"requestedUrl": "http://www.internationalinteractive.name/end-to-end",
"method": "PUT",
"ipAddress": "186.58.241.7",
"requestDuration": 678
}
```
Right after the message is posted, you should be able to see it in the Proton query result.
## Apply Streaming ETL and Write Data to Upstash Kafka
Cancel the previous streaming SQL and use the following one to mask the IP addresses.
```sql
select now64() AS time, requestedUrl,method,lower(hex(md5(ipAddress))) AS ip
from input where _tp_time > earliest_ts()
```
You will see results as below:
```
┌────────────────────time─┬─requestedUrl────────────────────────────────────────┬─method─┬─ip───────────────────────────────┐
│ 2024-01-10 03:43:16.997 │ http://www.internationalinteractive.name/end-to-end │ PUT │ d5b267be9018abbe87c1357723f2520c │
│ 2024-01-10 03:43:16.997 │ http://www.internationalinteractive.name/end-to-end │ PUT │ d5b267be9018abbe87c1357723f2520c │
└─────────────────────────┴─────────────────────────────────────────────────────┴────────┴──────────────────────────────────┘
```
To write the data back to Kafka, you need to create a new external stream (with `output` as topic name) and use a Materialized View as the background job to write data continuously to the output stream.
```sql
CREATE EXTERNAL STREAM target(
_tp_time datetime64(3),
time datetime64(3),
requestedUrl string,
method string,
ip string)
SETTINGS type='kafka',
brokers='grizzly-1234-us1-kafka.upstash.io:9092',
topic='output',
data_format='JSONEachRow',
security_protocol='SASL_SSL',
sasl_mechanism='SCRAM-SHA-256',
username='..',
password='..';
-- setup the ETL pipeline via a materialized view
CREATE MATERIALIZED VIEW mv INTO target AS
SELECT now64() AS _tp_time, now64() AS time, requestedUrl, method, lower(hex(md5(ipAddress))) AS ip FROM input;
```
Go back to the Upstash UI. Create a few more messages in `input` topic and you should get them available in `output` topic with raw IP addresses masked.
Congratulations! You just setup a streaming ETL with Proton, without any JVM components. Check out [https://github.com/timeplus-io/proton](https://github.com/timeplus-io/proton) for more details or join [https://timeplus.com/slack](https://timeplus.com/slack)
# Upstash Kafka with Quix
Source: https://upstash.com/docs/kafka/integrations/quix
This tutorial shows how to integrate Upstash Kafka with Quix
[Quix](https://quix.io?utm_source=upstash) is a complete platform for developing, deploying, and monitoring stream processing pipelines. You use the Quix Streams Python library to develop modular stream processing applications, and deploy them to containers managed in Quix with a single click. You can develop and manage applications on the command line or manage them in Quix Cloud and visualize them as a end-to-end pipeline.
## Upstash Kafka Setup
Create a Kafka cluster using
[Upstash Console](https://console.upstash.com/kafka) or
[Upstash CLI](https://github.com/upstash/cli) by following
[Getting Started](https://docs.upstash.com/kafka).
## Quix Setup
Like Upstash, Quix is a managed service—this means that you don't need to provision any servers or compute resources. You can [register for a free trial account](https://portal.platform.quix.io/self-sign-up/) and started in minutes.
# Configure the broker settings
When you [create your first project](https://quix.io/docs/create/create-project.html) in Quix, you'll be asked to configure a message broker. You have the option to configure an external broker (instead the default Quix managed broker).
To use Upstash as your message broker, select the Upstash option and configure the settings shown in the following screenshot:
## Create your first pipeline
To help you get started, the Quix platform includes several pipeline templates that you can deploy in a few clicks.
To test the Upstash connection, you can use the ["Hello Quix" template](https://quix.io/templates/hello-quix) which is a simple three-step pipeline:
* Click [**Clone this project** ](https://portal.platform.quix.io/signup?projectName=Hello%20Quix\&httpsUrl=https://github.com/quixio/template-hello-quix\&branchName=tutorial).
* On the **Import Project** screen, select **Quix advanced configuration** (this option ensures that you'll get the option to configure own broker settings).
* Follow the project creation wizard and configure your Upstash connection details when prompted.
* Click **Sync your pipeline**
## Test the Setup
In the Quix portal, wait for the services to deploy and show up as "Running".
Check that the required topics ("*csv-data*" and "*counted-names*") show up in both Quix and Upstash. In Upstash, topics that originate from Quix show up with the Quix workspace and project name as a prefix (e.g. "*quixdemo-helloquix-csv-data*").
## Links
[Quix documentation](https://quix.io/docs/get-started/welcome.html)
[Quix guide to creating projects](https://quix.io/blog/how-to-create-a-project-from-a-template#cloning-a-project-template-into-github)
[Quix portal](https://portal.platform.quix.io/workspaces)
[Upstash console](https://console.upstash.com/kafka)
# RisingWave
Source: https://upstash.com/docs/kafka/integrations/risingwave
This tutorial shows how to integrate Upstash Kafka with RisingWave
[RisingWave](https://risingwave.com) is a distributed SQL streaming database that enables simple, efficient, and reliable processing of streaming data.
## Upstash Kafka Setup
Create a Kafka cluster using [Upstash Console](https://console.upstash.com) or [Upstash CLI](https://github.com/upstash/cli) by following [Getting Started](https://docs.upstash.com/kafka).
Create two topics by following the creating topic [steps](https://docs.upstash.com/kafka#create-a-topic). Let’s name the first topic `risingwave_input`, since we are going to stream from this topic to RisingWave. The name of the second topic can be `risingwave_output`. This one is going to receive the stream from RisingWave.
## RisingWave Setup
RisingWave provides RisingWave Cloud, a fully managed and scalable stream processing platform.
To use the RisingWave Cloud, [create an account](https://cloud.risingwave.com/auth/signup) first.
After creating the account, navigate to the `Clusters` in the right bar. Click on `Create Cluster` and select your plan and cluster configuration.
Creation of the cluster takes a few minutes.
Once the cluster is created, open it and navigate to the `Query` page.
You need to create a user to log in to the cluster on Cloud first. The user will be a superuser by default.
Now, you have the required RisingWave setup to connect to the Upstash Kafka.
## Create Source
Source means streaming from an external database or pipeline to the RisingWave.
By creating a new source on RisingWave Cloud, the message you add to the Upstash Kafka topic is going to be streamed to the RisingWave database.
Create a source from [RisingWave Cloud console](https://cloud.risingwave.com/console) by running the following command:
```sql
CREATE SOURCE (
name VARCHAR,
city VARCHAR,
)
WITH(
connector = 'kafka',
topic = 'risingwave_input',
properties.bootstrap.server = '',
scan.startup.mode = 'latest',
properties.sasl.mechanism = 'SCRAM-SHA-512',
properties.security.protocol = 'SASL_SSL',
properties.sasl.username = '',
properties.sasl.password = ''
) FORMAT PLAIN ENCODE JSON;
```
You should replace the `UPSTASH-KAFKA-*` placeholders with the credentials from Upstash Kafka console.
This query will create a source on RisingWave. The source can be seen on the left in the console.
You can also see it in the [Sources](https://cloud.risingwave.com/source/) tab.
To test, go to your [Upstash console](https://console.upstash.com/kafka) and open the `risingwave_input` topic in your Kafka cluster.
Produce a message in this topic in a JSON format. The message should include the fields we defined in the source creation query.
```json
{
"name": "Noah",
"city": "London"
}
```
After producing the message, go back to the RisingWave console and run the following query to see the streamed data.
```sql
SELECT * FROM ;
```
## Create Sink
Sink means streaming from RisingWave database to the external data stores or pipelines.
By creating a sink, the data you inserted into the RisingWave table or the data streamed through the source will be streamed to the Upstash Kafka topic.
For testing purposes, let’s create a new table by running the following query. This table will be streamed to the Upstash Kafka sink topic.
```sql
CREATE TABLE (name VARCHAR, city VARCHAR);
```
Create a sink from [RisingWave Cloud console](https://cloud.risingwave.com/console) by running the following command:
```sql
CREATE SINK FROM
WITH (
connector = 'kafka',
properties.bootstrap.server = '',
properties.sasl.mechanism = 'SCRAM-SHA-512',
properties.security.protocol = 'SASL_SSL',
properties.sasl.username = '',
properties.sasl.password = '',
topic = 'risingwave_output',
properties.message.max.bytes = 2000
)
FORMAT PLAIN ENCODE JSON (
force_append_only = 'true'
);
```
You should replace the `UPSTASH-KAFKA-*` placeholders with the credentials from Upstash Kafka console.
To test this sink, go to your [Upstash console](https://console.upstash.com/kafka), open the `risingwave_output` topic in your Kafka cluster. Open the messages tab to see incoming messages.
Now insert a new row to the table to be streamed:
```sql
INSERT INTO VALUES ('Noah', 'Manchester');
```
You can see this row streamed to the Upstash Kafka output topic on your Upstash console.
# Rockset
Source: https://upstash.com/docs/kafka/integrations/rockset
This tutorial shows how to integrate Upstash Kafka with Rockset
[Rockset](https://rockset.com) is a real-time search and analytics database designed to serve millisecond-latency analytical queries on event streams, CDC streams, and vectors.
## Upstash Kafka Setup
Create a Kafka cluster using [Upstash Console](https://console.upstash.com) or [Upstash CLI](https://github.com/upstash/cli) by following [Getting Started](https://docs.upstash.com/kafka).
Create one topic by following the creating topic [steps](https://docs.upstash.com/kafka#create-a-topic). This topic will be the source for the Rockset. Let’s name it “transcript” for this example tutorial.
## Rockset Setup
To be able to use the Rockset, you first need to [create an account](https://rockset.com/create).
There are a couple of steps to create your organisation. After completing them, you can see your [Rockset dashboard](https://console.rockset.com) is created.
## Connect Rockset to Upstash Kafka
To ingest data from Upstash Kafka to Rockset, open [Integrations](https://console.rockset.com/integrations) and click to `Create your first Integration`.
Select `Kafka` as the external service and click `Start`. In the next step, name your integration and select Apache Kafka. In the data format section, select the data format and give the name of the topic you created.
When you continue, you will see 5 new steps to create and configure the Kafka Connector for Rockset. Kafka – Rockset connection can be established using the plugin Rockset provided only. Therefore, we have to create self-managed Kafka connector.
Since this tutorial explains the first connection, select `New — no pre-existing Kafka Connect cluster`.
To create the required Kafka connector, you must first download [Apache Kafka Connect](https://kafka.apache.org/downloads).
In the next step, you can give the endpoint of the Kafka Cluster as the `Address of Apache Kafka Broker` and then download the provided Kafka Connect properties.
The `connect-standalone.properties` file should be located in the same folder as Kafka.
Open `connect-standalone.properties` and add the following properties.
```properties
consumer.sasl.mechanism=SCRAM-SHA-256
consumer.security.protocol=SASL_SSL
consumer.sasl.jaas.config=org.apache.kafka.common.security.scram.ScramLoginModule required \
username="" \
password="";
sasl.mechanism=SCRAM-SHA-256
security.protocol=SASL_SSL
sasl.jaas.config=org.apache.kafka.common.security.scram.ScramLoginModule required \
username="" \
password="";
```
These additional properties will allow your Kafka connector access to your Kafka cluster and consume the topics.
In the next step, download the `Rockset Sink Connector` and `Rockset Sink Connector Properties`. Locate these files in the same folder with Kafka as well.
Now, navigate to the folder that contains all these files and execute the following command to run a standalone Apache Kafka Connect with Rockset Sink Connector.
```bash
./kafka_2.13-3.6.1/bin/connect-standalone.sh ./connect-standalone.properties ./connect-rockset-sink.properties
```
Before completing the integration, we can check if the data is coming to the Rockset. Let’s return to the Upstash console, click on your Kafka cluster and go to the “Topics” section. Open the source topic, which is `transcript` in this case. Select the Messages tab, then click Produce a new message. Send a message in JSON format like the one below:
```json
{
"studentID": 205,
"firstName": "Natalie",
"lastName": "Jones",
"gender": "Female",
"subject": "Maths",
"score": 3.8
}
```
You should see the integration `Active`.
## Query Data
When you complete the integration setup, click `Create Collection from Integration`. This will allow you to collect the data from the Uptash Kafka topic and query that data.
Type your Kafka topic in the data source selection step.
We can leave the Ingest Transformation Query as it is in the `Transform Data` step.
Lastly, name the collection and create.
Now, select `Query This Collection`. Go back to the Upstash console and produce a new message in the source topic.
```json
{
"studentID": 201,
"firstName": "John",
"lastName": "Doe",
"gender": "Male",
"subject": "Physics",
"score": 4.4
}
```
Let’s go to the [Rockset query editor](https://console.rockset.com/query) and run the following query.
```sql
SELECT * FROM commons.transcipts LIMIT 10
```
You can see the last message you sent to the source topic returned.
# Apache Spark
Source: https://upstash.com/docs/kafka/integrations/spark
This tutorial shows how to integrate Upstash Kafka with Apache Spark
[Apache Spark](https://spark.apache.org/) is a multi-language engine for
executing data engineering, data science, and machine learning on single-node
machines or clusters.
### Upstash Kafka Setup
Create a Kafka cluster using [Upstash Console](https://console.upstash.com/) or
[Upstash CLI](https://github.com/upstash/cli) by following
[Getting Started](https://docs.upstash.com/kafka).
Create a topic by following the creating topic
[steps](https://docs.upstash.com/kafka#create-a-topic). Let’s name the topic
“sentence”.
### Project Setup
If you already have a project and want to implement Upstash Kafka and Apache
Spark integration into it, you can skip this section and continue with [Add
Spark and Kafka into the Project](#add-spark-and-kafka-into-the-project).
Install Maven to your machine by following [Maven Installation Guide](https://maven.apache.org/guides/getting-started/maven-in-five-minutes.html).
Run `mvn –version` in a terminal or in a command prompt to make sure you have
Maven downloaded.
It should print out the version of the Maven you have:
```
Apache Maven 3.6.3 (cecedd343002696d0abb50b32b541b8a6ba2883f)
Maven home: D:\apache-maven-3.6.3\apache-maven\bin\..
Java version: 1.8.0_232, vendor: AdoptOpenJDK, runtime: C:\Program Files\AdoptOpenJDK\jdk-8.0.232.09-hotspot\jre
Default locale: en_US, platform encoding: Cp1250
OS name: "windows 10", version: "10.0", arch: "amd64", family: "windows"
```
To create the Maven project;
Go into the folder that you want to create the project in your terminal or
command prompt by running `cd `
Run the following command:
```
mvn archetype:generate -DgroupId=com.kafkasparkinteg.app -DartifactId=kafkasparkinteg-app -DarchetypeArtifactId=maven-archetype-quickstart -DarchetypeVersion=1.4 -DinteractiveMode=false
```
### Add Spark and Kafka into the Project
Open the project folder by using an IDE which has maven plugin such as Intellij,
Visual Studio, Eclipse etc. Add following Spark dependencies into the
dependencies tag in `pom.xml` file.
```xml
org.apache.sparkspark-core_2.123.3.1org.apache.sparkspark-streaming_2.123.3.1org.apache.sparkspark-sql_2.123.3.1org.apache.sparkspark-streaming-kafka-0-10_2.123.3.1org.apache.sparkspark-sql-kafka-0-10_2.123.3.1
```
### Using Apache Spark as Producer
Import the following packages first:
```java
import org.apache.spark.api.java.function.FlatMapFunction;
import org.apache.spark.sql.*;
import org.apache.spark.sql.types.DataTypes;
import org.apache.spark.sql.types.StructType;
import java.util.*;
```
To send messages to Kafka from Spark, use the following code after replacing the
`UPSTASH-KAFKA-*` placeholders with your cluster information:
```java
SparkSession spark = SparkSession.builder()
.appName("quickstart")
.config("spark.master", "local")
.getOrCreate();
StructType structType = new StructType();
structType = structType.add("key", DataTypes.StringType, false);
structType = structType.add("value", DataTypes.StringType, false);
List rows = new ArrayList();
rows.add(RowFactory.create("test key", "This is an example sentence"));
Dataset sentenceDF = spark.createDataFrame(rows, structType);
sentenceDF.selectExpr("CAST(key AS STRING)", "CAST(value AS STRING)")
.write()
.format("kafka")
.option("kafka.bootstrap.servers", "UPSTASH-KAFKA-ENDPOINT:9092")
.option("kafka.sasl.mechanism", "SCRAM-SHA-256")
.option("kafka.security.protocol", "SASL_SSL")
.option("kafka.sasl.jaas.config", "org.apache.kafka.common.security.scram.ScramLoginModule required username=\"UPSTASH-KAFKA-USERNAME\" password=\"UPSTASH-KAFKA-PASSWORD\";")
.option("topic", "sentence")
.save();
```
Before running the project, open the messages of the topic from
[console](https://console.upstash.com).
You can observe new message coming to the topic on Upstash console when you run
your project.
### Using Apache Spark as Consumer
If the following packages are not imported, import them first:
```java
import org.apache.spark.api.java.function.FlatMapFunction;
import org.apache.spark.sql.*;
import org.apache.spark.sql.types.DataTypes;
import org.apache.spark.sql.types.StructType;
import java.util.*;
```
To receive the messages from Kafka topic by Apache Spark and to process, use the
following code after replacing the UPSTASH-KAFKA-\* placeholders with your
cluster information:
```java
SparkSession spark = SparkSession.builder()
.appName("quickstart")
.config("spark.master", "local")
.getOrCreate();
Dataset lines = spark
.read()
.format("kafka")
.option("kafka.bootstrap.servers", "UPSTASH-KAFKA-ENDPOINT:9092")
.option("kafka.sasl.mechanism", "SCRAM-SHA-256")
.option("kafka.security.protocol", "SASL_SSL")
.option("kafka.sasl.jaas.config", "org.apache.kafka.common.security.scram.ScramLoginModule required username=\"UPSTASH-KAFKA-USERNAME\" password=\"UPSTASH-KAFKA-PASSWORD\";")
.option("startingOffsets", "earliest")
.option("subscribe", "sentence")
.load()
.selectExpr("CAST(key AS STRING)", "CAST(value AS STRING)");
// PROCESS RECEIVED MESSAGE - Word counting part
Dataset words = lines.select("value")
.as(Encoders.STRING())
.flatMap( new FlatMapFunction() { @Override public Iterator call(String x) { return Arrays.asList(x.split(" ")).iterator(); }
}, Encoders.STRING()); Dataset wordCounts = words.groupBy("value").count(); wordCounts.show();
```
You can verify that you can see the sentence, which you sent, on your console
with number of word occurrences:
```
+--------+-----+
| value|count|
+--------+-----+
| example| 1|
| is| 1|
|sentence| 1|
| an| 1|
| This| 1|
+--------+-----+
```
# StarTree
Source: https://upstash.com/docs/kafka/integrations/startree
This tutorial shows how to integrate Upstash Kafka with StarTree
[StarTree](https://startree.ai/) provides a fully managed, Apache Pinot based
real-time analytics database on its cloud environment.
## Upstash Kafka Setup
Create a Kafka cluster using [Upstash Console](https://console.upstash.com) or
[Upstash CLI](https://github.com/upstash/cli) by following
[Getting Started](https://docs.upstash.com/kafka).
Create one topic by following the creating topic
[steps](https://docs.upstash.com/kafka#create-a-topic). This topic will be the
source for the Apache Pinot table running on StarTree. Let’s name it
“transcript” for this example tutorial.
## StarTree Setup
To be able to use StarTree cloud, you first need to
[create an account](https://startree.ai/saas-signup).
There are two steps to initialize the cloud environment on StarTree. First, you
need to create an organization. Next, you need to create a workspace under this
new organization.
For these setup steps, you can also follow
[StarTree quickstart](https://dev.startree.ai/docs/startree-enterprise-edition/startree-cloud/getting-started/saas/how-to-guide).
## Connect StarTree Cloud to Upstash Kafka
Once you created your workspace, open Data Manager under the `Services` section
in your workspace. Data Manager is where we will connect Upstash Kafka and work
on the Pinot table.
To connect Upstash Kafka with StarTree, create a new connection in Data Manager.
As the connection type, select Kafka.
In Kafka connection settings, fill the following options:
* Connection Name: It can be anything. It is up to you.
* Broker Url: This should be the endpoint of your Upstash Kafka cluster. You can
find it in the details section in your
[Upstash Kafka cluster](https://console.upstash.com/kafka).
* Authentication Type: `SASL`
* Security Protocol: `SASL_SSL`
* SASL Mechanism: `SCRAM-SHA-256`
* Username: This should be the username given in the details section in your
[Upstash Kafka cluster](https://console.upstash.com/kafka).
* Password: This should be the password given in the details section in your
[Upstash Kafka cluster](https://console.upstash.com/kafka).
To proceed, you need to test the connection first. Once the test connection is
successful, then you can create the connection.
Now you have a connection between Upstash Kafka and StarTree Cloud! The next
step is to create a dataset to store data streamed from Upstash Kafka.
Let’s return to the Data Manager overview page and create a new dataset.
As the connection type, select Kafka again.
Now you can select the Kafka connection you created for connecting Upstash
Kafka.
In the next step, you need to name your dataset, provide the Kafka topic to be
the source of this new dataset and define the data format. We can give
“transcript” as the topic and select JSON as the data format.
To proceed to the next step, we must first produce a message in our Kafka topic.
StarTree doesn’t allow us to go to the next step before it validates the
connection is working, and data is being streamed correctly.
To make StarTree validate our connection, let’s turn back to the Upstash console
and create some events for our Kafka topic. To do this, click on your Kafka
cluster on Upstash console and go to the “Topics” section. Open the source
topic, which is “transcript” in this case. Select the Messages tab, then click
Produce a new message. Send a message in JSON format like the one below:
```json
{
"studentID": 205,
"firstName": "Natalie",
"lastName": "Jones",
"gender": "Female",
"subject": "Maths",
"score": 3.8,
"timestampInEpoch": 1571900400000
}
```
Now go back to the dataset details steps on StarTree Data Manager.
After you click next, StarTree will consume the message in the source Kafka
topic to verify the connection. Once it consumes the message, the message will
be displayed.
In the next step, StarTree extracts the data model from the message you sent.
If there is any additional configuration about the model of the data coming from
the source topic, you can add it here.
To keep things simple, we will click next without changing anything.
The last step is for more configuration of your dataset. We will click next
again and proceed to review. Click “Create Dataset” to finalize the dataset.
## Query Data
Open the dataset you created on StarTree Data Manager and navigate to the query
console.
You will be redirected to Pinot Query Console running on StarTree cloud.
When you run the following SQL Query, you will see the data that came from
Upstash Kafka into your dataset.
```sql
select * from limit 10
```
# Kafka Streams
Source: https://upstash.com/docs/kafka/integrations/streams
This tutorial shows how to integrate Upstash Kafka with Kafka Streams
[Kafka Streams](https://kafka.apache.org/documentation/streams/) is a client
library, which streams data from one Kafka topic to another.
### Upstash Kafka Setup
Create a Kafka cluster using [Upstash Console](https://console.upstash.com) or
[Upstash CLI](https://github.com/upstash/cli) by following
[Getting Started](https://docs.upstash.com/kafka).
Create two topics by following the creating topic
[steps](https://docs.upstash.com/kafka#create-a-topic). Let’s name first topic
“input”, since we are going to stream this topic to other one, which we can name
it as “output”.
### Project Setup
If you already have a project and want to use Kafka Streams with Upstash Kafka
in it, you can skip this section and continue with [Add Kafka Streams into the
Project](#add-kafka-streams-into-the-project).
Install Maven to your machine by following [Maven Installation Guide](https://maven.apache.org/guides/getting-started/maven-in-five-minutes.html).
Run `mvn –version` in a terminal or in a command prompt to make sure you have
Maven downloaded.
It should print out the version of the Maven you have:
```
Apache Maven 3.6.3 (cecedd343002696d0abb50b32b541b8a6ba2883f)
Maven home: D:\apache-maven-3.6.3\apache-maven\bin\..
Java version: 1.8.0_232, vendor: AdoptOpenJDK, runtime: C:\Program Files\AdoptOpenJDK\jdk-8.0.232.09-hotspot\jre
Default locale: en_US, platform encoding: Cp1250
OS name: "windows 10", version: "10.0", arch: "amd64", family: "windows"
```
To create the Maven project;
Go into the folder that you want to create the project in your terminal or
command prompt by running `cd `
Run the following command:
```
mvn archetype:generate -DgroupId=com.kafkastreamsinteg.app -DartifactId=kafkastreamsinteg-app -DarchetypeArtifactId=maven-archetype-quickstart -DarchetypeVersion=1.4 -DinteractiveMode=false
```
### Add Kafka Streams into the Project
Open the project folder by using an IDE which has maven plugin such as Intellij,
Visual Studio, Eclipse etc. Add following dependencies into the dependencies tag
in `pom.xml` file.
```xml
org.apache.kafkakafka-streams3.3.1org.slf4jslf4j-reload4j2.0.3
```
### Streaming From One Topic to Another Topic
Import the following packages first:
```java
import org.apache.kafka.common.config.SaslConfigs;
import org.apache.kafka.common.config.TopicConfig;
import org.apache.kafka.common.serialization.Serdes;
import org.apache.kafka.common.utils.Bytes;
import org.apache.kafka.streams.KafkaStreams;
import org.apache.kafka.streams.StreamsBuilder;
import org.apache.kafka.streams.StreamsConfig;
import org.apache.kafka.streams.Topology;
import org.apache.kafka.streams.kstream.Grouped;
import org.apache.kafka.streams.kstream.KStream;
import org.apache.kafka.streams.kstream.Materialized;
import org.apache.kafka.streams.kstream.Produced;
import org.apache.kafka.streams.state.KeyValueStore;
import java.util.Arrays;
import java.util.Properties;
import java.util.concurrent.CountDownLatch;
import java.util.regex.Pattern;
```
Define the names of the topics you are going to work on:
```java
String inputTopic = "input";
String outputTopic = "output";
```
Create the following properties for Kafka Streams and replace UPSTASH-KAFKA-\*
placeholders with your cluster information.
```java
final Properties props = new Properties();
props.put(StreamsConfig.BOOTSTRAP_SERVERS_CONFIG, "UPSTASH-KAFKA-ENDPOINT:9092");
props.put(SaslConfigs.SASL_MECHANISM, "SCRAM-SHA-256");
props.put(StreamsConfig.SECURITY_PROTOCOL_CONFIG, "SASL_SSL");
props.put(StreamsConfig.APPLICATION_ID_CONFIG,"myLastNewProject");
props.put(SaslConfigs.SASL_JAAS_CONFIG, "org.apache.kafka.common.security.scram.ScramLoginModule username=\"UPSTASH-KAFKA-USERNAME\" password=\"UPSTASH-KAFKA-PASSWORD\";");
props.put(StreamsConfig.DEFAULT_KEY_SERDE_CLASS_CONFIG, Serdes.String().getClass());
props.put(StreamsConfig.DEFAULT_VALUE_SERDE_CLASS_CONFIG, Serdes.String().getClass());
props.put(StreamsConfig.topicPrefix(TopicConfig.RETENTION_MS_CONFIG), 604800000); // 7 days for internal repartition topic retention period
props.put(StreamsConfig.topicPrefix(TopicConfig.CLEANUP_POLICY_CONFIG), TopicConfig.CLEANUP_POLICY_DELETE); // delete cleanup policy for internal repartition topic
props.put(StreamsConfig.topicPrefix(TopicConfig.RETENTION_BYTES_CONFIG), 268435456); // 256 MB for internal repartition topic retention size
```
Start the builder for streaming and assign input topic as the source:
```java
StreamsBuilder builder = new StreamsBuilder();
KStream source = builder.stream(inputTopic);
```
Apply the following steps to count the words in the sentence sent to input topic
and stream the results to the output topic:
```java
Pattern pattern = Pattern.compile("\\W+", Pattern.UNICODE_CHARACTER_CLASS);
Materialized> materialized = Materialized.as("countMapping");
materialized.withLoggingDisabled();
source.flatMapValues(value -> Arrays.asList(pattern.split(value.toLowerCase())))
.groupBy((key, word) -> word, Grouped.as("groupMapping"))
.count(materialized).toStream().mapValues(Object::toString)
.to(outputTopic, Produced.with(Serdes.String(), Serdes.String()));
```
Since “groupby” function causing repartition and creation of a new internal
topic to store the groups intermediately, be sure that there is enough partition
capacity on your Upstash Kafka. For detailed information about the max partition
capacity of Kafka cluster, check [plans](https://upstash.com/#section-pricing).
Just to be sure, you can check from topic section on
[console](https://console.upstash.com) if the internal repartition topic created
successfully when you run your application and send data to input topic. For
reference, naming convention for internal repartition topics:
```
```
Next, finalize and build the streams builder. Create a topology of your process.
It can be viewed by printing.
```java
final Topology topology = builder.build();
System.out.println(topology.describe());
```
Here is the example topology in this scenario:
```
Topologies:
Sub-topology: 0
Source: KSTREAM-SOURCE-0000000000 (topics: [input])
--> KSTREAM-FLATMAPVALUES-0000000001
Processor: KSTREAM-FLATMAPVALUES-0000000001 (stores: [])
--> groupMapping
<-- KSTREAM-SOURCE-0000000000
Processor: groupMapping (stores: [])
--> groupMapping-repartition-filter
<-- KSTREAM-FLATMAPVALUES-0000000001
Processor: groupMapping-repartition-filter (stores: [])
--> groupMapping-repartition-sink
<-- groupMapping
Sink: groupMapping-repartition-sink (topic: groupMapping-repartition)
<-- groupMapping-repartition-filter
Sub-topology: 1
Source: groupMapping-repartition-source (topics: [groupMapping-repartition])
--> KSTREAM-AGGREGATE-0000000003
Processor: KSTREAM-AGGREGATE-0000000003 (stores: [countMapping])
--> KTABLE-TOSTREAM-0000000007
<-- groupMapping-repartition-source
Processor: KTABLE-TOSTREAM-0000000007 (stores: [])
--> KSTREAM-MAPVALUES-0000000008
<-- KSTREAM-AGGREGATE-0000000003
Processor: KSTREAM-MAPVALUES-0000000008 (stores: [])
--> KSTREAM-SINK-0000000009
<-- KTABLE-TOSTREAM-0000000007
Sink: KSTREAM-SINK-0000000009 (topic: output)
<-- KSTREAM-MAPVALUES-0000000008
```
Finally, start the Kafka Streams that was built and run it.
```java
final KafkaStreams streams = new KafkaStreams(topology, props);
final CountDownLatch latch = new CountDownLatch(1);
try {
streams.start();
System.out.println("streams started");
latch.await();
} catch (final Throwable e) {
System.exit(1);
}
Runtime.getRuntime().addShutdownHook(new Thread("streams-word-count") {
@Override
public void run() {
streams.close();
latch.countDown();
}
});
```
# Timeplus
Source: https://upstash.com/docs/kafka/integrations/timeplus
This tutorial shows how to integrate Upstash Kafka with Timeplus
[Timeplus](https://timeplus.com) is a streaming-first data analytics platform. It provides powerful end-to-end capabilities, leveraging the open source streaming engine [Proton](https://github.com/timeplus-io/proton), to help teams process streaming and historical data quickly and intuitively, accessible for organizations of all sizes and industries. It enables data engineers and platform engineers to unlock streaming data value using SQL.
## Upstash Kafka Setup
Create a Kafka cluster using [Upstash Console](https://console.upstash.com) or [Upstash CLI](https://github.com/upstash/cli) by following [Getting Started](https://docs.upstash.com/kafka).
Create two topics by following the creating topic [steps](https://docs.upstash.com/kafka#create-a-topic). Let’s name the first topic `input`, since we are going to stream from this topic to Timeplus. The name of the second topic can be `output`. This one is going to receive the stream from Timeplus.
## Create a Kafka Source in Timeplus
Besides the Open Source engine [Proton](https://github.com/timeplus-io/proton), Timeplus also offers Timeplus Cloud, a fully managed cloud service with SOC2 Type 1 Security Compliance.
To use the Timeplus Cloud, [create an account](https://us.timeplus.cloud) and setup a new workspace.
After creating the workspace, click the `Data Ingestion` in the menu bar. Click on `Add Data`
Choose the `Apache Kafka` source.
In the wizard, specify the Kafka Brokers as `--kafka.upstash.io:9092`. Enable all security options and choose `SASL SCRAM 256` and type the username and password.
Click the `Next` button. In the dropdown list, you should be able to see all available Kafka topics. Choose the `input` topic. Leave the `JSON` as the `Read As` option. Choose `Earliest` if you already create messages in the topic. Otherwise use the default value `Latest`.
Click the `Next` button, it will start loading messages in the `input` topic.
Let's go to Upstash UI and post a JSON message in `input` topic:
```json
{
"requestedUrl": "http://www.internationalinteractive.name/end-to-end",
"method": "PUT",
"ipAddress": "186.58.241.7",
"requestDuration": 678
}
```
Right after the message is posted, you should be able to see it in the Timeplus UI. Since you specify JSON format, those 4 key/value pairs are read as 4 columns. Choose a name for the data stream, say `input` and accept the default options.
Click the `Next` button to review the settings. Finally, click the `Create the source` button.
There will be a green notification message informing you the source has been created.
## Run Streaming SQL
Click the `Query` menu on the left and type the streaming SQL as:
```sql
select * from input
```
Go back to the Upstash UI to post a few more messages to the topic and you can see those live events in the query result.
## Apply Streaming ETL and Write Data to Upstash Kafka
Cancel the previous streaming SQL and use the following one to mask the IP addresses.
```sql
select now64() AS time, requestedUrl,method,lower(hex(md5(ipAddress))) AS ip
from input where _tp_time > earliest_ts()
```
Click the `Send as Sink` button. Use the default `Kafka` output type and specify the broker, topic name(`output`), user name and password.
Click the `Send` button to create the sink.
Go back to the Upstash UI. Create a few more messages in `input` topic and you should get them available in `output` topic with raw IP addresses masked.
Congratulations! You just setup a streaming ETL with a single line of SQL in Timeplus Cloud. Learn more about Timeplus by visiting [https://docs.timeplus.com/](https://docs.timeplus.com/) or join [https://timeplus.com/slack](https://timeplus.com/slack)
# Tinybird
Source: https://upstash.com/docs/kafka/integrations/tinybird
This tutorial shows how to set up a pipeline to stream traffic events to Upstash Kafka and analyse with Tinybird
In this tutorial series, we will show how to build an end to end real time
analytics system. We will stream the traffic (click) events from our web
application to Upstash Kafka then we will analyse it on real time. We will
implement one simply query with different stream processing tools:
```sql
SELECT city, count() FROM kafka_topic_page_views where timestamp > now() - INTERVAL 15 MINUTE group by city
```
Namely, we will query the number of page views from different cities in last 15
minutes. We keep the query and scenario intentionally simple to make the series
easy to understand. But you can easily extend the model for your more complex
realtime analytics scenarios.
If you do not have already set up Kafka pipeline, see
[the first part of series](./cloudflare_workers) where we
did the set up our pipeline including Upstash Kafka and Cloudflare Workers (or
Vercel).
In this part of the series, we will showcase how to use Tinybird to run a query
on a Kafka topic.
### Tinybird Setup
Create a [Tinybird](https://tinybird.co) account and select a region. Create an
empty workspace. On the wizard screen click `Add Data` button.

In the next screen click on Kafka tab and fill the fields with the credentials
copied from Upstash Kafka console. Key is `username` , secret is `password` .
Select `SCRAM-SHA-256`. Then click on `Connect` button.

If the connection is successful, then you should see the topic you have just
created. Select it and click `Continue` .

In the next screen, you should see data is populated from your Kafka topic. It
should look like the below. Select `Latest` and click `Create Data Source`

Click `Create Pipe` on the next screen.

In the next page, you will see the query editor where you can execute queries on
your data pipe. You can rename the views. Update the query as (replace the
datasource):
```sql
SELECT city, count() FROM kafka_ds_534681 where timestamp > now() - INTERVAL 15 MINUTE group by city
```

You should see the number of page view from cities in last 15 minutes. The good
thing with TinyBird is you can chain queries (new transformation node) also you
can add multiple data sources (e.g. Kafka topics) and join them in a single
query.
If you are happy with your query, click on `Create API Endpoint` at top right.
It will create an API endpoint which returns the result for your query.

Copy the curl command and try, you should see the result like below:
```bash
curl --compressed -H 'Authorization: Bearer p.eyJ1IjogIjMyMDM1YzdjLTRkOGYtNDA3CJpZCI6ICJlNTY4ZjVjYS1hNjNiLTRlZTItYTFhMi03MjRiNzhiNmE5MWEifQ.3KgyhWoohcr_0HCt6J7y-kt71ZmWOlrjhYyFa7TaUlA' https://api.us-east.tinybird.co/v0/pipes/kafka_ds_534681_pipe_2444.json
{
"meta":
[
{
"name": "city",
"type": "String"
},
{
"name": "count()",
"type": "UInt64"
}
],
"data":
[
{
"city": "San Jose",
"count()": 8
}
],
"rows": 1,
"statistics":
{
"elapsed": 0.000562736,
"rows_read": 8,
"bytes_read": 168
}
}
```
## Conclusion
We have built a simple data pipeline which collect data from edge to Kafka then
create real time reports using SQL. Thanks to serverless technologies (Vercel,
Upstash, Tinybird), we achieved this without dealing any server or
infrastructural configurations. You can easily extend and adapt this example for
much more complex architectures and queries.
# Vercel Edge
Source: https://upstash.com/docs/kafka/integrations/vercel_edge
Vercel Edge middleware allows you to intercept the requests to your application
served by Vercel platform. We will create a simple Next.js application and send
the traffic events to Upstash Kafka using the Vercel Edge functions.
Create a Next.js application:
```shell
npx create-next-app@latest --typescript
```
Create a middleware.ts (or .js) file in your app directory.
Update the file as below:
```js app/middleware.ts
import { NextResponse } from "next/server";
import type { NextRequest, NextFetchEvent } from "next/server";
import { Kafka } from "@upstash/kafka";
// Trigger this middleware to run on the `/secret-page` route
export const config = {
matcher: "/",
};
export async function middleware(req: NextRequest, event: NextFetchEvent) {
// Extract country. Default to US if not found.
console.log(req.url);
const kafka = new Kafka({
url: process.env.UPSTASH_KAFKA_REST_URL,
username: process.env.UPSTASH_KAFKA_REST_USERNAME,
password: process.env.UPSTASH_KAFKA_REST_PASSWORD,
});
let message = {
country: req.geo?.country,
city: req.geo?.city,
region: req.geo?.region,
url: req.url,
ip: req.headers.get("x-real-ip"),
mobile: req.headers.get("sec-ch-ua-mobile"),
platform: req.headers.get("sec-ch-ua-platform"),
useragent: req.headers.get("user-agent"),
};
const p = kafka.producer();
const topic = "mytopic";
event.waitUntil(p.produce(topic, JSON.stringify(message)));
// Rewrite to URL
return NextResponse.next();
}
```
Above, we simply parse the request object and send useful information to Kafka.
You may add/remove information depending on your own requirements.
### Configure Credentials
We're going to store our credentials in `.env` file. You can copy/paste the necessary credentials from the Upstash Console.
```text .env
UPSTASH_KAFKA_REST_URL=
UPSTASH_KAFKA_REST_USERNAME=
UPSTASH_KAFKA_REST_PASSWORD=
```
You can test the function locally with `npm run dev`. Deploy your function to
Vercel with `vercel --prod`
The endpoint of the function will be printed. You can check if logs are
collected in Kafka by copying the `curl` expression from the console:
```shell
curl https://real-goldfish-14081-us1-rest-kafka.upstash.io/consume/GROUP_NAME/GROUP_INSTANCE_NAME/mytopic -H "Kafka-Auto-Offset-Reset: earliest" -u \
REPLACE_HERE
```
### Conclusion
We have successfully built to the pipeline to collect the traffic data from our
web application to Upstash Kafka. In the remaining of the series, we will
analyze the data in Kafka with different realtime analytics tool which are
capable to read from Kafka.
# AKHQ
Source: https://upstash.com/docs/kafka/monitoring/akhq
How to use AKHQ with Upstash Kafka
[AKHQ](https://akhq.io) is a GUI for monitoring & managing Apache Kafka topics,
topics data, consumers group etc. You can connect and monitor your Upstash Kafka
cluster using [AKHQ](https://akhq.io).
To be able to use [AKHQ](https://akhq.io), first you should create a yaml
configuration file:
```yaml
akhq:
connections:
my-cluster:
properties:
bootstrap.servers: "tops-stingray-7863-eu1-kafka.upstash.io:9092"
sasl.mechanism: SCRAM-SHA-512
security.protocol: SASL_SSL
sasl.jaas.config: org.apache.kafka.common.security.scram.ScramLoginModule required username="ZmlycG9iZXJtYW4ZHtSXVwmyJQ" password="J6ocnQfe25vUsI8AX-XxA==";
schema-registry:
url: UPSTASH_KAFKA_REST_URL/schema-registry
basic-auth-username: UPSTASH_KAFKA_REST_USERNAME
basic-auth-password: UPSTASH_KAFKA_REST_PASSWORD
```
You should replace `bootstrap.servers` and `sasl.jaas.config` attributes with your cluster endpoint and credentials.
You can find the endpoint, username and password from the cluster page at [Upstash Console](https://console.upstash.com).
Scroll down to the `REST API` section to find schema-registry related configs:
* `UPSTASH_KAFKA_REST_URL`
* `UPSTASH_KAFKA_REST_USERNAME`
* `UPSTASH_KAFKA_REST_PASSWORD`
You can start [AKHQ](https://akhq.io) application directly using `jar` file.
First download the latest release from
[releases page](https://github.com/tchiotludo/akhq/releases). Then launch the
application using following command:
```shell
java -Dmicronaut.config.files=application.yml -jar akhq.jar
```
Alternatively you can start using Docker:
```shell
docker run -p 8080:8080 -v ~/akhq/application.yml:/app/application.yml tchiotludo/akhq
```
After launching the [AKHQ](https://akhq.io) app, just go to
[http://localhost:8080](http://localhost:8080) to access UI.
For more information see
[AKHQ documentation](https://akhq.io/docs/#installation).
# Conduktor
Source: https://upstash.com/docs/kafka/monitoring/conduktor
How to monitor and manage Upstash Kafka clusters using Conduktor
[Conduktor](https://www.conduktor.io/) is a quite powerful application to
monitor and manage Apache Kafka clusters. You can connect and monitor your
Upstash Kafka cluster using [Conduktor](https://www.conduktor.io/). Conduktor
has a free for development and testing.
### Install Conduktor
Conduktor is a desktop application. So you need to
[download](https://www.conduktor.io/download/) it first. If you are using a Mac,
you can install it using `brew` too.
```shell
brew tap conduktor/brew
brew install conduktor
```
### Connect Your Cluster
Once you install Conduktor and
[create an Upstash Kafka cluster and topic](../overall/getstarted), you can
connect your cluster to Conduktor. Open Conduktor and click on
`New Kafka Cluster` button.
* You can set any name as `Cluster Name`.
* Copy Kafka endpoint from [Upstash console](https://console.upstash.com) and
paste to `Bootstrap Servers` field.
* In Upstash console, copy the properties from the `Properties` tab. Paste it to
the `Additional Properties` field on Conduktor.
Once you connected to the cluster, now you can produce and consume to your
topics using Conduktor.
# kafka-ui
Source: https://upstash.com/docs/kafka/monitoring/kafka-ui
Connect and monitor your Upstash Kafka cluster using kafka-ui.
[kafka-ui](https://github.com/provectus/kafka-ui) is a GUI for monitoring Apache
Kafka. From their description:
> Kafka UI for Apache Kafka is a simple tool that makes your data flows
> observable, helps find and troubleshoot issues faster and deliver optimal
> performance. Its lightweight dashboard makes it easy to track key metrics of
> your Kafka clusters - Brokers, Topics, Partitions, Production, and
> Consumption.
You can connect and monitor your Upstash Kafka cluster using
[kafka-ui](https://github.com/provectus/kafka-ui).
To be able to use [kafka-ui](https://github.com/provectus/kafka-ui), first you
should create a yaml configuration file:
```yaml
kafka:
clusters:
- name: my-cluster
bootstrapServers: "tops-stingray-7863-eu1-kafka.upstash.io:9092"
properties:
sasl.mechanism: SCRAM-SHA-512
security.protocol: SASL_SSL
sasl.jaas.config: org.apache.kafka.common.security.scram.ScramLoginModule required username="ZmlycG9iZXJtYW4ZHtSXVwmyJQ" password="J6ocnQfe25vUsI8AX-XxA==";
schemaRegistry: UPSTASH_KAFKA_REST_URL/schema-registry
schemaRegistryAuth:
username: UPSTASH_KAFKA_REST_USERNAME
password: UPSTASH_KAFKA_REST_PASSWORD
```
You should replace `bootstrap.servers` and `sasl.jaas.config` attributes with your cluster endpoint and credentials.
You can find the endpoint, username and password from the cluster page at [Upstash Console](https://console.upstash.com).
Scroll down to the `REST API` section to find schema-registry related configs:
* `UPSTASH_KAFKA_REST_URL`
* `UPSTASH_KAFKA_REST_USERNAME`
* `UPSTASH_KAFKA_REST_PASSWORD`
You can start [kafka-ui](https://github.com/provectus/kafka-ui) application
directly using `jar` file. First download the latest release from
[releases page](https://github.com/provectus/kafka-ui/releases). Then launch the
application using following command in the same directory with `application.yml`
file:
```shell
java -jar kafka-ui-api-X.Y.Z.jar
```
Alternatively you can start using Docker:
```shell
docker run -p 8080:8080 -v ~/kafka-ui/application.yml:/application.yml provectuslabs/kafka-ui:latest
```
After launching the [kafka-ui](https://github.com/provectus/kafka-ui) app, just
go to [http://localhost:8080](http://localhost:8080) to access UI.
For more information see
[kafka-ui documentation](https://github.com/provectus/kafka-ui/blob/master/README.md).
# Compare
Source: https://upstash.com/docs/kafka/overall/compare
kafkacompare
# Credentials
Source: https://upstash.com/docs/kafka/overall/credentials
The default Kafka credential limit is set at **10**.
If you require an extension beyond this limit, we kindly request that you submit a formal request to [support@upstash.com](mailto:support@upstash.com).
When you create a Kafka cluster on the
[Upstash Console](https://console.upstash.com), a *default* user credentials is
created automatically. *Default* user credentials has *full access* rights to
the Kafka cluster, which can produce to & consume from any topic.
You can create additional credentials which can have limited access to topics.
Credentials can be limited to *produce-only* or *consume-only* and also for a
certain topic or a topic prefix. When a topic prefix is used, a user will have
access to any topic whose name starts with the prefix. Newly created credentials
can be used with both Kafka clients and Upstash REST API similar to the
*default* credentials.
To create new credentials, switch to **Credentials** tab in the cluster details
page, and click the "*New Credentials*" button.
There are three inputs in the **New Credentials** view:
* **Name**: Name of the credentials. This name is shown on the Console only to
identify the credentials.
* **Topic**: A specific topic name or a topic prefix. This can be a literal
topic name (such as `users.events`, `product-orders`), or a topic prefix (such
as `users.*`, `products-*`). Wildcard character `*` can only be used at the
end of the topic name. `*` means any topic.
* **Permissions**: Access permissions for the credentials. It has three options:
`Full Access`, `Produce Only` and `Consume Only`.
You can see all existing credentials, copy username & password by clicking "+"
button and delete a credentials inside the "Credentials" tab.
Additionally you can change the credentials shown on the console and used in the
code snippets by clicking "Credentials" box at the top right on the Console and
selecting one of the credentials.
# Pro and Enterprise Plans
Source: https://upstash.com/docs/kafka/overall/enterprise
# Getting Started
Source: https://upstash.com/docs/kafka/overall/getstarted
Create a Kafka cluster in seconds
**Deprecated**
Starting September 11, 2024, Upstash Kafka has been transitioned into deprecation period, which will last for 6 months. It will eventually be discontinued on March 11, 2025.
During deprecation period, existing Upstash Kafka clusters and all of it's features will be fully supported. New Upstash Kafka cluster creation will not be possible.
You can find further details in our blog post [here](https://upstash.com/blog/workflow-kafka).
## Create a Kafka Cluster
Once you logged in, you can create a Kafka cluster by clicking on the **Create
Cluster** button.
**Name:** Type a name for the Kafka cluster.
**Region:** Please select the region in which you would like your cluster to be
deployed. To optimize performance, it is recommended to choose the region that
is closest to your applications. We have plans to expand our support to other
regions and cloud providers in the future. Please send your requests to
[feedback@upstash.com](mailto:feedback@upstash.com) to expedite it.
**Type:** Select the cluster type. Currently there are only two options, choose
single replica for testing/development, multi replica for production use cases:
* **Single Replica:** Topics created in the single replica cluster will only
have single replica.
* **Multi Replica:** Topics created in the multi replica cluster will have three
replicas.
Upon clicking the **Create** button, you will be presented with a list of your
clusters as shown below:
You can click on a cluster to navigate to the details page of related cluster.
Details section contains the necessary configurations and credentials.
## Create a Topic
To create a new topic, switch to the **Topics** tab in cluster details page, and
click the **Create topic** button:
{" "}
Type a name for your topic and pick a partition count according to your
application's needs.
Note that Kafka topic names can contain only alphanumerics, underscore (\_),
hyphen (-) and dot (.) characters.
You can also change some advanced properties such as
*
{" "}
Retention Time
*
{" "}
Retention Size
*
{" "}
Cleanup Policy
Upon creating the topic, you will have access to a topics list that provides an
overview of the topic's configuration and usage details. This list allows you to
view and modify the topic configuration, as well as delete the topic if needed.
## Connect to Cluster
To establish a connection with the Kafka cluster, you have the flexibility to
utilize any Kafka clients of your choice. In the cluster details section, you
will find code snippets specifically designed for several popular Kafka clients.
Normally username and password will be shown as `{{ UPSTASH_KAFKA_USERNAME }}`
and `{{ UPSTASH_KAFKA_PASSWORD }}`. By turning on "Show secrets" toggle, these
secrets will be replaced with the actual values of your cluster. For more info
about using Kafka clients see [Kafka API](./kafkaapi/) section.
Alternatively, you can use the REST API to connect the cluster. For more info
about using the REST API see [Kafka REST API](../rest/restintro).
# Kafka API
Source: https://upstash.com/docs/kafka/overall/kafkaapi
Upstash uses [Apache Kafka](https://kafka.apache.org/) for deployments and
provides a serverless Kafka cluster access using both native Kafka clients (over
TCP) and REST API (over HTTP). As a consequence of this flexible model, there
are some restrictions when using
[Kafka protocol](https://kafka.apache.org/protocol), mainly for administrative
Kafka APIs.
Currently following [Kafka Protocol APIs](https://kafka.apache.org/protocol) are
supported by Upstash:
| NAME | KEY | NAME | KEY | NAME | KEY |
| --------------- | :-: | -------------------- | :-: | ----------------------- | :-: |
| Produce | 0 | DescribeGroups | 15 | EndTxn | 26 |
| Fetch | 1 | ListGroups | 16 | TxnOffsetCommit | 28 |
| ListOffsets | 2 | SaslHandshake | 17 | DescribeConfigs | 32 |
| Metadata | 3 | ApiVersions | 18 | AlterConfigs | 33 |
| OffsetCommit | 8 | CreateTopics | 19 | DescribeLogDirs | 35 |
| OffsetFetch | 9 | DeleteTopics | 20 | SaslAuthenticate | 36 |
| FindCoordinator | 10 | DeleteRecords | 21 | CreatePartitions | 37 |
| JoinGroup | 11 | InitProducerId | 22 | DeleteGroups | 42 |
| Heartbeat | 12 | OffsetForLeaderEpoch | 23 | IncrementalAlterConfigs | 44 |
| LeaveGroup | 13 | AddPartitionsToTxn | 24 | OffsetDelete | 47 |
| SyncGroup | 14 | AddOffsetsToTxn | 25 | DescribeCluster | 60 |
Some of the unsupported Kafka APIs are in our roadmap to make them available.
If you need an API that we do not support at the moment, please drop a note to
[support@upstash.com](mailto:support@upstash.com). So we can inform you when
we are planning to support it.
## Connect Using Kafka Clients
Connecting to Upstash Kafka using any Kafka client is very straightforward. If
you do not have a Kafka cluster and/or topic already, follow
[these steps](../overall/getstarted) to create one.
After creating a cluster and a topic, just go to cluster details page on the
[Upstash Console](https://console.upstash.com) and copy bootstrap endpoint,
username and password.
Then replace following parameters in the code snippets of your favourite Kafka
client or language below.
* `{{ BOOTSTRAP_ENDPOINT }}`
* `{{ UPSTASH_KAFKA_USERNAME }}`
* `{{ UPSTASH_KAFKA_PASSWORD }}`
* `{{ TOPIC_NAME }}`
## Create a Topic
```java
class CreateTopic {
public static void main(String[] args) throws Exception {
var props = new Properties();
props.put("bootstrap.servers", "{{ BOOTSTRAP_ENDPOINT }}");
props.put("sasl.mechanism", "SCRAM-SHA-512");
props.put("security.protocol", "SASL_SSL");
props.put("sasl.jaas.config", "org.apache.kafka.common.security.scram.ScramLoginModule required " +
"username=\"{{ UPSTASH_KAFKA_USERNAME }}\" " +
"password=\"{{ UPSTASH_KAFKA_PASSWORD }}\";");
try (var admin = Admin.create(props)) {
admin.createTopics(
Set.of(new NewTopic("{{ TOPIC_NAME }}", partitions, replicationFactor))
).all().get();
}
}
}
```
```typescript
const { Kafka } = require("kafkajs");
const kafka = new Kafka({
brokers: ["{{ BOOTSTRAP_ENDPOINT }}"],
sasl: {
mechanism: "scram-sha-512",
username: "{{ UPSTASH_KAFKA_USERNAME }}",
password: "{{ UPSTASH_KAFKA_PASSWORD }}",
},
ssl: true,
});
const admin = kafka.admin();
const createTopic = async () => {
await admin.connect();
await admin.createTopics({
validateOnly: false,
waitForLeaders: true,
topics: [
{
topic: "{{ TOPIC_NAME }}",
numPartitions: partitions,
replicationFactor: replicationFactor,
},
],
});
await admin.disconnect();
};
createTopic();
```
```py
from kafka import KafkaAdminClient
from kafka.admin import NewTopic
admin = KafkaAdminClient(
bootstrap_servers=['{{ BOOTSTRAP_ENDPOINT }}'],
sasl_mechanism='SCRAM-SHA-512',
security_protocol='SASL_SSL',
sasl_plain_username='{{ UPSTASH_KAFKA_USERNAME }}',
sasl_plain_password='{{ UPSTASH_KAFKA_PASSWORD }}',
)
admin.create_topics([NewTopic(name='{{ TOPIC_NAME }}', num_partitions=partitions, replication_factor=replicationFactor)])
admin.close()
```
```go
import (
"context"
"crypto/tls"
"log"
"github.com/segmentio/kafka-go"
"github.com/segmentio/kafka-go/sasl/scram"
)
func main() {
mechanism, err := scram.Mechanism(scram.SHA512,
"{{ UPSTASH_KAFKA_USERNAME }}", "{{ UPSTASH_KAFKA_PASSWORD }}")
if err != nil {
log.Fatalln(err)
}
dialer := &kafka.Dialer{
SASLMechanism: mechanism,
TLS: &tls.Config{},
}
conn, err := dialer.Dial("tcp", "{{ BOOTSTRAP_ENDPOINT }}")
if err != nil {
log.Fatalln(err)
}
defer conn.Close()
controller, err := conn.Controller()
if err != nil {
log.Fatalln(err)
}
controllerConn, err := dialer.Dial("tcp", net.JoinHostPort(controller.Host, strconv.Itoa(controller.Port)))
if err != nil {
log.Fatalln(err)
}
defer controllerConn.Close()
err = controllerConn.CreateTopics(kafka.TopicConfig{
Topic: "{{ TOPIC_NAME }}",
NumPartitions: partitions,
ReplicationFactor: replicationFactor,
})
if err != nil {
log.Fatalln(err)
}
}
```
## Produce a Message
```java
class Produce {
public static void main(String[] args) throws Exception {
var props = new Properties();
props.put("bootstrap.servers", "{{ BOOTSTRAP_ENDPOINT }}");
props.put("sasl.mechanism", "SCRAM-SHA-512");
props.put("security.protocol", "SASL_SSL");
props.put("sasl.jaas.config", "org.apache.kafka.common.security.scram.ScramLoginModule required " +
"username=\"{{ UPSTASH_KAFKA_USERNAME }}\" " +
"password=\"{{ UPSTASH_KAFKA_PASSWORD }}\";");
props.put("key.serializer", "org.apache.kafka.common.serialization.StringSerializer");
props.put("value.serializer", "org.apache.kafka.common.serialization.StringSerializer");
try (var producer = new KafkaProducer(props)) {
producer.send(new ProducerRecord<>("{{ TOPIC_NAME }}", "Hello Upstash!"));
producer.flush();
}
}
}
```
```typescript
const { Kafka } = require("kafkajs");
const kafka = new Kafka({
brokers: ["{{ BOOTSTRAP_ENDPOINT }}"],
sasl: {
mechanism: "scram-sha-512",
username: "{{ UPSTASH_KAFKA_USERNAME }}",
password: "{{ UPSTASH_KAFKA_PASSWORD }}",
},
ssl: true,
});
const producer = kafka.producer();
const produce = async () => {
await producer.connect();
await producer.send({
topic: "{{ TOPIC_NAME }}",
messages: [{ value: "Hello Upstash!" }],
});
await producer.disconnect();
};
produce();
```
```py
from kafka import KafkaProducer
producer = KafkaProducer(
bootstrap_servers=['{{ BOOTSTRAP_ENDPOINT }}'],
sasl_mechanism='SCRAM-SHA-512',
security_protocol='SASL_SSL',
sasl_plain_username='{{ UPSTASH_KAFKA_USERNAME }}',
sasl_plain_password='{{ UPSTASH_KAFKA_PASSWORD }}',
)
future = producer.send('{{ TOPIC_NAME }}', b'Hello Upstash!')
record_metadata = future.get(timeout=10)
print (record_metadata)
producer.close()
```
```go
import (
"context"
"crypto/tls"
"log"
"github.com/segmentio/kafka-go"
"github.com/segmentio/kafka-go/sasl/scram"
)
func main() {
mechanism, err := scram.Mechanism(scram.SHA512,
"{{ UPSTASH_KAFKA_USERNAME }}", "{{ UPSTASH_KAFKA_PASSWORD }}")
if err != nil {
log.Fatalln(err)
}
dialer := &kafka.Dialer{
SASLMechanism: mechanism,
TLS: &tls.Config{},
}
w := kafka.NewWriter(kafka.WriterConfig{
Brokers: []string{"{{ BOOTSTRAP_ENDPOINT }}"},
Topic: "{{ TOPIC_NAME }}",
Dialer: dialer,
})
defer w.Close()
err = w.WriteMessages(context.Background(),
kafka.Message{
Value: []byte("Hello Upstash!"),
},
)
if err != nil {
log.Fatalln("failed to write messages:", err)
}
}
```
## Consume Messages
```java
class Consume {
public static void main(String[] args) throws Exception {
var props = new Properties();
props.put("bootstrap.servers", "{{ BOOTSTRAP_ENDPOINT }}");
props.put("sasl.mechanism", "SCRAM-SHA-512");
props.put("security.protocol", "SASL_SSL");
props.put("sasl.jaas.config", "org.apache.kafka.common.security.scram.ScramLoginModule required " +
"username=\"{{ UPSTASH_KAFKA_USERNAME }}\" " +
"password=\"{{ UPSTASH_KAFKA_PASSWORD }}\";");
props.put("key.deserializer", "org.apache.kafka.common.serialization.StringDeserializer");
props.put("value.deserializer", "org.apache.kafka.common.serialization.StringDeserializer");
props.put("auto.offset.reset", "earliest");
props.put("group.id", "{{ GROUP_NAME }}");
try(var consumer = new KafkaConsumer(props)) {
consumer.subscribe(Collections.singleton("{{ TOPIC_NAME }}"));
var records = consumer.poll(Duration.ofSeconds(10));
for (var record : records) {
System.out.println(record);
}
}
}
}
```
```typescript
const { Kafka } = require("kafkajs");
const kafka = new Kafka({
brokers: ["{{ BOOTSTRAP_ENDPOINT }}"],
sasl: {
mechanism: "scram-sha-512",
username: "{{ UPSTASH_KAFKA_USERNAME }}",
password: "{{ UPSTASH_KAFKA_PASSWORD }}",
},
ssl: true,
});
const consumer = kafka.consumer({ groupId: "{{ GROUP_NAME }}" });
const consume = async () => {
await consumer.connect();
await consumer.subscribe({ topic: "{{ TOPIC_NAME }}", fromBeginning: true });
await consumer.run({
eachMessage: async ({ topic, partition, message }) => {
console.log({
topic: topic,
partition: partition,
message: JSON.stringify(message),
});
},
});
};
consume();
```
```py
from kafka import KafkaConsumer
consumer = KafkaConsumer(
bootstrap_servers=['{{ BOOTSTRAP_ENDPOINT }}'],
sasl_mechanism='SCRAM-SHA-512',
security_protocol='SASL_SSL',
sasl_plain_username='{{ UPSTASH_KAFKA_USERNAME }}',
sasl_plain_password='{{ UPSTASH_KAFKA_PASSWORD }}',
group_id='{{ GROUP_NAME }}',
auto_offset_reset='earliest',
)
consumer.subscribe(['{{ TOPIC_NAME }}'])
records = consumer.poll(timeout_ms=10000)
print(records)
consumer.close()
```
```go
import (
"context"
"crypto/tls"
"log"
"time"
"github.com/segmentio/kafka-go"
"github.com/segmentio/kafka-go/sasl/scram"
)
func main() {
mechanism, err := scram.Mechanism(scram.SHA512,
"{{ UPSTASH_KAFKA_USERNAME }}", "{{ UPSTASH_KAFKA_PASSWORD }}")
if err != nil {
log.Fatalln(err)
}
dialer := &kafka.Dialer{
SASLMechanism: mechanism,
TLS: &tls.Config{},
}
r := kafka.NewReader(kafka.ReaderConfig{
Brokers: []string{"{{ BOOTSTRAP_ENDPOINT }}"},
GroupID: "{{ GROUP_NAME }}",
Topic: "{{ TOPIC_NAME }}",
Dialer: dialer,
})
defer r.Close()
ctx, cancel := context.WithTimeout(context.Background(), time.Second*10)
defer cancel()
m, err := r.ReadMessage(ctx)
if err != nil {
log.Fatalln(err)
}
log.Printf("%+v\n", m)
}
```
# Pricing & Limits
Source: https://upstash.com/docs/kafka/overall/pricing
# Use Cases
Source: https://upstash.com/docs/kafka/overall/usecases
kafkausecases
# Using ksqlDB with Kafka
Source: https://upstash.com/docs/kafka/real-time-analytics/ksqldb
This tutorial shows how to set up a pipeline to stream traffic events to Upstash Kafka and analyse with ksqlDB
In this tutorial series, we will show how to build an end to end real time
analytics system. We will stream the traffic (click) events from our web
application to Upstash Kafka then we will analyse it on real time. We will
implement one simply query with different stream processing tools:
```sql
SELECT city, count() FROM kafka_topic_page_views where timestamp > now() - INTERVAL 15 MINUTE group by city
```
Namely, we will query the number of page views from different cities in last 15
minutes. We keep the query and scenario intentionally simple to make the series
easy to understand. But you can easily extend the model for your more complex
realtime analytics scenarios.
If you do not have already set up Kafka pipeline, see
[the first part of series](../integrations/cloudflare_workers) where we
did the set up our pipeline including Upstash Kafka and Cloudflare Workers (or
Vercel).
In this part of the series, we will showcase how to use ksqlDB to run a query on
a Kafka topic.
### ksqlDB Setup
Upstash does not have a managed ksqlDB. In this article we will set up ksqlDB
using Docker Compose.
Create a `docker-compose.yml` file as below:
```yaml
version: "2"
services:
ksqldb-server:
image: confluentinc/ksqldb-server:0.28.2
hostname: ksqldb-server
container_name: ksqldb-server
ports:
- "8088:8088"
environment:
KSQL_LISTENERS: "http://0.0.0.0:8088"
KSQL_BOOTSTRAP_SERVERS: "REPLACE_YOUR_ENDPOINT"
KSQL_SASL_MECHANISM: "SCRAM-SHA-256"
KSQL_SECURITY_PROTOCOL: "SASL_SSL"
KSQL_SASL_JAAS_CONFIG: 'org.apache.kafka.common.security.scram.ScramLoginModule required username="REPLACE_YOUR_USERNAME" password="REPLACE_YOUR_PASSWORD";'
KSQL_KSQL_LOGGING_PROCESSING_STREAM_AUTO_CREATE: "true"
KSQL_KSQL_LOGGING_PROCESSING_TOPIC_AUTO_CREATE: "true"
ksqldb-cli:
image: confluentinc/ksqldb-cli:0.28.2
container_name: ksqldb-cli
depends_on:
- ksqldb-server
entrypoint: /bin/sh
tty: true
```
Don't forget to replace your endpoint, username and password above. Now start
the ksqlDB by running:
```shell
docker-compose up
```
Check your Kafka cluster in Upstash console, you will see new topics auto
created by ksqlDB.
### Start ksqlDB CLI
We will use ksqlDB cli to create streams and run queries. Start the CLI by
running:
```shell
docker exec -it ksqldb-cli ksql http://ksqldb-server:8088
```
### Create a stream
You can think of a stream as a schema on top of a Kafka topic. You can query a
stream and it will not return until it's terminated. New updates are pushed to
the stream. This type of queries is called `push query`.
Let's create a stream:
```sql
CREATE STREAM pageViews (country VARCHAR, city VARCHAR, region VARCHAR, url VARCHAR, ip VARCHAR, mobile VARCHAR, platform VARCHAR, useragent VARCHAR )
WITH (kafka_topic='mytopic', value_format='json', partitions=1);
```
You need to set the same topic which you have created in the
[the first part of series](../integrations/cloudflare_workers).
### Query the stream (push query)
You can query the stream to get the new updates to your Kafka topic:
```sql
SELECT * FROM pageViews EMIT CHANGES;
```
The query will continue display the updates until you terminate it.
### Create a table (materialized view)
Now let's create a table to query the cities with the highest number of page
views in last 10 minutes.
```sql
CREATE TABLE topCities AS
SELECT city, COUNT(*) AS views FROM pageViews
WINDOW TUMBLING (SIZE 10 MINUTE)
GROUP BY city
EMIT CHANGES;
```
We have used tumbling window to count the views. Check
[here](https://docs.ksqldb.io/en/latest/concepts/time-and-windows-in-ksqldb-queries/#window-types)
to learn about the other options.
### Query the table (pull query)
We can simply query the table. This is a pull query, it will return the current
result and terminate.
```sql
select * from topCities
```
!\[ksqldb1.png]\(/img/ksqldb/
.png)
You see the results with the same city but different intervals. If you just need
the latest interval (last 10 minutes) then run a query like this:
```sql
select * from topCities where WINDOWSTART > (UNIX_TIMESTAMP() - (10*60*1000+1));
```
In this query, we get the results with a starting window of last 10 minutes.
### Resources
[Upstash Kafka setup](../integrations/cloudflare_workers)
[ksqlDB setup](https://ksqldb.io/quickstart.html#quickstart-content)
[ksqlDB concepts](https://docs.ksqldb.io/en/latest/concepts/)
### Conclusion
We have built a simple data pipeline which collect data from edge to Kafka then
create real time reports using SQL. You can easily extend and adapt this example
for much more complex architectures and queries.
# Consumer APIs
Source: https://upstash.com/docs/kafka/rest/restconsumer
Consumer APIs in Kafka are used for fetching and consuming messages from Kafka
topics. Similar to Kafka clients, there are two mechanisms for consuming
messages: manual offset seeking and the use of consumer groups.
Manual offset seeking allows consumers to specify the desired offset from which
they want to consume messages, providing precise control over the consumption
process.
Consumer groups, on the other hand, manage offsets automatically within a
dedicated Kafka topic. They enable multiple consumers to work together in a
coordinated manner, where each consumer within the group is assigned a subset of
partitions from the Kafka topic. This automatic offset management simplifies the
consumption process and facilitates efficient and parallel message processing
across the consumer group.
We call the first one as **Fetch API** and the second one as **Consume API**.
Consume API has some additional methods if you wish to commit offsets manually.
Both Fetch API and Consume API return array of messages as JSON. Message
structure is as following:
```ts
Message {
topic: String,
partition: Int,
offset: Long,
timestamp: Long,
key: String,
value: String,
headers: Array
}
```
## Fetch API
`[GET | POST] /fetch`:
Fetches the message(s) starting with a given offset inside the partition. This
API doesn't use consumer groups. A `FetchRequest` should be sent via request
body as JSON. Structure of the `FetchRequest` is:
```ts
FetchRequest{
topic: String,
partition: Int,
offset: Long,
topicPartitionOffsets: Set,
timeout: Long
}
TopicPartitionOffset{
topic: String,
partition: Int,
offset: Long
}
```
It's possible to send a fetch request for only a single
`` or a set of them using `topicPartitionOffsets`.
`timeout` field defines the time to wait at most for the fetch request in
milliseconds. It's optional and its default value 1000.
* Fetch from a single ``:
```shell
curl https://tops-stingray-7863-eu1-rest-kafka.upstash.io/fetch -u myuser:mypass \
-d '{"topic": "greetings", "partition": 3, "offset": 11, "timeout": 1000}'
```
* Fetch from multiple `` triples:
```shell
curl https://tops-stingray-7863-eu1-rest-kafka.upstash.io/fetch -u myuser:mypass \
-d '{
"topicPartitionOffsets": [
{"topic": "greetings", "partition": 1, "offset": 1},
{"topic": "greetings", "partition": 2, "offset": 1},
{"topic": "greetings", "partition": 3, "offset": 1},
{"topic": "cities", "partition": 1, "offset": 10},
{"topic": "cities", "partition": 2, "offset": 20}
],
"timeout": 5000
}'
```
* You can even combine both:
```shell
curl https://tops-stingray-7863-eu1-rest-kafka.upstash.io/fetch -u myuser:mypass \
-d '{
"topic": "words", "partition": 0, "offset": 0,
"topicPartitionOffsets": [
{"topic": "cities", "partition": 1, "offset": 10},
{"topic": "cities", "partition": 2, "offset": 20}
],
"timeout": 5000
}'
```
## Consume API
Fetches the message(s) using Kafka consumer group mechanism and may commit the
offsets automatically. Consume API has two variants:
* `GET /consume/$CONSUMER_GROUP/$INSTANCE_ID/$TOPIC?timeout=$TIMEOUT`
* `[GET | POST] /consume/$CONSUMER_GROUP/$INSTANCE_ID`
`$CONSUMER_GROUP` is the name of the consumer group which is used as
[Kafka consumer group id](https://kafka.apache.org/documentation/#consumerconfigs_group.id).
`$INSTANCE_ID` is used identify Kafka consumer instances in the same consumer
group. It's used as
[Kafka consumer instance id](https://kafka.apache.org/documentation/#consumerconfigs_group.instance.id).
Each consumer instance is handled by a separate consumer client.
In the second variant, a `ConsumeRequest` should be sent via request body as
JSON. Structure of the `ConsumeRequest` is:
```typescript
ConsumeRequest{
topic: String,
topics: Set,
timeout: Long
}
```
It's possible to send a consume request for only a single `topic` or multiple
`topics`. `timeout` field defines the time to wait at most for the consume
request in milliseconds. It's optional and its default value is `1000`.
Consumer group instances will be closed after some idle time. So consume
requests should be sent periodically to keep them alive.
#### Request Headers
Kafka consumer instance can be configured with request headers. These
headers are only required for the very first request which creates and
initializes the consumer but it's fine to send them with every request and has
no further effect.
* `Kafka-Enable-Auto-Commit`: If true, the consumer's offset will be
periodically committed in the background. Valid values are ``.
Default is `true`.
* `Kafka-Auto-Commit-Interval`: The frequency in milliseconds that the consumer
offsets are auto-committed to Kafka if auto commit is enabled. Default is
`5000`.
* `Kafka-Auto-Offset-Reset`: What to do when there is no initial offset in Kafka
or if the current offset does not exist any more on the server. Default value
is `latest`.
* `earliest`: Automatically reset the offset to the earliest offset
* `latest`: Automatically reset the offset to the latest offset
* `none`: Throw exception to the consumer if no previous offset is found for
the consumer's group.
* `Kafka-Session-Timeout-Ms`: The timeout used to detect client failures.
The client sends periodic heartbeats to the broker. If no heartbeats are received
by the broker before the expiration of this session timeout, the client will be
removed from the group and initiate a rebalance. Default is `120000`(2 minutes)
If all or some of these headers are missing in the consume request, default
values will be used.
The first time a consumer is created, it needs to figure out the group
coordinator by asking the Kafka brokers and joins the consumer group. This
process takes some time to complete. That's why when a consumer instance is
created first time, it may return empty messages until consumer group
coordination is completed.
* Consume from a single topic:
```shell
curl https://tops-stingray-7863-eu1-rest-kafka.upstash.io/consume/mygroup/myconsumer/greetings -u myuser:mypass
```
* Consume from a single topic with timeout:
```shell
curl https://tops-stingray-7863-eu1-rest-kafka.upstash.io/consume/mygroup/myconsumer/greetings?timeout=10000 \
-u myuser:mypass
```
* Consume from a single topic via request body:
```shell
curl https://tops-stingray-7863-eu1-rest-kafka.upstash.io/consume/mygroup/myconsumer -u myuser:mypass \
-d '{"topic": "greetings", "timeout": 1000}'
```
* Consume from multiple topics:
```shell
curl https://tops-stingray-7863-eu1-rest-kafka.upstash.io/consume/mygroup/myconsumer -u myuser:mypass \
-d '{"topics": ["greetings", "cities", "words"], "timeout": 1000}'
```
* Consume from topics without auto commit:
```shell
curl https://tops-stingray-7863-eu1-rest-kafka.upstash.io/consume/mygroup/myconsumer -u myuser:mypass \
-H "Kafka-Enable-Auto-Commit: false" \
-d '{"topics": ["greetings", "cities", "words"], "timeout": 1000}'
```
* Consume from topics starting from the earliest message:
```shell
curl https://tops-stingray-7863-eu1-rest-kafka.upstash.io/consume/mygroup/myconsumer -u myuser:mypass \
-H "Kafka-Auto-Offset-Reset: earliest" \
-d '{"topics": ["greetings", "cities", "words"], "timeout": 1000}'
```
* Consume from topics with custom auto commit interval:
```shell
curl https://tops-stingray-7863-eu1-rest-kafka.upstash.io/consume/mygroup/myconsumer -u myuser:mypass \
-H "Kafka-Enable-Auto-Commit: true" \
-H "Kafka-Auto-Commit-Interval: 3000" \
-d '{"topics": ["greetings", "cities", "words"], "timeout": 1000}'
```
Maximum number of consumer group instances is limited to total partition count
of all topics.
## Commit Consumer API
`[GET | POST] /commit/$CONSUMER_GROUP/$INSTANCE_ID`
Commits the fetched message offsets. Commit API should be used alongside
**Consume API**, especially when auto commit is disabled. Request body should be
a single `TopicPartitionOffset` object or an array of `TopicPartitionOffset`s as
JSON.
```typescript
TopicPartitionOffset{topic: String, partition: Int, offset: Long}
```
When the body is empty (or an empty array), then the consumer will commit the
last consumed messages.
* Commit single topic partition offset:
```shell
curl https://tops-stingray-7863-eu1-rest-kafka.upstash.io/commit/mygroup/myconsumer -u myuser:mypass \
-d '{"topic": "cities", "partition": 1, "offset": 10}'
```
* Commit multiple topic partition offsets:
```shell
curl https://tops-stingray-7863-eu1-rest-kafka.upstash.io/commit/mygroup/myconsumer -u myuser:mypass \
-d '[
{"topic": "cities", "partition": 0, "offset": 13},
{"topic": "cities", "partition": 1, "offset": 37},
{"topic": "greetings", "partition": 0, "offset": 19}
]'
```
* Commit all latest consumed message offsets:
```shell
curl https://tops-stingray-7863-eu1-rest-kafka.upstash.io/commit/mygroup/myconsumer -u myuser:mypass
```
**Response:**
When commit is completed, a success JSON result will be returned:
```json
{ "result": "Success", "status": 200 }
```
## Remove Consumer Instance
`[POST|DELETE] /delete-consumer/$CONSUMER_GROUP/$INSTANCE_ID`
Stops and removes a previously created consumer group instance.
**Response:**
When deletion is completed, a success JSON result will be returned:
```json
{ "result": "Success", "status": 200 }
```
# Introduction
Source: https://upstash.com/docs/kafka/rest/restintro
Upstash offers a REST API alongside TCP-based Kafka clients, enabling access to
Kafka topics over HTTP. The REST API is particularly valuable in restricted
environments, such as mobile or edge devices, as it provides a lightweight
alternative to native Kafka clients. By utilizing the REST API, you can
eliminate the need for manual management of Kafka clients and connections. It
offers convenience and simplicity for interacting with Kafka topics without the
complexities associated with native client implementations.
## Get Started
If you do not have a Kafka cluster and/or topic already, follow
[these steps](../overall/getstarted) to create one.
In the cluster details section of the
[Upstash Console](https://console.upstash.com), scroll down the `REST API`
section. You will see two basic REST API snippets there; the first one is to
produce a message to a topic and the second one is to consume messages from a
topic using Kafka consumer group mechanism.
* Producer
```shell
curl https://tops-stingray-7863-eu1-rest-kafka.upstash.io/produce/$TOPIC/$MESSAGE \
-u {{ UPSTASH_KAFKA_REST_USERNAME }}:{{ UPSTASH_KAFKA_REST_PASSWORD }}
```
* Consumer
```shell
curl https://tops-stingray-7863-eu1-rest-kafka.upstash.io/consume/$GROUP_NAME/$GROUP_INSTANCE_NAME/$TOPIC \
-u {{ UPSTASH_KAFKA_REST_USERNAME }}:{{ UPSTASH_KAFKA_REST_PASSWORD }}
```
Upstash Kafka REST API uses HTTP Basic Authentication scheme. You should copy
the `UPSTASH_KAFKA_REST_USERNAME` and `UPSTASH_KAFKA_REST_PASSWORD` from the
console and replace then in the code snippets shown above.
## Produce
To produce a message just replace the `$TOPIC` variable with a topic name which
you've created before and replace the `$MESSAGE` with the message you want to
send to the Kafka topic.
```shell
curl https://tops-stingray-7863-eu1-rest-kafka.upstash.io/produce/mytopic/hello_kafka -u myuser:mypass
```
This will send the message to the `mytopic` Kafka topic and return the metadata
related to the message as a JSON, like:
```json
{
"topic": "mytopic",
"partition": 0,
"offset": 0,
"timestamp": 1637743323016
}
```
For more info and options about producer API please see [REST Producer
API](./restproducer) section.
## Consume
To consume messages from the topic, replace the `$TOPIC` variable with a topic
name which you've created before, replace the `$GROUP_NAME` with a meaningful
name to be used as the
[Kafka consumer group id](https://kafka.apache.org/documentation/#consumerconfigs_group.id),
and `$GROUP_INSTANCE_NAME` with a name for
[Kafka consumer instance id](https://kafka.apache.org/documentation/#consumerconfigs_group.instance.id).
```shell
curl https://tops-stingray-7863-eu1-rest-kafka.upstash.io/consume/mygroup/mygroup_instance0/mytopic -u myuser:mypass
```
This will consume some messages from the `mytopic` using Kafka consumer group
mechanism and return the messages as a JSON array, like:
```json
[
{
"topic": "mytopic",
"partition": 0,
"offset": 5,
"timestamp": 1637745824883,
"key": "",
"value": "hello-world",
"headers": []
},
{
"topic": "mytopic",
"partition": 0,
"offset": 6,
"timestamp": 1637745829327,
"key": "",
"value": "hello-kafka",
"headers": []
},
{
"topic": "mytopic",
"partition": 0,
"offset": 7,
"timestamp": 1637745834756,
"key": "",
"value": "hello-upstash",
"headers": []
}
]
```
For more info and options about consumer API please see [REST Consumer
APIs](./restconsumer) section.
## Responses
Each API returns a JSON response and they have their own specific structures.
When the API call fails for a reason (illegal argument, unauthorized access,
invalid API etc), a common error JSON message returned. Its structure is as
following:
```typescript
{error: String, status: Int}
```
`error` field contains the error message which explains the cause and `status`
field shows the HTTP status code for the error.
## Next
Apart from the basic usages explained in this section, there are three
categories for the REST API:
* [Producer API](./restproducer)
* [Consumer APIs](./restconsumer)
* [Metadata APIs](./restmetadata)
# Metadata API
Source: https://upstash.com/docs/kafka/rest/restmetadata
## List Topics
`GET /topics`
Lists all topics belonging to the user.
**Response:**
JSON Map of topic name to topic's partition:
```json
{
"cities": 12,
"greetings": 1,
"words": 137
}
```
## List Consumers
* `GET /consumers`
Lists consumers belonging to the user known by the REST server.
**Response:**
JSON array of `GroupAssignments`.
```typescript
TopicAssignments{
topic: String,
partitions: Array
}
InstanceAssignments{
name: String,
topics: Array
}
GroupAssignments{
name: String,
instances: Array
}
```
```json
[
{
"name": "mygroup",
"instances": [
{
"name": "instance-1",
"topics": [
{
"topic": "cities",
"partitions": [0, 1, 2]
},
{
"topic": "words",
"partitions": [10, 21, 32]
}
]
},
{
"name": "instance-2",
"topics": [
{
"topic": "cities",
"partitions": [3, 4, 5]
},
{
"topic": "words",
"partitions": [1, 3, 5, 7]
}
]
}
]
}
]
```
## List Committed Offsets
`[GET | POST] /committed/$CONSUMER_GROUP/$INSTANCE_ID?timeout=$TIMEOUT`
Returns the last committed offsets for the topic partitions inside the group.
Can be used alongside **Commit Consumer API**. Request body should be a single
`TopicPartition` object or an array of `TopicPartition`s:
```typescript
TopicPartition{topic: String, partition: Int}
```
`timeout` parameter defines the time to wait at most for the offsets in
milliseconds. It's optional and its default value is 10 seconds (`10000`).
* List committed offset for a single topic partition:
```shell
curl https://tops-stingray-7863-eu1-rest-kafka.upstash.io/committed/mygroup/myconsumer -u myuser:mypass \
-d '{"topic": "cities", "partition": 0}'
```
* List committed offsets for multiple topic partitions:
```shell
curl https://tops-stingray-7863-eu1-rest-kafka.upstash.io/committed/mygroup/myconsumer -u myuser:mypass \
-d '[
{"topic": "cities", "partition": 0},
{"topic": "cities", "partition": 1},
{"topic": "greetings", "partition": 0}
]'
```
* List committed offsets with a `1 second` timeout:
```shell
curl https://tops-stingray-7863-eu1-rest-kafka.upstash.io/committed/mygroup/myconsumer?timeout=1000 -u myuser:mypass \
-d '{"topic": "cities", "partition": 1}'
```
**Response:**
Returns a JSON array of `TopicPartitionOffset`s:
```json
[
{ "topic": "cities", "partition": 0, "offset": 11 },
{ "topic": "cities", "partition": 1, "offset": 21 },
{ "topic": "greetings", "partition": 0, "offset": 1 }
]
```
## Get Topic Partition Offsets
`[GET | POST] /offsets/$TIMESTAMP?timeout=$TIMEOUT`
Returns the offsets for the given partitions by timestamp. The returned offset
for each partition is the earliest offset whose timestamp is greater than or
equal to the given timestamp in the corresponding partition.
Request body should be a single `TopicPartition` object or an array of
`TopicPartition`s:
```typescript
TopicPartition{topic: String, partition: Int}
```
`timeout` parameter defines the time to wait at most for the offsets in
milliseconds. It's optional and its default value is 10 seconds (`10000`).
* Offset for a single topic partition:
```shell
curl https://tops-stingray-7863-eu1-rest-kafka.upstash.io/offsets/1642591892 -u myuser:mypass \
-d '{"topic": "cities", "partition": 0}'
```
* Offsets for multiple topic partitions:
```shell
curl https://tops-stingray-7863-eu1-rest-kafka.upstash.io/offsets/1642591892 -u myuser:mypass \
-d '[
{"topic": "cities", "partition": 0},
{"topic": "cities", "partition": 1},
{"topic": "greetings", "partition": 0}
]'
```
To find out the first and the end offsets for the partitions, `earliest` and
`latest` strings should be used as timestamp values.
* Beginning offsets for topic partitions:
```shell
curl https://tops-stingray-7863-eu1-rest-kafka.upstash.io/offsets/earliest -u myuser:mypass \
-d '[
{"topic": "cities", "partition": 0},
{"topic": "cities", "partition": 1},
{"topic": "greetings", "partition": 0}
]'
```
* End offsets for topic partitions:
```shell
curl https://tops-stingray-7863-eu1-rest-kafka.upstash.io/offsets/latest -u myuser:mypass \
-d '[
{"topic": "cities", "partition": 0},
{"topic": "cities", "partition": 1},
{"topic": "greetings", "partition": 0}
]'
```
* Offsets with a `1 second` timeout:
```shell
curl https://tops-stingray-7863-eu1-rest-kafka.upstash.io/offsets/latest?timeout=1000 -u myuser:mypass \
-d '{"topic": "cities", "partition": 1}'
```
**Response:**
Returns a JSON array of `TopicPartitionOffset`s:
```json
[
{ "topic": "cities", "partition": 0, "offset": 11 },
{ "topic": "cities", "partition": 1, "offset": 21 },
{ "topic": "greetings", "partition": 0, "offset": 1 }
]
```
# Producer API
Source: https://upstash.com/docs/kafka/rest/restproducer
Producer API is used to send one or more messages to the same or multiple Kafka
topics.
There are three variants of the Producer API:
1. `GET /produce/$TOPIC/$MESSAGE?key=$KEY`:
Sends a single message (`$MESSAGE`) to a topic (`$TOPIC`) using HTTP GET.
Optionally message key can be appended with a query parameter`?key=$KEY`.
Without message key:
```shell
curl https://tops-stingray-7863-eu1-rest-kafka.upstash.io/produce/greetings/hello_kafka -u myuser:mypass
```
With a message key:
```shell
curl https://tops-stingray-7863-eu1-rest-kafka.upstash.io/produce/cities/Istanbul?key=city -u myuser:mypass
```
**Response:**
A single metadata response is returned as JSON. Its structure is:
```typescript
Metadata{
topic: String,
partition: Int,
offset: Long,
timestamp: Long
}
```
2. `[GET | POST] /produce/$TOPIC`:
Produces one or more messages to a single topic (`$TOPIC`). Messages are sent
using request body as JSON. Structure of the message JSON is:
```typescript
Header {key: String, value: String}
Message{
partition?: Int,
timestamp?: Long,
key?: String,
value: String,
headers?: Array
}
```
Only `value` field is required. `partition`, `timestamp`, `key` and `headers`
fields are optional. When left blank, `partition` and `timestamp` fields will
be assigned by Kafka brokers. It's valid to send a single message or array of
messages as JSON.
* Single message with only value:
```shell
curl https://tops-stingray-7863-eu1-rest-kafka.upstash.io/produce/greetings -u myuser:mypass \
-d '{"value": "hello_kafka"}'
```
* Single message with multiple attributes:
```shell
curl https://tops-stingray-7863-eu1-rest-kafka.upstash.io/produce/cities -u myuser:mypass \
-d '{"partition": 1, "key": "city", "value": "Istanbul", "headers": [{"key": "expire", "value": "1637745834756"}] }'
```
* Multiple messages with only values:
```shell
curl https://tops-stingray-7863-eu1-rest-kafka.upstash.io/produce/greetings -u myuser:mypass \
-d '[
{"value": "hello_world"},
{"value": "hello_upstash"},
{"value": "hello_kafka"}
]'
```
* Multiple messages with attributes:
```shell
curl https://tops-stingray-7863-eu1-rest-kafka.upstash.io/produce/cities -u myuser:mypass \
-d '[
{"partition": 1, "timestamp": 1637745834744, "key": "city", "value": "Istanbul"},
{"partition": 2, "timestamp": 1637745823147, "key": "city", "value": "London"},
{"partition": 3, "timestamp": 1637455583829, "key": "city", "value": "Tokyo"},
]'
```
**Response:**
A metadata array response is returned as JSON. Its structure is same as
above. Each metadata in the response array belongs the message with the same
order in the request.
3. `[GET | POST] /produce`:
Produces one or more messages to a single or multiple topics. Messages are
sent using request body as JSON. Structure of the message JSON is the same as
the above, there's only an additional `topic` field:
```typescript
Message{
topic: String,
partition?: Int,
timestamp?: Long,
key?: String,
value: String,
headers?: Array
}
```
Only `topic` and `value` fields are required. `partition`, `timestamp`, `key`
and `headers` fields are optional. When left blank, `partition` and
`timestamp` fields will be assigned by Kafka brokers. It's valid to send a
single message or array of messages as JSON.
* Single message:
```shell
curl https://tops-stingray-7863-eu1-rest-kafka.upstash.io/produce -u myuser:mypass \
-d '{"topic": "greetings", "value": "hello_kafka"}'
```
* Multiple messages for a single topic:
```shell
curl https://tops-stingray-7863-eu1-rest-kafka.upstash.io/produce -u myuser:mypass \
-d '[
{"topic": "greetings", "value": "hello_world"},
{"topic": "greetings", "value": "hello_upstash"},
{"topic": "greetings", "value": "hello_kafka"}
]'
```
* Multiple messages to multiple topics:
```shell
curl https://tops-stingray-7863-eu1-rest-kafka.upstash.io/produce -u myuser:mypass \
-d '[
{"topic": "greetings", "value": "hello_world"},
{"topic": "greetings", "value": "hello_upstash"},
{"topic": "cities", "partition": 1, "value": "Istanbul"},
{"topic": "cities", "partition": 2, "value": "London"},
{"topic": "cities", "partition": 3, "value": "Tokyo"},
]'
```
**Response:**
A metadata array response is returned as JSON. Its structure is same as
above. Each metadata in the response array belongs the message with the same
order in the request.
Producer API works with `acks=all` [producer
configuration](https://kafka.apache.org/28/documentation.html#producerconfigs_acks),
which means the topic partition's leader will wait for the all in-sync
replicas to acknowledge the produced messages.
# Webhook API for Kafka
Source: https://upstash.com/docs/kafka/rest/webhook
A webhook is a custom *HTTP callback*, which can be triggered by some event from
another service, such as:
* pushing code to a git repository (e.g.
[GitHub](https://docs.github.com/en/developers/webhooks-and-events/webhooks/about-webhooks))
* an app is built and deployed to production (e.g.
[CircleCI](https://circleci.com/docs/2.0/webhooks/))
* a new user signed-up to a website (e.g.
[Auth0](https://auth0.com/docs/customize/hooks))
* a payment failed (e.g. [Stripe](https://stripe.com/docs/webhooks) )
* a new order is submitted on an e-commerce app (e.g.
[Shopify](https://shopify.dev/api/admin-rest/2022-01/resources/webhook#top) )
* an app fires a failure event on a logging system (e.g.
[Datadog](https://docs.datadoghq.com/integrations/webhooks/) )
When one of these events occurs, the source service notifies the webhook API by
making a call using an HTTP request. Because webhook APIs are pure HTTP, they
can be added to the existing flows without using another layer, such as
serverless functions, to call the target API.
Upstash Kafka Webhook API allows to publish these events directly to a user
defined topic without using a third-party infrastructure or service.
Signature of the Webhook API is:
```js
[GET | POST] /webhook?topic=$TOPIC_NAME
```
`topic` parameter is the target Kafka topic name to store events. Request body
is used as the message value and request headers (excluding standard HTTP
headers) are converted to message headers.
Webhook API supports both Basic HTTP Authentication and passing credentials as
query params when the source service does not support HTTP Auth. When Basic HTTP
Auth is not available, `user` and `pass` query parameters should be used to send
Upstash Kafka REST credentials.
* Usage with Basic HTTP Auth:
```shell
curl https://tops-stingray-7863-eu1-rest-kafka.upstash.io/webhook?topic=my-app-events -u myuser:mypass \
-d 'some event data'
```
* Usage without HTTP Auth:
```shell
curl https://tops-stingray-7863-eu1-rest-kafka.upstash.io/webhook?topic=my-app-events&user=myuser&pass=mypass \
-d 'some event data'
```
* With HTTP Headers:
```shell
curl https://tops-stingray-7863-eu1-rest-kafka.upstash.io/webhook?topic=my-app-events -u myuser:mypass \
-d 'some event data' \
-H "event-timestamp: 1642628041" \
-H "event-origin: my-app"
```
Above webhook call is equivalent to:
```shell
curl https://tops-stingray-7863-eu1-rest-kafka.upstash.io/produce -u myuser:mypass \
-d '{
"topic": "my-app-events",
"value": "some event data",
"headers": [
{"key": "event-timestamp", "value": "1642628041"},
{"key": "event-origin", "value": "my-app"},
]
}'
```
# Compatibility
Source: https://upstash.com/docs/kafka/schema-registry/schemacompatibility
One of the following compatibility rules can be selected when using the Schema Registry:
* `BACKWARD`: consumers using the new schema can read data written by producers using the latest registered schema.
* `BACKWARD_TRANSITIVE`(default): consumers using the new schema can read data written by producers using all previously registered schemas.
* `FORWARD`: consumers using the latest registered schema can read data written by producers using the new schema.
* `FORWARD_TRANSITIVE`: consumers using all previously registered schemas can read data written by producers using the new schema.
* `FULL`: the new schema is forward and backward compatible with the latest registered schema.
* `FULL_TRANSITIVE`: the new schema is forward and backward compatible with all previously registered schemas.
* `NONE`: schema compatibility checks are disabled.
To enable the semantics above, you are allowed to make the following changes in each option.
If you choose `TRANSITIVE`, it means that schema will be compared against all versions before,
not only the last one.
The table shows which applications `consumers` / `producers` should be upgraded first.
| Compatibility Type | What is allowed | Upgrade first |
| ----------------------- | ------------------------------------------- | -------------- |
| `BACKWARD[_TRANSITIVE]` | Delete fields. Add optional fields. | Consumers |
| `FORWARD[_TRANSITIVE]` | Add fields. Delete optional fields. | Producers |
| `FULL[_TRANSITIVE]` | Add optional fields.Delete optional fields. | Any order |
| `NONE` | All changes are accepted. | Not Applicable |
# How to
Source: https://upstash.com/docs/kafka/schema-registry/schemahowto
Schema registry can be used in various scenarios. In this page, the configurations for different use-cases are listed.
You can find the related parameters that you need the use in the configurations from [Upstash Console](https://console.upstash.com).
Scroll down to the `REST API` section to find the values you need:
* `UPSTASH_KAFKA_REST_URL`
* `UPSTASH_KAFKA_REST_USERNAME`
* `UPSTASH_KAFKA_REST_PASSWORD`
## Producer/Consumer
### Producer
If you need to configure your producers to use the schema registry, add the following properties to producer properties in addition to the broker configurations. Note that the selected deserializer needs to be schema-registry aware.
```java
Properties props = new Properties();
// ... other configurations like broker.url and broker authentication are skipped
props.put("key.serializer", "org.apache.kafka.common.serialization.StringSerializer");
props.put("value.serializer, "io.confluent.kafka.serializers.KafkaAvroSerializer");
props.put("schema.registry.url", UPSTASH_KAFKA_REST_URL + "/schema-registry");
props.put("basic.auth.credentials.source", "USER_INFO");
props.put("basic.auth.user.info", UPSTASH_KAFKA_REST_USERNAME + ":" + UPSTASH_KAFKA_REST_PASSWORD);
try (var producer = new KafkaProducer(props)) {
// ...
}
```
### Consumer
If you need to configure your consumers to use the schema registry, add the following
properties to consumer properties in addition to the broker configurations.
Note that the selected deserializer needs to be schema-registry aware.
```java
Properties props = new Properties();
// ... other configurations like broker.url and broker authentication are skipped
props.put("key.deserializer", "org.apache.kafka.common.serialization.StringDeserializer");
props.put("value.deserializer, "io.confluent.kafka.serializers.KafkaAvroDeserializer");
props.put("schema.registry.url", "$UPSTASH_KAFKA_REST_URL/schema-registry");
props.put("basic.auth.credentials.source", "USER_INFO");
props.put("basic.auth.user.info", UPSTASH_KAFKA_REST_USERNAME + ":" + UPSTASH_KAFKA_REST_PASSWORD);
try(var consumer = new KafkaConsumer(props)) {
// ...
}
```
## Connectors
Some connectors forces you to use a STRUCT as key/value which means that you need a schema and a schema aware convertor to use with the connector.
For this case, you can add the following configurations to your connector.
```json
{
"name": "myConnector",
"properties": {
"connector.class": "io.debezium.connector.mysql.MySqlConnector",
// other configurations are skipped.
"key.converter": "io.confluent.connect.avro.AvroConverter",
"key.converter.upstash.schema.registry.enable": "true",
"value.converter": "io.confluent.connect.avro.AvroConverter",
"value.converter.upstash.schema.registry.enable": "true"
}
}
```
The config above is the shorther version of the following.
```json
{
"name": "myConnector",
"properties": {
"connector.class": "io.debezium.connector.mysql.MySqlConnector",
// other configurations are skipped.
"key.converter": "io.confluent.connect.avro.AvroConverter",
"key.converter.basic.auth.credentials.source": "USER_INFO",
"key.converter.basic.auth.user.info": "UPSTASH_KAFKA_REST_USERNAME:UPSTASH_KAFKA_REST_PASSWORD",
"key.converter.schema.registry.url": "UPSTASH_KAFKA_REST_URL/schema-registry",
"value.converter": "io.confluent.connect.avro.AvroConverter",
"value.converter.basic.auth.credentials.source": "USER_INFO",
"value.converter.basic.auth.user.info": "UPSTASH_KAFKA_REST_USERNAME:UPSTASH_KAFKA_REST_PASSWORD",
"value.converter.schema.registry.url": "UPSTASH_KAFKA_REST_URL/schema-registry"
}
}
```
## Thirdy party UI tools
You can use third-party UI tools to use the schema registry with.
We have schema registry configuration examples in our `Monitoring` section.
* [AKHQ](../monitoring/akhq)
* [kafka-ui](../monitoring/kafka-ui)
## SchemaRegistryClient
[SchemaRegistryClient](https://github.com/confluentinc/schema-registry/blob/master/client/src/main/java/io/confluent/kafka/schemaregistry/client/SchemaRegistryClient.java)
can be used to access the schema registry programmatically. In this case, you can configure it as following:
```java
Map configs = new HashMap<>();
configs.put(SchemaRegistryClientConfig.BASIC_AUTH_CREDENTIALS_SOURCE, "USER_INFO");
configs.put(SchemaRegistryClientConfig.USER_INFO_CONFIG, UPSTASH_KAFKA_REST_USERNAME + ":" + UPSTASH_KAFKA_REST_PASSWORD);
var client = new CachedSchemaRegistryClient(UPSTASH_KAFKA_REST_URL + "/schema-registry", 100, configs);
```
# Introduction
Source: https://upstash.com/docs/kafka/schema-registry/schemaintroduction
Schema Registry serves as a central hub to handle and validate schemas for message data related to Kafka topics.
It also manages serialization and deserialization of data over the network.
This aids producers and consumers in maintaining data consistency and compatibility as schemas change.
Schema Registry by Upstash is API compatible with the Confluent Schema Registry. That means you can use
it with:
* io.confluent.kafka.serializers.KafkaAvroSerializer/Deserializer
* io.confluent.connect.avro.AvroConverter
* Any UI tool that supports Confluent Schema Registry.
See [How to](./schemahowto) to learn how to configure the schema registry to use in various scenarios.
See [Compatibility](./schemacompatibility) page for details of compatibility settings.
See [Rest API](./schemarest) in case you want to directly access the schema registry.
# Rest API
Source: https://upstash.com/docs/kafka/schema-registry/schemarest
## Register Schema
`POST /subjects/$SUBJECT/versions?normalize=[true/false]`
Registers the schema under given `$SUBJECT` only if the new schema is [compatible](./schemacompatibility).
`normalize` is false by default. If passed, the schema will be normalized.
Normalization enables semantically same but syntactically different schemas to be accounted as the same schema.
```shell
curl https://tops-stingray-7863-eu1-rest-kafka.upstash.io/schema-registry/subjects/$SUBJECT/versions -u myuser:mypass -d '
{
"schema": "{
\"type\": \"record\",
\"name\": \"myRecord\",
\"fields\":
[
{\"type\": \"string\",\"name\": \"field1\"},
{\"type\": \"int\" ,\"name\": \"field2\"}
]
}",
"schemaType": "AVRO"
}'
```
**Success Response:**
The schema ID returned as the response:
```json
{"id" : 2}
```
**Fail Response:**
```
- 409 Conflict – Incompatible schema
- 422 Unprocessable Entity
- Error code 42201 – Invalid schema
- 500 Internal Server Error
- Error code 50001 – Error in the backend data store
- Error code 50002 – Operation timed out
- Error code 50003 – Error while forwarding the request to the primary
```
## Check schema
`POST /subjects/$SUBJECT?normalize=[true/false]&deleted=[true/false]`
Check if the given schema is registered under the `$SUBJECT`. Returns the schema along with subject, version, and schema type.
`normalize` is false by default. If set to `true`, the schema will be normalized.
Normalization enables semantically same but syntactically different schemas to be accounted as the same schema.
`deleted` is false by default. If set to `true`, the soft-deleted schemas under the subject will also be taken into account.
See [Delete Subject](#delete-subject) or [Delete Schema](#delete-schema) for details.
````shell
curl https://tops-stingray-7863-eu1-rest-kafka.upstash.io/schema-registry/my-subject/$SUBJECT -u myuser:mypass -d '
{
"schema": "{
\"type\": \"record\",
\"name\": \"myRecord\",
\"fields\":
[
{\"type\": \"string\",\"name\": \"field1\"},
{\"type\": \"int\" ,\"name\": \"field2\"}
]
}",
"schemaType": "AVRO"
}'
**Success Response:**
```json
{
"subject": "my-subject",
"id": 2
"version": 3
"schema":
"
{
"schema": "{
\"type\": \"record\",
\"name\": \"myRecord\",
\"fields\":
[
{\"type\": \"string\",\"name\": \"field1\"},
{\"type\": \"int\" ,\"name\": \"field2\"}
]
}",
"schemaType": "AVRO"
}
"
}
````
**Fail Response**
```
- 404 Not Found
- Error code 40401 – Subject not found
- Error code 40403 – Schema not found
- 500 Internal Server Error
- Error code 50001 – Error in the backend data store
- Error code 50002 – Operation timed out
- Error code 50003 – Error while forwarding the request to the primary
```
## Set Config
`PUT /config`
Sets the global compatibility. Global compatibility is effective if a subject is not assigned a compatibility by default.
See [Compatibility](./schemacompatibility) for options.
```shell
curl -X PUT https://tops-stingray-7863-eu1-rest-kafka.upstash.io/schema-registry/config -u myuser:mypass -d '
{
"compatibility" : "FULL"
}'
```
`PUT /config/$SUBJECT`
Sets the compatibility of a subject.
See [Compatibility](./schemacompatibility) for options.
```shell
curl -X PUT https://tops-stingray-7863-eu1-rest-kafka.upstash.io/schema-registry/config/my-subject -u myuser:mypass -d '
{
"compatibility" : "FULL"
}'
```
**Success Response:**
```json
{
"compatibilityLevel" : "FULL"
}
```
**Fail Response**
```
- 500 Internal Server Error
- Error code 50001 – Error in the backend data store
- Error code 50002 – Operation timed out
- Error code 50003 – Error while forwarding the request to the primary
```
## Get Config
`GET /config`
Retrieves the global config. Note that the default global config is `BACKWARD_TRANSITIVE` by default if not set.
```shell
curl https://tops-stingray-7863-eu1-rest-kafka.upstash.io/schema-registry/config -u myuser:mypass
```
`GET /config/$SUBJECT?defaultToGlobal=[true/false]`
Retrieves the config of the given `$SUBJECT`.
`defaultToGlobal` is false by default. When set to `true`, this endpoint will show the effective compatibility on a register
operation. When set to `false`, it may return 404 Not found if a subject level compatibility is not set.
```shell
curl https://tops-stingray-7863-eu1-rest-kafka.upstash.io/schema-registry/config/my-subject -u myuser:mypass
```
**Success Response:**
```json
{
"compatibilityLevel" : "FULL"
}
```
**Fail Response**
```
- 404 Not Found – Subject not found
- 500 Internal Server Error
- Error code 50001 – Error in the backend data store
- Error code 50002 – Operation timed out
- Error code 50003 – Error while forwarding the request to the primary
```
## Get All Schemas
`GET /schemas?deleted=[false/true]`
Returns all schemas registered under subjects. Note that this endpoint will return the same schema multiple times if the same schema registered
under different subjects.
`deleted` is false by default. If set to `true`, the soft-deleted schemas under the subject will also be taken into account.
See [Delete Subject](#delete-subject) or [Delete Schema](#delete-schema) for details.
```shell
curl https://tops-stingray-7863-eu1-rest-kafka.upstash.io/schema-registry/schemas -u myuser:mypass
```
**Success Response:**
```json
[
{
"subject": "subject1",
"version": 1,
"id": 1,
"schemaType": "AVRO",
"schema": "{\"type\":\"record\",\"name\":\"test\",\"fields\":[{\"name\":\"field1\",\"type\":\"string\"}]}"
},
{
"subject": "subject2",
"version": 1,
"id": 2,
"schemaType": "AVRO",
"schema": "{\"type\":\"record\",\"name\":\"test\",\"fields\":[{\"name\":\"field1\",\"type\":\"string\"},{\"name\":\"field2\",\"type\":\"string\",\"default\":\"x\"}]}"
}
]
```
**Fail Response**
```
- 500 Internal Server Error
- Error code 50001 – Error in the backend data store
- Error code 50002 – Operation timed out
- Error code 50003 – Error while forwarding the request to the primary
```
## Get Schema With SchemaId
`GET /schemas/ids/$SCHEMA_ID`
Returns the schema corresponding to the given `$SCHEMA_ID`.
```shell
curl https://tops-stingray-7863-eu1-rest-kafka.upstash.io/schema-registry/schema/ids/1 -u myuser:mypass
```
**Success Response:**
```json
{
"schema": "{\"type\":\"record\",\"name\":\"test\",\"fields\":[{\"name\":\"field1\",\"type\":\"string\"}]}"
}
```
**Fail Response**
```
- 404 Not Found
- Error code 40403 – Schema not found
- 500 Internal Server Error
- Error code 50001 – Error in the backend data store
- Error code 50002 – Operation timed out
- Error code 50003 – Error while forwarding the request to the primary
```
`GET /schemas/ids/$SCHEMA_ID/schema`
Returns the schema corresponding to the given `$SCHEMA_ID`. Additionally unwraps the inner schema field.
```shell
curl https://tops-stingray-7863-eu1-rest-kafka.upstash.io/schema-registry/schema/ids/1/schema -u myuser:mypass
```
**Success Response:**
```json
{
"type": "record",
"name": "test",
"fields": [
{
"name": "field1",
"type": "string"
}
]
}
```
**Fail Response**
```
- 404 Not Found
- Error code 40403 – Schema not found
- 500 Internal Server Error
- Error code 50001 – Error in the backend data store
- Error code 50002 – Operation timed out
- Error code 50003 – Error while forwarding the request to the primary
```
## Get Schema With Subject And Version
`GET /subjects/$SUBJECT/versions/$VERSION?deleted=[true/false]`
Returns the schema with its metadata corresponding to the given `$SUBJECT` and `$VERSION`.
VERSION could be an int or string `latest`.
`deleted` is false by default. If set to `true`, the soft-deleted schemas under the subject will also be taken into account.
See [Delete Subject](#delete-subject) or [Delete Schema](#delete-schema) for details.
```shell
curl https://tops-stingray-7863-eu1-rest-kafka.upstash.io/schema-registry/subjects/subject1/versions/1 -u myuser:mypass
```
**Success Response:**
```json
{
"subject": "s1",
"version": 1,
"id": 1,
"schemaType": "AVRO",
"schema": "{\"type\":\"record\",\"name\":\"test\",\"fields\":[{\"name\":\"field1\",\"type\":\"string\"}]}"
}
```
**Fail Response**
```
- 404 Not Found
- Error code 40403 – Schema not found
- 500 Internal Server Error
- Error code 50001 – Error in the backend data store
- Error code 50002 – Operation timed out
- Error code 50003 – Error while forwarding the request to the primary
```
`GET /subjects/$SUBJECT/versions/$VERSION?deleted=[true/false]`
Returns only the schema corresponding to the given `$SUBJECT` and `$VERSION`.
VERSION could be an int or string `latest`.
`deleted` is false by default. If set to `true`, the soft-deleted schemas under the subject will also be taken into account.
See [Delete Subject](#delete-subject) or [Delete Schema](#delete-schema) for details.
```shell
curl https://tops-stingray-7863-eu1-rest-kafka.upstash.io/schema-registry/subjects/subject1/versions/1/schema -u myuser:mypass
```
**Success Response:**
```json
{
"type": "record",
"name": "test",
"fields": [
{
"name": "field1",
"type": "string"
}
]
}
```
**Fail Response**
```
- 404 Not Found
- Error code 40401 – Subject not found
- Error code 40402 – Version not found
- 422 Unprocessable Entity
- Error code 42202 – Invalid version
- 500 Internal Server Error
- Error code 50001 – Error in the backend data store
- Error code 50002 – Operation timed out
- Error code 50003 – Error while forwarding the request to the primary
```
## Get All Subjects
`GET /subjects?deleted=[false/true]`
Returns all subjects.
`deleted` is false by default. If set to `true`, the soft-deleted subjects will also be taken into account.
See [Delete Subject](#delete-subject) or [Delete Schema](#delete-schema) for details.
```shell
curl https://tops-stingray-7863-eu1-rest-kafka.upstash.io/schema-registry/subjects -u myuser:mypass
```
**Success Response:**
```json
["subject1","subject2"]
```
**Fail Response**
```
- 500 Internal Server Error
- Error code 50001 – Error in the backend data store
- Error code 50002 – Operation timed out
- Error code 50003 – Error while forwarding the request to the primary
```
## Get Subject Versions
`GET /subjects/$SUBJECT/versions?deleted=[false/true]`
Returns the versions of the given `$SUBJECT`.
`deleted` is false by default. If set to `true`, the soft-deleted subject versions will also be taken into account.
See [Delete Subject](#delete-subject) or [Delete Schema](#delete-schema) for details.
```shell
curl https://tops-stingray-7863-eu1-rest-kafka.upstash.io/schema-registry/subjects/subject1/versions -u myuser:mypass
```
**Success Response:**
```json
[ 1, 2 ]
```
**Fail Response**
```
- 404 Not Found
- Error code 40401 – Subject not found
- 500 Internal Server Error
- Error code 50001 – Error in the backend data store
- Error code 50002 – Operation timed out
- Error code 50003 – Error while forwarding the request to the primary
```
## Delete Subject
`DELETE /subjects/$SUBJECT?permanent=[true/false]`
Deletes the given `$SUBJECT`. Returns the deleted versions as the response.
This endpoint should rarely be needed in production and needs to be used with caution.
The use-case for this endpoint is mostly cleaning up the resources after testing in development environments.
`permanent` is false by default. In this case, the subject only will be soft-deleted. The corresponding schemas and schema-ids
will not be deleted. Any serializer/deserializer needing these schemas still will be able to use them.
if `permanent` is set to true. The schemas and schema-ids will also be deleted from the system only if these schemas are not
registered under any other subjects. The schemas will be deleted only after the last related subject is permanently deleted.
Note that a subject can not be permanently deleted before it is soft-deleted.
```shell
curl -X DELETE https://tops-stingray-7863-eu1-rest-kafka.upstash.io/schema-registry/subjects/my-subject -u myuser:mypass
```
**Success Response:**
Returns the deleted versions as the response.
```json
[1, 2, 3]
```
**Fail Response:**
```
- 404 Not Found
- Error code 40401 – Subject not found
- Error code 40404 - Subject '$SUBJECT' was soft deleted. Set permanent=true to delete permanently
- Error code 40405 - Subject '$SUBJECT' was not deleted first before being permanently deleted
- 422 Unprocessable Entity
- Error code 42202 – Invalid version
- 500 Internal Server Error
- Error code 50001 – Error in the backend data store
- Error code 50002 – Operation timed out
- Error code 50003 – Error while forwarding the request to the primary
```
## Delete Schema
`DELETE /subjects/$SUBJECT/versions/$VERSION?permanent=[true/false]`
Deletes the schema corresponding to the `$SUBJECT` and `$VERSION`. Returns the version as the response.
VERSION could be an int or string `latest`.
This endpoint should rarely be needed in production and needs to be used with caution.
The use-case for this endpoint is mostly cleaning up the resources after testing in development environments.
`permanent` is false by default. In this case, the subject-version only will be soft-deleted. The corresponding schema and schema-id
will not be deleted. Any serializer/deserializer needing this schema still will be able to use them.
if `permanent` is set to true. The schema and schema-id will also be deleted from the system only if this schema is not
registered under any other subjects. The schemas will be deleted only after the last related subject is permanently deleted.
Note that a subject-version can not be permanently deleted before it is soft-deleted.
```shell
curl -X DELETE https://tops-stingray-7863-eu1-rest-kafka.upstash.io/schema-registry/subjects/my-subject/versions/2 -u myuser:mypass
```
**Success Response:**
Returns the deleted version as the response.
```json
1
```
**Fail Response:**
```
- 404 Not Found
- Error code 40401 – Subject not found
- Error code 40402 – Version not found
- Error code 40406 - Subject '$SUBJECT' Version $VERSION was soft deleted. Set permanent=true to delete permanently
- Error code 40407 - Subject '$SUBJECT' Version $VERSION was not deleted first before being permanently deleted
- 422 Unprocessable Entity
- Error code 42202 – Invalid version
- 500 Internal Server Error
- Error code 50001 – Error in the backend data store
- Error code 50002 – Operation timed out
- Error code 50003 – Error while forwarding the request to the primary
```
# Typescript SDK
Source: https://upstash.com/docs/kafka/sdk/tskafka
You can find the Github Repository [here](https://github.com/upstash/upstash-kafka).
## Installation
```bash
npm install @upstash/kafka
```
## Quickstart
1. Go to [upstash](https://console.upstash.com/kafka) and select your cluster.
2. Copy the `REST API` secrets at the bottom of the page
```typescript
import { Kafka } from "@upstash/kafka";
const kafka = new Kafka({
url: "",
username: "",
password: "",
});
```
## Produce a single message
```typescript
const p = kafka.producer();
const message = { hello: "world" }; // Objects will get serialized using `JSON.stringify`
const res = await p.produce("", message);
const res = await p.produce("", message, {
partition: 1,
timestamp: 12345,
key: "",
headers: [{ key: "traceId", value: "85a9f12" }],
});
```
## Produce multiple messages.
The same options from the example above can be set for every message.
```typescript
const p = kafka.producer();
const res = await p.produceMany([
{
topic: "my.topic",
value: { hello: "world" },
// ...options
},
{
topic: "another.topic",
value: "another message",
// ...options
},
]);
```
## Consume
The first time a consumer is created, it needs to figure out the group
coordinator by asking the Kafka brokers and joins the consumer group. This
process takes some time to complete. That's why when a consumer instance is
created first time, it may return empty messages until consumer group
coordination is completed.
```typescript
const c = kafka.consumer();
const messages = await c.consume({
consumerGroupId: "group_1",
instanceId: "instance_1",
topics: ["test.topic"],
autoOffsetReset: "earliest",
});
```
More examples can be found in the
[docstring](https://github.com/upstash/upstash-kafka/blob/main/pkg/consumer.ts#L265)
## Commit manually
While `consume` can handle committing automatically, you can also use
`Consumer.commit` to manually commit.
```typescript
const consumerGroupId = "mygroup";
const instanceId = "myinstance";
const topic = "my.topic";
const c = kafka.consumer();
const messages = await c.consume({
consumerGroupId,
instanceId,
topics: [topic],
autoCommit: false,
});
for (const message of messages) {
// message handling logic
await c.commit({
consumerGroupId,
instanceId,
offset: {
topic: message.topic,
partition: message.partition,
offset: message.offset,
},
});
}
```
## Fetch
You can also manage offsets manually by using `Consumer.fetch`
```typescript
const c = kafka.consumer();
const messages = await c.fetch({
topic: "greeting",
partition: 3,
offset: 42,
timeout: 1000,
});
```
## Examples
See [examples](https://github.com/upstash/upstash-kafka/tree/main/examples) as
well as various examples in the docstrings of each method.
# Send Datadog Events to Kafka
Source: https://upstash.com/docs/kafka/tutorials/datadog_kafka_connect
This tutorial shows how to send Datadog Events to Upstash Kafka using webhook API
In this post, we will show how to connect Datadog to Upstash Kafka so Datadog
events will be sent to Kafka. We will use the [Webhook API](../rest/webhook)
provided by Upstash.
### Kafka Setup
Create an Upstash Kafka cluster and a topic as explained
[here](https://docs.upstash.com/kafka). In the cluster page, under the Webhook
API section, copy the webhook URL. It should be something like this:
```shell
https://definite-goldfish-14080-us1-rest-kafka.upstash.io/webhook?topic=datadog&user=ZGVmaW5pdGzQy2VXOja9Lkj35hhj&pass=v02ibEOSBgo42TwSZ0BPcIl2ziBk3eg7ITxCmkHwjm
```
You can change the topic parameter depending on which topic you want to send the
Datadog events.
### Webhook Setup
Login to your Datadog dashboard and click on
[Webhook Integration](https://app.datadoghq.com/account/settings?#integrations/webhooks).
Enter a name for your webhook and paste the webhook URL that you copied from the
Upstash Console. You can also change the payload template and add some custom
headers as described [here](https://docs.datadoghq.com/integrations/webhooks/).
### Monitor Setup
Now you need to select which events to sent to Kafka. You can either
[create a new monitor](https://app.datadoghq.com/monitors/create) or
[update existing monitors](https://app.datadoghq.com/monitors/manage). At the
`Notify your team` section you need to add your webhook, so the monitor will
start sending new events to Kafka via webhook API.
Now you can manually trigger an event and check your Kafka topic to see the
events are coming. Copy/paste the curl consume expression from \[Upstash Console]
to check the new events.
```shell
curl https://definite-goldfish-14224-us1-rest-kafka.upstash.io/consume/GROUP_NAME/GROUP_INSTANCE_NAME/datadogtopic -u \
ZGVmaW5pdGUtZ29swSZ0BPcfdgfdfg45543tIl2ziBk3eg7ITxCmkHwjmRdN
```
# Get Started with AWS Lambda and Kafka
Source: https://upstash.com/docs/kafka/tutorials/getstarted_awslambda_kafka
This tutorial shows how to produce Kafka messages in AWS Lambda. If you want
to consume Kafka messages in AWS Lambda then check [this
one](../howto/kafkaproduceinlambda)
# Get Started with Cloudflare Workers and Kafka
Source: https://upstash.com/docs/kafka/tutorials/getstarted_cloudflare_workers_kafka
TODO: andreas
import CloudflareWorkers from "../howto/kafkaproduceincloudflareworkers";
# Get Started with Next.js and Kafka
Source: https://upstash.com/docs/kafka/tutorials/getstarted_nextjs_kafka
This tutorial shows how to use Upstash Kafka with Next.js.
In this post, we will implement the most simple application where we will
publish messages to Kafka from a Next.js application.
### Project Setup
First create a Next project with:
```
➜ kafka-examples git:(master) ✗ npx create-next-app@latest
✔ What is your project named? … getstarted-nextjs
Creating a new Next.js app in /Users/enes/dev/kafka-examples/getstarted-nextjs.
```
Then create an Upstash Kafka cluster and a topic as explained
[here](https://docs.upstash.com/kafka). In the cluster page, under the REST API
section, copy the producer code under the tab `Javascript (fetch)`.
### Implementation
Paste the producer code to the `pages/api/hello.js` as below:
```javascript
export default function handler(req, res) {
fetch(
"https://full-mantis-14079-us1-rest-kafka.upstash.io/produce/newtopic/MESSAGE",
{
headers: {
Authorization:
"Basic Wm5Wc2JDMzUwYVhNdE1UUXlPVDlUR2szT0ZkanZlWUhCVjlKanpvdzAzU25VdFJROjQtUi1mbXRvYWxYbm9ldTlUalFG5qZlNLd0VzRTEwWXZITWlXNjNoRmxqcVVycnE1X3lBcTRUUEdkOWM2SmJxZlE9PQ==",
},
}
)
.then((response) => response.json())
.then((data) => {
console.log(data);
});
res.status(200).json({ name: "John Doe" });
}
```
### Run and Deploy
Now you can test your code by running:
```
npm run dev
```
Check:
[http://localhost:3000/api/hello](http://localhost:3000/api/hello)
In the logs you should see the output of Kafka like below:
```json
{
"topic": "newtopic",
"partition": 0,
"offset": 281,
"timestamp": 1640993860432
}
```
# API Rate Limit Response
Source: https://upstash.com/docs/qstash/api/api-ratelimiting
This page documents the rate limiting behavior of our API and explains how to handle different types of rate limit errors.
## Overview
Our API implements rate limiting to ensure fair usage and maintain service stability. There are three types of rate limits:
1. **Daily rate limit**
2. **Burst rate limit**
3. **Chat-based rate limit**
When a rate limit is exceeded, the API returns a 429 status code along with specific headers that provide information about the limit, remaining requests/tokens, and reset time.
You can learn more about QStash plans and their limits on the [QStash pricing page](https://upstash.com/pricing/qstash).
### Daily Rate Limit
This is a **daily** limit applied to publish-related API endpoints (new message requests like publish, enqueue, or batch). Other API requests, such as fetching events or messages, do not count toward this limit.
**Headers**:
* `RateLimit-Limit`: Maximum number of requests allowed per day
* `RateLimit-Remaining`: Remaining number of requests for the day
* `RateLimit-Reset`: Time (in unix timestamp) when the daily limit will reset
### Burst Rate Limit
This is a short-term limit **per second** to prevent rapid bursts of requests. This limit applies to all API endpoints.
**Headers**:
* `Burst-RateLimit-Limit`: Maximum number of requests allowed in the burst window (1 second)
* `Burst-RateLimit-Remaining`: Remaining number of requests in the burst window (1 second)
* `Burst-RateLimit-Reset`: Time (in unix timestamp) when the burst limit will reset
### Chat-based Rate Limit
This limit is applied to chat-related API endpoints.
**Headers**:
* `x-ratelimit-limit-requests`: Maximum number of requests allowed per day
* `x-ratelimit-limit-tokens`: Maximum number of tokens allowed per day
* `x-ratelimit-remaining-requests`: Remaining number of requests for the day
* `x-ratelimit-remaining-tokens`: Remaining number of tokens for the day
* `x-ratelimit-reset-requests`: Time (in unix timestamp) until the request limit resets
* `x-ratelimit-reset-tokens`: Time (in unix timestamp) when the token limit will reset
### Example Rate Limit Error Handling
```typescript Handling Daily Rate Limit Error
import { QstashDailyRatelimitError } from "@upstash/qstash";
try {
// Example of a publish request that could hit the daily rate limit
const result = await client.publishJSON({
url: "https://my-api...",
// or urlGroup: "the name or id of a url group"
body: {
hello: "world",
},
});
} catch (error) {
if (error instanceof QstashDailyRatelimitError) {
console.log("Daily rate limit exceeded. Retry after:", error.reset);
// Implement retry logic or notify the user
} else {
console.error("An unexpected error occurred:", error);
}
}
```
```typescript Handling Burst Rate Limit Error
import { QstashRatelimitError } from "@upstash/qstash";
try {
// Example of a request that could hit the burst rate limit
const result = await client.publishJSON({
url: "https://my-api...",
// or urlGroup: "the name or id of a url group"
body: {
hello: "world",
},
});
} catch (error) {
if (error instanceof QstashRatelimitError) {
console.log("Burst rate limit exceeded. Retry after:", error.reset);
// Implement exponential backoff or delay before retrying
} else {
console.error("An unexpected error occurred:", error);
}
}
```
```typescript Handling Chat-based Rate Limit Error
import { QstashChatRatelimitError, Client, openai } from "@upstash/qstash";
try {
// Example of a chat-related request that could hit the chat rate limit
const client = new Client({
token: "",
});
const result = await client.publishJSON({
api: {
name: "llm",
provider: openai({ token: process.env.OPENAI_API_KEY! }),
},
body: {
model: "gpt-3.5-turbo",
messages: [
{
role: "user",
content: "Where is the capital of Turkey?",
},
],
},
callback: "https://oz.requestcatcher.com/",
});
} catch (error) {
if (error instanceof QstashChatRatelimitError) {
console.log("Chat rate limit exceeded. Retry after:", error.resetRequests);
// Handle chat-specific rate limiting, perhaps by queueing requests
} else {
console.error("An unexpected error occurred:", error);
}
}
```
# Authentication
Source: https://upstash.com/docs/qstash/api/authentication
Authentication for the QStash API
You'll need to authenticate your requests to access any of the endpoints in the
QStash API. In this guide, we'll look at how authentication works.
## Bearer Token
When making requests to QStash, you will need your `QSTASH_TOKEN` — you will
find it in the [console](https://console.upstash.com/qstash). Here's how to add
the token to the request header using cURL:
```bash
curl https://qstash.upstash.io/v2/publish/... \
-H "Authorization: Bearer "
```
## Query Parameter
In environments where setting the header is not possible, you can use the `qstash_token` query parameter instead.
```bash
curl https://qstash.upstash.io/v2/publish/...?qstash_token=
```
Always keep your token safe and reset it if you suspect it has been compromised.
# Delete a message from the DLQ
Source: https://upstash.com/docs/qstash/api/dlq/deleteMessage
DELETE https://qstash.upstash.io/v2/dlq/{dlqId}
Manually remove a message
Delete a message from the DLQ.
## Request
The dlq id of the message you want to remove. You will see this id when
listing all messages in the dlq with the [/v2/dlq](/qstash/api/dlq/listMessages) endpoint.
## Response
The endpoint doesn't return anything, a status code of 200 means the message is removed from the DLQ.
If the message is not found in the DLQ, (either is has been removed by you, or automatically), the endpoint returns a 404 status code.
```sh
curl -X DELETE https://qstash.upstash.io/v2/dlq/my-dlq-id \
-H "Authorization: Bearer "
```
# Delete multiple messages from the DLQ
Source: https://upstash.com/docs/qstash/api/dlq/deleteMessages
DELETE https://qstash.upstash.io/v2/dlq
Manually remove messages
Delete multiple messages from the DLQ.
You can get the `dlqId` from the [list DLQs endpoint](/qstash/api/dlq/listMessages).
## Request
The list of DLQ message IDs to remove.
## Response
A deleted object with the number of deleted messages.
```JSON
{
"deleted": number
}
```
```json 200 OK
{
"deleted": 3
}
```
```sh curl
curl -XDELETE https://qstash.upstash.io/v2/dlq \
-H "Authorization: Bearer " \
-H "Content-Type: application/json" \
-d '{
"dlqIds": ["11111-0", "22222-0", "33333-0"]
}'
```
```js Node
const response = await fetch("https://qstash.upstash.io/v2/dlq", {
method: "DELETE",
headers: {
Authorization: "Bearer ",
"Content-Type": "application/json",
},
body: {
dlqIds: [
"11111-0",
"22222-0",
"33333-0",
],
},
});
```
```python Python
import requests
headers = {
'Authorization': 'Bearer ',
'Content-Type': 'application/json',
}
data = {
"dlqIds": [
"11111-0",
"22222-0",
"33333-0"
]
}
response = requests.delete(
'https://qstash.upstash.io/v2/dlq',
headers=headers,
data=data
)
```
```go Go
var data = strings.NewReader(`{
"dlqIds": [
"11111-0",
"22222-0",
"33333-0"
]
}`)
req, err := http.NewRequest("DELETE", "https://qstash.upstash.io/v2/dlq", data)
if err != nil {
log.Fatal(err)
}
req.Header.Set("Authorization", "Bearer ")
req.Header.Set("Content-Type", "application/json")
resp, err := http.DefaultClient.Do(req)
if err != nil {
log.Fatal(err)
}
defer resp.Body.Close()
```
# Get a message from the DLQ
Source: https://upstash.com/docs/qstash/api/dlq/getMessage
GET https://qstash.upstash.io/v2/dlq/{dlqId}
Get a message from the DLQ
Get a message from DLQ.
## Request
The dlq id of the message you want to retrieve. You will see this id when
listing all messages in the dlq with the [/v2/dlq](/qstash/api/dlq/listMessages) endpoint,
as well as in the content of [the failure callback](https://docs.upstash.com/qstash/features/callbacks#what-is-a-failure-callback)
## Response
If the message is not found in the DLQ, (either is has been removed by you, or automatically), the endpoint returns a 404 status code.
```sh
curl -X GET https://qstash.upstash.io/v2/dlq/my-dlq-id \
-H "Authorization: Bearer "
```
# List messages in the DLQ
Source: https://upstash.com/docs/qstash/api/dlq/listMessages
GET https://qstash.upstash.io/v2/dlq
List and paginate through all messages currently inside the DLQ
List all messages currently inside the DLQ
## Request
By providing a cursor you can paginate through all of the messages in the DLQ
Filter DLQ messages by message id.
Filter DLQ messages by url.
Filter DLQ messages by url group.
Filter DLQ messages by schedule id.
Filter DLQ messages by queue name.
Filter DLQ messages by API name.
Filter DLQ messages by starting date, in milliseconds (Unix timestamp). This is inclusive.
Filter DLQ messages by ending date, in milliseconds (Unix timestamp). This is inclusive.
Filter DLQ messages by HTTP response status code.
Filter DLQ messages by IP address of the publisher.
The number of messages to return. Default and maximum is 100.
The sorting order of DLQ messages by timestamp. Valid values are "earliestFirst" and "latestFirst". The default is "earliestFirst".
## Response
A cursor which you can use in subsequent requests to paginate through all
events. If no cursor is returned, you have reached the end of the events.
```sh
curl https://qstash.upstash.io/v2/dlq \
-H "Authorization: Bearer "
```
```sh with cursor
curl https://qstash.upstash.io/v2/dlq?cursor=xxx \
-H "Authorization: Bearer "
```
```json 200 OK
{
"messages": [
{
"messageId": "msg_123",
"topicId": "tpc_123",
"url":"https://example.com",
"method": "POST",
"header": {
"My-Header": ["my-value"]
},
"body": "{\"foo\":\"bar\"}",
"createdAt": 1620000000000,
"state": "failed"
}
]
}
```
# Enqueue a Message
Source: https://upstash.com/docs/qstash/api/enqueue
POST https://qstash.upstash.io/v2/enqueue/{queueName}/{destination}
Enqueue a message
## Request
The name of the queue that message will be enqueued on.
If doesn't exist, it will be created automatically.
Destination can either be a topic name or id that you configured in the
Upstash console, a valid url where the message gets sent to, or a valid
QStash API name like `api/llm`. If the destination is a URL, make sure
the URL is prefixed with a valid protocol (`http://` or `https://`)
Id to use while deduplicating messages, so that only one message with
the given deduplication id is published.
When set to true, automatically deduplicates messages based on their content,
so that only one message with the same content is published.
Content based deduplication creates unique deduplication ids based on the
following message fields:
* Destination
* Body
* Headers
## Response
```sh curl
curl -X POST "https://qstash.upstash.io/v2/enqueue/myQueue/https://www.example.com" \
-H "Authorization: Bearer " \
-H "Content-Type: application/json" \
-H "Upstash-Method: POST" \
-H "Upstash-Retries: 3" \
-H "Upstash-Forward-Custom-Header: custom-value" \
-d '{"message":"Hello, World!"}'
```
```js Node
const response = await fetch(
"https://qstash.upstash.io/v2/enqueue/myQueue/https://www.example.com",
{
method: "POST",
headers: {
Authorization: "Bearer ",
"Content-Type": "application/json",
"Upstash-Method": "POST",
"Upstash-Retries": "3",
"Upstash-Forward-Custom-Header": "custom-value",
},
body: JSON.stringify({
message: "Hello, World!",
}),
}
);
```
```python Python
import requests
headers = {
'Authorization': 'Bearer ',
'Content-Type': 'application/json',
'Upstash-Method': 'POST',
'Upstash-Retries': '3',
'Upstash-Forward-Custom-Header': 'custom-value',
}
json_data = {
'message': 'Hello, World!',
}
response = requests.post(
'https://qstash.upstash.io/v2/enqueue/myQueue/https://www.example.com',
headers=headers,
json=json_data
)
```
```go Go
var data = strings.NewReader(`{"message":"Hello, World!"}`)
req, err := http.NewRequest("POST", "https://qstash.upstash.io/v2/enqueue/myQueue/https://www.example.com", data)
if err != nil {
log.Fatal(err)
}
req.Header.Set("Authorization", "Bearer ")
req.Header.Set("Content-Type", "application/json")
req.Header.Set("Upstash-Method", "POST")
req.Header.Set("Upstash-Retries", "3")
req.Header.Set("Upstash-Forward-Custom-Header", "custom-value")
resp, err := http.DefaultClient.Do(req)
if err != nil {
log.Fatal(err)
}
defer resp.Body.Close()
```
```json URL
{
"messageId": "msd_1234",
"url": "https://www.example.com"
}
```
```json URL Group
[
{
"messageId": "msd_1234",
"url": "https://www.example.com"
},
{
"messageId": "msd_5678",
"url": "https://www.somewhere-else.com",
"deduplicated": true
}
]
```
# List Events
Source: https://upstash.com/docs/qstash/api/events/list
GET https://qstash.upstash.io/v2/events
List all events that happened, such as message creation or delivery
## Request
By providing a cursor you can paginate through all of the events.
Filter events by message id.
Filter events by [state](/qstash/howto/debug-logs)
Filter events by url.
Filter events by URL Group (topic) name.
Filter events by schedule id.
Filter events by queue name.
Filter events by starting date, in milliseconds (Unix timestamp). This is inclusive.
Filter events by ending date, in milliseconds (Unix timestamp). This is inclusive.
The number of events to return. Default and max is 1000.
The sorting order of events by timestamp. Valid values are "earliestFirst" and "latestFirst". The default is "latestFirst".
## Response
A cursor which you can use in subsequent requests to paginate through all events.
If no cursor is returned, you have reached the end of the events.
Timestamp of this log entry, in milliseconds
The associated message id
The headers of the message.
Base64 encoded body of the message.
The current state of the message at this point in time.
| Value | Description |
| ------------------ | ---------------------------------------------------------------------------------------- |
| `CREATED` | The message has been accepted and stored in QStash |
| `ACTIVE` | The task is currently being processed by a worker. |
| `RETRY` | The task has been scheduled to retry. |
| `ERROR` | The execution threw an error and the task is waiting to be retried or failed. |
| `DELIVERED` | The message was successfully delivered. |
| `FAILED` | The task has errored too many times or encountered an error that it cannot recover from. |
| `CANCEL_REQUESTED` | The cancel request from the user is recorded. |
| `CANCELLED` | The cancel request from the user is honored. |
An explanation what went wrong
The next scheduled time of the message.
(Unix timestamp in milliseconds)
The destination url
The name of the URL Group (topic) if this message was sent through a topic
The name of the endpoint if this message was sent through a URL Group
The scheduleId of the message if the message is triggered by a schedule
The name of the queue if this message is enqueued on a queue
The headers that are forwarded to the users endpoint
Base64 encoded body of the message
The status code of the response. Only set if the state is `ERROR`
The base64 encoded body of the response. Only set if the state is `ERROR`
The headers of the response. Only set if the state is `ERROR`
The timeout(in milliseconds) of the outgoing http requests, after which Qstash cancels the request
Method is the HTTP method of the message for outgoing request
Callback is the URL address where QStash sends the response of a publish
The headers that are passed to the callback url
Failure Callback is the URL address where QStash sends the response of a publish
The headers that are passed to the failure callback url
The number of retries that should be attempted in case of delivery failure
```sh curl
curl https://qstash.upstash.io/v2/events \
-H "Authorization: Bearer "
```
```javascript Node
const response = await fetch("https://qstash.upstash.io/v2/events", {
headers: {
Authorization: "Bearer ",
},
});
```
```python Python
import requests
headers = {
'Authorization': 'Bearer ',
}
response = requests.get(
'https://qstash.upstash.io/v2/events',
headers=headers
)
```
```go Go
req, err := http.NewRequest("GET", "https://qstash.upstash.io/v2/events", nil)
if err != nil {
log.Fatal(err)
}
req.Header.Set("Authorization", "Bearer ")
resp, err := http.DefaultClient.Do(req)
if err != nil {
log.Fatal(err)
}
defer resp.Body.Close()
```
```json 200 OK
{
"cursor": "1686652644442-12",
"events":[
{
"time": "1686652644442",
"messageId": "msg_123",
"state": "delivered",
"url": "https://example.com",
"header": { "Content-Type": [ "application/x-www-form-urlencoded" ] },
"body": "bWVyaGFiYSBiZW5pbSBhZGltIHNhbmNhcg=="
}
]
}
```
# Create Chat Completion
Source: https://upstash.com/docs/qstash/api/llm/create
POST https://qstash.upstash.io/llm/v1/chat/completions
Creates a chat completion of one or more messages
Creates a chat completion that generates a textual response
for one or more messages using a large language model.
## Request
Name of the model.
One or more chat messages.
The role of the message author. One of `system`, `assistant`, or `user`.
The content of the message.
An optional name for the participant.
Provides the model information to differentiate between participants of the same role.
Number between `-2.0` and `2.0`. Positive values penalize new tokens based on their existing
frequency in the text so far, decreasing the model's likelihood to repeat the same line verbatim.
Modify the likelihood of specified tokens appearing in the completion.
Accepts a JSON object that maps tokens (specified by their token ID in the tokenizer)
to an associated bias value from `-100` to `100`. Mathematically, the bias is added to
the logits generated by the model prior to sampling. The exact effect will vary
per model, but values between `-1` and `1` should decrease or increase likelihood
of selection; values like `-100` or `100` should result in a ban or exclusive
selection of the relevant token.
Whether to return log probabilities of the output tokens or not. If true, returns
the log probabilities of each output token returned in the content of message.
An integer between `0` and `20` specifying the number of most likely tokens to return at
each token position, each with an associated log probability. logprobs must be set
to true if this parameter is used.
The maximum number of tokens that can be generated in the chat completion.
How many chat completion choices to generate for each input message.
Note that you will be charged based on the number of generated tokens
across all of the choices. Keep `n` as `1` to minimize costs.
Number between `-2.0` and `2.0`. Positive values penalize new tokens
based on whether they appear in the text so far, increasing the
model's likelihood to talk about new topics.
An object specifying the format that the model must output.
Setting to `{ "type": "json_object" }` enables JSON mode,
which guarantees the message the model generates is valid JSON.
**Important**: when using JSON mode, you must also instruct the model
to produce JSON yourself via a system or user message. Without this,
the model may generate an unending stream of whitespace until the
generation reaches the token limit, resulting in a long-running and
seemingly "stuck" request. Also note that the message content may
be partially cut off if `finish_reason="length"`, which indicates the
generation exceeded max\_tokens or the conversation exceeded the max context length.
Must be one of `text` or `json_object`.
This feature is in Beta. If specified, our system will make a best effort to sample
deterministically, such that repeated requests with the same seed and parameters
should return the same result. Determinism is not guaranteed, and you should
refer to the `system_fingerprint` response parameter to monitor changes in the backend.
Up to 4 sequences where the API will stop generating further tokens.
If set, partial message deltas will be sent. Tokens will be sent as
data-only server-sent events as they become available, with the stream
terminated by a `data: [DONE]` message.
What sampling temperature to use, between `0` and `2`. Higher values
like `0.8` will make the output more random, while lower values
like `0.2` will make it more focused and deterministic.
We generally recommend altering this or `top_p` but not both.
An alternative to sampling with temperature, called nucleus sampling,
where the model considers the results of the tokens with `top_p`
probability mass. So `0.1` means only the tokens comprising the top
\`10%\`\` probability mass are considered.
We generally recommend altering this or `temperature` but not both.
## Response
Returned when `stream` is `false` or not set.
A unique identifier for the chat completion.
A list of chat completion choices. Can be more than one if `n` is greater than `1`.
A chat completion message generated by the model.
The role of the author of this message.
The contents of the message.
The reason the model stopped generating tokens. This will be `stop` if the
model hit a natural stop point or a provided stop sequence, `length` if
the maximum number of tokens specified in the request was reached.
The stop string or token id that caused the completion to stop,
null if the completion finished for some other reason including
encountering the EOS token
The index of the choice in the list of choices.
Log probability information for the choice.
A list of message content tokens with log probability information.
The token.
The log probability of this token, if it is within the top 20 most likely tokens.
Otherwise, the value `-9999.0` is used to signify that the token is very unlikely.
A list of integers representing the UTF-8 bytes representation of the token.
Useful in instances where characters are represented by multiple tokens and
their byte representations must be combined to generate the correct text
representation. Can be null if there is no bytes representation for the token.
List of the most likely tokens and their log probability, at this token position.
In rare cases, there may be fewer than the number of requested `top_logprobs` returned.
The token.
The log probability of this token, if it is within the top 20 most likely tokens.
Otherwise, the value `-9999.0` is used to signify that the token is very unlikely.
A list of integers representing the UTF-8 bytes representation of the token.
Useful in instances where characters are represented by multiple tokens and
their byte representations must be combined to generate the correct text
representation. Can be null if there is no bytes representation for the token.
The Unix timestamp (in seconds) of when the chat completion was created.
The model used for the chat completion.
This fingerprint represents the backend configuration that the model runs with.
Can be used in conjunction with the `seed` request parameter to understand
when backend changes have been made that might impact determinism.
The object type, which is always `chat.completion`.
Usage statistics for the completion request.
Number of tokens in the generated completion.
Number of tokens in the prompt.
Total number of tokens used in the request (prompt + completion).
## Stream Response
Returned when `stream` is `true`.
A unique identifier for the chat completion. Each chunk has the same ID.
A list of chat completion choices. Can be more than one if `n` is greater than `1`.
Can also be empty for the last chunk.
A chat completion delta generated by streamed model responses.
The role of the author of this message.
The contents of the chunk message.
The reason the model stopped generating tokens. This will be `stop` if the
model hit a natural stop point or a provided stop sequence, `length` if
the maximum number of tokens specified in the request was reached.
The index of the choice in the list of choices.
Log probability information for the choice.
A list of message content tokens with log probability information.
The token.
The log probability of this token, if it is within the top 20 most likely tokens.
Otherwise, the value `-9999.0` is used to signify that the token is very unlikely.
A list of integers representing the UTF-8 bytes representation of the token.
Useful in instances where characters are represented by multiple tokens and
their byte representations must be combined to generate the correct text
representation. Can be null if there is no bytes representation for the token.
List of the most likely tokens and their log probability, at this token position.
In rare cases, there may be fewer than the number of requested `top_logprobs` returned.
The token.
The log probability of this token, if it is within the top 20 most likely tokens.
Otherwise, the value `-9999.0` is used to signify that the token is very unlikely.
A list of integers representing the UTF-8 bytes representation of the token.
Useful in instances where characters are represented by multiple tokens and
their byte representations must be combined to generate the correct text
representation. Can be null if there is no bytes representation for the token.
The Unix timestamp (in seconds) of when the chat completion was created. Each chunk has the same timestamp.
The model used for the chat completion.
This fingerprint represents the backend configuration that the model runs with.
Can be used in conjunction with the `seed` request parameter to understand
when backend changes have been made that might impact determinism.
The object type, which is always `chat.completion.chunk`.
it contains a null value except for the last chunk which contains the token usage statistics for the entire request.
Number of tokens in the generated completion.
Number of tokens in the prompt.
Total number of tokens used in the request (prompt + completion).
```sh curl
curl "https://qstash.upstash.io/llm/v1/chat/completions" \
-X POST \
-H "Authorization: Bearer QSTASH_TOKEN" \
-H "Content-Type: application/json" \
-d '{
"model": "meta-llama/Meta-Llama-3-8B-Instruct",
"messages": [
{
"role": "user",
"content": "What is the capital of Turkey?"
}
]
}'
```
```json 200 OK
{
"id": "cmpl-abefcf66fae945b384e334e36c7fdc97",
"object": "chat.completion",
"created": 1717483987,
"model": "meta-llama/Meta-Llama-3-8B-Instruct",
"choices": [
{
"index": 0,
"message": {
"role": "assistant",
"content": "The capital of Turkey is Ankara."
},
"logprobs": null,
"finish_reason": "stop",
"stop_reason": null
}
],
"usage": {
"prompt_tokens": 18,
"total_tokens": 26,
"completion_tokens": 8
}
}
```
```json 200 OK - Stream
data: {"id":"cmpl-dfc1ad80d0254c2aaf3e7775d1830c9d","object":"chat.completion.chunk","created":1717484084,"model":"meta-llama/Meta-Llama-3-8B-Instruct","choices":[{"index":0,"delta":{"role":"assistant"},"logprobs":null,"finish_reason":null}]}
data: {"id":"cmpl-dfc1ad80d0254c2aaf3e7775d1830c9d","object":"chat.completion.chunk","created":1717484084,"model":"meta-llama/Meta-Llama-3-8B-Instruct","choices":[{"index":0,"delta":{"content":"The"},"logprobs":null,"finish_reason":null}]}
data: {"id":"cmpl-dfc1ad80d0254c2aaf3e7775d1830c9d","object":"chat.completion.chunk","created":1717484084,"model":"meta-llama/Meta-Llama-3-8B-Instruct","choices":[{"index":0,"delta":{"content":" capital"},"logprobs":null,"finish_reason":null}]}
data: {"id":"cmpl-dfc1ad80d0254c2aaf3e7775d1830c9d","object":"chat.completion.chunk","created":1717484084,"model":"meta-llama/Meta-Llama-3-8B-Instruct","choices":[{"index":0,"delta":{"content":" of"},"logprobs":null,"finish_reason":null}]}
data: {"id":"cmpl-dfc1ad80d0254c2aaf3e7775d1830c9d","object":"chat.completion.chunk","created":1717484084,"model":"meta-llama/Meta-Llama-3-8B-Instruct","choices":[{"index":0,"delta":{"content":" Turkey"},"logprobs":null,"finish_reason":null}]}
data: {"id":"cmpl-dfc1ad80d0254c2aaf3e7775d1830c9d","object":"chat.completion.chunk","created":1717484084,"model":"meta-llama/Meta-Llama-3-8B-Instruct","choices":[{"index":0,"delta":{"content":" is"},"logprobs":null,"finish_reason":null}]}
data: {"id":"cmpl-dfc1ad80d0254c2aaf3e7775d1830c9d","object":"chat.completion.chunk","created":1717484084,"model":"meta-llama/Meta-Llama-3-8B-Instruct","choices":[{"index":0,"delta":{"content":" Ankara"},"logprobs":null,"finish_reason":null}]}
data: {"id":"cmpl-dfc1ad80d0254c2aaf3e7775d1830c9d","object":"chat.completion.chunk","created":1717484084,"model":"meta-llama/Meta-Llama-3-8B-Instruct","choices":[{"index":0,"delta":{"content":"."},"logprobs":null,"finish_reason":null}]}
data: {"id":"cmpl-dfc1ad80d0254c2aaf3e7775d1830c9d","object":"chat.completion.chunk","created":1717484084,"model":"meta-llama/Meta-Llama-3-8B-Instruct","choices":[{"index":0,"delta":{"content":""},"finish_reason":"stop"}],"usage":{"prompt_tokens":18,"total_tokens":26,"completion_tokens":8}}
data: [DONE]
```
# Batch Messages
Source: https://upstash.com/docs/qstash/api/messages/batch
POST https://qstash.upstash.io/v2/batch
Send multiple messages in a single request
You can learn more about batching in the [batching section](/qstash/features/batch).
API playground is not available for this endpoint. You can use the cURL example below.
You can publish to destination, URL Group or queue in the same batch request.
## Request
The endpoint is `POST https://qstash.upstash.io/v2/batch` and the body is an array of
messages. Each message has the following fields:
```
destination: string
headers: headers object
body: string
```
The headers are identical to the headers in the [create](/qstash/api/publish#request) endpoint.
```shell cURL
curl -XPOST https://qstash.upstash.io/v2/batch -H "Authorization: Bearer XXX" \
-H "Content-Type: application/json" \
-d '
[
{
"destination": "myUrlGroup",
"headers":{
"Upstash-Delay":"5s",
"Upstash-Forward-Hello":"123456"
},
"body": "Hello World"
},
{
"queue": "test",
"destination": "https://example.com/destination",
"headers":{
"Upstash-Forward-Hello":"789"
}
},
{
"destination": "https://example.com/destination1",
"headers":{
"Upstash-Delay":"7s",
"Upstash-Forward-Hello":"789"
}
},
{
"destination": "https://example.com/destination2",
"headers":{
"Upstash-Delay":"9s",
"Upstash-Forward-Hello":"again"
}
}
]'
```
## Response
```json
[
[
{
"messageId": "msg_...",
"url": "https://myUrlGroup-endpoint1.com"
},
{
"messageId": "msg_...",
"url": "https://myUrlGroup-endpoint2.com"
}
],
{
"messageId": "msg_...",
},
{
"messageId": "msg_..."
},
{
"messageId": "msg_..."
}
]
```
# Bulk Cancel Messages
Source: https://upstash.com/docs/qstash/api/messages/bulk-cancel
DELETE https://qstash.upstash.io/v2/messages
Stop delivery of multiple messages at once
Bulk cancel allows you to cancel multiple messages at once.
Cancelling a message will remove it from QStash and stop it from being delivered
in the future. If a message is in flight to your API, it might be too late to
cancel.
If you provide a set of message IDs in the body of the request, only those messages will be cancelled.
If you include filter parameters in the request body, only the messages that match the filters will be canceled.
If the `messageIds` array is empty, QStash will cancel all of your messages.
If no body is sent, QStash will also cancel all of your messages.
This operation scans all your messages and attempts to cancel them.
If an individual message cannot be cancelled, it will not continue and will return an error message.
Therefore, some messages may not be cancelled at the end.
In such cases, you can run the bulk cancel operation multiple times.
You can filter the messages to cancel by including filter parameters in the request body.
## Request
The list of message IDs to cancel.
Filter messages to cancel by queue name.
Filter messages to cancel by destination URL.
Filter messages to cancel by URL Group (topic) name.
Filter messages to cancel by starting date, in milliseconds (Unix timestamp). This is inclusive.
Filter messages to cancel by ending date, specified in milliseconds (Unix timestamp). This is inclusive.
Filter messages to cancel by schedule ID.
Filter messages to cancel by IP address of publisher.
## Response
A cancelled object with the number of cancelled messages.
```JSON
{
"cancelled": number
}
```
```sh curl
curl -XDELETE https://qstash.upstash.io/v2/messages/ \
-H "Content-Type: application/json" \
-H "Authorization: Bearer " \
-d '{"messageIds": ["msg_id_1", "msg_id_2", "msg_id_3"]}'
```
```js Node
const response = await fetch('https://qstash.upstash.io/v2/messages', {
method: 'DELETE',
headers: {
'Authorization': 'Bearer ',
'Content-Type': 'application/json',
body: {
messageIds: [
"msg_id_1",
"msg_id_2",
"msg_id_3",
],
},
}
});
```
```python Python
import requests
headers = {
'Authorization': 'Bearer ',
'Content-Type': 'application/json',
}
data = {
"messageIds": [
"msg_id_1",
"msg_id_2",
"msg_id_3"
]
}
response = requests.delete(
'https://qstash.upstash.io/v2/messages',
headers=headers,
data=data
)
```
```go Go
var data = strings.NewReader(`{
"messageIds": [
"msg_id_1",
"msg_id_2",
"msg_id_3"
]
}`)
req, err := http.NewRequest("DELETE", "https://qstash.upstash.io/v2/messages", data)
if err != nil {
log.Fatal(err)
}
req.Header.Set("Authorization", "Bearer ")
req.Header.Set("Content-Type", "application/json")
resp, err := http.DefaultClient.Do(req)
if err != nil {
log.Fatal(err)
}
defer resp.Body.Close()
```
```json 202 Accepted
{
"cancelled": 10
}
```
# Cancel Message
Source: https://upstash.com/docs/qstash/api/messages/cancel
DELETE https://qstash.upstash.io/v2/messages/{messageId}
Stop delivery of an existing message
Cancelling a message will remove it from QStash and stop it from being delivered
in the future. If a message is in flight to your API, it might be too late to
cancel.
## Request
The id of the message to cancel.
## Response
This endpoint only returns `202 OK`
```sh curl
curl -XDELETE https://qstash.upstash.io/v2/messages/msg_123 \
-H "Authorization: Bearer "
```
```js Node
const response = await fetch('https://qstash.upstash.io/v2/messages/msg_123', {
method: 'DELETE',
headers: {
'Authorization': 'Bearer '
}
});
```
```python Python
import requests
headers = {
'Authorization': 'Bearer ',
}
response = requests.delete(
'https://qstash.upstash.io/v2/messages/msg_123',
headers=headers
)
```
```go Go
req, err := http.NewRequest("DELETE", "https://qstash.upstash.io/v2/messages/msg_123", nil)
if err != nil {
log.Fatal(err)
}
req.Header.Set("Authorization", "Bearer ")
resp, err := http.DefaultClient.Do(req)
if err != nil {
log.Fatal(err)
}
defer resp.Body.Close()
```
```text 202 Accepted
OK
```
# Get Message
Source: https://upstash.com/docs/qstash/api/messages/get
GET https://qstash.upstash.io/v2/messages/{messageId}
Retrieve a message by its id
## Request
The id of the message to retrieve.
Messages are removed from the database shortly after they're delivered, so you
will not be able to retrieve a message after. This endpoint is intended to be used
for accessing messages that are in the process of being delivered/retried.
## Response
```sh curl
curl https://qstash.upstash.io/v2/messages/msg_123 \
-H "Authorization: Bearer "
```
```js Node
const response = await fetch("https://qstash.upstash.io/v2/messages/msg_123", {
headers: {
Authorization: "Bearer ",
},
});
```
```python Python
import requests
headers = {
'Authorization': 'Bearer ',
}
response = requests.get(
'https://qstash.upstash.io/v2/messages/msg_123',
headers=headers
)
```
```go Go
req, err := http.NewRequest("GET", "https://qstash.upstash.io/v2/messages/msg_123", nil)
if err != nil {
log.Fatal(err)
}
req.Header.Set("Authorization", "Bearer ")
resp, err := http.DefaultClient.Do(req)
if err != nil {
log.Fatal(err)
}
defer resp.Body.Close()
```
```json 200 OK
{
"messageId": "msg_123",
"topicName": "myTopic",
"url":"https://example.com",
"method": "POST",
"header": {
"My-Header": ["my-value"]
},
"body": "{\"foo\":\"bar\"}",
"createdAt": 1620000000000
}
```
# Publish a Message
Source: https://upstash.com/docs/qstash/api/publish
POST https://qstash.upstash.io/v2/publish/{destination}
Publish a message
## Request
Destination can either be a topic name or id that you configured in the
Upstash console, a valid url where the message gets sent to, or a valid
QStash API name like `api/llm`. If the destination is a URL, make sure
the URL is prefixed with a valid protocol (`http://` or `https://`)
Delay the message delivery.
Format for this header is a number followed by duration abbreviation, like
`10s`. Available durations are `s` (seconds), `m` (minutes), `h` (hours), `d`
(days).
example: "50s" | "3m" | "10h" | "1d"
Delay the message delivery until a certain time in the future.
The format is a unix timestamp in seconds, based on the UTC timezone.
When both `Upstash-Not-Before` and `Upstash-Delay` headers are provided,
`Upstash-Not-Before` will be used.
Id to use while deduplicating messages, so that only one message with
the given deduplication id is published.
When set to true, automatically deduplicates messages based on their content,
so that only one message with the same content is published.
Content based deduplication creates unique deduplication ids based on the
following message fields:
* Destination
* Body
* Headers
## Response
```sh curl
curl -X POST "https://qstash.upstash.io/v2/publish/https://www.example.com" \
-H "Authorization: Bearer " \
-H "Content-Type: application/json" \
-H "Upstash-Method: POST" \
-H "Upstash-Delay: 10s" \
-H "Upstash-Retries: 3" \
-H "Upstash-Forward-Custom-Header: custom-value" \
-d '{"message":"Hello, World!"}'
```
```js Node
const response = await fetch(
"https://qstash.upstash.io/v2/publish/https://www.example.com",
{
method: "POST",
headers: {
Authorization: "Bearer ",
"Content-Type": "application/json",
"Upstash-Method": "POST",
"Upstash-Delay": "10s",
"Upstash-Retries": "3",
"Upstash-Forward-Custom-Header": "custom-value",
},
body: JSON.stringify({
message: "Hello, World!",
}),
}
);
```
```python Python
import requests
headers = {
'Authorization': 'Bearer ',
'Content-Type': 'application/json',
'Upstash-Method': 'POST',
'Upstash-Delay': '10s',
'Upstash-Retries': '3',
'Upstash-Forward-Custom-Header': 'custom-value',
}
json_data = {
'message': 'Hello, World!',
}
response = requests.post(
'https://qstash.upstash.io/v2/publish/https://www.example.com',
headers=headers,
json=json_data
)
```
```go Go
var data = strings.NewReader(`{"message":"Hello, World!"}`)
req, err := http.NewRequest("POST", "https://qstash.upstash.io/v2/publish/https://www.example.com", data)
if err != nil {
log.Fatal(err)
}
req.Header.Set("Authorization", "Bearer ")
req.Header.Set("Content-Type", "application/json")
req.Header.Set("Upstash-Method", "POST")
req.Header.Set("Upstash-Delay", "10s")
req.Header.Set("Upstash-Retries", "3")
req.Header.Set("Upstash-Forward-Custom-Header", "custom-value")
resp, err := http.DefaultClient.Do(req)
if err != nil {
log.Fatal(err)
}
defer resp.Body.Close()
```
```json URL
{
"messageId": "msd_1234",
"url": "https://www.example.com"
}
```
```json URL Group
[
{
"messageId": "msd_1234",
"url": "https://www.example.com"
},
{
"messageId": "msd_5678",
"url": "https://www.somewhere-else.com",
"deduplicated": true
}
]
```
# Get a Queue
Source: https://upstash.com/docs/qstash/api/queues/get
GET https://qstash.upstash.io/v2/queues/{queueName}
Retrieves a queue
## Request
The name of the queue to retrieve.
## Response
The creation time of the queue. UnixMilli
The update time of the queue. UnixMilli
The name of the queue.
The number of parallel consumers consuming from [the queue](/qstash/features/queues).
The number of unprocessed messages that exist in [the queue](/qstash/features/queues).
```sh curl
curl https://qstash.upstash.io/v2/queues/my-queue \
-H "Authorization: Bearer "
```
```js Node
const response = await fetch('https://qstash.upstash.io/v2/queue/my-queue', {
headers: {
'Authorization': 'Bearer '
}
});
```
```python Python
import requests
headers = {
'Authorization': 'Bearer ',
}
response = requests.get(
'https://qstash.upstash.io/v2/queue/my-queue',
headers=headers
)
```
```go Go
req, err := http.NewRequest("GET", "https://qstash.upstash.io/v2/queue/my-queue", nil)
if err != nil {
log.Fatal(err)
}
req.Header.Set("Authorization", "Bearer ")
resp, err := http.DefaultClient.Do(req)
if err != nil {
log.Fatal(err)
}
defer resp.Body.Close()
```
```json 200 OK
{
"createdAt": 1623345678001,
"updatedAt": 1623345678001,
"name": "my-queue",
"parallelism" : 5,
"lag" : 100
}
```
# List Queues
Source: https://upstash.com/docs/qstash/api/queues/list
GET https://qstash.upstash.io/v2/queues
List all your queues
## Request
No parameters
## Response
The creation time of the queue. UnixMilli
The update time of the queue. UnixMilli
The name of the queue.
The number of parallel consumers consuming from [the queue](/qstash/features/queues).
The number of unprocessed messages that exist in [the queue](/qstash/features/queues).
```sh curl
curl https://qstash.upstash.io/v2/queues \
-H "Authorization: Bearer "
```
```js Node
const response = await fetch("https://qstash.upstash.io/v2/queues", {
headers: {
Authorization: "Bearer ",
},
});
```
```python Python
import requests
headers = {
'Authorization': 'Bearer ',
}
response = requests.get(
'https://qstash.upstash.io/v2/queues',
headers=headers
)
```
```go Go
req, err := http.NewRequest("GET", "https://qstash.upstash.io/v2/queues", nil)
if err != nil {
log.Fatal(err)
}
req.Header.Set("Authorization", "Bearer ")
resp, err := http.DefaultClient.Do(req)
if err != nil {
log.Fatal(err)
}
defer resp.Body.Close()
```
```json 200 OK
[
{
"createdAt": 1623345678001,
"updatedAt": 1623345678001,
"name": "my-queue",
"parallelism" : 5,
"lag" : 100
},
// ...
]
```
# Pause Queue
Source: https://upstash.com/docs/qstash/api/queues/pause
POST https://qstash.upstash.io/v2/queues/{queueName}/pause
Pause an active queue
Pausing a queue stops the delivery of enqueued messages.
The queue will still accept new messages, but they will wait until the queue becomes active for delivery.
If the queue is already paused, this action has no effect.
Resuming or creating a queue may take up to a minute.
Therefore, it is not recommended to pause or delete a queue during critical operations.
## Request
The name of the queue to pause.
## Response
This endpoint simply returns 200 OK if the queue is paused successfully.
```sh curl
curl -X POST https://qstash.upstash.io/v2/queues/queue_1234/pause \
-H "Authorization: Bearer "
```
```js Node
import { Client } from "@upstash/qstash";
/**
* Import a fetch polyfill only if you are using node prior to v18.
* This is not necessary for nextjs, deno or cloudflare workers.
*/
import "isomorphic-fetch";
const c = new Client({
token: "",
});
c.queue({ queueName: "" }).pause()
```
```python Python
from qstash import QStash
client = QStash("")
client.queue.pause("")
```
```go Go
package main
import (
"github.com/upstash/qstash-go"
)
func main() {
client := qstash.NewClient("")
// error checking is omitted for brevity
err := client.Queues().Pause("")
}
```
# Remove a Queue
Source: https://upstash.com/docs/qstash/api/queues/remove
DELETE https://qstash.upstash.io/v2/queues/{queueName}
Removes a queue
Resuming or creating a queue may take up to a minute.
Therefore, it is not recommended to pause or delete a queue during critical operations.
## Request
The name of the queue to remove.
## Response
This endpoint returns 200 if the queue is removed successfully,
or it doesn't exist.
```sh curl
curl https://qstash.upstash.io/v2/queues/my-queue \
-H "Authorization: Bearer "
```
```js Node
const response = await fetch('https://qstash.upstash.io/v2/queue/my-queue', {
method: "DELETE",
headers: {
'Authorization': 'Bearer '
}
});
```
```python Python
import requests
headers = {
'Authorization': 'Bearer ',
}
response = requests.delete(
'https://qstash.upstash.io/v2/queue/my-queue',
headers=headers
)
```
```go Go
req, err := http.NewRequest("DELETE", "https://qstash.upstash.io/v2/queue/my-queue", nil)
if err != nil {
log.Fatal(err)
}
req.Header.Set("Authorization", "Bearer ")
resp, err := http.DefaultClient.Do(req)
if err != nil {
log.Fatal(err)
}
defer resp.Body.Close()
```
# Resume Queue
Source: https://upstash.com/docs/qstash/api/queues/resume
POST https://qstash.upstash.io/v2/queues/{queueName}/resume
Resume a paused queue
Resuming a queue starts the delivery of enqueued messages from the earliest undelivered message.
If the queue is already active, this action has no effect.
## Request
The name of the queue to resume.
## Response
This endpoint simply returns 200 OK if the queue is resumed successfully.
```sh curl
curl -X POST https://qstash.upstash.io/v2/queues/queue_1234/resume \
-H "Authorization: Bearer "
```
```js Node
import { Client } from "@upstash/qstash";
/**
* Import a fetch polyfill only if you are using node prior to v18.
* This is not necessary for nextjs, deno or cloudflare workers.
*/
import "isomorphic-fetch";
const c = new Client({
token: "",
});
c.queue({ queueName: "" }).resume()
```
```python Python
from qstash import QStash
client = QStash("")
client.queue.resume("")
```
```go Go
package main
import (
"github.com/upstash/qstash-go"
)
func main() {
client := qstash.NewClient("")
// error checking is omitted for brevity
err := client.Queues().Resume("")
}
```
# Upsert a Queue
Source: https://upstash.com/docs/qstash/api/queues/upsert
POST https://qstash.upstash.io/v2/queues/
Updates or creates a queue
## Request
The name of the queue.
The number of parallel consumers consuming from [the queue](/qstash/features/queues).
For the parallelism limit, we introduced an easier and less limited API with publish.
Please check the [flowControl](/qstash/features/flow-control) page for the detailed information.
Setting parallelism with queues will be deprecated at some point.
## Response
This endpoint returns
* 200 if the queue is added successfully.
* 412 if it fails because of the the allowed number of queues limit
```sh curl
curl -XPOST https://qstash.upstash.io/v2/queues/ \
-H "Authorization: Bearer " \
-H "Content-Type: application/json" \
-d '{
"queueName": "my-queue" ,
"parallelism" : 5,
}'
```
```js Node
const response = await fetch('https://qstash.upstash.io/v2/queues/', {
method: 'POST',
headers: {
'Authorization': 'Bearer ',
'Content-Type': 'application/json'
},
body: JSON.stringify({
"queueName": "my-queue" ,
"parallelism" : 5,
})
});
```
```python Python
import requests
headers = {
'Authorization': 'Bearer ',
'Content-Type': 'application/json',
}
json_data = {
"queueName": "my-queue" ,
"parallelism" : 5,
}
response = requests.post(
'https://qstash.upstash.io/v2/queues/',
headers=headers,
json=json_data
)
```
```go Go
var data = strings.NewReader(`{
"queueName": "my-queue" ,
"parallelism" : 5,
}`)
req, err := http.NewRequest("POST", "https://qstash.upstash.io/v2/queues/", data)
if err != nil {
log.Fatal(err)
}
req.Header.Set("Authorization", "Bearer ")
req.Header.Set("Content-Type", "application/json")
resp, err := http.DefaultClient.Do(req)
if err != nil {
log.Fatal(err)
}
defer resp.Body.Close()
```
# Create Schedule
Source: https://upstash.com/docs/qstash/api/schedules/create
POST https://qstash.upstash.io/v2/schedules/{destination}
Create a schedule to send messages periodically
## Request
Destination can either be a topic name or id that you configured in the
Upstash console or a valid url where the message gets sent to.
If the destination is a URL, make sure
the URL is prefixed with a valid protocol (`http://` or `https://`)
Cron allows you to send this message periodically on a schedule.
Add a Cron expression and we will requeue this message automatically whenever
the Cron expression triggers. We offer an easy to use UI for creating Cron
expressions in our [console](https://console.upstash.com/qstash) or you can
check out [Crontab.guru](https://crontab.guru).
Note: it can take up to 60 seconds until the schedule is registered on an
available qstash node.
Example: `*/5 * * * *`
Delay the message delivery.
Delay applies to the delivery of the scheduled messages.
For example, with the delay set to 10 minutes for a schedule
that runs everyday at 00:00, the scheduled message will be
created at 00:00 and it will be delivered at 00:10.
Format for this header is a number followed by duration abbreviation, like
`10s`. Available durations are `s` (seconds), `m` (minutes), `h` (hours), `d`
(days).
example: "50s" | "3m" | "10h" | "1d"
Assign a schedule id to the created schedule.
This header allows you to set the schedule id yourself instead of QStash assigning
a random id.
If a schedule with the provided id exists, the settings of the existing schedule
will be updated with the new settings.
## Response
The unique id of this schedule. You can use it to delete the schedule later.
```sh curl
curl -XPOST https://qstash.upstash.io/v2/schedules/https://www.example.com/endpoint \
-H "Authorization: Bearer " \
-H "Upstash-Cron: */5 * * * *"
```
```js Node
const response = await fetch('https://qstash.upstash.io/v2/schedules/https://www.example.com/endpoint', {
method: 'POST',
headers: {
'Authorization': 'Bearer ',
'Upstash-Cron': '*/5 * * * *'
}
});
```
```python Python
import requests
headers = {
'Authorization': 'Bearer ',
'Upstash-Cron': '*/5 * * * *'
}
response = requests.post(
'https://qstash.upstash.io/v2/schedules/https://www.example.com/endpoint',
headers=headers
)
```
```go Go
req, err := http.NewRequest("POST", "https://qstash.upstash.io/v2/schedules/https://www.example.com/endpoint", nil)
if err != nil {
log.Fatal(err)
}
req.Header.Set("Authorization", "Bearer ")
req.Header.Set("Upstash-Cron", "*/5 * * * *")
resp, err := http.DefaultClient.Do(req)
if err != nil {
log.Fatal(err)
}
defer resp.Body.Close()
```
```json 200 OK
{
"scheduleId": "scd_1234"
}
```
# Get Schedule
Source: https://upstash.com/docs/qstash/api/schedules/get
GET https://qstash.upstash.io/v2/schedules/{scheduleId}
Retrieves a schedule by id.
## Request
The id of the schedule to retrieve.
## Response
The creation time of the object. UnixMilli
The id of the schedule.
The cron expression used to schedule the message.
IP address where this schedule created from.
Url or URL Group name
The HTTP method to use for the message.
The headers of the message.
The body of the message.
The number of retries that should be attempted in case of delivery failure.
The delay in seconds before the message is delivered.
The url where we send a callback to after the message is delivered
```sh curl
curl https://qstash.upstash.io/v2/schedules/scd_1234 \
-H "Authorization: Bearer "
```
```js Node
const response = await fetch('https://qstash.upstash.io/v2/schedules/scd_1234', {
headers: {
'Authorization': 'Bearer '
}
});
```
```python Python
import requests
headers = {
'Authorization': 'Bearer ',
}
response = requests.get(
'https://qstash.upstash.io/v2/schedules/scd_1234',
headers=headers
)
```
```go Go
req, err := http.NewRequest("GET", "https://qstash.upstash.io/v2/schedules/scd_1234", nil)
if err != nil {
log.Fatal(err)
}
req.Header.Set("Authorization", "Bearer ")
resp, err := http.DefaultClient.Do(req)
if err != nil {
log.Fatal(err)
}
defer resp.Body.Close()
```
```json 200 OK
{
"scheduleId": "scd_1234",
"createdAt": 1623345678001,
"cron": "0 0 1 * *",
"destination": "https://example.com",
"method": "POST",
"header": {
"Content-Type": ["application/json"]
},
"body": "{\"message\":\"hello\"}",
"retries": 3
}
```
# List Schedules
Source: https://upstash.com/docs/qstash/api/schedules/list
GET https://qstash.upstash.io/v2/schedules
List all your schedules
## Response
The creation time of the object. UnixMilli
The id of the schedule.
The cron expression used to schedule the message.
Url or URL Group (topic) name
The HTTP method to use for the message.
The headers of the message.
The body of the message.
The number of retries that should be attempted in case of delivery failure.
The delay in seconds before the message is delivered.
The url where we send a callback to after the message is delivered
```sh curl
curl https://qstash.upstash.io/v2/schedules \
-H "Authorization: Bearer "
```
```js Node
const response = await fetch('https://qstash.upstash.io/v2/schedules', {
headers: {
'Authorization': 'Bearer '
}
});
```
```python Python
import requests
headers = {
'Authorization': 'Bearer ',
}
response = requests.get(
'https://qstash.upstash.io/v2/schedules',
headers=headers
)
```
```go Go
req, err := http.NewRequest("GET", "https://qstash.upstash.io/v2/schedules", nil)
if err != nil {
log.Fatal(err)
}
req.Header.Set("Authorization", "Bearer ")
resp, err := http.DefaultClient.Do(req)
if err != nil {
log.Fatal(err)
}
defer resp.Body.Close()
```
```json 200 OK
[
{
"scheduleId": "scd_1234",
"createdAt": 1623345678001,
"cron": "0 0 1 * *",
"destination": "https://example.com",
"method": "POST",
"header": {
"Content-Type": ["application/json"]
},
"body": "{\"message\":\"hello\"}",
"retries": 3
}
]
```
# Pause Schedule
Source: https://upstash.com/docs/qstash/api/schedules/pause
POST https://qstash.upstash.io/v2/schedules/{scheduleId}/pause
Pause an active schedule
Pausing a schedule will not change the next delivery time, but the delivery will be ignored.
If the schedule is already paused, this action has no effect.
## Request
The id of the schedule to pause.
## Response
This endpoint simply returns 200 OK if the schedule is paused successfully.
```sh curl
curl -X POST https://qstash.upstash.io/v2/schedules/scd_1234/pause \
-H "Authorization: Bearer "
```
```js Node
import { Client } from "@upstash/qstash";
/**
* Import a fetch polyfill only if you are using node prior to v18.
* This is not necessary for nextjs, deno or cloudflare workers.
*/
import "isomorphic-fetch";
const c = new Client({
token: "",
});
c.schedules.pause({
schedule: ""
});
```
```python Python
from qstash import QStash
client = QStash("")
client.schedule.pause("")
```
```go Go
package main
import "github.com/upstash/qstash-go"
func main() {
client := qstash.NewClient("")
// error checking is omitted for brevity
err := client.Schedules().Pause("")
}
```
# Remove Schedule
Source: https://upstash.com/docs/qstash/api/schedules/remove
DELETE https://qstash.upstash.io/v2/schedules/{scheduleId}
Remove a schedule
## Request
The schedule id to remove
## Response
This endpoint simply returns 200 OK if the schedule is removed successfully.
```sh curl
curl -XDELETE https://qstash.upstash.io/v2/schedules/scd_123 \
-H "Authorization: Bearer "
```
```javascript Node
const response = await fetch('https://qstash.upstash.io/v2/schedules/scd_123', {
method: 'DELETE',
headers: {
'Authorization': 'Bearer '
}
});
```
```python Python
import requests
headers = {
'Authorization': 'Bearer ',
}
response = requests.delete(
'https://qstash.upstash.io/v2/schedules/scd_123',
headers=headers
)
```
```go Go
req, err := http.NewRequest("DELETE", "https://qstash.upstash.io/v2/schedules/scd_123", nil)
if err != nil {
log.Fatal(err)
}
req.Header.Set("Authorization", "Bearer ")
resp, err := http.DefaultClient.Do(req)
if err != nil {
log.Fatal(err)
}
defer resp.Body.Close()
```
# Resume Schedule
Source: https://upstash.com/docs/qstash/api/schedules/resume
POST https://qstash.upstash.io/v2/schedules/{scheduleId}/resume
Resume a paused schedule
Resuming a schedule marks the schedule as active.
This means the upcoming messages will be delivered and will not be ignored.
If the schedule is already active, this action has no effect.
## Request
The id of the schedule to resume.
## Response
This endpoint simply returns 200 OK if the schedule is resumed successfully.
```sh curl
curl -X POST https://qstash.upstash.io/v2/schedules/scd_1234/resume \
-H "Authorization: Bearer "
```
```js Node
import { Client } from "@upstash/qstash";
/**
* Import a fetch polyfill only if you are using node prior to v18.
* This is not necessary for nextjs, deno or cloudflare workers.
*/
import "isomorphic-fetch";
const c = new Client({
token: "",
});
c.schedules.resume({
schedule: ""
});
```
```python Python
from qstash import QStash
client = QStash("")
client.schedule.resume("")
```
```go Go
package main
import "github.com/upstash/qstash-go"
func main() {
client := qstash.NewClient("")
// error checking is omitted for brevity
err := client.Schedules().Resume("")
}
```
# Get Signing Keys
Source: https://upstash.com/docs/qstash/api/signingKeys/get
GET https://qstash.upstash.io/v2/keys
Retrieve your signing keys
## Response
Your current signing key.
The next signing key.
```sh curl
curl https://qstash.upstash.io/v2/keys \
-H "Authorization: Bearer "
```
```javascript Node
const response = await fetch('https://qstash.upstash.io/v2/keys', {
headers: {
'Authorization': 'Bearer '
}
});
```
```python Python
import requests
headers = {
'Authorization': 'Bearer ',
}
response = requests.get(
'https://qstash.upstash.io/v2/keys',
headers=headers
)
```
```go Go
req, err := http.NewRequest("GET", "https://qstash.upstash.io/v2/keys", nil)
if err != nil {
log.Fatal(err)
}
req.Header.Set("Authorization", "Bearer ")
resp, err := http.DefaultClient.Do(req)
if err != nil {
log.Fatal(err)
}
defer resp.Body.Close()
```
```json 200 OK
{ "current": "sig_123", "next": "sig_456" }
```
# Rotate Signing Keys
Source: https://upstash.com/docs/qstash/api/signingKeys/rotate
POST https://qstash.upstash.io/v2/keys/rotate
Rotate your signing keys
## Response
Your current signing key.
The next signing key.
```sh curl
curl https://qstash.upstash.io/v2/keys/rotate \
-H "Authorization: Bearer "
```
```javascript Node
const response = await fetch('https://qstash.upstash.io/v2/keys/rotate', {
headers: {
'Authorization': 'Bearer '
}
});
```
```python Python
import requests
headers = {
'Authorization': 'Bearer ',
}
response = requests.get(
'https://qstash.upstash.io/v2/keys/rotate',
headers=headers
)
```
```go Go
req, err := http.NewRequest("GET", "https://qstash.upstash.io/v2/keys/rotate", nil)
if err != nil {
log.Fatal(err)
}
req.Header.Set("Authorization", "Bearer ")
resp, err := http.DefaultClient.Do(req)
if err != nil {
log.Fatal(err)
}
defer resp.Body.Close()
```
```json 200 OK
{ "current": "sig_123", "next": "sig_456" }
```
# Upsert URL Group and Endpoint
Source: https://upstash.com/docs/qstash/api/url-groups/add-endpoint
POST https://qstash.upstash.io/v2/topics/{urlGroupName}/endpoints
Add an endpoint to a URL Group
If the URL Group does not exist, it will be created. If the endpoint does not exist, it will be created.
## Request
The name of your URL Group (topic). If it doesn't exist yet, it will be created.
The endpoints to add to the URL Group.
The name of the endpoint
The URL of the endpoint
## Response
This endpoint returns 200 if the endpoints are added successfully.
```sh curl
curl -XPOST https://qstash.upstash.io/v2/topics/:urlGroupName/endpoints \
-H "Authorization: Bearer " \
-H "Content-Type: application/json" \
-d '{
"endpoints": [
{
"name": "endpoint1",
"url": "https://example.com"
},
{
"name": "endpoint2",
"url": "https://somewhere-else.com"
}
]
}'
```
```js Node
const response = await fetch('https://qstash.upstash.io/v2/topics/:urlGroupName/endpoints', {
method: 'POST',
headers: {
'Authorization': 'Bearer ',
'Content-Type': 'application/json'
},
body: JSON.stringify({
'endpoints': [
{
'name': 'endpoint1',
'url': 'https://example.com'
},
{
'name': 'endpoint2',
'url': 'https://somewhere-else.com'
}
]
})
});
```
```python Python
import requests
headers = {
'Authorization': 'Bearer ',
'Content-Type': 'application/json',
}
json_data = {
'endpoints': [
{
'name': 'endpoint1',
'url': 'https://example.com',
},
{
'name': 'endpoint2',
'url': 'https://somewhere-else.com',
},
],
}
response = requests.post(
'https://qstash.upstash.io/v2/topics/:urlGroupName/endpoints',
headers=headers,
json=json_data
)
```
```go Go
var data = strings.NewReader(`{
"endpoints": [
{
"name": "endpoint1",
"url": "https://example.com"
},
{
"name": "endpoint2",
"url": "https://somewhere-else.com"
}
]
}`)
req, err := http.NewRequest("POST", "https://qstash.upstash.io/v2/topics/:urlGroupName/endpoints", data)
if err != nil {
log.Fatal(err)
}
req.Header.Set("Authorization", "Bearer ")
req.Header.Set("Content-Type", "application/json")
resp, err := http.DefaultClient.Do(req)
if err != nil {
log.Fatal(err)
}
defer resp.Body.Close()
```
# Get a URL Group
Source: https://upstash.com/docs/qstash/api/url-groups/get
GET https://qstash.upstash.io/v2/topics/{urlGroupName}
Retrieves a URL Group
## Request
The name of the URL Group (topic) to retrieve.
## Response
The creation time of the URL Group. UnixMilli
The update time of the URL Group. UnixMilli
The name of the URL Group.
The name of the endpoint
The URL of the endpoint
```sh curl
curl https://qstash.upstash.io/v2/topics/my-url-group \
-H "Authorization: Bearer "
```
```js Node
const response = await fetch('https://qstash.upstash.io/v2/topics/my-url-group', {
headers: {
'Authorization': 'Bearer '
}
});
```
```python Python
import requests
headers = {
'Authorization': 'Bearer ',
}
response = requests.get(
'https://qstash.upstash.io/v2/topics/my-url-group',
headers=headers
)
```
```go Go
req, err := http.NewRequest("GET", "https://qstash.upstash.io/v2/topics/my-url-group", nil)
if err != nil {
log.Fatal(err)
}
req.Header.Set("Authorization", "Bearer ")
resp, err := http.DefaultClient.Do(req)
if err != nil {
log.Fatal(err)
}
defer resp.Body.Close()
```
```json 200 OK
{
"createdAt": 1623345678001,
"updatedAt": 1623345678001,
"name": "my-url-group",
"endpoints": [
{
"name": "my-endpoint",
"url": "https://my-endpoint.com"
}
]
}
```
# List URL Groups
Source: https://upstash.com/docs/qstash/api/url-groups/list
GET https://qstash.upstash.io/v2/topics
List all your URL Groups
## Request
No parameters
## Response
The creation time of the URL Group. UnixMilli
The update time of the URL Group. UnixMilli
The name of the URL Group.
The name of the endpoint.
The URL of the endpoint
```sh curl
curl https://qstash.upstash.io/v2/topics \
-H "Authorization: Bearer "
```
```js Node
const response = await fetch("https://qstash.upstash.io/v2/topics", {
headers: {
Authorization: "Bearer ",
},
});
```
```python Python
import requests
headers = {
'Authorization': 'Bearer ',
}
response = requests.get(
'https://qstash.upstash.io/v2/topics',
headers=headers
)
```
```go Go
req, err := http.NewRequest("GET", "https://qstash.upstash.io/v2/topics", nil)
if err != nil {
log.Fatal(err)
}
req.Header.Set("Authorization", "Bearer ")
resp, err := http.DefaultClient.Do(req)
if err != nil {
log.Fatal(err)
}
defer resp.Body.Close()
```
```json 200 OK
[
{
"createdAt": 1623345678001,
"updatedAt": 1623345678001,
"name": "my-url-group",
"endpoints": [
{
"name": "my-endpoint",
"url": "https://my-endpoint.com"
}
]
},
// ...
]
```
# Remove URL Group
Source: https://upstash.com/docs/qstash/api/url-groups/remove
DELETE https://qstash.upstash.io/v2/topics/{urlGroupName}
Remove a URL group and all its endpoints
The URL Group and all its endpoints are removed. In flight messages in the URL Group are not removed but you will not be able to send messages to the topic anymore.
## Request
The name of the URL Group to remove.
## Response
This endpoint returns 200 if the URL Group is removed successfully.
```sh curl
curl -XDELETE https://qstash.upstash.io/v2/topics/my-url-group \
-H "Authorization: Bearer "
```
```js Node
const response = await fetch('https://qstash.upstash.io/v2/topics/my-url-group', {
method: 'DELETE',
headers: {
'Authorization': 'Bearer '
}
});
```
```python Python
import requests
headers = {
'Authorization': 'Bearer ',
}
response = requests.delete(
'https://qstash.upstash.io/v2/topics/my-url-group',
headers=headers
)
```
```go Go
req, err := http.NewRequest("DELETE", "https://qstash.upstash.io/v2/topics/my-url-group", nil)
if err != nil {
log.Fatal(err)
}
req.Header.Set("Authorization", "Bearer ")
resp, err := http.DefaultClient.Do(req)
if err != nil {
log.Fatal(err)
}
defer resp.Body.Close()
```
# Remove Endpoints
Source: https://upstash.com/docs/qstash/api/url-groups/remove-endpoint
DELETE https://qstash.upstash.io/v2/topics/{urlGroupName}/endpoints
Remove one or more endpoints
Remove one or multiple endpoints from a URL Group. If all endpoints have been removed, the URL Group will be deleted.
## Request
The name of your URL Group. If it doesn't exist, we return an error.
The endpoints to be removed from to the URL Group.
Either `name` or `url` must be provided
The name of the endpoint
The URL of the endpoint
## Response
This endpoint simply returns 200 OK if the endpoints have been removed successfully.
```sh curl
curl -XDELETE https://qstash.upstash.io/v2/topics/:urlGroupName/endpoints \
-H "Authorization: Bearer " \
-H "Content-Type: application/json" \
-d '{
"endpoints": [
{
"name": "endpoint1",
},
{
"url": "https://somewhere-else.com"
}
]
}'
```
```js Node
const response = await fetch("https://qstash.upstash.io/v2/topics/:urlGroupName/endpoints", {
method: "DELETE",
headers: {
Authorization: "Bearer ",
"Content-Type": "application/json",
},
body: {
endpoints: [
{
name: "endpoint1",
},
{
url: "https://somewhere-else.com",
},
],
},
});
```
```python Python
import requests
headers = {
'Authorization': 'Bearer ',
'Content-Type': 'application/json',
}
data = {
"endpoints": [
{
"name": "endpoint1",
},
{
"url": "https://somewhere-else.com"
}
]
}
response = requests.delete(
'https://qstash.upstash.io/v2/topics/:urlGroupName/endpoints',
headers=headers,
data=data
)
```
```go Go
var data = strings.NewReader(`{
"endpoints": [
{
"name": "endpoint1",
},
{
"url": "https://somewhere-else.com"
}
]
}`)
req, err := http.NewRequest("DELETE", "https://qstash.upstash.io/v2/topics/:urlGroupName/endpoints", data)
if err != nil {
log.Fatal(err)
}
req.Header.Set("Authorization", "Bearer ")
req.Header.Set("Content-Type", "application/json")
resp, err := http.DefaultClient.Do(req)
if err != nil {
log.Fatal(err)
}
defer resp.Body.Close()
```
# Background Jobs
Source: https://upstash.com/docs/qstash/features/background-jobs
## When do you need background jobs
Background jobs are essential for executing tasks that are too time-consuming to run in the
main execution thread without affecting the user experience.
These tasks might include data processing, sending batch emails, performing scheduled maintenance,
or any other operations that are not immediately required to respond to user requests.
Utilizing background jobs allows your application to remain responsive and scalable, handling more requests simultaneously by offloading
heavy lifting to background processes.
In Serverless frameworks, your hosting provider will likely have a limit for how long each task can last. Try searching
for the maximum execution time for your hosting provider to find out more.
## How to use QStash for background jobs
QStash provides a simple and efficient way to run background jobs, you can understand it as a 2 step process:
1. **Public API** Create a public API endpoint within your application. The endpoint should contain the logic for the background job.
Since QStash requires a public endpoint to invoke the background job, it won't be able to access any localhost APIs.
QStash requires a public endpoint to trigger background jobs, which means it cannot directly access localhost APIs.
To get around this, you have two options:
* Run QStash [development server](/qstash/howto/local-development) locally
* Set up a [local tunnel](/qstash/howto/local-tunnel) for your API
2. **QStash Request** Invoke QStash to start/schedule the execution of the API endpoint.
Here's what this looks like in a simple Next.js application:
```tsx app/page.tsx
"use client"
export default function Home() {
async function handleClick() {
// Send a request to our server to start the background job.
// For proper error handling, refer to the quick start.
// Note: This can also be a server action instead of a route handler
await fetch("/api/start-email-job", {
method: "POST",
body: JSON.stringify({
users: ["a@gmail.com", "b@gmail.com", "c.gmail.com"]
}),
})
}
return (
);
}
```
```typescript app/api/start-email-job/route.ts
import { Client } from "@upstash/qstash";
const qstashClient = new Client({
token: "YOUR_TOKEN",
});
export async function POST(request: Request) {
const body = await request.json();
const users: string[] = body.users;
// If you know the public URL of the email API, you can use it directly
const rootDomain = request.url.split('/').slice(0, 3).join('/');
const emailAPIURL = `${rootDomain}/api/send-email`; // ie: https://yourapp.com/api/send-email
// Tell QStash to start the background job.
// For proper error handling, refer to the quick start.
await qstashClient.publishJSON({
url: emailAPIURL,
body: {
users
}
});
return new Response("Job started", { status: 200 });
}
```
```typescript app/api/send-email/route.ts
// This is a public API endpoint that will be invoked by QStash.
// It contains the logic for the background job and may take a long time to execute.
import { sendEmail } from "your-email-library";
export async function POST(request: Request) {
const body = await request.json();
const users: string[] = body.users;
// Send emails to the users
for (const user of users) {
await sendEmail(user);
}
return new Response("Job started", { status: 200 });
}
```
To better understand the application, let's break it down:
1. **Client**: The client application contains a button that, when clicked, sends a request to the server to start the background job.
2. **Next.js server**: The first endpoint, `/api/start-email-job`, is invoked by the client to start the background job.
3. **QStash**: The QStash client is used to invoke the `/api/send-email` endpoint, which contains the logic for the background job.
Here is a visual representation of the process:
To view a more detailed Next.js quick start guide for setting up QStash, refer to the [quick start](/qstash/quickstarts/vercel-nextjs) guide.
It's also possible to schedule a background job to run at a later time using [schedules](/qstash/features/schedules).
If you'd like to invoke another endpoint when the background job is complete, you can use [callbacks](/qstash/features/callbacks).
# Batching
Source: https://upstash.com/docs/qstash/features/batch
[Publishing](/qstash/howto/publishing) is great for sending one message
at a time, but sometimes you want to send a batch of messages at once.
This can be useful to send messages to a single or multiple destinations.
QStash provides the `batch` endpoint to help
you with this.
If the format of the messages are valid, the response will be an array of
responses for each message in the batch. When batching URL Groups, the response
will be an array of responses for each destination in the URL Group. If one
message fails to be sent, that message will have an error response, but the
other messages will still be sent.
You can publish to destination, URL Group or queue in the same batch request.
## Batching messages with destinations
You can also send messages to the same destination!
```shell cURL
curl -XPOST https://qstash.upstash.io/v2/batch \
-H 'Authorization: Bearer XXX' \
-H "Content-type: application/json" \
-d '
[
{
"destination": "https://example.com/destination1"
},
{
"destination": "https://example.com/destination2"
}
]'
```
```typescript TypeScript
import { Client } from "@upstash/qstash";
// Each message is the same as the one you would send with the publish endpoint
const client = new Client({ token: "" });
const res = await client.batchJSON([
{
url: "https://example.com/destination1",
},
{
url: "https://example.com/destination2",
},
]);
```
```python Python
from qstash import QStash
client = QStash("")
client.message.batch_json(
[
{"url": "https://example.com/destination1"},
{"url": "https://example.com/destination2"},
]
)
```
## Batching messages with URL Groups
If you have a [URL Group](/qstash/howto/url-group-endpoint), you can batch send with
the URL Group as well.
```shell cURL
curl -XPOST https://qstash.upstash.io/v2/batch \
-H 'Authorization: Bearer XXX' \
-H "Content-type: application/json" \
-d '
[
{
"destination": "myUrlGroup"
},
{
"destination": "https://example.com/destination2"
}
]'
```
```typescript TypeScript
const client = new Client({ token: "" });
// Each message is the same as the one you would send with the publish endpoint
const res = await client.batchJSON([
{
urlGroup: "myUrlGroup",
},
{
url: "https://example.com/destination2",
},
]);
```
```python Python
from qstash import QStash
client = QStash("")
client.message.batch_json(
[
{"url_group": "my-url-group"},
{"url": "https://example.com/destination2"},
]
)
```
## Batching messages with queue
If you have a [queue](/qstash/features/queues), you can batch send with
the queue. It is the same as publishing to a destination, but you need to set the queue name.
```shell cURL
curl -XPOST https://qstash.upstash.io/v2/batch \
-H 'Authorization: Bearer XXX' \
-H "Content-type: application/json" \
-d '
[
{
"queue": "my-queue",
"destination": "https://example.com/destination1"
},
{
"queue": "my-second-queue",
"destination": "https://example.com/destination2"
}
]'
```
```typescript TypeScript
const client = new Client({ token: "" });
const res = await client.batchJSON([
{
queueName: "my-queue",
url: "https://example.com/destination1",
},
{
queueName: "my-second-queue",
url: "https://example.com/destination2",
},
]);
```
```python Python
from upstash_qstash import QStash
from upstash_qstash.message import BatchRequest
qstash = QStash("")
messages = [
BatchRequest(
queue="my-queue",
url="https://httpstat.us/200",
body=f"hi 1",
retries=0
),
BatchRequest(
queue="my-second-queue",
url="https://httpstat.us/200",
body=f"hi 2",
retries=0
),
]
qstash.message.batch(messages)
```
## Batching messages with headers and body
You can provide custom headers and a body for each message in the batch.
```shell cURL
curl -XPOST https://qstash.upstash.io/v2/batch -H "Authorization: Bearer XXX" \
-H "Content-Type: application/json" \
-d '
[
{
"destination": "myUrlGroup",
"headers":{
"Upstash-Delay":"5s",
"Upstash-Forward-Hello":"123456"
},
"body": "Hello World"
},
{
"destination": "https://example.com/destination1",
"headers":{
"Upstash-Delay":"7s",
"Upstash-Forward-Hello":"789"
}
},
{
"destination": "https://example.com/destination2",
"headers":{
"Upstash-Delay":"9s",
"Upstash-Forward-Hello":"again"
}
}
]'
```
```typescript TypeScript
const client = new Client({ token: "" });
// Each message is the same as the one you would send with the publish endpoint
const msgs = [
{
urlGroup: "myUrlGroup",
delay: 5,
body: "Hello World",
headers: {
hello: "123456",
},
},
{
url: "https://example.com/destination1",
delay: 7,
headers: {
hello: "789",
},
},
{
url: "https://example.com/destination2",
delay: 9,
headers: {
hello: "again",
},
body: {
Some: "Data",
},
},
];
const res = await client.batchJSON(msgs);
```
```python Python
from qstash import QStash
client = QStash("")
client.message.batch_json(
[
{
"url_group": "my-url-group",
"delay": "5s",
"body": {"hello": "world"},
"headers": {"random": "header"},
},
{
"url": "https://example.com/destination1",
"delay": "1m",
},
{
"url": "https://example.com/destination2",
"body": {"hello": "again"},
},
]
)
```
#### The response for this will look like
```json
[
[
{
"messageId": "msg_...",
"url": "https://myUrlGroup-endpoint1.com"
},
{
"messageId": "msg_...",
"url": "https://myUrlGroup-endpoint2.com"
}
],
{
"messageId": "msg_..."
},
{
"messageId": "msg_..."
}
]
```
# Callbacks
Source: https://upstash.com/docs/qstash/features/callbacks
All serverless function providers have a maximum execution time for each
function. Usually you can extend this time by paying more, but it's still
limited. QStash provides a way to go around this problem by using callbacks.
## What is a callback?
A callback allows you to call a long running function without having to wait for
its response. Instead of waiting for the request to finish, you can add a
callback url to your published message and when the request finishes, we will
call your callback URL with the response.
1. You publish a message to QStash using the `/v2/publish` endpoint
2. QStash will enqueue the message and deliver it to the destination
3. QStash waits for the response from the destination
4. When the response is ready, QStash calls your callback URL with the response
Callbacks publish a new message with the response to the callback URL. Messages
created by callbacks are charged as any other message.
## How do I use Callbacks?
You can add a callback url in the `Upstash-Callback` header when publishing a
message. The value must be a valid URL.
```bash cURL
curl -X POST \
https://qstash.upstash.io/v2/publish/https://my-api... \
-H 'Content-Type: application/json' \
-H 'Authorization: Bearer ' \
-H 'Upstash-Callback: ' \
-d '{ "hello": "world" }'
```
```typescript Typescript
import { Client } from "@upstash/qstash";
const client = new Client({ token: "" });
const res = await client.publishJSON({
url: "https://my-api...",
body: { hello: "world" },
callback: "https://my-callback...",
});
```
```python Python
from qstash import QStash
client = QStash("")
client.message.publish_json(
url="https://my-api...",
body={
"hello": "world",
},
callback="https://my-callback...",
)
```
The callback body sent to you will be a JSON object with the following fields:
```json
{
"status": 200,
"header": { "key": ["value"] }, // Response header
"body": "YmFzZTY0IGVuY29kZWQgcm9keQ==", // base64 encoded response body
"retried": 2, // How many times we retried to deliver the original message
"maxRetries": 3, // Number of retries before the message assumed to be failed to delivered.
"sourceMessageId": "msg_xxx", // The ID of the message that triggered the callback
"topicName": "myTopic", // The name of the URL Group (topic) if the request was part of a URL Group
"endpointName": "myEndpoint", // The endpoint name if the endpoint is given a name within a topic
"url": "http://myurl.com", // The destination url of the message that triggered the callback
"method": "GET", // The http method of the message that triggered the callback
"sourceHeader": { "key": "value" }, // The http header of the message that triggered the callback
"sourceBody": "YmFzZTY0kZWQgcm9keQ==", // The base64 encoded body of the message that triggered the callback
"notBefore": "1701198458025", // The unix timestamp of the message that triggered the callback is/will be delivered in milliseconds
"createdAt": "1701198447054", // The unix timestamp of the message that triggered the callback is created in milliseconds
"scheduleId": "scd_xxx", // The scheduleId of the message if the message is triggered by a schedule
"callerIP": "178.247.74.179" // The IP address where the message that triggered the callback is published from
}
```
In Next.js you could use the following code to handle the callback:
```js
// pages/api/callback.js
import { verifySignature } from "@upstash/qstash/nextjs";
function handler(req, res) {
// responses from qstash are base64-encoded
const decoded = atob(req.body.body);
console.log(decoded);
return res.status(200).end();
}
export default verifySignature(handler);
export const config = {
api: {
bodyParser: false,
},
};
```
We may truncate the response body if it exceeds your plan limits. You can check
your `Max Message Size` in the
[console](https://console.upstash.com/qstash?tab=details).
Make sure you verify the authenticity of the callback request made to your API
by
[verifying the signature](/qstash/features/security/#request-signing-optional).
# What is a Failure-Callback?
Failure callbacks are similar to callbacks but they are called only when all the retries are exhausted and still
the message can not be delivered to the given endpoint.
This is designed to be an serverless alternative to [List messages to DLQ](/qstash/api/dlq/listMessages).
You can add a failure callback URL in the `Upstash-Failure-Callback` header when publishing a
message. The value must be a valid URL.
```bash cURL
curl -X POST \
https://qstash.upstash.io/v2/publish/ \
-H 'Content-Type: application/json' \
-H 'Authorization: Bearer ' \
-H 'Upstash-Failure-Callback: ' \
-d '{ "hello": "world" }'
```
```typescript Typescript
import { Client } from "@upstash/qstash";
const client = new Client({ token: "" });
const res = await client.publishJSON({
url: "https://my-api...",
body: { hello: "world" },
failureCallback: "https://my-callback...",
});
```
```python Python
from qstash import QStash
client = QStash("")
client.message.publish_json(
url="https://my-api...",
body={
"hello": "world",
},
failure_callback="https://my-callback...",
)
```
The callback body sent to you will be a JSON object with the following fields:
```json
{
"status": 400,
"header": { "key": ["value"] }, // Response header
"body": "YmFzZTY0IGVuY29kZWQgcm9keQ==", // base64 encoded response body
"retried": 3, // How many times we retried to deliver the original message
"maxRetries": 3, // Number of retries before the message assumed to be failed to delivered.
"dlqId": "1725323658779-0", // Dead Letter Queue id. This can be used to retrieve/remove the related message from DLQ.
"sourceMessageId": "msg_xxx", // The ID of the message that triggered the callback
"topicName": "myTopic", // The name of the URL Group (topic) if the request was part of a topic
"endpointName": "myEndpoint", // The endpoint name if the endpoint is given a name within a topic
"url": "http://myurl.com", // The destination url of the message that triggered the callback
"method": "GET", // The http method of the message that triggered the callback
"sourceHeader": { "key": "value" }, // The http header of the message that triggered the callback
"sourceBody": "YmFzZTY0kZWQgcm9keQ==", // The base64 encoded body of the message that triggered the callback
"notBefore": "1701198458025", // The unix timestamp of the message that triggered the callback is/will be delivered in milliseconds
"createdAt": "1701198447054", // The unix timestamp of the message that triggered the callback is created in milliseconds
"scheduleId": "scd_xxx", // The scheduleId of the message if the message is triggered by a schedule
"callerIP": "178.247.74.179" // The IP address where the message that triggered the callback is published from
}
```
You can also use a callback and failureCallback together!
## Configuring Callbacks
Publishes/enqueues for callbacks can also be configured with the same HTTP headers that are used to configure direct publishes/enqueues.
You can refer to headers that are used to configure `publishes` [here](https://upstash.com/docs/qstash/api/publish) and for `enqueues`
[here](https://upstash.com/docs/qstash/api/enqueue)
Instead of the `Upstash` prefix for headers, the `Upstash-Callback`/`Upstash-Failure-Callback` prefix can be used to configure callbacks as follows:
```
Upstash-Callback-Timeout
Upstash-Callback-Retries
Upstash-Callback-Delay
Upstash-Callback-Method
Upstash-Failure-Callback-Timeout
Upstash-Failure-Callback-Retries
Upstash-Failure-Callback-Delay
Upstash-Failure-Callback-Method
```
You can also forward headers to your callback endpoints as follows:
```
Upstash-Callback-Forward-MyCustomHeader
Upstash-Failure-Callback-Forward-MyCustomHeader
```
# Deduplication
Source: https://upstash.com/docs/qstash/features/deduplication
Messages can be deduplicated to prevent duplicate messages from being sent. When
a duplicate message is detected, it is accepted by QStash but not enqueued. This
can be useful when the connection between your service and QStash fails, and you
never receive the acknowledgement. You can simply retry publishing and can be
sure that the message will enqueued only once.
In case a message is a duplicate, we will accept the request and return the
messageID of the existing message. The only difference will be the response
status code. We'll send HTTP `202 Accepted` code in case of a duplicate message.
## Deduplication ID
To deduplicate a message, you can send the `Upstash-Deduplication-Id` header
when publishing the message.
```shell cURL
curl -XPOST \
-H 'Authorization: Bearer XXX' \
-H "Content-type: application/json" \
-H "Upstash-Deduplication-Id: abcdef" \
-d '{ "hello": "world" }' \
'https://qstash.upstash.io/v2/publish/https://my-api..."'
```
```typescript TypeScript
import { Client } from "@upstash/qstash";
const client = new Client({ token: "" });
const res = await client.publishJSON({
url: "https://my-api...",
body: { hello: "world" },
deduplicationId: "abcdef",
});
```
```python Python
from qstash import QStash
client = QStash("")
client.message.publish_json(
url="https://my-api...",
body={
"hello": "world",
},
deduplication_id="abcdef",
)
```
## Content Based Deduplication
If you want to deduplicate messages automatically, you can set the
`Upstash-Content-Based-Deduplication` header to `true`.
```shell cURL
curl -XPOST \
-H 'Authorization: Bearer XXX' \
-H "Content-type: application/json" \
-H "Upstash-Content-Based-Deduplication: true" \
-d '{ "hello": "world" }' \
'https://qstash.upstash.io/v2/publish/...'
```
```typescript TypeScript
import { Client } from "@upstash/qstash";
const client = new Client({ token: "" });
const res = await client.publishJSON({
url: "https://my-api...",
body: { hello: "world" },
contentBasedDeduplication: true,
});
```
```python Python
from qstash import QStash
client = QStash("")
client.message.publish_json(
url="https://my-api...",
body={
"hello": "world",
},
content_based_deduplication=True,
)
```
Content based deduplication creates a unique deduplication ID for the message
based on the following fields:
* **Destination**: The URL Group or endpoint you are publishing the message to.
* **Body**: The body of the message.
* **Header**: This includes the `Content-Type` header and all headers, that you
forwarded with the `Upstash-Forward-` prefix. See
[custom HTTP headers section](/qstash/howto/publishing#sending-custom-http-headers).
# Delay
Source: https://upstash.com/docs/qstash/features/delay
When publishing a message, you can delay it for a certain amount of time before
it will be delivered to your API. See the [pricing table](https://upstash.com/pricing/qstash) for more information
For free: The maximum allowed delay is **7 days**.
For pay-as-you-go: The maximum allowed delay is **1 year**.
For fixed pricing: The maximum allowed delay is **Custom(you may delay as much as needed)**.
## Relative Delay
Delay a message by a certain amount of time relative to the time the message was
published.
The format for the duration is ``. Here are some examples:
* `10s` = 10 seconds
* `1m` = 1 minute
* `30m` = half an hour
* `2h` = 2 hours
* `7d` = 7 days
You can send this duration inside the `Upstash-Delay` header.
```shell cURL
curl -XPOST \
-H 'Authorization: Bearer XXX' \
-H "Content-type: application/json" \
-H "Upstash-Delay: 1m" \
-d '{ "hello": "world" }' \
'https://qstash.upstash.io/v2/publish/https://my-api...'
```
```typescript Typescript
import { Client } from "@upstash/qstash";
const client = new Client({ token: "" });
const res = await client.publishJSON({
url: "https://my-api...",
body: { hello: "world" },
delay: 60,
});
```
```python Python
from qstash import QStash
client = QStash("")
client.message.publish_json(
url="https://my-api...",
body={
"hello": "world",
},
headers={
"test-header": "test-value",
},
delay="60s",
)
```
`Upstash-Delay` will get overridden by `Upstash-Not-Before` header when both are
used together.
## Absolute Delay
Delay a message until a certain time in the future. The format is a unix
timestamp in seconds, based on the UTC timezone.
You can send the timestamp inside the `Upstash-Not-Before` header.
```shell cURL
curl -XPOST \
-H 'Authorization: Bearer XXX' \
-H "Content-type: application/json" \
-H "Upstash-Not-Before: 1657104947" \
-d '{ "hello": "world" }' \
'https://qstash.upstash.io/v2/publish/https://my-api...'
```
```typescript Typescript
import { Client } from "@upstash/qstash";
const client = new Client({ token: "" });
const res = await client.publishJSON({
url: "https://my-api...",
body: { hello: "world" },
notBefore: 1657104947,
});
```
```python Python
from qstash import QStash
client = QStash("")
client.message.publish_json(
url="https://my-api...",
body={
"hello": "world",
},
headers={
"test-header": "test-value",
},
not_before=1657104947,
)
```
`Upstash-Not-Before` will override the `Upstash-Delay` header when both are used
together.
## Delays in Schedules
Adding a delay in schedules is only possible via `Upstash-Delay`. The
delay will affect the messages that will be created by the schedule and not the
schedule itself.
For example when you create a new schedule with a delay of `30s`, the messages
will be created when the schedule triggers but only delivered after 30 seconds.
# Dead Letter Queues
Source: https://upstash.com/docs/qstash/features/dlq
At times, your API may fail to process a request. This could be due to a bug in your code, a temporary issue with a third-party service, or even network issues.
QStash automatically retries messages that fail due to a temporary issue but eventually stops and moves the message to a dead letter queue to be handled manually.
Read more about retries [here](/qstash/features/retry).
## How to Use the Dead Letter Queue
You can manually republish messages from the dead letter queue in the console.
1. **Retry** - Republish the message and remove it from the dead letter queue. Republished messages are just like any other message and will be retried automatically if they fail.
2. **Delete** - Delete the message from the dead letter queue.
## Limitations
Dead letter queues are limited to a certain number of messages. If you exceed this limit, the oldest messages will be dropped.
Unhandled messages are evicted after some time.
See the [pricing](https://upstash.com/pricing/qstash) page for more information.
# Flow Control
Source: https://upstash.com/docs/qstash/features/flowcontrol
FlowControl enables you to limit the number of messages sent to your endpoint via delaying the delivery.
There are two limits that you can set with the FlowControl feature: [RatePerSecond](#ratepersecond-limit) and [Parallelism](#parallelism-limit).
And if needed both parameters can be [combined](#ratepersecond-and-parallelism-together).
For the `FlowControl`, you need to choose a key first. This key is used to count the number of calls made to your endpoint.
The rate/parallelism limits are not applied per `url`, they are applied per `Flow-Control-Key`.
There are not limits to number of keys you can use.
## RatePerSecond Limit
The rate limit is the number of cals that can be made to your endpoint per second.
QStash will delay the delivery of the messages if the rate limit is exceeded.
In case of burst calls to QStash, a delivery can be delayed as long as necessary to guarantee the rate limit.
You can set the rate limit 10 calls per second as follows:
```typescript TypeScript
const client = new Client({ token: "" });
await client.publishJSON({
url: "https://example.com",
body: { hello: "world" },
flowControl: { key: "USER_GIVEN_KEY", ratePerSecond: 10 },
});
```
```bash cURL
curl -XPOST -H 'Authorization: Bearer XXX' \
-H "Content-type: application/json" \
-H "Upstash-Flow-Control-Key:USER_GIVEN_KEY" \
-H "Upstash-Flow-Control-Value:Rate=10" \
'https://qstash.upstash.io/v2/publish/https://example.com' \
-d '{"message":"Hello, World!"}'
```
## Parallelism Limit
The parallelism limit is the number of calls that can be active at the same time.
Active means that the call is made to your endpoint and the response is not received yet.
You can set the parallelism limit to 10 calls active at the same time as follows:
```typescript TypeScript
const client = new Client({ token: "" });
await client.publishJSON({
url: "https://example.com",
body: { hello: "world" },
flowControl: { key: "USER_GIVEN_KEY", parallelism: 10 },
});
```
```bash cURL
curl -XPOST -H 'Authorization: Bearer XXX' \
-H "Content-type: application/json" \
-H "Upstash-Flow-Control-Key:USER_GIVEN_KEY" \
-H "Upstash-Flow-Control-Value:Parallelism=10" \
'https://qstash.upstash.io/v2/publish/https://example.com' \
-d '{"message":"Hello, World!"}'
```
### RatePerSecond and Parallelism Together
Both parameters can be combined. For example, with a rate of 20 per second and parallelism of 10, if each request takes a minute to complete, QStash will trigger 20 calls in the first second and another 20 in the next. Since none of them will have finished, the system will wait until one completes before triggering another.
```typescript TypeScript
const client = new Client({ token: "" });
await client.publishJSON({
url: "https://example.com",
body: { hello: "world" },
flowControl: { key: "USER_GIVEN_KEY", ratePerSecond: 20, parallelism: 10 },
});
```
```bash cURL
curl -XPOST -H 'Authorization: Bearer XXX' \
-H "Content-type: application/json" \
-H "Upstash-Flow-Control-Key:USER_GIVEN_KEY" \
-H "Upstash-Flow-Control-Value:Rate=20,Parallelism=10" \
'https://qstash.upstash.io/v2/publish/https://example.com' \
-d '{"message":"Hello, World!"}'
```
# Queues
Source: https://upstash.com/docs/qstash/features/queues
The queue concept in QStash allows ordered delivery (FIFO).
See the [API doc](/qstash/api/queues/upsert) for the full list of related Rest APIs.
Here we list common use cases for Queue and how to use them.
## Ordered Delivery
With Queues, the ordered delivery is guaranteed by default.
This means:
* Your messages will be queued without blocking the REST API and sent one by one in FIFO order. Queued means [CREATED](/qstash/howto/debug-logs) event will be logged.
* The next message will wait for retries of the current one if it can not be delivered because your endpoint returns non-2xx code.
In other words, the next message will be [ACTIVE](/qstash/howto/debug-logs) only after the last message is either [DELIVERED](/qstash/howto/debug-logs) or
[FAILED](/qstash/howto/debug-logs).
* Next message will wait for [callbacks](/qstash/features/callbacks#what-is-a-callback) or [failure callbacks](/qstash/features/callbacks#what-is-a-failure-callback) to finish.
```bash cURL
curl -XPOST -H 'Authorization: Bearer XXX' \
-H "Content-type: application/json" \
'https://qstash.upstash.io/v2/enqueue/my-queue/https://example.com' -d '{"message":"Hello, World!"}'
```
```typescript TypeScript
const client = new Client({ token: "" });
const queue = client.queue({
queueName: "my-queue"
})
await queue.enqueueJSON({
url: "https://example.com",
body: {
"Hello": "World"
}
})
```
```python Python
from qstash import QStash
client = QStash("")
client.message.enqueue_json(
queue="my-queue",
url="https://example.com",
body={
"Hello": "World",
},
)
```
## Controlled Parallelism
For the parallelism limit, we introduced an easier and less limited API with publish.
Please check the [flowControl](/qstash/features/flow-control) page for the detailed information.
Setting parallelism with queues will be deprecated at some point.
To ensure that your endpoint is not overwhelmed and also you want more than one-by-one delivery for better throughput,
you can achieve controlled parallelism with queues.
By default, queues have parallelism 1.
Depending on your [plan](https://upstash.com/pricing/qstash), you can configure the parallelism of your queues as follows:
```bash cURL
curl -XPOST https://qstash.upstash.io/v2/queues/ \
-H "Authorization: Bearer " \
-H "Content-Type: application/json" \
-d '{
"queueName": "my-queue",
"parallelism": 5,
}'
```
```typescript TypeScript
const client = new Client({ token: "" });
const queue = client.queue({
queueName: "my-queue"
})
await queue.upsert({
parallelism: 1,
})
```
```python Python
from qstash import QStash
client = QStash("")
client.queue.upsert("my-queue", parallelism=5)
```
After that, you can use the `enqueue` path to send your messages.
```bash cURL
curl -XPOST -H 'Authorization: Bearer XXX' \
-H "Content-type: application/json" \
'https://qstash.upstash.io/v2/enqueue/my-queue/https://example.com' -d '{"message":"Hello, World!"}'
```
```typescript TypeScript
const client = new Client({ token: "" });
const queue = QStashClient.queue({
queueName: "my-queue"
})
await queue.enqueueJSON({
url: "https://example.com",
body: {
"Hello": "World"
}
})
```
```python Python
from qstash import QStash
client = QStash("")
client.message.enqueue_json(
queue="my-queue",
url="https://example.com",
body={
"Hello": "World",
},
)
```
You can check the parallelism of your queues with the following API:
```bash cURL
curl https://qstash.upstash.io/v2/queues/my-queue \
-H "Authorization: Bearer "
```
```typescript TypeScript
const client = new Client({ token: "" });
const queue = client.queue({
queueName: "my-queue"
})
const res = await queue.get()
```
```python Python
from qstash import QStash
client = QStash("")
client.queue.get("my-queue")
```
# Retry
Source: https://upstash.com/docs/qstash/features/retry
For free: Requests will be considered failed if not processed within **15 minutes**.
For pay-as-you-go: Requests will be considered failed if not processed within **2 hours**.
For fixed pricing: Requests will be considered failed if not processed within **Custom(you may timeout as much as needed)**.
Many things can go wrong in a serverless environment. If your API does not
respond with a success status code (2XX), we retry the request to ensure every
message will be delivered.
The maximum number of retries depends on your current plan. By default, we retry
the maximum amount of times, but you can set it lower by sending the
`Upstash-Retries` header:
```shell cURL
curl -XPOST \
-H 'Authorization: Bearer XXX' \
-H "Content-type: application/json" \
-H "Upstash-Retries: 2" \
-d '{ "hello": "world" }' \
'https://qstash.upstash.io/v2/publish/https://my-api...'
```
```typescript TypeScript
import { Client } from "@upstash/qstash";
const client = new Client({ token: "" });
const res = await client.publishJSON({
url: "https://my-api...",
body: { hello: "world" },
retries: 2,
});
```
```python Python
from qstash import QStash
client = QStash("")
client.message.publish_json(
url="https://my-api...",
body={
"hello": "world",
},
retries=2,
)
```
The backoff algorithm calculates the retry delay based on the number of retries.
Each delay is capped at 1 day.
```
n = how many times this request has been retried
delay = min(86400, e ** (2.5*n)) // in seconds
```
| n | delay |
| - | ------ |
| 1 | 12s |
| 2 | 2m28s |
| 3 | 30m8ss |
| 4 | 6h7m6s |
| 5 | 24h |
| 6 | 24h |
## Retry-After Headers
Instead of using the default backoff algorithm, you can specify when QStash should retry your message.
To do this, include one of the following headers in your response to QStash request.
* Retry-After
* X-RateLimit-Reset
* X-RateLimit-Reset-Requests
* X-RateLimit-Reset-Tokens
These headers can be set to a value in seconds, the RFC1123 date format, or a duration format (e.g., 6m5s).
For the duration format, valid time units are "ns", "us" (or "µs"), "ms", "s", "m", "h".
Note that you can only delay retries up to the maximum value of the default backoff algorithm, which is one day.
If you specify a value beyond this limit, the backoff algorithm will be applied.
This feature is particularly useful if your application has rate limits, ensuring retries are scheduled appropriately without wasting attempts during restricted periods.
```
Retry-After: 0 // Next retry will be scheduled immediately without any delay.
Retry-After: 10 // Next retry will be scheduled after a 10-second delay.
Retry-After: 6m5s // Next retry will be scheduled after 6 minutes 5 seconds delay.
Retry-After: Sun, 27 Jun 2024 12:16:24 GMT // Next retry will be scheduled for the specified date, within the allowable limits.
```
## Upstash-Retried Header
QStash adds the `Upstash-Retried` header to requests sent to your API. This
indicates how many times the request has been retried.
```
Upstash-Retried: 0 // This is the first attempt
Upstash-Retried: 1 // This request has been sent once before and now is the second attempt
Upstash-Retried: 2 // This request has been sent twice before and now is the third attempt
```
# Schedules
Source: https://upstash.com/docs/qstash/features/schedules
In addition to sending a message once, you can create a schedule, and we will
publish the message in the given period. To create a schedule, you simply need
to add the `Upstash-Cron` header to your `publish` request.
Schedules can be configured using `cron` expressions.
[crontab.guru](https://crontab.guru/) is a great tool for understanding and
creating cron expressions.
We use `UTC` as timezone when evaluating cron expressions.
The following request would create a schedule that will automatically publish
the message every minute:
```typescript Typescript
import { Client } from "@upstash/qstash";
const client = new Client({ token: "" });
await client.schedules.create({
destination: "https://example.com",
cron: "* * * * *",
});
```
```python Python
from qstash import QStash
client = QStash("")
client.schedule.create(
destination="https://example.com",
cron="* * * * *",
)
```
```shell cURL
curl -XPOST \
-H 'Authorization: Bearer XXX' \
-H "Content-type: application/json" \
-H "Upstash-Cron: * * * * *" \
-d '{ "hello": "world" }' \
'https://qstash.upstash.io/v2/schedules/https://example.com'
```
All of the [other config options](/qstash/howto/publishing#optional-parameters-and-configuration)
can still be used.
It can take up to 60 seconds for the schedule to be loaded on an active node and
triggered for the first time.
You can see and manage your schedules in the
[Upstash Console](https://console.upstash.com/qstash).
### Scheduling to a URL Group
Instead of scheduling a message to a specific URL, you can also create a
schedule, that publishes to a URL Group. Simply use either the URL Group name or its id:
```typescript Typescript
import { Client } from "@upstash/qstash";
const client = new Client({ token: "" });
await client.schedules.create({
destination: "urlGroupName",
cron: "* * * * *",
});
```
```python Python
from qstash import QStash
client = QStash("")
client.schedule.create(
destination="url-group-name",
cron="* * * * *",
)
```
```bash cURL
curl -XPOST \
-H 'Authorization: Bearer XXX' \
-H "Content-type: application/json" \
-H "Upstash-Cron: * * * * *" \
-d '{ "hello": "world" }' \
'https://qstash.upstash.io/v2/schedules/'
```
### Scheduling to a Queue
You can schedule an item to be added to a queue at a specified time.
```bash typescript
curl -XPOST \
import { Client } from "@upstash/qstash";
const client = new Client({ token: "" });
await client.schedules.create({
destination: "https://example.com",
cron: "* * * * *",
queueName: "yourQueueName",
});
```
```bash cURL
curl -XPOST \
-H 'Authorization: Bearer XXX' \
-H "Content-type: application/json" \
-H "Upstash-Cron: * * * * *" \
-H "Upstash-Queue-Name: yourQueueName" \
-d '{ "hello": "world" }' \
'https://qstash.upstash.io/v2/schedules/https://example.com'
```
### Overwriting an existing schedule
You can pass scheduleId explicitly to overwrite an existing schedule or just simply create the schedule
with the given schedule id.
```typescript Typescript
import { Client } from "@upstash/qstash";
const client = new Client({ token: "" });
await client.schedules.create({
destination: "https://example.com",
scheduleId: "existingScheduleId",
cron: "* * * * *",
});
```
```shell cURL
curl -XPOST \
-H 'Authorization: Bearer XXX' \
-H "Content-type: application/json" \
-H "Upstash-Cron: * * * * *" \
-H "Upstash-Schedule-Id: existingScheduleId" \
-d '{ "hello": "world" }' \
'https://qstash.upstash.io/v2/schedules/https://example.com'
```
# Security
Source: https://upstash.com/docs/qstash/features/security
### Request Authorization
When interacting with the QStash API, you will need an authorization token. You
can get your token from the [Console](https://console.upstash.com/qstash).
Send this token along with every request made to `QStash` inside the
`Authorization` header like this:
```
"Authorization": "Bearer "
```
### Request Signing (optional)
Because your endpoint needs to be publicly available, we recommend you verify
the authenticity of each incoming request.
#### The `Upstash-Signature` header
With each request we are sending a JWT inside the `Upstash-Signature` header.
You can learn more about them [here](https://jwt.io).
An example token would be:
**Header**
```json
{
"alg": "HS256",
"typ": "JWT"
}
```
**Payload**
```json
{
"iss": "Upstash",
"sub": "https://qstash-remote.requestcatcher.com/test",
"exp": 1656580612,
"nbf": 1656580312,
"iat": 1656580312,
"jti": "jwt_67kxXD6UBAk7DqU6hzuHMDdXFXfP",
"body": "qK78N0k3pNKI8zN62Fq2Gm-_LtWkJk1z9ykio3zZvY4="
}
```
The JWT is signed using `HMAC SHA256` algorithm with your current signing key
and includes the following claims:
#### Claims
##### `iss`
The issuer field is always `Upstash`.
##### `sub`
The url of your endpoint, where this request is sent to.
For example when you are using a nextjs app on vercel, this would look something
like `https://my-app.vercel.app/api/endpoint`
##### `exp`
A unix timestamp in seconds after which you should no longer accept this
request. Our JWTs have a lifetime of 5 minutes by default.
##### `iat`
A unix timestamp in seconds when this JWT was created.
##### `nbf`
A unix timestamp in seconds before which you should not accept this request.
##### `jti`
A unique id for this token.
##### `body`
The body field is a base64 encoded sha256 hash of the request body. We use url
encoding as specified in
[RFC 4648](https://datatracker.ietf.org/doc/html/rfc4648#section-5).
#### Verifying the signature
See [how to verify the signature](/qstash/howto/signature).
# URL Groups
Source: https://upstash.com/docs/qstash/features/url-groups
Sending messages to a single endpoint and not having to worry about retries is
already quite useful, but we also added the concept of URL Groups to QStash.
In short, a URL Group is just a namespace where you can publish messages to, the
same way as publishing a message to an endpoint directly.
After creating a URL Group, you can create one or multiple endpoints. An endpoint is
defined by a publicly available URL where the request will be sent to each
endpoint after it is published to the URL Group.
When you publish a message to a URL Group, it will be fanned out and sent to all the
subscribed endpoints.
## When should I use URL Groups?
URL Groups decouple your message producers from consumers by grouping one or more
endpoints into a single namespace.
Here's an example: You have a serverless function which is invoked with each
purchase in your e-commerce site. You want to send email to the customer after
the purchase. Inside the function, you submit the URL `api/sendEmail` to the
QStash. Later, if you want to send a Slack notification, you need to update the
serverless function adding another call to QStash to submit
`api/sendNotification`. In this example, you need to update and redeploy the
Serverless function at each time you change (or add) the endpoints.
If you create a URL Group `product-purchase` and produce messages to that URL Group in
the function, then you can add or remove endpoints by only updating the URL Group.
URL Groups give you freedom to modify endpoints without touching the backend
implementation.
Check [here](/qstash/howto/publishing#publish-to-url-group) to learn how to publish
to URL Groups.
## How URL Groups work
When you publish a message to a URL Group, we will enqueue a unique task for each
subscribed endpoint and guarantee successful delivery to each one of them.
[](https://mermaid.live/edit#pako:eNp1kl1rgzAUhv9KyOWoddXNtrkYVNdf0F0U5ijRHDVMjctHoRT_-2KtaztUQeS8j28e8JxxKhhggpWmGt45zSWtnKMX13GN7PX59IUc5w19iIanBDUmKbkq-qwfXuKdSVQqeQLssK1ZI3itVQ9dekdzdO6Ja9ntKKq-DxtEoP4xYGCIr-OOGCoOG4IYlPwIcqBu0V0XQRK0PE0w9lyCvP1-iB1n1CgcNwofjcJpo_Cua8ooHDWadIrGnaJHp2jaKbrrmnKK_jl1d9s98AxXICvKmd2fy8-MsS6gghgT-5oJCUrH2NKWNA2zi7BlXAuJSUZLBTNMjRa7U51ioqWBAbpu4R9VCsrAfnTG-tR0u5pzpW1lKuqM593cyNKOC60bRVy3i-c514VJ5qmoXMVZQaUujuvADbxgRT0fgqVPX32fpclivcq8l0XGls8Lj-K2bX8Bx2nzPg)
Consider this scenario: You have a URL Group and 3 endpoints that are subscribed to
it. Now when you publish a message to the URL Group, internally we will create a
task for each subscribed endpoint and handle all retry mechanism isolated from
each other.
## How to create a URL Group
Please refer to the howto [here](/qstash/howto/url-group-endpoint).
# Debug Logs
Source: https://upstash.com/docs/qstash/howto/debug-logs
To debug the logs, first you need to understand the different states a message can
be in.
Only the last 10.000 logs are kept and older logs are removed automatically.
## Lifecycle of a Message
To understand the lifecycle of each message, we'll look at the following chart:
[comment]: # "https://mermaid.live/edit#pako:eNplkmFr2zAQhv-K0MeRNIvTpa0_DEKiQiHbmJsOtnmMqyTbAlkK0rkQQv57z1Ybt1SfTs-9uns53ZFLrzTPeURAvTFQB2inT1npGJ2_n_6x6fQrWxditRObBNer72ux_V-Inw_inmhSDHBLtyRyHjWzukLmq48vctbqGKHWTIKT2jITKbJWq5cWqd9QebXe3f0Siad4wKIofhRUqAuWBY1dcJFVYCypPmg3YkthMTR-q4-dlOSDnd8UYlf8Hp7cru62g5604cCsaQ1SDLJ59Thq3zpMtnqa8omOBvoMTTXhlybv2DjId7h0fMJbHVowin7r2NOSY6NbXfKcQqUr6CyWvHQnkkKH_v7gJM8xdHrCu70a_5fnFdh4pkIZ9OEMrQel6XrkeNj3q1GbiFRSeleZuuc0Q8IN4j7ms1mfvqgNNt3jhfTtLBrVQMDm6WY5W2bLa8gWenm1gC-LhZKP85vrKrucV-rq8zwDfjpN-B7cH-9HV3rw8y3t5bCep2crG8on"
Either you or a previously setup schedule will create a message.
When a message is ready for execution, it will be become `ACTIVE` and a delivery to
your API is attempted.
If you API responds with a status code between `200 - 299`, the task is
considered successful and will be marked as `DELIVERED`.
Otherwise the message is being retried if there are any retries left and moves to `RETRY`. If all retries are exhausted, the task has `FAILED` and the message will be moved to the DLQ.
During all this a message can be cancelled via [DELETE /v2/messages/:messageId](https://docs.upstash.com/qstash/api/messages/cancel). When the request is received, `CANCEL_REQUESTED` will be logged first.
If retries are not exhausted yet, in the next deliver time, the message will be marked as `CANCELLED` and will be completely removed from the system.
## Console
Head over to the [Upstash Console](https://console.upstash.com/qstash) and go to
the `Logs` tab, where you can see the latest events.
# Delete Schedules
Source: https://upstash.com/docs/qstash/howto/delete-schedule
Deleting schedules can be done using the [schedules api](/qstash/api/schedules/remove).
```shell cURL
curl -XDELETE \
-H 'Authorization: Bearer XXX' \
'https://qstash.upstash.io/v2/schedules/'
```
```typescript Typescript
import { Client } from "@upstash/qstash";
const client = new Client({ token: "" });
await client.schedules.delete("");
```
```python Python
from qstash import QStash
client = QStash("")
client.schedule.delete("")
```
Deleting a schedule does not stop existing messages from being delivered. It
only stops the schedule from creating new messages.
## Schedule ID
If you don't know the schedule ID, you can get a list of all of your schedules
from [here](/qstash/api/schedules/list).
```shell cURL
curl \
-H 'Authorization: Bearer XXX' \
'https://qstash.upstash.io/v2/schedules'
```
```typescript Typescript
import { Client } from "@upstash/qstash";
const client = new Client({ token: "" });
const allSchedules = await client.schedules.list();
```
```python Python
from qstash import QStash
client = QStash("")
client.schedule.list()
```
# Handling Failures
Source: https://upstash.com/docs/qstash/howto/handling-failures
Sometimes, endpoints fail due to various reasons such as network issues or server issues.
In such cases, QStash offers a few options to handle these failures.
## Failure Callbacks
When publishing a message, you can provide a failure callback that will be called if the message fails to be published.
You can read more about callbacks [here](/qstash/features/callbacks).
With the failure callback, you can add custom logic such as logging the failure or sending an alert to the team.
Once you handle the failure, you can [delete it from the dead letter queue](/qstash/api/dlq/deleteMessage).
```bash cURL
curl -X POST \
https://qstash.upstash.io/v2/publish/ \
-H 'Content-Type: application/json' \
-H 'Authorization: Bearer ' \
-H 'Upstash-Failure-Callback: ' \
-d '{ "hello": "world" }'
```
```typescript Typescript
import { Client } from "@upstash/qstash";
const client = new Client({ token: "" });
const res = await client.publishJSON({
url: "https://my-api...",
body: { hello: "world" },
failureCallback: "https://my-callback...",
});
```
```python Python
from qstash import QStash
client = QStash("")
client.message.publish_json(
url="https://my-api...",
body={
"hello": "world",
},
failure_callback="https://my-callback...",
)
```
## Dead Letter Queue
If you don't want to handle the failure immediately, you can use the dead letter queue (DLQ) to store the failed messages.
You can read more about the dead letter queue [here](/qstash/features/dlq).
Failed messages are automatically moved to the dead letter queue upon failure, and can be retried from the console or
the API by [retrieving the message](/qstash/api/dlq/getMessage) then [publishing it](/qstash/api/publish).
# Publish To Kafka
Source: https://upstash.com/docs/qstash/howto/kafka
You can use QStash to forward a message to Kafka by using our
[Kafka REST API](/kafka/rest).
All you need is the `Webhook` url from the
[Upstash Console](https://console.upstash.com/kafka) and the Kafka topic to
publish to.
Here is a complete example: ``, `` and `` will already be
filled in when you copy the url, but you need to replace `` and
`` with the correct values.
```
curl -XPOST 'https://qstash.upstash.io/v2/publish//webhook?topic=&user=&pass=' \
-H 'Authorization: Bearer ' \
-d 'hello world'
```
# Local Development
Source: https://upstash.com/docs/qstash/howto/local-development
QStash requires a publicly available API to send messages to.
During development when applications are not yet deployed, developers typically need to expose their local API by creating a public tunnel.
While local tunneling works seamlessly, it requires code changes between development and production environments and increase friction for developers.
To simplify the development process, Upstash provides QStash CLI, which allows you to run a development server locally for testing and development.
The development server fully supports all QStash features including Schedules, URL Groups, Workflows, and Event Logs.Since the development server operates entirely in-memory, all data is reset when the server restarts.
You can download and run the QStash CLI executable binary in several ways:
## NPX (Node Package Executable)
Install the binary via the `@upstash/qstash-cli` NPM package:
```javascript
npx @upstash/qstash-cli dev
// Start on a different port
npx @upstash/qstash-cli dev -port=8081
```
## Docker
QStash CLI is available as a Docker image through our public AWS ECR repository:
```javascript
// Pull the image
docker pull public.ecr.aws/upstash/qstash:latest
// Run the image
docker run -p 8080:8080 public.ecr.aws/upstash/qstash:latest qstash dev
```
## Artifact Repository
You can download the binary directly from our artifact repository without using a package manager:
[https://artifacts.upstash.com/#qstash/versions/](https://artifacts.upstash.com/#qstash/versions/)
Select the appropriate version, architecture, and operating system for your platform.
After extracting the archive file, run the executable:
```
$ ./qstash dev
```
## QStash CLI
Currently, the only available command for QStash CLI is `dev`, which starts a development server instance.
```
$ ./qstash dev --help
Usage of dev:
-port int
The port to start HTTP server at [env QSTASH_DEV_PORT] (default 8080)
-quota string
The quota of users [env QSTASH_DEV_QUOTA] (default "payg")
```
There are predefined test users available. You can configure the quota type of users using the `-quota` option, with available options being `payg` and `pro`.
These quotas don't affect performance but allow you to simulate different server limits based on the subscription tier.
After starting the development server using any of the methods above, it will display the necessary environment variables.
Select and copy the credentials from one of the following test users:
```javascript User 1
QSTASH_URL=http://localhost:8080
QSTASH_TOKEN=eyJVc2VySUQiOiJkZWZhdWx0VXNlciIsIlBhc3N3b3JkIjoiZGVmYXVsdFBhc3N3b3JkIn0=
QSTASH_CURRENT_SIGNING_KEY=sig_7kYjw48mhY7kAjqNGcy6cr29RJ6r
QSTASH_NEXT_SIGNING_KEY=sig_5ZB6DVzB1wjE8S6rZ7eenA8Pdnhs
```
```javascript User 2
QSTASH_URL=http://localhost:8080
QSTASH_TOKEN=eyJVc2VySUQiOiJ0ZXN0VXNlcjEiLCJQYXNzd29yZCI6InRlc3RQYXNzd29yZCJ9
QSTASH_CURRENT_SIGNING_KEY=sig_7GVPjvuwsfqF65iC8fSrs1dfYruM
QSTASH_NEXT_SIGNING_KEY=sig_5NoELc3EFnZn4DVS5bDs2Nk4b7Ua
```
```javascript User 3
QSTASH_URL=http://localhost:8080
QSTASH_TOKEN=eyJVc2VySUQiOiJ0ZXN0VXNlcjIiLCJQYXNzd29yZCI6InRlc3RQYXNzd29yZCJ9
QSTASH_CURRENT_SIGNING_KEY=sig_6jWGaWRxHsw4vMSPJprXadyvrybF
QSTASH_NEXT_SIGNING_KEY=sig_7qHbvhmahe5GwfePDiS5Lg3pi6Qx
```
```javascript User 4
QSTASH_URL=http://localhost:8080
QSTASH_TOKEN=eyJVc2VySUQiOiJ0ZXN0VXNlcjMiLCJQYXNzd29yZCI6InRlc3RQYXNzd29yZCJ9
QSTASH_CURRENT_SIGNING_KEY=sig_5T8FcSsynBjn9mMLBsXhpacRovJf
QSTASH_NEXT_SIGNING_KEY=sig_7GFR4YaDshFcqsxWRZpRB161jguD
```
Currently, there is no GUI client available for the development server. You can use QStash SDKs to fetch resources like event logs.
## License
The QStash development server is licensed under the [Development Server License](/qstash/misc/license), which restricts its use to development and testing purposes only.
It is not permitted to use it in production environments. Please refer to the full license text for details.
# Local Tunnel
Source: https://upstash.com/docs/qstash/howto/local-tunnel
QStash requires a publicly available API to send messages to.
The recommended approach is to run a [development server](/qstash/howto/local-development) locally and use it for development purposes.
Alternatively, you can set up a local tunnel to expose your API, enabling QStash to send requests directly to your application during development.
## localtunnel.me
[localtunnel.me](https://github.com/localtunnel/localtunnel) is a free service to provide
a public endpoint for your local development.
It's as simple as running
```
npx localtunnel --port 3000
```
replacing `3000` with the port your application is running on.
This will give you a public URL like `https://good-months-leave.loca.lt` which can be used
as your QStash URL.
If you run into issues, you may need to set the `Upstash-Forward-bypass-tunnel-reminder` header to
any value to bypass the reminder message.
## ngrok
[ngrok](https://ngrok.com) is a free service, that provides you with a public
endpoint and forwards all traffic to your localhost.
### Sign up
Create a new account on
[dashboard.ngrok.com/signup](https://dashboard.ngrok.com/signup) and follow the
[instructions](https://dashboard.ngrok.com/get-started/setup) to download the
ngrok CLI and connect your account:
```bash
ngrok config add-authtoken XXX
```
### Start the tunnel
Choose the port where your application is running. Here I'm forwarding to port
3000, because Next.js is using it.
```bash
$ ngrok http 3000
Session Status online
Account Andreas Thomas (Plan: Free)
Version 3.1.0
Region Europe (eu)
Latency -
Web Interface http://127.0.0.1:4040
Forwarding https://e02f-2a02-810d-af40-5284-b139-58cc-89df-b740.eu.ngrok.io -> http://localhost:3000
Connections ttl opn rt1 rt5 p50 p90
0 0 0.00 0.00 0.00 0.00
```
### Publish a message
Now copy the `Forwarding` url and use it as destination in QStash. Make sure to
add the path of your API at the end. (`/api/webhooks` in this case)
```
curl -XPOST \
-H 'Authorization: Bearer XXX' \
-H "Content-type: application/json" \
-d '{ "hello": "world" }' \
'https://qstash.upstash.io/v2/publish/https://e02f-2a02-810d-af40-5284-b139-58cc-89df-b740.eu.ngrok.io/api/webhooks'
```
### Debug
In case messages are not delivered or something else doesn't work as expected,
you can go to [http://127.0.0.1:4040](http://127.0.0.1:4040) to see what ngrok
is doing.
# Publish Messages
Source: https://upstash.com/docs/qstash/howto/publishing
Publishing a message is as easy as sending a HTTP request to the `/publish`
endpoint. All you need is a valid url of your destination.
Destination URLs must always include the protocol (`http://` or `https://`)
## The message
The message you want to send is passed in the request body. Upstash does not
use, parse, or validate the body, so you can send any kind of data you want. We
suggest you add a `Content-Type` header to your request to make sure your
destination API knows what kind of data you are sending.
## Sending custom HTTP headers
In addition to sending the message itself, you can also forward HTTP headers.
Simply add them prefixed with `Upstash-Forward-` and we will include them in the
message.
#### Here's an example
```shell cURL
curl -XPOST \
-H 'Authorization: Bearer XXX' \
-H 'Upstash-Forward-My-Header: my-value' \
-H "Content-type: application/json" \
-d '{ "hello": "world" }' \
'https://qstash.upstash.io/v2/publish/https://example.com'
```
```typescript Typescript
import { Client } from "@upstash/qstash";
const client = new Client({ token: "" });
const res = await client.publishJSON({
url: "https://example.com",
body: { "hello": "world" },
headers: { "my-header": "my-value" },
});
```
```python Python
from qstash import QStash
client = QStash("")
client.message.publish_json(
url="https://my-api...",
body={
"hello": "world",
},
headers={
"my-header": "my-value",
},
)
```
In this case, we would deliver a `POST` request to `https://example.com` with
the following body and headers:
```json
// body
{ "hello": "world" }
// headers
My-Header: my-value
Content-Type: application/json
```
#### What happens after publishing?
When you publish a message, it will be durably stored in an
[Upstash Redis database](https://upstash.com/redis). Then we try to deliver the
message to your chosen destination API. If your API is down or does not respond
with a success status code (200-299), the message will be retried and delivered
when it comes back online. You do not need to worry about retrying messages or
ensuring that they are delivered.
By default, the multiple messages published to QStash are sent to your API in parallel.
## Publish to URL Group
URL Groups allow you to publish a single message to more than one API endpoints. To
learn more about URL Groups, check [URL Groups section](/qstash/features/url-groups).
Publishing to a URL Group is very similar to publishing to a single destination. All
you need to do is replace the `URL` in the `/publish` endpoint with the URL Group
name.
```
https://qstash.upstash.io/v2/publish/https://example.com
https://qstash.upstash.io/v2/publish/my-url-group
```
```shell cURL
curl -XPOST \
-H 'Authorization: Bearer XXX' \
-H "Content-type: application/json" \
-d '{ "hello": "world" }' \
'https://qstash.upstash.io/v2/publish/my-url-group'
```
```typescript Typescript
import { Client } from "@upstash/qstash";
const client = new Client({ token: "" });
const res = await client.publishJSON({
urlGroup: "my-url-group",
body: { "hello": "world" },
});
```
```python Python
from qstash import QStash
client = QStash("")
client.message.publish_json(
url_group="my-url-group",
body={
"hello": "world",
},
)
```
## Optional parameters and configuration
QStash supports a number of optional parameters and configuration that you can
use to customize the delivery of your message. All configuration is done using
HTTP headers.
# Receiving Messages
Source: https://upstash.com/docs/qstash/howto/receiving
What do we send to your API?
When you publish a message, QStash will deliver it to your chosen destination. This is a brief overview of how a request to your API looks like.
## Headers
We are forwarding all headers that have been prefixed with `Upstash-Forward-` to your API. [Learn more](/qstash/howto/publishing#sending-custom-http-headers)
In addition to your custom headers, we're sending these headers as well:
| Header | Description |
| --------------------- | -------------------------------------------------------------------- |
| `User-Agent` | Will be set to `Upstash-QStash` |
| `Content-Type` | The original `Content-Type` header |
| `Upstash-Topic-Name` | The URL Group (topic) name if sent to a URL Group |
| `Upstash-Signature` | The signature you need to verify [See here](/qstash/howto/signature) |
| `Upstash-Retried` | How often the message has been retried so far. Starts with 0. |
| `Upstash-Message-Id` | The message id of the message. |
| `Upstash-Schedule-Id` | The schedule id of the message if it is related to a schedule. |
| `Upstash-Caller-Ip` | The IP address of the publisher of this message. |
## Body
The body is passed as is, we do not modify it at all. If you send a JSON body, you will receive a JSON body. If you send a string, you will receive a string.
## Verifying the signature
[See here](/qstash/howto/signature)
# Reset Token
Source: https://upstash.com/docs/qstash/howto/reset-token
Your token is used to interact with the QStash API. You need it to publish
messages as well as create, read, update or delete other resources, such as
URL Groups and endpoints.
Resetting your token will invalidate your current token and all future requests
with the old token will be rejected.
To reset your token, simply click on the "Reset token" button at the bottom in
the [QStash UI](https://console.upstash.com/qstash) and confirm the dialog.

Afterwards you should immediately update your token in all your applications.
# Roll Your Signing Keys
Source: https://upstash.com/docs/qstash/howto/roll-signing-keys
Because your API needs to be publicly accessible from the internet, you should
make sure to verify the authenticity of each request.
Upstash provides a JWT with each request. This JWT is signed by your individual
secret signing keys. [Read more](/qstash/howto/signature).
We are using 2 signing keys:
* current: This is the key used to sign the JWT.
* next: This key will be used to sign after you have rolled your keys.
If we were using only a single key, there would be some time between when you
rolled your keys and when you can edit the key in your applications. In order to
minimize downtime, we use 2 keys and you should always try to verify with both
keys.
## What happens when I roll my keys?
When you roll your keys, the current key will be replaced with the next key and
a new next key will be generated.
```
currentKey = nextKey
nextKey = generateNewKey()
```
Rolling your keys twice without updating your applications will cause your apps
to reject all requests, because both the current and next keys will have been
replaced.
## How to roll your keys
Rolling your keys can be done by going to the
[QStash UI](https://console.upstash.com/qstash) and clicking on the "Roll keys"
button.

# Verify Signatures
Source: https://upstash.com/docs/qstash/howto/signature
We send a JWT with each request. This JWT is signed by your individual secret
signing key and sent in the `Upstash-Signature` HTTP header.
You can use this signature to verify the request is coming from QStash.

You need to keep your signing keys in a secure location.
Otherwise some malicious actor could use them to send requests to your API as if they were coming from QStash.
## Verifying
You can use the official QStash SDKs or implement a custom verifier either by using [an open source library](https://jwt.io/libraries) or by processing the JWT manually.
### Via SDK (Recommended)
QStash SDKs provide a `Receiver` type that simplifies signature verification.
```typescript Typescript
import { Receiver } from "@upstash/qstash";
const receiver = new Receiver({
currentSigningKey: "YOUR_CURRENT_SIGNING_KEY",
nextSigningKey: "YOUR_NEXT_SIGNING_KEY",
});
// ... in your request handler
const signature = req.headers["Upstash-Signature"];
const body = req.body;
const isValid = receiver.verify({
body,
signature,
url: "YOUR-SITE-URL",
});
```
```python Python
from qstash import Receiver
receiver = Receiver(
current_signing_key="YOUR_CURRENT_SIGNING_KEY",
next_signing_key="YOUR_NEXT_SIGNING_KEY",
)
# ... in your request handler
signature, body = req.headers["Upstash-Signature"], req.body
receiver.verify(
body=body,
signature=signature,
url="YOUR-SITE-URL",
)
```
```go Golang
import "github.com/qstash/qstash-go"
receiver := qstash.NewReceiver("", "NEXT_SIGNING_KEY")
// ... in your request handler
signature := req.Header.Get("Upstash-Signature")
body, err := io.ReadAll(req.Body)
// handle err
err := receiver.Verify(qstash.VerifyOptions{
Signature: signature,
Body: string(body),
Url: "YOUR-SITE-URL", // optional
})
// handle err
```
Depending on the environment, the body might be parsed into an object by the HTTP handler if it is JSON.
Ensure you use the raw body string as is. For example, converting the parsed object back to a string (e.g., JSON.stringify(object)) may cause inconsistencies and result in verification failure.
### Manual verification
If you don't want to use the SDKs, you can implement your own verifier either by using an open-source library or by manually processing the JWT.
The exact implementation depends on the language of your choice and the library if you use one.
Instead here are the steps you need to follow:
1. Split the JWT into its header, payload and signature
2. Verify the signature
3. Decode the payload and verify the claims
* `iss`: The issuer must be`Upstash`.
* `sub`: The subject must the url of your API.
* `exp`: Verify the token has not expired yet.
* `nbf`: Verify the token is already valid.
* `body`: Hash the raw request body using `SHA-256` and compare it with the
`body` claim.
You can also reference the implementation in our
[Typescript SDK](https://github.com/upstash/sdk-qstash-ts/blob/main/src/receiver.ts#L82).
After you have verified the signature and the claims, you can be sure the
request came from Upstash and process it accordingly.
## Claims
All claims in the JWT are listed [here](/qstash/features/security#claims)
# Create URL Groups and Endpoints
Source: https://upstash.com/docs/qstash/howto/url-group-endpoint
QStash allows you to group multiple APIs together into a single namespace,
called a `URL Group` (Previously, it was called `Topics`).
Read more about URL Groups [here](/qstash/features/url-groups).
There are two ways to create endpoints and URL Groups: The UI and the REST API.
## UI
Go to [console.upstash.com/qstash](https://console.upstash.com/qstash) and click
on the `URL Groups` tab. Afterwards you can create a new URL Group by giving it a name.
Keep in mind that URL Group names are restricted to alphanumeric, underscore, hyphen
and dot characters.

After creating the URL Group, you can add endpoints to it:

## API
You can create a URL Group and endpoint using the [console](https://console.upstash.com/qstash) or [REST API](/qstash/api/url-groups/add-endpoint).
```bash cURL
curl -XPOST https://qstash.upstash.io/v2/topics/:urlGroupName/endpoints \
-H "Authorization: Bearer " \
-H "Content-Type: application/json" \
-d '{
"endpoints": [
{
"name": "endpoint1",
"url": "https://example.com"
},
{
"name": "endpoint2",
"url": "https://somewhere-else.com"
}
]
}'
```
```typescript Typescript
import { Client } from "@upstash/qstash";
const client = new Client({ token: "" });
const urlGroups = client.urlGroups;
await urlGroups.addEndpoints({
name: "urlGroupName",
endpoints: [
{ name: "endpoint1", url: "https://example.com" },
{ name: "endpoint2", url: "https://somewhere-else.com" },
],
});
```
```python Python
from qstash import QStash
client = QStash("")
client.url_group.upsert_endpoints(
url_group="url-group-name",
endpoints=[
{"name": "endpoint1", "url": "https://example.com"},
{"name": "endpoint2", "url": "https://somewhere-else.com"},
],
)
```
# Use as Webhook Receiver
Source: https://upstash.com/docs/qstash/howto/webhook
You can configure QStash to receive and process your webhook calls.
Instead of having the webhook service call your endpoint directly, QStash acts as an intermediary, receiving the request and forwarding it to your endpoint.
QStash provides additional control over webhook requests, allowing you to configure properties such as delay, retries, timeouts, callbacks, and flow control.
There are multiple ways to configure QStash to receive webhook requests.
## 1. Publish
You can configure your webhook URL as a QStash publish request.
For example, if your webhook endpoint is:
`https://example.com/api/webhook`
Instead of using this URL directly as the webhook address, use:
`https://qstash.upstash.io/v2/publish/https://example.com/api/webhook?qstash_token=`
Request configurations such as custom retries, timeouts, and other settings can be specified using HTTP headers in the publish request.
Refer to the [REST API documentation](/qstash/api/publish) for a full list of available configuration headers.
By default, any headers in the publish request that are prefixed with `Upstash-Forward-` will be forwarded to your endpoint without the prefix.
However, since most webhook services do not allow header prefixing, we introduced a configuration option to enable forwarding all incoming request headers.
To enable this, set `Upstash-Header-Forward: true` in the publish request or append the query parameter `?upstash-header-forward=true` to the request URL. This ensures that all headers are forwarded to your endpoint without requiring the `Upstash-Forward-` prefix.
If the webhook service does not allow setting custom headers, you can create a URL Group and store default configurations on the QStash server, as explained in the next section.
## 2. URL Group
URL Groups allow you to define server-side templates for publishing messages. You can create a URL Group either through the UI or programmatically.
For example, if your webhook endpoint is:
`https://example.com/api/webhook`
Instead of using this URL directly, you can use the address for your URL Group and add your webhook endpoint to it:
`https://qstash.upstash.io/v2/publish/myUrlGroup?qstash_token=`
You can define default headers for a URL Group, which will automatically apply to all requests sent to that group.
```
curl -X PATCH https://qstash.upstash.io/v2/topics/myUrlGroup \
-H "Authorizarion: Bearer "
-d '{
"headers": {
"Upstash-Header-Forward": ["true"]
}
}'
```
When you save this header for your URL Group, it ensures that all headers are forwarded as needed for your webhook processing.
A URL Group also enables you to define multiple endpoints within group.
When a publish request is made to a URL Group, all associated endpoints will be triggered, allowing you to fan-out a single webhook call to multiple destinations.
# LLM with Anthropic
Source: https://upstash.com/docs/qstash/integrations/anthropic
QStash integrates smoothly with Anthropic's API, allowing you to send LLM requests and leverage QStash features like retries, callbacks, and batching. This is especially useful when working in serverless environments where LLM response times vary and traditional timeouts may be limiting. QStash provides an HTTP timeout of up to 2 hours, which is ideal for most LLM cases.
### Example: Publishing and Enqueueing Requests
Specify the `api` as `llm` with the provider set to `anthropic()` when publishing requests. Use the `Upstash-Callback` header to handle responses asynchronously, as streaming completions aren’t supported for this integration.
#### Publishing a Request
```typescript
import { anthropic, Client } from "@upstash/qstash";
const client = new Client({ token: "" });
await client.publishJSON({
api: { name: "llm", provider: anthropic({ token: "" }) },
body: {
model: "claude-3-5-sonnet-20241022",
messages: [{ role: "user", content: "Summarize recent tech trends." }],
},
callback: "https://example.com/callback",
});
```
### Enqueueing a Chat Completion Request
Use `enqueueJSON` with Anthropic as the provider to enqueue requests for asynchronous processing.
```typescript
import { anthropic, Client } from "@upstash/qstash";
const client = new Client({ token: "" });
const result = await client.queue({ queueName: "your-queue-name" }).enqueueJSON({
api: { name: "llm", provider: anthropic({ token: "" }) },
body: {
model: "claude-3-5-sonnet-20241022",
messages: [
{
role: "user",
content: "Generate ideas for a marketing campaign.",
},
],
},
callback: "https://example.com/callback",
});
console.log(result);
```
### Sending Chat Completion Requests in Batches
Use `batchJSON` to send multiple requests at once. Each request in the batch specifies the same Anthropic provider and includes a callback URL.
```typescript
import { anthropic, Client } from "@upstash/qstash";
const client = new Client({ token: "" });
const result = await client.batchJSON([
{
api: { name: "llm", provider: anthropic({ token: "" }) },
body: {
model: "claude-3-5-sonnet-20241022",
messages: [
{
role: "user",
content: "Describe the latest in AI research.",
},
],
},
callback: "https://example.com/callback1",
},
{
api: { name: "llm", provider: anthropic({ token: "" }) },
body: {
model: "claude-3-5-sonnet-20241022",
messages: [
{
role: "user",
content: "Outline the future of remote work.",
},
],
},
callback: "https://example.com/callback2",
},
// Add more requests as needed
]);
console.log(result);
```
#### Analytics with Helicone
To monitor usage, include Helicone analytics by passing your Helicone API key under `analytics`:
```typescript
await client.publishJSON({
api: {
name: "llm",
provider: anthropic({ token: "" }),
analytics: { name: "helicone", token: process.env.HELICONE_API_KEY! },
},
body: { model: "claude-3-5-sonnet-20241022", messages: [{ role: "user", content: "Hello!" }] },
callback: "https://example.com/callback",
});
```
With this setup, Anthropic can be used seamlessly in any LLM workflows in QStash.
# LLM - OpenAI
Source: https://upstash.com/docs/qstash/integrations/llm
QStash has built-in support for calling LLM APIs. This allows you to take advantage of QStash features such as retries, callbacks, and batching while using LLM APIs.
QStash is especially useful for LLM processing because LLM response times are often highly variable. When accessing LLM APIs from serverless runtimes, invocation timeouts are a common issue. QStash offers an HTTP timeout of 2 hours, which is sufficient for most LLM use cases. By using callbacks and the workflows, you can easily manage the asynchronous nature of LLM APIs.
## QStash LLM API
You can publish (or enqueue) single LLM request or batch LLM requests using all existing QStash features natively. To do this, specify the destination `api` as `llm` with a valid provider. The body of the published or enqueued message should contain a valid chat completion request. For these integrations, you must specify the `Upstash-Callback` header so that you can process the response asynchronously. Note that streaming chat completions cannot be used with them. Use [the chat API](#chat-api) for streaming completions.
All the examples below can be used with **OpenAI-compatible LLM providers**.
### Publishing a Chat Completion Request
```js JavaScript
import { Client, upstash } from "@upstash/qstash";
const client = new Client({
token: "",
});
const result = await client.publishJSON({
api: { name: "llm", provider: openai({ token: "_OPEN_AI_TOKEN_"}) },
body: {
model: "gpt-3.5-turbo",
messages: [
{
role: "user",
content: "Write a hello world program in Rust.",
},
],
},
callback: "https://abc.requestcatcher.com/",
});
console.log(result);
```
```python Python
from qstash import QStash
from qstash.chat import upstash
q = QStash("")
result = q.message.publish_json(
api={"name": "llm", "provider": openai("")},
body={
"model": "gpt-3.5-turbo",
"messages": [
{
"role": "user",
"content": "Write a hello world program in Rust.",
}
],
},
callback="https://abc.requestcatcher.com/",
)
print(result)
```
### Enqueueing a Chat Completion Request
```js JavaScript
import { Client, upstash } from "@upstash/qstash";
const client = new Client({
token: "",
});
const result = await client.queue({ queueName: "queue-name" }).enqueueJSON({
api: { name: "llm", provider: openai({ token: "_OPEN_AI_TOKEN_"}) },
body: {
"model": "gpt-3.5-turbo",
messages: [
{
role: "user",
content: "Write a hello world program in Rust.",
},
],
},
callback: "https://abc.requestcatcher.com",
});
console.log(result);
```
```python Python
from qstash import QStash
from qstash.chat import upstash
q = QStash("")
result = q.message.enqueue_json(
queue="queue-name",
api={"name": "llm", "provider": openai("")},
body={
"model": "gpt-3.5-turbo",
"messages": [
{
"role": "user",
"content": "Write a hello world program in Rust.",
}
],
},
callback="https://abc.requestcatcher.com",
)
print(result)
```
### Sending Chat Completion Requests in Batches
```js JavaScript
import { Client, upstash } from "@upstash/qstash";
const client = new Client({
token: "",
});
const result = await client.batchJSON([
{
api: { name: "llm", provider: openai({ token: "_OPEN_AI_TOKEN_" }) },
body: { ... },
callback: "https://abc.requestcatcher.com",
},
...
]);
console.log(result);
```
```python Python
from qstash import QStash
from qstash.chat import upstash
q = QStash("")
result = q.message.batch_json(
[
{
"api":{"name": "llm", "provider": openai("")},
"body": {...},
"callback": "https://abc.requestcatcher.com",
},
...
]
)
print(result)
```
```shell curl
curl "https://qstash.upstash.io/v2/batch" \
-X POST \
-H "Authorization: Bearer QSTASH_TOKEN" \
-H "Content-Type: application/json" \
-d '[
{
"destination": "api/llm",
"body": {...},
"callback": "https://abc.requestcatcher.com"
},
...
]'
```
### Retrying After Rate Limit Resets
When the rate limits are exceeded, QStash automatically schedules the retry of
publish or enqueue of chat completion tasks depending on the reset time
of the rate limits. That helps with not doing retries prematurely
when it is definitely going to fail due to exceeding rate limits.
## Analytics via Helicone
Helicone is a powerful observability platform that provides valuable insights into your LLM usage. Integrating Helicone with QStash is straightforward.
To enable Helicone observability in QStash, you simply need to pass your Helicone API key when initializing your model. Here's how to do it for both custom models and OpenAI:
```ts
import { Client, custom } from "@upstash/qstash";
const client = new Client({
token: "",
});
await client.publishJSON({
api: {
name: "llm",
provider: custom({
token: "XXX",
baseUrl: "https://api.together.xyz",
}),
analytics: { name: "helicone", token: process.env.HELICONE_API_KEY! },
},
body: {
model: "meta-llama/Llama-3-8b-chat-hf",
messages: [
{
role: "user",
content: "hello",
},
],
},
callback: "https://oz.requestcatcher.com/",
});
```
# Pipedream
Source: https://upstash.com/docs/qstash/integrations/pipedream
Build and run workflows with 1000s of open source triggers and actions across 900+ apps.
[Pipedream](https://pipedream.com) allows you to build and run workflows with
1000s of open source triggers and actions across 900+ apps.
Check out the [official integration](https://pipedream.com/apps/qstash).
## Trigger a Pipedream workflow from a QStash topic message
This is a step by step guide on how to trigger a Pipedream workflow from a
QStash topic message.
Alternatively [click here](https://pipedream.com/new?h=tch_3egfAX) to create a
new workflow with this QStash topic trigger added.
### 1. Create a Topic in QStash
If you haven't yet already, create a **Topic** in the
[QStash dashboard](https://console.upstash.com/qstash?tab=topics).
### 2. Create a new Pipedream workflow
Sign into [Pipedream](https://pipedream.com) and create a new workflow.
### 3. Add QStash Topic Message as a trigger
In the workflow **Trigger** search for QStash and select the **Create Topic
Endpoint** trigger.
Then, connect your QStash account by clicking the QStash prop and retrieving
your token from the
[QStash dashboard](https://console.upstash.com/qstash?tab=details).
After connecting your QStash account, click the **Topic** prop, a dropdown will
appear containing the QStash topics on your account.
Then *click* on a specific topic to listen for new messages on.
Finally, *click* **Continue**. Pipedream will create a unique HTTP endpoint and
add it to your QStash topic.
### 4. Test with a sample message
Use the *Request Builder* in the
[QStash dashboard](https://console.upstash.com/qstash?tab=details) to publish a
test message to your topic.
Alternatively, you can use the **Create topic message** action in a Pipedream
workflow to send a message to your topic.
*Don't forget* to use this action in a separate workflow, otherwise you might
cause an infinite loop of messages between QStash and Pipedream.
### 5. Add additional steps
Add additional steps to the workflow by clicking the plus icon beneath the
Trigger step.
Build a workflow with the 1,000+ pre-built components available in Pipedream,
including [Airtable](https://pipedream.com/apps/airtable),
[Google Sheets](https://pipedream.com/apps/google-sheets),
[Slack](https://pipedream.com/apps/slack) and many more.
Alternatively, use [Node.js](https://pipedream.com/docs/code/nodejs) or
[Python](https://pipedream.com/docs/code/python) code steps to retrieve,
transform, or send data to other services.
### 6. Deploy your Pipedream workflow
After you're satisfied with your changes, click the **Deploy** button in the
top right of your Pipedream workflow. Your deployed workflow will not
automatically process new messages to your QStash topic. Collapse
quickstart-trigger-pipedream-workflow-from-topic.md 3 KB
### Video tutorial
If you prefer video, you can check out this tutorial by
[pipedream](https://pipedream.com).
[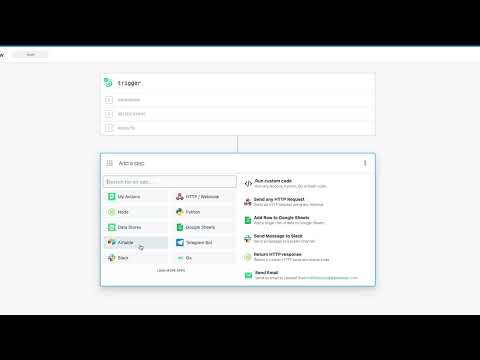](https://www.youtube.com/watch?v=-oXlWuxNG5A)
## Trigger a Pipedream workflow from a QStash topic message
This is a step by step guide on how to trigger a Pipedream workflow from a
QStash endpoint message.
Alternatively [click here](https://pipedream.com/new?h=tch_m5ofX6) to create a
pre-configured workflow with the HTTP trigger and QStash webhook verification
step already added.
### 1. Create a new Pipedream workflow
Sign into [Pipedream](https://pipedream.com) and create a new workflow.
### 2. Configure the workflow with an HTTP trigger
In the workflow **Trigger** select the **New HTTP / Webhook Requests** option.

Pipedream will create a unique HTTP endpoint for your workflow.
Then configure the HTTP trigger to *return a custom response*. By default
Pipedream will always return a 200 response, which allows us to return a non-200
response to QStash to retry the workflow again if there's an error during the
execution of the QStash message.
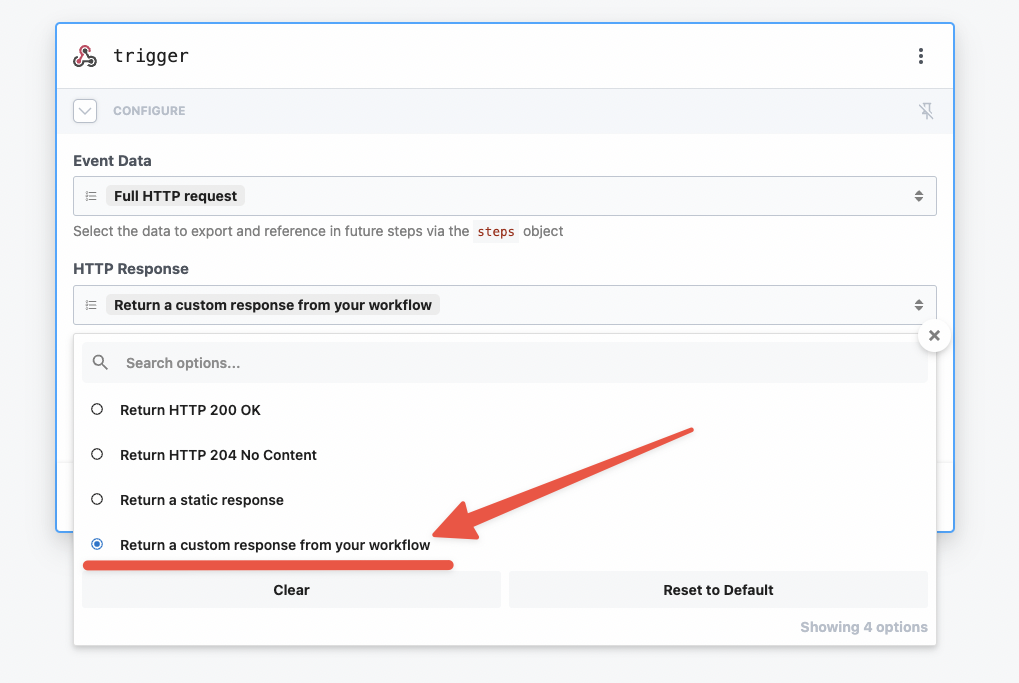
Lastly, set the **Event Body** to be a **Raw request**. This will make sure the
QStash verify webhook action receives the data in the correct format.
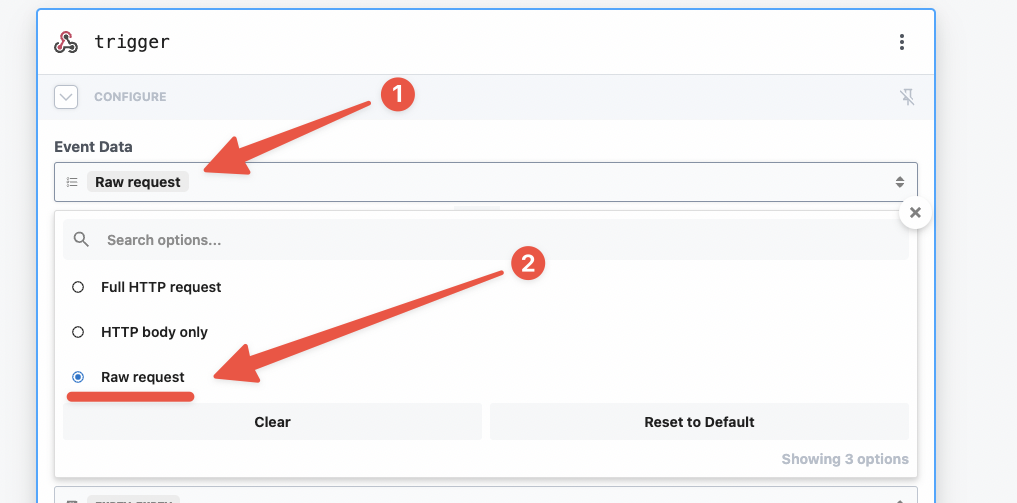
### 3. Test with a sample message
Use the *Request Builder* in the
[QStash dashboard](https://console.upstash.com/qstash?tab=details) to publish a
test message to your topic.
Alternatively, you can use the **Create topic message** action in a Pipedream
workflow to send a message to your topic.
*Don't forget* to use this action in a separate workflow, otherwise you might
cause an infinite loop of messages between QStash and Pipedream.
### 4. Verify the QStash webhook
Pipedream has a pre-built QStash action that will verify the content of incoming
webhooks from QStash.
First, search for **QStash** in the step search bar, then select the QStash app.
Of the available actions, select the **Verify Webhook** action.
Then connect your QStash account and select the **HTTP request** prop. In the
dropdown, click **Enter custom expression** and then paste in
`{{ steps.trigger.event }}`.
This step will automatically verify the incoming HTTP requests and exit the
workflow early if requests are not from QStash.
### 5. Add additional steps
Add additional steps to the workflow by clicking the plus icon beneath the
Trigger step.
Build a workflow with the 1,000+ pre-built components available in Pipedream,
including [Airtable](https://pipedream.com/apps/airtable),
[Google Sheets](https://pipedream.com/apps/google-sheets),
[Slack](https://pipedream.com/apps/slack) and many more.
Alternatively, use [Node.js](https://pipedream.com/docs/code/nodejs) or
[Python](https://pipedream.com/docs/code/python) code steps to retrieve,
transform, or send data to other services.
### 6. Return a 200 response
In the final step of your workflow, return a 200 response by adding a new step
and selecting **Return an HTTP Response**.
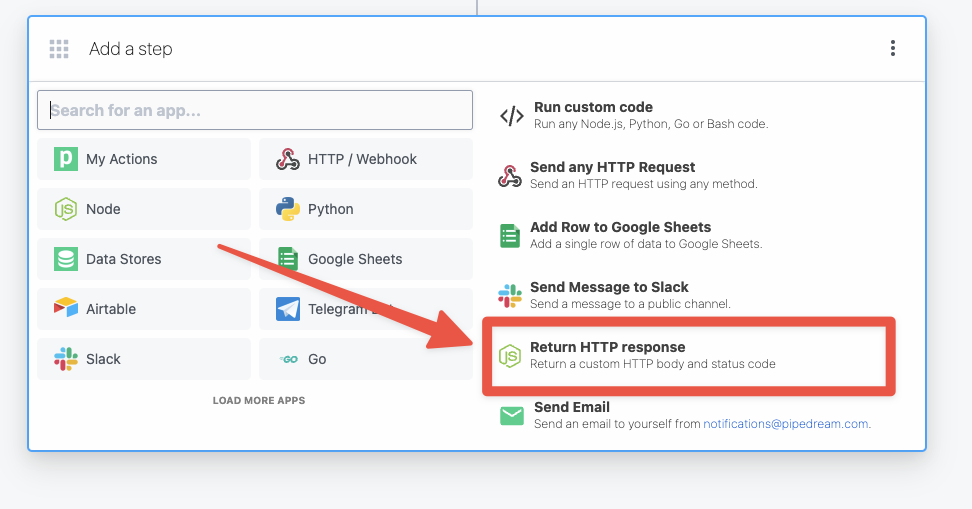
This will generate Node.js code to return an HTTP response to QStash using the
`$.respond` helper in Pipedream.
### 7. Deploy your Pipedream workflow
After you're satisfied with your changes, click the **Deploy** button in the
top right of your Pipedream workflow. Your deployed workflow will not
automatically process new messages to your QStash topic.
### Video tutorial
If you prefer video, you can check out this tutorial by
[pipedream](https://pipedream.com).
[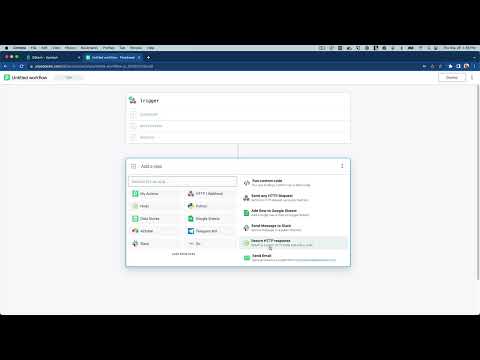](https://youtu.be/uG8eO7BNok4)
# Email - Resend
Source: https://upstash.com/docs/qstash/integrations/resend
The `qstash-js` SDK offers an integration to easily send emails using [Resend](https://resend.com/), streamlining email delivery in your applications.
## Basic Email Sending
To send a single email, use the `publishJSON` method with the `resend` provider. Ensure your `QSTASH_TOKEN` and `RESEND_TOKEN` are set for authentication.
```typescript
import { Client, resend } from "@upstash/qstash";
const client = new Client({ token: "" });
await client.publishJSON({
api: {
name: "email",
provider: resend({ token: "" }),
},
body: {
from: "Acme ",
to: ["delivered@resend.dev"],
subject: "Hello World",
html: "
It works!
",
},
});
```
In the `body` field, specify any parameters supported by [the Resend Send Email API](https://resend.com/docs/api-reference/emails/send-email), such as `from`, `to`, `subject`, and `html`.
## Sending Batch Emails
To send multiple emails at once, use Resend’s [Batch Email API](https://resend.com/docs/api-reference/emails/send-batch-emails). Set the `batch` option to `true` to enable batch sending. Each email configuration is defined as an object within the `body` array.
```typescript
await client.publishJSON({
api: {
name: "email",
provider: resend({ token: "", batch: true }),
},
body: [
{
from: "Acme ",
to: ["foo@gmail.com"],
subject: "Hello World",
html: "
",
},
],
});
```
Each entry in the `body` array represents an individual email, allowing customization of `from`, `to`, `subject`, `html`, and any other Resend-supported fields.
# Development Server License Agreement
Source: https://upstash.com/docs/qstash/misc/license
## 1. Purpose and Scope
This software is a development server implementation of QStash API ("Development Server") provided for testing and development purposes only. It is not intended for production use, commercial deployment, or as a replacement for the official QStash service.
## 2. Usage Restrictions
By using this Development Server, you agree to the following restrictions:
a) The Development Server may only be used for:
* Local development and testing
* Continuous Integration (CI) testing
* Educational purposes
* API integration development
b) The Development Server may NOT be used for:
* Production environments
* Commercial service offerings
* Public-facing applications
* Operating as a Software-as-a-Service (SaaS)
* Reselling or redistributing as a service
## 3. Restrictions on Modification and Reverse Engineering
You may not:
* Decompile, reverse engineer, disassemble, or attempt to derive the source code of the Development Server
* Modify, adapt, translate, or create derivative works based upon the Development Server
* Remove, obscure, or alter any proprietary rights notices within the Development Server
* Attempt to bypass or circumvent any technical limitations or security measures in the Development Server
## 4. Technical Limitations
Users acknowledge that the Development Server:
* Operates entirely in-memory without persistence
* Provides limited functionality compared to the official service
* Offers no data backup or recovery mechanisms
* Has no security guarantees
* May have performance limitations
* Does not implement all features of the official service
## 5. Warranty Disclaimer
THE DEVELOPMENT SERVER IS PROVIDED "AS IS" WITHOUT WARRANTY OF ANY KIND, EXPRESS OR IMPLIED. THE AUTHORS OR COPYRIGHT HOLDERS SHALL NOT BE LIABLE FOR ANY CLAIMS, DAMAGES, OR OTHER LIABILITY ARISING FROM THE USE OF THE SOFTWARE IN VIOLATION OF THIS LICENSE.
## 6. Termination
Your rights under this license will terminate automatically if you fail to comply with any of its terms. Upon termination, you must cease all use of the Development Server.
## 7. Acknowledgment
By using the Development Server, you acknowledge that you have read this license, understand it, and agree to be bound by its terms.
# API Examples
Source: https://upstash.com/docs/qstash/overall/apiexamples
### Use QStash via:
* cURL
* [Typescript SDK](https://github.com/upstash/sdk-qstash-ts)
* [Python SDK](https://github.com/upstash/qstash-python)
Below are some examples to get you started. You can also check the [how to](/qstash/howto/publishing) section for
more technical details or the [API reference](/qstash/api/messages) to test the API.
### Publish a message to an endpoint
Simple example to [publish](/qstash/howto/publishing) a message to an endpoint.
```shell
curl -XPOST \
-H 'Authorization: Bearer XXX' \
-H "Content-type: application/json" \
-d '{ "hello": "world" }' \
'https://qstash.upstash.io/v2/publish/https://example.com'
```
```typescript
const client = new Client({ token: "" });
await client.publishJSON({
url: "https://example.com",
body: {
hello: "world",
},
});
```
```python
from qstash import QStash
client = QStash("")
client.message.publish_json(
url="https://example.com",
body={
"hello": "world",
},
)
# Async version is also available
```
### Publish a message to a URL Group
The [URL Group](/qstash/features/url-groups) is a way to publish a message to multiple endpoints in a
fan out pattern.
```shell
curl -XPOST \
-H 'Authorization: Bearer XXX' \
-H "Content-type: application/json" \
-d '{ "hello": "world" }' \
'https://qstash.upstash.io/v2/publish/myUrlGroup'
```
```typescript
const client = new Client({ token: "" });
await client.publishJSON({
urlGroup: "myUrlGroup",
body: {
hello: "world",
},
});
```
```python
from qstash import QStash
client = QStash("")
client.message.publish_json(
url_group="my-url-group",
body={
"hello": "world",
},
)
# Async version is also available
```
### Publish a message with 5 minutes delay
Add a delay to the message to be published. After QStash receives the message,
it will wait for the specified time (5 minutes in this example) before sending the message to the endpoint.
```shell
curl -XPOST \
-H 'Authorization: Bearer XXX' \
-H "Content-type: application/json" \
-H "Upstash-Delay: 5m" \
-d '{ "hello": "world" }' \
'https://qstash.upstash.io/v2/publish/https://example.com'
```
```typescript
const client = new Client({ token: "" });
await client.publishJSON({
url: "https://example.com",
body: {
hello: "world",
},
delay: 300,
});
```
```python
from qstash import QStash
client = QStash("")
client.message.publish_json(
url="https://example.com",
body={
"hello": "world",
},
delay="5m",
)
# Async version is also available
```
### Send a custom header
Add a custom header to the message to be published.
```shell
curl -XPOST \
-H 'Authorization: Bearer XXX' \
-H 'Upstash-Forward-My-Header: my-value' \
-H "Content-type: application/json" \
-d '{ "hello": "world" }' \
'https://qstash.upstash.io/v2/publish/https://example.com'
```
```typescript
const client = new Client({ token: "" });
await client.publishJSON({
url: "https://example.com",
body: {
hello: "world",
},
headers: {
"My-Header": "my-value",
},
});
```
```python
from qstash import QStash
client = QStash("")
client.message.publish_json(
url="https://example.com",
body={
"hello": "world",
},
headers={
"My-Header": "my-value",
},
)
# Async version is also available
```
### Schedule to run once a day
```shell
curl -XPOST \
-H 'Authorization: Bearer XXX' \
-H "Upstash-Cron: 0 0 * * *" \
-H "Content-type: application/json" \
-d '{ "hello": "world" }' \
'https://qstash.upstash.io/v2/schedules/https://example.com'
```
```typescript
const client = new Client({ token: "" });
await client.schedules.create({
destination: "https://example.com",
cron: "0 0 * * *",
});
```
```python
from qstash import QStash
client = QStash("")
client.schedule.create(
destination="https://example.com",
cron="0 0 * * *",
)
# Async version is also available
```
### Publish messages to a FIFO queue
By default, messges are published concurrently. With a [queue](/qstash/features/queues), you can enqueue messages in FIFO order.
```shell
curl -XPOST -H 'Authorization: Bearer XXX' \
-H "Content-type: application/json" \
'https://qstash.upstash.io/v2/enqueue/my-queue/https://example.com'
-d '{"message":"Hello, World!"}'
```
```typescript
const client = new Client({ token: "" });
const queue = client.queue({
queueName: "my-queue"
})
await queue.enqueueJSON({
url: "https://example.com",
body: {
"Hello": "World"
}
})
```
```python
from qstash import QStash
client = QStash("")
client.message.enqueue_json(
queue="my-queue",
url="https://example.com",
body={
"Hello": "World",
},
)
# Async version is also available
```
### Publish messages in a [batch](/qstash/features/batch)
Publish multiple messages in a single request.
```shell
curl -XPOST https://qstash.upstash.io/v2/batch \
-H 'Authorization: Bearer XXX' \
-H "Content-type: application/json" \
-d '
[
{
"destination": "https://example.com/destination1"
},
{
"destination": "https://example.com/destination2"
}
]'
```
```typescript
import { Client } from "@upstash/qstash";
const client = new Client({ token: "" });
const res = await client.batchJSON([
{
url: "https://example.com/destination1",
},
{
url: "https://example.com/destination2",
},
]);
```
```python
from qstash import QStash
client = QStash("")
client.message.batch_json(
[
{
"url": "https://example.com/destination1",
},
{
"url": "https://example.com/destination2",
},
]
)
# Async version is also available
```
### Set max retry count to 3
Configure how many times QStash should retry to send the message to the endpoint before
sending it to the [dead letter queue](/qstash/features/dlq).
```shell
curl -XPOST \
-H 'Authorization: Bearer XXX' \
-H "Upstash-Retries: 3" \
-H "Content-type: application/json" \
-d '{ "hello": "world" }' \
'https://qstash.upstash.io/v2/publish/https://example.com'
```
```typescript
const client = new Client({ token: "" });
await client.publishJSON({
url: "https://example.com",
body: {
hello: "world",
},
retries: 3,
});
```
```python
from qstash import QStash
client = QStash("")
client.message.publish_json(
url="https://example.com",
body={
"hello": "world",
},
retries=3,
)
# Async version is also available
```
### Set callback url
Receive a response from the endpoint and send it to the specified callback URL.
If the endpoint returns a response, QStash will send it to the failure callback URL.
```shell
curl -XPOST \
-H 'Authorization: Bearer XXX' \
-H "Content-type: application/json" \
-H "Upstash-Callback: https://example.com/callback" \
-H "Upstash-Failure-Callback: https://example.com/failure" \
-d '{ "hello": "world" }' \
'https://qstash.upstash.io/v2/publish/https://example.com'
```
```typescript
const client = new Client({ token: "" });
await client.publishJSON({
url: "https://example.com",
body: {
hello: "world",
},
callback: "https://example.com/callback",
failureCallback: "https://example.com/failure",
});
```
```python
from qstash import QStash
client = QStash("")
client.message.publish_json(
url="https://example.com",
body={
"hello": "world",
},
callback="https://example.com/callback",
failure_callback="https://example.com/failure",
)
# Async version is also available
```
### List all events
Retrieve a list of all [events](https://upstash.com/docs/qstash/api/events/list) that have
been published (filtering is also available).
```shell
curl https://qstash.upstash.io/v2/events \
-H "Authorization: Bearer XXX"
```
```typescript
const client = new Client({ token: "" });
const events = await client.events()
```
```python
from qstash import QStash
client = QStash("")
client.event.list()
# Async version is also available
```
### List all schedules
```shell
curl https://qstash.upstash.io/v2/schedules \
-H "Authorization: Bearer XXX"
```
```typescript
const client = new Client({ token: "" });
const scheds = await client.schedules.list();
```
```python
from qstash import QStash
client = QStash("")
client.schedule.list()
# Async version is also available
```
# Changelog
Source: https://upstash.com/docs/qstash/overall/changelog
Workflow changelogs are [here](/workflow/changelog)
* RateLimit and Parallelism limits. These features allow you to control the rate of workflow runs and the number of concurrent runs. Learn more about these features [here](/qstash/features/flow-control).
* **Python SDK (`qstash-py`):**
* Addressed a few minor bugs. See the full changelog [here](https://github.com/upstash/qstash-py/compare/v2.0.2...v2.0.3).
* **Local Development Server:**
* The local development server is now publicly available. This server allows you to test your Qstash setup locally. Learn more about the local development server [here](https://upstash.com/docs/qstash/howto/local-development).
* **Console:**
* Separated the Workflow and QStash consoles for an improved user experience.
* Separated their DLQ messages as well.
* **Workflow Server:**
* The core team focused on RateLimit and Parallelism features. These features are ready on the server and will be announced next month after the documentation and SDKs are completed.
* **TypeScript SDK (`qstash-js`):**
* Added global headers to the client, which are automatically included in every publish request.
* Resolved issues related to the Anthropics and Resend integrations.
* Full changelog, including all fixes, is available [here](https://github.com/upstash/qstash-js/compare/v2.7.17...v2.7.20).
* **Python SDK (`qstash-py`):**
* Introduced support for custom `schedule_id` values.
* Enabled passing headers to callbacks using the `Upstash-Callback-Forward-...` prefix.
* Full changelog, including all fixes, is available [here](https://github.com/upstash/qstash-py/compare/v2.0.0...v2.0.1).
* **Qstash Server:**
* Finalized the local development server, now almost ready for public release.
* Improved error reporting by including the field name in cases of invalid input.
* Increased the maximum response body size for batch use cases to 100 MB per REST call.
* Extended event retention to up to 14 days, instead of limiting to the most recent 10,000 events. Learn more on the [Pricing page](https://upstash.com/pricing/qstash).
* **TypeScript SDK (qstash-js):**
* Added support for the Anthropics provider and refactored the `api` field of `publishJSON`. See the documentation [here](https://upstash.com/docs/qstash/integrations/anthropic).
* Full changelog, including fixes, is available [here](https://github.com/upstash/qstash-js/compare/v2.7.14...v2.7.17).
* **Qstash Server:**
* Fixed a bug in schedule reporting. The Upstash-Caller-IP header now correctly reports the user’s IP address instead of an internal IP for schedules.
* Validated the scheduleId parameter. The scheduleId must now be alphanumeric or include hyphens, underscores, or periods.
* Added filtering support to bulk message cancellation. Users can now delete messages matching specific filters. See Rest API [here](https://upstash.com/docs/qstash/api/messages/bulk-cancel).
* Resolved a bug that caused the DLQ Console to become unusable when data was too large.
* Fixed an issue with queues that caused them to stop during temporary network communication problems with the storage layer.
* **TypeScript SDK (qstash-js):**
* Fixed a bug on qstash-js where we skipped using the next signing key when the current signing key fails to verify the `upstash-signature`. Released with qstash-js v2.7.14.
* Added resend API. See [here](/qstash/integrations/resend). Released with qstash-js v2.7.14.
* Added `schedule to queues` feature to the qstash-js. See [here](/qstash/features/schedules#scheduling-to-a-queue). Released with qstash-js v2.7.14.
* **Console:**
* Optimized the console by trimming event bodies, reducing resource usage and enabling efficient querying of events with large payloads.
* **Qstash Server:**
* Began development on a new architecture to deliver faster event processing on the server.
* Added more fields to events in the [REST API](/qstash/api/events/list), including `Timeout`, `Method`, `Callback`, `CallbackHeaders`, `FailureCallback`, `FailureCallbackHeaders`, and `MaxRetries`.
* Enhanced retry backoff logic by supporting additional headers for retry timing. Along with `Retry-After`, Qstash now recognizes `X-RateLimit-Reset`, `X-RateLimit-Reset-Requests`, and `X-RateLimit-Reset-Tokens` as backoff time indicators. See [here](/qstash/features/retry#retry-after-headers) for more details.
* Improved performance, resulting in reduced latency for average publish times.
* Set the `nbf` (not before) claim on Signing Keys to 0. This claim specifies the time before which the JWT must not be processed. Previously, this was incorrectly used, causing validation issues when there were minor clock discrepancies between systems.
* Fixed queue name validation. Queue names must now be alphanumeric or include hyphens, underscores, or periods, consistent with other API resources.
* Resolved bugs related to [overwriting a schedule](https://upstash.com/docs/qstash/features/schedules#overwriting-an-existing-schedule).
* Released [Upstash Workflow](https://upstash.com/docs/qstash/workflow).
* Fixed a bug where paused schedules were mistakenly resumed after a process restart (typically occurring during new version releases).
* Big update on the UI, where all the Rest functinality exposed in the Console.
* Addded order query parameter to [/v2/events](https://upstash.com/docs/qstash/api/events/list) and [/v2/dlq](https://upstash.com/docs/qstash/api/dlq/listMessages) endpoints.
* Added [ability to configure](https://upstash.com/docs/qstash/features/callbacks#configuring-callbacks) callbacks(/failure\_callbacks)
* A critical fix for schedule pause and resume Rest APIs where the endpoints were not working at all before the fix.
* Pause and resume for scheduled messages
* Pause and resume for queues
* [Bulk cancel](https://upstash.com/docs/qstash/api/messages/bulk-cancel) messages
* Body and headers on [events](https://upstash.com/docs/qstash/api/events/list)
* Fixed inaccurate queue lag
* [Retry-After](https://upstash.com/docs/qstash/features/retry#retry-after-header) support for rate-limited endpoints
* [Upstash-Timeout](https://upstash.com/docs/qstash/api/publish) header
* [Queues and parallelism](https://upstash.com/docs/qstash/features/queues)
* [Event filtering](https://upstash.com/docs/qstash/api/events/list)
* [Batch publish messages](https://upstash.com/docs/qstash/api/messages/batch)
* [Bulk delete](https://upstash.com/docs/qstash/api/dlq/deleteMessages) for DLQ
* Added [failure callback support](https://upstash.com/docs/qstash/api/schedules/create) to scheduled messages
* Added Upstash-Caller-IP header to outgoing messages. See \[[https://upstash.com/docs/qstash/howto/receiving](https://upstash.com/docs/qstash/howto/receiving)] for all headers
* Added Schedule ID to [events](https://upstash.com/docs/qstash/api/events/list) and [messages](https://upstash.com/docs/qstash/api/messages/get)
* Put last response in DLQ
* DLQ [get message](https://upstash.com/docs/qstash/api/dlq/getMessage)
* Pass schedule ID to the header when calling the user's endpoint
* Added more information to [callbacks](https://upstash.com/docs/qstash/features/callbacks)
* Added [Upstash-Failure-Callback](https://upstash.com/docs/qstash/features/callbacks#what-is-a-failure-callback)
# Compare
Source: https://upstash.com/docs/qstash/overall/compare
In this section, we will compare QStash with alternative solutions.
### BullMQ
BullMQ is a message queue for NodeJS based on Redis. BullMQ is open source
project, you can run BullMQ yourself.
* Using BullMQ in serverless environments is problematic due to stateless nature
of serverless. QStash is designed for serverless environments.
* With BullMQ, you need to run a stateful application to consume messages.
QStash calls the API endpoints, so you do not need your application to consume
messages continuously.
* You need to run and maintain BullMQ and Redis yourself. QStash is completely
serverless, you maintain nothing and pay for just what you use.
### Zeplo
Zeplo is a message queue targeting serverless. Just like QStash it allows users
to queue and schedule HTTP requests.
While Zeplo targets serverless, it has a fixed monthly price in paid plans which
is \$39/month. In QStash, price scales to zero, you do not pay if you are not
using it.
With Zeplo, you can send messages to a single endpoint. With QStash, in addition
to endpoint, you can submit messages to a URL Group which groups one or more
endpoints into a single namespace. Zeplo does not have URL Group functionality.
### Quirrel
Quirrel is a job queueing service for serverless. It has a similar functionality
with QStash.
Quirrel is acquired by Netlify, some of its functionality is available as
Netlify scheduled functions. QStash is platform independent, you can use it
anywhere.
# Getting Started
Source: https://upstash.com/docs/qstash/overall/getstarted
QStash is a **serverless messaging and scheduling solution**. It fits easily into your existing workflow and allows you to build reliable systems without managing infrastructure.
Instead of calling an endpoint directly, QStash acts as a middleman between you and an API to guarantee delivery, perform automatic retries on failure, and more.
We have a new SDK called [Upstash Workflow](/workflow/getstarted).
**Upstash Workflow SDK** is **QStash** simplified for your complex applications
* Skip the details of preparing a complex dependent endpoints.
* Focus on the essential parts.
* Enjoy automatic retries and delivery guarantees.
* Avoid platform-specific timeouts.
Check out [Upstash Workflow Getting Started](/workflow/getstarted) for more.
## Quick Start
Check out these Quick Start guides to get started with QStash in your application.
Build a Next application that uses QStash to start a long-running job on your platform
Build a Python application that uses QStash to schedule a daily job that clean up a database
Or continue reading to learn how to send your first message!
## Send your first message
**Prerequisite**
You need an Upstash account before publishing messages, create one
[here](https://console.upstash.com).
### Public API
Make sure you have a publicly available HTTP API that you want to send your
messages to. If you don't, you can use something like
[requestcatcher.com](https://requestcatcher.com/), [webhook.site](https://webhook.site/) or
[webhook-test.com](https://webhook-test.com/) to try it out.
For example, you can use this URL to test your messages: [https://firstqstashmessage.requestcatcher.com](https://firstqstashmessage.requestcatcher.com)
### Get your token
Go to the [Upstash Console](https://console.upstash.com/qstash) and copy the
`QSTASH_TOKEN`.
### Publish a message
A message can be any shape or form: json, xml, binary, anything, that can be
transmitted in the http request body. We do not impose any restrictions other
than a size limit of 1 MB (which can be customized at your request).
In addition to the request body itself, you can also send HTTP headers. Learn
more about this in the [message publishing section](/qstash/howto/publishing).
```bash cURL
curl -XPOST \
-H 'Authorization: Bearer ' \
-H "Content-type: application/json" \
-d '{ "hello": "world" }' \
'https://qstash.upstash.io/v2/publish/https://'
```
```bash cURL RequestCatcher
curl -XPOST \
-H 'Authorization: Bearer ' \
-H "Content-type: application/json" \
-d '{ "hello": "world" }' \
'https://qstash.upstash.io/v2/publish/https://firstqstashmessage.requestcatcher.com/test'
```
Don't worry, we have SDKs for different languages so you don't
have to make these requests manually.
### Check Response
You should receive a response with a unique message ID.
### Check Message Status
Head over to [Upstash Console](https://console.upstash.com/qstash) and go to the
`Events` tab where you can see your message activities.
Learn more about different states [here](/qstash/howto/debug-logs).
## Features and Use Cases
Run long-running tasks in the background, without blocking your application
Schedule messages to be delivered at a time in the future
Publish messages to multiple endpoints, in parallel, using URL Groups
Enqueue messages to be delivered one by one in the order they have enqueued.
Custom rate per second and parallelism limits to avoid overflowing your endpoint.
Get a response delivered to your API when a message is delivered
Use a Dead Letter Queue to have full control over failed messages
Prevent duplicate messages from being delivered
Publish, enqueue, or batch chat completion requests using large language models with QStash
features.
# Pricing & Limits
Source: https://upstash.com/docs/qstash/overall/pricing
Please check our [pricing page](https://upstash.com/pricing/qstash) for the most up-to-date information on pricing and limits.
# Use Cases
Source: https://upstash.com/docs/qstash/overall/usecases
TODO: andreas: rework and reenable this page after we have 2 use cases ready
[https://linear.app/upstash/issue/QSTH-84/use-cases-summaryhighlights-of-recipes](https://linear.app/upstash/issue/QSTH-84/use-cases-summaryhighlights-of-recipes)
This section is still a work in progress.
We will be adding detailed tutorials for each use case soon.
Tell us on [Discord](https://discord.gg/w9SenAtbme) or
[X](https://x.com/upstash) what you would like to see here.
### Triggering Nextjs Functions on a schedule
Create a schedule in QStash that runs every hour and calls a Next.js serverless
function hosted on Vercel.
### Reset Billing Cycle in your Database
Once a month, reset database entries to start a new billing cycle.
### Fanning out alerts to Slack, email, Opsgenie, etc.
Createa QStash URL Group that receives alerts from a single source and delivers them
to multiple destinations.
### Send delayed message when a new user signs up
Publish delayed messages whenever a new user signs up in your app. After a
certain delay (e.g. 10 minutes), QStash will send a request to your API,
allowing you to email the user a welcome message.
# AWS Lambda (Node)
Source: https://upstash.com/docs/qstash/quickstarts/aws-lambda/nodejs
## Setting up a Lambda
The [AWS CDK](https://aws.amazon.com/cdk/) is the most convenient way to create a new project on AWS Lambda. For example, it lets you directly define integrations such as APIGateway, a tool to make our lambda publicly available as an API, in your code.
```bash Terminal
mkdir my-app
cd my-app
cdk init app -l typescript
npm i esbuild @upstash/qstash
mkdir lambda
touch lambda/index.ts
```
## Webhook verification
### Using the SDK (recommended)
Edit `lambda/index.ts`, the file containing our core lambda logic:
```ts lambda/index.ts
import { Receiver } from "@upstash/qstash"
import type { APIGatewayProxyEvent, APIGatewayProxyResult } from "aws-lambda"
const receiver = new Receiver({
currentSigningKey: process.env.QSTASH_CURRENT_SIGNING_KEY ?? "",
nextSigningKey: process.env.QSTASH_NEXT_SIGNING_KEY ?? "",
})
export const handler = async (
event: APIGatewayProxyEvent
): Promise => {
const signature = event.headers["upstash-signature"]
const lambdaFunctionUrl = `https://${event.requestContext.domainName}`
if (!signature) {
return {
statusCode: 401,
body: JSON.stringify({ message: "Missing signature" }),
}
}
try {
await receiver.verify({
signature: signature,
body: event.body ?? "",
url: lambdaFunctionUrl,
})
} catch (err) {
return {
statusCode: 401,
body: JSON.stringify({ message: "Invalid signature" }),
}
}
// Request is valid, perform business logic
return {
statusCode: 200,
body: JSON.stringify({ message: "Request processed successfully" }),
}
}
```
We'll set the `QSTASH_CURRENT_SIGNING_KEY` and `QSTASH_NEXT_SIGNING_KEY` environment variables together when deploying our Lambda.
### Manual Verification
In this section, we'll manually verify our incoming QStash requests without additional packages. Also see our [manual verification example](https://github.com/upstash/qstash-examples/tree/main/aws-lambda).
1. Implement the handler function
```ts lambda/index.ts
import type { APIGatewayEvent, APIGatewayProxyResult } from "aws-lambda"
import { createHash, createHmac } from "node:crypto"
export const handler = async (
event: APIGatewayEvent,
): Promise => {
const signature = event.headers["upstash-signature"] ?? ""
const currentSigningKey = process.env.QSTASH_CURRENT_SIGNING_KEY ?? ""
const nextSigningKey = process.env.QSTASH_NEXT_SIGNING_KEY ?? ""
const url = `https://${event.requestContext.domainName}`
try {
// Try to verify the signature with the current signing key and if that fails, try the next signing key
// This allows you to roll your signing keys once without downtime
await verify(signature, currentSigningKey, event.body, url).catch((err) => {
console.error(
`Failed to verify signature with current signing key: ${err}`
)
return verify(signature, nextSigningKey, event.body, url)
})
} catch (err) {
const message = err instanceof Error ? err.toString() : err
return {
statusCode: 400,
body: JSON.stringify({ error: message }),
}
}
// Add your business logic here
return {
statusCode: 200,
body: JSON.stringify({ message: "Request processed successfully" }),
}
}
```
2. Implement the `verify` function:
```ts lambda/index.ts
/**
* @param jwt - The content of the `upstash-signature` header (JWT)
* @param signingKey - The signing key to use to verify the signature (Get it from Upstash Console)
* @param body - The raw body of the request
* @param url - The public URL of the lambda function
*/
async function verify(
jwt: string,
signingKey: string,
body: string | null,
url: string
): Promise {
const split = jwt.split(".")
if (split.length != 3) {
throw new Error("Invalid JWT")
}
const [header, payload, signature] = split
if (
signature !=
createHmac("sha256", signingKey)
.update(`${header}.${payload}`)
.digest("base64url")
) {
throw new Error("Invalid JWT signature")
}
// JWT is verified, start looking at payload claims
const p: {
sub: string
iss: string
exp: number
nbf: number
body: string
} = JSON.parse(Buffer.from(payload, "base64url").toString())
if (p.iss !== "Upstash") {
throw new Error(`invalid issuer: ${p.iss}, expected "Upstash"`)
}
if (p.sub !== url) {
throw new Error(`invalid subject: ${p.sub}, expected "${url}"`)
}
const now = Math.floor(Date.now() / 1000)
if (now > p.exp) {
throw new Error("token has expired")
}
if (now < p.nbf) {
throw new Error("token is not yet valid")
}
if (body != null) {
if (
p.body.replace(/=+$/, "") !=
createHash("sha256").update(body).digest("base64url")
) {
throw new Error("body hash does not match")
}
}
}
```
You can find the complete example
[here](https://github.com/upstash/qstash-examples/blob/main/aws-lambda/typescript-example/index.ts).
## Deploying a Lambda
### Using the AWS CDK (recommended)
Because we used the AWS CDK to initialize our project, deployment is straightforward. Edit the `lib/.ts` file the CDK created when bootstrapping the project. For example, if our lambda webhook does video processing, it could look like this:
```ts lib/.ts
import * as cdk from "aws-cdk-lib";
import * as lambda from "aws-cdk-lib/aws-lambda";
import { NodejsFunction } from "aws-cdk-lib/aws-lambda-nodejs";
import { Construct } from "constructs";
import path from "path";
import * as apigateway from 'aws-cdk-lib/aws-apigateway';
export class VideoProcessingStack extends cdk.Stack {
constructor(scope: Construct, id: string, props?: cdk.StackProps) {
super(scope, id, props)
// Create the Lambda function
const videoProcessingLambda = new NodejsFunction(this, 'VideoProcessingLambda', {
runtime: lambda.Runtime.NODEJS_20_X,
handler: 'handler',
entry: path.join(__dirname, '../lambda/index.ts'),
});
// Create the API Gateway
const api = new apigateway.RestApi(this, 'VideoProcessingApi', {
restApiName: 'Video Processing Service',
description: 'This service handles video processing.',
defaultMethodOptions: {
authorizationType: apigateway.AuthorizationType.NONE,
},
});
api.root.addMethod('POST', new apigateway.LambdaIntegration(videoProcessingLambda));
}
}
```
Every time we now run the following deployment command in our terminal, our changes are going to be deployed right to a publicly available API, authorized by our QStash webhook logic from before.
```bash Terminal
cdk deploy
```
You may be prompted to confirm the necessary AWS permissions during this process, for example allowing APIGateway to invoke your lambda function.
Once your code has been deployed to Lambda, you'll receive a live URL to your endpoint via the CLI and can see the new APIGateway connection in your AWS dashboard:
The URL you use to invoke your function typically follows this format, especially if you follow the same stack configuration as shown above:
`https://.execute-api..amazonaws.com/prod/`
To provide our `QSTASH_CURRENT_SIGNING_KEY` and `QSTASH_NEXT_SIGNING_KEY` environment variables, navigate to your QStash dashboard:
and make these two variables available to your Lambda in your function configuration:
Tada, we just deployed a live Lambda with the AWS CDK! 🎉
### Manual Deployment
1. Create a new Lambda function by going to the [AWS dashboard](https://us-east-1.console.aws.amazon.com/lambda/home?region=us-east-1#/create/function) for your desired lambda region. Give your new function a name and select `Node.js 20.x` as runtime, then create the function.
2. To make this Lambda available under a public URL, navigate to the `Configuration` tab and click `Function URL`:
3. In the following dialog, you'll be asked to select one of two authentication types. Select `NONE`, because we are handling authentication ourselves. Then, click `Save`.
You'll see the function URL on the right side of your function overview:
4. Get your current and next signing key from the
[Upstash Console](https://console.upstash.com/qstash).
5. Still under the `Configuration` tab, set the `QSTASH_CURRENT_SIGNING_KEY` and `QSTASH_NEXT_SIGNING_KEY`
environment variables:
6. Add the following script to your `package.json` file to build and zip your code:
```json package.json
{
"scripts": {
"build": "rm -rf ./dist; esbuild index.ts --bundle --minify --sourcemap --platform=node --target=es2020 --outfile=dist/index.js && cd dist && zip -r index.zip index.js*"
}
}
```
7. Click the `Upload from` button for your Lambda and
deploy the code to AWS. Select `./dist/index.zip` as the upload file.
Tada, you've manually deployed a zip file to AWS Lambda! 🎉
## Testing the Integration
To make sure everything works as expected, navigate to your QStash request builder and send a request to your freshly deployed Lambda function:
Alternatively, you can also send a request via CURL:
```bash Terminal
curl --request POST "https://qstash.upstash.io/v2/publish/" \
-H "Authorization: Bearer " \
-H "Content-Type: application/json" \
-d "{ \"hello\": \"world\"}"
```
# AWS Lambda (Python)
Source: https://upstash.com/docs/qstash/quickstarts/aws-lambda/python
[Source Code](https://github.com/upstash/qstash-examples/tree/main/aws-lambda/python-example)
This is a step by step guide on how to receive webhooks from QStash in your
Lambda function on AWS.
### 1. Create a new project
Let's create a new folder called `aws-lambda` and initialize a new project by
creating `lambda_function.py` This example uses Makefile, but the scripts can
also be written for `Pipenv`.
```bash
mkdir aws-lambda
cd aws-lambda
touch lambda_function.py
```
### 2. Dependencies
We are using `PyJwt` for decoding the JWT token in our code. We will install the
package in the zipping stage.
### 3. Creating the handler function
In this example we will show how to receive a webhook from QStash and verify the
signature.
First, let's import everything we need:
```python
import json
import os
import hmac
import hashlib
import base64
import time
import jwt
```
Now, we create the handler function. In the handler we will prepare all
necessary variables that we need for verification. This includes the signature,
the signing keys and the url of the lambda function. Then we try to verify the
request using the current signing key and if that fails we will try the next
one. If the signature could be verified, we can start processing the request.
```python
def lambda_handler(event, context):
# parse the inputs
current_signing_key = os.environ['QSTASH_CURRENT_SIGNING_KEY']
next_signing_key = os.environ['QSTASH_NEXT_SIGNING_KEY']
headers = event['headers']
signature = headers['upstash-signature']
url = "https://{}{}".format(event["requestContext"]["domainName"], event["rawPath"])
body = None
if 'body' in event:
body = event['body']
# check verification now
try:
verify(signature, current_signing_key, body, url)
except Exception as e:
print("Failed to verify signature with current signing key:", e)
try:
verify(signature, next_signing_key, body, url)
except Exception as e2:
return {
"statusCode": 400,
"body": json.dumps({
"error": str(e2),
}),
}
# Your logic here...
return {
"statusCode": 200,
"body": json.dumps({
"message": "ok",
}),
}
```
The `verify` function will handle the actual verification of the signature. The
signature itself is actually a [JWT](https://jwt.io) and includes claims about
the request. See [here](/qstash/features/security#claims).
```python
# @param jwt_token - The content of the `upstash-signature` header
# @param signing_key - The signing key to use to verify the signature (Get it from Upstash Console)
# @param body - The raw body of the request
# @param url - The public URL of the lambda function
def verify(jwt_token, signing_key, body, url):
split = jwt_token.split(".")
if len(split) != 3:
raise Exception("Invalid JWT.")
header, payload, signature = split
message = header + '.' + payload
generated_signature = base64.urlsafe_b64encode(hmac.new(bytes(signing_key, 'utf-8'), bytes(message, 'utf-8'), digestmod=hashlib.sha256).digest()).decode()
if generated_signature != signature and signature + "=" != generated_signature :
raise Exception("Invalid JWT signature.")
decoded = jwt.decode(jwt_token, options={"verify_signature": False})
sub = decoded['sub']
iss = decoded['iss']
exp = decoded['exp']
nbf = decoded['nbf']
decoded_body = decoded['body']
if iss != "Upstash":
raise Exception("Invalid issuer: {}".format(iss))
if sub.rstrip("/") != url.rstrip("/"):
raise Exception("Invalid subject: {}".format(sub))
now = time.time()
if now > exp:
raise Exception("Token has expired.")
if now < nbf:
raise Exception("Token is not yet valid.")
if body != None:
while decoded_body[-1] == "=":
decoded_body = decoded_body[:-1]
m = hashlib.sha256()
m.update(bytes(body, 'utf-8'))
m = m.digest()
generated_hash = base64.urlsafe_b64encode(m).decode()
if generated_hash != decoded_body and generated_hash != decoded_body + "=" :
raise Exception("Body hash doesn't match.")
```
You can find the complete file
[here](https://github.com/upstash/qstash-examples/tree/main/aws-lambda/python-example/lambda_function.py).
That's it, now we can create the function on AWS and test it.
### 4. Create a Lambda function on AWS
Create a new Lambda function from scratch by going to the
[AWS console](https://us-east-1.console.aws.amazon.com/lambda/home?region=us-east-1#/create/function).
(Make sure you select your desired region)
Give it a name and select `Python 3.8` as runtime, then create the function.
Afterwards we will add a public URL to this lambda by going to the
`Configuration` tab:
Select `Auth Type = NONE` because we are handling authentication ourselves.
After creating the url, you should see it on the right side of the overview of
your function:
### 5. Set Environment Variables
Get your current and next signing key from the
[Upstash Console](https://console.upstash.com/qstash)
On the same `Configuration` tab from earlier, we will now set the required
environment variables:
### 6. Deploy your Lambda function
We need to bundle our code and zip it to deploy it to AWS.
Add the following script to your `Makefile` file (or corresponding pipenv
script):
```yaml
zip:
rm -rf dist
pip3 install --target ./dist pyjwt
cp lambda_function.py ./dist/lambda_function.py
cd dist && zip -r lambda.zip .
mv ./dist/lambda.zip ./
```
When calling `make zip` this will install PyJwt and zip the code.
Afterwards we can click the `Upload from` button in the lower right corner and
deploy the code to AWS. Select `lambda.zip` as upload file.
### 7. Publish a message
Open a different terminal and publish a message to QStash. Note the destination
url is the URL from step 4.
```bash
curl --request POST "https://qstash.upstash.io/v2/publish/https://urzdbfn4et56vzeasu3fpcynym0zerme.lambda-url.eu-west-1.on.aws" \
-H "Authorization: Bearer " \
-H "Content-Type: application/json" \
-d "{ \"hello\": \"world\"}"
```
## Next Steps
That's it, you have successfully created a secure AWS lambda function, that
receives and verifies incoming webhooks from qstash.
Learn more about publishing a message to qstash [here](/qstash/howto/publishing)
# Cloudflare Workers
Source: https://upstash.com/docs/qstash/quickstarts/cloudflare-workers
This is a step by step guide on how to receive webhooks from QStash in your
Cloudflare Worker.
### Project Setup
We will use **C3 (create-cloudflare-cli)** command-line tool to create our functions. You can open a new terminal window and run C3 using the prompt below.
```shell npm
npm create cloudflare@latest
```
```shell yarn
yarn create cloudflare@latest
```
This will install the `create-cloudflare` package, and lead you through setup. C3 will also install Wrangler in projects by default, which helps us testing and deploying the projects.
```text
➜ npm create cloudflare@latest
Need to install the following packages:
create-cloudflare@2.1.0
Ok to proceed? (y) y
using create-cloudflare version 2.1.0
╭ Create an application with Cloudflare Step 1 of 3
│
├ In which directory do you want to create your application?
│ dir ./cloudflare_starter
│
├ What type of application do you want to create?
│ type "Hello World" Worker
│
├ Do you want to use TypeScript?
│ yes typescript
│
├ Copying files from "hello-world" template
│
├ Do you want to use TypeScript?
│ yes typescript
│
├ Retrieving current workerd compatibility date
│ compatibility date 2023-08-07
│
├ Do you want to use git for version control?
│ yes git
│
╰ Application created
```
We will also install the **Upstash QStash library**.
```bash
npm install @upstash/qstash
```
### 3. Use QStash in your handler
First we import the library:
```ts src/index.ts
import { Receiver } from "@upstash/qstash";
```
Then we adjust the `Env` interface to include the `QSTASH_CURRENT_SIGNING_KEY`
and `QSTASH_NEXT_SIGNING_KEY` environment variables.
```ts src/index.ts
export interface Env {
QSTASH_CURRENT_SIGNING_KEY: string;
QSTASH_NEXT_SIGNING_KEY: string;
}
```
And then we validate the signature in the `handler` function.
First we create a new receiver and provide it with the signing keys.
```ts src/index.ts
const receiver = new Receiver({
currentSigningKey: env.QSTASH_CURRENT_SIGNING_KEY,
nextSigningKey: env.QSTASH_NEXT_SIGNING_KEY,
});
```
Then we verify the signature.
```ts src/index.ts
const body = await request.text();
const isValid = receiver.verify({
signature: request.headers.get("Upstash-Signature")!,
body,
});
```
The entire file looks like this now:
```ts src/index.ts
import { Receiver } from "@upstash/qstash";
export interface Env {
QSTASH_CURRENT_SIGNING_KEY: string;
QSTASH_NEXT_SIGNING_KEY: string;
}
export default {
async fetch(
request: Request,
env: Env,
ctx: ExecutionContext
): Promise {
const c = new Receiver({
currentSigningKey: env.QSTASH_CURRENT_SIGNING_KEY,
nextSigningKey: env.QSTASH_NEXT_SIGNING_KEY,
});
const body = await request.text();
const isValid = await c
.verify({
signature: request.headers.get("Upstash-Signature")!,
body,
})
.catch((err) => {
console.error(err);
return false;
});
if (!isValid) {
return new Response("Invalid signature", { status: 401 });
}
console.log("The signature was valid");
// do work here
return new Response("Hello World!");
},
};
```
### Configure Credentials
There are two methods for setting up the credentials for QStash. The recommended way is to use Cloudflare Upstash Integration. Alternatively, you can add the credentials manually.
#### Using the Cloudflare Integration
Access to the [Cloudflare Dashboard](https://dash.cloudflare.com) and login with the same account that you've used while setting up the Worker application. Then, navigate to **Workers & Pages > Overview** section on the sidebar. Here, you'll find your application listed.
Clicking on the application will direct you to the application details page, where you can perform the integration process. Switch to the **Settings** tab in the application details, and proceed to **Integrations** section. You will see various Worker integrations listed. To proceed, click the **Add Integration** button associated with the QStash.
On the Integration page, connect to your Upstash account. Then, select the related database from the dropdown menu. Finalize the process by pressing Save button.
#### Setting up Manually
Navigate to [Upstash Console](https://console.upstash.com) and copy/paste your QStash credentials to `wrangler.toml` as below.
```yaml
[vars]
QSTASH_URL="REPLACE_HERE"
QSTASH_TOKEN="REPLACE_HERE"
QSTASH_CURRENT_SIGNING_KEY="REPLACE_HERE"
QSTASH_NEXT_SIGNING_KEY="REPLACE_HERE"
```
### Test and Deploy
You can test the function locally with `npx wrangler dev`
Deploy your function to Cloudflare with `npx wrangler deploy`
The endpoint of the function will be provided to you, once the deployment is done.
### Publish a message
Open a different terminal and publish a message to QStash. Note the destination
url is the same that was printed in the previous deploy step.
```bash
curl --request POST "https://qstash.upstash.io/v2/publish/https://cloudflare-workers.upstash.workers.dev" \
-H "Authorization: Bearer " \
-H "Content-Type: application/json" \
-d "{ \"hello\": \"world\"}"
```
In the logs you should see something like this:
```bash
$ npx wrangler tail
⛅️ wrangler 2.0.17
--------------------
Retrieving cached values for account from node_modules/.cache/wrangler
Successfully created tail, expires at 2022-07-11T21:11:36Z
Connected to cloudflare-workers, waiting for logs...
POST https://cloudflare-workers.upstash.workers.dev/ - Ok @ 7/11/2022, 5:13:19 PM
(log) The signature was valid
```
## Next Steps
That's it, you have successfully created a secure Cloudflare Worker, that
receives and verifies incoming webhooks from qstash.
Learn more about publishing a message to qstash [here](/qstash/howto/publishing).
You can find the source code [here](https://github.com/upstash/qstash-examples/tree/main/cloudflare-workers).
# Deno Deploy
Source: https://upstash.com/docs/qstash/quickstarts/deno-deploy
[Source Code](https://github.com/upstash/qstash-examples/tree/main/deno-deploy)
This is a step by step guide on how to receive webhooks from QStash in your Deno
deploy project.
### 1. Create a new project
Go to [https://dash.deno.com/projects](https://dash.deno.com/projects) and
create a new playground project.
### 2. Edit the handler function
Then paste the following code into the browser editor:
```ts
import { serve } from "https://deno.land/std@0.142.0/http/server.ts";
import { Receiver } from "https://deno.land/x/upstash_qstash@v0.1.4/mod.ts";
serve(async (req: Request) => {
const r = new Receiver({
currentSigningKey: Deno.env.get("QSTASH_CURRENT_SIGNING_KEY")!,
nextSigningKey: Deno.env.get("QSTASH_NEXT_SIGNING_KEY")!,
});
const isValid = await r
.verify({
signature: req.headers.get("Upstash-Signature")!,
body: await req.text(),
})
.catch((err: Error) => {
console.error(err);
return false;
});
if (!isValid) {
return new Response("Invalid signature", { status: 401 });
}
console.log("The signature was valid");
// do work
return new Response("OK", { status: 200 });
});
```
### 3. Add your signing keys
Click on the `settings` button at the top of the screen and then click
`+ Add Variable`
Get your current and next signing key from
[Upstash](https://console.upstash.com/qstash) and then set them in deno deploy.

### 4. Deploy
Simply click on `Save & Deploy` at the top of the screen.
### 5. Publish a message
Make note of the url displayed in the top right. This is the public url of your
project.
```bash
curl --request POST "https://qstash.upstash.io/v2/publish/https://early-frog-33.deno.dev" \
-H "Authorization: Bearer " \
-H "Content-Type: application/json" \
-d "{ \"hello\": \"world\"}"
```
In the logs you should see something like this:
```basheurope-west3isolate start time: 2.21 ms
Listening on http://localhost:8000/
The signature was valid
```
## Next Steps
That's it, you have successfully created a secure deno API, that receives and
verifies incoming webhooks from qstash.
Learn more about publishing a message to qstash [here](/qstash/howto/publishing)
# Golang
Source: https://upstash.com/docs/qstash/quickstarts/fly-io/go
[Source Code](https://github.com/upstash/qstash-examples/tree/main/fly.io/go)
This is a step by step guide on how to receive webhooks from QStash in your
Golang application running on [fly.io](https://fly.io).
## 0. Prerequisites
* [flyctl](https://fly.io/docs/getting-started/installing-flyctl/) - The fly.io
CLI
## 1. Create a new project
Let's create a new folder called `flyio-go` and initialize a new project.
```bash
mkdir flyio-go
cd flyio-go
go mod init flyio-go
```
## 2. Creating the main function
In this example we will show how to receive a webhook from QStash and verify the
signature using the popular [golang-jwt/jwt](https://github.com/golang-jwt/jwt)
library.
First, let's import everything we need:
```go
package main
import (
"crypto/sha256"
"encoding/base64"
"fmt"
"github.com/golang-jwt/jwt/v4"
"io"
"net/http"
"os"
"time"
)
```
Next we create `main.go`. Ignore the `verify` function for now. We will add that
next. In the handler we will prepare all necessary variables that we need for
verification. This includes the signature and the signing keys. Then we try to
verify the request using the current signing key and if that fails we will try
the next one. If the signature could be verified, we can start processing the
request.
```go
func main() {
port := os.Getenv("PORT")
if port == "" {
port = "8080"
}
http.HandleFunc("/", func(w http.ResponseWriter, r *http.Request) {
defer r.Body.Close()
currentSigningKey := os.Getenv("QSTASH_CURRENT_SIGNING_KEY")
nextSigningKey := os.Getenv("QSTASH_NEXT_SIGNING_KEY")
tokenString := r.Header.Get("Upstash-Signature")
body, err := io.ReadAll(r.Body)
if err != nil {
http.Error(w, err.Error(), http.StatusInternalServerError)
return
}
err = verify(body, tokenString, currentSigningKey)
if err != nil {
fmt.Printf("Unable to verify signature with current signing key: %v", err)
err = verify(body, tokenString, nextSigningKey)
}
if err != nil {
http.Error(w, err.Error(), http.StatusUnauthorized)
return
}
// handle your business logic here
w.WriteHeader(http.StatusOK)
})
fmt.Println("listening on", port)
err := http.ListenAndServe(":"+port, nil)
if err != nil {
panic(err)
}
}
```
The `verify` function will handle verification of the [JWT](https://jwt.io),
that includes claims about the request. See
[here](/qstash/features/security#claims).
```go
func verify(body []byte, tokenString, signingKey string) error {
token, err := jwt.Parse(
tokenString,
func(token *jwt.Token) (interface{}, error) {
if _, ok := token.Method.(*jwt.SigningMethodHMAC); !ok {
return nil, fmt.Errorf("Unexpected signing method: %v", token.Header["alg"])
}
return []byte(signingKey), nil
})
if err != nil {
return err
}
claims, ok := token.Claims.(jwt.MapClaims)
if !ok || !token.Valid {
return fmt.Errorf("Invalid token")
}
if !claims.VerifyIssuer("Upstash", true) {
return fmt.Errorf("invalid issuer")
}
if !claims.VerifyExpiresAt(time.Now().Unix(), true) {
return fmt.Errorf("token has expired")
}
if !claims.VerifyNotBefore(time.Now().Unix(), true) {
return fmt.Errorf("token is not valid yet")
}
bodyHash := sha256.Sum256(body)
if claims["body"] != base64.URLEncoding.EncodeToString(bodyHash[:]) {
return fmt.Errorf("body hash does not match")
}
return nil
}
```
You can find the complete file
[here](https://github.com/upstash/qstash-examples/blob/main/fly.io/go/main.go).
That's it, now we can deploy our API and test it.
## 3. Create app on fly.io
[Login](https://fly.io/docs/getting-started/log-in-to-fly/) with `flyctl` and
then `flyctl launch` the new app. This will create the necessary `fly.toml` for
us. It will ask you a bunch of questions. I chose all defaults here except for
the last question. We do not want to deploy just yet.
```bash
$ flyctl launch
Creating app in /Users/andreasthomas/github/upstash/qstash-examples/fly.io/go
Scanning source code
Detected a Go app
Using the following build configuration:
Builder: paketobuildpacks/builder:base
Buildpacks: gcr.io/paketo-buildpacks/go
? App Name (leave blank to use an auto-generated name):
Automatically selected personal organization: Andreas Thomas
? Select region: fra (Frankfurt, Germany)
Created app winer-cherry-9545 in organization personal
Wrote config file fly.toml
? Would you like to setup a Postgresql database now? No
? Would you like to deploy now? No
Your app is ready. Deploy with `flyctl deploy`
```
## 4. Set Environment Variables
Get your current and next signing key from the
[Upstash Console](https://console.upstash.com/qstash)
Then set them using `flyctl secrets set ...`
```bash
flyctl secrets set QSTASH_CURRENT_SIGNING_KEY=...
flyctl secrets set QSTASH_NEXT_SIGNING_KEY=...
```
## 5. Deploy the app
Fly.io made this step really simple. Just `flyctl deploy` and enjoy.
```bash
flyctl deploy
```
## 6. Publish a message
Now you can publish a message to QStash. Note the destination url is basically
your app name, if you are not sure what it is, you can go to
[fly.io/dashboard](https://fly.io/dashboard) and find out. In my case the app is
named "winter-cherry-9545" and the public url is
"[https://winter-cherry-9545.fly.dev](https://winter-cherry-9545.fly.dev)".
```bash
curl --request POST "https://qstash.upstash.io/v2/publish/https://winter-cherry-9545.fly.dev" \
-H "Authorization: Bearer " \
-H "Content-Type: application/json" \
-d "{ \"hello\": \"world\"}"
```
## Next Steps
That's it, you have successfully created a Go API hosted on fly.io, that
receives and verifies incoming webhooks from qstash.
Learn more about publishing a message to qstash [here](/qstash/howto/publishing)
# Python on Vercel
Source: https://upstash.com/docs/qstash/quickstarts/python-vercel
## Introduction
This quickstart will guide you through setting up QStash to run a daily script
to clean up your database. This is useful for testing and development environments
where you want to reset the database every day.
## Prerequisites
* Create an Upstash account and get your [QStash token](https://console.upstash.com/qstash)
First, we'll create a new directory for our Python app. We'll call it `clean-db-cron`.
The database we'll be using is Redis, so we'll need to install the `upstash_redis` package.
```bash
mkdir clean-db-cron
```
```bash
cd clean-db-cron
```
```bash
pip install upstash-redis
```
Let's write the Python code to clean up the database. We'll use the `upstash_redis`
package to connect to the database and delete all keys.
```python index.py
from upstash_redis import Redis
redis = Redis(url="https://YOUR_REDIS_URL", token="YOUR_TOKEN")
def delete_all_entries():
keys = redis.keys("*") # Match all keys
redis.delete(*keys)
delete_all_entries()
```
Try running the code to see if it works. Your database keys should be deleted!
In order to use QStash, we need to make the Python code into a public endpoint. There
are many ways to do this such as using Flask, FastAPI, or Django. In this example, we'll
use the Python `http.server` module to create a simple HTTP server.
```python api/index.py
from http.server import BaseHTTPRequestHandler
from upstash_redis import Redis
redis = Redis(url="https://YOUR_REDIS_URL", token="YOUR_TOKEN")
def delete_all_entries():
keys = redis.keys("*") # Match all keys
redis.delete(*keys)
class handler(BaseHTTPRequestHandler):
def do_POST(self):
delete_all_entries()
self.send_response(200)
self.end_headers()
```
For the purpose of this tutorial, I'll deploy the application to Vercel using the
[Python Runtime](https://vercel.com/docs/functions/runtimes/python), but feel free to
use any other hosting provider.
There are many ways to [deploy to Vercel](https://vercel.com/docs/deployments/overview), but
I'm going to use the Vercel CLI.
```bash
npm install -g vercel
```
```bash
vercel
```
Once deployed, you can find the public URL in the dashboard.
There are two ways we can go about configuring QStash. We can either use the QStash dashboard
or the QStash API. In this example, it makes more sense to utilize the dashboard since we
only need to set up a singular cronjob.
However, you can imagine a scenario where you have a large number of cronjobs and you'd
want to automate the process. In that case, you'd want to use the QStash Python SDK.
To create the schedule, go to the [QStash dashboard](https://console.upstash.com/qstash) and enter
the URL of the public endpoint you created. Then, set the type to schedule and change the
`Upstash-Cron` header to run daily at a time of your choosing.
```
URL: https://your-vercel-app.vercel.app/api
Type: Schedule
Every: every day at midnight (feel free to customize)
```
Once you start the schedule, QStash will invoke the endpoint at the specified time. You can
scroll down and verify the job has been created!
If you have a use case where you need to automate the creation of jobs, you can use the SDK instead.
```python
from qstash import QStash
client = QStash("")
client.schedule.create(
destination="https://YOUR_URL.vercel.app/api",
cron="0 12 * * *",
)
```
Now, go ahead and try it out for yourself! Try using some of the other features of QStash, such as
[callbacks](/qstash/features/callbacks) and [URL Groups](/qstash/features/url-groups).
# Next.js
Source: https://upstash.com/docs/qstash/quickstarts/vercel-nextjs
QStash is a robust message queue and task-scheduling service that integrates perfectly with Next.js. This guide will show you how to use QStash in your Next.js projects, including a quickstart and a complete example.
## Quickstart
At its core, each QStash message contains two pieces of information:
* URL (which endpoint to call)
* Request body (e.g. IDs of items you want to process)
The following endpoint could be used to upload an image and then asynchronously queue a processing task to optimize the image in the background.
```tsx upload-image/route.ts
import { Client } from "@upstash/qstash"
import { NextResponse } from "next/server"
const client = new Client({ token: process.env.QSTASH_TOKEN! })
export const POST = async (req: Request) => {
// Image uploading logic
// 👇 Once uploading is done, queue an image processing task
const result = await client.publishJSON({
url: "https://your-api-endpoint.com/process-image",
body: { imageId: "123" },
})
return NextResponse.json({
message: "Image queued for processing!",
qstashMessageId: result.messageId,
})
}
```
Note that the URL needs to be publicly available for QStash to call, either as a deployed project or by [developing with QStash locally](/qstash/howto/local-tunnel).
Because QStash calls our image processing task, we get automatic retries whenever the API throws an error. These retries make our function very reliable. We also let the user know immediately that their image has been successfully queued.
Now, let's **receive the QStash message** in our image processing endpoint:
```tsx process-image/route.ts
import { verifySignatureAppRouter } from "@upstash/qstash/nextjs"
// 👇 Verify that this messages comes from QStash
export const POST = verifySignatureAppRouter(async (req: Request) => {
const body = await req.json()
const { imageId } = body as { imageId: string }
// Image processing logic, i.e. using sharp
return new Response(`Image with id "${imageId}" processed successfully.`)
})
```
```bash .env
# Copy all three from your QStash dashboard
QSTASH_TOKEN=
QSTASH_CURRENT_SIGNING_KEY=
QSTASH_NEXT_SIGNING_KEY=
```
Just like that, we set up a reliable and asynchronous image processing system in Next.js. The same logic works for email queues, reliable webhook processing, long-running report generations and many more.
## Example project
* Create an Upstash account and get your [QStash token](https://console.upstash.com/qstash)
* Node.js installed
```bash
npx create-next-app@latest qstash-bg-job
```
```bash
cd qstash-bg-job
```
```bash
npm install @upstash/qstash
```
```bash
npm run dev
```
After removing the default content in `src/app/page.tsx`, let's create a simple UI to trigger the background job
using a button.
```tsx src/app/page.tsx
"use client"
export default function Home() {
return (
)
}
```
We can use QStash to start a background job by calling the `publishJSON` method.
In this example, we're using Next.js server actions, but you can also use route handlers.
Since we don't have our public API endpoint yet, we can use [Request Catcher](https://requestcatcher.com/) to test the background job.
This will eventually be replaced with our own API endpoint.
```ts src/app/actions.ts
"use server"
import { Client } from "@upstash/qstash"
const qstashClient = new Client({
// Add your token to a .env file
token: process.env.QSTASH_TOKEN!,
})
export async function startBackgroundJob() {
await qstashClient.publishJSON({
url: "https://firstqstashmessage.requestcatcher.com/test",
body: {
hello: "world",
},
})
}
```
Now let's invoke the `startBackgroundJob` function when the button is clicked.
```tsx src/app/page.tsx
"use client"
import { startBackgroundJob } from "@/app/actions"
export default function Home() {
async function handleClick() {
await startBackgroundJob()
}
return (
)
}
```
To test the background job, click the button and check the Request Catcher for the incoming request.
You can also head over to [Upstash Console](https://console.upstash.com/qstash) and go to the
`Logs` tab where you can see your message activities.
Now that we know QStash is working, let's create our own endpoint to handle a background job. This
is the endpoint that will be invoked by QStash.
This job will be responsible for sending 10 requests, each with a 500ms delay. Since we're deploying
to Vercel, we have to be cautious of the [time limit for serverless functions](https://vercel.com/docs/functions/runtimes#max-duration).
```ts src/app/api/long-task/route.ts
export async function POST(request: Request) {
const data = await request.json()
for (let i = 0; i < 10; i++) {
await fetch("https://firstqstashmessage.requestcatcher.com/test", {
method: "POST",
body: JSON.stringify(data),
headers: { "Content-Type": "application/json" },
})
await new Promise((resolve) => setTimeout(resolve, 500))
}
return Response.json({ success: true })
}
```
Now let's update our `startBackgroundJob` function to use our new endpoint.
There's 1 problem: our endpoint is not public. We need to make it public so that QStash can call it.
We have 2 options:
1. Deploy our application to a platform like Vercel and use the public URL.
2. Create a [local tunnel](/qstash/howto/local-tunnel) to test the endpoint locally.
For the purpose, of this tutorial, I'll deploy the application to Vercel, but
feel free to use a local tunnel if you prefer.
There are many ways to [deploy to Vercel](https://vercel.com/docs/deployments/overview), but
I'm going to use the Vercel CLI.
```bash
npm install -g vercel
```
```bash
vercel
```
Once deployed, you can find the public URL in the Vercel dashboard.
Now that we have a public URL, we can update the URL.
```ts src/app/actions.ts
"use server"
import { Client } from "@upstash/qstash"
const qstashClient = new Client({
token: process.env.QSTASH_TOKEN!,
})
export async function startBackgroundJob() {
await qstashClient.publishJSON({
// Replace with your public URL
url: "https://qstash-bg-job.vercel.app/api/long-task",
body: {
hello: "world",
},
})
}
```
And voila! You've created a Next.js app that calls a long-running background job using QStash.
QStash is a great way to handle background jobs, but it's important to remember that it's a public
API. This means that anyone can call your endpoint. Make sure to add security measures to your endpoint
to ensure that QStash is the sender of the request.
Luckily, our SDK provides a way to verify the sender of the request. Make sure to get your signing keys
from the QStash console and add them to your environment variables. The `verifySignatureAppRouter` will try to
load `QSTASH_CURRENT_SIGNING_KEY` and `QSTASH_NEXT_SIGNING_KEY` from the environment. If one of them is missing,
an error is thrown.
```ts src/app/api/long-task/route.ts
import { verifySignatureAppRouter } from "@upstash/qstash/nextjs"
async function handler(request: Request) {
const data = await request.json()
for (let i = 0; i < 10; i++) {
await fetch("https://firstqstashmessage.requestcatcher.com/test", {
method: "POST",
body: JSON.stringify(data),
headers: { "Content-Type": "application/json" },
})
await new Promise((resolve) => setTimeout(resolve, 500))
}
return Response.json({ success: true })
}
export const POST = verifySignatureAppRouter(handler)
```
Let's also add error catching to our action and a loading state to our UI.
```ts src/app/actions.ts
"use server"
import { Client } from "@upstash/qstash";
const qstashClient = new Client({
token: process.env.QSTASH_TOKEN!,
});
export async function startBackgroundJob() {
try {
const response = await qstashClient.publishJSON({
"url": "https://qstash-bg-job.vercel.app/api/long-task",
body: {
"hello": "world"
}
});
return response.messageId;
} catch (error) {
console.error(error);
return null;
}
}
```
```tsx src/app/page.tsx
"use client"
import { startBackgroundJob } from "@/app/actions";
import { useState } from "react";
export default function Home() {
const [loading, setLoading] = useState(false);
const [msg, setMsg] = useState("");
async function handleClick() {
setLoading(true);
const messageId = await startBackgroundJob();
if (messageId) {
setMsg(`Started job with ID ${messageId}`);
} else {
setMsg("Failed to start background job");
}
setLoading(false);
}
return (
{loading &&
Loading...
}
{msg &&
{msg}
}
);
}
```
## Result
We have now created a Next.js app that calls a long-running background job using QStash!
Here's the app in action:
We can also view the logs on Vercel and QStash
Vercel
QStash
And the code for the 3 files we created:
```tsx src/app/page.tsx
"use client"
import { startBackgroundJob } from "@/app/actions";
import { useState } from "react";
export default function Home() {
const [loading, setLoading] = useState(false);
const [msg, setMsg] = useState("");
async function handleClick() {
setLoading(true);
const messageId = await startBackgroundJob();
if (messageId) {
setMsg(`Started job with ID ${messageId}`);
} else {
setMsg("Failed to start background job");
}
setLoading(false);
}
return (
{loading &&
Loading...
}
{msg &&
{msg}
}
);
}
```
```ts src/app/actions.ts
"use server"
import { Client } from "@upstash/qstash";
const qstashClient = new Client({
token: process.env.QSTASH_TOKEN!,
});
export async function startBackgroundJob() {
try {
const response = await qstashClient.publishJSON({
"url": "https://qstash-bg-job.vercel.app/api/long-task",
body: {
"hello": "world"
}
});
return response.messageId;
} catch (error) {
console.error(error);
return null;
}
}
```
```ts src/app/api/long-task/route.ts
import { verifySignatureAppRouter } from "@upstash/qstash/nextjs"
async function handler(request: Request) {
const data = await request.json()
for (let i = 0; i < 10; i++) {
await fetch("https://firstqstashmessage.requestcatcher.com/test", {
method: "POST",
body: JSON.stringify(data),
headers: { "Content-Type": "application/json" },
})
await new Promise((resolve) => setTimeout(resolve, 500))
}
return Response.json({ success: true })
}
export const POST = verifySignatureAppRouter(handler)
```
Now, go ahead and try it out for yourself! Try using some of the other features of QStash, like
[schedules](/qstash/features/schedules), [callbacks](/qstash/features/callbacks), and [URL Groups](/qstash/features/url-groups).
# Periodic Data Updates
Source: https://upstash.com/docs/qstash/recipes/periodic-data-updates
* Code:
[Repository](https://github.com/upstash/qstash-examples/tree/main/periodic-data-updates)
* App:
[qstash-examples-periodic-data-updates.vercel.app](https://qstash-examples-periodic-data-updates.vercel.app)
This recipe shows how to use QStash as a trigger for a Next.js api route, that
fetches data from somewhere and stores it in your database.
For the database we will use Redis because it's very simple to setup and is not
really the main focus of this recipe.
## What will be build?
Let's assume there is a 3rd party API that provides some data. One approach
would be to just query the API whenever you or your users need it, however that
might not work well if the API is slow, unavailable or rate limited.
A better approach would be to continuously fetch fresh data from the API and
store it in your database.
Traditionally this would require a long running process, that would continuously
call the API. With QStash you can do this inside your Next.js app and you don't
need to worry about maintaining anything.
For the purpose of this recipe we will build a simple app, that scrapes the
current Bitcoin price from a public API, stores it in redis and then displays a
chart in the browser.
## Setup
If you don't have one already, create a new Next.js project with
`npx create-next-app@latest --ts`.
Then install the required packages
```bash
npm install @upstash/qstash @upstash/redis
```
You can replace `@upstash/redis` with any kind of database client you want.
## Scraping the API
Create a new serverless function in `/pages/api/cron.ts`
````ts
import { NextApiRequest, NextApiResponse } from "next";
import { Redis } from "@upstash/redis";
import { verifySignature } from "@upstash/qstash/nextjs";
/**
* You can use any database you want, in this case we use Redis
*/
const redis = Redis.fromEnv();
/**
* Load the current bitcoin price in USD and store it in our database at the
* current timestamp
*/
async function handler(_req: NextApiRequest, res: NextApiResponse) {
try {
/**
* The API returns something like this:
* ```json
* {
* "USD": {
* "last": 123
* },
* ...
* }
* ```
*/
const raw = await fetch("https://blockchain.info/ticker");
const prices = await raw.json();
const bitcoinPrice = prices["USD"]["last"] as number;
/**
* After we have loaded the current bitcoin price, we can store it in the
* database together with the current time
*/
await redis.zadd("bitcoin-prices", {
score: Date.now(),
member: bitcoinPrice,
});
res.send("OK");
} catch (err) {
res.status(500).send(err);
} finally {
res.end();
}
}
/**
* Wrap your handler with `verifySignature` to automatically reject all
* requests that are not coming from Upstash.
*/
export default verifySignature(handler);
/**
* To verify the authenticity of the incoming request in the `verifySignature`
* function, we need access to the raw request body.
*/
export const config = {
api: {
bodyParser: false,
},
};
````
## Deploy to Vercel
That's all we need to fetch fresh data. Let's deploy our app to Vercel.
You can either push your code to a git repository and deploy it to Vercel, or
you can deploy it directly from your local machine using the
[vercel cli](https://vercel.com/docs/cli).
For a more indepth tutorial on how to deploy to Vercel, check out this
[quickstart](/qstash/quickstarts/vercel-nextjs#4-deploy-to-vercel).
After you have deployed your app, it is time to add your secrets to your
environment variables.
## Secrets
Head over to [QStash](https://console.upstash.com/qstash) and copy the
`QSTASH_CURRENT_SIGNING_KEY` and `QSTASH_NEXT_SIGNING_KEY` to vercel's
environment variables. 
If you are not using a custom database, you can quickly create a new
[Redis database](https://console.upstash.com/redis). Afterwards copy the
`UPSTASH_REDIS_REST_URL` and `UPSTASH_REDIS_REST_TOKEN` to vercel.
In the near future we will update our
[Vercel integration](https://vercel.com/integrations/upstash) to do this for
you.
## Redeploy
To use the environment variables, you need to redeploy your app. Either with
`npx vercel --prod` or in the UI.
## Create cron trigger in QStash
The last part is to add the trigger in QStash. Go to
[QStash](https://console.upstash.com/qstash) and create a new schedule.

Now we will call your api function whenever you schedule is triggered.
## Adding frontend UI
This part is probably the least interesting and would require more dependencies
for styling etc. Check out the
[index.tsx](https://github.com/upstash/qstash-examples/blob/main/periodic-data-updates/pages/index.tsx)
file, where we load the data from the database and display it in a chart.
## Hosted example
You can find a running example of this recipe
[here](https://qstash-examples-periodic-data-updates.vercel.app/).
# DLQ
Source: https://upstash.com/docs/qstash/sdks/py/examples/dlq
You can run the async code by importing `AsyncQStash` from `qstash`
and awaiting the methods.
#### Get all messages with pagination using cursor
Since the DLQ can have a large number of messages, they are paginated.
You can go through the results using the `cursor`.
```python
from qstash import QStash
client = QStash("")
all_messages = []
cursor = None
while True:
res = client.dlq.list(cursor=cursor)
all_messages.extend(res.messages)
cursor = res.cursor
if cursor is None:
break
```
#### Get a message from the DLQ
```python
from qstash import QStash
client = QStash("")
msg = client.dlq.get("")
```
#### Delete a message from the DLQ
```python
from qstash import QStash
client = QStash("")
client.dlq.delete("")
```
# Events
Source: https://upstash.com/docs/qstash/sdks/py/examples/events
You can run the async code by importing `AsyncQStash` from `qstash`
and awaiting the methods.
#### Get all events with pagination using cursor
Since there can be a large number of events, they are paginated.
You can go through the results using the `cursor`.
```python
from qstash import QStash
client = QStash("")
all_events = []
cursor = None
while True:
res = client.event.list(cursor=cursor)
all_events.extend(res.events)
cursor = res.cursor
if cursor is None:
break
```
# Keys
Source: https://upstash.com/docs/qstash/sdks/py/examples/keys
You can run the async code by importing `AsyncQStash` from `qstash`
and awaiting the methods.
#### Retrieve your signing Keys
```python
from qstash import QStash
client = QStash("")
signing_key = client.signing_key.get()
print(signing_key.current, signing_key.next)
```
#### Rotate your signing Keys
```python
from qstash import QStash
client = QStash("")
new_signing_key = client.signing_key.rotate()
print(new_signing_key.current, new_signing_key.next)
```
# Messages
Source: https://upstash.com/docs/qstash/sdks/py/examples/messages
You can run the async code by importing `AsyncQStash` from `qstash`
and awaiting the methods.
Messages are removed from the database shortly after they're delivered, so you
will not be able to retrieve a message after. This endpoint is intended to be used
for accessing messages that are in the process of being delivered/retried.
#### Retrieve a message
```python
from qstash import QStash
client = QStash("")
msg = client.message.get("")
```
#### Cancel/delete a message
```python
from qstash import QStash
client = QStash("")
client.message.cancel("")
```
#### Cancel messages in bulk
Cancel many messages at once or cancel all messages
```python
from qstash import QStash
client = QStash("")
# cancel more than one message
client.message.cancel_many(["", ""])
# cancel all messages
client.message.cancel_all()
```
# Overview
Source: https://upstash.com/docs/qstash/sdks/py/examples/overview
These are example usages of each method in the QStash SDK. You can also reference the
[examples repo](https://github.com/upstash/qstash-py/tree/main/examples) and [API examples](/qstash/overall/apiexamples) for more.
# Publish
Source: https://upstash.com/docs/qstash/sdks/py/examples/publish
You can run the async code by importing `AsyncQStash` from `qstash`
and awaiting the methods.
#### Publish to a URL with a 3 second delay and headers/body
```python
from qstash import QStash
client = QStash("")
res = client.message.publish_json(
url="https://my-api...",
body={
"hello": "world",
},
headers={
"test-header": "test-value",
},
delay="3s",
)
print(res.message_id)
```
#### Publish to a URL group with a 3 second delay and headers/body
You can make a URL group on the QStash console or using the [URL group API](/qstash/sdks/py/examples/url-groups)
```python
from qstash import QStash
client = QStash("")
res = client.message.publish_json(
url_group="my-url-group",
body={
"hello": "world",
},
headers={
"test-header": "test-value",
},
delay="3s",
)
# When publishing to a URL group, the response is an array of messages for each URL in the group
print(res[0].message_id)
```
#### Publish a method with a callback URL
[Callbacks](/qstash/features/callbacks) are useful for long running functions. Here, QStash will return the response
of the publish request to the callback URL.
We also change the `method` to `GET` in this use case so QStash will make a `GET` request to the `url`. The default
is `POST`.
```python
from qstash import QStash
client = QStash("")
client.message.publish_json(
url="https://my-api...",
body={
"hello": "world",
},
callback="https://my-callback...",
failure_callback="https://my-failure-callback...",
method="GET",
)
```
#### Configure the number of retries
The max number of retries is based on your [QStash plan](https://upstash.com/pricing/qstash)
```python
from qstash import QStash
client = QStash("")
client.message.publish_json(
url="https://my-api...",
body={
"hello": "world",
},
retries=1,
)
```
#### Publish HTML content instead of JSON
```python
from qstash import QStash
client = QStash("")
client.message.publish(
url="https://my-api...",
body="
Hello World
",
content_type="text/html",
)
```
#### Publish a message with [content-based-deduplication](/qstash/features/deduplication)
```python
from qstash import QStash
client = QStash("")
client.message.publish_json(
url="https://my-api...",
body={
"hello": "world",
},
content_based_deduplication=True,
)
```
#### Publish a message with timeout
Timeout value to use when calling a url ([See `Upstash-Timeout` in Publish Message page](/qstash/api/publish#request))
```python
from qstash import QStash
client = QStash("")
client.message.publish_json(
url="https://my-api...",
body={
"hello": "world",
},
timeout="30s",
)
```
# Queues
Source: https://upstash.com/docs/qstash/sdks/py/examples/queues
#### Create a queue with parallelism
```python
from qstash import QStash
client = QStash("")
queue_name = "upstash-queue"
client.queue.upsert(queue_name, parallelism=2)
print(client.queue.get(queue_name))
```
#### Delete a queue
```python
from qstash import QStash
client = QStash("")
queue_name = "upstash-queue"
client.queue.delete(queue_name)
```
Resuming or creating a queue may take up to a minute.
Therefore, it is not recommended to pause or delete a queue during critical operations.
#### Pause/Resume a queue
```python
from qstash import QStash
client = QStash("")
queue_name = "upstash-queue"
client.queue.upsert(queue_name, parallelism=1)
client.queue.pause(queue_name)
queue = client.queue.get(queue_name)
print(queue.paused) # prints True
client.queue.resume(queue_name)
```
Resuming or creating a queue may take up to a minute.
Therefore, it is not recommended to pause or delete a queue during critical operations.
# Receiver
Source: https://upstash.com/docs/qstash/sdks/py/examples/receiver
When receiving a message from QStash, you should [verify the signature](/qstash/howto/signature).
The QStash Python SDK provides a helper function for this.
```python
from qstash import Receiver
receiver = Receiver(
current_signing_key="YOUR_CURRENT_SIGNING_KEY",
next_signing_key="YOUR_NEXT_SIGNING_KEY",
)
# ... in your request handler
signature, body = req.headers["Upstash-Signature"], req.body
receiver.verify(
body=body,
signature=signature,
url="YOUR-SITE-URL",
)
```
# Schedules
Source: https://upstash.com/docs/qstash/sdks/py/examples/schedules
You can run the async code by importing `AsyncQStash` from `qstash`
and awaiting the methods.
#### Create a schedule that runs every 5 minutes
```python
from qstash import QStash
client = QStash("")
schedule_id = client.schedule.create(
destination="https://my-api...",
cron="*/5 * * * *",
)
print(schedule_id)
```
#### Create a schedule that runs every hour and sends the result to a [callback URL](/qstash/features/callbacks)
```python
from qstash import QStash
client = QStash("")
client.schedule.create(
destination="https://my-api...",
cron="0 * * * *",
callback="https://my-callback...",
failure_callback="https://my-failure-callback...",
)
```
#### Create a schedule to a URL group that runs every minute
```python
from qstash import QStash
client = QStash("")
client.schedule.create(
destination="my-url-group",
cron="0 * * * *",
)
```
#### Get a schedule by schedule id
```python
from qstash import QStash
client = QStash("")
schedule = client.schedule.get("")
print(schedule.cron)
```
#### List all schedules
```python
from qstash import QStash
client = QStash("")
all_schedules = client.schedule.list()
print(all_schedules)
```
#### Delete a schedule
```python
from qstash import QStash
client = QStash("")
client.schedule.delete("")
```
#### Create a schedule with timeout
Timeout value to use when calling a schedule URL ([See `Upstash-Timeout` in Create Schedule page](/qstash/api/schedules/create)).
```python
from qstash import QStash
client = QStash("")
schedule_id = client.schedule.create(
destination="https://my-api...",
cron="*/5 * * * *",
timeout="30s",
)
print(schedule_id)
```
#### Pause/Resume a schedule
```python
from qstash import QStash
client = QStash("")
schedule_id = "scd_1234"
client.schedule.pause(schedule_id)
schedule = client.schedule.get(schedule_id)
print(schedule.paused) # prints True
client.schedule.resume(schedule_id)
```
# URL Groups
Source: https://upstash.com/docs/qstash/sdks/py/examples/url-groups
You can run the async code by importing `AsyncQStash` from `qstash`
and awaiting the methods.
#### Create a URL group and add 2 endpoints
```python
from qstash import QStash
client = QStash("")
client.url_group.upsert_endpoints(
url_group="my-url-group",
endpoints=[
{"url": "https://my-endpoint-1"},
{"url": "https://my-endpoint-2"},
],
)
```
#### Get URL group by name
```python
from qstash import QStash
client = QStash("")
url_group = client.url_group.get("my-url-group")
print(url_group.name, url_group.endpoints)
```
#### List URL groups
```python
from qstash import QStash
client = QStash("")
all_url_groups = client.url_group.list()
for url_group in all_url_groups:
print(url_group.name, url_group.endpoints)
```
#### Remove an endpoint from a URL group
```python
from qstash import QStash
client = QStash("")
client.url_group.remove_endpoints(
url_group="my-url-group",
endpoints=[
{"url": "https://my-endpoint-1"},
],
)
```
#### Delete a URL group
```python
from qstash import QStash
client = QStash("")
client.url_group.delete("my-url-group")
```
# Getting Started
Source: https://upstash.com/docs/qstash/sdks/py/gettingstarted
## Install
### PyPI
```bash
pip install qstash
```
## Get QStash token
Follow the instructions [here](/qstash/overall/getstarted) to get your QStash token and signing keys.
## Usage
#### Synchronous Client
```python
from qstash import QStash
client = QStash("")
client.message.publish_json(...)
```
#### Asynchronous Client
```python
import asyncio
from qstash import AsyncQStash
async def main():
client = AsyncQStash("")
await client.message.publish_json(...)
asyncio.run(main())
```
#### RetryConfig
You can configure the retry policy of the client by passing the configuration to the client constructor.
Note: This isn for sending the request to QStash, not for the retry policy of QStash.
The default number of retries is **5** and the default backoff function is `lambda retry_count: math.exp(retry_count) * 50`.
You can also pass in `False` to disable retrying.
```python
from qstash import QStash
client = QStash(
"",
retry={
"retries": 3,
"backoff": lambda retry_count: (2**retry_count) * 20,
},
)
```
# Overview
Source: https://upstash.com/docs/qstash/sdks/py/overview
`qstash` is an Python SDK for QStash, allowing for easy access to the QStash API.
Using `qstash` you can:
* Publish a message to a URL/URL group/API
* Publish a message with a delay
* Schedule a message to be published
* Access all events
* Create, read, update, or delete URL groups.
* Read or remove messages from the [DLQ](/qstash/features/dlq)
* Read or cancel messages
* Verify the signature of a message
You can find the Github Repository [here](https://github.com/upstash/qstash-py).
# DLQ
Source: https://upstash.com/docs/qstash/sdks/ts/examples/dlq
#### Get all messages with pagination using cursor
Since the DLQ can have a large number of messages, they are paginated.
You can go through the results using the `cursor`.
```typescript
import { Client } from "@upstash/qstash";
const client = new Client("");
const dlq = client.dlq;
const all_messages = [];
let cursor = null;
while (true) {
const res = await dlq.listMessages({ cursor });
all_messages.push(...res.messages);
cursor = res.cursor;
if (!cursor) {
break;
}
}
```
#### Delete a message from the DLQ
```typescript
import { Client } from "@upstash/qstash";
const client = new Client({ token: "" });
const dlq = client.dlq;
await dlq.delete("dlqId");
```
# Events
Source: https://upstash.com/docs/qstash/sdks/ts/examples/events
#### Get all events with pagination using cursor
Since there can be a large number of events, they are paginated.
You can go through the results using the `cursor`.
```typescript
import { Client } from "@upstash/qstash";
const client = new Client({ token: "" });
const allEvents = [];
let cursor = null;
while (true) {
const res = await client.events({ cursor });
allEvents.push(...res.events);
cursor = res.cursor;
if (!cursor) {
break;
}
}
```
#### Filter events by state and only return the first 50.
More filters can be found in the [API Reference](/qstash/api/events/list).
```typescript
import { Client } from "@upstash/qstash";
const client = new Client({ token: "" });
const res = await client.events({
filter: {
state: "DELIVERED",
count: 50
}
});
```
# Messages
Source: https://upstash.com/docs/qstash/sdks/ts/examples/messages
Messages are removed from the database shortly after they're delivered, so you
will not be able to retrieve a message after. This endpoint is intended to be used
for accessing messages that are in the process of being delivered/retried.
#### Retrieve a message
```typescript
import { Client } from "@upstash/qstash";
const client = new Client({ token: "" });
const messages = client.messages
const msg = await messages.get("msgId");
```
#### Cancel/delete a message
```typescript
import { Client } from "@upstash/qstash";
const client = new Client({ token: "" });
const messages = client.messages
const msg = await messages.delete("msgId");
```
#### Cancel messages in bulk
Cancel many messages at once or cancel all messages
```typescript
import { Client } from "@upstash/qstash";
const client = new Client({ token: "" });
// deleting two messages at once
await client.messages.deleteMany([
"message-id-1",
"message-id-2",
])
// deleting all messages
await client.messages.deleteAll()
```
# Overview
Source: https://upstash.com/docs/qstash/sdks/ts/examples/overview
These are example usages of each method in the QStash SDK. You can also reference the
[examples repo](https://github.com/upstash/sdk-qstash-ts/tree/main/examples) and [API examples](/qstash/overall/apiexamples) for more.
# Publish
Source: https://upstash.com/docs/qstash/sdks/ts/examples/publish
#### Publish to a URL with a 3 second delay and headers/body
```typescript
import { Client } from "@upstash/qstash";
const client = new Client({ token: "" });
const res = await client.publishJSON({
url: "https://my-api...",
body: { hello: "world" },
headers: { "test-header": "test-value" },
delay: "3s",
});
```
#### Publish to a URL group with a 3 second delay and headers/body
You create URL group on the QStash console or using the [URL Group API](/qstash/sdks/ts/examples/url-groups#create-a-url-group-and-add-2-endpoints)
```typescript
import { Client } from "@upstash/qstash";
const client = new Client({ token: "" });
const res = await client.publishJSON({
urlGroup: "my-url-group",
body: { hello: "world" },
headers: { "test-header": "test-value" },
delay: "3s",
});
// When publishing to a URL Group, the response is an array of messages for each URL in the URL Group
console.log(res[0].messageId);
```
#### Publish a method with a callback URL
[Callbacks](/qstash/features/callbacks) are useful for long running functions. Here, QStash will return the response
of the publish request to the callback URL.
We also change the `method` to `GET` in this use case so QStash will make a `GET` request to the `url`. The default
is `POST`.
```typescript
import { Client } from "@upstash/qstash";
const client = new Client({ token: "
 You can enter multiple credit cards and set one of them as the default one. The
payments will be charged from the default credit card.
You can enter multiple credit cards and set one of them as the default one. The
payments will be charged from the default credit card.
 ## Payment Security
Upstash does not store users' credit card information in its servers. We use
Stripe Inc payment processing company to handle payments. You can read more
about payment security in Stripe
[here](https://stripe.com/docs/security/stripe).
# Audit Logs
Source: https://upstash.com/docs/common/account/auditlogs
Audit logs give you a chronological set of activity records that have affected
your databases and Upstash account. You can see the list of all activities on a
single page. You can access your audit logs under `Account > Audit Logs` in your
console:
## Payment Security
Upstash does not store users' credit card information in its servers. We use
Stripe Inc payment processing company to handle payments. You can read more
about payment security in Stripe
[here](https://stripe.com/docs/security/stripe).
# Audit Logs
Source: https://upstash.com/docs/common/account/auditlogs
Audit logs give you a chronological set of activity records that have affected
your databases and Upstash account. You can see the list of all activities on a
single page. You can access your audit logs under `Account > Audit Logs` in your
console:
 Here the `Source` column shows if the action has been called by the console or via
an API key. The `Entity` column gives you the name of the resource that has been
affected by the action. For example, when you delete a database, the name of the
database will be shown here. Also, you can see the IP address which performed the
action.
## Security
You can track your audit logs to detect any unusual activity on your account and
databases. When you suspect any security breach, you should delete the API key
related to suspicious activity and inform us by emailing
[support@upstash.com](mailto:support@upstash.com)
## Retention period
After the retention period, the audit logs are deleted. The retention period for free databases is 7 days, for pay-as-you-go databases, it is 30 days, and for the Pro tier, it is one year.
# AWS Marketplace
Source: https://upstash.com/docs/common/account/awsmarketplace
Here the `Source` column shows if the action has been called by the console or via
an API key. The `Entity` column gives you the name of the resource that has been
affected by the action. For example, when you delete a database, the name of the
database will be shown here. Also, you can see the IP address which performed the
action.
## Security
You can track your audit logs to detect any unusual activity on your account and
databases. When you suspect any security breach, you should delete the API key
related to suspicious activity and inform us by emailing
[support@upstash.com](mailto:support@upstash.com)
## Retention period
After the retention period, the audit logs are deleted. The retention period for free databases is 7 days, for pay-as-you-go databases, it is 30 days, and for the Pro tier, it is one year.
# AWS Marketplace
Source: https://upstash.com/docs/common/account/awsmarketplace
 Once you click subscribe, you will be prompted to select which personal or team account you wish to link with your AWS Subscription.
 Once your account is linked, regardless of which Upstash product you use, all of your usage will be billed to your AWS Account. You can also upgrade or downgrade your subscription through Upstash console.
 # Cost Explorer
Source: https://upstash.com/docs/common/account/costexplorer
The Cost Explorer pages allow you to view your current and previous months’ costs. To access the Cost Explorer, navigate to the left menu and select Account > Cost Explorer. Below is an example report:
# Cost Explorer
Source: https://upstash.com/docs/common/account/costexplorer
The Cost Explorer pages allow you to view your current and previous months’ costs. To access the Cost Explorer, navigate to the left menu and select Account > Cost Explorer. Below is an example report:
 You can select a specific month to view the cost breakdown for that period. Here's the explanation of the fields in the report:
**Request:** This represents the total number of requests sent to the database.
**Storage:** This indicates the average size of the total storage consumed. Upstash database includes a persistence layer for data durability. For example, if you have 1 GB of data in your database throughout the entire month, this value will be 1 GB. Even if your database is empty for the first 29 days of the month and then expands to 30 GB on the last day, this value will still be 1 GB.
**Cost:** This field represents the total cost of your database in US Dollars.
> The values for the current month is updated hourly, so values can be stale up
> to 1 hour.
# Create an Account
Source: https://upstash.com/docs/common/account/createaccount
You can sign up for
You can select a specific month to view the cost breakdown for that period. Here's the explanation of the fields in the report:
**Request:** This represents the total number of requests sent to the database.
**Storage:** This indicates the average size of the total storage consumed. Upstash database includes a persistence layer for data durability. For example, if you have 1 GB of data in your database throughout the entire month, this value will be 1 GB. Even if your database is empty for the first 29 days of the month and then expands to 30 GB on the last day, this value will still be 1 GB.
**Cost:** This field represents the total cost of your database in US Dollars.
> The values for the current month is updated hourly, so values can be stale up
> to 1 hour.
# Create an Account
Source: https://upstash.com/docs/common/account/createaccount
You can sign up for  You can download receipt. If one of your payments failed, you can retry your
payment on this page.
# Teams and Users
Source: https://upstash.com/docs/common/account/teams
Team management enables collaboration with other users. You can create a team and invite people to join by using their email addresses. Team members will have access to databases created under the team based on their assigned roles.
You can download receipt. If one of your payments failed, you can retry your
payment on this page.
# Teams and Users
Source: https://upstash.com/docs/common/account/teams
Team management enables collaboration with other users. You can create a team and invite people to join by using their email addresses. Team members will have access to databases created under the team based on their assigned roles.
 ## Create Team
You can create a team using the menu `Account > Teams`
## Create Team
You can create a team using the menu `Account > Teams`

 > A user can create up to 5 teams. You can be part of even more teams but only
> be the owner of 5 teams. If you need to own more teams please email us at
> [support@upstash.com](mailto:support@upstash.com).
You can still continue using your personal account or switch to a team.
> The databases in your personal account are not shared with anyone. If you want
> your database to be accessible by other users, you need to create it under a
> team.
## Switch Team
You need to switch to the team to create databases shared with other team
members. You can switch to the team via the switch button in the team table. Or
you can click your profile pic in the top right and switch to any team listed
there.
> A user can create up to 5 teams. You can be part of even more teams but only
> be the owner of 5 teams. If you need to own more teams please email us at
> [support@upstash.com](mailto:support@upstash.com).
You can still continue using your personal account or switch to a team.
> The databases in your personal account are not shared with anyone. If you want
> your database to be accessible by other users, you need to create it under a
> team.
## Switch Team
You need to switch to the team to create databases shared with other team
members. You can switch to the team via the switch button in the team table. Or
you can click your profile pic in the top right and switch to any team listed
there.
 ## Add/Remove Team Member
After switching to a team, if you are the Owner or an Admin of the team, you can add team members by navigating to `Account > Teams`. Simply enter their email addresses.It's not an issue if the email addresses are not yet registered with Upstash. Once the user registers with that email, they will gain access to the team. We do not send invitations; when you add a member, they become a member directly. You can also remove members from the same page.
> Only Admins or the Owner can add/remove users.
## Add/Remove Team Member
After switching to a team, if you are the Owner or an Admin of the team, you can add team members by navigating to `Account > Teams`. Simply enter their email addresses.It's not an issue if the email addresses are not yet registered with Upstash. Once the user registers with that email, they will gain access to the team. We do not send invitations; when you add a member, they become a member directly. You can also remove members from the same page.
> Only Admins or the Owner can add/remove users.
 ## Roles
While adding a team member, you will need to select a role. Here are the access rights associated with each role:
* Admin: This role has full access, including the ability to add and remove members, manage databases, and payment methods.
* Dev: This role can create, manage, and delete databases but cannot manage users or payment methods.
* Finance: This role is limited to managing payment methods and cannot manage databases or users.
* Owner: The Owner role has all the access rights of an Admin and, in addition to having the ability to delete the team. This role is automatically assigned to the user who created the team, and you cannot assign it to other members.
> If you want to change a user's role, you will need to delete and re-add them with the desired access rights.
## Delete Team
Only the original creator (owner) can delete a team. Also the team should not
have any active databases, namely all databases under the team should be deleted
first. To delete your team, first you need to switch your personal account then
you can delete your team in the team list under `Account > Teams`.
## Roles
While adding a team member, you will need to select a role. Here are the access rights associated with each role:
* Admin: This role has full access, including the ability to add and remove members, manage databases, and payment methods.
* Dev: This role can create, manage, and delete databases but cannot manage users or payment methods.
* Finance: This role is limited to managing payment methods and cannot manage databases or users.
* Owner: The Owner role has all the access rights of an Admin and, in addition to having the ability to delete the team. This role is automatically assigned to the user who created the team, and you cannot assign it to other members.
> If you want to change a user's role, you will need to delete and re-add them with the desired access rights.
## Delete Team
Only the original creator (owner) can delete a team. Also the team should not
have any active databases, namely all databases under the team should be deleted
first. To delete your team, first you need to switch your personal account then
you can delete your team in the team list under `Account > Teams`.
 ### SDKs for Popular Languages
To enhance the developer experience, Upstash is developing SDKs in various popular programming languages. These SDKs simplify the process of integrating Upstash services with your applications by providing straightforward methods and functions that abstract the underlying REST API calls.
### Resources
[Redis REST API Docs](https://upstash.com/docs/redis/features/restapi)
[Kafka REST API Docs](https://upstash.com/docs/kafka/rest/restintro)
[QStash REST API Docs](https://upstash.com/docs/qstash/api/authentication)
[Redis SDK - Typescript](https://github.com/upstash/upstash-redis)
[Redis SDK - Python](https://github.com/upstash/redis-python)
[Kafka SDK - Typescript](https://github.com/upstash/upstash-kafka)
[QStash SDK - Typescript](https://github.com/upstash/sdk-qstash-ts)
# Global Replication
Source: https://upstash.com/docs/common/concepts/global-replication
Fast anywhere.
Upstash Redis replicates your data to user-selected regions. You can add or remove regions from a running cluster without experiencing downtime. Think of each region as a replica that maintains a copy of your data, ensuring low latency and high availability.
## Designed for the Edge Functions
Edge runtimes, such as Cloudflare Workers and Vercel Edge, enhance speed by executing your code at locations closest to your users. However, if your use case involves data storage, it's crucial to position your data store near your users to achieve optimal performance. Upstash Global tackles this need by replicating your data across multiple regions. While edge runtimes come with certain limitations, Upstash provides a HTTP-based Redis® client designed and tested to integrate seamlessly with popular edge runtimes, including Vercel, Cloudflare, Fastly, and Deno.
## Read Regions Everywhere, Low Latency Anywhere
The global database is designed to minimize latency for read operations. It consists of a single primary replica and multiple read replicas. Write commands are sent to and processed by the primary replica, then replicated across all read replicas. When a client issues a read command, it retrieves the response from the nearest read replica based on the region. Conversely, all write requests are directed to the primary replica to maintain consistency.
Our tests indicate sub-millisecond latency for clients located in the same AWS region as the Redis® instance.
**Read operations are processed at the the nearest replica.**
### SDKs for Popular Languages
To enhance the developer experience, Upstash is developing SDKs in various popular programming languages. These SDKs simplify the process of integrating Upstash services with your applications by providing straightforward methods and functions that abstract the underlying REST API calls.
### Resources
[Redis REST API Docs](https://upstash.com/docs/redis/features/restapi)
[Kafka REST API Docs](https://upstash.com/docs/kafka/rest/restintro)
[QStash REST API Docs](https://upstash.com/docs/qstash/api/authentication)
[Redis SDK - Typescript](https://github.com/upstash/upstash-redis)
[Redis SDK - Python](https://github.com/upstash/redis-python)
[Kafka SDK - Typescript](https://github.com/upstash/upstash-kafka)
[QStash SDK - Typescript](https://github.com/upstash/sdk-qstash-ts)
# Global Replication
Source: https://upstash.com/docs/common/concepts/global-replication
Fast anywhere.
Upstash Redis replicates your data to user-selected regions. You can add or remove regions from a running cluster without experiencing downtime. Think of each region as a replica that maintains a copy of your data, ensuring low latency and high availability.
## Designed for the Edge Functions
Edge runtimes, such as Cloudflare Workers and Vercel Edge, enhance speed by executing your code at locations closest to your users. However, if your use case involves data storage, it's crucial to position your data store near your users to achieve optimal performance. Upstash Global tackles this need by replicating your data across multiple regions. While edge runtimes come with certain limitations, Upstash provides a HTTP-based Redis® client designed and tested to integrate seamlessly with popular edge runtimes, including Vercel, Cloudflare, Fastly, and Deno.
## Read Regions Everywhere, Low Latency Anywhere
The global database is designed to minimize latency for read operations. It consists of a single primary replica and multiple read replicas. Write commands are sent to and processed by the primary replica, then replicated across all read replicas. When a client issues a read command, it retrieves the response from the nearest read replica based on the region. Conversely, all write requests are directed to the primary replica to maintain consistency.
Our tests indicate sub-millisecond latency for clients located in the same AWS region as the Redis® instance.
**Read operations are processed at the the nearest replica.**
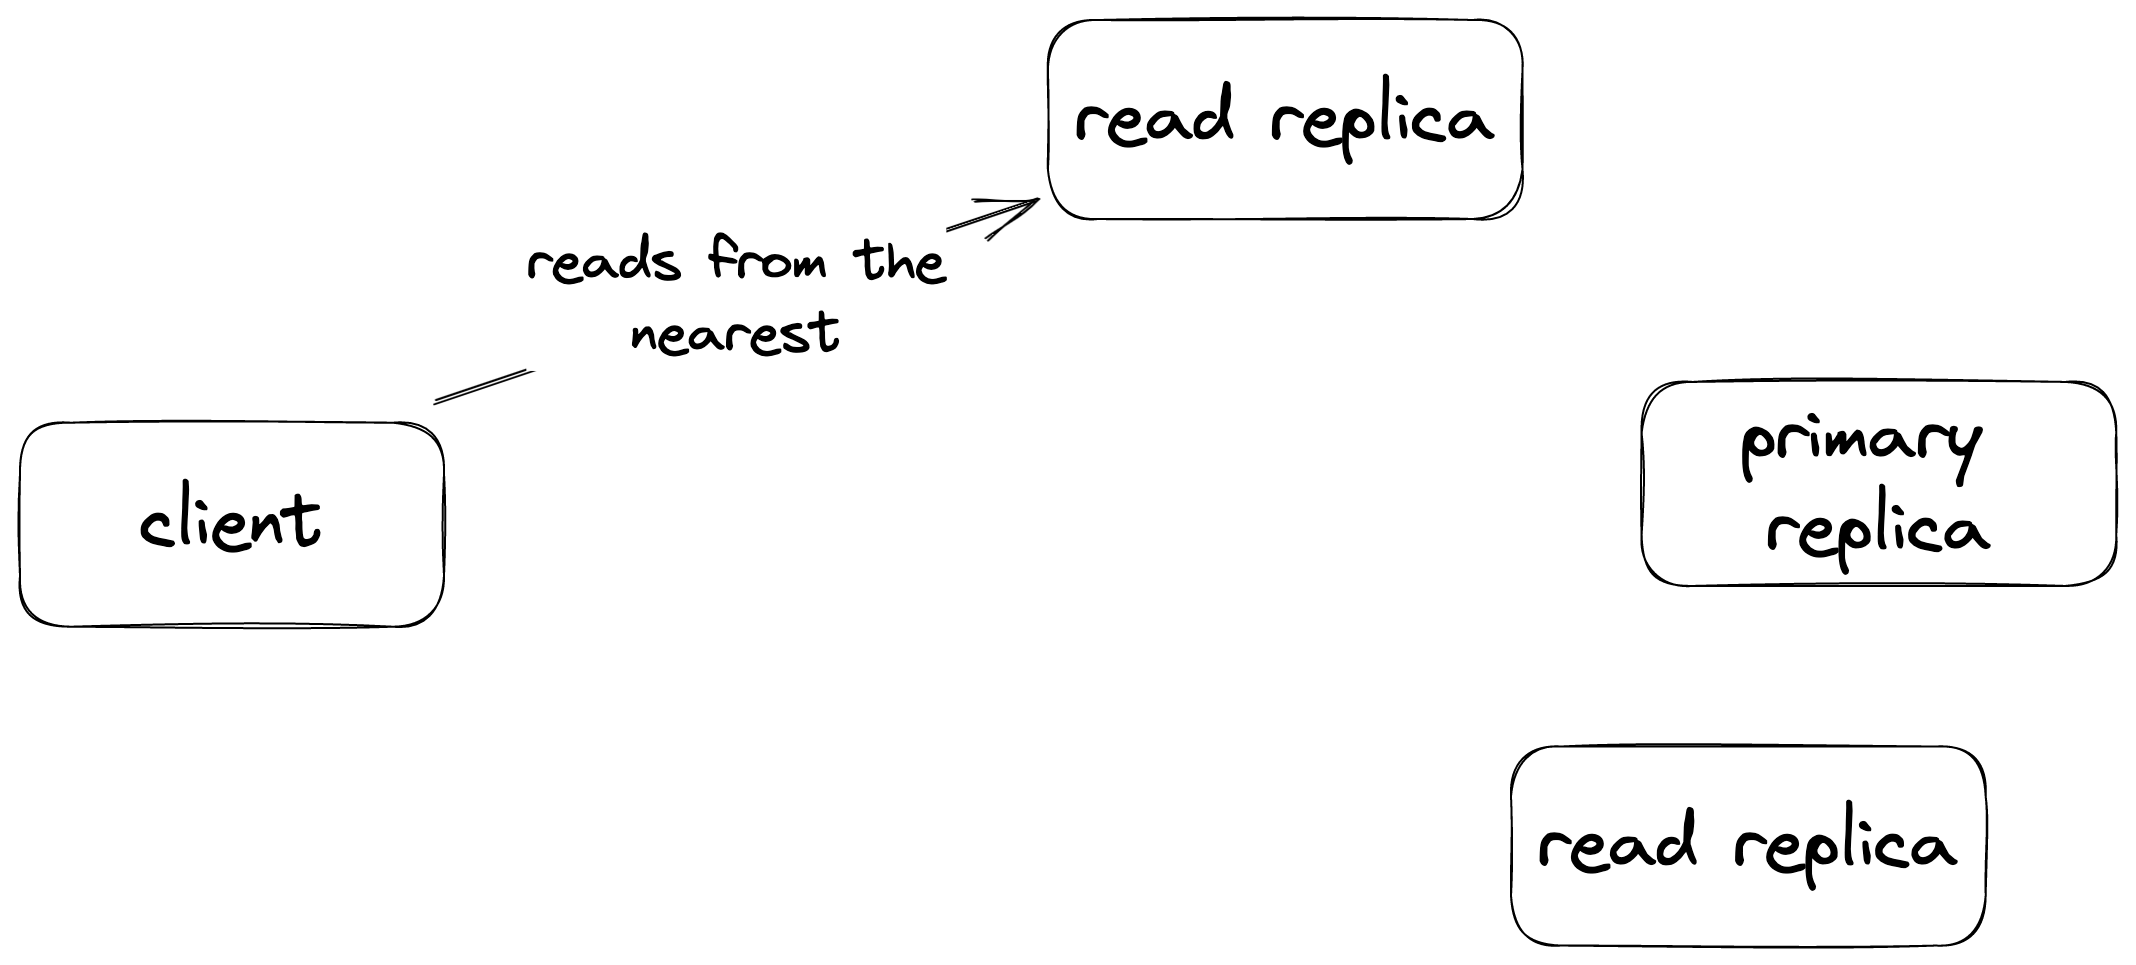 **Writes are processed at the primary replica.**
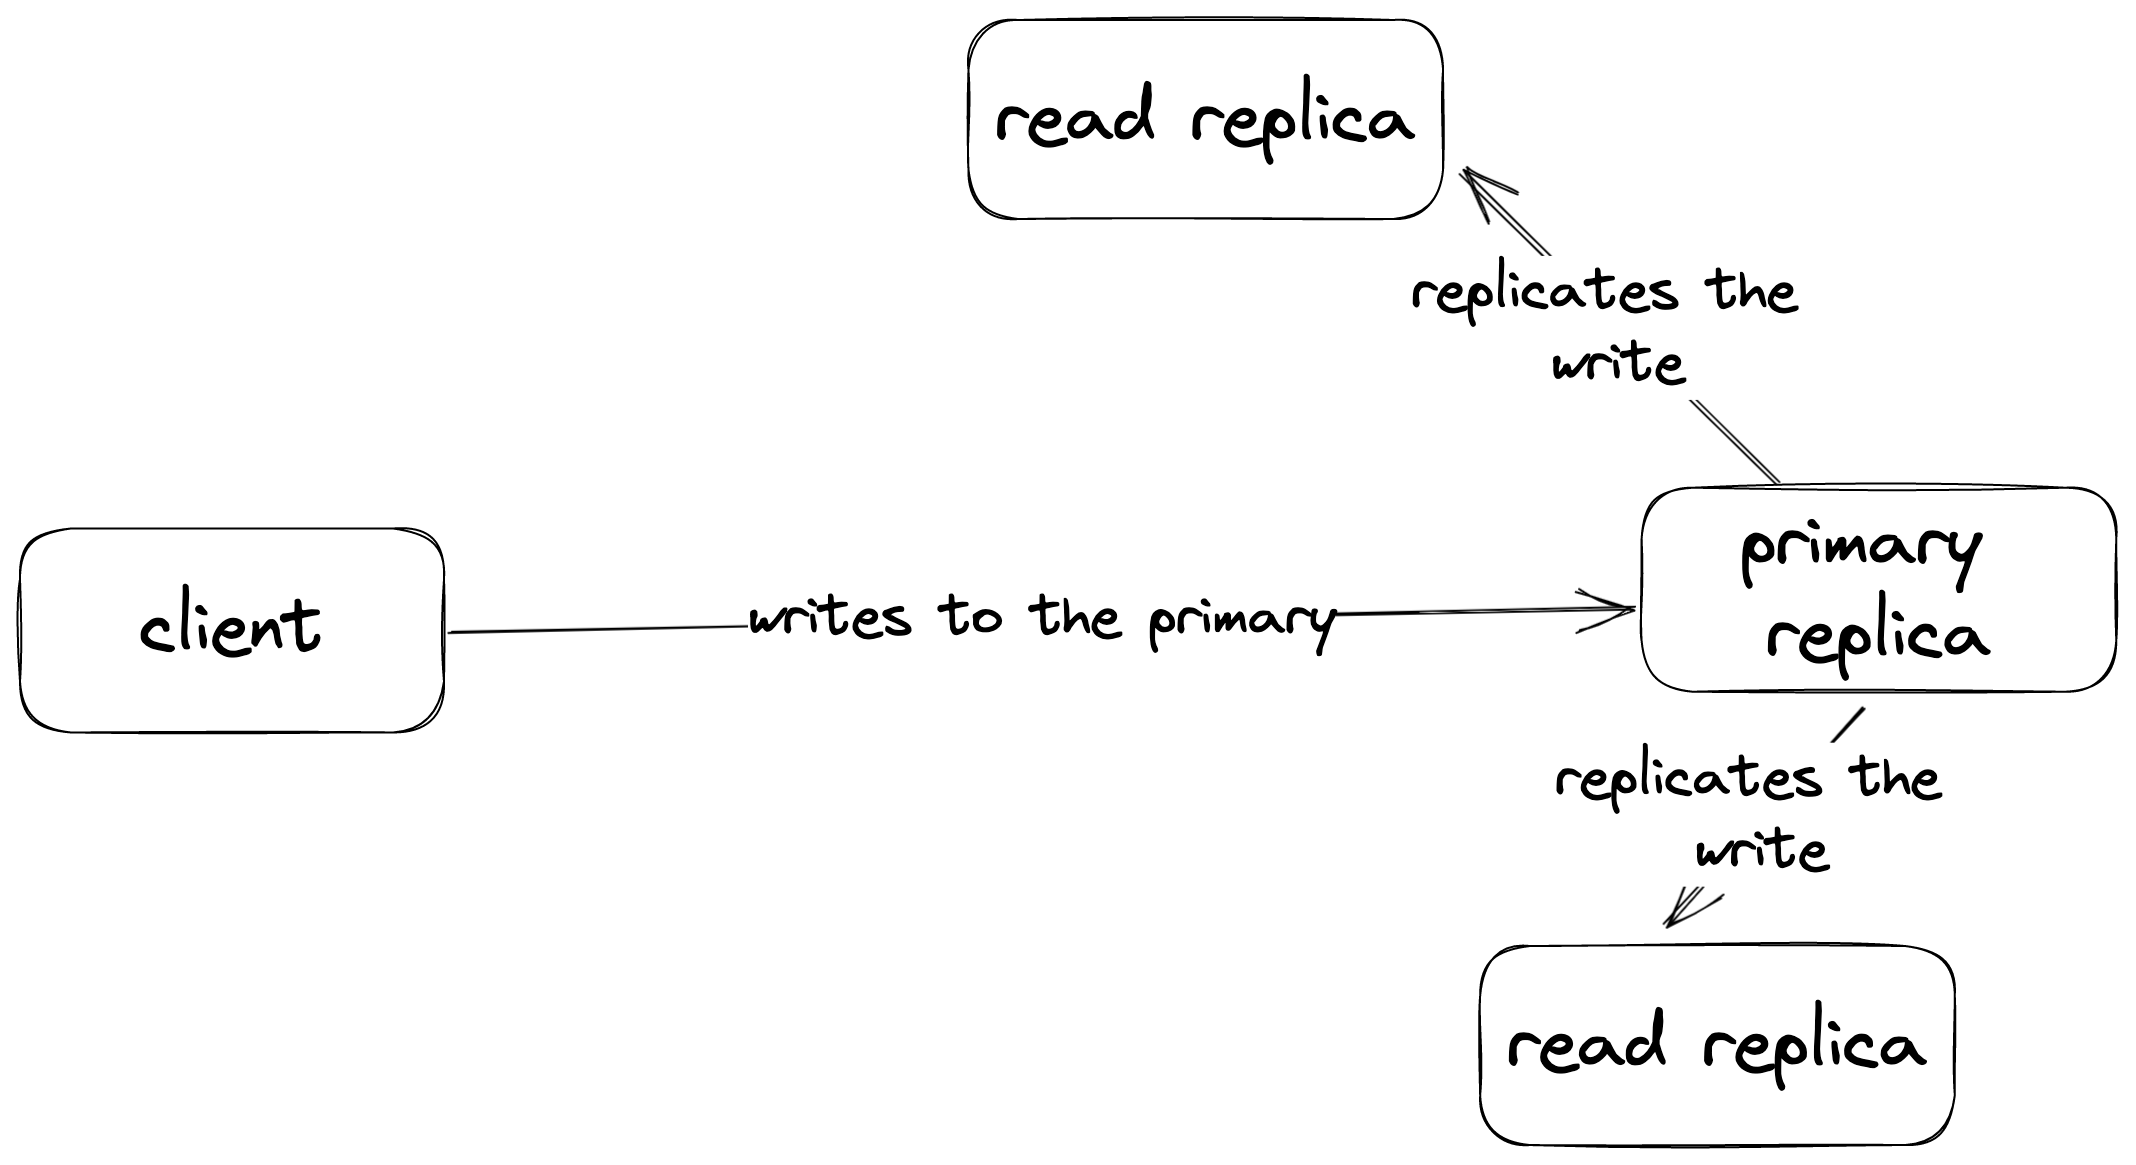 ## Choose your regions
The global database requires you to choose primary and read regions:
→ Choose a primary region where your write operations will take place to ensure faster write speeds.
→ Select read regions that are closest to the majority of your user base for optimized read speeds.
Below are the supported regions:
* AWS US-East-1 (North Virginia)
* AWS US-West-1 (North California)
* AWS US-West-2 (Oregon)
* AWS EU-West-1 (Ireland)
* AWS EU-Central-1 (Frankfurt)
* AWS AP-Southeast-1 (Singapore)
* AWS AP-Southeast-2 (Sydney)
* AWS SA-East-1 (São Paulo)
## Choose your regions
The global database requires you to choose primary and read regions:
→ Choose a primary region where your write operations will take place to ensure faster write speeds.
→ Select read regions that are closest to the majority of your user base for optimized read speeds.
Below are the supported regions:
* AWS US-East-1 (North Virginia)
* AWS US-West-1 (North California)
* AWS US-West-2 (Oregon)
* AWS EU-West-1 (Ireland)
* AWS EU-Central-1 (Frankfurt)
* AWS AP-Southeast-1 (Singapore)
* AWS AP-Southeast-2 (Sydney)
* AWS SA-East-1 (São Paulo)
 Check out [our blog post](https://upstash.com/blog/global-database) to learn more about. Also see our [live benchmark](https://latency.upstash.com/) to check the latency number from different locations.
# Scale to Zero
Source: https://upstash.com/docs/common/concepts/scale-to-zero
Only pay for what you really use.
Traditionally, cloud services required users to predict their resource needs and provision servers or instances based on those predictions. This often led to over-provisioning to handle potential peak loads, resulting in paying for unused resources during periods of low demand.
By *scaling to zero*, our pricing model aligns more closely with actual usage.
## Pay for usage
You're only charged for the resources you actively use. When your application experiences low activity or no incoming requests, the system automatically scales down resources to a minimal level. This means you're no longer paying for idle capacity, resulting in cost savings.
Check out [our blog post](https://upstash.com/blog/global-database) to learn more about. Also see our [live benchmark](https://latency.upstash.com/) to check the latency number from different locations.
# Scale to Zero
Source: https://upstash.com/docs/common/concepts/scale-to-zero
Only pay for what you really use.
Traditionally, cloud services required users to predict their resource needs and provision servers or instances based on those predictions. This often led to over-provisioning to handle potential peak loads, resulting in paying for unused resources during periods of low demand.
By *scaling to zero*, our pricing model aligns more closely with actual usage.
## Pay for usage
You're only charged for the resources you actively use. When your application experiences low activity or no incoming requests, the system automatically scales down resources to a minimal level. This means you're no longer paying for idle capacity, resulting in cost savings.
 ## Flexibility
"Scaling to zero" offers flexibility in scaling both up and down. As your application experiences traffic spikes, the system scales up resources to meet demand. Conversely, during quiet periods, resources scale down.
## Focus on Innovation
Developers can concentrate on building and improving the application without constantly worrying about resource optimization. Upstash handles the scaling, allowing developers to focus on creating features that enhance user experiences.
In essence, this aligns pricing with actual utilization, increases cost efficiency, and promotes a more sustainable approach to resource consumption. This model empowers businesses to leverage cloud resources without incurring unnecessary expenses, making cloud computing more accessible and attractive to a broader range of organizations.
# Serverless
Source: https://upstash.com/docs/common/concepts/serverless
What do we mean by serverless?
Upstash is a modern serverless data platform. But what do we mean by serverless?
## No Server Management
In a serverless setup, developers don't need to worry about configuring or managing servers. We take care of server provisioning, scaling, and maintenance.
## Automatic Scaling
As traffic or demand increases, Upstash automatically scales the required resources to handle the load. This means applications can handle sudden spikes in traffic without manual intervention.
## Granular Billing
We charge based on the actual usage of resources rather than pre-allocated capacity. This can lead to more cost-effective solutions, as users only pay for what they consume. [Read more](/common/concepts/scale-to-zero)
## Stateless Functions
In serverless architectures, functions are typically stateless. However, the traditional approach involves establishing long-lived connections to databases, which can lead to issues in serverless environments if connections aren't properly managed after use. Additionally, there are scenarios where TCP connections may not be feasible. Upstash addresses this issue by offering access via HTTP, a universally available protocol across all platforms.
## Rapid Deployment
Fast iteration is the key to success in today's competitive environment. You can create a new Upstash database in seconds, with minimal required configuration.
# Account & Teams
Source: https://upstash.com/docs/common/help/account
## Create an Account
You can sign up to
## Flexibility
"Scaling to zero" offers flexibility in scaling both up and down. As your application experiences traffic spikes, the system scales up resources to meet demand. Conversely, during quiet periods, resources scale down.
## Focus on Innovation
Developers can concentrate on building and improving the application without constantly worrying about resource optimization. Upstash handles the scaling, allowing developers to focus on creating features that enhance user experiences.
In essence, this aligns pricing with actual utilization, increases cost efficiency, and promotes a more sustainable approach to resource consumption. This model empowers businesses to leverage cloud resources without incurring unnecessary expenses, making cloud computing more accessible and attractive to a broader range of organizations.
# Serverless
Source: https://upstash.com/docs/common/concepts/serverless
What do we mean by serverless?
Upstash is a modern serverless data platform. But what do we mean by serverless?
## No Server Management
In a serverless setup, developers don't need to worry about configuring or managing servers. We take care of server provisioning, scaling, and maintenance.
## Automatic Scaling
As traffic or demand increases, Upstash automatically scales the required resources to handle the load. This means applications can handle sudden spikes in traffic without manual intervention.
## Granular Billing
We charge based on the actual usage of resources rather than pre-allocated capacity. This can lead to more cost-effective solutions, as users only pay for what they consume. [Read more](/common/concepts/scale-to-zero)
## Stateless Functions
In serverless architectures, functions are typically stateless. However, the traditional approach involves establishing long-lived connections to databases, which can lead to issues in serverless environments if connections aren't properly managed after use. Additionally, there are scenarios where TCP connections may not be feasible. Upstash addresses this issue by offering access via HTTP, a universally available protocol across all platforms.
## Rapid Deployment
Fast iteration is the key to success in today's competitive environment. You can create a new Upstash database in seconds, with minimal required configuration.
# Account & Teams
Source: https://upstash.com/docs/common/help/account
## Create an Account
You can sign up to 

 3. Enter a name for your key. You can not use the same name for multiple keys.

 You need to download or copy/save your API key. Upstash does not remember or
keep your API for security reasons. So if you forget your API key, it becomes
useless; you need to create a new one.
You need to download or copy/save your API key. Upstash does not remember or
keep your API for security reasons. So if you forget your API key, it becomes
useless; you need to create a new one.
 ### Create the Connector
Go to the Connectors tab, and create your first connector by clicking the **New
Connector** button.
### Create the Connector
Go to the Connectors tab, and create your first connector by clicking the **New
Connector** button.
 Choose your connector as **Aiven Http Sink Connector**
 Enter the required properties.
 The advanced screen is for any other configuration that the selected connector
supports. At the top of this screen, you can find a link to related
documentation. We can proceed with what we have and click the **Connect** button
directly.
The advanced screen is for any other configuration that the selected connector
supports. At the top of this screen, you can find a link to related
documentation. We can proceed with what we have and click the **Connect** button
directly.
 Congratulations! You have created an Aiven Http Sink Connector.
As you put data into your selected topics, the requests should be visible in
[webhook.site](https://webhook.site/)
Congratulations! You have created an Aiven Http Sink Connector.
As you put data into your selected topics, the requests should be visible in
[webhook.site](https://webhook.site/)
 # Supported Drivers
Source: https://upstash.com/docs/kafka/connect/aivenjdbcdrivers
# Supported Drivers
Source: https://upstash.com/docs/kafka/connect/aivenjdbcdrivers
 Enter the required properties.
 The advanced screen is for any other configuration that the selected connector
supports. At the top of this screen, you can find a link to related
documentation. We can proceed with what we have and click the **Connect** button
directly.
The advanced screen is for any other configuration that the selected connector
supports. At the top of this screen, you can find a link to related
documentation. We can proceed with what we have and click the **Connect** button
directly.
 Congratulations! You have created an Aiven JDBC Sink Connector.
As you put data into your selected topics, the data will be written into your
relational database.
## Supported Databases
Congratulations! You have created an Aiven JDBC Sink Connector.
As you put data into your selected topics, the data will be written into your
relational database.
## Supported Databases
 The advanced screen is for any other configuration that the selected connector
supports. At the top of this screen, you can find a link to related
documentation. We can proceed with what we have and click the **Connect** button
directly.
The advanced screen is for any other configuration that the selected connector
supports. At the top of this screen, you can find a link to related
documentation. We can proceed with what we have and click the **Connect** button
directly.
 Congratulations! You have created an Aiven JDBC Source Connector. As you put
data into your relational database, your topics will be created and populated
with new data.
You can go to the **Messages** section to see latest events as they are coming
from Kafka.
## Supported Databases
Congratulations! You have created an Aiven JDBC Source Connector. As you put
data into your relational database, your topics will be created and populated
with new data.
You can go to the **Messages** section to see latest events as they are coming
from Kafka.
## Supported Databases
 Don't forget to save the deployment credentials. We need them to create the
connector later.
Don't forget to save the deployment credentials. We need them to create the
connector later.
 Lastly, we need the connection endpoint. Click on your deployment to see the
details and click to the "Copy Endpoint" of Elasticsearch in Applications
section.
Lastly, we need the connection endpoint. Click on your deployment to see the
details and click to the "Copy Endpoint" of Elasticsearch in Applications
section.
 These three(username, password, and endpoint) should be enough to create the
connector.
### Create the Connector
Go to the Connectors tab, and create your first connector by clicking the **New
Connector** button.
These three(username, password, and endpoint) should be enough to create the
connector.
### Create the Connector
Go to the Connectors tab, and create your first connector by clicking the **New
Connector** button.
 Enter the required properties.
 The advanced screen is for any other configuration that the selected connector
supports. At the top of this screen, you can find a link to related
documentation. We can proceed with what we have and click the **Connect** button
directly.
The advanced screen is for any other configuration that the selected connector
supports. At the top of this screen, you can find a link to related
documentation. We can proceed with what we have and click the **Connect** button
directly.
 Congratulations! You have created an OpenSearch Sink Connector.
As you put data into your selected topics, the data will be written into
ElasticSearch.
# Aiven Amazon S3 Sink Connector
Source: https://upstash.com/docs/kafka/connect/aivens3sink
Congratulations! You have created an OpenSearch Sink Connector.
As you put data into your selected topics, the data will be written into
ElasticSearch.
# Aiven Amazon S3 Sink Connector
Source: https://upstash.com/docs/kafka/connect/aivens3sink
 To make this guide simple, we will allow public access to this bucket(not
recommended in production).
To make this guide simple, we will allow public access to this bucket(not
recommended in production).
 You can disable public access and allow only following IP's coming from Upstash
:
```
52.48.149.7
52.213.40.91
174.129.75.41
34.195.190.47
52.58.175.235
18.158.44.120
63.34.151.162
54.247.137.96
3.78.151.126
3.124.80.204
34.236.200.33
44.195.74.73
```
Aside from bucket name and public access changes, default configurations should
be fine for this guide.
Next, we will create a user account with permissions to modify S3 buckets Go to
[AWS IAM](https://console.aws.amazon.com/iam) , then "Access Management" and
"Users". Click on "Add Users".
You can disable public access and allow only following IP's coming from Upstash
:
```
52.48.149.7
52.213.40.91
174.129.75.41
34.195.190.47
52.58.175.235
18.158.44.120
63.34.151.162
54.247.137.96
3.78.151.126
3.124.80.204
34.236.200.33
44.195.74.73
```
Aside from bucket name and public access changes, default configurations should
be fine for this guide.
Next, we will create a user account with permissions to modify S3 buckets Go to
[AWS IAM](https://console.aws.amazon.com/iam) , then "Access Management" and
"Users". Click on "Add Users".
 Give a name to the user and continue with the next screen.
 On the "Set Permissions" screen, we will give the "AmazonFullS3Access" to this
user.
This gives more permissions than needed. You can create a custom policy with
following json for more restrictive policy.
```
{
"Version": "2012-10-17",
"Statement": [
{
"Sid": "VisualEditor0",
"Effect": "Allow",
"Action": [
"s3:PutObject",
"s3:GetObject",
"s3:ListBucketMultipartUploads",
"s3:AbortMultipartUpload",
"s3:ListMultipartUploadParts"
],
"Resource": "*"
}
]
}
```
After creating the user, we will go into the details of that user to create a
key. Click on the user, then go to the "Security Credentials". An the "Access
Keys" section, click on the "Create access key" button.
On the "Set Permissions" screen, we will give the "AmazonFullS3Access" to this
user.
This gives more permissions than needed. You can create a custom policy with
following json for more restrictive policy.
```
{
"Version": "2012-10-17",
"Statement": [
{
"Sid": "VisualEditor0",
"Effect": "Allow",
"Action": [
"s3:PutObject",
"s3:GetObject",
"s3:ListBucketMultipartUploads",
"s3:AbortMultipartUpload",
"s3:ListMultipartUploadParts"
],
"Resource": "*"
}
]
}
```
After creating the user, we will go into the details of that user to create a
key. Click on the user, then go to the "Security Credentials". An the "Access
Keys" section, click on the "Create access key" button.

 We will choose "Application running outside AWS" and create the access key.
Don't forget to store access key id and secret key. We will use these two when
creating the connector.
### Create the Connector
Go to the Connectors tab, and create your first connector by clicking the **New
Connector** button.
We will choose "Application running outside AWS" and create the access key.
Don't forget to store access key id and secret key. We will use these two when
creating the connector.
### Create the Connector
Go to the Connectors tab, and create your first connector by clicking the **New
Connector** button.
 Enter the required properties.
 The advanced screen is for any other configuration that the selected connector
supports. At the top of this screen, you can find a link to related
documentation. We can proceed with what we have and click the **Connect** button
directly.
The advanced screen is for any other configuration that the selected connector
supports. At the top of this screen, you can find a link to related
documentation. We can proceed with what we have and click the **Connect** button
directly.
 Congratulations! You have created an Aiven Amazon S3 Sink Connector.
As you put data into your selected topics, the data will be written into Amazon
S3. You can see the data coming from your related bucket in the Amazon Console.
Congratulations! You have created an Aiven Amazon S3 Sink Connector.
As you put data into your selected topics, the data will be written into Amazon
S3. You can see the data coming from your related bucket in the Amazon Console.
 # Google BigQuery Sink Connector
Source: https://upstash.com/docs/kafka/connect/bigquerysink
# Google BigQuery Sink Connector
Source: https://upstash.com/docs/kafka/connect/bigquerysink
 Create a dataset for the project. Note that this dataset name will be used later
to configure the connector.
Create a dataset for the project. Note that this dataset name will be used later
to configure the connector.
 Default configurations should be fine for this guide.
 Next, we will create a service account which later we will connect to this
project. Go to [Google Cloud Console](https://console.cloud.google.com/), then
"IAM & admin" and "Service accounts"
Next, we will create a service account which later we will connect to this
project. Go to [Google Cloud Console](https://console.cloud.google.com/), then
"IAM & admin" and "Service accounts"
 Click on "Create Service Account".
 Give a name to your service account.
 Configure permissions for the service account. To keep it simple, we will make
this service account "Owner" to allow everything. You may want to be more
specific.
Configure permissions for the service account. To keep it simple, we will make
this service account "Owner" to allow everything. You may want to be more
specific.
 The rest of the config can be left empty. After creating the service account, we
will go to its settings to attach a key to it. Go to the "Actions" tab, and
select "Manage keys".
The rest of the config can be left empty. After creating the service account, we
will go to its settings to attach a key to it. Go to the "Actions" tab, and
select "Manage keys".
 Then create a new key, if you don't have one already. We will select the "JSON"
key type as recommended.
Then create a new key, if you don't have one already. We will select the "JSON"
key type as recommended.
 We will use the content of this JSON file when creating the connector. For
reference it should look something like this:
```json
{
"type": "service_account",
"project_id": "bigquerysinkproject",
"private_key_id": "b5e8b29ed62171aaaa2b5045f04826635bcf78c4",
"private_key": "-----BEGIN PRIVATE A_LONG_PRIVATE_KEY_WILL_BE_HERE PRIVATE KEY-----\n",
"client_email": "serviceforbigquerysink@bigquerysinkproject.iam.gserviceaccount.com",
"client_id": "109444138898162952667",
"auth_uri": "https://accounts.google.com/o/oauth2/auth",
"token_uri": "https://oauth2.googleapis.com/token",
"auth_provider_x509_cert_url": "https://www.googleapis.com/oauth2/v1/certs",
"client_x509_cert_url": "https://www.googleapis.com/robot/v1/metadata/x509/serviceforbigquerysink%40bigquerysinkproject.iam.gserviceaccount.com"
}
```
Then we need to give permission to this service account from the dataset that we
created. From [BigQuery Console](https://console.cloud.google.com/bigquery) go
to your dataset settings and click share.
We will use the content of this JSON file when creating the connector. For
reference it should look something like this:
```json
{
"type": "service_account",
"project_id": "bigquerysinkproject",
"private_key_id": "b5e8b29ed62171aaaa2b5045f04826635bcf78c4",
"private_key": "-----BEGIN PRIVATE A_LONG_PRIVATE_KEY_WILL_BE_HERE PRIVATE KEY-----\n",
"client_email": "serviceforbigquerysink@bigquerysinkproject.iam.gserviceaccount.com",
"client_id": "109444138898162952667",
"auth_uri": "https://accounts.google.com/o/oauth2/auth",
"token_uri": "https://oauth2.googleapis.com/token",
"auth_provider_x509_cert_url": "https://www.googleapis.com/oauth2/v1/certs",
"client_x509_cert_url": "https://www.googleapis.com/robot/v1/metadata/x509/serviceforbigquerysink%40bigquerysinkproject.iam.gserviceaccount.com"
}
```
Then we need to give permission to this service account from the dataset that we
created. From [BigQuery Console](https://console.cloud.google.com/bigquery) go
to your dataset settings and click share.
 The "Dataset Permissions" view will open. Click to "Add Principal" We will add
the service account we have created as a principal here. And we will assign the
"Owner" role to it to make this example simple. You may want to be more specific
here.
The "Dataset Permissions" view will open. Click to "Add Principal" We will add
the service account we have created as a principal here. And we will assign the
"Owner" role to it to make this example simple. You may want to be more specific
here.
 With this step, the BigQuery dataset should be ready to use with the connector.
### Create the Connector
Go to the Connectors tab, and create your first connector by clicking the **New
Connector** button.
With this step, the BigQuery dataset should be ready to use with the connector.
### Create the Connector
Go to the Connectors tab, and create your first connector by clicking the **New
Connector** button.
 Enter the required properties.
 Note that the Google BigQuery Connector expects the data to have a schema. That
is why we choose JsonConvertor with schema included. Alternatively AvroConvertor
with SchemaRegistry can be used as well.
The advanced screen is for any other configuration that the selected connector
supports. At the top of this screen, you can find a link to related
documentation. We can proceed with what we have and click the **Connect** button
directly.
Note that the Google BigQuery Connector expects the data to have a schema. That
is why we choose JsonConvertor with schema included. Alternatively AvroConvertor
with SchemaRegistry can be used as well.
The advanced screen is for any other configuration that the selected connector
supports. At the top of this screen, you can find a link to related
documentation. We can proceed with what we have and click the **Connect** button
directly.
 Congratulations! You have created a Google BigQuery Sink Connector.
As you put data into your selected topics, the data will be written into Google
BigQuery. You can view it from the Google BigQuery Console.
Congratulations! You have created a Google BigQuery Sink Connector.
As you put data into your selected topics, the data will be written into Google
BigQuery. You can view it from the Google BigQuery Console.
 # Supported Connect Plugins
Source: https://upstash.com/docs/kafka/connect/connectplugins
# Supported Connect Plugins
Source: https://upstash.com/docs/kafka/connect/connectplugins
 Enter a connector name and MongoDB URI(connection string). Other configurations
are optional. We will skip them for now.
Enter a connector name and MongoDB URI(connection string). Other configurations
are optional. We will skip them for now.
 The advanced screen is for any other configuration that the selected connector
supports. At the top of this screen, you can find a link to related
documentation.
The advanced screen is for any other configuration that the selected connector
supports. At the top of this screen, you can find a link to related
documentation.
 Congratulations! You have created a Debezium MongoDB Source Connector to Kafka.
Note that no topics will be created until some data is available on the MongoDB
database.
You can go to **Messages** section of the related topic to see latest events as
they are coming from Kafka.
# Debezium Mysql Source Connector
Source: https://upstash.com/docs/kafka/connect/debeziummysql
Congratulations! You have created a Debezium MongoDB Source Connector to Kafka.
Note that no topics will be created until some data is available on the MongoDB
database.
You can go to **Messages** section of the related topic to see latest events as
they are coming from Kafka.
# Debezium Mysql Source Connector
Source: https://upstash.com/docs/kafka/connect/debeziummysql
 Enter the required properties.
 The advanced screen is for any other configuration that the selected connector
supports. At the top of this screen, you can find a link to related
documentation. We can proceed with what we have and click the **Connect** button
directly.
The advanced screen is for any other configuration that the selected connector
supports. At the top of this screen, you can find a link to related
documentation. We can proceed with what we have and click the **Connect** button
directly.
 Congratulations! You have created a Debezium Mysql Source Connector. As you put
data into your Mysql DB, you will see that topics prefixed with given **Server
Name** will be created and populated with new data.
You can go to **Messages** section to see latest events as they are coming from
Kafka.
# Debezium PostgreSQL Source Connector
Source: https://upstash.com/docs/kafka/connect/debeziumpsql
Congratulations! You have created a Debezium Mysql Source Connector. As you put
data into your Mysql DB, you will see that topics prefixed with given **Server
Name** will be created and populated with new data.
You can go to **Messages** section to see latest events as they are coming from
Kafka.
# Debezium PostgreSQL Source Connector
Source: https://upstash.com/docs/kafka/connect/debeziumpsql
 Enter the required properties.
 The advanced screen is for any other configuration that the selected connector
supports. At the top of this screen, you can find a link to related
documentation. We can proceed with what we have and click the **Connect** button
directly.
The advanced screen is for any other configuration that the selected connector
supports. At the top of this screen, you can find a link to related
documentation. We can proceed with what we have and click the **Connect** button
directly.
 Congratulations! You have created a Debezium PostgreSQL Source Connector. As you
put data into your PostgreSQL DB, you will see that related topics will be
created and populated with new data.
You can go to **Messages** section to see latest events as they are coming from
Kafka.
# Deprecation Notice
Source: https://upstash.com/docs/kafka/connect/deprecation
As of April 2024, Kafka Connectors are deprecated and will be removed in October, 1st 2024. Please check our [blog post](https://upstash.com/blog/kafka-connectors-deprecation) for more information.
If you were previously using Kafka Connect provided by Upstash, please follow [this guide](https://github.com/upstash/kafka-connectors?tab=readme-ov-file#migration-guide-from-upstash-kafka-connect) to migrate to your own self-hosted Kafka Connect.
If you have any questions or need further assistance, reach out to us at [support@upstash.com](mailto:support@upstash.com) or join our community on [Discord](https://upstash.com/discord).
# Introduction
Source: https://upstash.com/docs/kafka/connect/intro
Congratulations! You have created a Debezium PostgreSQL Source Connector. As you
put data into your PostgreSQL DB, you will see that related topics will be
created and populated with new data.
You can go to **Messages** section to see latest events as they are coming from
Kafka.
# Deprecation Notice
Source: https://upstash.com/docs/kafka/connect/deprecation
As of April 2024, Kafka Connectors are deprecated and will be removed in October, 1st 2024. Please check our [blog post](https://upstash.com/blog/kafka-connectors-deprecation) for more information.
If you were previously using Kafka Connect provided by Upstash, please follow [this guide](https://github.com/upstash/kafka-connectors?tab=readme-ov-file#migration-guide-from-upstash-kafka-connect) to migrate to your own self-hosted Kafka Connect.
If you have any questions or need further assistance, reach out to us at [support@upstash.com](mailto:support@upstash.com) or join our community on [Discord](https://upstash.com/discord).
# Introduction
Source: https://upstash.com/docs/kafka/connect/intro

 From here, you will be redirected to Database Deployments screen. Go to
`Connect` and select `Connect your application` to find the MongoDB
URI(connection string). Copy this string to use later when creating our Kafka
Connector. Don't forget to replace the password that you selected earlier for
your MongoDB user.
From here, you will be redirected to Database Deployments screen. Go to
`Connect` and select `Connect your application` to find the MongoDB
URI(connection string). Copy this string to use later when creating our Kafka
Connector. Don't forget to replace the password that you selected earlier for
your MongoDB user.
 ### Create the Connector
Head over to [console.upstash.com](https://console.upstash.com) and select
your Kafka cluster. Go the Connectors tab, and create your first connector with
`New Connector` button.
### Create the Connector
Head over to [console.upstash.com](https://console.upstash.com) and select
your Kafka cluster. Go the Connectors tab, and create your first connector with
`New Connector` button.
 Choose a connector name and enter MongoDB URI(connection string) that we
prepared earlier in Config screen. Other configurations are optional. We will
skip them for now.
Choose a connector name and enter MongoDB URI(connection string) that we
prepared earlier in Config screen. Other configurations are optional. We will
skip them for now.
 Advanced screen is for any other configuration that selected Connector supports.
At the top of this screen, you can find a link to related documentation. For
this example, we can proceed with what we have and click `Connect` button
directly.
Advanced screen is for any other configuration that selected Connector supports.
At the top of this screen, you can find a link to related documentation. For
this example, we can proceed with what we have and click `Connect` button
directly.
 Congratulations you have created your first source connector to Kafka. Note that
no topics will be created until some data is available on the MongoDB.
### See It In Action
With this setup, anything that you have introduced in your MongoDB will be
available on your Kafka topic immediately.
Lets go to MongoDB and populate it with some data.
From main `Database` screen, choose `Browse Collections` , and then click
`Add My Own Data`. Create your database in the next screen.
Congratulations you have created your first source connector to Kafka. Note that
no topics will be created until some data is available on the MongoDB.
### See It In Action
With this setup, anything that you have introduced in your MongoDB will be
available on your Kafka topic immediately.
Lets go to MongoDB and populate it with some data.
From main `Database` screen, choose `Browse Collections` , and then click
`Add My Own Data`. Create your database in the next screen.
 Select `Insert Document` on the right.
 And lets put some data here.
 Shortly, we should see a topic created in Upstash Console Kafka with
`DATABASE_NAME.COLLECTION_NAME` in MongoDB database.
Shortly, we should see a topic created in Upstash Console Kafka with
`DATABASE_NAME.COLLECTION_NAME` in MongoDB database.
 After selecting the topic, you can go to `Messages` section to see latest events
as they are coming from Kafka.
## Next
Check our list of available connectors and how to use them from following links:
* [MongoDB Source Connector](./mongosource)
* [MongoDB Sink Connector](./mongosink)
* [Debezium MongoDB Source Connector](./debeziummongo)
* [Debezium MysqlDB Source Connector](./debeziummysql)
* [Debezium PostgreSql Source Connector](./debeziumpsql)
* [Aiven JDBC Source Connector](./aivenjdbcsource)
* [Aiven JDBC Sink Connector](./aivenjdbcsink)
* [Google BigQuery Sink Connector](./bigquerysink)
* [Aiven Amazon S3 Sink Connector](./aivens3sink)
* [Aiven OpenSearch(Elasticsearch) Sink Connector](./aivenopensearchsink)
* [Aiven Http Sink Connector](./aivenhttpsink)
* [Snowflake Sink Connector](./snowflakesink)
If the connector that you need is not in this list, please add a request to our
[Road Map](https://roadmap.upstash.com/)
# MongoDB Sink Connector
Source: https://upstash.com/docs/kafka/connect/mongosink
After selecting the topic, you can go to `Messages` section to see latest events
as they are coming from Kafka.
## Next
Check our list of available connectors and how to use them from following links:
* [MongoDB Source Connector](./mongosource)
* [MongoDB Sink Connector](./mongosink)
* [Debezium MongoDB Source Connector](./debeziummongo)
* [Debezium MysqlDB Source Connector](./debeziummysql)
* [Debezium PostgreSql Source Connector](./debeziumpsql)
* [Aiven JDBC Source Connector](./aivenjdbcsource)
* [Aiven JDBC Sink Connector](./aivenjdbcsink)
* [Google BigQuery Sink Connector](./bigquerysink)
* [Aiven Amazon S3 Sink Connector](./aivens3sink)
* [Aiven OpenSearch(Elasticsearch) Sink Connector](./aivenopensearchsink)
* [Aiven Http Sink Connector](./aivenhttpsink)
* [Snowflake Sink Connector](./snowflakesink)
If the connector that you need is not in this list, please add a request to our
[Road Map](https://roadmap.upstash.com/)
# MongoDB Sink Connector
Source: https://upstash.com/docs/kafka/connect/mongosink
 Enter a connector name and MongoDB URI(connection string). Select single or
multiple topics from existing topics to read data from.
Enter Database and Collection that the selected topics are written into. We
entered "new" as Database and "test" as Collection. It is not required for this
database and collection to exist on MongoDB database. They will be created
automatically.
Enter a connector name and MongoDB URI(connection string). Select single or
multiple topics from existing topics to read data from.
Enter Database and Collection that the selected topics are written into. We
entered "new" as Database and "test" as Collection. It is not required for this
database and collection to exist on MongoDB database. They will be created
automatically.
 The advanced screen is for any other configuration that the selected connector
supports. At the top of this screen, you can find a link to related
documentation. We can proceed with what we have and click the **Connect** button
directly.
The advanced screen is for any other configuration that the selected connector
supports. At the top of this screen, you can find a link to related
documentation. We can proceed with what we have and click the **Connect** button
directly.
 Congratulations! You have created your MongoDB Sink Connector. As you put data
into your selected topics, the data will be written into your MongoDB database.
# MongoDB Source Connector
Source: https://upstash.com/docs/kafka/connect/mongosource
Congratulations! You have created your MongoDB Sink Connector. As you put data
into your selected topics, the data will be written into your MongoDB database.
# MongoDB Source Connector
Source: https://upstash.com/docs/kafka/connect/mongosource
 A URL similar to [https://mn93536.eu-central-1.snowflakecomputing.com](https://mn93536.eu-central-1.snowflakecomputing.com) will be
copied. We need to append port 443 while passing it to the connector. At the end
`snowflake.url.name` will look like the following.
```
https://mn93536.eu-central-1.snowflakecomputing.com:443
```
#### snowflake.user.name
`snowflake.user.name` can be seen on the profile view. To open the profile view,
go to the top left and click on the profile as shown below.
A URL similar to [https://mn93536.eu-central-1.snowflakecomputing.com](https://mn93536.eu-central-1.snowflakecomputing.com) will be
copied. We need to append port 443 while passing it to the connector. At the end
`snowflake.url.name` will look like the following.
```
https://mn93536.eu-central-1.snowflakecomputing.com:443
```
#### snowflake.user.name
`snowflake.user.name` can be seen on the profile view. To open the profile view,
go to the top left and click on the profile as shown below.
 #### snowflake.private.key
`snowflake.private.key` will be generated by you locally. A pair of private and
public keys need to be generated. `public.key` will be set to the user on the
snowflake and the private key will be set to the connector as
`snowflake.private.key`.
See
[the following document](https://docs.snowflake.com/en/user-guide/kafka-connector-install#using-key-pair-authentication-key-rotation)
to learn how to generate the keys and set the public key to snowflake.
#### snowflake.database.name & snowflake.schema.name
From [the snowflake app](https://app.snowflake.com), create a database and a
schema. To be able to use this schema and connector we need to create and assign
a custom role to the database and the schema. You can follow
[this document](https://docs.snowflake.com/en/user-guide/kafka-connector-install#creating-a-role-to-use-the-kafka-connector)
to see how to do it.
Make sure that the script described in the document above is running on the
desired database and schema by selecting them at the top of the script as
follows:
#### snowflake.private.key
`snowflake.private.key` will be generated by you locally. A pair of private and
public keys need to be generated. `public.key` will be set to the user on the
snowflake and the private key will be set to the connector as
`snowflake.private.key`.
See
[the following document](https://docs.snowflake.com/en/user-guide/kafka-connector-install#using-key-pair-authentication-key-rotation)
to learn how to generate the keys and set the public key to snowflake.
#### snowflake.database.name & snowflake.schema.name
From [the snowflake app](https://app.snowflake.com), create a database and a
schema. To be able to use this schema and connector we need to create and assign
a custom role to the database and the schema. You can follow
[this document](https://docs.snowflake.com/en/user-guide/kafka-connector-install#creating-a-role-to-use-the-kafka-connector)
to see how to do it.
Make sure that the script described in the document above is running on the
desired database and schema by selecting them at the top of the script as
follows:
 Now, everything should be ready on the snowflake side. We can move on the
creating the connector.
### Create the Connector
Go to the Connectors tab, and create your first connector by clicking the **New
Connector** button.
Now, everything should be ready on the snowflake side. We can move on the
creating the connector.
### Create the Connector
Go to the Connectors tab, and create your first connector by clicking the **New
Connector** button.
 Enter the required properties.
 The advanced screen is for any other configuration that the selected connector
supports. At the top of this screen, you can find a link to related
documentation. We can proceed with what we have and click the **Connect** button
directly.
The advanced screen is for any other configuration that the selected connector
supports. At the top of this screen, you can find a link to related
documentation. We can proceed with what we have and click the **Connect** button
directly.
 Congratulations! You have created a Snowflake Sink Connector.
As you put data into your selected topics, the data will be written into
Snowflake. You should see the data in
[the snowflake app](https://app.snowflake.com) as follows:
Congratulations! You have created a Snowflake Sink Connector.
As you put data into your selected topics, the data will be written into
Snowflake. You should see the data in
[the snowflake app](https://app.snowflake.com) as follows:
 # Compliance
Source: https://upstash.com/docs/kafka/help/compliance
## Upstash Legal & Security Documents
* [Upstash Terms of Service](https://upstash.com/static/trust/terms.pdf)
* [Upstash Privacy Policy](https://upstash.com/static/trust/privacy.pdf)
* [Upstash Data Processing Agreement](https://upstash.com/static/trust/dpa.pdf)
* [Upstash Technical and Organizational Security Measures](https://upstash.com/static/trust/security-measures.pdf)
* [Upstash Subcontractors](https://upstash.com/static/trust/subprocessors.pdf)
## Is Upstash SOC2 Compliant?
As of July 2023, Upstash Redis and Kafka are SOC2 compliant. Check our [trust page](https://trust.upstash.com/) for details.
## Is Upstash ISO-27001 Compliant?
We are in process of getting this certification. Contact us
([support@upstash.com](mailto:support@upstash.com)) to learn about the expected
date.
## Is Upstash GDPR Compliant?
Yes. For more information, see our
[Privacy Policy](https://upstash.com/static/trust/privacy.pdf). We acquire DPAs
from each [subcontractor](https://upstash.com/static/trust/subprocessors.pdf)
that we work with.
## Is Upstash HIPAA Compliant?
Upstash is currently not HIPAA compliant. Contact us
([support@upstash.com](mailto:support@upstash.com)) if HIPAA is important for
you and we can share more details.
## Is Upstash PCI Compliant?
Upstash does not store personal credit card information. We use Stripe for
payment processing. Stripe is a certified PCI Service Provider Level 1, which is
the highest level of certification in the payments industry.
## Does Upstash conduct vulnerability scanning and penetration tests?
Yes, we use third party tools and work with pen testers. We share the results
with Enterprise customers. Contact us
([support@upstash.com](mailto:support@upstash.com)) for more information.
## Does Upstash take backups?
Yes, we take regular snapshots of the data cluster to the AWS S3 platform.
## Does Upstash encrypt data?
Customers can enable TLS while creating database/cluster, and we recommend it
for production databases/clusters. Also we encrypt data at rest at request of
customers.
# Integration with Third Parties & Partnerships
Source: https://upstash.com/docs/kafka/help/integration
# Compliance
Source: https://upstash.com/docs/kafka/help/compliance
## Upstash Legal & Security Documents
* [Upstash Terms of Service](https://upstash.com/static/trust/terms.pdf)
* [Upstash Privacy Policy](https://upstash.com/static/trust/privacy.pdf)
* [Upstash Data Processing Agreement](https://upstash.com/static/trust/dpa.pdf)
* [Upstash Technical and Organizational Security Measures](https://upstash.com/static/trust/security-measures.pdf)
* [Upstash Subcontractors](https://upstash.com/static/trust/subprocessors.pdf)
## Is Upstash SOC2 Compliant?
As of July 2023, Upstash Redis and Kafka are SOC2 compliant. Check our [trust page](https://trust.upstash.com/) for details.
## Is Upstash ISO-27001 Compliant?
We are in process of getting this certification. Contact us
([support@upstash.com](mailto:support@upstash.com)) to learn about the expected
date.
## Is Upstash GDPR Compliant?
Yes. For more information, see our
[Privacy Policy](https://upstash.com/static/trust/privacy.pdf). We acquire DPAs
from each [subcontractor](https://upstash.com/static/trust/subprocessors.pdf)
that we work with.
## Is Upstash HIPAA Compliant?
Upstash is currently not HIPAA compliant. Contact us
([support@upstash.com](mailto:support@upstash.com)) if HIPAA is important for
you and we can share more details.
## Is Upstash PCI Compliant?
Upstash does not store personal credit card information. We use Stripe for
payment processing. Stripe is a certified PCI Service Provider Level 1, which is
the highest level of certification in the payments industry.
## Does Upstash conduct vulnerability scanning and penetration tests?
Yes, we use third party tools and work with pen testers. We share the results
with Enterprise customers. Contact us
([support@upstash.com](mailto:support@upstash.com)) for more information.
## Does Upstash take backups?
Yes, we take regular snapshots of the data cluster to the AWS S3 platform.
## Does Upstash encrypt data?
Customers can enable TLS while creating database/cluster, and we recommend it
for production databases/clusters. Also we encrypt data at rest at request of
customers.
# Integration with Third Parties & Partnerships
Source: https://upstash.com/docs/kafka/help/integration
 ## Introduction
In this guideline we will outline the steps to integrate Upstash into your platform (GUI or Web App) and allow your users to create and manage Upstash databases without leaving your interfaces. We will explain how to use OAuth2.0 as the underlying foundation to enable this access seamlessly.
If your product or service offering utilizes Redis, Kafka or QStash or if there is a common use case that your end users enable by leveraging these database resources, we invite you to be a partner with us. By integrating Upstash into your platform, you can offer a more complete package for your customers and become a one stop shop. This will also position yourself at the forefront of innovative cloud computing trends such as serverless and expand your customer base.
This is the most commonly used partnership integration model that can be easily implemented by following this guideline. Recently [Cloudflare workers integration](https://blog.cloudflare.com/cloudflare-workers-database-integration-with-upstash/) is implemented through this methodology. For any further questions or partnership discussions please send us an email at [partnerships@upstash.com](mailto:partnerships@upstash.com)
## Introduction
In this guideline we will outline the steps to integrate Upstash into your platform (GUI or Web App) and allow your users to create and manage Upstash databases without leaving your interfaces. We will explain how to use OAuth2.0 as the underlying foundation to enable this access seamlessly.
If your product or service offering utilizes Redis, Kafka or QStash or if there is a common use case that your end users enable by leveraging these database resources, we invite you to be a partner with us. By integrating Upstash into your platform, you can offer a more complete package for your customers and become a one stop shop. This will also position yourself at the forefront of innovative cloud computing trends such as serverless and expand your customer base.
This is the most commonly used partnership integration model that can be easily implemented by following this guideline. Recently [Cloudflare workers integration](https://blog.cloudflare.com/cloudflare-workers-database-integration-with-upstash/) is implemented through this methodology. For any further questions or partnership discussions please send us an email at [partnerships@upstash.com](mailto:partnerships@upstash.com)
 1. User clicks **`Connect Upstash`** button from web app.
2. Web app initiates Upstash OAuth 2.0 flow and it can use **[Auth0 native libraries](https://auth0.com/docs/libraries)**.
3. App will open new browser:
```
https://auth.upstash.com/authorize?response_type=code&audience=upstash-api&scope=offline_access&client_id=XXXXXXXXXX&redirect_uri=http%3A%2F%2Flocalhost:3000
```
1. User clicks **`Connect Upstash`** button from web app.
2. Web app initiates Upstash OAuth 2.0 flow and it can use **[Auth0 native libraries](https://auth0.com/docs/libraries)**.
3. App will open new browser:
```
https://auth.upstash.com/authorize?response_type=code&audience=upstash-api&scope=offline_access&client_id=XXXXXXXXXX&redirect_uri=http%3A%2F%2Flocalhost:3000
```
 Then replace following parameters in the code snippets of your favourite Kafka
client or language below.
* `{{ BOOTSTRAP_ENDPOINT }}`
* `{{ UPSTASH_KAFKA_USERNAME }}`
* `{{ UPSTASH_KAFKA_PASSWORD }}`
* `{{ TOPIC_NAME }}`
## Create a Topic
Then replace following parameters in the code snippets of your favourite Kafka
client or language below.
* `{{ BOOTSTRAP_ENDPOINT }}`
* `{{ UPSTASH_KAFKA_USERNAME }}`
* `{{ UPSTASH_KAFKA_PASSWORD }}`
* `{{ TOPIC_NAME }}`
## Create a Topic
 ### Create AWS Lambda Function
Now let’s create an AWS Lambda function. For the best performance, select the
same region with Upstash Kafka cluster. We will use Node.js runtime.
### Create AWS Lambda Function
Now let’s create an AWS Lambda function. For the best performance, select the
same region with Upstash Kafka cluster. We will use Node.js runtime.

 In the next screen give a name to your secret.
 ### Edit AWS Lambda Role
Now we need to configure the Lambda function’s role to access the secrets.
On the AWS Lambda function’s page, click on `Configuration` tab and
`Permissions`. Click to the link just below the `Role name` label.
### Edit AWS Lambda Role
Now we need to configure the Lambda function’s role to access the secrets.
On the AWS Lambda function’s page, click on `Configuration` tab and
`Permissions`. Click to the link just below the `Role name` label.
 The IAM management console will be opened in a new tab. On the `Permissions` tab
click on the link which starts with `AWSLambdaBasicExecutionRole-....`
The IAM management console will be opened in a new tab. On the `Permissions` tab
click on the link which starts with `AWSLambdaBasicExecutionRole-....`
 Click on the `Edit Policy` button and add this configuration in the JSON tab:
```json
{
"Effect": "Allow",
"Action": ["secretsmanager:GetSecretValue"],
"Resource": ["REPLACE_THE_ARN_OF_THE_SECRET"]
}
```
You need to replace the ARN of the secret that you created in the previous step.
### Create the Trigger
Go back to your Lambda functions page and click the `Add trigger` button. Select
`Apache Kafka` from the menu and fill in the inputs.
Bootstrap servers: copy/paste endpoint from Upstash console.
Topic name: enter your topic’s name
Click on the `Add` button under Authentication. Select `SASL_SCRAM_256_AUTH` and
select the secret that you created in the previous step.
Check the `Enable trigger` checkbox and you can leave the remaining inputs as
they are.
Click on the `Edit Policy` button and add this configuration in the JSON tab:
```json
{
"Effect": "Allow",
"Action": ["secretsmanager:GetSecretValue"],
"Resource": ["REPLACE_THE_ARN_OF_THE_SECRET"]
}
```
You need to replace the ARN of the secret that you created in the previous step.
### Create the Trigger
Go back to your Lambda functions page and click the `Add trigger` button. Select
`Apache Kafka` from the menu and fill in the inputs.
Bootstrap servers: copy/paste endpoint from Upstash console.
Topic name: enter your topic’s name
Click on the `Add` button under Authentication. Select `SASL_SCRAM_256_AUTH` and
select the secret that you created in the previous step.
Check the `Enable trigger` checkbox and you can leave the remaining inputs as
they are.
 ### Testing
Now let’s produce messages and see if AWS Lambda is processing the messages.
Copy the curl URL to produce a message from
[Upstash Console](https://console.upstash.com).
```shell
➜ curl https://full-mantis-14289-us1-rest-kafka.upstash.io/produce/newtopic/newmessage -u ZnVsbC1tYW50aXMtMTQyODkkimaEsuUsiT9TGk3OFdjveYHBV9Jjzow03SnUtRQ:4-R-fmtoalXnoeu9TjQBOOL4njfSKwEsE10YvHMiW63hFljqUrrq5_yAq4TPGd9c6JbqfQ==
{
"topic" : "newtopic",
"partition" : 0,
"offset" : 48,
"timestamp" : 1639522675505
}
```
Check the cloudwatch **(Lambda > Monitor > View logs in CloudWatch)**. You
should see the messages you produced are logged by Lambda function.
# Fetch Messages Using REST API
Source: https://upstash.com/docs/kafka/howto/fetchwithrest
### Testing
Now let’s produce messages and see if AWS Lambda is processing the messages.
Copy the curl URL to produce a message from
[Upstash Console](https://console.upstash.com).
```shell
➜ curl https://full-mantis-14289-us1-rest-kafka.upstash.io/produce/newtopic/newmessage -u ZnVsbC1tYW50aXMtMTQyODkkimaEsuUsiT9TGk3OFdjveYHBV9Jjzow03SnUtRQ:4-R-fmtoalXnoeu9TjQBOOL4njfSKwEsE10YvHMiW63hFljqUrrq5_yAq4TPGd9c6JbqfQ==
{
"topic" : "newtopic",
"partition" : 0,
"offset" : 48,
"timestamp" : 1639522675505
}
```
Check the cloudwatch **(Lambda > Monitor > View logs in CloudWatch)**. You
should see the messages you produced are logged by Lambda function.
# Fetch Messages Using REST API
Source: https://upstash.com/docs/kafka/howto/fetchwithrest
 Once you connected to the cluster, now you can produce and consume to your
topics using Conduktor.
Once you connected to the cluster, now you can produce and consume to your
topics using Conduktor.
 # Monitoring Upstash Kafka Cluster with kafka-ui
Source: https://upstash.com/docs/kafka/howto/monitorwith_kafkaui
[kafka-ui](https://github.com/provectus/kafka-ui) is a GUI for monitoring Apache
Kafka. From their description:
> Kafka UI for Apache Kafka is a simple tool that makes your data flows
> observable, helps find and troubleshoot issues faster and deliver optimal
> performance. Its lightweight dashboard makes it easy to track key metrics of
> your Kafka clusters - Brokers, Topics, Partitions, Production, and
> Consumption.
You can connect and monitor your Upstash Kafka cluster using
[kafka-ui](https://github.com/provectus/kafka-ui).
To be able to use [kafka-ui](https://github.com/provectus/kafka-ui), first you
should create a yaml configuration file:
```yaml
kafka:
clusters:
- name: my-cluster
bootstrapServers: "tops-stingray-7863-eu1-rest-kafka.upstash.io:9092"
properties:
sasl.mechanism: SCRAM-SHA-512
security.protocol: SASL_SSL
sasl.jaas.config: org.apache.kafka.common.security.scram.ScramLoginModule required username="ZmlycG9iZXJtYW4ZHtSXVwmyJQ" password="J6ocnQfe25vUsI8AX-XxA==";
```
# Monitoring Upstash Kafka Cluster with kafka-ui
Source: https://upstash.com/docs/kafka/howto/monitorwith_kafkaui
[kafka-ui](https://github.com/provectus/kafka-ui) is a GUI for monitoring Apache
Kafka. From their description:
> Kafka UI for Apache Kafka is a simple tool that makes your data flows
> observable, helps find and troubleshoot issues faster and deliver optimal
> performance. Its lightweight dashboard makes it easy to track key metrics of
> your Kafka clusters - Brokers, Topics, Partitions, Production, and
> Consumption.
You can connect and monitor your Upstash Kafka cluster using
[kafka-ui](https://github.com/provectus/kafka-ui).
To be able to use [kafka-ui](https://github.com/provectus/kafka-ui), first you
should create a yaml configuration file:
```yaml
kafka:
clusters:
- name: my-cluster
bootstrapServers: "tops-stingray-7863-eu1-rest-kafka.upstash.io:9092"
properties:
sasl.mechanism: SCRAM-SHA-512
security.protocol: SASL_SSL
sasl.jaas.config: org.apache.kafka.common.security.scram.ScramLoginModule required username="ZmlycG9iZXJtYW4ZHtSXVwmyJQ" password="J6ocnQfe25vUsI8AX-XxA==";
```
 We will use a `Node.js` sample code to show how to produce message(s) using the
REST API. Our sample will use a topic named `cities` and send a few city names
to this topic.
Replace following parameters in the code snippets below with your actual values.
```js
const address = "https://tops-stingray-7863-eu1-rest-kafka.upstash.io";
const user = "G9wcy1zdGluZ3JheS03ODYzJMUX";
const pass = "eUmYCkAlxEhihIc7Hooi2IA2pz2fw==";
const auth = Buffer.from(`${user}:${pass}`).toString("base64");
const topic = "cities";
```
Following code will produce three city names to a topic:
```js
async function produce(topic, msg) {
const response = await fetch(`${address}/produce/${topic}/${msg}`, {
headers: { Authorization: `Basic ${auth}` },
});
const metadata = await response.json();
console.log(
`Topic: ${metadata.topic}, Partition: ${metadata.partition}, Offset: ${metadata.offset}`
);
}
produce(topic, "Tokyo");
produce(topic, "Istanbul");
produce(topic, "London");
```
Alternatively we can post all cities using a single request, instead of
producing them one-by-one. Note that in this case, URL does not have the message
argument but instead all messages are posted in the request body.
```js
async function produceMulti(topic, ...messages) {
let data = messages.map((msg) => {
return { value: msg };
});
const response = await fetch(`${address}/produce/${topic}`, {
headers: { Authorization: `Basic ${auth}` },
method: "POST",
body: JSON.stringify(data),
});
const metadata = await response.json();
metadata.forEach((m) => {
console.log(
`Topic: ${m.topic}, Partition: ${m.partition}, Offset: ${m.offset}`
);
});
}
produceMulti(topic, "Tokyo", "Istanbul", "London");
```
For more info about using the REST API see
[Kafka REST Produce API](../rest/restproducer) section.
# Clickhouse
Source: https://upstash.com/docs/kafka/integrations/clickhouse
This tutorial shows how to set up a pipeline to stream traffic events to Upstash Kafka and analyse with Clickhouse
In this tutorial series, we will show how to build an end to end real time
analytics system. We will stream the traffic (click) events from our web
application to Upstash Kafka then we will analyse it on real time. We will
implement one simply query with different stream processing tools:
```sql
SELECT city, count() FROM page_views where event_time > now() - INTERVAL 15 MINUTE group by city
```
Namely, we will query the number of page views from different cities in last 15
minutes. We keep the query and scenario intentionally simple to make the series
easy to understand. But you can easily extend the model for your more complex
realtime analytics scenarios.
If you do not have already set up Kafka pipeline, see
[the first part of series](./cloudflare_workers) where we
did the set up our pipeline including Upstash Kafka and Cloudflare Workers (or
Vercel).
In this part of the series, we will showcase how to use ClickHouse to run a
query on a Kafka topic.
## Clickhouse Setup
You can create a managed service from
[Clickhouse Cloud](https://clickhouse.cloud/) with a 30 days free trial.
Select your region and enter a name for your service. For simplicity, you can
allow access to the service from anywhere. If you want to restrict to the IP
addresses here is the list of Upstash addresses that needs permission:
```text
52.48.149.7
52.213.40.91
174.129.75.41
34.195.190.47
52.58.175.235
18.158.44.120
63.34.151.162
54.247.137.96
3.78.151.126
3.124.80.204
34.236.200.33
44.195.74.73
```
We will use a `Node.js` sample code to show how to produce message(s) using the
REST API. Our sample will use a topic named `cities` and send a few city names
to this topic.
Replace following parameters in the code snippets below with your actual values.
```js
const address = "https://tops-stingray-7863-eu1-rest-kafka.upstash.io";
const user = "G9wcy1zdGluZ3JheS03ODYzJMUX";
const pass = "eUmYCkAlxEhihIc7Hooi2IA2pz2fw==";
const auth = Buffer.from(`${user}:${pass}`).toString("base64");
const topic = "cities";
```
Following code will produce three city names to a topic:
```js
async function produce(topic, msg) {
const response = await fetch(`${address}/produce/${topic}/${msg}`, {
headers: { Authorization: `Basic ${auth}` },
});
const metadata = await response.json();
console.log(
`Topic: ${metadata.topic}, Partition: ${metadata.partition}, Offset: ${metadata.offset}`
);
}
produce(topic, "Tokyo");
produce(topic, "Istanbul");
produce(topic, "London");
```
Alternatively we can post all cities using a single request, instead of
producing them one-by-one. Note that in this case, URL does not have the message
argument but instead all messages are posted in the request body.
```js
async function produceMulti(topic, ...messages) {
let data = messages.map((msg) => {
return { value: msg };
});
const response = await fetch(`${address}/produce/${topic}`, {
headers: { Authorization: `Basic ${auth}` },
method: "POST",
body: JSON.stringify(data),
});
const metadata = await response.json();
metadata.forEach((m) => {
console.log(
`Topic: ${m.topic}, Partition: ${m.partition}, Offset: ${m.offset}`
);
});
}
produceMulti(topic, "Tokyo", "Istanbul", "London");
```
For more info about using the REST API see
[Kafka REST Produce API](../rest/restproducer) section.
# Clickhouse
Source: https://upstash.com/docs/kafka/integrations/clickhouse
This tutorial shows how to set up a pipeline to stream traffic events to Upstash Kafka and analyse with Clickhouse
In this tutorial series, we will show how to build an end to end real time
analytics system. We will stream the traffic (click) events from our web
application to Upstash Kafka then we will analyse it on real time. We will
implement one simply query with different stream processing tools:
```sql
SELECT city, count() FROM page_views where event_time > now() - INTERVAL 15 MINUTE group by city
```
Namely, we will query the number of page views from different cities in last 15
minutes. We keep the query and scenario intentionally simple to make the series
easy to understand. But you can easily extend the model for your more complex
realtime analytics scenarios.
If you do not have already set up Kafka pipeline, see
[the first part of series](./cloudflare_workers) where we
did the set up our pipeline including Upstash Kafka and Cloudflare Workers (or
Vercel).
In this part of the series, we will showcase how to use ClickHouse to run a
query on a Kafka topic.
## Clickhouse Setup
You can create a managed service from
[Clickhouse Cloud](https://clickhouse.cloud/) with a 30 days free trial.
Select your region and enter a name for your service. For simplicity, you can
allow access to the service from anywhere. If you want to restrict to the IP
addresses here is the list of Upstash addresses that needs permission:
```text
52.48.149.7
52.213.40.91
174.129.75.41
34.195.190.47
52.58.175.235
18.158.44.120
63.34.151.162
54.247.137.96
3.78.151.126
3.124.80.204
34.236.200.33
44.195.74.73
```
 ### Create a table
On Clickhouse service screen click on `Open SQL console`. Click on `+` to open a
new query window and run the following query to create a table:
```sql
CREATE TABLE page_views
(
country String,
city String,
region String,
url String,
ip String,
event_time DateTime DEFAULT now()
)
ORDER BY (event_time)
```
### Create a table
On Clickhouse service screen click on `Open SQL console`. Click on `+` to open a
new query window and run the following query to create a table:
```sql
CREATE TABLE page_views
(
country String,
city String,
region String,
url String,
ip String,
event_time DateTime DEFAULT now()
)
ORDER BY (event_time)
```
 ## Kafka Setup
We will create an [Upstash Kafka cluster](https://console.upstash.com/kafka).
Upstash offers serverless Kafka cluster with per message pricing. Select the
same (or nearest) region with region of Clickhouse for the best performance.
## Kafka Setup
We will create an [Upstash Kafka cluster](https://console.upstash.com/kafka).
Upstash offers serverless Kafka cluster with per message pricing. Select the
same (or nearest) region with region of Clickhouse for the best performance.
 Also create a topic whose messages will be streamed to Clickhouse.
 ## Connector Setup
We will create a connector on
[Upstash console](https://console.upstash.com/kafka). Select your cluster and
click on `Connectors` tab. Select `Aiven JDBC Connector - Sink`
## Connector Setup
We will create a connector on
[Upstash console](https://console.upstash.com/kafka). Select your cluster and
click on `Connectors` tab. Select `Aiven JDBC Connector - Sink`
 Click next to skip the Config step as we will enter the configuration manually
at the third (Advanced) step.
In the third step. copy paste the below config to the text editor:
```json
{
"name": "kafka-clickhouse",
"properties": {
"auto.create": false,
"auto.evolve": false,
"batch.size": 10,
"connection.password": "KqVQvD4HWMng",
"connection.url": "jdbc:clickhouse://a8mo654iq4e.eu-central-1.aws.clickhouse.cloud:8443/default?ssl=true",
"connection.user": "default",
"connector.class": "io.aiven.connect.jdbc.JdbcSinkConnector",
"errors.deadletterqueue.topic.name": "dlqtopic",
"insert.mode": "insert",
"key.converter": "org.apache.kafka.connect.storage.StringConverter",
"key.converter.schemas.enable": false,
"pk.mode": "none",
"table.name.format": "page_views",
"topics": "mytopic",
"value.converter": "org.apache.kafka.connect.json.JsonConverter",
"value.converter.schemas.enable": true
}
}
```
Click next to skip the Config step as we will enter the configuration manually
at the third (Advanced) step.
In the third step. copy paste the below config to the text editor:
```json
{
"name": "kafka-clickhouse",
"properties": {
"auto.create": false,
"auto.evolve": false,
"batch.size": 10,
"connection.password": "KqVQvD4HWMng",
"connection.url": "jdbc:clickhouse://a8mo654iq4e.eu-central-1.aws.clickhouse.cloud:8443/default?ssl=true",
"connection.user": "default",
"connector.class": "io.aiven.connect.jdbc.JdbcSinkConnector",
"errors.deadletterqueue.topic.name": "dlqtopic",
"insert.mode": "insert",
"key.converter": "org.apache.kafka.connect.storage.StringConverter",
"key.converter.schemas.enable": false,
"pk.mode": "none",
"table.name.format": "page_views",
"topics": "mytopic",
"value.converter": "org.apache.kafka.connect.json.JsonConverter",
"value.converter.schemas.enable": true
}
}
```
 Replace the following attributes:
* "name" : Name your connector.
* "connection.password": Copy this from your Clickhouse dashboard. (`Connect` >
`View connection string`)
* "connection.url": Copy this from your Clickhouse dashboard. (`Connect` >
`View connection string`)
* "connection.user": Copy this from your Clickhouse dashboard. (`Connect` >
`View connection string`)
* "errors.deadletterqueue.topic.name": Give a name for your dead letter topic.
It will be auto created.
* "topics": Enter the name of the topic that you have created.
Note that there should be `?ssl=true` as a parameter for the connection.url.
Click the `Connect` button to create the connector.
## Test and Run
Clickhouse expects a schema together with the message payload. We need to go
back to [the set up step](./cloudflare_workers) and update
the message object to include schema as below:
```js
const message = {
schema: {
type: "struct",
optional: false,
version: 1,
fields: [
{
field: "country",
type: "string",
optional: false,
},
{
field: "city",
type: "string",
optional: false,
},
{
field: "region",
type: "string",
optional: false,
},
{
field: "url",
type: "string",
optional: false,
},
{
field: "ip",
type: "string",
optional: false,
},
],
},
payload: {
country: req.geo?.country,
city: req.geo?.city,
region: req.geo?.region,
url: req.url,
ip: req.headers.get("x-real-ip"),
mobile: req.headers.get("sec-ch-ua-mobile"),
platform: req.headers.get("sec-ch-ua-platform"),
useragent: req.headers.get("user-agent"),
},
};
```
Replace the following attributes:
* "name" : Name your connector.
* "connection.password": Copy this from your Clickhouse dashboard. (`Connect` >
`View connection string`)
* "connection.url": Copy this from your Clickhouse dashboard. (`Connect` >
`View connection string`)
* "connection.user": Copy this from your Clickhouse dashboard. (`Connect` >
`View connection string`)
* "errors.deadletterqueue.topic.name": Give a name for your dead letter topic.
It will be auto created.
* "topics": Enter the name of the topic that you have created.
Note that there should be `?ssl=true` as a parameter for the connection.url.
Click the `Connect` button to create the connector.
## Test and Run
Clickhouse expects a schema together with the message payload. We need to go
back to [the set up step](./cloudflare_workers) and update
the message object to include schema as below:
```js
const message = {
schema: {
type: "struct",
optional: false,
version: 1,
fields: [
{
field: "country",
type: "string",
optional: false,
},
{
field: "city",
type: "string",
optional: false,
},
{
field: "region",
type: "string",
optional: false,
},
{
field: "url",
type: "string",
optional: false,
},
{
field: "ip",
type: "string",
optional: false,
},
],
},
payload: {
country: req.geo?.country,
city: req.geo?.city,
region: req.geo?.region,
url: req.url,
ip: req.headers.get("x-real-ip"),
mobile: req.headers.get("sec-ch-ua-mobile"),
platform: req.headers.get("sec-ch-ua-platform"),
useragent: req.headers.get("user-agent"),
},
};
```
 Also run the following query to get most popular cities in last 15 minutes:
```shell
SELECT city, count() FROM page_views where event_time > now() - INTERVAL 15 MINUTE group by city
```
It should return something like below:
Also run the following query to get most popular cities in last 15 minutes:
```shell
SELECT city, count() FROM page_views where event_time > now() - INTERVAL 15 MINUTE group by city
```
It should return something like below:
 # Cloudflare Workers
Source: https://upstash.com/docs/kafka/integrations/cloudflare_workers
As a tutorial for this integration, we'll implement a real time analytics system. We'll stream the traffic (click) events from our web application to Upstash Kafka. Here's the implementation for this simple query:
```sql
SELECT city, count() FROM kafka_topic_page_views where timestamp > now() - INTERVAL 15 MINUTE group by city
```
Namely, we will query the number of page views from different cities in last 15 minutes. We keep the query and scenario intentionally simple to make the series easy to understand. But you can easily extend the model for your more complex realtime analytics scenarios.
We'll use Clouflare Workers to intercept incoming requests to the website, and run a serverless function.
### Kafka Setup
Create an Upstash Kafka cluster and a topic as explained
[here](https://docs.upstash.com/kafka).
### Project Setup
We will use **C3 (create-cloudflare-cli)** command-line tool to create our application. You can open a new terminal window and run C3 using the prompt below.
# Cloudflare Workers
Source: https://upstash.com/docs/kafka/integrations/cloudflare_workers
As a tutorial for this integration, we'll implement a real time analytics system. We'll stream the traffic (click) events from our web application to Upstash Kafka. Here's the implementation for this simple query:
```sql
SELECT city, count() FROM kafka_topic_page_views where timestamp > now() - INTERVAL 15 MINUTE group by city
```
Namely, we will query the number of page views from different cities in last 15 minutes. We keep the query and scenario intentionally simple to make the series easy to understand. But you can easily extend the model for your more complex realtime analytics scenarios.
We'll use Clouflare Workers to intercept incoming requests to the website, and run a serverless function.
### Kafka Setup
Create an Upstash Kafka cluster and a topic as explained
[here](https://docs.upstash.com/kafka).
### Project Setup
We will use **C3 (create-cloudflare-cli)** command-line tool to create our application. You can open a new terminal window and run C3 using the prompt below.
 Clicking on the application will direct you to the application details page, where you can perform the integration process. Switch to the **Settings** tab in the application details, and proceed to **Integrations** section. You will see various Worker integrations listed. To proceed, click the **Add Integration** button associated with the Upstash Kafka.
 On the Integration page, connect to your Upstash account. Then, select the related cluster from the dropdown menu. Finalize the process by pressing **Add Integration** button.
 #### Setting up Manually
Navigate to [Upstash Console](https://console.upstash.com) and copy/paste your `UPSTASH_KAFKA_REST_URL`, `UPSTASH_KAFKA_REST_USERNAME` and `UPSTASH_KAFKA_REST_PASSWORD` credentials to your `wrangler.toml` as below.
```yaml
[vars]
UPSTASH_KAFKA_REST_URL="REPLACE_HERE"
UPSTASH_KAFKA_REST_USERNAME="REPLACE_HERE"
UPSTASH_KAFKA_REST_PASSWORD="REPLACE_HERE"
```
### Test and Deploy
You can test the function locally with `npx wrangler dev`
Deploy your function to Cloudflare with `npx wrangler deploy`
Once the deployment is done, the endpoint of the function will be provided to you.
You can check if logs are collected in Kafka by copying the `curl` expression from the console:
```shell
curl https://
#### Setting up Manually
Navigate to [Upstash Console](https://console.upstash.com) and copy/paste your `UPSTASH_KAFKA_REST_URL`, `UPSTASH_KAFKA_REST_USERNAME` and `UPSTASH_KAFKA_REST_PASSWORD` credentials to your `wrangler.toml` as below.
```yaml
[vars]
UPSTASH_KAFKA_REST_URL="REPLACE_HERE"
UPSTASH_KAFKA_REST_USERNAME="REPLACE_HERE"
UPSTASH_KAFKA_REST_PASSWORD="REPLACE_HERE"
```
### Test and Deploy
You can test the function locally with `npx wrangler dev`
Deploy your function to Cloudflare with `npx wrangler deploy`
Once the deployment is done, the endpoint of the function will be provided to you.
You can check if logs are collected in Kafka by copying the `curl` expression from the console:
```shell
curl https:// In the next step, click on `New Stream` and give a name to it.
 In the schema screen, add `country`, `city`, `region` and `url` with `string`
type.
In the schema screen, add `country`, `city`, `region` and `url` with `string`
type.
 Give a name to your connection and click `Create Connection`. In the next screen
click on Start.
Give a name to your connection and click `Create Connection`. In the next screen
click on Start.
 ## Test the Setup
Now, let's some events to our Kafka topic. Go to Upstash console, click on your
cluster then `Topics`, click `mytopic`. Select `Messages` tab then click
`Produce a new message`. Send a message in JSON format like the below:
```json
{
"country": "US",
"city": "San Jose",
"region": "CA",
"url": "https://upstash.com"
}
```
## Test the Setup
Now, let's some events to our Kafka topic. Go to Upstash console, click on your
cluster then `Topics`, click `mytopic`. Select `Messages` tab then click
`Produce a new message`. Send a message in JSON format like the below:
```json
{
"country": "US",
"city": "San Jose",
"region": "CA",
"url": "https://upstash.com"
}
```
 Now, go back to Decodable console, click Streams and select the one you have
created. Then click `Run Preview`. You should see something like:
Now, go back to Decodable console, click Streams and select the one you have
created. Then click `Run Preview`. You should see something like:
 ## Links
[Decodable documentation](https://docs.decodable.co/docs)
[Decodable console](https://app.decodable.co/)
[Upstash console](https://console.upstash.com/kafka)
# EMQX Cloud
Source: https://upstash.com/docs/kafka/integrations/emqx
This tutorial shows how to integrate Upstash Kafka with EMQX Cloud
EMQX, a robust open-source MQTT message broker, is engineered for scalable, distributed environments, prioritizing high availability, throughput, and minimal latency. As a preferred protocol in the IoT landscape, MQTT (Message Queuing Telemetry Transport) excels in enabling devices to effectively publish and subscribe to messages.
Offered by EMQ, EMQX Cloud is a comprehensively managed MQTT service in the cloud, inherently scalable and secure. Its design is particularly advantageous for IoT applications, providing dependable MQTT messaging services.
This guide elaborates on streaming MQTT data to Upstash by establishing data integration. This process allows clients to route temperature and humidity metrics to EMQX Cloud using MQTT protocol, and subsequently channel these data streams into a Kafka topic within Upstash.
## Initiating Kafka Clusters on Upstash
Begin your journey with Upstash by visiting [Upstash](https://upstash.com/) and registering for an account.
### Kafka Cluster Creation
1. After logging in, initiate the creation of a Kafka cluster by selecting the **Create Cluster** button.
2. Input an appropriate name and select your desired deployment region, ideally close to your EMQX Cloud deployment for optimized performance.
3. Choose your cluster type: opt for a single replica for development/testing or a multi-replica setup for production scenarios.
4. Click **Create Cluster** to establish your serverless Kafka cluster.

### Topic Configuration
1. Inside the Cluster console, navigate to **Topics** and proceed with **Create Topic**.
2. Enter `emqx` in the **Topic name** field, maintaining default settings, then finalize with **Create**.

### Setting Up Credentials
1. Go to **Credentials** in the navigation menu and choose **New Credentials**.
2. Here, you can customize the topic and permissions for the credential. Default settings will be used in this tutorial.

With these steps, we have laid the groundwork for Upstash.
## Establishing Data Integration with Upstash
### Enabling EMQX Cloud's NAT Gateway
1. Sign in to the EMQX Cloud console and visit the deployment overview page.
2. Click on the **NAT Gateway** section at the bottom of the page and opt for **Subscribe Now**.

### Data Integration Setup
1. In the EMQX Cloud console, under your deployment, go to **Data Integrations** and select **Upstash for Kafka**.

2. Fill in the **Endpoints** details from the Upstash Cluster details into the **Kafka Server** fields. Insert the username and password created in Create Credentials into the respective fields and click **Test** to confirm the connection.

3. Opt for **New** to add a Kafka resource. You'll see your newly created Upstash for Kafka listed under **Configured Resources**.
4. Formulate a new SQL rule. Input the following SQL command in the **SQL** field. This rule will process messages from the `temp_hum/emqx` topic and append details like client\_id, topic, and timestamp.
```sql
SELECT
timestamp as up_timestamp,
clientid as client_id,
payload.temp as temp,
payload.hum as hum
FROM
"temp_hum/emqx"
```

5. Conduct an SQL test by inputting the test payload, topic, and client data. Success is indicated by results similar to the example below.

6. Advance to **Next** to append an action to the rule. Specify the Kafka topic and message format, then confirm.
```bash
# kafka topic
emqx
# kafka message template
{"up_timestamp": ${up_timestamp}, "client_id": ${client_id}, "temp": ${temp}, "hum": ${hum}}
```

7. View the rule SQL statement and bound actions by clicking **View Details** after successfully adding the action.
8. To review created rules, click **View Created Rules** on the Data Integrations
# Apache Flink
Source: https://upstash.com/docs/kafka/integrations/flink
This tutorial shows how to integrate Upstash Kafka with Apache Flink
[Apache Flink](https://flink.apache.org/) is a distributed processing engine
which can process streaming data.
### Upstash Kafka Setup
Create a Kafka cluster using [Upstash Console](https://console.upstash.com) or
[Upstash CLI](https://github.com/upstash/cli) by following
[Getting Started](https://docs.upstash.com/kafka).
Create two topics by following the creating topic
[steps](https://docs.upstash.com/kafka#create-a-topic). Let’s name first topic
“input”, since we are going to stream this topic to other one, which we can name
it as “output”.
### Project Setup
## Links
[Decodable documentation](https://docs.decodable.co/docs)
[Decodable console](https://app.decodable.co/)
[Upstash console](https://console.upstash.com/kafka)
# EMQX Cloud
Source: https://upstash.com/docs/kafka/integrations/emqx
This tutorial shows how to integrate Upstash Kafka with EMQX Cloud
EMQX, a robust open-source MQTT message broker, is engineered for scalable, distributed environments, prioritizing high availability, throughput, and minimal latency. As a preferred protocol in the IoT landscape, MQTT (Message Queuing Telemetry Transport) excels in enabling devices to effectively publish and subscribe to messages.
Offered by EMQ, EMQX Cloud is a comprehensively managed MQTT service in the cloud, inherently scalable and secure. Its design is particularly advantageous for IoT applications, providing dependable MQTT messaging services.
This guide elaborates on streaming MQTT data to Upstash by establishing data integration. This process allows clients to route temperature and humidity metrics to EMQX Cloud using MQTT protocol, and subsequently channel these data streams into a Kafka topic within Upstash.
## Initiating Kafka Clusters on Upstash
Begin your journey with Upstash by visiting [Upstash](https://upstash.com/) and registering for an account.
### Kafka Cluster Creation
1. After logging in, initiate the creation of a Kafka cluster by selecting the **Create Cluster** button.
2. Input an appropriate name and select your desired deployment region, ideally close to your EMQX Cloud deployment for optimized performance.
3. Choose your cluster type: opt for a single replica for development/testing or a multi-replica setup for production scenarios.
4. Click **Create Cluster** to establish your serverless Kafka cluster.

### Topic Configuration
1. Inside the Cluster console, navigate to **Topics** and proceed with **Create Topic**.
2. Enter `emqx` in the **Topic name** field, maintaining default settings, then finalize with **Create**.

### Setting Up Credentials
1. Go to **Credentials** in the navigation menu and choose **New Credentials**.
2. Here, you can customize the topic and permissions for the credential. Default settings will be used in this tutorial.

With these steps, we have laid the groundwork for Upstash.
## Establishing Data Integration with Upstash
### Enabling EMQX Cloud's NAT Gateway
1. Sign in to the EMQX Cloud console and visit the deployment overview page.
2. Click on the **NAT Gateway** section at the bottom of the page and opt for **Subscribe Now**.

### Data Integration Setup
1. In the EMQX Cloud console, under your deployment, go to **Data Integrations** and select **Upstash for Kafka**.

2. Fill in the **Endpoints** details from the Upstash Cluster details into the **Kafka Server** fields. Insert the username and password created in Create Credentials into the respective fields and click **Test** to confirm the connection.

3. Opt for **New** to add a Kafka resource. You'll see your newly created Upstash for Kafka listed under **Configured Resources**.
4. Formulate a new SQL rule. Input the following SQL command in the **SQL** field. This rule will process messages from the `temp_hum/emqx` topic and append details like client\_id, topic, and timestamp.
```sql
SELECT
timestamp as up_timestamp,
clientid as client_id,
payload.temp as temp,
payload.hum as hum
FROM
"temp_hum/emqx"
```

5. Conduct an SQL test by inputting the test payload, topic, and client data. Success is indicated by results similar to the example below.

6. Advance to **Next** to append an action to the rule. Specify the Kafka topic and message format, then confirm.
```bash
# kafka topic
emqx
# kafka message template
{"up_timestamp": ${up_timestamp}, "client_id": ${client_id}, "temp": ${temp}, "hum": ${hum}}
```

7. View the rule SQL statement and bound actions by clicking **View Details** after successfully adding the action.
8. To review created rules, click **View Created Rules** on the Data Integrations
# Apache Flink
Source: https://upstash.com/docs/kafka/integrations/flink
This tutorial shows how to integrate Upstash Kafka with Apache Flink
[Apache Flink](https://flink.apache.org/) is a distributed processing engine
which can process streaming data.
### Upstash Kafka Setup
Create a Kafka cluster using [Upstash Console](https://console.upstash.com) or
[Upstash CLI](https://github.com/upstash/cli) by following
[Getting Started](https://docs.upstash.com/kafka).
Create two topics by following the creating topic
[steps](https://docs.upstash.com/kafka#create-a-topic). Let’s name first topic
“input”, since we are going to stream this topic to other one, which we can name
it as “output”.
### Project Setup
 The message you sent to this topic should be streamed to Materialize source.
Query the Materialize source from SQL Shell by converting it to a readable form
since we defined the source format as “BYTE” while creating the source.
```sql
materialize=> SELECT convert_from(data, 'utf8') as data from upstash_source;
data
-----------------------------
"This is my test sentence."
(1 row)
```
## Create Sink
Sink means streaming from Materialize database to external data stores or
pipelines. By creating a sink, the data you inserted to Materialize table or
source will be streamed to the Upstash Kafka topic.
For testing purposes, let's create a new table. This table will be streamed to
the Upstash Kafka sink topic.
```sql
materialize=> CREATE TABLE mytable (name text, age int);
CREATE TABLE
materialize=> SELECT * FROM mytable;
name | age
-----+-----
(0 rows)
```
Create a sink from SQL Shell by running the following command:
```sql
CREATE SINK
The message you sent to this topic should be streamed to Materialize source.
Query the Materialize source from SQL Shell by converting it to a readable form
since we defined the source format as “BYTE” while creating the source.
```sql
materialize=> SELECT convert_from(data, 'utf8') as data from upstash_source;
data
-----------------------------
"This is my test sentence."
(1 row)
```
## Create Sink
Sink means streaming from Materialize database to external data stores or
pipelines. By creating a sink, the data you inserted to Materialize table or
source will be streamed to the Upstash Kafka topic.
For testing purposes, let's create a new table. This table will be streamed to
the Upstash Kafka sink topic.
```sql
materialize=> CREATE TABLE mytable (name text, age int);
CREATE TABLE
materialize=> SELECT * FROM mytable;
name | age
-----+-----
(0 rows)
```
Create a sink from SQL Shell by running the following command:
```sql
CREATE SINK  # Upstash Kafka with Apache Pinot
Source: https://upstash.com/docs/kafka/integrations/kafkapinot
This tutorial shows how to integrate Upstash Kafka with Apache Pinot
[Apache Pinot](https://pinot.apache.org/) is a real-time distributed OLAP
(Online Analytical Processing) data store. It aims to make users able to execute
OLAP queries with low latency. It can consume the data from batch data sources
or streaming sources, which can be Upstash Kafka.
## Upstash Kafka Setup
Create a Kafka cluster using
[Upstash Console](https://console.upstash.com/kafka) or
[Upstash CLI](https://github.com/upstash/cli) by following
[Getting Started](https://docs.upstash.com/kafka).
Create one topic by following the creating topic
[steps](https://docs.upstash.com/kafka#create-a-topic). This topic is going to
be source for Apache Pinot table. Let’s name it “transcript” for this example
tutorial.
## Apache Pinot Setup
You need a host to run Apache Pinot. For this quick setup, you can run it on
your local machine.
First, download [Docker](https://www.docker.com/). Running in docker container
is much better option for running Apache Pinot than running it locally.
Once you have docker on your machine, you can follow the steps on
[Getting Started](https://docs.pinot.apache.org/basics/getting-started/running-pinot-in-docker)
run Apache Pinot in docker.
In short, you will need to pull the Apache Pinot image by running following
command.
```
docker pull apachepinot/pinot:latest
```
Create a file named docker-compose.yml with the following content.
```yml
version: "3.7"
services:
pinot-zookeeper:
image: zookeeper:3.5.6
container_name: pinot-zookeeper
ports:
- "2181:2181"
environment:
ZOOKEEPER_CLIENT_PORT: 2181
ZOOKEEPER_TICK_TIME: 2000
pinot-controller:
image: apachepinot/pinot:0.12.0
command: "StartController -zkAddress pinot-zookeeper:2181"
container_name: pinot-controller
restart: unless-stopped
ports:
- "9000:9000"
environment:
JAVA_OPTS: "-Dplugins.dir=/opt/pinot/plugins -Xms1G -Xmx4G -XX:+UseG1GC -XX:MaxGCPauseMillis=200 -Xloggc:gc-pinot-controller.log"
depends_on:
- pinot-zookeeper
pinot-broker:
image: apachepinot/pinot:0.12.0
command: "StartBroker -zkAddress pinot-zookeeper:2181"
restart: unless-stopped
container_name: "pinot-broker"
ports:
- "8099:8099"
environment:
JAVA_OPTS: "-Dplugins.dir=/opt/pinot/plugins -Xms4G -Xmx4G -XX:+UseG1GC -XX:MaxGCPauseMillis=200 -Xloggc:gc-pinot-broker.log"
depends_on:
- pinot-controller
pinot-server:
image: apachepinot/pinot:0.12.0
command: "StartServer -zkAddress pinot-zookeeper:2181"
restart: unless-stopped
container_name: "pinot-server"
ports:
- "8098:8098"
environment:
JAVA_OPTS: "-Dplugins.dir=/opt/pinot/plugins -Xms4G -Xmx16G -XX:+UseG1GC -XX:MaxGCPauseMillis=200 -Xloggc:gc-pinot-server.log"
depends_on:
- pinot-broker
```
Go into the directory from your terminal and run the following command to start
Pinot.
```
docker-compose --project-name pinot-demo up
```
Now, Apache Pinot should be up and running. You can check it by running:
```
docker container ls
```
You should see the output like this:
```
CONTAINER ID IMAGE COMMAND CREATED STATUS PORTS NAMES
ba5cb0868350 apachepinot/pinot:0.9.3 "./bin/pinot-admin.s…" About a minute ago Up About a minute 8096-8099/tcp, 9000/tcp pinot-server
698f160852f9 apachepinot/pinot:0.9.3 "./bin/pinot-admin.s…" About a minute ago Up About a minute 8096-8098/tcp, 9000/tcp, 0.0.0.0:8099->8099/tcp, :::8099->8099/tcp pinot-broker
b1ba8cf60d69 apachepinot/pinot:0.9.3 "./bin/pinot-admin.s…" About a minute ago Up About a minute 8096-8099/tcp, 0.0.0.0:9000->9000/tcp, :::9000->9000/tcp pinot-controller
54e7e114cd53 zookeeper:3.5.6 "/docker-entrypoint.…" About a minute ago Up About a minute 2888/tcp, 3888/tcp, 0.0.0.0:2181->2181/tcp, :::2181->2181/tcp, 8080/tcp pinot-zookeeper
```
Now, you should add table to your Pinot to store the data streamed from Kafka
topic.
You need to open [http://localhost:9000/](http://localhost:9000/) on your
browser.
# Upstash Kafka with Apache Pinot
Source: https://upstash.com/docs/kafka/integrations/kafkapinot
This tutorial shows how to integrate Upstash Kafka with Apache Pinot
[Apache Pinot](https://pinot.apache.org/) is a real-time distributed OLAP
(Online Analytical Processing) data store. It aims to make users able to execute
OLAP queries with low latency. It can consume the data from batch data sources
or streaming sources, which can be Upstash Kafka.
## Upstash Kafka Setup
Create a Kafka cluster using
[Upstash Console](https://console.upstash.com/kafka) or
[Upstash CLI](https://github.com/upstash/cli) by following
[Getting Started](https://docs.upstash.com/kafka).
Create one topic by following the creating topic
[steps](https://docs.upstash.com/kafka#create-a-topic). This topic is going to
be source for Apache Pinot table. Let’s name it “transcript” for this example
tutorial.
## Apache Pinot Setup
You need a host to run Apache Pinot. For this quick setup, you can run it on
your local machine.
First, download [Docker](https://www.docker.com/). Running in docker container
is much better option for running Apache Pinot than running it locally.
Once you have docker on your machine, you can follow the steps on
[Getting Started](https://docs.pinot.apache.org/basics/getting-started/running-pinot-in-docker)
run Apache Pinot in docker.
In short, you will need to pull the Apache Pinot image by running following
command.
```
docker pull apachepinot/pinot:latest
```
Create a file named docker-compose.yml with the following content.
```yml
version: "3.7"
services:
pinot-zookeeper:
image: zookeeper:3.5.6
container_name: pinot-zookeeper
ports:
- "2181:2181"
environment:
ZOOKEEPER_CLIENT_PORT: 2181
ZOOKEEPER_TICK_TIME: 2000
pinot-controller:
image: apachepinot/pinot:0.12.0
command: "StartController -zkAddress pinot-zookeeper:2181"
container_name: pinot-controller
restart: unless-stopped
ports:
- "9000:9000"
environment:
JAVA_OPTS: "-Dplugins.dir=/opt/pinot/plugins -Xms1G -Xmx4G -XX:+UseG1GC -XX:MaxGCPauseMillis=200 -Xloggc:gc-pinot-controller.log"
depends_on:
- pinot-zookeeper
pinot-broker:
image: apachepinot/pinot:0.12.0
command: "StartBroker -zkAddress pinot-zookeeper:2181"
restart: unless-stopped
container_name: "pinot-broker"
ports:
- "8099:8099"
environment:
JAVA_OPTS: "-Dplugins.dir=/opt/pinot/plugins -Xms4G -Xmx4G -XX:+UseG1GC -XX:MaxGCPauseMillis=200 -Xloggc:gc-pinot-broker.log"
depends_on:
- pinot-controller
pinot-server:
image: apachepinot/pinot:0.12.0
command: "StartServer -zkAddress pinot-zookeeper:2181"
restart: unless-stopped
container_name: "pinot-server"
ports:
- "8098:8098"
environment:
JAVA_OPTS: "-Dplugins.dir=/opt/pinot/plugins -Xms4G -Xmx16G -XX:+UseG1GC -XX:MaxGCPauseMillis=200 -Xloggc:gc-pinot-server.log"
depends_on:
- pinot-broker
```
Go into the directory from your terminal and run the following command to start
Pinot.
```
docker-compose --project-name pinot-demo up
```
Now, Apache Pinot should be up and running. You can check it by running:
```
docker container ls
```
You should see the output like this:
```
CONTAINER ID IMAGE COMMAND CREATED STATUS PORTS NAMES
ba5cb0868350 apachepinot/pinot:0.9.3 "./bin/pinot-admin.s…" About a minute ago Up About a minute 8096-8099/tcp, 9000/tcp pinot-server
698f160852f9 apachepinot/pinot:0.9.3 "./bin/pinot-admin.s…" About a minute ago Up About a minute 8096-8098/tcp, 9000/tcp, 0.0.0.0:8099->8099/tcp, :::8099->8099/tcp pinot-broker
b1ba8cf60d69 apachepinot/pinot:0.9.3 "./bin/pinot-admin.s…" About a minute ago Up About a minute 8096-8099/tcp, 0.0.0.0:9000->9000/tcp, :::9000->9000/tcp pinot-controller
54e7e114cd53 zookeeper:3.5.6 "/docker-entrypoint.…" About a minute ago Up About a minute 2888/tcp, 3888/tcp, 0.0.0.0:2181->2181/tcp, :::2181->2181/tcp, 8080/tcp pinot-zookeeper
```
Now, you should add table to your Pinot to store the data streamed from Kafka
topic.
You need to open [http://localhost:9000/](http://localhost:9000/) on your
browser.
 Click on “Tables” section.
 First, click on “Add Schema” and fill it until you see the following JSON as
your schema config.
```json
{
"schemaName": "transcript",
"dimensionFieldSpecs": [
{
"name": "studentID",
"dataType": "INT"
},
{
"name": "firstName",
"dataType": "STRING"
},
{
"name": "lastName",
"dataType": "STRING"
},
{
"name": "gender",
"dataType": "STRING"
},
{
"name": "subject",
"dataType": "STRING"
}
],
"metricFieldSpecs": [
{
"name": "score",
"dataType": "FLOAT"
}
],
"dateTimeFieldSpecs": [
{
"name": "timestamp",
"dataType": "LONG",
"format": "1:MILLISECONDS:EPOCH",
"granularity": "1:MILLISECONDS"
}
]
}
```
Click save and click to “Add Realtime Table” since we will stream the data
real-time.
On this page, table name must be the same name with the schema name, which is
“transcript” in this case.
Then, go below on this page and replace “segmentsConfig” and “tableIndexConfig”
sections in the table config on your browser with the following JSON. Do not
forget to replace UPSTASH-KAFKA-\* placeholders with your cluster information.
```json
{
"segmentsConfig": {
"timeColumnName": "timestampInEpoch",
"timeType": "MILLISECONDS",
"schemaName": "transcript",
"replicasPerPartition": "1",
"replication": "1"
},
"tableIndexConfig": {
"loadMode": "MMAP",
"streamConfigs": {
"streamType": "kafka",
"stream.kafka.consumer.type": "lowlevel",
"stream.kafka.topic.name": "transcript",
"stream.kafka.decoder.class.name": "org.apache.pinot.plugin.stream.kafka.KafkaJSONMessageDecoder",
"stream.kafka.consumer.factory.class.name": "org.apache.pinot.plugin.stream.kafka20.KafkaConsumerFactory",
"stream.kafka.broker.list": "UPSTASH-KAFKA-ENDPOINT:9092",
"security.protocol": "SASL_SSL",
"sasl.jaas.config": "org.apache.kafka.common.security.scram.ScramLoginModule required username=\"UPSTASH-KAFKA-USERNAME\" password=\"UPSTASH-KAFKA-PASSWORD\";",
"sasl.mechanism": "SCRAM-SHA-256",
"realtime.segment.flush.threshold.rows": "0",
"realtime.segment.flush.threshold.time": "24h",
"realtime.segment.flush.threshold.segment.size": "50M",
"stream.kafka.consumer.prop.auto.offset.reset": "smallest"
}
}
}
```
First, click on “Add Schema” and fill it until you see the following JSON as
your schema config.
```json
{
"schemaName": "transcript",
"dimensionFieldSpecs": [
{
"name": "studentID",
"dataType": "INT"
},
{
"name": "firstName",
"dataType": "STRING"
},
{
"name": "lastName",
"dataType": "STRING"
},
{
"name": "gender",
"dataType": "STRING"
},
{
"name": "subject",
"dataType": "STRING"
}
],
"metricFieldSpecs": [
{
"name": "score",
"dataType": "FLOAT"
}
],
"dateTimeFieldSpecs": [
{
"name": "timestamp",
"dataType": "LONG",
"format": "1:MILLISECONDS:EPOCH",
"granularity": "1:MILLISECONDS"
}
]
}
```
Click save and click to “Add Realtime Table” since we will stream the data
real-time.
On this page, table name must be the same name with the schema name, which is
“transcript” in this case.
Then, go below on this page and replace “segmentsConfig” and “tableIndexConfig”
sections in the table config on your browser with the following JSON. Do not
forget to replace UPSTASH-KAFKA-\* placeholders with your cluster information.
```json
{
"segmentsConfig": {
"timeColumnName": "timestampInEpoch",
"timeType": "MILLISECONDS",
"schemaName": "transcript",
"replicasPerPartition": "1",
"replication": "1"
},
"tableIndexConfig": {
"loadMode": "MMAP",
"streamConfigs": {
"streamType": "kafka",
"stream.kafka.consumer.type": "lowlevel",
"stream.kafka.topic.name": "transcript",
"stream.kafka.decoder.class.name": "org.apache.pinot.plugin.stream.kafka.KafkaJSONMessageDecoder",
"stream.kafka.consumer.factory.class.name": "org.apache.pinot.plugin.stream.kafka20.KafkaConsumerFactory",
"stream.kafka.broker.list": "UPSTASH-KAFKA-ENDPOINT:9092",
"security.protocol": "SASL_SSL",
"sasl.jaas.config": "org.apache.kafka.common.security.scram.ScramLoginModule required username=\"UPSTASH-KAFKA-USERNAME\" password=\"UPSTASH-KAFKA-PASSWORD\";",
"sasl.mechanism": "SCRAM-SHA-256",
"realtime.segment.flush.threshold.rows": "0",
"realtime.segment.flush.threshold.time": "24h",
"realtime.segment.flush.threshold.segment.size": "50M",
"stream.kafka.consumer.prop.auto.offset.reset": "smallest"
}
}
}
```
 ## Test the Setup
Now, let's create some events to our Kafka topic. Go to Upstash console, click
on your cluster then Topics, click “transcript”. Select Messages tab then click
Produce a new message. Send a message in JSON format like the below:
```json
{
"studentID": 205,
"firstName": "Natalie",
"lastName": "Jones",
"gender": "Female",
"subject": "Maths",
"score": 3.8,
"timestampInEpoch": 1571900400000
}
```
## Test the Setup
Now, let's create some events to our Kafka topic. Go to Upstash console, click
on your cluster then Topics, click “transcript”. Select Messages tab then click
Produce a new message. Send a message in JSON format like the below:
```json
{
"studentID": 205,
"firstName": "Natalie",
"lastName": "Jones",
"gender": "Female",
"subject": "Maths",
"score": 3.8,
"timestampInEpoch": 1571900400000
}
```
 Now, go back to your Pinot console on your browser. Navigate to “Query Console”
from the left side bar. When you click on “transcript” table, you will see the
result of the following query automatically.
```sql
select * from transcript limit 10
```
The query result should be as following:
Now, go back to your Pinot console on your browser. Navigate to “Query Console”
from the left side bar. When you click on “transcript” table, you will see the
result of the following query automatically.
```sql
select * from transcript limit 10
```
The query result should be as following:
 ## Links
[Running Pinot in Docker](https://docs.pinot.apache.org/basics/getting-started/running-pinot-in-docker)
[Apache Pinot Stream Ingestion](https://docs.pinot.apache.org/basics/data-import/pinot-stream-ingestion)
# Upstash Kafka with Apache Spark
Source: https://upstash.com/docs/kafka/integrations/kafkaspark
This tutorial shows how to integrate Upstash Kafka with Apache Spark
[Apache Spark](https://spark.apache.org/) is a multi-language engine for
executing data engineering, data science, and machine learning on single-node
machines or clusters.
### Upstash Kafka Setup
Create a Kafka cluster using [Upstash Console](https://console.upstash.com/) or
[Upstash CLI](https://github.com/upstash/cli) by following
[Getting Started](https://docs.upstash.com/kafka).
Create a topic by following the creating topic
[steps](https://docs.upstash.com/kafka#create-a-topic). Let’s name the topic
“sentence”.
### Project Setup
## Links
[Running Pinot in Docker](https://docs.pinot.apache.org/basics/getting-started/running-pinot-in-docker)
[Apache Pinot Stream Ingestion](https://docs.pinot.apache.org/basics/data-import/pinot-stream-ingestion)
# Upstash Kafka with Apache Spark
Source: https://upstash.com/docs/kafka/integrations/kafkaspark
This tutorial shows how to integrate Upstash Kafka with Apache Spark
[Apache Spark](https://spark.apache.org/) is a multi-language engine for
executing data engineering, data science, and machine learning on single-node
machines or clusters.
### Upstash Kafka Setup
Create a Kafka cluster using [Upstash Console](https://console.upstash.com/) or
[Upstash CLI](https://github.com/upstash/cli) by following
[Getting Started](https://docs.upstash.com/kafka).
Create a topic by following the creating topic
[steps](https://docs.upstash.com/kafka#create-a-topic). Let’s name the topic
“sentence”.
### Project Setup
 As the connection type, select Kafka.
In Kafka connection settings, fill the following options:
* Connection Name: It can be anything. It is up to you.
* Broker Url: This should be the endpoint of your Upstash Kafka cluster. You can
find it in the details section in your
[Upstash Kafka cluster](https://console.upstash.com/kafka).
* Authentication Type: `SASL`
* Security Protocol: `SASL_SSL`
* SASL Mechanism: `SCRAM-SHA-256`
* Username: This should be the username given in the details section in your
[Upstash Kafka cluster](https://console.upstash.com/kafka).
* Password: This should be the password given in the details section in your
[Upstash Kafka cluster](https://console.upstash.com/kafka).
As the connection type, select Kafka.
In Kafka connection settings, fill the following options:
* Connection Name: It can be anything. It is up to you.
* Broker Url: This should be the endpoint of your Upstash Kafka cluster. You can
find it in the details section in your
[Upstash Kafka cluster](https://console.upstash.com/kafka).
* Authentication Type: `SASL`
* Security Protocol: `SASL_SSL`
* SASL Mechanism: `SCRAM-SHA-256`
* Username: This should be the username given in the details section in your
[Upstash Kafka cluster](https://console.upstash.com/kafka).
* Password: This should be the password given in the details section in your
[Upstash Kafka cluster](https://console.upstash.com/kafka).
 To proceed, you need to test the connection first. Once the test connection is
successful, then you can create the connection.
Now you have a connection between Upstash Kafka and StarTree Cloud! The next
step is to create a dataset to store data streamed from Upstash Kafka.
Let’s return to the Data Manager overview page and create a new dataset.
To proceed, you need to test the connection first. Once the test connection is
successful, then you can create the connection.
Now you have a connection between Upstash Kafka and StarTree Cloud! The next
step is to create a dataset to store data streamed from Upstash Kafka.
Let’s return to the Data Manager overview page and create a new dataset.
 As the connection type, select Kafka again.
Now you can select the Kafka connection you created for connecting Upstash
Kafka.
As the connection type, select Kafka again.
Now you can select the Kafka connection you created for connecting Upstash
Kafka.
 In the next step, you need to name your dataset, provide the Kafka topic to be
the source of this new dataset and define the data format. We can give
“transcript” as the topic and select JSON as the data format.
To proceed to the next step, we must first produce a message in our Kafka topic.
StarTree doesn’t allow us to go to the next step before it validates the
connection is working, and data is being streamed correctly.
To make StarTree validate our connection, let’s turn back to the Upstash console
and create some events for our Kafka topic. To do this, click on your Kafka
cluster on Upstash console and go to the “Topics” section. Open the source
topic, which is “transcript” in this case. Select the Messages tab, then click
Produce a new message. Send a message in JSON format like the one below:
```json
{
"studentID": 205,
"firstName": "Natalie",
"lastName": "Jones",
"gender": "Female",
"subject": "Maths",
"score": 3.8,
"timestampInEpoch": 1571900400000
}
```
In the next step, you need to name your dataset, provide the Kafka topic to be
the source of this new dataset and define the data format. We can give
“transcript” as the topic and select JSON as the data format.
To proceed to the next step, we must first produce a message in our Kafka topic.
StarTree doesn’t allow us to go to the next step before it validates the
connection is working, and data is being streamed correctly.
To make StarTree validate our connection, let’s turn back to the Upstash console
and create some events for our Kafka topic. To do this, click on your Kafka
cluster on Upstash console and go to the “Topics” section. Open the source
topic, which is “transcript” in this case. Select the Messages tab, then click
Produce a new message. Send a message in JSON format like the one below:
```json
{
"studentID": 205,
"firstName": "Natalie",
"lastName": "Jones",
"gender": "Female",
"subject": "Maths",
"score": 3.8,
"timestampInEpoch": 1571900400000
}
```
 Now go back to the dataset details steps on StarTree Data Manager.
After you click next, StarTree will consume the message in the source Kafka
topic to verify the connection. Once it consumes the message, the message will
be displayed.
Now go back to the dataset details steps on StarTree Data Manager.
After you click next, StarTree will consume the message in the source Kafka
topic to verify the connection. Once it consumes the message, the message will
be displayed.
 In the next step, StarTree extracts the data model from the message you sent.
 If there is any additional configuration about the model of the data coming from
the source topic, you can add it here.
To keep things simple, we will click next without changing anything.
The last step is for more configuration of your dataset. We will click next
again and proceed to review. Click “Create Dataset” to finalize the dataset.
## Query Data
Open the dataset you created on StarTree Data Manager and navigate to the query
console.
If there is any additional configuration about the model of the data coming from
the source topic, you can add it here.
To keep things simple, we will click next without changing anything.
The last step is for more configuration of your dataset. We will click next
again and proceed to review. Click “Create Dataset” to finalize the dataset.
## Query Data
Open the dataset you created on StarTree Data Manager and navigate to the query
console.
 You will be redirected to Pinot Query Console running on StarTree cloud.
When you run the following SQL Query, you will see the data that came from
Upstash Kafka into your dataset.
```sql
select * from
You will be redirected to Pinot Query Console running on StarTree cloud.
When you run the following SQL Query, you will see the data that came from
Upstash Kafka into your dataset.
```sql
select * from  # Upstash Kafka with Kafka Streams
Source: https://upstash.com/docs/kafka/integrations/kafkastreams
This tutorial shows how to integrate Upstash Kafka with Kafka Streams
[Kafka Streams](https://kafka.apache.org/documentation/streams/) is a client
library, which streams data from one Kafka topic to another.
### Upstash Kafka Setup
Create a Kafka cluster using [Upstash Console](https://console.upstash.com) or
[Upstash CLI](https://github.com/upstash/cli) by following
[Getting Started](https://docs.upstash.com/kafka).
Create two topics by following the creating topic
[steps](https://docs.upstash.com/kafka#create-a-topic). Let’s name first topic
“input”, since we are going to stream this topic to other one, which we can name
it as “output”.
### Project Setup
# Upstash Kafka with Kafka Streams
Source: https://upstash.com/docs/kafka/integrations/kafkastreams
This tutorial shows how to integrate Upstash Kafka with Kafka Streams
[Kafka Streams](https://kafka.apache.org/documentation/streams/) is a client
library, which streams data from one Kafka topic to another.
### Upstash Kafka Setup
Create a Kafka cluster using [Upstash Console](https://console.upstash.com) or
[Upstash CLI](https://github.com/upstash/cli) by following
[Getting Started](https://docs.upstash.com/kafka).
Create two topics by following the creating topic
[steps](https://docs.upstash.com/kafka#create-a-topic). Let’s name first topic
“input”, since we are going to stream this topic to other one, which we can name
it as “output”.
### Project Setup
 Right after the message is posted, you should be able to see it in the Proton query result.
## Apply Streaming ETL and Write Data to Upstash Kafka
Cancel the previous streaming SQL and use the following one to mask the IP addresses.
```sql
select now64() AS time, requestedUrl,method,lower(hex(md5(ipAddress))) AS ip
from input where _tp_time > earliest_ts()
```
You will see results as below:
```
┌────────────────────time─┬─requestedUrl────────────────────────────────────────┬─method─┬─ip───────────────────────────────┐
│ 2024-01-10 03:43:16.997 │ http://www.internationalinteractive.name/end-to-end │ PUT │ d5b267be9018abbe87c1357723f2520c │
│ 2024-01-10 03:43:16.997 │ http://www.internationalinteractive.name/end-to-end │ PUT │ d5b267be9018abbe87c1357723f2520c │
└─────────────────────────┴─────────────────────────────────────────────────────┴────────┴──────────────────────────────────┘
```
To write the data back to Kafka, you need to create a new external stream (with `output` as topic name) and use a Materialized View as the background job to write data continuously to the output stream.
```sql
CREATE EXTERNAL STREAM target(
_tp_time datetime64(3),
time datetime64(3),
requestedUrl string,
method string,
ip string)
SETTINGS type='kafka',
brokers='grizzly-1234-us1-kafka.upstash.io:9092',
topic='output',
data_format='JSONEachRow',
security_protocol='SASL_SSL',
sasl_mechanism='SCRAM-SHA-256',
username='..',
password='..';
-- setup the ETL pipeline via a materialized view
CREATE MATERIALIZED VIEW mv INTO target AS
SELECT now64() AS _tp_time, now64() AS time, requestedUrl, method, lower(hex(md5(ipAddress))) AS ip FROM input;
```
Go back to the Upstash UI. Create a few more messages in `input` topic and you should get them available in `output` topic with raw IP addresses masked.
Right after the message is posted, you should be able to see it in the Proton query result.
## Apply Streaming ETL and Write Data to Upstash Kafka
Cancel the previous streaming SQL and use the following one to mask the IP addresses.
```sql
select now64() AS time, requestedUrl,method,lower(hex(md5(ipAddress))) AS ip
from input where _tp_time > earliest_ts()
```
You will see results as below:
```
┌────────────────────time─┬─requestedUrl────────────────────────────────────────┬─method─┬─ip───────────────────────────────┐
│ 2024-01-10 03:43:16.997 │ http://www.internationalinteractive.name/end-to-end │ PUT │ d5b267be9018abbe87c1357723f2520c │
│ 2024-01-10 03:43:16.997 │ http://www.internationalinteractive.name/end-to-end │ PUT │ d5b267be9018abbe87c1357723f2520c │
└─────────────────────────┴─────────────────────────────────────────────────────┴────────┴──────────────────────────────────┘
```
To write the data back to Kafka, you need to create a new external stream (with `output` as topic name) and use a Materialized View as the background job to write data continuously to the output stream.
```sql
CREATE EXTERNAL STREAM target(
_tp_time datetime64(3),
time datetime64(3),
requestedUrl string,
method string,
ip string)
SETTINGS type='kafka',
brokers='grizzly-1234-us1-kafka.upstash.io:9092',
topic='output',
data_format='JSONEachRow',
security_protocol='SASL_SSL',
sasl_mechanism='SCRAM-SHA-256',
username='..',
password='..';
-- setup the ETL pipeline via a materialized view
CREATE MATERIALIZED VIEW mv INTO target AS
SELECT now64() AS _tp_time, now64() AS time, requestedUrl, method, lower(hex(md5(ipAddress))) AS ip FROM input;
```
Go back to the Upstash UI. Create a few more messages in `input` topic and you should get them available in `output` topic with raw IP addresses masked.
 Congratulations! You just setup a streaming ETL with Proton, without any JVM components. Check out [https://github.com/timeplus-io/proton](https://github.com/timeplus-io/proton) for more details or join [https://timeplus.com/slack](https://timeplus.com/slack)
# Upstash Kafka with Quix
Source: https://upstash.com/docs/kafka/integrations/quix
This tutorial shows how to integrate Upstash Kafka with Quix
[Quix](https://quix.io?utm_source=upstash) is a complete platform for developing, deploying, and monitoring stream processing pipelines. You use the Quix Streams Python library to develop modular stream processing applications, and deploy them to containers managed in Quix with a single click. You can develop and manage applications on the command line or manage them in Quix Cloud and visualize them as a end-to-end pipeline.
## Upstash Kafka Setup
Create a Kafka cluster using
[Upstash Console](https://console.upstash.com/kafka) or
[Upstash CLI](https://github.com/upstash/cli) by following
[Getting Started](https://docs.upstash.com/kafka).
## Quix Setup
Like Upstash, Quix is a managed service—this means that you don't need to provision any servers or compute resources. You can [register for a free trial account](https://portal.platform.quix.io/self-sign-up/) and started in minutes.
# Configure the broker settings
When you [create your first project](https://quix.io/docs/create/create-project.html) in Quix, you'll be asked to configure a message broker. You have the option to configure an external broker (instead the default Quix managed broker).
Congratulations! You just setup a streaming ETL with Proton, without any JVM components. Check out [https://github.com/timeplus-io/proton](https://github.com/timeplus-io/proton) for more details or join [https://timeplus.com/slack](https://timeplus.com/slack)
# Upstash Kafka with Quix
Source: https://upstash.com/docs/kafka/integrations/quix
This tutorial shows how to integrate Upstash Kafka with Quix
[Quix](https://quix.io?utm_source=upstash) is a complete platform for developing, deploying, and monitoring stream processing pipelines. You use the Quix Streams Python library to develop modular stream processing applications, and deploy them to containers managed in Quix with a single click. You can develop and manage applications on the command line or manage them in Quix Cloud and visualize them as a end-to-end pipeline.
## Upstash Kafka Setup
Create a Kafka cluster using
[Upstash Console](https://console.upstash.com/kafka) or
[Upstash CLI](https://github.com/upstash/cli) by following
[Getting Started](https://docs.upstash.com/kafka).
## Quix Setup
Like Upstash, Quix is a managed service—this means that you don't need to provision any servers or compute resources. You can [register for a free trial account](https://portal.platform.quix.io/self-sign-up/) and started in minutes.
# Configure the broker settings
When you [create your first project](https://quix.io/docs/create/create-project.html) in Quix, you'll be asked to configure a message broker. You have the option to configure an external broker (instead the default Quix managed broker).
 To use Upstash as your message broker, select the Upstash option and configure the settings shown in the following screenshot:
 ## Create your first pipeline
To help you get started, the Quix platform includes several pipeline templates that you can deploy in a few clicks.
To test the Upstash connection, you can use the ["Hello Quix" template](https://quix.io/templates/hello-quix) which is a simple three-step pipeline:
## Create your first pipeline
To help you get started, the Quix platform includes several pipeline templates that you can deploy in a few clicks.
To test the Upstash connection, you can use the ["Hello Quix" template](https://quix.io/templates/hello-quix) which is a simple three-step pipeline:
 * Click [**Clone this project** ](https://portal.platform.quix.io/signup?projectName=Hello%20Quix\&httpsUrl=https://github.com/quixio/template-hello-quix\&branchName=tutorial).
* On the **Import Project** screen, select **Quix advanced configuration** (this option ensures that you'll get the option to configure own broker settings).
* Follow the project creation wizard and configure your Upstash connection details when prompted.
* Click **Sync your pipeline**
## Test the Setup
In the Quix portal, wait for the services to deploy and show up as "Running".
* Click [**Clone this project** ](https://portal.platform.quix.io/signup?projectName=Hello%20Quix\&httpsUrl=https://github.com/quixio/template-hello-quix\&branchName=tutorial).
* On the **Import Project** screen, select **Quix advanced configuration** (this option ensures that you'll get the option to configure own broker settings).
* Follow the project creation wizard and configure your Upstash connection details when prompted.
* Click **Sync your pipeline**
## Test the Setup
In the Quix portal, wait for the services to deploy and show up as "Running".
 Check that the required topics ("*csv-data*" and "*counted-names*") show up in both Quix and Upstash. In Upstash, topics that originate from Quix show up with the Quix workspace and project name as a prefix (e.g. "*quixdemo-helloquix-csv-data*").
 Creation of the cluster takes a few minutes.
Once the cluster is created, open it and navigate to the `Query` page.
You need to create a user to log in to the cluster on Cloud first. The user will be a superuser by default.
Creation of the cluster takes a few minutes.
Once the cluster is created, open it and navigate to the `Query` page.
You need to create a user to log in to the cluster on Cloud first. The user will be a superuser by default.
 Now, you have the required RisingWave setup to connect to the Upstash Kafka.
## Create Source
Source means streaming from an external database or pipeline to the RisingWave.
By creating a new source on RisingWave Cloud, the message you add to the Upstash Kafka topic is going to be streamed to the RisingWave database.
Create a source from [RisingWave Cloud console](https://cloud.risingwave.com/console) by running the following command:
```sql
CREATE SOURCE
Now, you have the required RisingWave setup to connect to the Upstash Kafka.
## Create Source
Source means streaming from an external database or pipeline to the RisingWave.
By creating a new source on RisingWave Cloud, the message you add to the Upstash Kafka topic is going to be streamed to the RisingWave database.
Create a source from [RisingWave Cloud console](https://cloud.risingwave.com/console) by running the following command:
```sql
CREATE SOURCE  You can also see it in the [Sources](https://cloud.risingwave.com/source/) tab.
To test, go to your [Upstash console](https://console.upstash.com/kafka) and open the `risingwave_input` topic in your Kafka cluster.
Produce a message in this topic in a JSON format. The message should include the fields we defined in the source creation query.
```json
{
"name": "Noah",
"city": "London"
}
```
After producing the message, go back to the RisingWave console and run the following query to see the streamed data.
```sql
SELECT * FROM
You can also see it in the [Sources](https://cloud.risingwave.com/source/) tab.
To test, go to your [Upstash console](https://console.upstash.com/kafka) and open the `risingwave_input` topic in your Kafka cluster.
Produce a message in this topic in a JSON format. The message should include the fields we defined in the source creation query.
```json
{
"name": "Noah",
"city": "London"
}
```
After producing the message, go back to the RisingWave console and run the following query to see the streamed data.
```sql
SELECT * FROM  ## Create Sink
Sink means streaming from RisingWave database to the external data stores or pipelines.
By creating a sink, the data you inserted into the RisingWave table or the data streamed through the source will be streamed to the Upstash Kafka topic.
For testing purposes, let’s create a new table by running the following query. This table will be streamed to the Upstash Kafka sink topic.
```sql
CREATE TABLE
## Create Sink
Sink means streaming from RisingWave database to the external data stores or pipelines.
By creating a sink, the data you inserted into the RisingWave table or the data streamed through the source will be streamed to the Upstash Kafka topic.
For testing purposes, let’s create a new table by running the following query. This table will be streamed to the Upstash Kafka sink topic.
```sql
CREATE TABLE  # Rockset
Source: https://upstash.com/docs/kafka/integrations/rockset
This tutorial shows how to integrate Upstash Kafka with Rockset
[Rockset](https://rockset.com) is a real-time search and analytics database designed to serve millisecond-latency analytical queries on event streams, CDC streams, and vectors.
## Upstash Kafka Setup
Create a Kafka cluster using [Upstash Console](https://console.upstash.com) or [Upstash CLI](https://github.com/upstash/cli) by following [Getting Started](https://docs.upstash.com/kafka).
Create one topic by following the creating topic [steps](https://docs.upstash.com/kafka#create-a-topic). This topic will be the source for the Rockset. Let’s name it “transcript” for this example tutorial.
## Rockset Setup
To be able to use the Rockset, you first need to [create an account](https://rockset.com/create).
There are a couple of steps to create your organisation. After completing them, you can see your [Rockset dashboard](https://console.rockset.com) is created.
## Connect Rockset to Upstash Kafka
To ingest data from Upstash Kafka to Rockset, open [Integrations](https://console.rockset.com/integrations) and click to `Create your first Integration`.
Select `Kafka` as the external service and click `Start`. In the next step, name your integration and select Apache Kafka. In the data format section, select the data format and give the name of the topic you created.
# Rockset
Source: https://upstash.com/docs/kafka/integrations/rockset
This tutorial shows how to integrate Upstash Kafka with Rockset
[Rockset](https://rockset.com) is a real-time search and analytics database designed to serve millisecond-latency analytical queries on event streams, CDC streams, and vectors.
## Upstash Kafka Setup
Create a Kafka cluster using [Upstash Console](https://console.upstash.com) or [Upstash CLI](https://github.com/upstash/cli) by following [Getting Started](https://docs.upstash.com/kafka).
Create one topic by following the creating topic [steps](https://docs.upstash.com/kafka#create-a-topic). This topic will be the source for the Rockset. Let’s name it “transcript” for this example tutorial.
## Rockset Setup
To be able to use the Rockset, you first need to [create an account](https://rockset.com/create).
There are a couple of steps to create your organisation. After completing them, you can see your [Rockset dashboard](https://console.rockset.com) is created.
## Connect Rockset to Upstash Kafka
To ingest data from Upstash Kafka to Rockset, open [Integrations](https://console.rockset.com/integrations) and click to `Create your first Integration`.
Select `Kafka` as the external service and click `Start`. In the next step, name your integration and select Apache Kafka. In the data format section, select the data format and give the name of the topic you created.
 When you continue, you will see 5 new steps to create and configure the Kafka Connector for Rockset. Kafka – Rockset connection can be established using the plugin Rockset provided only. Therefore, we have to create self-managed Kafka connector.
Since this tutorial explains the first connection, select `New — no pre-existing Kafka Connect cluster`.
To create the required Kafka connector, you must first download [Apache Kafka Connect](https://kafka.apache.org/downloads).
In the next step, you can give the endpoint of the Kafka Cluster as the `Address of Apache Kafka Broker` and then download the provided Kafka Connect properties.
When you continue, you will see 5 new steps to create and configure the Kafka Connector for Rockset. Kafka – Rockset connection can be established using the plugin Rockset provided only. Therefore, we have to create self-managed Kafka connector.
Since this tutorial explains the first connection, select `New — no pre-existing Kafka Connect cluster`.
To create the required Kafka connector, you must first download [Apache Kafka Connect](https://kafka.apache.org/downloads).
In the next step, you can give the endpoint of the Kafka Cluster as the `Address of Apache Kafka Broker` and then download the provided Kafka Connect properties.
 The `connect-standalone.properties` file should be located in the same folder as Kafka.
Open `connect-standalone.properties` and add the following properties.
```properties
consumer.sasl.mechanism=SCRAM-SHA-256
consumer.security.protocol=SASL_SSL
consumer.sasl.jaas.config=org.apache.kafka.common.security.scram.ScramLoginModule required \
username="
The `connect-standalone.properties` file should be located in the same folder as Kafka.
Open `connect-standalone.properties` and add the following properties.
```properties
consumer.sasl.mechanism=SCRAM-SHA-256
consumer.security.protocol=SASL_SSL
consumer.sasl.jaas.config=org.apache.kafka.common.security.scram.ScramLoginModule required \
username=" Now, navigate to the folder that contains all these files and execute the following command to run a standalone Apache Kafka Connect with Rockset Sink Connector.
```bash
./kafka_2.13-3.6.1/bin/connect-standalone.sh ./connect-standalone.properties ./connect-rockset-sink.properties
```
Before completing the integration, we can check if the data is coming to the Rockset. Let’s return to the Upstash console, click on your Kafka cluster and go to the “Topics” section. Open the source topic, which is `transcript` in this case. Select the Messages tab, then click Produce a new message. Send a message in JSON format like the one below:
```json
{
"studentID": 205,
"firstName": "Natalie",
"lastName": "Jones",
"gender": "Female",
"subject": "Maths",
"score": 3.8
}
```
You should see the integration `Active`.
Now, navigate to the folder that contains all these files and execute the following command to run a standalone Apache Kafka Connect with Rockset Sink Connector.
```bash
./kafka_2.13-3.6.1/bin/connect-standalone.sh ./connect-standalone.properties ./connect-rockset-sink.properties
```
Before completing the integration, we can check if the data is coming to the Rockset. Let’s return to the Upstash console, click on your Kafka cluster and go to the “Topics” section. Open the source topic, which is `transcript` in this case. Select the Messages tab, then click Produce a new message. Send a message in JSON format like the one below:
```json
{
"studentID": 205,
"firstName": "Natalie",
"lastName": "Jones",
"gender": "Female",
"subject": "Maths",
"score": 3.8
}
```
You should see the integration `Active`.
 ## Query Data
When you complete the integration setup, click `Create Collection from Integration`. This will allow you to collect the data from the Uptash Kafka topic and query that data.
Type your Kafka topic in the data source selection step.
## Query Data
When you complete the integration setup, click `Create Collection from Integration`. This will allow you to collect the data from the Uptash Kafka topic and query that data.
Type your Kafka topic in the data source selection step.
 We can leave the Ingest Transformation Query as it is in the `Transform Data` step.
 Now, select `Query This Collection`. Go back to the Upstash console and produce a new message in the source topic.
```json
{
"studentID": 201,
"firstName": "John",
"lastName": "Doe",
"gender": "Male",
"subject": "Physics",
"score": 4.4
}
```
Let’s go to the [Rockset query editor](https://console.rockset.com/query) and run the following query.
```sql
SELECT * FROM commons.transcipts LIMIT 10
```
You can see the last message you sent to the source topic returned.
# Apache Spark
Source: https://upstash.com/docs/kafka/integrations/spark
This tutorial shows how to integrate Upstash Kafka with Apache Spark
[Apache Spark](https://spark.apache.org/) is a multi-language engine for
executing data engineering, data science, and machine learning on single-node
machines or clusters.
### Upstash Kafka Setup
Create a Kafka cluster using [Upstash Console](https://console.upstash.com/) or
[Upstash CLI](https://github.com/upstash/cli) by following
[Getting Started](https://docs.upstash.com/kafka).
Create a topic by following the creating topic
[steps](https://docs.upstash.com/kafka#create-a-topic). Let’s name the topic
“sentence”.
### Project Setup
Now, select `Query This Collection`. Go back to the Upstash console and produce a new message in the source topic.
```json
{
"studentID": 201,
"firstName": "John",
"lastName": "Doe",
"gender": "Male",
"subject": "Physics",
"score": 4.4
}
```
Let’s go to the [Rockset query editor](https://console.rockset.com/query) and run the following query.
```sql
SELECT * FROM commons.transcipts LIMIT 10
```
You can see the last message you sent to the source topic returned.
# Apache Spark
Source: https://upstash.com/docs/kafka/integrations/spark
This tutorial shows how to integrate Upstash Kafka with Apache Spark
[Apache Spark](https://spark.apache.org/) is a multi-language engine for
executing data engineering, data science, and machine learning on single-node
machines or clusters.
### Upstash Kafka Setup
Create a Kafka cluster using [Upstash Console](https://console.upstash.com/) or
[Upstash CLI](https://github.com/upstash/cli) by following
[Getting Started](https://docs.upstash.com/kafka).
Create a topic by following the creating topic
[steps](https://docs.upstash.com/kafka#create-a-topic). Let’s name the topic
“sentence”.
### Project Setup
 Choose the `Apache Kafka` source.
 In the wizard, specify the Kafka Brokers as `
 Click the `Next` button. In the dropdown list, you should be able to see all available Kafka topics. Choose the `input` topic. Leave the `JSON` as the `Read As` option. Choose `Earliest` if you already create messages in the topic. Otherwise use the default value `Latest`.
 Click the `Next` button, it will start loading messages in the `input` topic.
Let's go to Upstash UI and post a JSON message in `input` topic:
```json
{
"requestedUrl": "http://www.internationalinteractive.name/end-to-end",
"method": "PUT",
"ipAddress": "186.58.241.7",
"requestDuration": 678
}
```
Click the `Next` button, it will start loading messages in the `input` topic.
Let's go to Upstash UI and post a JSON message in `input` topic:
```json
{
"requestedUrl": "http://www.internationalinteractive.name/end-to-end",
"method": "PUT",
"ipAddress": "186.58.241.7",
"requestDuration": 678
}
```
 Click the `Next` button to review the settings. Finally, click the `Create the source` button.
 There will be a green notification message informing you the source has been created.
## Run Streaming SQL
Click the `Query` menu on the left and type the streaming SQL as:
```sql
select * from input
```
Go back to the Upstash UI to post a few more messages to the topic and you can see those live events in the query result.
There will be a green notification message informing you the source has been created.
## Run Streaming SQL
Click the `Query` menu on the left and type the streaming SQL as:
```sql
select * from input
```
Go back to the Upstash UI to post a few more messages to the topic and you can see those live events in the query result.
 ## Apply Streaming ETL and Write Data to Upstash Kafka
Cancel the previous streaming SQL and use the following one to mask the IP addresses.
```sql
select now64() AS time, requestedUrl,method,lower(hex(md5(ipAddress))) AS ip
from input where _tp_time > earliest_ts()
```
## Apply Streaming ETL and Write Data to Upstash Kafka
Cancel the previous streaming SQL and use the following one to mask the IP addresses.
```sql
select now64() AS time, requestedUrl,method,lower(hex(md5(ipAddress))) AS ip
from input where _tp_time > earliest_ts()
```
 Click the `Send as Sink` button. Use the default `Kafka` output type and specify the broker, topic name(`output`), user name and password.
 Click the `Send` button to create the sink.
Go back to the Upstash UI. Create a few more messages in `input` topic and you should get them available in `output` topic with raw IP addresses masked.
Click the `Send` button to create the sink.
Go back to the Upstash UI. Create a few more messages in `input` topic and you should get them available in `output` topic with raw IP addresses masked.
 There are three inputs in the **New Credentials** view:
* **Name**: Name of the credentials. This name is shown on the Console only to
identify the credentials.
* **Topic**: A specific topic name or a topic prefix. This can be a literal
topic name (such as `users.events`, `product-orders`), or a topic prefix (such
as `users.*`, `products-*`). Wildcard character `*` can only be used at the
end of the topic name. `*` means any topic.
* **Permissions**: Access permissions for the credentials. It has three options:
`Full Access`, `Produce Only` and `Consume Only`.
You can see all existing credentials, copy username & password by clicking "+"
button and delete a credentials inside the "Credentials" tab.
There are three inputs in the **New Credentials** view:
* **Name**: Name of the credentials. This name is shown on the Console only to
identify the credentials.
* **Topic**: A specific topic name or a topic prefix. This can be a literal
topic name (such as `users.events`, `product-orders`), or a topic prefix (such
as `users.*`, `products-*`). Wildcard character `*` can only be used at the
end of the topic name. `*` means any topic.
* **Permissions**: Access permissions for the credentials. It has three options:
`Full Access`, `Produce Only` and `Consume Only`.
You can see all existing credentials, copy username & password by clicking "+"
button and delete a credentials inside the "Credentials" tab.
 Additionally you can change the credentials shown on the console and used in the
code snippets by clicking "Credentials" box at the top right on the Console and
selecting one of the credentials.
Additionally you can change the credentials shown on the console and used in the
code snippets by clicking "Credentials" box at the top right on the Console and
selecting one of the credentials.
 # Pro and Enterprise Plans
Source: https://upstash.com/docs/kafka/overall/enterprise
# Pro and Enterprise Plans
Source: https://upstash.com/docs/kafka/overall/enterprise
 **Name:** Type a name for the Kafka cluster.
**Region:** Please select the region in which you would like your cluster to be
deployed. To optimize performance, it is recommended to choose the region that
is closest to your applications. We have plans to expand our support to other
regions and cloud providers in the future. Please send your requests to
[feedback@upstash.com](mailto:feedback@upstash.com) to expedite it.
**Type:** Select the cluster type. Currently there are only two options, choose
single replica for testing/development, multi replica for production use cases:
* **Single Replica:** Topics created in the single replica cluster will only
have single replica.
* **Multi Replica:** Topics created in the multi replica cluster will have three
replicas.
Upon clicking the **Create** button, you will be presented with a list of your
clusters as shown below:
**Name:** Type a name for the Kafka cluster.
**Region:** Please select the region in which you would like your cluster to be
deployed. To optimize performance, it is recommended to choose the region that
is closest to your applications. We have plans to expand our support to other
regions and cloud providers in the future. Please send your requests to
[feedback@upstash.com](mailto:feedback@upstash.com) to expedite it.
**Type:** Select the cluster type. Currently there are only two options, choose
single replica for testing/development, multi replica for production use cases:
* **Single Replica:** Topics created in the single replica cluster will only
have single replica.
* **Multi Replica:** Topics created in the multi replica cluster will have three
replicas.
Upon clicking the **Create** button, you will be presented with a list of your
clusters as shown below:
 You can click on a cluster to navigate to the details page of related cluster.
Details section contains the necessary configurations and credentials.
You can click on a cluster to navigate to the details page of related cluster.
Details section contains the necessary configurations and credentials.
 To create a new topic, switch to the **Topics** tab in cluster details page, and
click the **Create topic** button:
{" "}
To create a new topic, switch to the **Topics** tab in cluster details page, and
click the **Create topic** button:
{" "}
 Type a name for your topic and pick a partition count according to your
application's needs.
Type a name for your topic and pick a partition count according to your
application's needs.
 Upon creating the topic, you will have access to a topics list that provides an
overview of the topic's configuration and usage details. This list allows you to
view and modify the topic configuration, as well as delete the topic if needed.
Upon creating the topic, you will have access to a topics list that provides an
overview of the topic's configuration and usage details. This list allows you to
view and modify the topic configuration, as well as delete the topic if needed.
 ## Connect to Cluster
To establish a connection with the Kafka cluster, you have the flexibility to
utilize any Kafka clients of your choice. In the cluster details section, you
will find code snippets specifically designed for several popular Kafka clients.
## Connect to Cluster
To establish a connection with the Kafka cluster, you have the flexibility to
utilize any Kafka clients of your choice. In the cluster details section, you
will find code snippets specifically designed for several popular Kafka clients.
 Normally username and password will be shown as `{{ UPSTASH_KAFKA_USERNAME }}`
and `{{ UPSTASH_KAFKA_PASSWORD }}`. By turning on "Show secrets" toggle, these
secrets will be replaced with the actual values of your cluster. For more info
about using Kafka clients see [Kafka API](./kafkaapi/) section.
Alternatively, you can use the REST API to connect the cluster. For more info
about using the REST API see [Kafka REST API](../rest/restintro).
Normally username and password will be shown as `{{ UPSTASH_KAFKA_USERNAME }}`
and `{{ UPSTASH_KAFKA_PASSWORD }}`. By turning on "Show secrets" toggle, these
secrets will be replaced with the actual values of your cluster. For more info
about using Kafka clients see [Kafka API](./kafkaapi/) section.
Alternatively, you can use the REST API to connect the cluster. For more info
about using the REST API see [Kafka REST API](../rest/restintro).
 The query will continue display the updates until you terminate it.
### Create a table (materialized view)
Now let's create a table to query the cities with the highest number of page
views in last 10 minutes.
```sql
CREATE TABLE topCities AS
SELECT city, COUNT(*) AS views FROM pageViews
WINDOW TUMBLING (SIZE 10 MINUTE)
GROUP BY city
EMIT CHANGES;
```
We have used tumbling window to count the views. Check
[here](https://docs.ksqldb.io/en/latest/concepts/time-and-windows-in-ksqldb-queries/#window-types)
to learn about the other options.
### Query the table (pull query)
We can simply query the table. This is a pull query, it will return the current
result and terminate.
```sql
select * from topCities
```
!\[ksqldb1.png]\(/img/ksqldb/
The query will continue display the updates until you terminate it.
### Create a table (materialized view)
Now let's create a table to query the cities with the highest number of page
views in last 10 minutes.
```sql
CREATE TABLE topCities AS
SELECT city, COUNT(*) AS views FROM pageViews
WINDOW TUMBLING (SIZE 10 MINUTE)
GROUP BY city
EMIT CHANGES;
```
We have used tumbling window to count the views. Check
[here](https://docs.ksqldb.io/en/latest/concepts/time-and-windows-in-ksqldb-queries/#window-types)
to learn about the other options.
### Query the table (pull query)
We can simply query the table. This is a pull query, it will return the current
result and terminate.
```sql
select * from topCities
```
!\[ksqldb1.png]\(/img/ksqldb/ .png)
You see the results with the same city but different intervals. If you just need
the latest interval (last 10 minutes) then run a query like this:
```sql
select * from topCities where WINDOWSTART > (UNIX_TIMESTAMP() - (10*60*1000+1));
```
.png)
You see the results with the same city but different intervals. If you just need
the latest interval (last 10 minutes) then run a query like this:
```sql
select * from topCities where WINDOWSTART > (UNIX_TIMESTAMP() - (10*60*1000+1));
```
 In this query, we get the results with a starting window of last 10 minutes.
### Resources
[Upstash Kafka setup](../integrations/cloudflare_workers)
[ksqlDB setup](https://ksqldb.io/quickstart.html#quickstart-content)
[ksqlDB concepts](https://docs.ksqldb.io/en/latest/concepts/)
### Conclusion
We have built a simple data pipeline which collect data from edge to Kafka then
create real time reports using SQL. You can easily extend and adapt this example
for much more complex architectures and queries.
# Consumer APIs
Source: https://upstash.com/docs/kafka/rest/restconsumer
Consumer APIs in Kafka are used for fetching and consuming messages from Kafka
topics. Similar to Kafka clients, there are two mechanisms for consuming
messages: manual offset seeking and the use of consumer groups.
Manual offset seeking allows consumers to specify the desired offset from which
they want to consume messages, providing precise control over the consumption
process.
Consumer groups, on the other hand, manage offsets automatically within a
dedicated Kafka topic. They enable multiple consumers to work together in a
coordinated manner, where each consumer within the group is assigned a subset of
partitions from the Kafka topic. This automatic offset management simplifies the
consumption process and facilitates efficient and parallel message processing
across the consumer group.
We call the first one as **Fetch API** and the second one as **Consume API**.
Consume API has some additional methods if you wish to commit offsets manually.
Both Fetch API and Consume API return array of messages as JSON. Message
structure is as following:
```ts
Message {
topic: String,
partition: Int,
offset: Long,
timestamp: Long,
key: String,
value: String,
headers: Array
In this query, we get the results with a starting window of last 10 minutes.
### Resources
[Upstash Kafka setup](../integrations/cloudflare_workers)
[ksqlDB setup](https://ksqldb.io/quickstart.html#quickstart-content)
[ksqlDB concepts](https://docs.ksqldb.io/en/latest/concepts/)
### Conclusion
We have built a simple data pipeline which collect data from edge to Kafka then
create real time reports using SQL. You can easily extend and adapt this example
for much more complex architectures and queries.
# Consumer APIs
Source: https://upstash.com/docs/kafka/rest/restconsumer
Consumer APIs in Kafka are used for fetching and consuming messages from Kafka
topics. Similar to Kafka clients, there are two mechanisms for consuming
messages: manual offset seeking and the use of consumer groups.
Manual offset seeking allows consumers to specify the desired offset from which
they want to consume messages, providing precise control over the consumption
process.
Consumer groups, on the other hand, manage offsets automatically within a
dedicated Kafka topic. They enable multiple consumers to work together in a
coordinated manner, where each consumer within the group is assigned a subset of
partitions from the Kafka topic. This automatic offset management simplifies the
consumption process and facilitates efficient and parallel message processing
across the consumer group.
We call the first one as **Fetch API** and the second one as **Consume API**.
Consume API has some additional methods if you wish to commit offsets manually.
Both Fetch API and Consume API return array of messages as JSON. Message
structure is as following:
```ts
Message {
topic: String,
partition: Int,
offset: Long,
timestamp: Long,
key: String,
value: String,
headers: Array Upstash Kafka Webhook API allows to publish these events directly to a user
defined topic without using a third-party infrastructure or service.
Signature of the Webhook API is:
```js
[GET | POST] /webhook?topic=$TOPIC_NAME
```
`topic` parameter is the target Kafka topic name to store events. Request body
is used as the message value and request headers (excluding standard HTTP
headers) are converted to message headers.
Webhook API supports both Basic HTTP Authentication and passing credentials as
query params when the source service does not support HTTP Auth. When Basic HTTP
Auth is not available, `user` and `pass` query parameters should be used to send
Upstash Kafka REST credentials.
* Usage with Basic HTTP Auth:
```shell
curl https://tops-stingray-7863-eu1-rest-kafka.upstash.io/webhook?topic=my-app-events -u myuser:mypass \
-d 'some event data'
```
* Usage without HTTP Auth:
```shell
curl https://tops-stingray-7863-eu1-rest-kafka.upstash.io/webhook?topic=my-app-events&user=myuser&pass=mypass \
-d 'some event data'
```
* With HTTP Headers:
```shell
curl https://tops-stingray-7863-eu1-rest-kafka.upstash.io/webhook?topic=my-app-events -u myuser:mypass \
-d 'some event data' \
-H "event-timestamp: 1642628041" \
-H "event-origin: my-app"
```
Above webhook call is equivalent to:
```shell
curl https://tops-stingray-7863-eu1-rest-kafka.upstash.io/produce -u myuser:mypass \
-d '{
"topic": "my-app-events",
"value": "some event data",
"headers": [
{"key": "event-timestamp", "value": "1642628041"},
{"key": "event-origin", "value": "my-app"},
]
}'
```
# Compatibility
Source: https://upstash.com/docs/kafka/schema-registry/schemacompatibility
One of the following compatibility rules can be selected when using the Schema Registry:
* `BACKWARD`: consumers using the new schema can read data written by producers using the latest registered schema.
* `BACKWARD_TRANSITIVE`(default): consumers using the new schema can read data written by producers using all previously registered schemas.
* `FORWARD`: consumers using the latest registered schema can read data written by producers using the new schema.
* `FORWARD_TRANSITIVE`: consumers using all previously registered schemas can read data written by producers using the new schema.
* `FULL`: the new schema is forward and backward compatible with the latest registered schema.
* `FULL_TRANSITIVE`: the new schema is forward and backward compatible with all previously registered schemas.
* `NONE`: schema compatibility checks are disabled.
To enable the semantics above, you are allowed to make the following changes in each option.
If you choose `TRANSITIVE`, it means that schema will be compared against all versions before,
not only the last one.
The table shows which applications `consumers` / `producers` should be upgraded first.
| Compatibility Type | What is allowed | Upgrade first |
| ----------------------- | ------------------------------------------- | -------------- |
| `BACKWARD[_TRANSITIVE]` | Delete fields. Add optional fields. | Consumers |
| `FORWARD[_TRANSITIVE]` | Add fields. Delete optional fields. | Producers |
| `FULL[_TRANSITIVE]` | Add optional fields.Delete optional fields. | Any order |
| `NONE` | All changes are accepted. | Not Applicable |
# How to
Source: https://upstash.com/docs/kafka/schema-registry/schemahowto
Schema registry can be used in various scenarios. In this page, the configurations for different use-cases are listed.
You can find the related parameters that you need the use in the configurations from [Upstash Console](https://console.upstash.com).
Scroll down to the `REST API` section to find the values you need:
* `UPSTASH_KAFKA_REST_URL`
* `UPSTASH_KAFKA_REST_USERNAME`
* `UPSTASH_KAFKA_REST_PASSWORD`
## Producer/Consumer
### Producer
If you need to configure your producers to use the schema registry, add the following properties to producer properties in addition to the broker configurations. Note that the selected deserializer needs to be schema-registry aware.
```java
Properties props = new Properties();
// ... other configurations like broker.url and broker authentication are skipped
props.put("key.serializer", "org.apache.kafka.common.serialization.StringSerializer");
props.put("value.serializer, "io.confluent.kafka.serializers.KafkaAvroSerializer");
props.put("schema.registry.url", UPSTASH_KAFKA_REST_URL + "/schema-registry");
props.put("basic.auth.credentials.source", "USER_INFO");
props.put("basic.auth.user.info", UPSTASH_KAFKA_REST_USERNAME + ":" + UPSTASH_KAFKA_REST_PASSWORD);
try (var producer = new KafkaProducer
Upstash Kafka Webhook API allows to publish these events directly to a user
defined topic without using a third-party infrastructure or service.
Signature of the Webhook API is:
```js
[GET | POST] /webhook?topic=$TOPIC_NAME
```
`topic` parameter is the target Kafka topic name to store events. Request body
is used as the message value and request headers (excluding standard HTTP
headers) are converted to message headers.
Webhook API supports both Basic HTTP Authentication and passing credentials as
query params when the source service does not support HTTP Auth. When Basic HTTP
Auth is not available, `user` and `pass` query parameters should be used to send
Upstash Kafka REST credentials.
* Usage with Basic HTTP Auth:
```shell
curl https://tops-stingray-7863-eu1-rest-kafka.upstash.io/webhook?topic=my-app-events -u myuser:mypass \
-d 'some event data'
```
* Usage without HTTP Auth:
```shell
curl https://tops-stingray-7863-eu1-rest-kafka.upstash.io/webhook?topic=my-app-events&user=myuser&pass=mypass \
-d 'some event data'
```
* With HTTP Headers:
```shell
curl https://tops-stingray-7863-eu1-rest-kafka.upstash.io/webhook?topic=my-app-events -u myuser:mypass \
-d 'some event data' \
-H "event-timestamp: 1642628041" \
-H "event-origin: my-app"
```
Above webhook call is equivalent to:
```shell
curl https://tops-stingray-7863-eu1-rest-kafka.upstash.io/produce -u myuser:mypass \
-d '{
"topic": "my-app-events",
"value": "some event data",
"headers": [
{"key": "event-timestamp", "value": "1642628041"},
{"key": "event-origin", "value": "my-app"},
]
}'
```
# Compatibility
Source: https://upstash.com/docs/kafka/schema-registry/schemacompatibility
One of the following compatibility rules can be selected when using the Schema Registry:
* `BACKWARD`: consumers using the new schema can read data written by producers using the latest registered schema.
* `BACKWARD_TRANSITIVE`(default): consumers using the new schema can read data written by producers using all previously registered schemas.
* `FORWARD`: consumers using the latest registered schema can read data written by producers using the new schema.
* `FORWARD_TRANSITIVE`: consumers using all previously registered schemas can read data written by producers using the new schema.
* `FULL`: the new schema is forward and backward compatible with the latest registered schema.
* `FULL_TRANSITIVE`: the new schema is forward and backward compatible with all previously registered schemas.
* `NONE`: schema compatibility checks are disabled.
To enable the semantics above, you are allowed to make the following changes in each option.
If you choose `TRANSITIVE`, it means that schema will be compared against all versions before,
not only the last one.
The table shows which applications `consumers` / `producers` should be upgraded first.
| Compatibility Type | What is allowed | Upgrade first |
| ----------------------- | ------------------------------------------- | -------------- |
| `BACKWARD[_TRANSITIVE]` | Delete fields. Add optional fields. | Consumers |
| `FORWARD[_TRANSITIVE]` | Add fields. Delete optional fields. | Producers |
| `FULL[_TRANSITIVE]` | Add optional fields.Delete optional fields. | Any order |
| `NONE` | All changes are accepted. | Not Applicable |
# How to
Source: https://upstash.com/docs/kafka/schema-registry/schemahowto
Schema registry can be used in various scenarios. In this page, the configurations for different use-cases are listed.
You can find the related parameters that you need the use in the configurations from [Upstash Console](https://console.upstash.com).
Scroll down to the `REST API` section to find the values you need:
* `UPSTASH_KAFKA_REST_URL`
* `UPSTASH_KAFKA_REST_USERNAME`
* `UPSTASH_KAFKA_REST_PASSWORD`
## Producer/Consumer
### Producer
If you need to configure your producers to use the schema registry, add the following properties to producer properties in addition to the broker configurations. Note that the selected deserializer needs to be schema-registry aware.
```java
Properties props = new Properties();
// ... other configurations like broker.url and broker authentication are skipped
props.put("key.serializer", "org.apache.kafka.common.serialization.StringSerializer");
props.put("value.serializer, "io.confluent.kafka.serializers.KafkaAvroSerializer");
props.put("schema.registry.url", UPSTASH_KAFKA_REST_URL + "/schema-registry");
props.put("basic.auth.credentials.source", "USER_INFO");
props.put("basic.auth.user.info", UPSTASH_KAFKA_REST_USERNAME + ":" + UPSTASH_KAFKA_REST_PASSWORD);
try (var producer = new KafkaProducer ### Webhook Setup
Login to your Datadog dashboard and click on
[Webhook Integration](https://app.datadoghq.com/account/settings?#integrations/webhooks).
Enter a name for your webhook and paste the webhook URL that you copied from the
Upstash Console. You can also change the payload template and add some custom
headers as described [here](https://docs.datadoghq.com/integrations/webhooks/).
### Webhook Setup
Login to your Datadog dashboard and click on
[Webhook Integration](https://app.datadoghq.com/account/settings?#integrations/webhooks).
Enter a name for your webhook and paste the webhook URL that you copied from the
Upstash Console. You can also change the payload template and add some custom
headers as described [here](https://docs.datadoghq.com/integrations/webhooks/).
 ### Monitor Setup
Now you need to select which events to sent to Kafka. You can either
[create a new monitor](https://app.datadoghq.com/monitors/create) or
[update existing monitors](https://app.datadoghq.com/monitors/manage). At the
`Notify your team` section you need to add your webhook, so the monitor will
start sending new events to Kafka via webhook API.
### Monitor Setup
Now you need to select which events to sent to Kafka. You can either
[create a new monitor](https://app.datadoghq.com/monitors/create) or
[update existing monitors](https://app.datadoghq.com/monitors/manage). At the
`Notify your team` section you need to add your webhook, so the monitor will
start sending new events to Kafka via webhook API.
 Now you can manually trigger an event and check your Kafka topic to see the
events are coming. Copy/paste the curl consume expression from \[Upstash Console]
to check the new events.
```shell
curl https://definite-goldfish-14224-us1-rest-kafka.upstash.io/consume/GROUP_NAME/GROUP_INSTANCE_NAME/datadogtopic -u \
ZGVmaW5pdGUtZ29swSZ0BPcfdgfdfg45543tIl2ziBk3eg7ITxCmkHwjmRdN
```
# Get Started with AWS Lambda and Kafka
Source: https://upstash.com/docs/kafka/tutorials/getstarted_awslambda_kafka
Now you can manually trigger an event and check your Kafka topic to see the
events are coming. Copy/paste the curl consume expression from \[Upstash Console]
to check the new events.
```shell
curl https://definite-goldfish-14224-us1-rest-kafka.upstash.io/consume/GROUP_NAME/GROUP_INSTANCE_NAME/datadogtopic -u \
ZGVmaW5pdGUtZ29swSZ0BPcfdgfdfg45543tIl2ziBk3eg7ITxCmkHwjmRdN
```
# Get Started with AWS Lambda and Kafka
Source: https://upstash.com/docs/kafka/tutorials/getstarted_awslambda_kafka

 To view a more detailed Next.js quick start guide for setting up QStash, refer to the [quick start](/qstash/quickstarts/vercel-nextjs) guide.
It's also possible to schedule a background job to run at a later time using [schedules](/qstash/features/schedules).
If you'd like to invoke another endpoint when the background job is complete, you can use [callbacks](/qstash/features/callbacks).
# Batching
Source: https://upstash.com/docs/qstash/features/batch
[Publishing](/qstash/howto/publishing) is great for sending one message
at a time, but sometimes you want to send a batch of messages at once.
This can be useful to send messages to a single or multiple destinations.
QStash provides the `batch` endpoint to help
you with this.
If the format of the messages are valid, the response will be an array of
responses for each message in the batch. When batching URL Groups, the response
will be an array of responses for each destination in the URL Group. If one
message fails to be sent, that message will have an error response, but the
other messages will still be sent.
To view a more detailed Next.js quick start guide for setting up QStash, refer to the [quick start](/qstash/quickstarts/vercel-nextjs) guide.
It's also possible to schedule a background job to run at a later time using [schedules](/qstash/features/schedules).
If you'd like to invoke another endpoint when the background job is complete, you can use [callbacks](/qstash/features/callbacks).
# Batching
Source: https://upstash.com/docs/qstash/features/batch
[Publishing](/qstash/howto/publishing) is great for sending one message
at a time, but sometimes you want to send a batch of messages at once.
This can be useful to send messages to a single or multiple destinations.
QStash provides the `batch` endpoint to help
you with this.
If the format of the messages are valid, the response will be an array of
responses for each message in the batch. When batching URL Groups, the response
will be an array of responses for each destination in the URL Group. If one
message fails to be sent, that message will have an error response, but the
other messages will still be sent.

 1. You publish a message to QStash using the `/v2/publish` endpoint
2. QStash will enqueue the message and deliver it to the destination
3. QStash waits for the response from the destination
4. When the response is ready, QStash calls your callback URL with the response
Callbacks publish a new message with the response to the callback URL. Messages
created by callbacks are charged as any other message.
## How do I use Callbacks?
You can add a callback url in the `Upstash-Callback` header when publishing a
message. The value must be a valid URL.
1. You publish a message to QStash using the `/v2/publish` endpoint
2. QStash will enqueue the message and deliver it to the destination
3. QStash waits for the response from the destination
4. When the response is ready, QStash calls your callback URL with the response
Callbacks publish a new message with the response to the callback URL. Messages
created by callbacks are charged as any other message.
## How do I use Callbacks?
You can add a callback url in the `Upstash-Callback` header when publishing a
message. The value must be a valid URL.
 1. **Retry** - Republish the message and remove it from the dead letter queue. Republished messages are just like any other message and will be retried automatically if they fail.
2. **Delete** - Delete the message from the dead letter queue.
## Limitations
Dead letter queues are limited to a certain number of messages. If you exceed this limit, the oldest messages will be dropped.
Unhandled messages are evicted after some time.
See the [pricing](https://upstash.com/pricing/qstash) page for more information.
# Flow Control
Source: https://upstash.com/docs/qstash/features/flowcontrol
FlowControl enables you to limit the number of messages sent to your endpoint via delaying the delivery.
There are two limits that you can set with the FlowControl feature: [RatePerSecond](#ratepersecond-limit) and [Parallelism](#parallelism-limit).
And if needed both parameters can be [combined](#ratepersecond-and-parallelism-together).
For the `FlowControl`, you need to choose a key first. This key is used to count the number of calls made to your endpoint.
1. **Retry** - Republish the message and remove it from the dead letter queue. Republished messages are just like any other message and will be retried automatically if they fail.
2. **Delete** - Delete the message from the dead letter queue.
## Limitations
Dead letter queues are limited to a certain number of messages. If you exceed this limit, the oldest messages will be dropped.
Unhandled messages are evicted after some time.
See the [pricing](https://upstash.com/pricing/qstash) page for more information.
# Flow Control
Source: https://upstash.com/docs/qstash/features/flowcontrol
FlowControl enables you to limit the number of messages sent to your endpoint via delaying the delivery.
There are two limits that you can set with the FlowControl feature: [RatePerSecond](#ratepersecond-limit) and [Parallelism](#parallelism-limit).
And if needed both parameters can be [combined](#ratepersecond-and-parallelism-together).
For the `FlowControl`, you need to choose a key first. This key is used to count the number of calls made to your endpoint.
 Send this token along with every request made to `QStash` inside the
`Authorization` header like this:
```
"Authorization": "Bearer
Send this token along with every request made to `QStash` inside the
`Authorization` header like this:
```
"Authorization": "Bearer  Either you or a previously setup schedule will create a message.
When a message is ready for execution, it will be become `ACTIVE` and a delivery to
your API is attempted.
If you API responds with a status code between `200 - 299`, the task is
considered successful and will be marked as `DELIVERED`.
Otherwise the message is being retried if there are any retries left and moves to `RETRY`. If all retries are exhausted, the task has `FAILED` and the message will be moved to the DLQ.
During all this a message can be cancelled via [DELETE /v2/messages/:messageId](https://docs.upstash.com/qstash/api/messages/cancel). When the request is received, `CANCEL_REQUESTED` will be logged first.
If retries are not exhausted yet, in the next deliver time, the message will be marked as `CANCELLED` and will be completely removed from the system.
## Console
Head over to the [Upstash Console](https://console.upstash.com/qstash) and go to
the `Logs` tab, where you can see the latest events.
# Delete Schedules
Source: https://upstash.com/docs/qstash/howto/delete-schedule
Deleting schedules can be done using the [schedules api](/qstash/api/schedules/remove).
Either you or a previously setup schedule will create a message.
When a message is ready for execution, it will be become `ACTIVE` and a delivery to
your API is attempted.
If you API responds with a status code between `200 - 299`, the task is
considered successful and will be marked as `DELIVERED`.
Otherwise the message is being retried if there are any retries left and moves to `RETRY`. If all retries are exhausted, the task has `FAILED` and the message will be moved to the DLQ.
During all this a message can be cancelled via [DELETE /v2/messages/:messageId](https://docs.upstash.com/qstash/api/messages/cancel). When the request is received, `CANCEL_REQUESTED` will be logged first.
If retries are not exhausted yet, in the next deliver time, the message will be marked as `CANCELLED` and will be completely removed from the system.
## Console
Head over to the [Upstash Console](https://console.upstash.com/qstash) and go to
the `Logs` tab, where you can see the latest events.
# Delete Schedules
Source: https://upstash.com/docs/qstash/howto/delete-schedule
Deleting schedules can be done using the [schedules api](/qstash/api/schedules/remove).
 # Publish To Kafka
Source: https://upstash.com/docs/qstash/howto/kafka
You can use QStash to forward a message to Kafka by using our
[Kafka REST API](/kafka/rest).
All you need is the `Webhook` url from the
[Upstash Console](https://console.upstash.com/kafka) and the Kafka topic to
publish to.
Here is a complete example: `
# Publish To Kafka
Source: https://upstash.com/docs/qstash/howto/kafka
You can use QStash to forward a message to Kafka by using our
[Kafka REST API](/kafka/rest).
All you need is the `Webhook` url from the
[Upstash Console](https://console.upstash.com/kafka) and the Kafka topic to
publish to.
Here is a complete example: `

 ### Check Message Status
Head over to [Upstash Console](https://console.upstash.com/qstash) and go to the
`Events` tab where you can see your message activities.
### Check Message Status
Head over to [Upstash Console](https://console.upstash.com/qstash) and go to the
`Events` tab where you can see your message activities.
 Learn more about different states [here](/qstash/howto/debug-logs).
## Features and Use Cases
Learn more about different states [here](/qstash/howto/debug-logs).
## Features and Use Cases
 The URL you use to invoke your function typically follows this format, especially if you follow the same stack configuration as shown above:
`https://
The URL you use to invoke your function typically follows this format, especially if you follow the same stack configuration as shown above:
`https:// and make these two variables available to your Lambda in your function configuration:
 Tada, we just deployed a live Lambda with the AWS CDK! 🎉
### Manual Deployment
1. Create a new Lambda function by going to the [AWS dashboard](https://us-east-1.console.aws.amazon.com/lambda/home?region=us-east-1#/create/function) for your desired lambda region. Give your new function a name and select `Node.js 20.x` as runtime, then create the function.
Tada, we just deployed a live Lambda with the AWS CDK! 🎉
### Manual Deployment
1. Create a new Lambda function by going to the [AWS dashboard](https://us-east-1.console.aws.amazon.com/lambda/home?region=us-east-1#/create/function) for your desired lambda region. Give your new function a name and select `Node.js 20.x` as runtime, then create the function.
 2. To make this Lambda available under a public URL, navigate to the `Configuration` tab and click `Function URL`:
 3. In the following dialog, you'll be asked to select one of two authentication types. Select `NONE`, because we are handling authentication ourselves. Then, click `Save`.
You'll see the function URL on the right side of your function overview:
3. In the following dialog, you'll be asked to select one of two authentication types. Select `NONE`, because we are handling authentication ourselves. Then, click `Save`.
You'll see the function URL on the right side of your function overview:
 4. Get your current and next signing key from the
[Upstash Console](https://console.upstash.com/qstash).
4. Get your current and next signing key from the
[Upstash Console](https://console.upstash.com/qstash).
 Tada, you've manually deployed a zip file to AWS Lambda! 🎉
## Testing the Integration
To make sure everything works as expected, navigate to your QStash request builder and send a request to your freshly deployed Lambda function:
Tada, you've manually deployed a zip file to AWS Lambda! 🎉
## Testing the Integration
To make sure everything works as expected, navigate to your QStash request builder and send a request to your freshly deployed Lambda function:
 Alternatively, you can also send a request via CURL:
```bash Terminal
curl --request POST "https://qstash.upstash.io/v2/publish/
Alternatively, you can also send a request via CURL:
```bash Terminal
curl --request POST "https://qstash.upstash.io/v2/publish/ Afterwards we will add a public URL to this lambda by going to the
`Configuration` tab:
Afterwards we will add a public URL to this lambda by going to the
`Configuration` tab:
 ### 5. Set Environment Variables
Get your current and next signing key from the
[Upstash Console](https://console.upstash.com/qstash)
On the same `Configuration` tab from earlier, we will now set the required
environment variables:
### 5. Set Environment Variables
Get your current and next signing key from the
[Upstash Console](https://console.upstash.com/qstash)
On the same `Configuration` tab from earlier, we will now set the required
environment variables:
 On the Integration page, connect to your Upstash account. Then, select the related database from the dropdown menu. Finalize the process by pressing Save button.
 #### Setting up Manually
Navigate to [Upstash Console](https://console.upstash.com) and copy/paste your QStash credentials to `wrangler.toml` as below.
```yaml
[vars]
QSTASH_URL="REPLACE_HERE"
QSTASH_TOKEN="REPLACE_HERE"
QSTASH_CURRENT_SIGNING_KEY="REPLACE_HERE"
QSTASH_NEXT_SIGNING_KEY="REPLACE_HERE"
```
### Test and Deploy
You can test the function locally with `npx wrangler dev`
Deploy your function to Cloudflare with `npx wrangler deploy`
The endpoint of the function will be provided to you, once the deployment is done.
### Publish a message
Open a different terminal and publish a message to QStash. Note the destination
url is the same that was printed in the previous deploy step.
```bash
curl --request POST "https://qstash.upstash.io/v2/publish/https://cloudflare-workers.upstash.workers.dev" \
-H "Authorization: Bearer
#### Setting up Manually
Navigate to [Upstash Console](https://console.upstash.com) and copy/paste your QStash credentials to `wrangler.toml` as below.
```yaml
[vars]
QSTASH_URL="REPLACE_HERE"
QSTASH_TOKEN="REPLACE_HERE"
QSTASH_CURRENT_SIGNING_KEY="REPLACE_HERE"
QSTASH_NEXT_SIGNING_KEY="REPLACE_HERE"
```
### Test and Deploy
You can test the function locally with `npx wrangler dev`
Deploy your function to Cloudflare with `npx wrangler deploy`
The endpoint of the function will be provided to you, once the deployment is done.
### Publish a message
Open a different terminal and publish a message to QStash. Note the destination
url is the same that was printed in the previous deploy step.
```bash
curl --request POST "https://qstash.upstash.io/v2/publish/https://cloudflare-workers.upstash.workers.dev" \
-H "Authorization: Bearer  Once you start the schedule, QStash will invoke the endpoint at the specified time. You can
scroll down and verify the job has been created!
Once you start the schedule, QStash will invoke the endpoint at the specified time. You can
scroll down and verify the job has been created!

 We can also view the logs on Vercel and QStash
 QStash
