# Announcing Upstash Chatbox
> **Source:** https://upstash.com/blog/upstash-chatbox
> **Date:** 2022-05-10
> **Author(s):** Burak Yılmaz
> **Reading time:** 3 min read
> **Tags:** upstash, redis, nextjs, chatbox, chat
> **Format:** text/markdown — machine-readable content for agents and LLMs
---
Instant, interactive communication is crucial for satisfactory user experience. This is why many companies provide a live chatbox widget on their websites.
## What it is
This is a chatbox widget, alongside with admin chat panel for websites, connecting users with developers/admins. This way, an interactive communication between peers can be established.
This project uses Next.js, alongside Upstash Redis for storage.
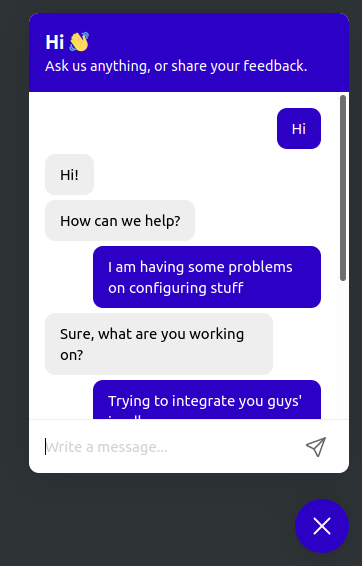
### User initiates conversation
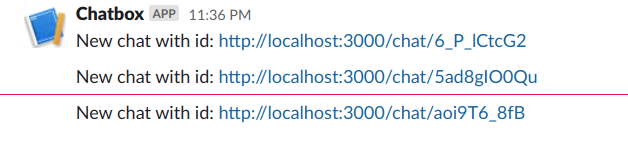
### A notification for the newly initiated chat goes to Slack
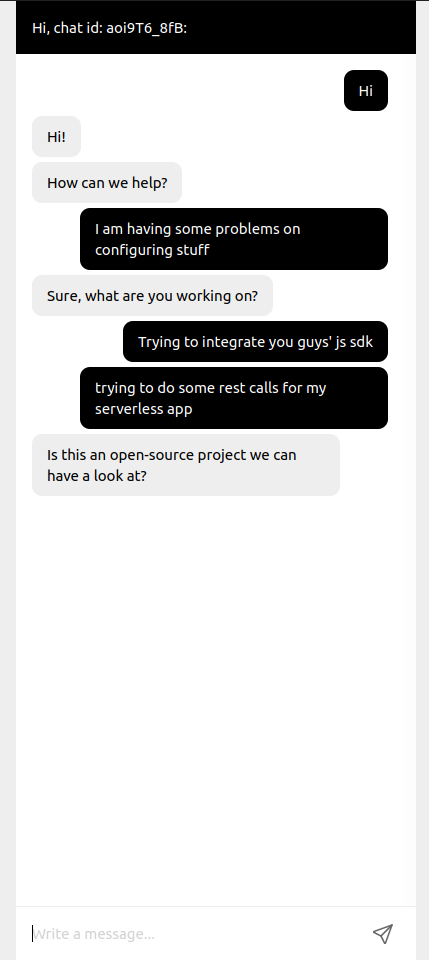
### Admins can reply
You can see the demo [here](https://upstash-chatbox.vercel.app).
Notice that chat id is shown in the console. Note that and go to `/chat/{id}` to see the admin panel and how both interfaces interact with each other.
### 1. Create Database and Environment Variables
The data will be kept at [Upstash Redis](https://upstash.com).
Create a free Redis database at [Upstash Console](https://console.upstash.com)
Copy the `.env.local.example` file to `.env.local` (which will be ignored by
Git):
```bash
cp .env.local.example .env.local
```
- `UPSTASH_REDIS_REST_URL` and `UPSTASH_REDIS_REST_TOKEN` can be found at the
database details page in Upstash Console.
- `SLACK_WEBHOOK_URL` can be found at the Slack integration page
in https://api.slack.com/messaging/webhooks
### 2. Install Package
```bash
yarn add @upstash/chatbox
```
### 3. Import CSS and Widget
```jsx
// pages/_app.js
import "@upstash/chatbox/index.css";
import dynamic from "next/dynamic";
const ChatBoxWidget = dynamic({
loader: () => import("@upstash/chatbox").then((mod) => mod.ChatBoxWidget),
ssr: false,
});
export default function MyApp({ Component, pageProps }) {
return (
<>
);
}
```
The options can be passed as React props
| key | type | default |
| ---------------- | -------------------- | ---------------------------------------- |
| `themeColor?` | `string` | #2d00c6 |
| `textColor?` | `string` | #fff |
| `title?` | `string` | Hi 👋 |
| `description?` | `string` | Ask us anything, or share your feedback. |
| `showOnInitial?` | `boolean` | false |
| `customIcon?` | `React.ReactElement` | |
### 4. Admin Dashboard
```js
// pages/chat/[id].js
import dynamic from "next/dynamic";
const ChatBoxAdmin = dynamic({
loader: () => import("@upstash/chatbox").then((mod) => mod.ChatBoxAdmin),
ssr: false,
});
export default function () {
return ;
}
```
### 5. Create API
```js
// pages/api/chatbox/[...chatbox].js
import createChatBoxAPI from "@upstash/chatbox/api";
const ChatBoxAPI = createChatBoxAPI({
webhooks: [process.env.SLACK_WEBHOOK_URL],
});
export default ChatBoxAPI;
```
## Congratulations!
Now you have your own chatbox for users! Enjoy!
You can see the source code [here](https://github.com/upstash/chatbox) and npm package [here](https://www.npmjs.com/package/@upstash/chatbox).
About this project or in general,
we highly appreciate your feedbacks and ideas. If you want to give any feedback or thoughts on our services, you can do so via [twitter](https://twitter.com/upstash) or [discord](https://upstash.com/discord).