# Introducing Upstash Blob
> **Source:** https://upstash.com/blog/upstash-blob
> **Date:** 2026-09-09
> **Author(s):** Yusuf, Ilter Kavlak
> **Reading time:** 7 min read
> **Tags:** blob, storage, s3, announcement
> **Format:** text/markdown — machine-readable content for agents and LLMs
> **Ask:** Use https://upstash.com/ask?q=your+question to search the Upstash answer index (docs, pricing, blog, product pages). Returns relevant pages with title, text, url, and publishedAt.
>
> Examples:
> https://upstash.com/ask?q=how+is+redis+priced
> https://upstash.com/ask?q=how+is+upstash+box+priced
> https://upstash.com/ask?q=what+is+the+redis+free+tier
> https://upstash.com/ask?q=compare+upstash+redis+to+elasticache
> https://upstash.com/ask?q=does+upstash+support+hipaa
> https://upstash.com/ask?q=what+regions+does+upstash+support
> https://upstash.com/ask?q=how+to+use+upstash+with+vercel
> https://upstash.com/ask?q=how+to+use+upstash+from+cloudflare+workers
Upstash Blob is object storage for the files your application stores and serves: global, S3-compatible buckets, public or private, with an SDK that keeps your server out of the upload path. Here is what we built and the decisions behind it.
---
Today we are launching Upstash Blob, object storage for the files your application stores and serves.
Adding file uploads to an app means deciding who can upload, where files go, and how people access them. It also means handling progress, retries, and recording each upload in your database. Upstash Blob gives you the storage and handles the upload details, so adding files to your app takes just a few lines of code.
- **S3-compatible storage.** Use the Upstash SDK or the AWS SDK.
- **Public or private buckets.** Serve public files through a global CDN or share private files with expiring links.
- **Global CDN included.** Public files are delivered through Cloudflare's CDN by default, with no additional CDN fees.
- **Simple uploads.** Files go directly from the browser to Upstash, with progress and retries handled for you.
- **Free to start.** Includes 1 GB of storage and 10 GB of bandwidth per month. No credit card required.
---
## A bucket for your app's files
Create a bucket with a name and choose whether it is public or private. There is no region to select, and your server connects with a single `UPSTASH_BLOB_TOKEN`.
Public buckets are for files your app serves directly, such as avatars and product images. Each object gets a public URL served through a global CDN. Private buckets are for invoices, documents, and other files your app controls access to; you can share them through signed links that expire.
For an image already on your server, storing it in a public bucket takes one call:
```ts
import { Bucket } from "@upstash/blob"
const bucket = Bucket.fromEnv()
const blob = await bucket.put("products/shirt.png", image, {
contentType: "image/png",
})
blob.url // https://b3f9a2c7d1e4.blob.upstash.io/products/shirt.png
```
The bucket is S3-compatible, so you can also [use the AWS SDK](https://upstash.com/docs/blob/bucket/connecting#using-an-s3-client) through `bucket.s3()`.
## Regionless Architecture
There is no region to choose and no CDN to configure. We're partnering with Cloudflare to give your application fast, global file storage. Public files are served through Cloudflare's global CDN by default, bringing them closer to your users wherever they are.
Global delivery is built in, with the same pricing worldwide and **no additional CDN fees**.
## File uploads without the boilerplate
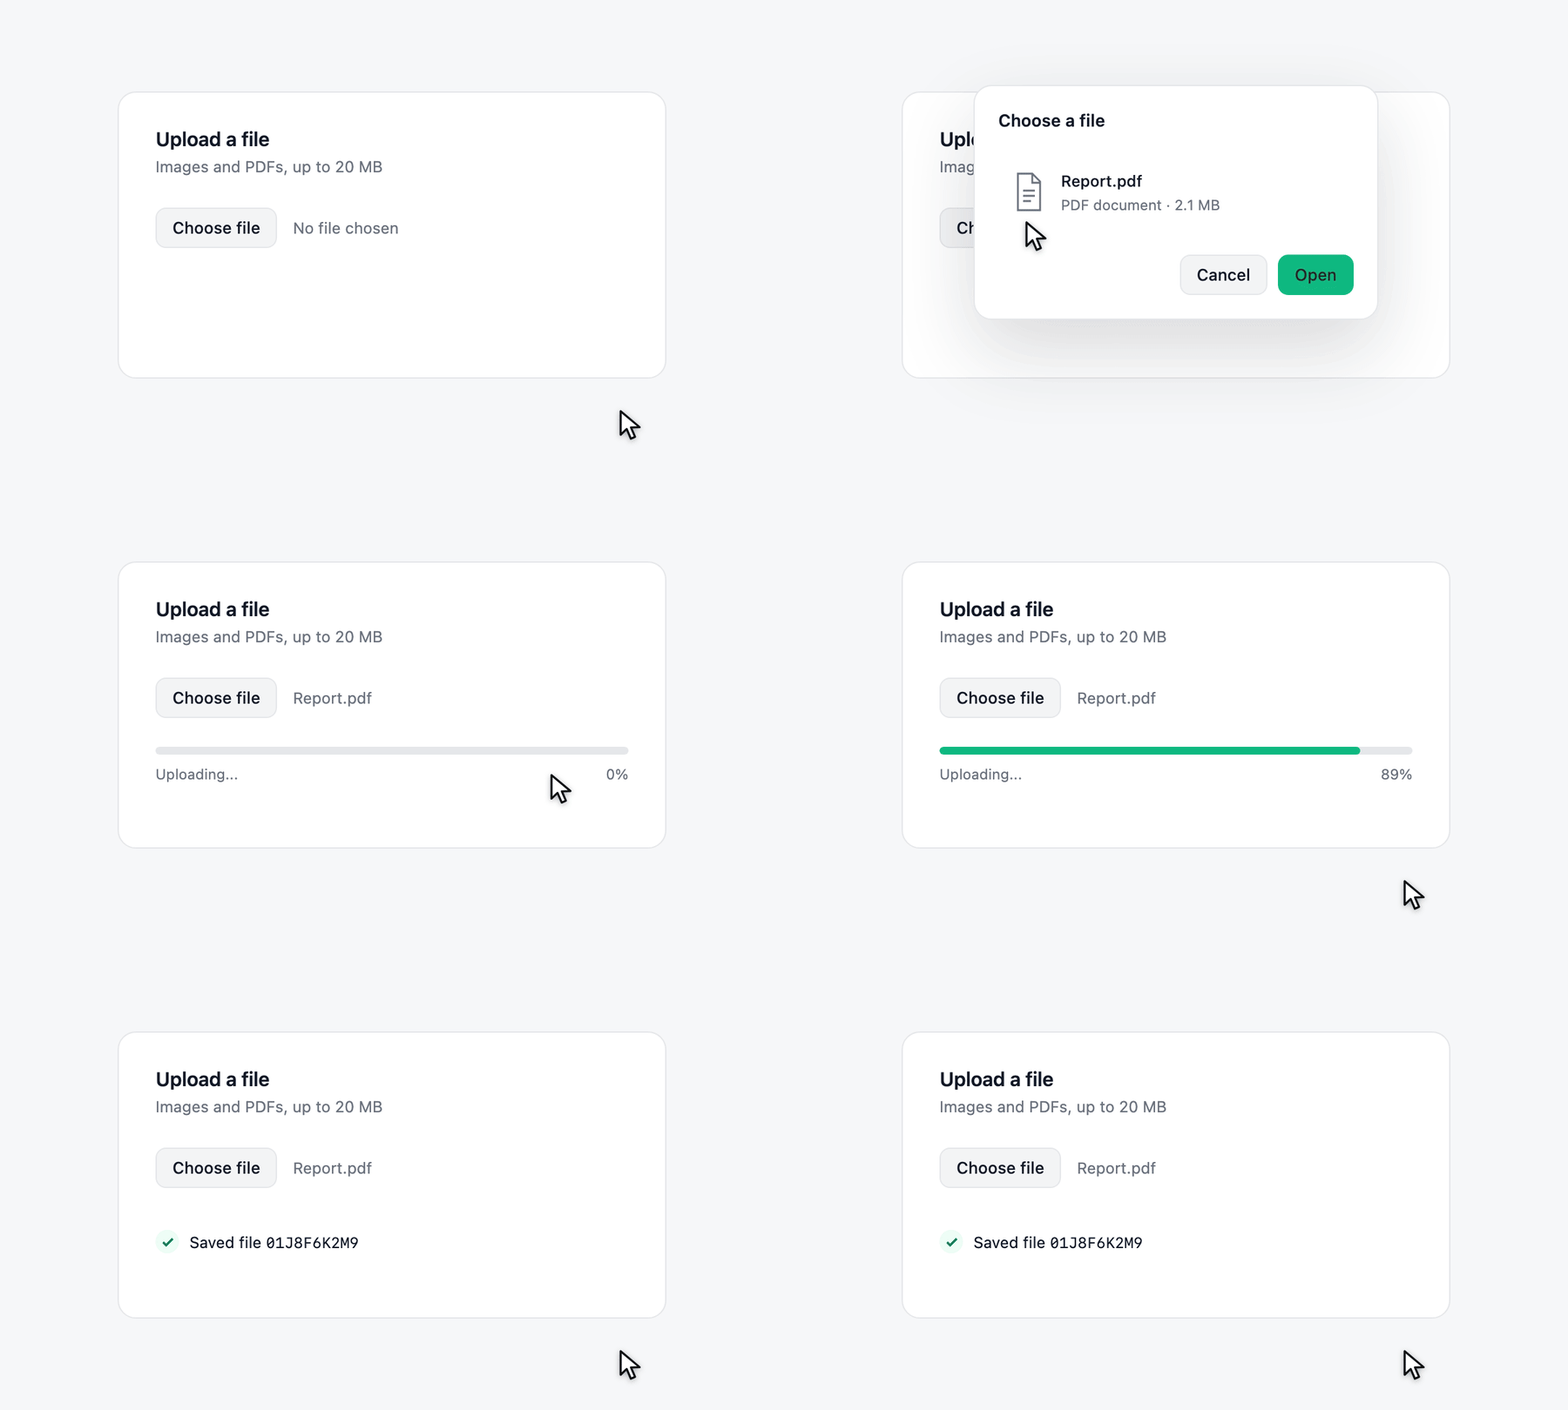
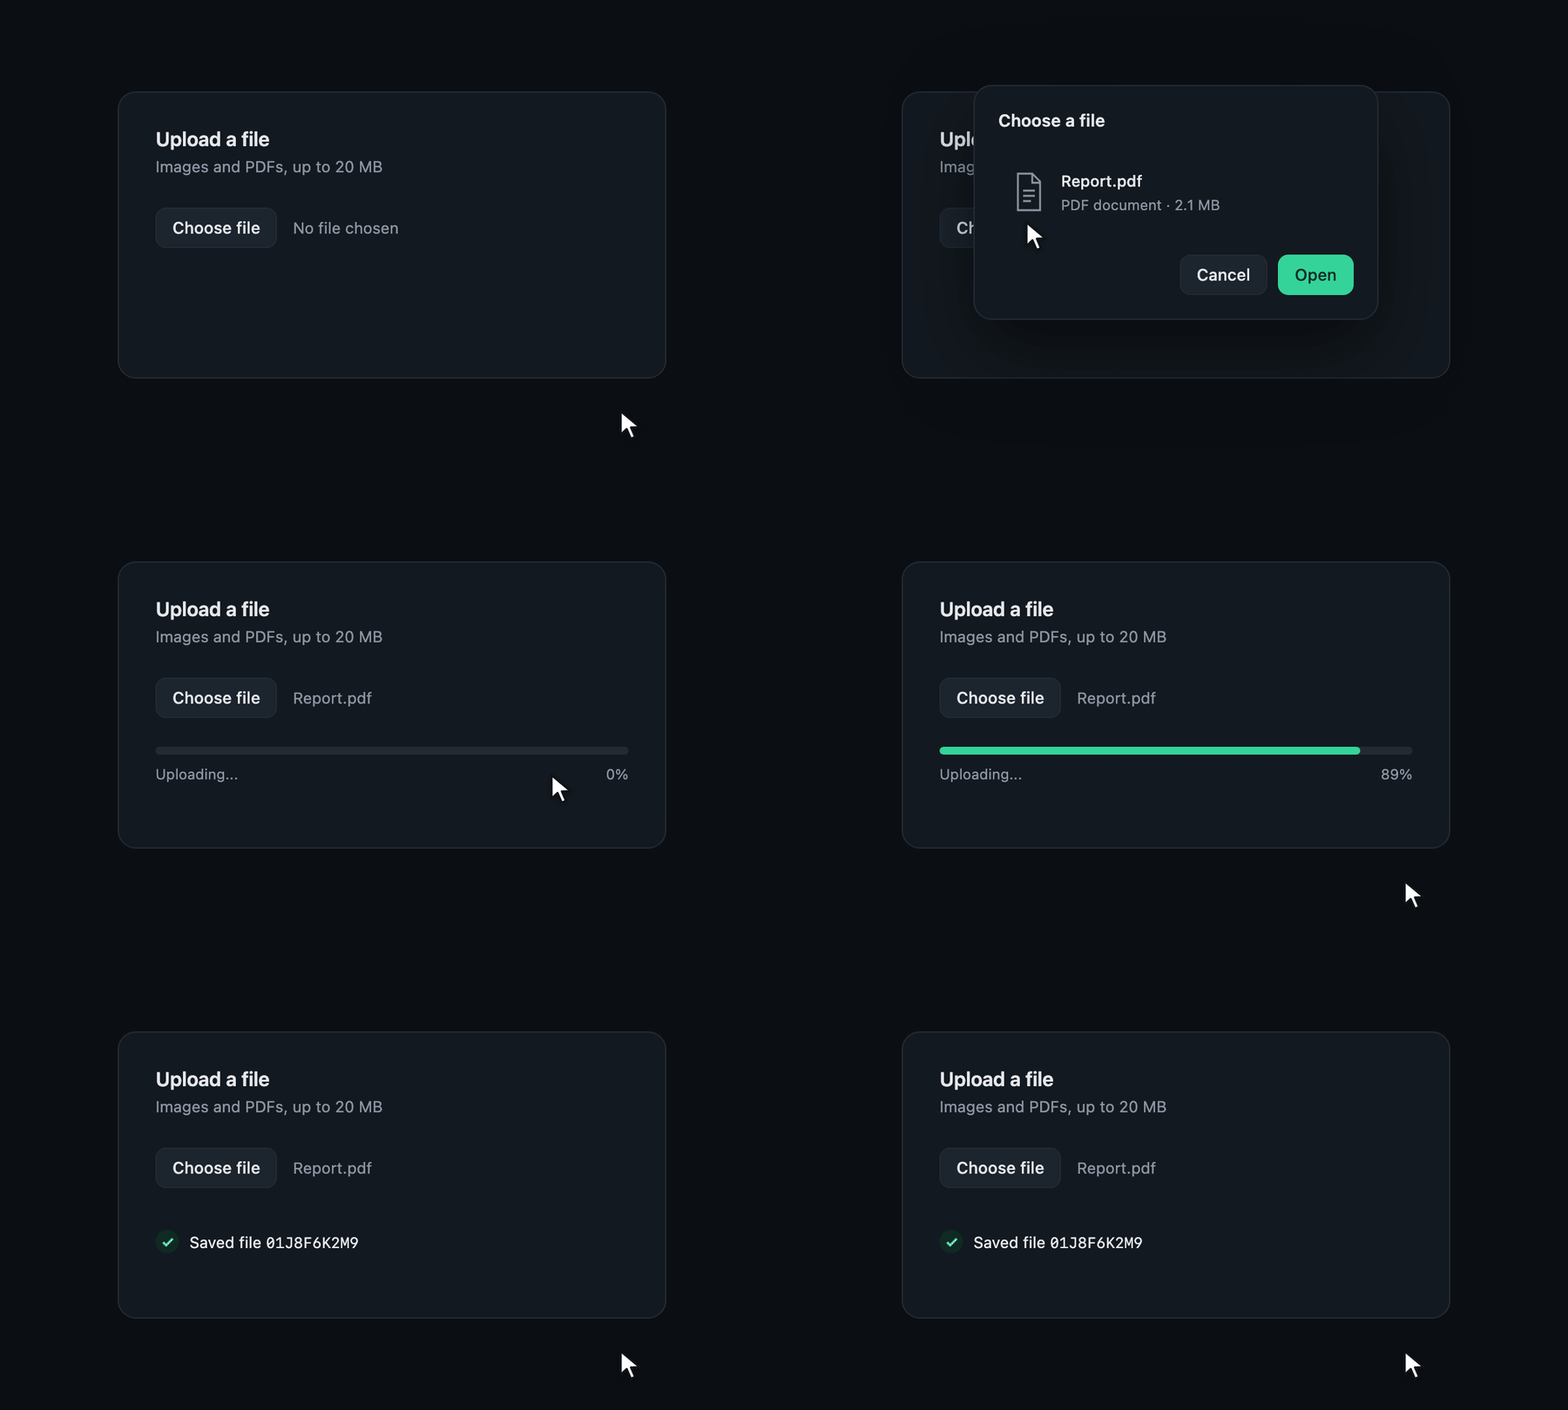
When a user selects a file in your app, there is more to handle: checking permissions, showing progress, and recording the result. That is where the upload SDK comes in.
The upload SDK lets you define who can upload, what you accept, and what happens when a file arrives. Sensible defaults handle the transport, and **end-to-end type safety** connects your server logic all the way to the component that renders the result.
Start with a handler. This one accepts images and PDFs from signed-in users, gives each file a unique path, and saves a database record when it lands. `getUser` and `db` are your app's existing auth and database helpers:
```ts
// lib/uploads.ts
import "server-only"
import { BlobError, uploadHandler } from "@upstash/blob"
import { getUser } from "./auth"
import { db } from "./db"
export const uploads = uploadHandler({
constraints: { maxSize: "20mb", contentTypes: ["image/*", "application/pdf"] },
onBeforeUpload: async ({ request }) => {
const user = await getUser(request)
if (!user) throw new BlobError("unauthorized")
return {
path: `${user.id}/${crypto.randomUUID()}`,
metadata: { owner: user.id },
}
},
onUploadComplete: async ({ uploadId, path, url, metadata }) => {
await db.files.upsert({ uploadId, owner: metadata.owner, path, url })
// Sent to the client as upload.blob.data, with its type inferred end to end.
return { fileId: uploadId }
},
})
```
The row saved in `onUploadComplete` lets your database answer questions like "which files belong to this user?" The bucket holds the bytes; your database indexes the files.
In Next.js, mounting it takes two lines:
```ts
// app/api/upload/route.ts
import { uploads } from "@/lib/uploads"
export const { GET, POST } = uploads
```
Then connect your UI to the handler's type:
```tsx
"use client"
import { uploadHooks } from "@upstash/blob/react"
import type { uploads } from "@/lib/uploads"
const { useUpload } = uploadHooks()
export function FilePicker() {
const { start, upload, accept } = useUpload()
return (
<>
start({ file: e.target.files?.[0] })}
/>
{upload?.pending && }
{upload?.status === "error" &&
{upload.error.message}
}
{upload?.status === "done" &&
Saved file {upload.blob.data.fileId}
}
)
}
```
That `fileId` is inferred from `onUploadComplete`. Rename it on the server and TypeScript points to the component that needs updating.
Add named routes and `useUpload("avatar")` only accepts names your handler defines. For uploads that need extra data, an [input schema](https://upstash.com/docs/blob/uploads/upload-handler#uploadroute) gives you both server validation and a typed `start({ file, input })` call.
No duplicate request and response interfaces, code generation, or type assertions to keep the two sides in sync. The client imports only a type, so your server code stays on the server.
The defaults do just as much work. The hook already knows to call `/api/upload`. Its `accept` value comes from your handler's allowed file types, and the server enforces your size and type constraints. Files over 16 MB automatically use multipart uploads, with pause, resume, retries for failed parts, and refreshed upload signatures when they expire. Small and large files expose the same progress and error state to your UI. You can change the defaults when your app needs it; the [upload client](https://upstash.com/docs/blob/uploads/upload-client) and [large-file docs](https://upstash.com/docs/blob/uploads/large-files) cover the controls.
## Direct uploads
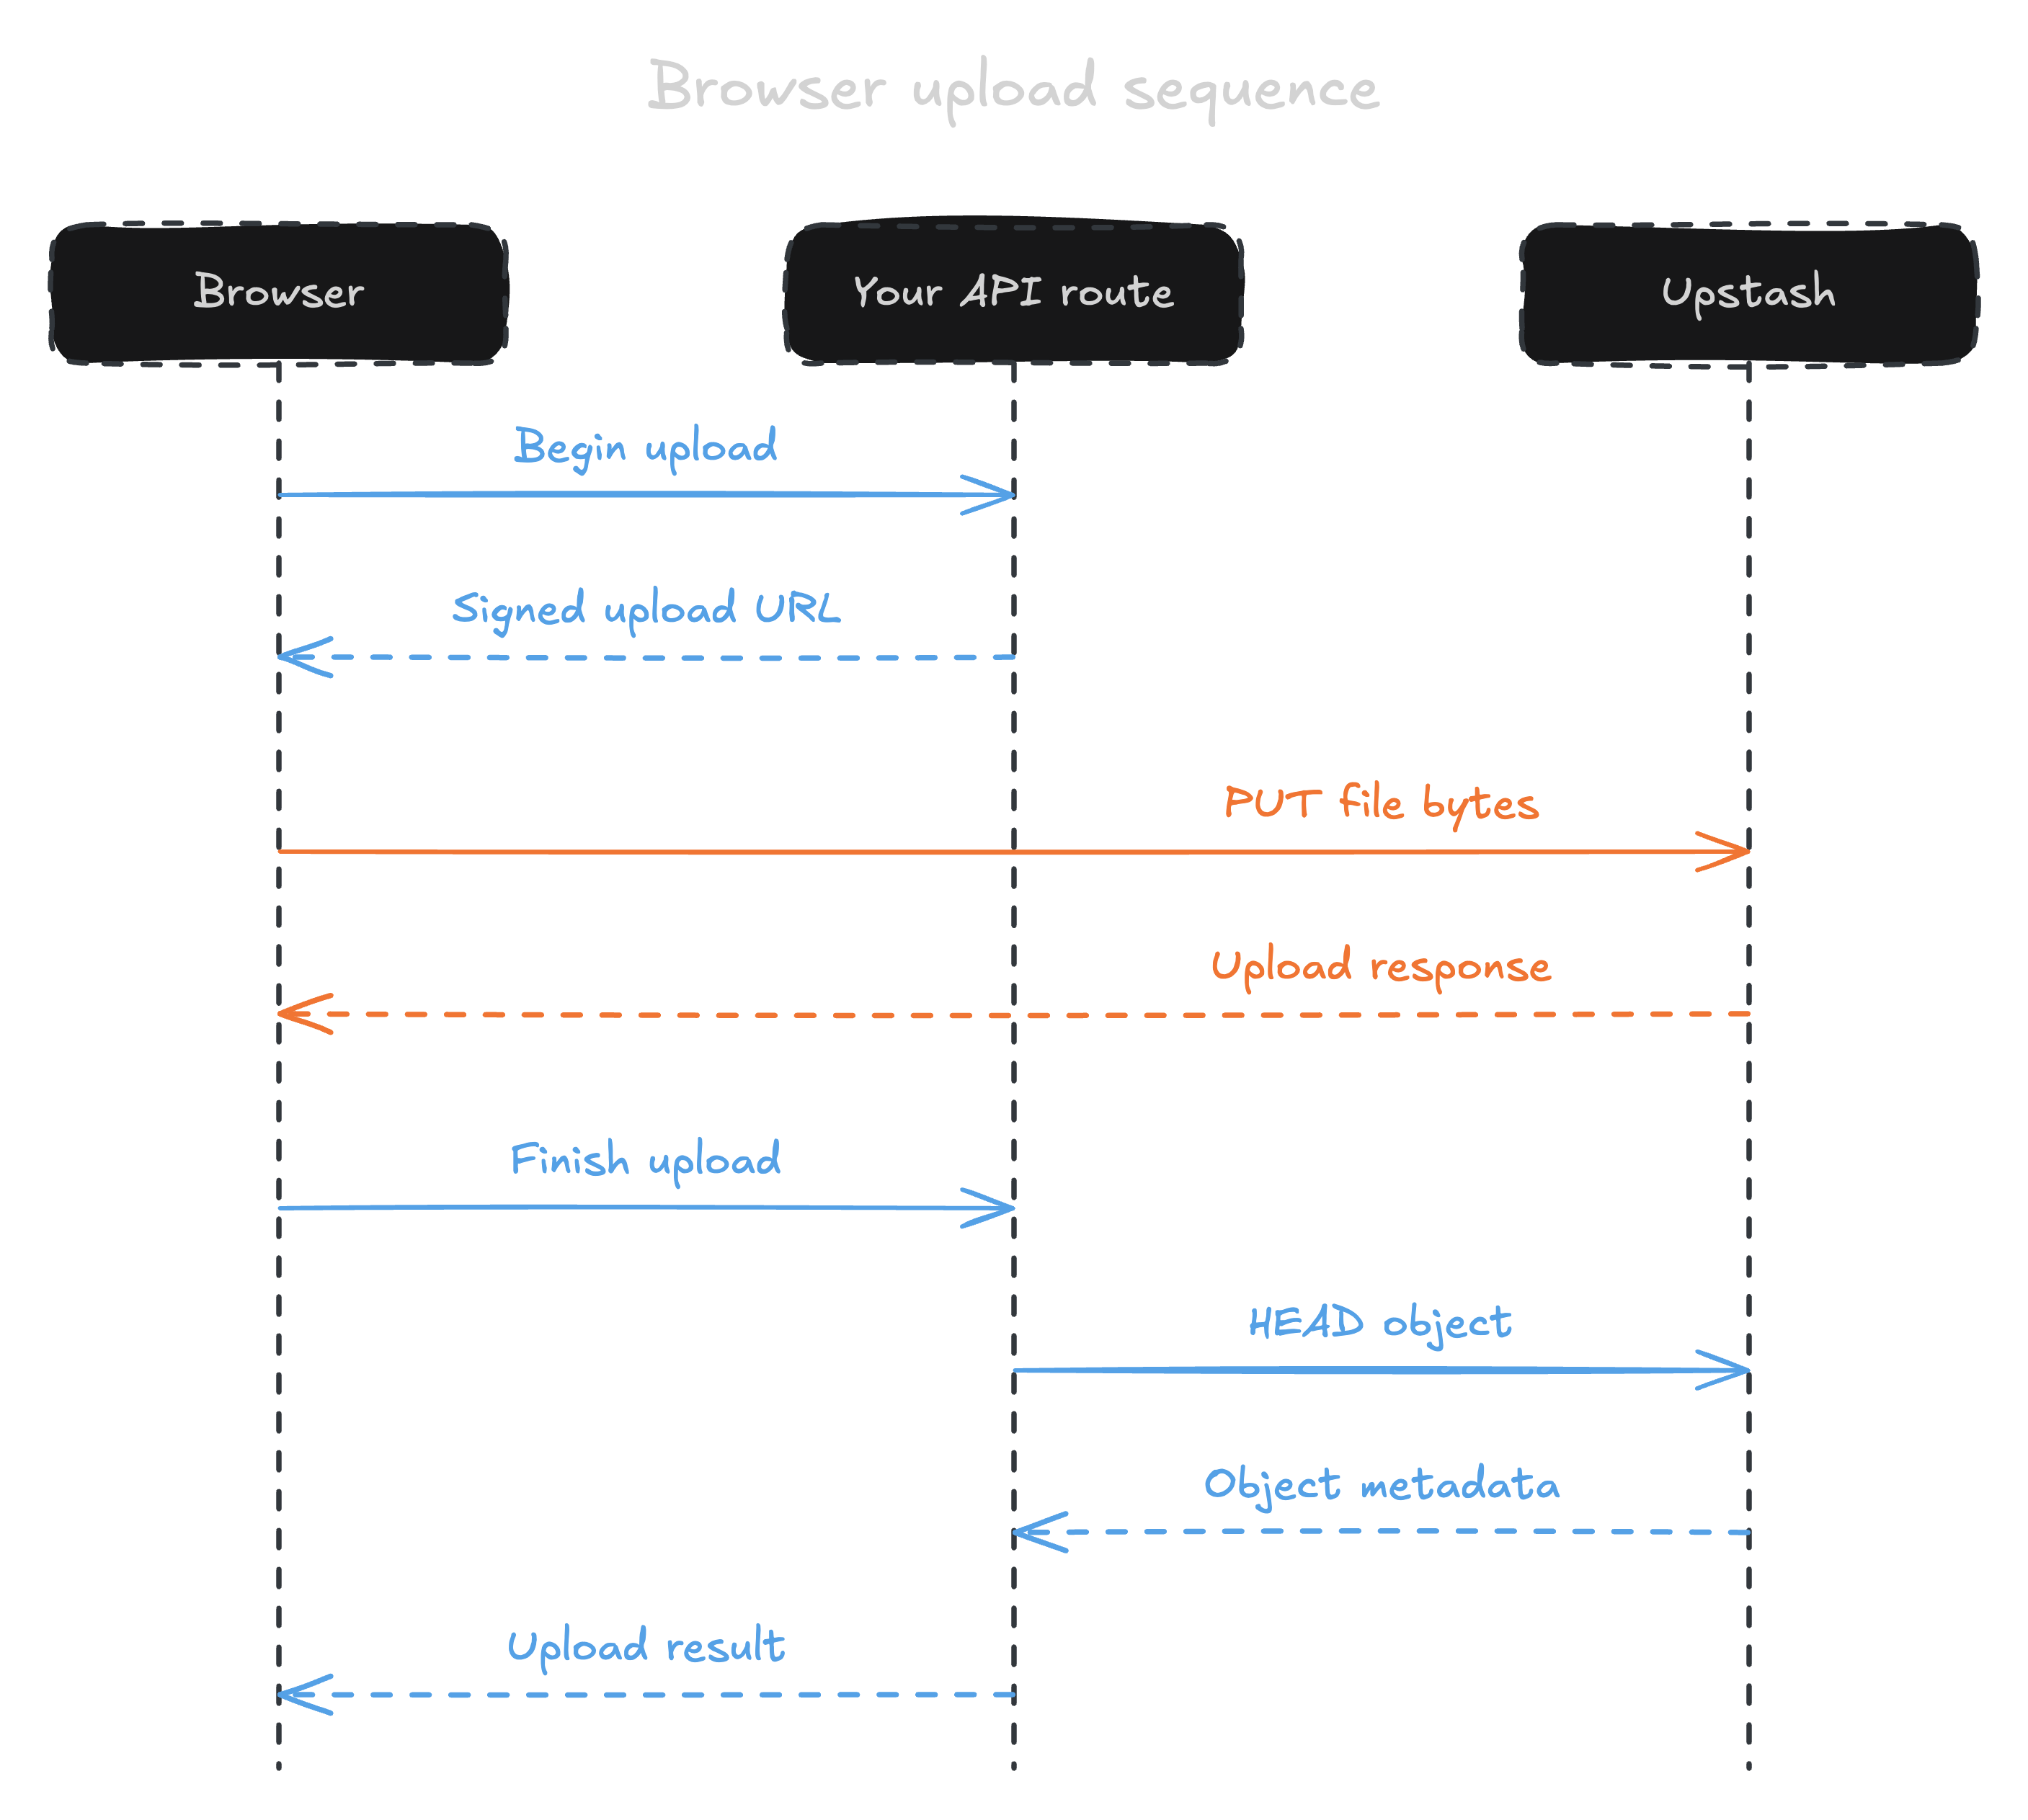
Your server authorizes the upload and gives the browser a signed URL. The browser sends the file bytes directly to Upstash, then your server verifies the upload and runs `onUploadComplete`. The file never passes through your server, so its request body limit does not restrict the upload.
You start with a short, typed integration that already handles the upload mechanics. Your code stays focused on your product as its file storage needs grow.
## Simple pricing, no extra CDN charges
**CDN delivery is included in our standard pricing.** On pay as you go, outbound bandwidth costs **$0.02 per GB** and reads cost **$0.30 per million**, with the same rates worldwide.
You pay the same rates whether a file comes from the CDN or the underlying storage, with no extra delivery fees.
Storage costs **$0.02 per GB** per month, and writes, lists and copies cost $4.50 per million. Uploads cost nothing to transfer, deletes are free, and storage is billed on the monthly average of the bucket rather than its peak. Every meter is billed as measured, with no rounding up to a whole unit.
The free tier is 1 GB of storage, 10 GB of bandwidth, 10,000 reads and 2,000 writes a month, with no card. The full breakdown is on the [pricing page](https://upstash.com/pricing/blob).
## Try it
Create a bucket in the [Upstash Console](https://console.upstash.com), copy the token, and the [quickstart](https://upstash.com/docs/blob/overall/quickstart) takes you to a working file picker. The [recipes](https://upstash.com/docs/blob/recipes/avatars) go further: avatars, attachments, private documents, exports and video, each wired end to end.
We would like to hear what you build with it, and what gets in your way. Find us on [Discord](https://upstash.com/discord).
 Start with a handler. This one accepts images and PDFs from signed-in users, gives each file a unique path, and saves a database record when it lands. `getUser` and `db` are your app's existing auth and database helpers:
```ts
// lib/uploads.ts
import "server-only"
import { BlobError, uploadHandler } from "@upstash/blob"
import { getUser } from "./auth"
import { db } from "./db"
export const uploads = uploadHandler({
constraints: { maxSize: "20mb", contentTypes: ["image/*", "application/pdf"] },
onBeforeUpload: async ({ request }) => {
const user = await getUser(request)
if (!user) throw new BlobError("unauthorized")
return {
path: `${user.id}/${crypto.randomUUID()}`,
metadata: { owner: user.id },
}
},
onUploadComplete: async ({ uploadId, path, url, metadata }) => {
await db.files.upsert({ uploadId, owner: metadata.owner, path, url })
// Sent to the client as upload.blob.data, with its type inferred end to end.
return { fileId: uploadId }
},
})
```
The row saved in `onUploadComplete` lets your database answer questions like "which files belong to this user?" The bucket holds the bytes; your database indexes the files.
In Next.js, mounting it takes two lines:
```ts
// app/api/upload/route.ts
import { uploads } from "@/lib/uploads"
export const { GET, POST } = uploads
```
Then connect your UI to the handler's type:
```tsx
"use client"
import { uploadHooks } from "@upstash/blob/react"
import type { uploads } from "@/lib/uploads"
const { useUpload } = uploadHooks
Start with a handler. This one accepts images and PDFs from signed-in users, gives each file a unique path, and saves a database record when it lands. `getUser` and `db` are your app's existing auth and database helpers:
```ts
// lib/uploads.ts
import "server-only"
import { BlobError, uploadHandler } from "@upstash/blob"
import { getUser } from "./auth"
import { db } from "./db"
export const uploads = uploadHandler({
constraints: { maxSize: "20mb", contentTypes: ["image/*", "application/pdf"] },
onBeforeUpload: async ({ request }) => {
const user = await getUser(request)
if (!user) throw new BlobError("unauthorized")
return {
path: `${user.id}/${crypto.randomUUID()}`,
metadata: { owner: user.id },
}
},
onUploadComplete: async ({ uploadId, path, url, metadata }) => {
await db.files.upsert({ uploadId, owner: metadata.owner, path, url })
// Sent to the client as upload.blob.data, with its type inferred end to end.
return { fileId: uploadId }
},
})
```
The row saved in `onUploadComplete` lets your database answer questions like "which files belong to this user?" The bucket holds the bytes; your database indexes the files.
In Next.js, mounting it takes two lines:
```ts
// app/api/upload/route.ts
import { uploads } from "@/lib/uploads"
export const { GET, POST } = uploads
```
Then connect your UI to the handler's type:
```tsx
"use client"
import { uploadHooks } from "@upstash/blob/react"
import type { uploads } from "@/lib/uploads"
const { useUpload } = uploadHooks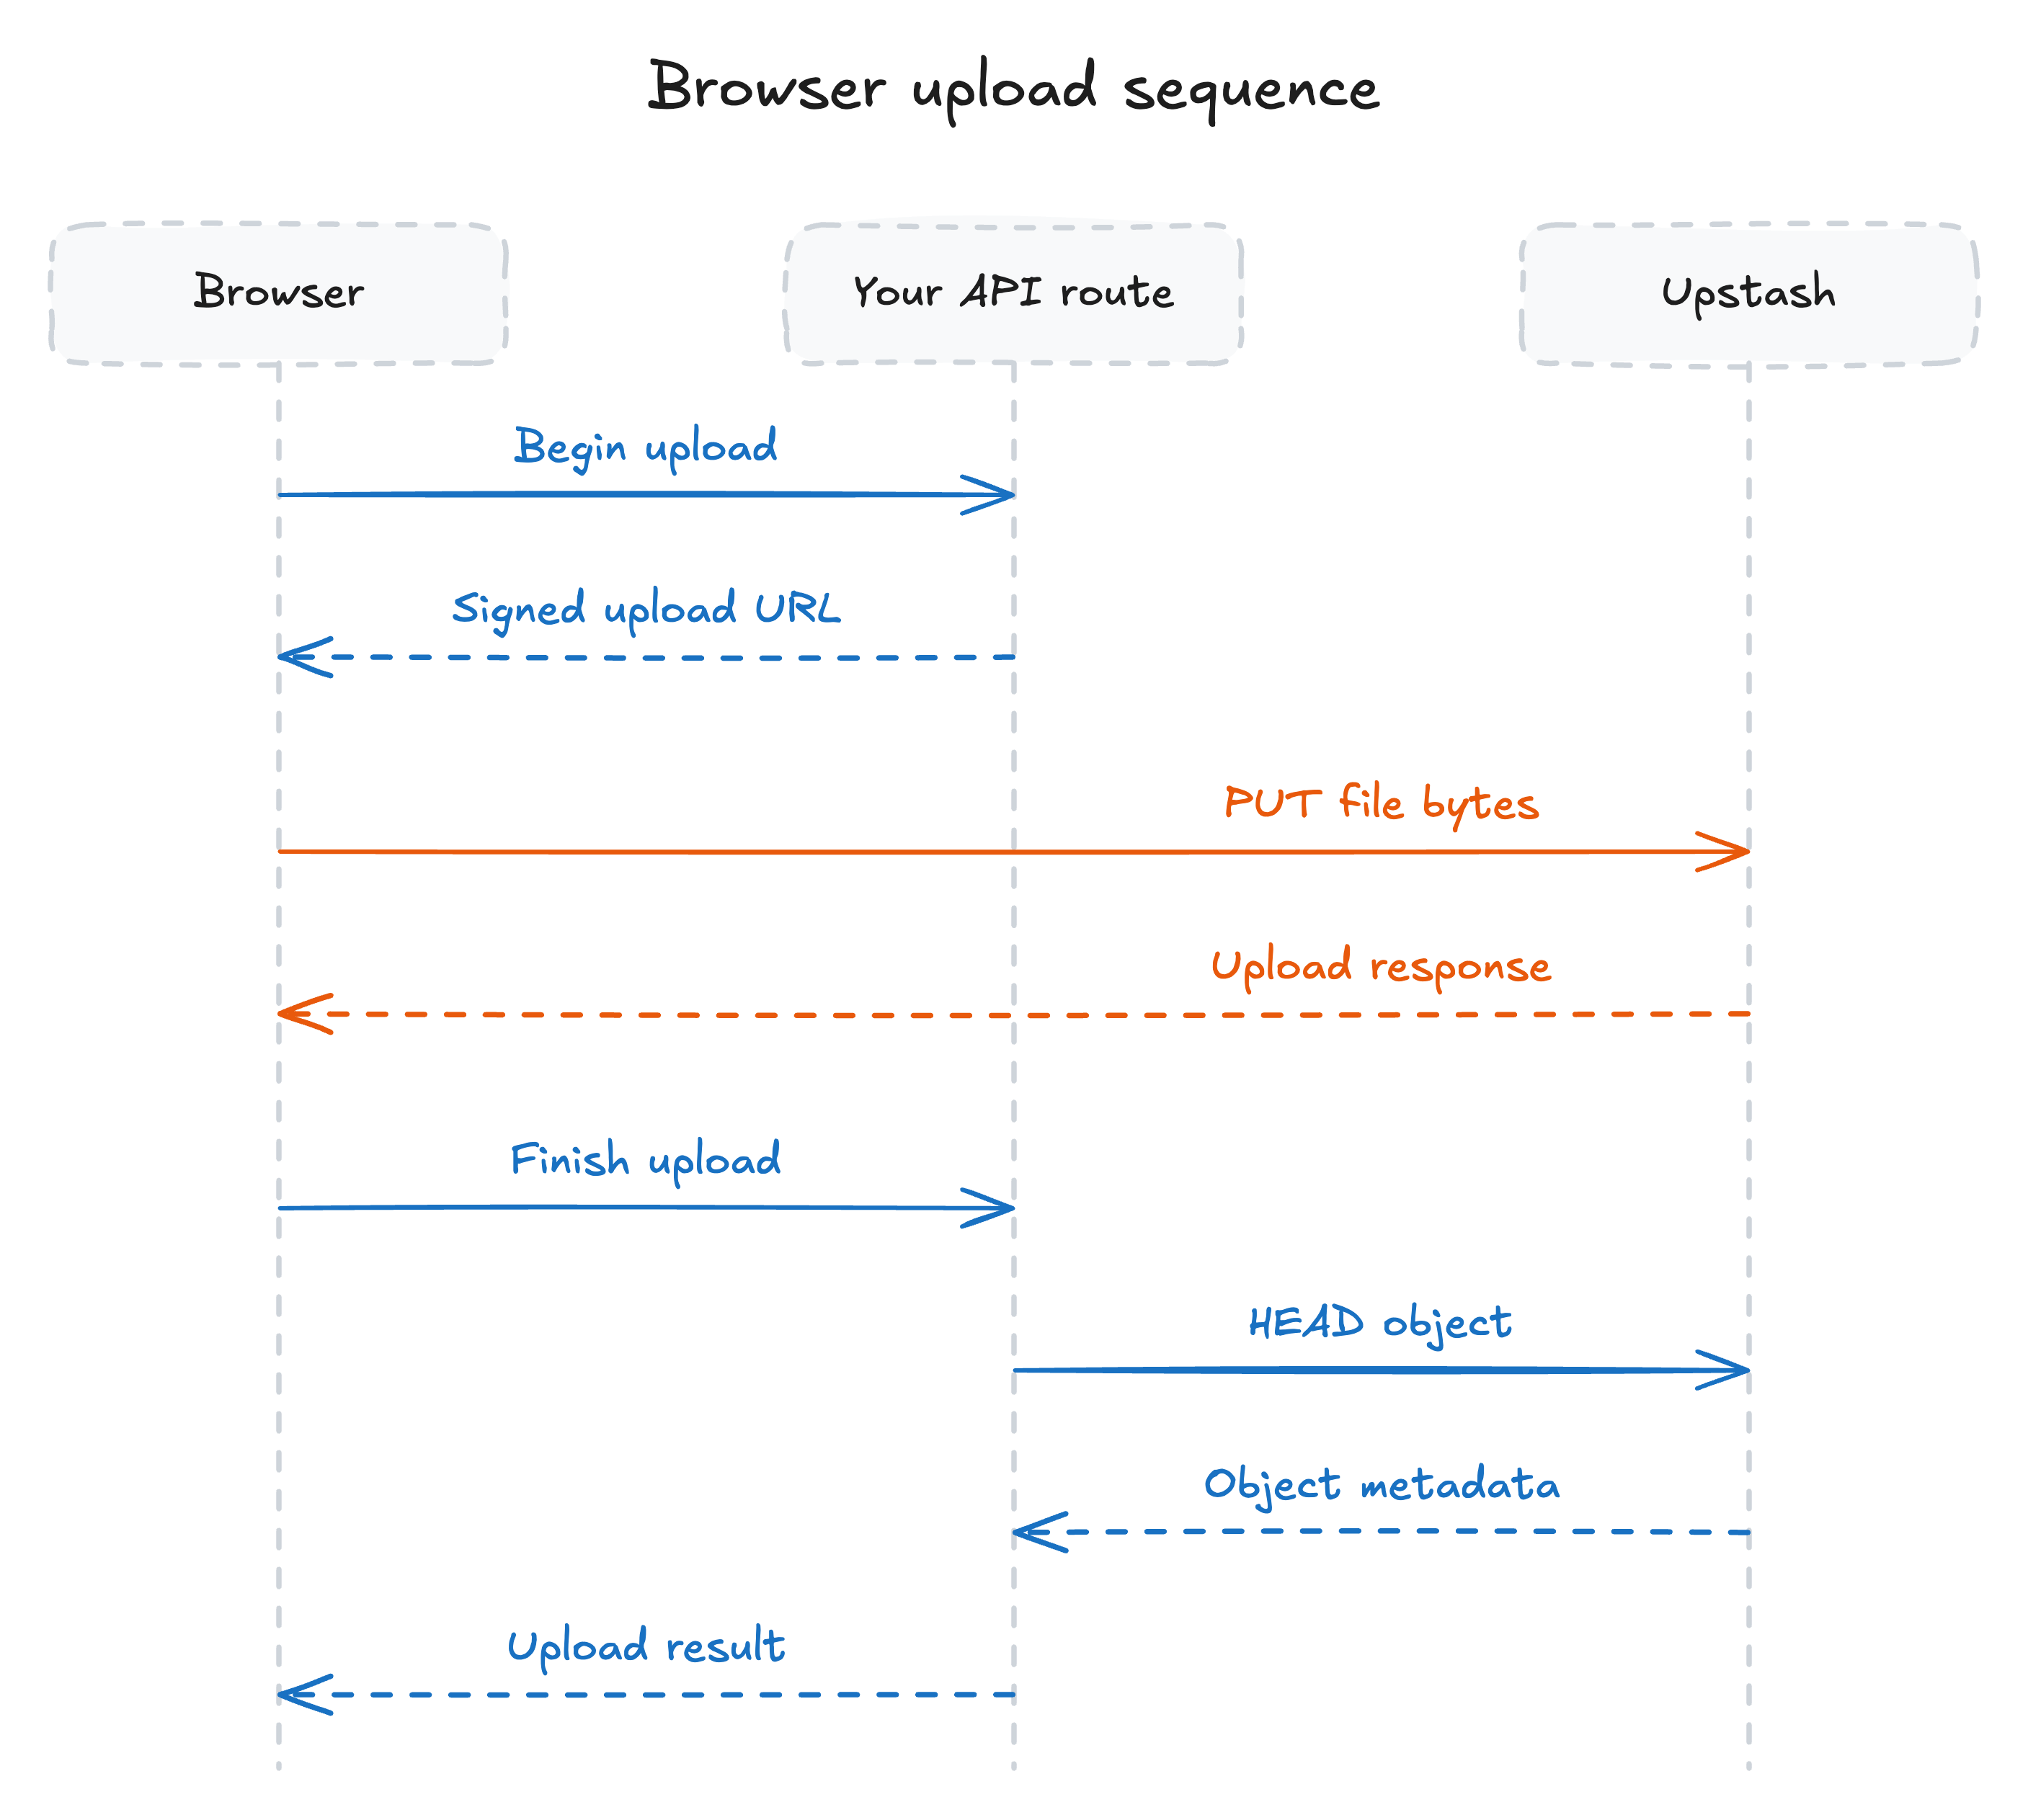
 You start with a short, typed integration that already handles the upload mechanics. Your code stays focused on your product as its file storage needs grow.
## Simple pricing, no extra CDN charges
**CDN delivery is included in our standard pricing.** On pay as you go, outbound bandwidth costs **$0.02 per GB** and reads cost **$0.30 per million**, with the same rates worldwide.
You pay the same rates whether a file comes from the CDN or the underlying storage, with no extra delivery fees.
Storage costs **$0.02 per GB** per month, and writes, lists and copies cost $4.50 per million. Uploads cost nothing to transfer, deletes are free, and storage is billed on the monthly average of the bucket rather than its peak. Every meter is billed as measured, with no rounding up to a whole unit.
The free tier is 1 GB of storage, 10 GB of bandwidth, 10,000 reads and 2,000 writes a month, with no card. The full breakdown is on the [pricing page](https://upstash.com/pricing/blob).
## Try it
Create a bucket in the [Upstash Console](https://console.upstash.com), copy the token, and the [quickstart](https://upstash.com/docs/blob/overall/quickstart) takes you to a working file picker. The [recipes](https://upstash.com/docs/blob/recipes/avatars) go further: avatars, attachments, private documents, exports and video, each wired end to end.
We would like to hear what you build with it, and what gets in your way. Find us on [Discord](https://upstash.com/discord).
You start with a short, typed integration that already handles the upload mechanics. Your code stays focused on your product as its file storage needs grow.
## Simple pricing, no extra CDN charges
**CDN delivery is included in our standard pricing.** On pay as you go, outbound bandwidth costs **$0.02 per GB** and reads cost **$0.30 per million**, with the same rates worldwide.
You pay the same rates whether a file comes from the CDN or the underlying storage, with no extra delivery fees.
Storage costs **$0.02 per GB** per month, and writes, lists and copies cost $4.50 per million. Uploads cost nothing to transfer, deletes are free, and storage is billed on the monthly average of the bucket rather than its peak. Every meter is billed as measured, with no rounding up to a whole unit.
The free tier is 1 GB of storage, 10 GB of bandwidth, 10,000 reads and 2,000 writes a month, with no card. The full breakdown is on the [pricing page](https://upstash.com/pricing/blob).
## Try it
Create a bucket in the [Upstash Console](https://console.upstash.com), copy the token, and the [quickstart](https://upstash.com/docs/blob/overall/quickstart) takes you to a working file picker. The [recipes](https://upstash.com/docs/blob/recipes/avatars) go further: avatars, attachments, private documents, exports and video, each wired end to end.
We would like to hear what you build with it, and what gets in your way. Find us on [Discord](https://upstash.com/discord).