# SvelteKit TODO App with Redis
> **Source:** https://upstash.com/blog/sveltekit-todo-redis
> **Date:** 2022-03-10
> **Author(s):** Adem Ilter
> **Reading time:** 4 min read
> **Tags:** svelte, sveltekit, todo, serverless, redis, upstash
> **Format:** text/markdown — machine-readable content for agents and LLMs
---
In this post, we will write a simple TODO app
using [SvelteKit](https://kit.svelte.dev/)
and [Serverless Redis](https://upstash.com) (Upstash).
> SvelteKit is a framework for building web applications of all sizes, with a beautiful development experience and flexible filesystem-based routing.
### Create project
Run the below command:
```shell
npm init svelte@next todo-app-with-redis
```

The project is ready. Now let's install the dependencies and run:
```shell
npm install
```
```shell
npm run dev
```
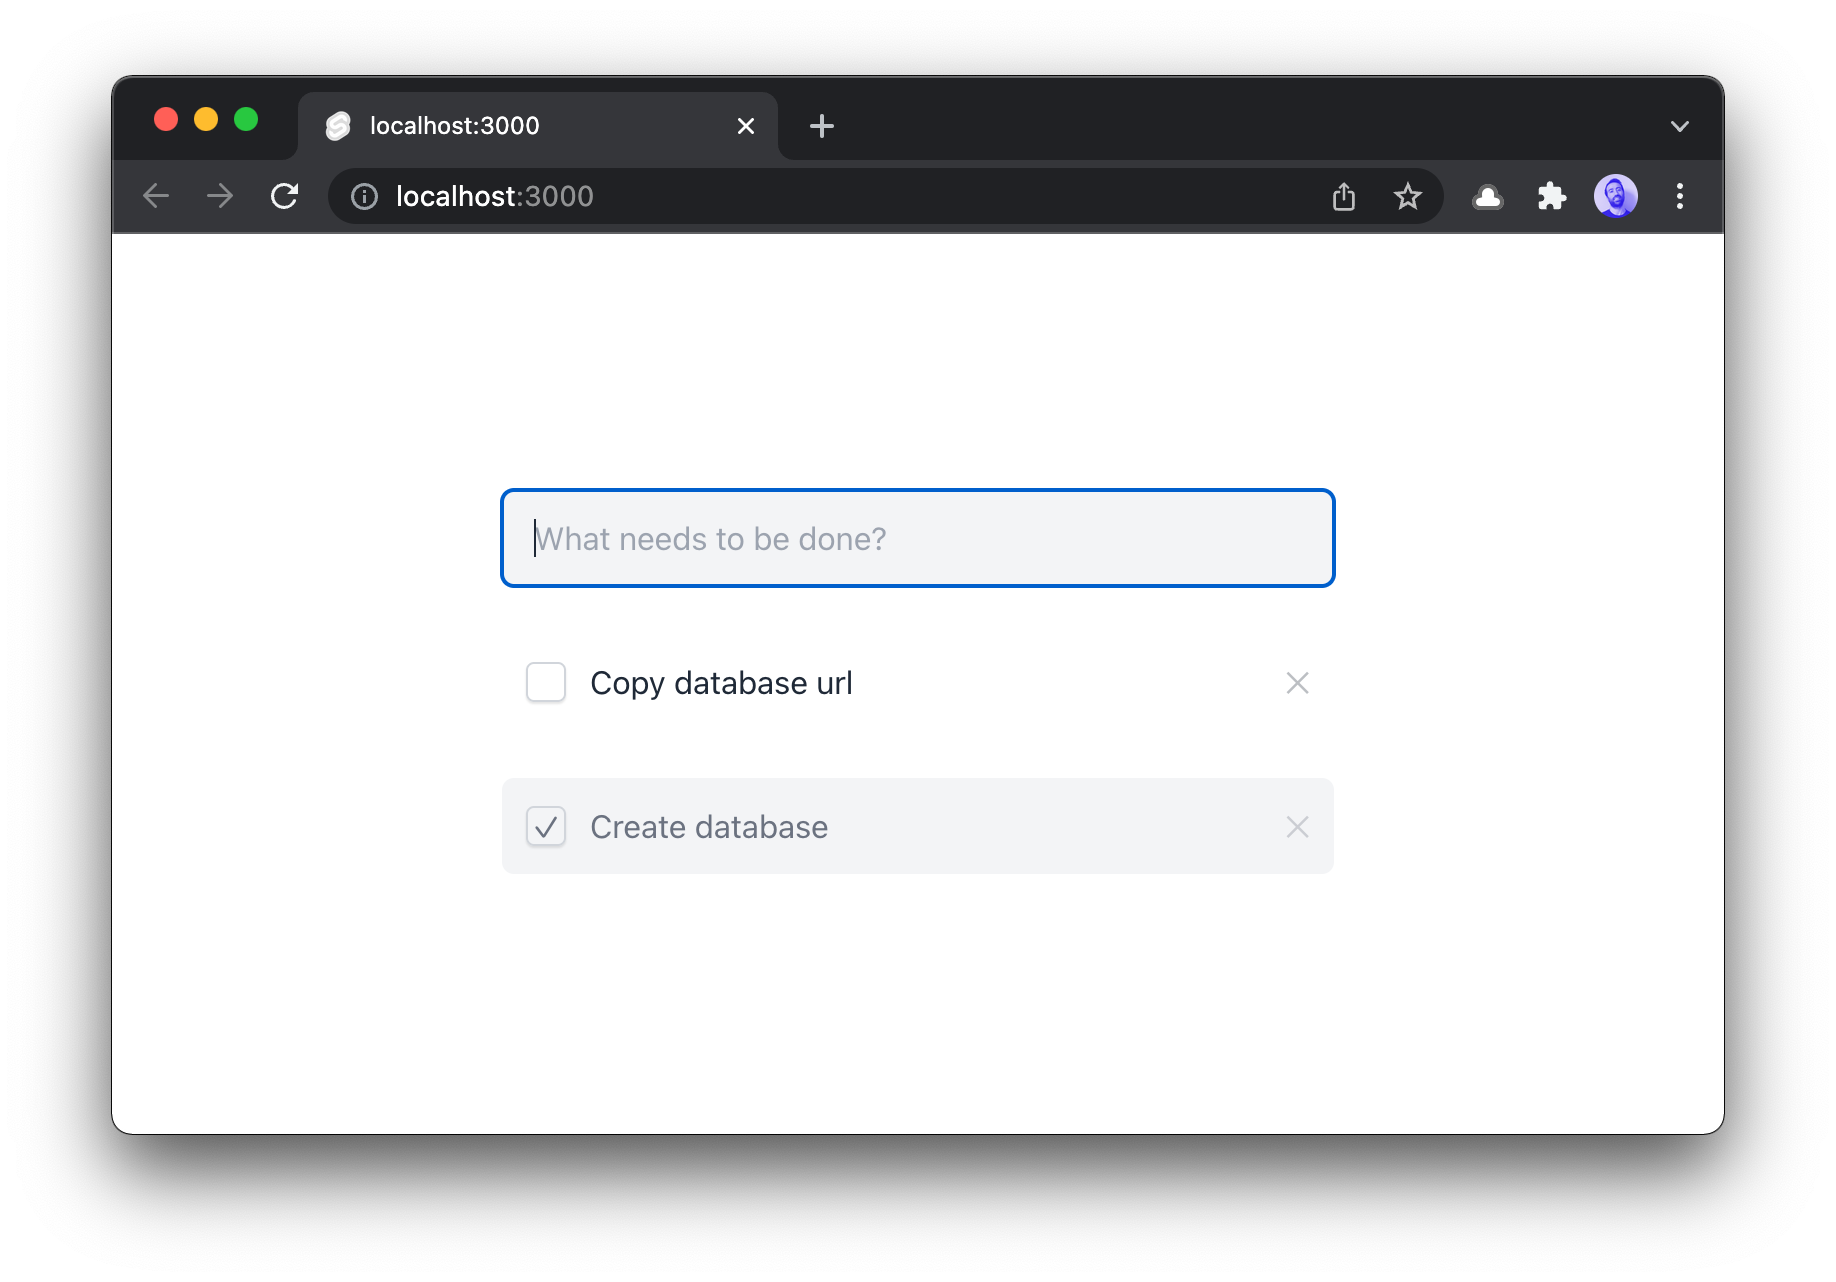
### The User Interface
We create a simple form and a list to keep the todo items. It will be empty for now, later we will bind it to the database.
```tsx
// src/routes/index.svelte
{#if uncheckedTodos.length}
{#each uncheckedTodos as todo (todo.id)}
{/each}
{/if}
{#if checkedTodos.length}
{#each checkedTodos as todo (todo.id)}
{/each}
{/if}
```
Here is our TODO component:
```tsx
// src/components/Todo.svelte
{todo.text}
```
Now you should see:
### Prepare the database
We will keep our data in Upstash Redis.
So [create an Upstash database](https://console.upstash.com/). We will use HTTP
based Upstash client which is friendly with Serverless environments. Let's install:
```shell
npm install @upstash/redis
```
Now let's create our Redis database on [Upstash Console](https://console.upstash.com).
Copy/paste the `UPSTASH_REDIS_REST_URL`
and `UPSTASH_REDIS_REST_TOKEN` to the .env file.
```
UPSTASH_REDIS_REST_URL=https://global-renewing-gecko-31543.upstash.io
UPSTASH_REDIS_REST_TOKEN=AXs3ACsjfg684jJBFQgN34je7RFJ58wYjg4NjMt=
```
We need to install **dotenv** to use the environment variables.
```shell
npm install dotenv
```
Now create `lib/redis.ts` and create a new Redis instance as below:
```ts
// src/lib/redis.ts
import "dotenv/config";
import { Redis } from "@upstash/redis";
export const databaseName =
process.env.NODE_ENV === "development"
? "redis-with-svelte-kit-dev"
: "redis-with-svelte-kit";
const redis = new Redis({
url: process.env.UPSTASH_REDIS_REST_URL,
token: process.env.UPSTASH_REDIS_REST_TOKEN,
});
export default redis;
```
### Create API
In the folder, the `js/ts` files is used as API backend. So `index.svelte` -> frontend, `index.ts` -> backend.
Let's create `index.ts` and add the required API methods.
```ts
// src/routes/index.ts
import type { RequestHandler } from "@sveltejs/kit";
import redis, { databaseName } from "../lib/redis";
const redirect = {
status: 303,
headers: {
location: "/",
},
};
export const get: RequestHandler = async () => {
// runs every time the page is loaded
return { body: { todos: [] } };
};
export const post: RequestHandler = async ({ request }) => {
// form: create todo
return redirect;
};
export const patch: RequestHandler = async ({ request }) => {
// form: update todo
return redirect;
};
export const del: RequestHandler = async ({ request }) => {
// form: delete todo
return redirect;
};
```
#### `POST` Create Todo
Let's implement the TODO item creation:
```ts
// src/routes/index.ts
export const post: RequestHandler = async ({ request }) => {
const form = await request.formData();
const text = form.get("text");
const id = Date.now().toString();
const todo = JSON.stringify({ text, status: false });
await redis.hset(databaseName, id, todo);
return redirect;
};
```
#### `GET` Load Todos
Now, let's list the TODO items:
```ts
// src/routes/index.ts
export const get: RequestHandler = async () => {
let todos = [];
const data = await redis.hgetall(databaseName);
if (!data) return { body: { todos } };
// normalize data
todos = Object.keys(data)
.map((key) => ({
id: key,
text: data[key]["text"],
status: data[key]["status"],
}))
// id = timestamp
.sort((a, b) => parseInt(b.id) - parseInt(a.id));
return { body: { todos } };
};
```
> To keep the post simple, I did not add `task deletion` and `taks completion` code here, but you can see them in the github repo.
Now everything is ready!
[Source Code](https://github.com/upstash/redis-examples/tree/master/svelte-kit-todo-app-with-redis)
| [Demo App](https://svelte-kit-todo-app-with-redis.vercel.app/)
---
I am planning to implement the same TODO application with Next.js. Then I will
compare my experience in these frameworks.
Stay tuned and follow us at on [Twitter](https://twitter.com/upstash)
and [Discord](https://discord.gg/w9SenAtbme).