Accurate AI Responses with Peaka's RAG Pipeline and Upstash Vector
Problem: Generative AI Hallucinations and Accuracy
The era of artificial intelligence (AI) is here, presenting vast opportunities for harnessing data for business purposes. However, these prospects are not without their hurdles, including hallucinations, accuracy concerns, and potential security issues.
AI hallucinations can be amusing when you are chit-chatting with your favorite AI bot. But if you want to build generative AI applications for your specific business needs, you want to minimize the risk of AI hallucination. To achieve this, you need to feed domain- or product-specific information (context) into the model, which will be used to generate responses relevant to your needs.
Solution: RAG
One powerful technique that has emerged to address these challenges and enhance the accuracy of AI-generated text is Retrieval-augmented Generation (RAG), which combines data retrieval with text generation. RAG provides the context for the type of data needed and tells AI what to look for, which improves precision in data retrieval. By establishing clear limits on which data to use and which to ignore, RAG ensures that AI will generate precise, accurate, and contextually-relevant responses, mitigating the hallucination and security risks.
Building the optimal data stack for RAG
The effectiveness of RAG is directly linked to the efficiency of data retrieval. The more accurate and relevant the retrieved data, the better the context provided to the AI model, leading to more precise and contextually appropriate responses.
The contextual information that you will feed into the AI model comes from a number of database indexes.
- Full-text indexes lend themselves to semantic searches, where the context of a query is important, or fuzzy searches, where the query lacks precision due to spelling mistakes or variations in expressions.
- Vector databases are good at spotting data points with similar attributes based on vector distance.
- Graph databases, on the other hand, are perfect for capturing relationships between different entities and conducting network analysis.
All these databases have relative advantages and disadvantages compared to others. You need to use them in various combinations, mixing and matching to create the optimum data stack for your needs. How much of the context comes from which type of database depends on the actual domain. Finding the optimum balance between different databases is key to creating the best possible context and generating the most relevant result.
However, this is easier said than done. Pulling in data from different platforms and tools can turn into a multistep operation, which users are not keen on. Users want data retrieval to be a single-step process that takes fuzziness and semantic relationships into account.
Single-step context creation with Peaka
This is where Peaka comes in, as it offers an efficient data retrieval process to guide AI models. Establishing a semantic layer over various data sources, Peaka dynamically builds the optimum data stack required for the context. It even goes beyond accessing databases, connecting to SaaS tools and retrieving SaaS data without having to move it to a database.
By taking care of data retrieval and context preparation in a single SQL query, Peaka eliminates the need for multi-step operations and development that RAG requires. It provides AI models with precise contextual information so they can generate accurate and hallucination-free results for product-specific tasks.
In this blog post we will build a RAG pipeline for a movie recommendation chatbot by using Peaka We will add PostgreSQL and Upstash Vector as connections to Peaka and leverage Peaka’s Node Client to query data for the RAG pipeline.
The basic architecture will look like below:

TL;DR
If you want to skip the implementation details, check out the finished code on Github. Follow the instructions on Readme to run the project on your local machine.
If you want to try the demo for your self, we have deployed the project on Vercel. You can try the demo your self by clicking this link.
Prerequisites
You will need the following accounts for this project:
Tech Stack
| Technology | Description |
|---|---|
| https://www.peaka.com/ | A zero-ETL data integration platform with single-step context generation capability |
| https://upstash.com/docs/vector/overall/getstarted | The serverless vector database which will be used for storing vector embeddings. |
| https://openai.com/ | An artificial intelligence research lab focused on developing advanced AI technologies. |
| https://vercel.com/templates/ai | Library for building AI-powered streaming text and chat UIs. |
| https://www.postgresql.org/ | A powerful, open source object-relational database system with over 35 years of active development that has earned it a strong reputation for reliability, feature robustness, and performance. |
| https://docs.nlkit.com/nlux/ | NLUX is an open-source JavaScript library for creating elegant and performant conversational user interfaces. |
| https://nextjs.org/ | The React Framework for the Web. Nextjs will be used for building the chatbot app. |
Create Peaka Project and API Key
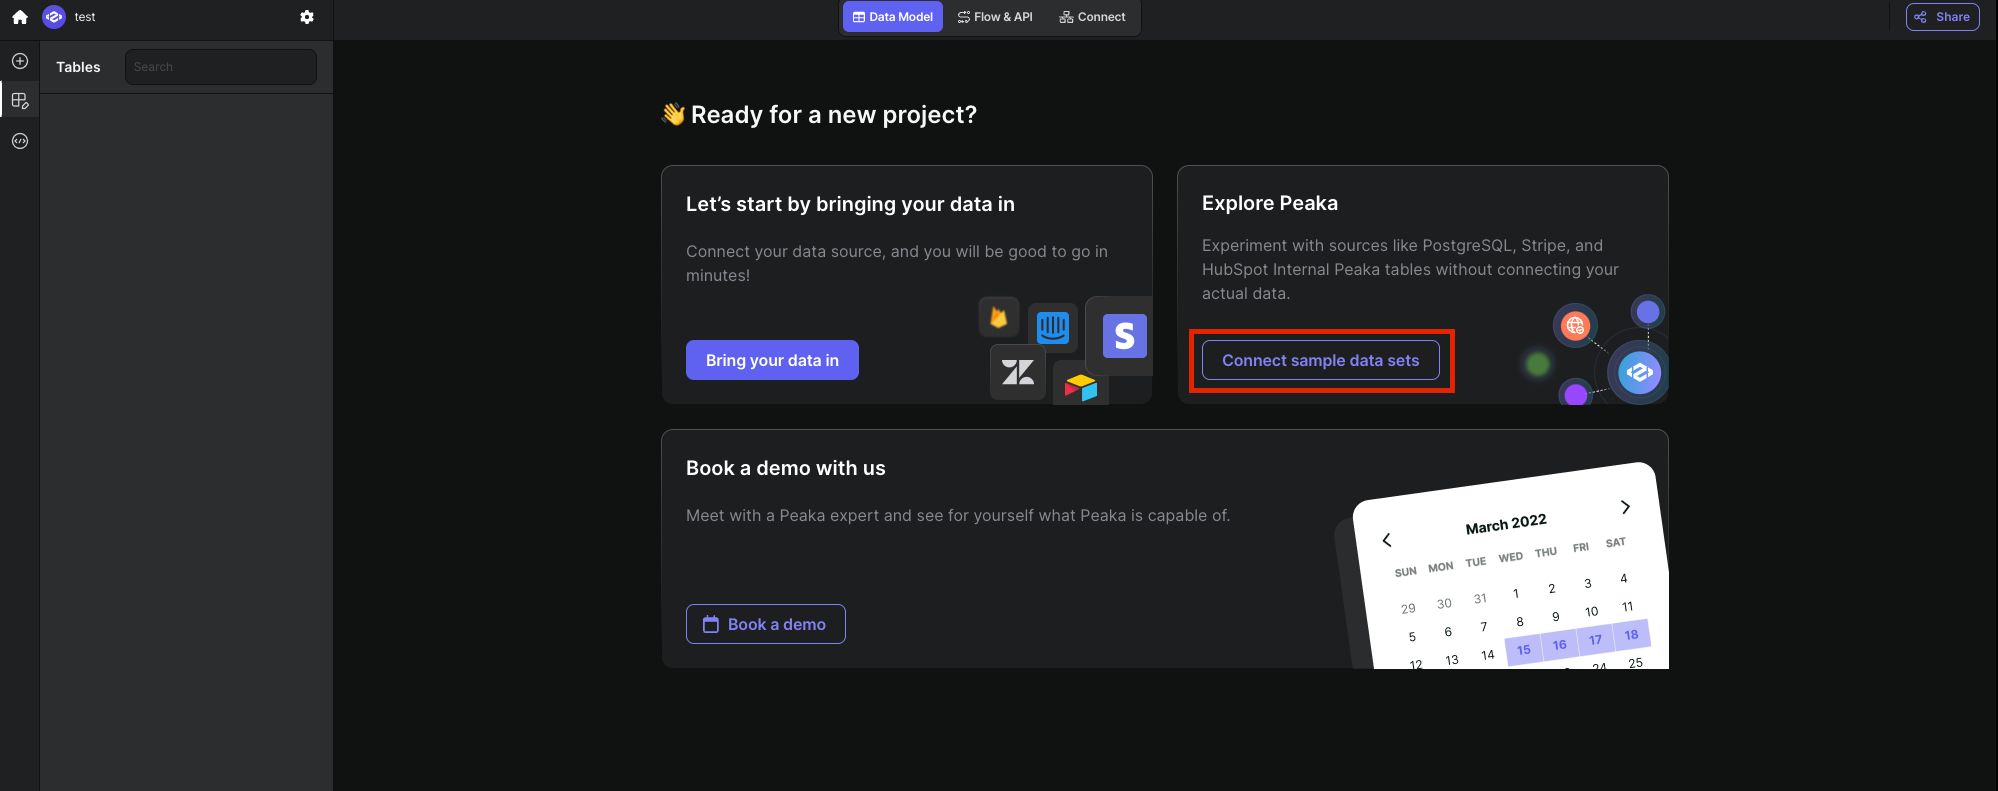
Once you login to Peaka, you need to create your project and connect sample data sets. Checkout Peaka Documentation for creating your Project and follow detailed instructions by clicking here. Enter your created project and click Connect sample data sets button on the screen as shown in the image below:

In the sample data set both PostgreSQL and Upstash Vector data sources are already added. We will use these data sources for our demo app.
After you create your project, setup connections, and create your catalogs in Peaka, you need to generate a Peaka API Key to use it in our project.
Check out Peaka Documentation for creating your API Key and follow the detailed instructions by clicking here. Copy and save your Peaka API Key.
Create a Next.js Application
To create a new project, first navigate to the directory that you want to create your project in using your terminal. Then, run the following commands:
npm install -g create-next-app
npx create-next-app@latest- Use Tailwind CSS (for UI design)
- Use "App Router"
After this step, go to your project's folder with the cd command and install the necessary libraries
npm i @ai-sdk/openai @ai-sdk/react @nlux/react @nlux/themes @peaka/client @upstash/vector ai langchain lodash zodFrom now on, when you are at the directory of your project the command
npm run dev
is going to be sufficient to run the project on localhost:3000.
If you need further clarification, you can refer to the Readme or the Next.js documentation
Create .env file
Now create a file called .env in your project and add it to the .gitignore file if you are considering to add this project to your Github account. In this file, we will store our API keys.
PEAKA_API_KEY=<YOUR_PEAKA_API_KEY>
OPENAI_API_KEY=<YOUR_OPEN_API_KEY>

# Enter these if you want to populate your upstash instance with data by calling populate data endpoint
# It is not required if you are using sample data provided in Peaka
UPSTASH_VECTOR_REST_URL=<YOUR_UPSTASH_VECTOR_REST_URL>
UPSTASH_VECTOR_REST_TOKEN=<YOUR_UPSTASH_VECTOR_REST_TOKEN>
Create Peaka Service
Create a service folder under the root folder in your project and create a peaka.service.ts file inside this folder. We will need to implement two methods in this service class. The first method is getRentedMoviesOfUser, which will fetch all the movies rented by a customer. It will query the PostgreSQL database with the following SQL Query.
SELECT DISTINCT(f."film_id"), f."title",f."description", f."language_id",f."rental_duration", f."rental_rate", f."length", f."rating",
  c."name" AS category_name
  FROM "postgresql"."public"."customer" cu
  JOIN "postgresql"."public"."rental" r ON cu."customer_id" = r."customer_id"
  JOIN "postgresql"."public"."inventory" i ON r."inventory_id" = i."inventory_id"
  JOIN "postgresql"."public"."film" f ON i."film_id" = f."film_id"
  JOIN "postgresql"."public"."film_category" fc ON f."film_id" = fc."film_id"
  JOIN "postgresql"."public"."category" c ON fc."category_id" = c."category_id"
  WHERE cu."email" = '<%= email %>'
Then we need to implement getMovieRecommendationFromVectorDatabase method, which will query both Upstash Vector index and will join the results with PostgreSQL database to get all of the metadata of the movies. The query will be like this:
WITH vector_query AS (
    SELECT CAST(JSON_EXTRACT(metadata, '$.filmId') AS INT) AS film_id FROM "upstash_vector"."main"."default"
    WHERE "_q_search" ='query_data(data="<%= query %>"; topK=<%= topK %>;)'
  )

  SELECT * FROM "vector_query" AS vq, "postgresql"."public"."film" AS f WHERE f.film_id = vq.film_id
Finally, peaka.service.ts will look like this:
import {
  GET_RENTED_MOVIES_OF_USER_SQL_TEMPLATE,
  VECTOR_RECOMMENDED_MOVIES_SQL_TEMPLATE,
} from "@/config/config";
import { Film } from "@/types/types";
import { connectToPeaka, Peaka, QueryData } from "@peaka/client";

export class PeakaService {
  private connection: Peaka;

  private constructor() {
    this.connection = connectToPeaka(process.env.PEAKA_API_KEY ?? "");
  }

  static #instance: PeakaService;

  public static get instance(): PeakaService {
    if (!PeakaService.#instance) {
      PeakaService.#instance = new PeakaService();
    }

    return PeakaService.#instance;
  }

  public async getRentedMoviesOfUser(email: string): Promise<Film[]> {
    const iter = await this.connection.query(
      GET_RENTED_MOVIES_OF_USER_SQL_TEMPLATE({ email })
    );

    const data: QueryData[] = await iter
      .map((r) => r.data ?? [])
      .fold<QueryData[]>([], (row, acc) => [...acc, ...row]);

    const rentedFilms: Film[] = [];

    for (const queryData of data) {
      const film: Film = {
        filmId: queryData[0],
        filmTitle: queryData[1],
        filmDescription: queryData[2],
        languageId: queryData[3],
        rentalDuration: queryData[4],
        rentalRate: queryData[5],
        length: queryData[6],
        rating: queryData[7],
        filmCategory: queryData[8],
      };
      rentedFilms.push(film);
    }

    return rentedFilms;
  }

  public async getMovieRecommendationFromVectorDatabase(
    query: string,
    topK: number
  ) {
    const iter = await this.connection.query(
      VECTOR_RECOMMENDED_MOVIES_SQL_TEMPLATE({ query, topK }).trim()
    );

    const data: QueryData[] = await iter
      .map((r) => r.data ?? [])
      .fold<QueryData[]>([], (row, acc) => [...acc, ...row]);

    const recommendedFilms: Film[] = [];

    for (const queryData of data) {
      const film: Film = {
        filmId: queryData[1],
        filmTitle: queryData[2],
        filmDescription: queryData[3],
        languageId: queryData[4],
        rentalDuration: queryData[5],
        rentalRate: queryData[6],
        length: queryData[7],
        rating: queryData[9],
        filmCategory: undefined,
      };
      recommendedFilms.push(film);
    }

    return recommendedFilms;
  }
}
Create Chat Prompts
Create a folder config in the root directory of the project and create a config.ts under this folder. We will define our system prompt and OpenAI parameters for our chatbot in here with lodash templates and export them like below:
export const MOVIE_RECOMMENDATION_CHATBOT_SYSTEM_PROMPT =
  _.template(`You are a helpful film recommendation chatbot. I will provide you the list of films rented by the user Mary Smith and
a list of films recommended by a recommendation engine. I want you choose a film from the list of recommended films that the user has not rented yet. And try to explain the film
to the user. These are the list of films that the user has rented:
<%= rentedFilms %>
These are the list of films recommended by the recommendation engine:
<%= recommendedFilms %>
Only choose a film from the list of recommended films that the user has not rented yet. And try to explain the film to the user. Also try to choose from the top of the list. The recommended film list
ordered by relevancy.
`);

export const MOVIE_RECOMMENDATION_CHATBOT_PARAMS = {
  temperature: 0,
  modelName: "gpt-4o",
  max_tokens: 2000,
};
Implement Chatbot API
In the chatbot, we should first create a POST endpoint. The input of this endpoint should be the message of the user and output should be the message generated by LLM running on OpenAI.
First, we will create route.ts under app/api/chat. This file will have the POST endpoint with /api/chat extension in the url.
We will use ai-sdk of Vercel for response streaming and use langchain open library to interact with LLM.
The code is straight forward with an algorithm is like this:
- Get the prompt from request body
- Get all movies rented by user with user email
- Get recommended movies by running query Upstash Vector
- Ask OpenAI to extract
SearchCriteriato from query - Filter recommended movies
SearchCriterarating only - If a recommended movie is already rented remove it from recommended movie list
- Finally, feed the recommended movies and already rented movies to the LLM and stream the response of LLM to frontend
Implementation of api/chat route should like this:
import {
  MOVIE_RECOMMENDATION_CHATBOT_FEW_SHOT_PROMPT,
  MOVIE_RECOMMENDATION_CHATBOT_INSTRUCTION,
  MOVIE_RECOMMENDATION_CHATBOT_PARAMS,
  MOVIE_RECOMMENDATION_CHATBOT_SYSTEM_PROMPT,
  USER_EMAIL,
} from "@/config/config";
import { PeakaService } from "@/service/peaka.service";
import { Film, SearchCriteria } from "@/types/types";
import { openai } from "@ai-sdk/openai";
import { ChatOpenAI } from "@langchain/openai";
import { streamText } from "ai";

export const maxDuration = 30;

export async function POST(req: Request) {
  const request = await req.json();

  if (!request.prompt) return new Response("Missing query", { status: 400 });

  const prompt = request.prompt;
  const peakaService = PeakaService.instance;

  const promises = [];

  promises.push(peakaService.getRentedMoviesOfUser(USER_EMAIL));

  promises.push(
    peakaService.getMovieRecommendationFromVectorDatabase(prompt, 20)
  );

  const structuredRecommendationPrompt =
    MOVIE_RECOMMENDATION_CHATBOT_INSTRUCTION +
    "Return you response in the following format: " +
    MOVIE_RECOMMENDATION_CHATBOT_FEW_SHOT_PROMPT +
    "query: " +
    prompt +
    "response:";

  const llm = new ChatOpenAI(MOVIE_RECOMMENDATION_CHATBOT_PARAMS);
  promises.push(llm.predict(structuredRecommendationPrompt));

  let [rentedFilms, recommendedFilms, llmResponse] = await Promise.all(
    promises
  );

  const rentedFilmIds = (rentedFilms as Film[]).map((film) => film.filmId);

  // Filter already rented films from recommended films
  recommendedFilms = (recommendedFilms as Film[]).filter(
    (film) => !rentedFilmIds.includes(film.filmId)
  );

  try {
    let resp = (llmResponse as string).replace("response:", "");
    resp = resp.replaceAll("```json", "");
    resp = resp.replaceAll("```", "");

    const criteria: SearchCriteria = JSON.parse(resp);
    // Filter correct rating
    if (criteria.rating) {
      recommendedFilms = recommendedFilms.filter(
        (film) => film.rating === criteria.rating
      );
    }
  } catch (e) {
    console.log("Could not parse llm response skipping extra filter", e);
  }

  console.log(
    MOVIE_RECOMMENDATION_CHATBOT_SYSTEM_PROMPT({
      recommendedFilms: JSON.stringify(recommendedFilms),
      rentedFilms: JSON.stringify(rentedFilms),
    })
  );

  const result = await streamText({
    model: openai("gpt-4o"),
    messages: [
      {
        role: "system",
        content: MOVIE_RECOMMENDATION_CHATBOT_SYSTEM_PROMPT({
          recommendedFilms: JSON.stringify(recommendedFilms),
          rentedFilms: JSON.stringify(rentedFilms),
        }),
      },
      {
        role: "user",
        content: prompt,
      },
    ],
  });

  return result.toTextStreamResponse();
}
Implement Chatbot UI
We have the POST endpoint ready. Now we need the UI for our chatbot. For the UI, we will use NLUX. We choose NLUX because it provides easy integration with Vercel AI SDK.
Let's open pages.tsx file to build our chat window. The following code will implement a very basic chatbot UI for this demo. We will use AiChat component from NLUX and need to implement ChatAdapter interface in order to communicate with the backend. Then, we provide conversationOptions to our AiChat component which will built-in chat prompt for demo purposes.
"use client";
import "@nlux/themes/nova.css";
import {
  AiChat,
  AiChatUI,
  ChatAdapter,
  StreamingAdapterObserver,
} from "@nlux/react";

export default function Chat() {
  const chatAdapter: ChatAdapter = {
    streamText: async (prompt: string, observer: StreamingAdapterObserver) => {
      const response = await fetch("/api/chat", {
        method: "POST",
        body: JSON.stringify({ prompt: prompt }),
        headers: { "Content-Type": "application/json" },
      });
      if (response.status !== 200) {
        observer.error(new Error("Failed to connect to the server"));
        return;
      }

      if (!response.body) {
        return;
      }

      // Read a stream of server-sent events
      // and feed them to the observer as they are being generated
      const reader = response.body.getReader();
      const textDecoder = new TextDecoder();

      while (true) {
        const { value, done } = await reader.read();
        if (done) {
          break;
        }

        const content = textDecoder.decode(value);
        if (content) {
          observer.next(content);
        }
      }

      observer.complete();
    },
  };

  return (
    <main className="flex min-h-screen flex-col items-center justify-between p-24">
      <div className="z-10 w-full max-w-3xl items-center justify-between font-mono text-sm lg:flex">
        <AiChat
          adapter={chatAdapter}
          displayOptions={{
            colorScheme: "dark",
            height: 1200,
          }}
          personaOptions={{
            assistant: {
              name: "Peaka Bot",
              avatar:
                "https://docs.nlkit.com/nlux/images/personas/harry-botter.png",
              tagline: "Making Magic With Peaka",
            },
          }}
          conversationOptions={{
            layout: "bubbles",
            conversationStarters: [
              {
                icon: "https://cdn-icons-png.flaticon.com/512/3171/3171927.png",
                label: "Sample Prompt 1",
                prompt:
                  "I want to watch a popular short movie with my children tonight.",
              },
              {
                icon: "https://cdn-icons-png.flaticon.com/512/3574/3574820.png",
                label: "Sample Prompt 2",
                prompt:
                  "Look at what I rented before and try to recommend me a romantic movie to watch with my partner tonight.",
              },
              {
                icon: "https://cdn-icons-png.flaticon.com/512/16286/16286224.png",
                label: "Sample Prompt 3",
                prompt:
                  "My friends are coming tonight, I want to watch an action movie with them. What can you recommend to me?",
              },
            ],
          }}
        >
          <AiChatUI.Greeting>
            <span className="rounded">
              <div className="flex flex-col justify-center items-center gap-5">
                <div>Hello! 👋</div>
                <div className="text-pretty w-2/3 text-center">
                  This is a movie recommendation bot demo to demonstrate RAG
                  pipeline with Peaka. All movies are fake movies taken from dvd
                  rental store sample database.
                </div>

                <div className="text-pretty w-2/3 text-center">
                  Try by clicking sample prompts or get to the full code from{" "}
                  <a
                    href="https://github.com/peakacom/movie-recommendation-bot"
                    target="_blank"
                    className="underline"
                  >
                    Github
                  </a>
                </div>
              </div>
            </span>
          </AiChatUI.Greeting>
        </AiChat>
      </div>
    </main>
  );
}
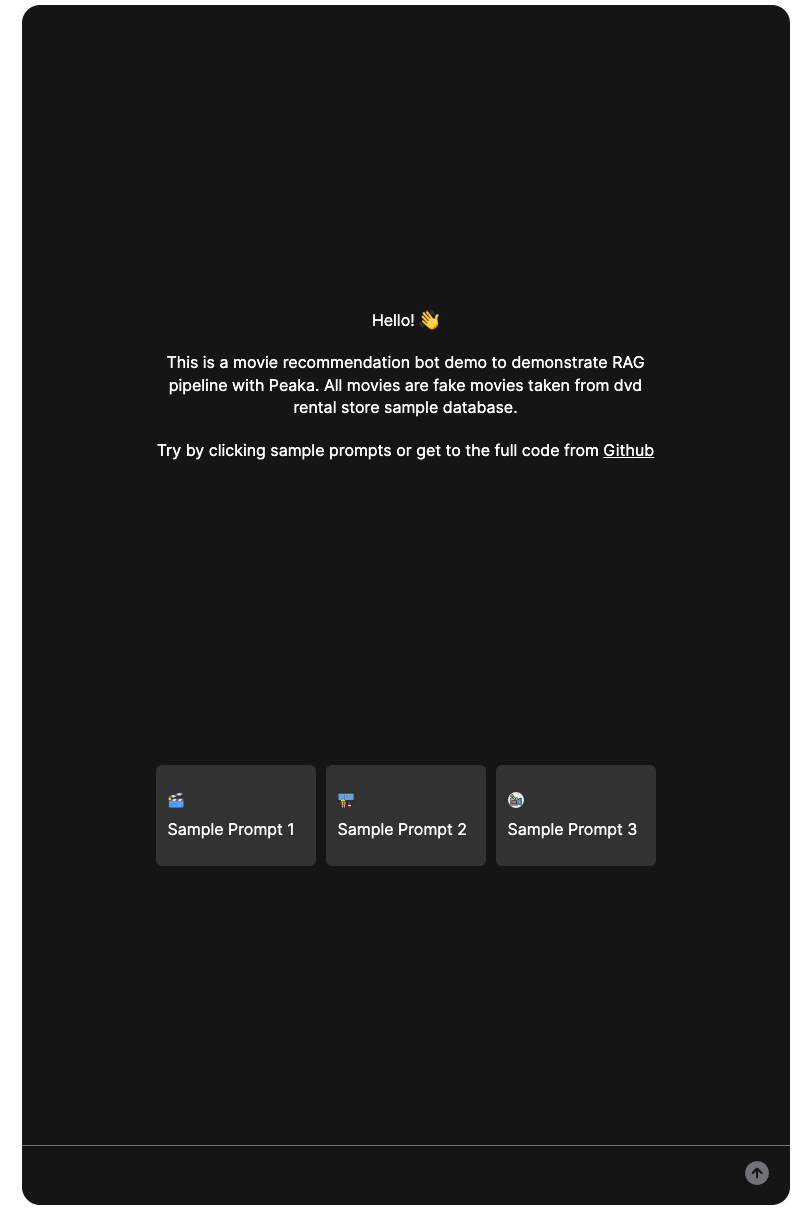
After we finish our implementation, the UI should look like this:

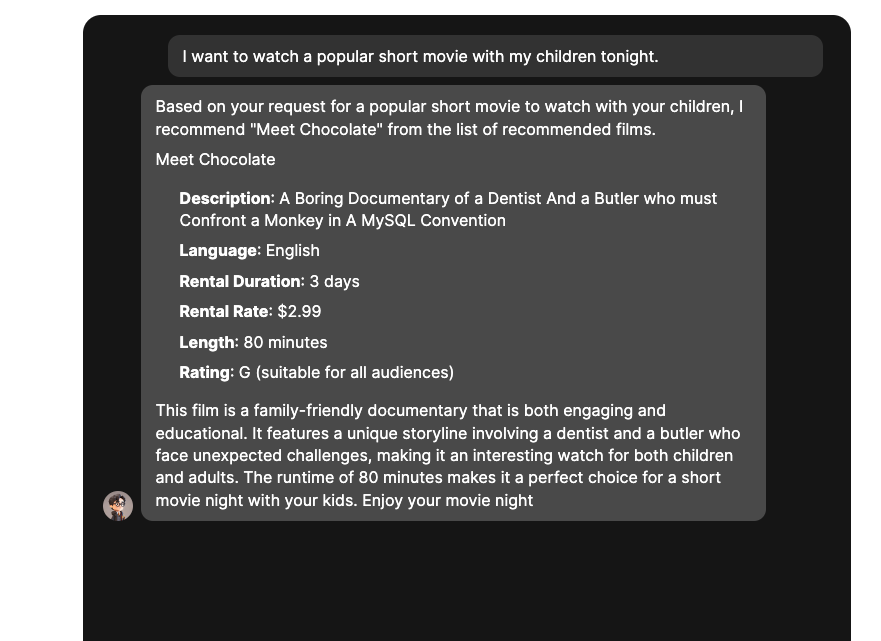
Let’s try one of our sample prompts and see what our movie recommendation bot recommends:

As you can see, our chat bot recommended a movie according to our search criteria by combining movie data from PostgreSQL and Upstash Vector with Peaka’s query engine. Our simple RAG pipeline is feeding the LLM with the names of non-existent movies in the training data of OpenAI.
Conclusion
In this tutorial, we’ve demonstrated how you can build a RAG pipeline using Peaka and Upstash Vector. By leveraging Peaka’s unified query engine and Upstash Vector's efficient similarity search capabilities, we provided the necessary data to the LLM's context window based on the user's query to ensure accurate answers and avoid hallucinations.
If you have any questions or comments, feel free to reach out to me on GitHub.
