Efficient Multiplayer Game State Synchronization with Upstash Kafka and Node.js


In online games, it’s vital that everyone sees the same thing for it to be fun. Making this happen smoothly is tough, but the right tools help game creators involve players in the action.
Let’s Understand the Challenge
Multiplayer games demand accurate and rapid synchronization of game state between all players connected to a session. The game state includes information about player positions, scores, animations, item locations, and more. Any delay or inconsistency in state synchronization can lead to frustrating experiences for players and negatively impact gameplay.
In this article, we’ll explore how to make sure everyone sees the same game when playing together online. We are going to use two technologies in this article Node.js and Upstash Kafka but our main focus is Upstash Kafka which is built upon the robust foundation of the Apache Kafka ecosystem, Upstash Kafka combines the power of distributed messaging and event-driven architecture with the ease and convenience of a fully managed service. It is a critical enabler in this solution as it acts as a super-efficient highway that lets players share information in real time. This ensures that no matter where the players are, they all receive the same updates in real-time speed.
Upstash Kafka stands out as an excellent choice for game development due to its seamless integration and rapid response times, which are crucial for an optimal gaming experience. Upstash Kafka can be effectively utilized to manage events, notifications, and various real-time scenarios within games.
Why Upstash Kafka?
With Upstash Kafka, you get a completely managed service. This implies that Upstash handles all the technical tasks, such as server provisioning, scaling, and maintenance involved in running Kafka clusters. This takes away the need for you to worry about things like setting up the infrastructure, getting everything to work correctly, and maintaining it over time. This allows you to focus on leveraging Kafka for your unique requirements and objectives. Without the burden of managing infrastructure, you can now channel your energy into enhancing the overall quality of your application, particularly in a rapidly evolving development environment.
Setting Up the Upstash Kafka
To start with the Upstash Kafka, first, we have to go to Upstash: Serverless Kafka® and then Go to Kafka Tab and create an Upstash Kafka cluster for this follow the following steps:
1. Click on the Create Kafka Cluster to create it.

2. Name it and select the Region

Currently, It offers three regions in which we have
- N.Virginia us-east-1
- **Ireland **eu-west-1
- **Frankfurt **eu-central-1
Then click on the Create cluster button to create an Upstash Kafka cluster.
3. Create your first Topic

Congratulations! You have successfully set up an Upstash Kafka cluster.
Let’s Create a Seamless Multiplayer Experience
We’ll develop a straightforward multiplayer game server using Node.js, socket.io, and the Kafkajs library to establish a connection between Upstash Kafka and our service. In this application, we will emphasize synchronizing player positions within a model where two clients interact with a single server, facilitating event flow between them.
1. Initialize a New Project
create a new Node.js project folder and navigate to it using your terminal.
    mkdir gaming-with-upstash-kafka
    cd gaming-with-upstash-kafka
2. Install Dependencies
Start by creating a new Node.js project and installing the required dependencies:
    npm init -y
    npm install kafkajs socket.io ejs express
Backend Server
First, we would implement the backend server of the game where will would implement sockets and Kafka with express.js
1. Upstash Kafka Configuration
We will create a file which is named config.js to have the Upstash Kafka configuration using kafka.js.
// dotenv is used to load environment variables from a .env file into process.env
import dotenv from "dotenv";
import { Kafka } from "kafkajs";

const { updatePlayerState } = require("./players");

dotenv.config();

// create a new Kafka instance and export it
export const kafka = new Kafka({
  brokers: [process.env.UPSTASH_KAFKA_BROKER_URL],
  sasl: {
    mechanism: "scram-sha-256",
    username: process.env.UPSTASH_KAFKA_USERNAME,
    password: process.env.UPSTASH_KAFKA_PASSWORD,
  },
  ssl: true,
  // dont log anything
  logLevel: 0,
});

const consumer = kafka.consumer({ groupId: "players-state" });
const producer = kafka.producer();

// on succesfull connection to kafka broker
consumer.on("consumer.group_join", () => {
  console.log("Consumer connected to kafka broker!");
});

// on disconnect from kafka broker
consumer.on("consumer.stop", () => {
  console.log("Consumer disconnected from kafka broker!");
});

const consume = async () => {
  await consumer.connect();
  await consumer.subscribe({ topic: "players-state" });
  await consumer.run({
    eachMessage: async ({ __, _, message }) => {
      const updatedPlayerState = JSON.parse(message.value);
      console.log({ updatedPlayerState });
      updatePlayerState(updatedPlayerState);
    },
  });
};

const produce = async (message) => {
  await producer.connect();
  await producer.send({
    topic: "players-state",
    messages: [{ value: JSON.stringify(message) }],
  });
};

module.exports = { kafka, consume, produce };
where we are using the environment variables that are defined in the .env file. we have two functions one to produce messages to the Kafka and one to **consume **messages.
2. Socket Server configuration
The server configuration would be,
const express = require("express");
const http = require("http");
const socketIo = require("socket.io");

const app = express();
const server = http.createServer(app);
const io = socketIo(server);

module.exports = { app, server, io };
3. Players Configuration
The “player.js” file centralizes player data and offers an “updatePlayerState” function for real-time state management. It tracks player movements and interactions, facilitating synchronization among players in our multiplayer game through the “io” object. This file is integral to ensuring dynamic and engaging gameplay by maintaining player states and broadcasting updates to all connected clients.
    const { io } = require("./socketServer")

    let players = [
     {
      id: 1,
      name: "player 1",
      y: 0,
     },
     {
      id: 2,
      name: "player 2",
      y: 0,
     },
    ]

    const updatePlayerState = state => {
     //update it in players array
     players[state.id - 1] = state
     io.emit("update-state-by-consumer", { players })
    }

    module.exports = {
     players,
     updatePlayerState
    }

    ```

### 4. Main server

Now, we are going to implement the main server.js file

```js
    const express = require("express")
    const path = require("path")
    const { produce, consume } = require("./config")

    const { app, server, io } = require("./socketServer")
    const { updatePlayerState } = require("./players")

    // Serve static files
    app.use(express.static(path.join(__dirname, "public")))

    // Set view engine
    app.set("view engine", "ejs")

    // Render index page
    app.get("/", (req, res) => {
     res.render("index")
    })

    // Socket.io connection
    io.on("connection", socket => {
     console.log("New user connected!")

     // on user state change
     socket.on("player-state-change", state => {
      updatePlayerState(state)
      produce(state)
     })

     socket.on("disconnect", () => {
      console.log("User disconnected")
     })
    })

    // Consume messages from kafka
    consume()

    // Start the server
    const PORT = process.env.PORT || 3000
    server.listen(PORT, () => {
     console.log(`Server is running on port ${PORT}`)
    })
Our primary event is “player-state-change,” which triggers the production of a message to the Upstash Kafka cluster whenever a player updates their state. Simultaneously, a Kafka consumer operates, actively monitoring this specific topic for newly produced messages. It consumes these messages in real-time and promptly updates the player values on other players’ computers that are subscribed to receive this data.
Thanks to Upstash Kafka for its seamless connection/fast response time.
Frontend Application
Next, we’ll create a basic game UI to visualize real-time player state changes. To achieve this, we’ll employ the EJS template engine, seamlessly integrated with our Node.js server.
1. Use EJS Template Engine
First, we would create a file named index.ejs in the views folder.
<!doctype html>
<html lang="en">
  <head>
    <meta charset="UTF-8" />
    <meta name="viewport" content="width=device-width, initial-scale=1.0" />
    <link rel="stylesheet" href="/styles.css" />
    <title>Two-Player Game</title>
  </head>
  <body>
    <div class="player" id="player1">P1</div>
    <div class="player" id="player2">P2</div>
    <script src="/socket.io/socket.io.js"></script>
    <script>
      const socket = io();

      const player1 = document.getElementById("player1");
      const player2 = document.getElementById("player2");

      const PLAYER_SPEED = 10;

      let player1Position = 0;
      let player2Position = 0;

      function updatePositions() {
        player1.style.top = player1Position + "px";
        player2.style.top = player2Position + "px";
      }

      document.addEventListener("keydown", (event) => {
        const key = event.key;
        if (key === "ArrowUp") {
          player1Position = Math.max(player1Position - PLAYER_SPEED, 0);
          updatePlayerPosition(1, player1Position);
        } else if (key === "ArrowDown") {
          player1Position = Math.min(
            player1Position + PLAYER_SPEED,
            window.innerHeight - 50,
          );
          updatePlayerPosition(1, player1Position);
        } else if (key === "w") {
          player2Position = Math.max(player2Position - PLAYER_SPEED, 0);
          updatePlayerPosition(2, player2Position);
        } else if (key === "s") {
          player2Position = Math.min(
            player2Position + PLAYER_SPEED,
            window.innerHeight - 50,
          );
          updatePlayerPosition(2, player2Position);
        }

        updatePositions();
      });

      function updatePlayerPosition(playerId, position) {
        socket.emit("player-state-change", {
          id: playerId,
          name: "player" + playerId,
          y: position,
        });
      }

      socket.on("update-state-by-consumer", (data) => {
        const newData = data.players;
        //iterate through the array and update the position
        newData.forEach(function (player) {
          console.log("player", player);
          if (player.id === 1) {
            player1Position = player.y;
          } else if (player.id === 2) {
            player2Position = player.y;
          }
        });

        updatePositions();
      });
    </script>
  </body>
</html>
In our game, we have just two users who can move up and down. We employ two key events: “player-state-change,” which is triggered whenever a player alters their state, and “update-state-by-consumer,” which listens for updates when the consumer processes the player’s new state. Upon consumption, it promptly adjusts the player’s state accordingly.
Finally, Run the Game
Run the following command in the terminal to run the game,
npm run start
Let the Upstash Kafka connect to the application. You are good to go!
Here, we have two game clients running
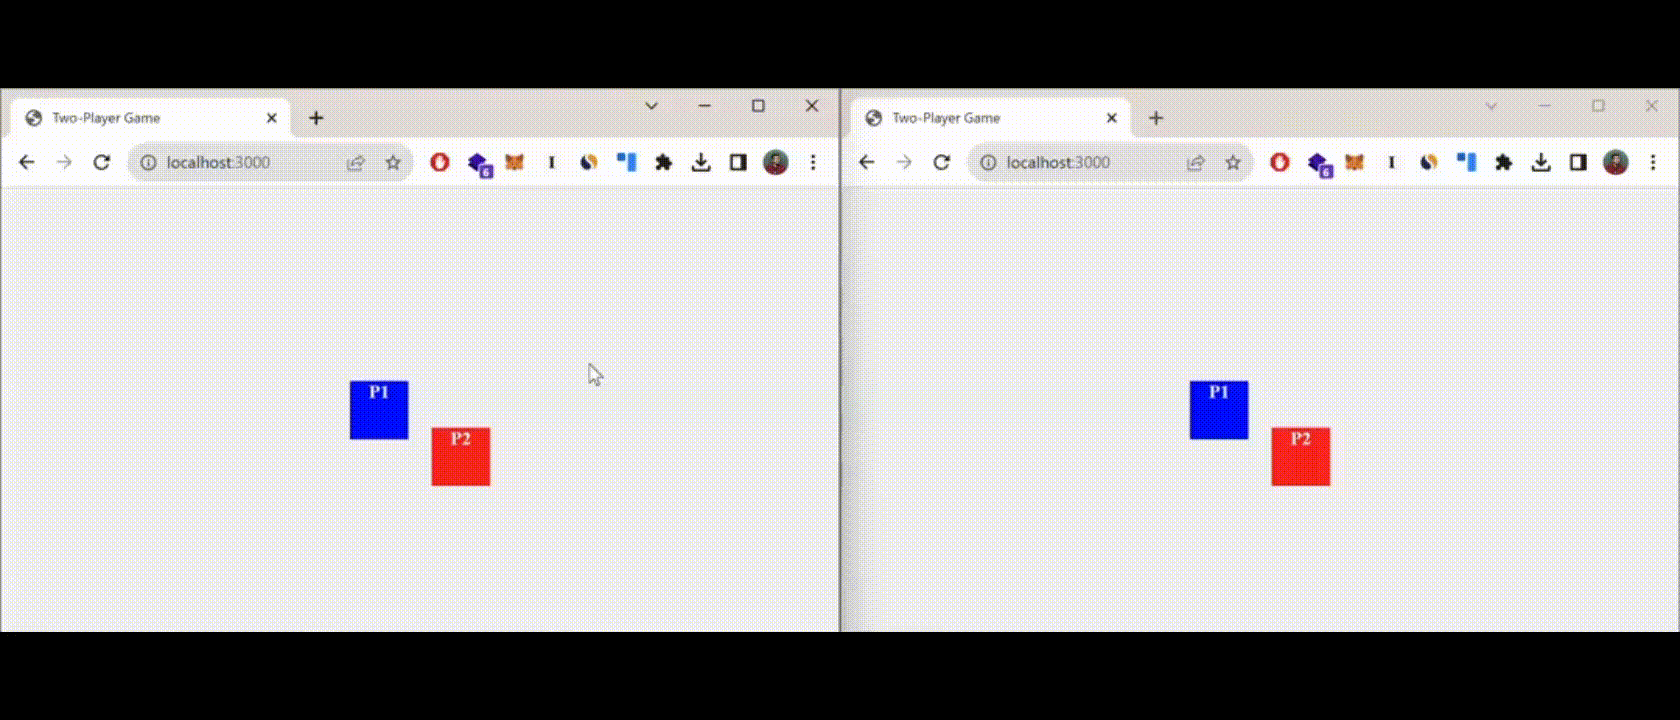
Notice how effortlessly the player states transition thanks to the flawless integration of UpStash Kafka!
Code Repository
asimhafeezz/multiplayer-game-upstash-kafka
Conclusion
By leveraging the power of Upstash Kafka and Node.js, we’ve created a simple yet effective solution for synchronizing the multiplayer game state in real-time. While this example focused on player position updates, similar principles can be applied to synchronize various game elements.
Keep in mind that this example is just a starting point. In real situations, you’d need to manage more complicated game data and think about things like making sure players are who they say they are, keeping things safe, and dealing with problems. But with the tools and information we’ve given you, you’re ready to explore more about making multiplayer games exciting.
If you found this article helpful, don’t forget to give it a clap 👏 and share it with your friends.