# Building an Article Research Agent with Mastra & Upstash
> **Source:** https://upstash.com/blog/build-article-research-agent
> **Date:** 2025-08-25
> **Author(s):** Mustafa Taha Söylemez
> **Reading time:** 14 min read
> **Tags:** redis, vector, agent, mastra, vercel
> **Format:** text/markdown — machine-readable content for agents and LLMs
---
## Introduction to AI Research Agents
Academic research moves quickly—new papers appear every day on arXiv and other pre-print servers.
Keeping up manually can be overwhelming. In this guide, we will build an **AI research assistant** that:
1. Understands a researcher’s natural-language question
2. Finds the most relevant papers in a vector database of arXiv abstracts
3. Summarizes key insights and explains how they answer the question
4. Provides a direct PDF link for deeper reading
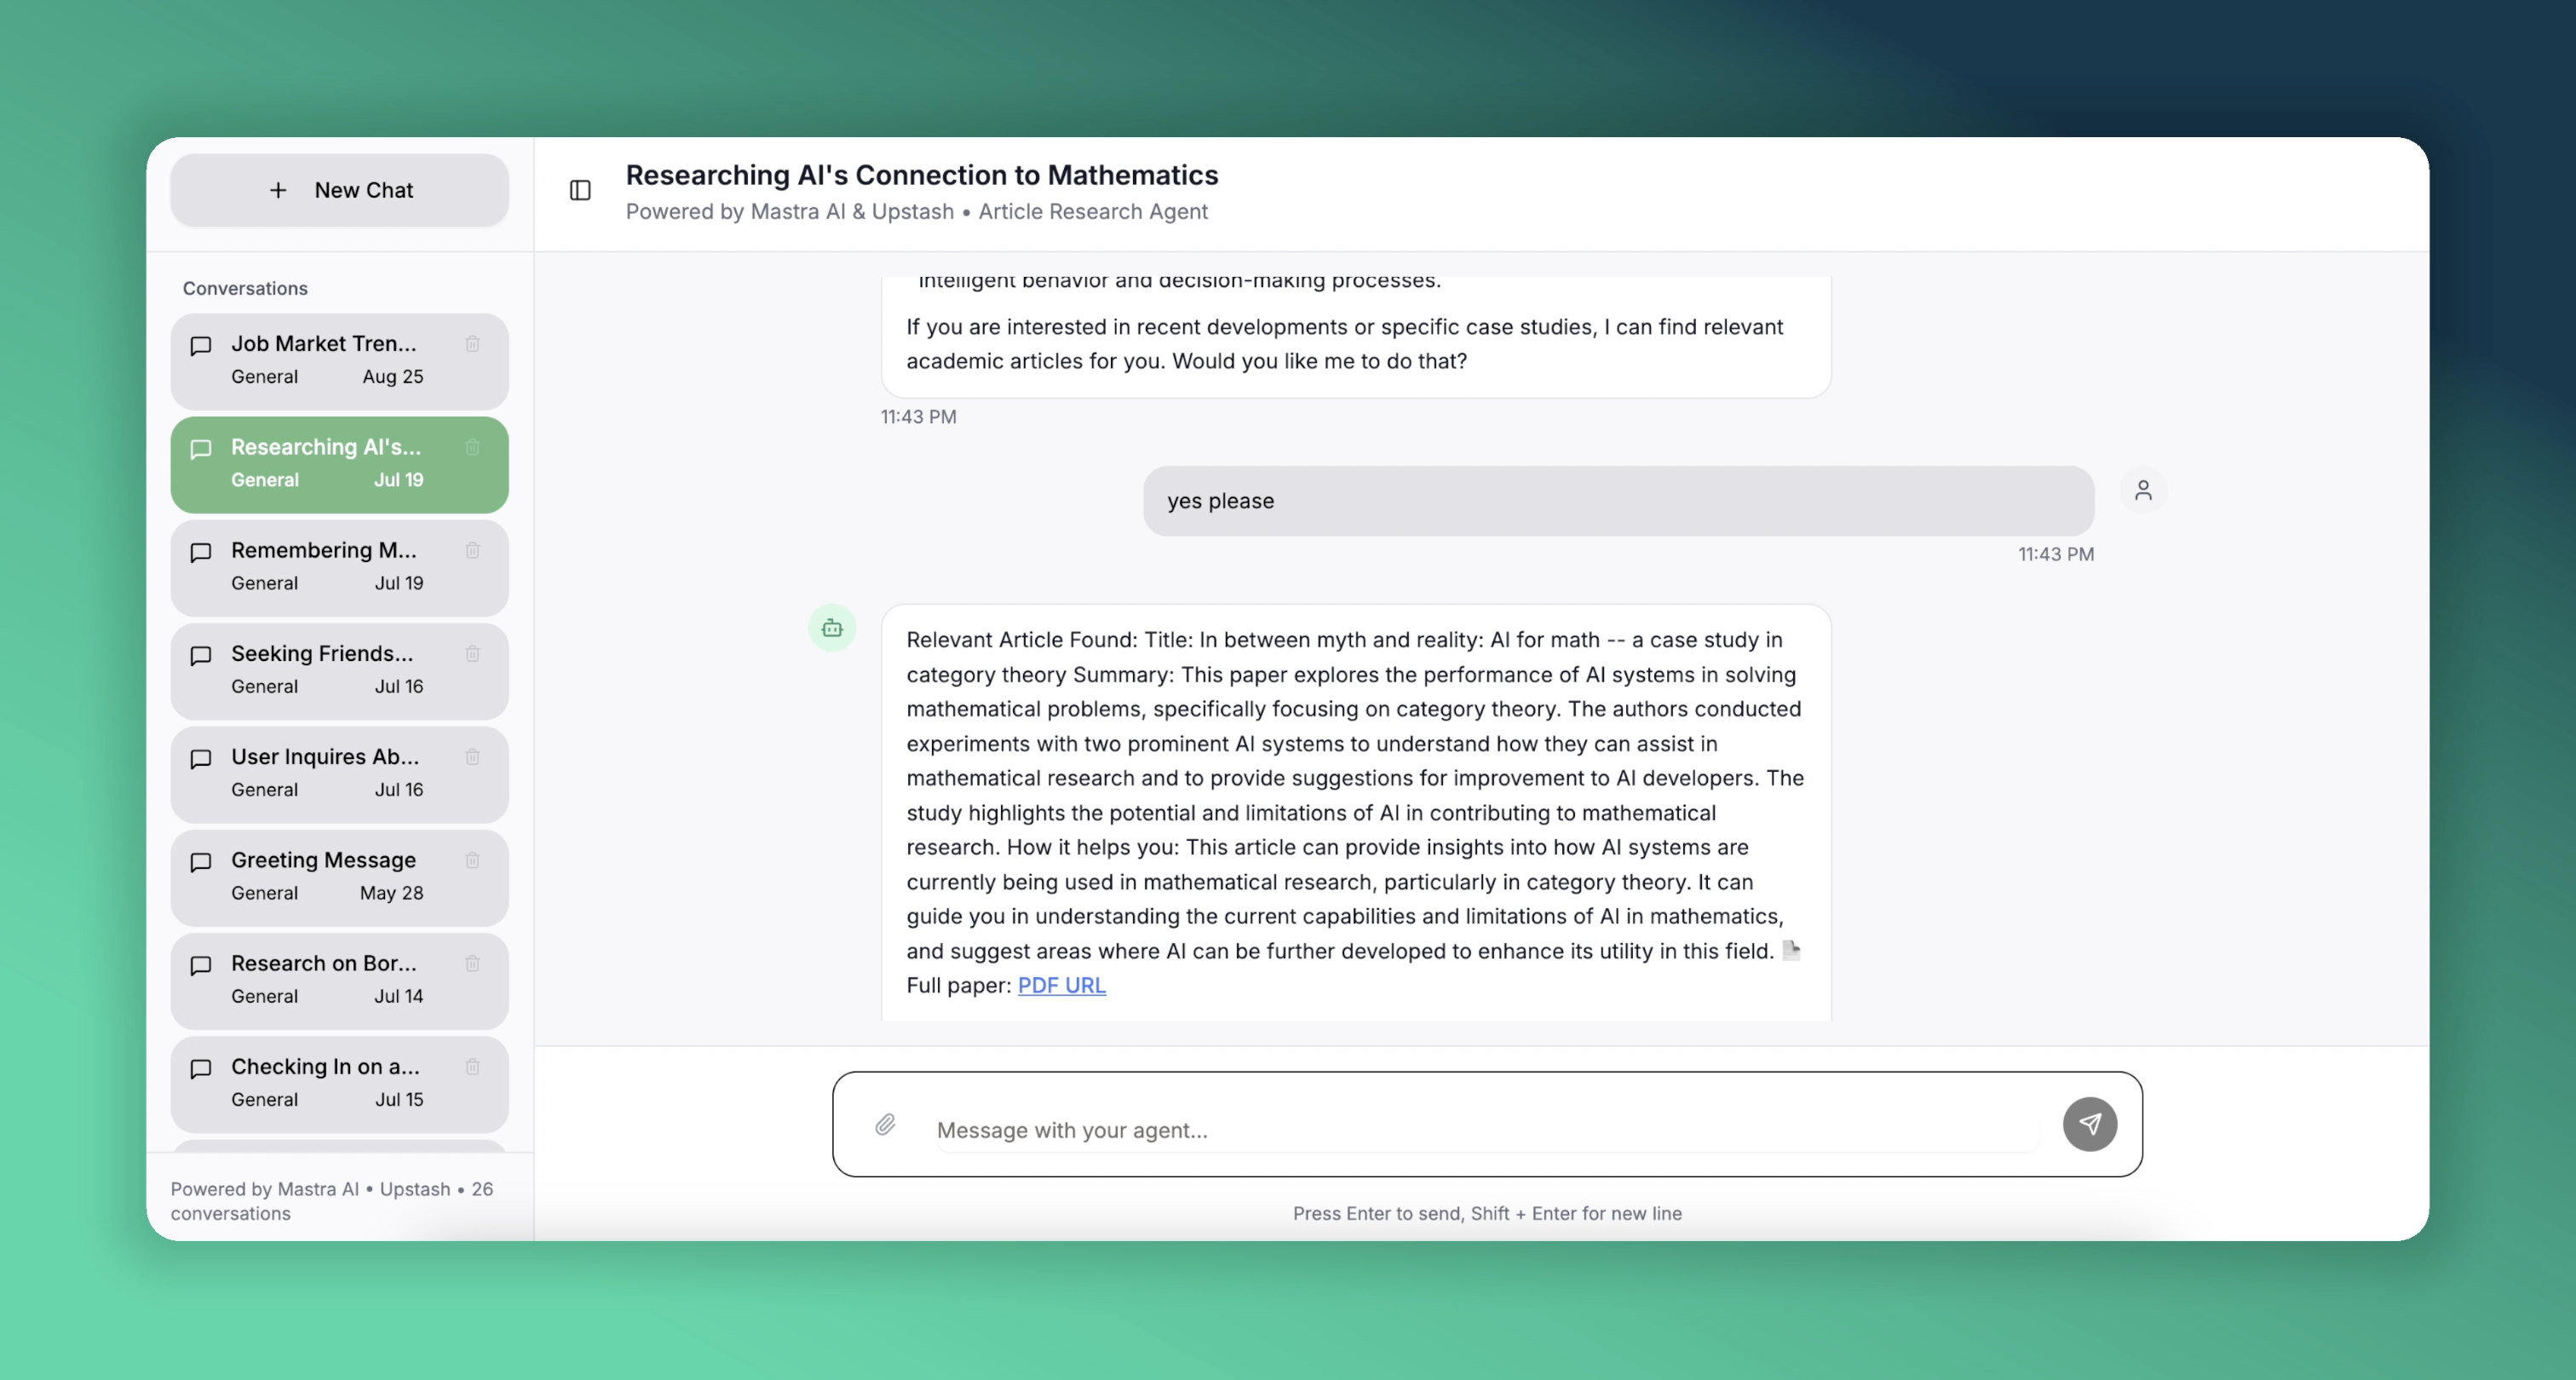
We will accomplish this with **Mastra**, an open-source TypeScript framework for building AI agents, and **Upstash** for serverless Redis and Vector storage. Here is a [live demo](https://mastra-upstash.vercel.app/) of our article agent focused on AI research. It is deployed on Vercel for you to try out.
 ---
## What is Mastra?
Mastra is a batteries-included framework that makes it simple to create production-grade AI agents.
- **Agents & Workflows** — Compose agents, tools, and multi-step workflows
- **Retrieval-Augmented Generation (RAG)** - Built-in memory and vector stores
- **Multi-LLM** - Works with OpenAI, Claude and more.
We will create an agent that uses Upstash Redis for memory. It will also have a tool to find relevant research articles, which we will have previously embedded into an Upstash Vector database.
> For a deeper dive, check out the [Mastra documentation](https://mastra.ai/en/docs).
---
## Tech Stack for the Project
- **Mastra Framework** to create AI agents and tools
- **Upstash Redis** to give conversation memory to the agent
- **Upstash Vector** to store the embeddings of the research article abstracts
- **Next.js & Vercel** to build and deploy the web application
We will also use Upstash Ratelimit to limit requests for our demo application.
---
## Implementation Walkthrough
Building this application involves creating two main components: the Mastra server and the web application. While they can be in the same project, it's cleaner to keep them separate. Let's start with the Mastra server.
### Creating a Mastra Project
To create a new Mastra project, run the following command in your terminal.
```bash
npm create mastra@latest
```
It will ask a few questions; for this project, the default settings are fine.
### Creating Agents and Tools
The first step in configuring an agent is to define its name, purpose, and tools. It's also important to choose a language model that will perform well for the given tasks. In this project, we will have one agent and one tool.
```typescript
export const articleAgent = new Agent({
name: "articleAgent",
instructions: instruction,
model: openai('gpt-4o'),
tools: { articleQueryTool },
memory: memory
});
```
Configuring an agent is as simple as shown above. We define our **articleAgent** with an `instruction` (which serves as a system prompt), its dedicated `tools`, `model`, and another important component: `memory`.
### Agent's Memory
Mastra provides agents with both chat history and semantic recall capabilities. By maintaining memory in storage, the agent can provide more personalized and accurate answers. Let's look at our agent's memory configuration.
```typescript
export const memory = new Memory({
storage: myUpstashStore,
options: {
lastMessages: 10,
semanticRecall: false,
threads: {
generateTitle: true
}
}
});
```
To enable chat history, we use Upstash Redis as our storage option. We initialize it as an `UpstashStore` object, which extends `MastraStorage`, ensuring it works seamlessly with our Mastra agent.
```typescript
export const myUpstashStore = new UpstashStore({
url: process.env.UPSTASH_REDIS_REST_URL!,
token: process.env.UPSTASH_REDIS_REST_TOKEN!,
});
```
We previously mentioned adding a semantic recall feature to our agent, which allows it to consider previous messages related to the current context. For that, the agent needs a vector database and an embedder to process the messages. Since our public demo is not for personal use and doesn't need to remember messages across different threads, we won't use this feature, but it can be implemented as follows.
```typescript
export const myUpstashVector = new UpstashVector({
url: process.env.UPSTASH_VECTOR_REST_URL!,
token: process.env.UPSTASH_VECTOR_REST_TOKEN!,
});
export const memory = new Memory({
storage: myUpstashStore,
vector: myUpstashVector,
embedder: openai.embedding("text-embedding-3-small"),
options: {
lastMessages: 10,
semanticRecall: {
topK: 3,
messageRange: 2,
scope: 'resource'
},
threads: {
generateTitle: true
}
}
});
```
In the semantic recall configuration, **topK** specifies the number of similar messages to retrieve, **messageRange** defines how much surrounding context to include with each match, and setting **scope** to 'resource' makes the agent search across all threads associated with the user named 'resource'. This cross-thread memory is a powerful awailable with Upstash.
### Tools
Creating a tool is nearly as simple as creating an agent. We provide a name, description, input and output schemas, and a function to execute when the agent needs the tool's capabilities.
```typescript
export const articleQueryTool = createTool({
id: 'get-relevant-article',
description: 'Get relevant article information',
inputSchema: z.object({
question: z.string().describe('the question about the field'),
}),
outputSchema: z.object({
bestOption: z.object({
abstract: z.string().describe('the abstract of the article'),
title: z.string().describe('the title of the article'),
pdfUrl: z.string().describe('the PDF URL of the article')
})
}),
execute: async ({ context }) => {
return await querySimilar(context.question);
},
});
```
We use Zod to validate the input and output schemas. This helps maintain consistent responses and minimizes potential errors from the LLM. We also define a function for the tool to use. Our tool will query a large collection of research articles, which is periodically updated via the arXiv API and embedded in our Upstash Vector database.
```typescript
const querySimilar = async (query: string) => {
const { embedding } = await embed({
value: query,
model: openai.embedding("text-embedding-3-small"),
});
const results = await myMastraUpstashVector.query({
indexName: "arxiv",
queryVector: embedding,
topK: 3,
});
if (results && results.length > 0) {
const bestMatch = results[0];
const metadata = bestMatch.metadata as ArxivPaper;
return {
bestOption: {
abstract: metadata.abstract,
title: metadata.title,
pdfUrl: metadata.pdfUrl
}
};
}
throw new Error("No relevant information found");
}
```
We can perform simple operations on our vector database through an `UpstashVector` instance, which extends `MastraVector`. Above, we query for similar article abstracts that we embedded beforehand and return the best result to the tool. Note that we use the same embedding model for the query as we did for the articles. We will explain article embedding in more detail later.
### The Mastra Instance
```typescript
export const mastra = new Mastra({
storage: myMastraUpstashStore,
agents: { articleAgent },
deployer: new VercelDeployer()
});
```
We simply specify which agents to use, and our `Mastra` object is ready. We also provide storage to persist data beyond in-memory storage. You can also choose from [available deployment configurations](https://mastra.ai/en/docs/deployment/overview); we will deploy using Vercel.
With the default options from `create-mastra-app`, we already have the required file structure:
```bash
.
└── mastra
├── agents
│ └── index.ts
├── tools
│ └── index.ts
└── index.ts
```
Only one step remains before deploying: our environment variables.
```bash
OPENAI_API_KEY=
UPSTASH_VECTOR_REST_URL=
UPSTASH_VECTOR_REST_TOKEN=
UPSTASH_REDIS_REST_URL=
UPSTASH_REDIS_REST_TOKEN=
```
Put these in your `.env.local` file for local development and add them to your deployment environment.
Now we are ready to build and deploy our Mastra server.
```bash
npm run build && vercel --prod
```
You can check the [Vercel documentation](https://vercel.com/docs/deployments#vercel-cli) to see how to deploy.
While developing, we can use the Mastra Playground to see our server's output. Run the following command:
```bash
npm run dev
```
This will provide a link to a web interface where you can chat with our agent, run tools explicitly, and explore the capabilities of our server.
Now it's time to talk about the other part of the application.
### Next.js Server
Once the Mastra server is set up, we need to handle three things: the UI, communication with the Mastra server, and an article service that talks to the arXiv API and embeds abstracts into Upstash Vector. Mastra has a client SDK to expose the server's functionalities. Through it, you can access agents, tools, memory, and more. Its usage is straightforward, but we will share some examples. For more details, you can check the documentation [here](https://mastra.ai/en/reference/client-js/agents). In a Next.js project, you can simply install and use the client SDK.
```bash
npm install @mastra/client-js@latest
```
In your code, create an instance of `MastraClient` to use it in your project.
```typescript
import { MastraClient } from "@mastra/client-js";
export const mastra_sdk = new MastraClient({
baseUrl: process.env.NEXT_PUBLIC_MASTRA_API!,
retries: 3,
});
```
You need to set `NEXT_PUBLIC_MASTRA_API` to the address of your Mastra server. If you are developing locally, this will be a `localhost` address. Since there will probably be a port conflict on `3000`, you can change the configuration of the Mastra server when running it locally, as follows:
```typescript
export const mastra = new Mastra({
storage: myMastraUpstashStore,
agents: { articleAgent },
server: {
port: 4111,
timeout: 10000,
}
});
```
Now, when we run the Mastra server locally with `npm run dev`, it is served at port `4111`. We can set `NEXT_PUBLIC_MASTRA_API` to `http://localhost:4111` when we run the Next.js project locally.
Let's see how we can use Mastra's client SDK.
```typescript
export const MASTRA_CONFIG = {
resourceId: process.env.NEXT_PUBLIC_RESOURCE_ID || "articleAgent",
agentId: "articleAgent",
baseUrl: process.env.NEXT_PUBLIC_MASTRA_API || "http://localhost:4111",
retries: 3,
}; // this is exported in another file so that we can use it anywhere in the codebase.
// Get your agent and simply stream your response through your agent object.
const agent = mastra_sdk.getAgent(MASTRA_CONFIG.agentId);
const response = await agent.stream({
messages: [message],
resourceId: MASTRA_CONFIG.resourceId,
threadId: threadId
});
```
You can get your tools and agents, and once you have them, you can do almost everything you could do with the actual objects through the client SDK.
Since we will publish this demo project publicly, it is important to avoid heavy loads on the agent. This is where Upstash Ratelimit comes in. Before every stream request, we will check if the user is rate-limited. To configure our rate limiter, we will need Upstash Redis. We can use the same Redis database we have for our Mastra agent.
```typescript
import { Ratelimit } from '@upstash/ratelimit';
import { Redis } from '@upstash/redis';
// Using the same Redis DB across the project
export const rateLimit = new Ratelimit({
redis: new Redis({
url: process.env.UPSTASH_REDIS_MEMORY_URL!,
token: process.env.UPSTASH_REDIS_MEMORY_TOKEN!
}),
limiter: Ratelimit.slidingWindow(10, '10s'),
prefix: 'upstash-ratelimit',
});
// Fetch the below function before every stream.
export async function isRateLimited(id: string): Promise {
const { success } = await rateLimit.limit(id);
return !success;
}
```
This way, we ensure that our endpoints will not be under heavy load.
When creating chat agents with Mastra, knowing some features of Mastra's thread generation can be helpful. Remember that when we configured the memory for the agent, we set `generateTitle` to `true` in the `threads` object. This makes Mastra generate titles automatically for newly created threads. But here is the catch: it is possible to create a thread explicitly, but automatic title generation is not triggered that way. Normally, the way to create a new thread is as follows:
```typescript
const thread = await mastraClient.createMemoryThread({
title: "New Conversation",
metadata: { category: "support" },
resourceId: "resource-1",
agentId: "agent-1",
});
```
However, this takes away the agent's ability to generate titles automatically, since you are setting it manually. Leaving the `title` field empty does not work either. In this case, we can see what the Playground does. Remember the Playground, provided by Mastra to experience the capabilities of your server during development? If we inspect the network tab in the browser's developer tools, we see that when a new thread is created, it doesn't actually send an API request to create it. Instead, it waits for you to submit your first message. After that, it sends a stream request with a newly generated thread ID. This tells Mastra that no thread exists with this ID, so it should create one and, if `generateTitle` is true, generate a title based on the first message.
Let's continue with the last component of our project: the arXiv articles.
### arXiv Articles
arXiv is an open-access archive for nearly 2.4 million research articles in various fields. The `articleQueryTool` queries the Upstash Vector database, which is fed by articles fetched via the arXiv API. The API is simple to use; you can find more details [here](https://info.arxiv.org/help/api/user-manual.html).
In our project, we fetch and store articles daily. The first time the server runs, it fetches about 30,000 articles from specified categories. After that, it fetches new articles published the previous day. To specify the article categories and whether to fetch the initial large batch, we set the corresponding environment variables. We should provide the desired article categories using arXiv's taxonomy, separated by commas. You can look up the categories [here](https://arxiv.org/category_taxonomy).
```bash
CATEGORIES=cs.AI
RUN_BEGINNING_STACK=false
```
If you want a more comprehensive database, you can use [arXiv's bulk data access](https://info.arxiv.org/help/bulk_data/index.html). Without it, we are limited to 30,000 articles per API query, which is sufficient for our purposes.
A simple query to arXiv looks like this:
```typescript
const categories = process.env.CATEGORIES?.split(',') || []; // Get the desired categories and split them for the query.
const searchQuery = categories.length === 1 ? `cat:${categories[0]}` : `(${categories.map(c => `cat:${c}`).join(" OR ")})`;
const query = `search_query=${searchQuery}&sortBy=submittedDate&sortOrder=descending`;
const url = `http://export.arxiv.org/api/query?${query}`;
const response = await axios.get(url); // Make the API call with the constructed URL.
```
We make similar calls to get the latest articles every day and to fetch the initial stack.
After fetching the articles, we normalize them and embed them for storage in Upstash Vector. This must be the same vector database that our Mastra tool uses. By "normalize," we mean parsing the fetched articles into a standard `ArxivPaper` type, which we will use throughout our codebase.
```typescript
export interface ArxivPaper {
id: string;
title: string;
abstract: string;
authors: string[];
published: string;
pdfUrl: string;
category: string;
}// The type for our articles, across our codebase.
async function storeAbstracts(papers: ArxivPaper[]) {
const embeddingModel = openai.embedding("text-embedding-3-small"); // The same model used to query on the Mastra side.
const embeddings = await embedArticles(papers, embeddingModel)
// Put the embeddings into the required form with their metadata.
const vectorsToUpsert = getVectorsToUpsert(embeddings, papers)
for (let j = 0; j < vectorsToUpsert.length; j++) {
await vectorStore.upsert(vectorsToUpsert[j], { namespace: "arxiv" }); // Upsert the embeddings with their metadata to Upstash Vector.
}
}
```
To ensure our database remains current with the latest research, we implement Upstash QStash for scheduled task execution. Given our deployment on Vercel, we need to prevent function timeouts that can occur with extended processing intervals. We address this by exposing a public API endpoint on our server, enabling our QStash instance to trigger the daily database update function reliably.
```typescript
// src/app/api/arxiv_reneval/route.ts
import { verifySignatureAppRouter } from "@upstash/qstash/nextjs"
import { fetchAndUpsertYesterday} from "@/services/arxiv"
async function handler(request: Request) {
console.log("Fetching and upserting yesterday's papers...")
await fetchAndUpsertYesterday()
console.log("Fetching and upserting yesterday's papers completed")
return Response.json({ success: true })
}
export const POST = verifySignatureAppRouter(handler)
```
A scheduler can be configured through the Upstash Console to automatically trigger requests to this endpoint daily at 6:00 AM UTC.
---
## What is Mastra?
Mastra is a batteries-included framework that makes it simple to create production-grade AI agents.
- **Agents & Workflows** — Compose agents, tools, and multi-step workflows
- **Retrieval-Augmented Generation (RAG)** - Built-in memory and vector stores
- **Multi-LLM** - Works with OpenAI, Claude and more.
We will create an agent that uses Upstash Redis for memory. It will also have a tool to find relevant research articles, which we will have previously embedded into an Upstash Vector database.
> For a deeper dive, check out the [Mastra documentation](https://mastra.ai/en/docs).
---
## Tech Stack for the Project
- **Mastra Framework** to create AI agents and tools
- **Upstash Redis** to give conversation memory to the agent
- **Upstash Vector** to store the embeddings of the research article abstracts
- **Next.js & Vercel** to build and deploy the web application
We will also use Upstash Ratelimit to limit requests for our demo application.
---
## Implementation Walkthrough
Building this application involves creating two main components: the Mastra server and the web application. While they can be in the same project, it's cleaner to keep them separate. Let's start with the Mastra server.
### Creating a Mastra Project
To create a new Mastra project, run the following command in your terminal.
```bash
npm create mastra@latest
```
It will ask a few questions; for this project, the default settings are fine.
### Creating Agents and Tools
The first step in configuring an agent is to define its name, purpose, and tools. It's also important to choose a language model that will perform well for the given tasks. In this project, we will have one agent and one tool.
```typescript
export const articleAgent = new Agent({
name: "articleAgent",
instructions: instruction,
model: openai('gpt-4o'),
tools: { articleQueryTool },
memory: memory
});
```
Configuring an agent is as simple as shown above. We define our **articleAgent** with an `instruction` (which serves as a system prompt), its dedicated `tools`, `model`, and another important component: `memory`.
### Agent's Memory
Mastra provides agents with both chat history and semantic recall capabilities. By maintaining memory in storage, the agent can provide more personalized and accurate answers. Let's look at our agent's memory configuration.
```typescript
export const memory = new Memory({
storage: myUpstashStore,
options: {
lastMessages: 10,
semanticRecall: false,
threads: {
generateTitle: true
}
}
});
```
To enable chat history, we use Upstash Redis as our storage option. We initialize it as an `UpstashStore` object, which extends `MastraStorage`, ensuring it works seamlessly with our Mastra agent.
```typescript
export const myUpstashStore = new UpstashStore({
url: process.env.UPSTASH_REDIS_REST_URL!,
token: process.env.UPSTASH_REDIS_REST_TOKEN!,
});
```
We previously mentioned adding a semantic recall feature to our agent, which allows it to consider previous messages related to the current context. For that, the agent needs a vector database and an embedder to process the messages. Since our public demo is not for personal use and doesn't need to remember messages across different threads, we won't use this feature, but it can be implemented as follows.
```typescript
export const myUpstashVector = new UpstashVector({
url: process.env.UPSTASH_VECTOR_REST_URL!,
token: process.env.UPSTASH_VECTOR_REST_TOKEN!,
});
export const memory = new Memory({
storage: myUpstashStore,
vector: myUpstashVector,
embedder: openai.embedding("text-embedding-3-small"),
options: {
lastMessages: 10,
semanticRecall: {
topK: 3,
messageRange: 2,
scope: 'resource'
},
threads: {
generateTitle: true
}
}
});
```
In the semantic recall configuration, **topK** specifies the number of similar messages to retrieve, **messageRange** defines how much surrounding context to include with each match, and setting **scope** to 'resource' makes the agent search across all threads associated with the user named 'resource'. This cross-thread memory is a powerful awailable with Upstash.
### Tools
Creating a tool is nearly as simple as creating an agent. We provide a name, description, input and output schemas, and a function to execute when the agent needs the tool's capabilities.
```typescript
export const articleQueryTool = createTool({
id: 'get-relevant-article',
description: 'Get relevant article information',
inputSchema: z.object({
question: z.string().describe('the question about the field'),
}),
outputSchema: z.object({
bestOption: z.object({
abstract: z.string().describe('the abstract of the article'),
title: z.string().describe('the title of the article'),
pdfUrl: z.string().describe('the PDF URL of the article')
})
}),
execute: async ({ context }) => {
return await querySimilar(context.question);
},
});
```
We use Zod to validate the input and output schemas. This helps maintain consistent responses and minimizes potential errors from the LLM. We also define a function for the tool to use. Our tool will query a large collection of research articles, which is periodically updated via the arXiv API and embedded in our Upstash Vector database.
```typescript
const querySimilar = async (query: string) => {
const { embedding } = await embed({
value: query,
model: openai.embedding("text-embedding-3-small"),
});
const results = await myMastraUpstashVector.query({
indexName: "arxiv",
queryVector: embedding,
topK: 3,
});
if (results && results.length > 0) {
const bestMatch = results[0];
const metadata = bestMatch.metadata as ArxivPaper;
return {
bestOption: {
abstract: metadata.abstract,
title: metadata.title,
pdfUrl: metadata.pdfUrl
}
};
}
throw new Error("No relevant information found");
}
```
We can perform simple operations on our vector database through an `UpstashVector` instance, which extends `MastraVector`. Above, we query for similar article abstracts that we embedded beforehand and return the best result to the tool. Note that we use the same embedding model for the query as we did for the articles. We will explain article embedding in more detail later.
### The Mastra Instance
```typescript
export const mastra = new Mastra({
storage: myMastraUpstashStore,
agents: { articleAgent },
deployer: new VercelDeployer()
});
```
We simply specify which agents to use, and our `Mastra` object is ready. We also provide storage to persist data beyond in-memory storage. You can also choose from [available deployment configurations](https://mastra.ai/en/docs/deployment/overview); we will deploy using Vercel.
With the default options from `create-mastra-app`, we already have the required file structure:
```bash
.
└── mastra
├── agents
│ └── index.ts
├── tools
│ └── index.ts
└── index.ts
```
Only one step remains before deploying: our environment variables.
```bash
OPENAI_API_KEY=
UPSTASH_VECTOR_REST_URL=
UPSTASH_VECTOR_REST_TOKEN=
UPSTASH_REDIS_REST_URL=
UPSTASH_REDIS_REST_TOKEN=
```
Put these in your `.env.local` file for local development and add them to your deployment environment.
Now we are ready to build and deploy our Mastra server.
```bash
npm run build && vercel --prod
```
You can check the [Vercel documentation](https://vercel.com/docs/deployments#vercel-cli) to see how to deploy.
While developing, we can use the Mastra Playground to see our server's output. Run the following command:
```bash
npm run dev
```
This will provide a link to a web interface where you can chat with our agent, run tools explicitly, and explore the capabilities of our server.
Now it's time to talk about the other part of the application.
### Next.js Server
Once the Mastra server is set up, we need to handle three things: the UI, communication with the Mastra server, and an article service that talks to the arXiv API and embeds abstracts into Upstash Vector. Mastra has a client SDK to expose the server's functionalities. Through it, you can access agents, tools, memory, and more. Its usage is straightforward, but we will share some examples. For more details, you can check the documentation [here](https://mastra.ai/en/reference/client-js/agents). In a Next.js project, you can simply install and use the client SDK.
```bash
npm install @mastra/client-js@latest
```
In your code, create an instance of `MastraClient` to use it in your project.
```typescript
import { MastraClient } from "@mastra/client-js";
export const mastra_sdk = new MastraClient({
baseUrl: process.env.NEXT_PUBLIC_MASTRA_API!,
retries: 3,
});
```
You need to set `NEXT_PUBLIC_MASTRA_API` to the address of your Mastra server. If you are developing locally, this will be a `localhost` address. Since there will probably be a port conflict on `3000`, you can change the configuration of the Mastra server when running it locally, as follows:
```typescript
export const mastra = new Mastra({
storage: myMastraUpstashStore,
agents: { articleAgent },
server: {
port: 4111,
timeout: 10000,
}
});
```
Now, when we run the Mastra server locally with `npm run dev`, it is served at port `4111`. We can set `NEXT_PUBLIC_MASTRA_API` to `http://localhost:4111` when we run the Next.js project locally.
Let's see how we can use Mastra's client SDK.
```typescript
export const MASTRA_CONFIG = {
resourceId: process.env.NEXT_PUBLIC_RESOURCE_ID || "articleAgent",
agentId: "articleAgent",
baseUrl: process.env.NEXT_PUBLIC_MASTRA_API || "http://localhost:4111",
retries: 3,
}; // this is exported in another file so that we can use it anywhere in the codebase.
// Get your agent and simply stream your response through your agent object.
const agent = mastra_sdk.getAgent(MASTRA_CONFIG.agentId);
const response = await agent.stream({
messages: [message],
resourceId: MASTRA_CONFIG.resourceId,
threadId: threadId
});
```
You can get your tools and agents, and once you have them, you can do almost everything you could do with the actual objects through the client SDK.
Since we will publish this demo project publicly, it is important to avoid heavy loads on the agent. This is where Upstash Ratelimit comes in. Before every stream request, we will check if the user is rate-limited. To configure our rate limiter, we will need Upstash Redis. We can use the same Redis database we have for our Mastra agent.
```typescript
import { Ratelimit } from '@upstash/ratelimit';
import { Redis } from '@upstash/redis';
// Using the same Redis DB across the project
export const rateLimit = new Ratelimit({
redis: new Redis({
url: process.env.UPSTASH_REDIS_MEMORY_URL!,
token: process.env.UPSTASH_REDIS_MEMORY_TOKEN!
}),
limiter: Ratelimit.slidingWindow(10, '10s'),
prefix: 'upstash-ratelimit',
});
// Fetch the below function before every stream.
export async function isRateLimited(id: string): Promise {
const { success } = await rateLimit.limit(id);
return !success;
}
```
This way, we ensure that our endpoints will not be under heavy load.
When creating chat agents with Mastra, knowing some features of Mastra's thread generation can be helpful. Remember that when we configured the memory for the agent, we set `generateTitle` to `true` in the `threads` object. This makes Mastra generate titles automatically for newly created threads. But here is the catch: it is possible to create a thread explicitly, but automatic title generation is not triggered that way. Normally, the way to create a new thread is as follows:
```typescript
const thread = await mastraClient.createMemoryThread({
title: "New Conversation",
metadata: { category: "support" },
resourceId: "resource-1",
agentId: "agent-1",
});
```
However, this takes away the agent's ability to generate titles automatically, since you are setting it manually. Leaving the `title` field empty does not work either. In this case, we can see what the Playground does. Remember the Playground, provided by Mastra to experience the capabilities of your server during development? If we inspect the network tab in the browser's developer tools, we see that when a new thread is created, it doesn't actually send an API request to create it. Instead, it waits for you to submit your first message. After that, it sends a stream request with a newly generated thread ID. This tells Mastra that no thread exists with this ID, so it should create one and, if `generateTitle` is true, generate a title based on the first message.
Let's continue with the last component of our project: the arXiv articles.
### arXiv Articles
arXiv is an open-access archive for nearly 2.4 million research articles in various fields. The `articleQueryTool` queries the Upstash Vector database, which is fed by articles fetched via the arXiv API. The API is simple to use; you can find more details [here](https://info.arxiv.org/help/api/user-manual.html).
In our project, we fetch and store articles daily. The first time the server runs, it fetches about 30,000 articles from specified categories. After that, it fetches new articles published the previous day. To specify the article categories and whether to fetch the initial large batch, we set the corresponding environment variables. We should provide the desired article categories using arXiv's taxonomy, separated by commas. You can look up the categories [here](https://arxiv.org/category_taxonomy).
```bash
CATEGORIES=cs.AI
RUN_BEGINNING_STACK=false
```
If you want a more comprehensive database, you can use [arXiv's bulk data access](https://info.arxiv.org/help/bulk_data/index.html). Without it, we are limited to 30,000 articles per API query, which is sufficient for our purposes.
A simple query to arXiv looks like this:
```typescript
const categories = process.env.CATEGORIES?.split(',') || []; // Get the desired categories and split them for the query.
const searchQuery = categories.length === 1 ? `cat:${categories[0]}` : `(${categories.map(c => `cat:${c}`).join(" OR ")})`;
const query = `search_query=${searchQuery}&sortBy=submittedDate&sortOrder=descending`;
const url = `http://export.arxiv.org/api/query?${query}`;
const response = await axios.get(url); // Make the API call with the constructed URL.
```
We make similar calls to get the latest articles every day and to fetch the initial stack.
After fetching the articles, we normalize them and embed them for storage in Upstash Vector. This must be the same vector database that our Mastra tool uses. By "normalize," we mean parsing the fetched articles into a standard `ArxivPaper` type, which we will use throughout our codebase.
```typescript
export interface ArxivPaper {
id: string;
title: string;
abstract: string;
authors: string[];
published: string;
pdfUrl: string;
category: string;
}// The type for our articles, across our codebase.
async function storeAbstracts(papers: ArxivPaper[]) {
const embeddingModel = openai.embedding("text-embedding-3-small"); // The same model used to query on the Mastra side.
const embeddings = await embedArticles(papers, embeddingModel)
// Put the embeddings into the required form with their metadata.
const vectorsToUpsert = getVectorsToUpsert(embeddings, papers)
for (let j = 0; j < vectorsToUpsert.length; j++) {
await vectorStore.upsert(vectorsToUpsert[j], { namespace: "arxiv" }); // Upsert the embeddings with their metadata to Upstash Vector.
}
}
```
To ensure our database remains current with the latest research, we implement Upstash QStash for scheduled task execution. Given our deployment on Vercel, we need to prevent function timeouts that can occur with extended processing intervals. We address this by exposing a public API endpoint on our server, enabling our QStash instance to trigger the daily database update function reliably.
```typescript
// src/app/api/arxiv_reneval/route.ts
import { verifySignatureAppRouter } from "@upstash/qstash/nextjs"
import { fetchAndUpsertYesterday} from "@/services/arxiv"
async function handler(request: Request) {
console.log("Fetching and upserting yesterday's papers...")
await fetchAndUpsertYesterday()
console.log("Fetching and upserting yesterday's papers completed")
return Response.json({ success: true })
}
export const POST = verifySignatureAppRouter(handler)
```
A scheduler can be configured through the Upstash Console to automatically trigger requests to this endpoint daily at 6:00 AM UTC.
 With this scheduler configuration in place, our server will perform automated database updates each morning, ensuring continuous data freshness.
We should also provide credentials for our QStash instance, all required env variables are given in the example env file.
That's pretty much it. If you want, you can try and play around with the code. Just fork the repositories and start developing. You can go to the [Mastra part's repository here](https://github.com/mtahasylmz/agents-mastra) and [the other repo here](https://github.com/mtahasylmz/mastraWithUpstash). After forking them:
- Clone them to your local machine.
- Fill in your environment variables (example `.env` files are provided).
- Go to the root directory for both projects in separate terminals.
- Run the following commands:
```bash
npm install
npm run dev
```
Now you can see your application at [http://localhost:3000](http://localhost:3000).
With Mastra, you can build more complicated things by utilizing its other templates like RAG, workflows, and networks. It seems that memory and storage play a significant role in all these purposes. This is where Upstash shines.
With this scheduler configuration in place, our server will perform automated database updates each morning, ensuring continuous data freshness.
We should also provide credentials for our QStash instance, all required env variables are given in the example env file.
That's pretty much it. If you want, you can try and play around with the code. Just fork the repositories and start developing. You can go to the [Mastra part's repository here](https://github.com/mtahasylmz/agents-mastra) and [the other repo here](https://github.com/mtahasylmz/mastraWithUpstash). After forking them:
- Clone them to your local machine.
- Fill in your environment variables (example `.env` files are provided).
- Go to the root directory for both projects in separate terminals.
- Run the following commands:
```bash
npm install
npm run dev
```
Now you can see your application at [http://localhost:3000](http://localhost:3000).
With Mastra, you can build more complicated things by utilizing its other templates like RAG, workflows, and networks. It seems that memory and storage play a significant role in all these purposes. This is where Upstash shines.