# Build a Comment Section for your NextJS blog using Redis and NextAuth
> **Source:** https://upstash.com/blog/blog-comments-nextjs13
> **Date:** 2023-06-30
> **Author(s):** Jaydeep Das
> **Reading time:** 5 min read
> **Tags:** redis, nextjs, nextauth
> **Format:** text/markdown — machine-readable content for agents and LLMs
---
We will build a comment section for your blog in this tutorial️. The tech stack we will be:
1. [NextJS 13](https://nextjs.org/) (in App dir)
2. [NextAuth](https://next-auth.js.org/) (for Authentication)
3. [Upstash Redis](https://upstash.com/) (for storing comments)
4. [SWR](https://swr.vercel.app/) (for Caching and Revalidation of comments)
Let's start.
## Handling Auth with NextAuth
Firstly, we can't just let anyone post a comment, right? Someone could just run a script to spam your blog with comments. Let's first build an Authentication system before letting people post a comment. We will use NextAuth.
Install `next-auth` in your project.
```sh
pnpm install next-auth
```
This is the directory structure inside the App Directory
```
.
├── app
│ ├── api
│ │ └── auth
│ │ └── [...nextauth]
│ │ └── route.ts
│ ├── blog
│ │ ├── page.tsx
│ │ └── [...slug]
│ │ └── page.tsx
│ ├── components
│ │ └── LoginButton.tsx
│ ├── favicon.ico
│ ├── globals.css
│ ├── layout.tsx
```
Set up our Auth API route:
```ts
// app/api/auth/[...nextauth]/route.ts
import NextAuth from "next-auth";
import GithubProvider from "next-auth/providers/github";
const handler = NextAuth({
providers: [
GithubProvider({
clientId: process.env.GITHUB_CLIENT_ID!,
clientSecret: process.env.GITHUB_CLIENT_SECRET!,
}),
],
callbacks: {
async session({ session, token }) {
if (session && session.user && token.sub) {
session.user.sub = token.sub;
}
return session;
},
},
});
export { handler as GET, handler as POST };
```
Create a new Github OAuth application from [here](https://github.com/settings/applications/new) to get the `GITHUB_CLIENT_ID` and `GITHUB_CLIENT_SECRET`.
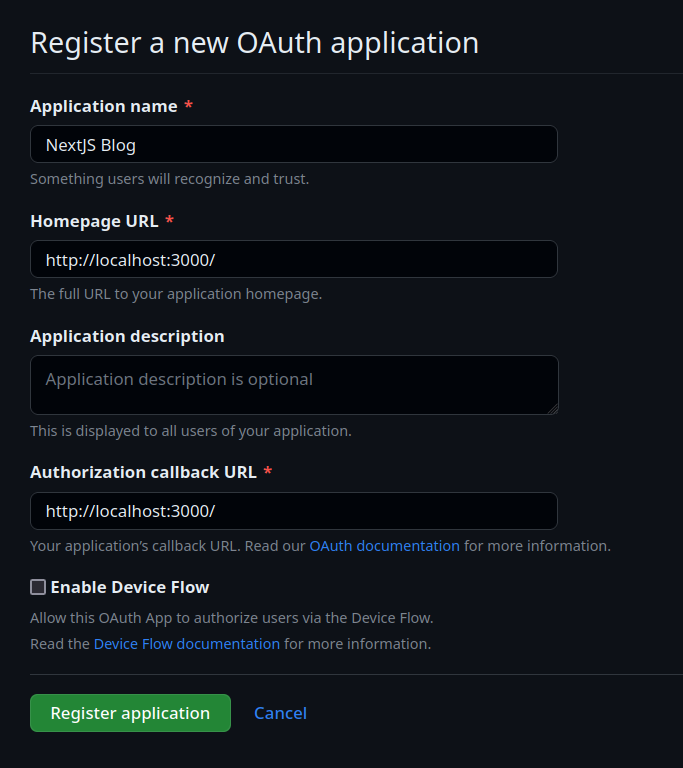
Now, NextAuth allows you to Sign in and SignOut from any Client Component using `signIn` and `signOut` functions from `next-auth`. But before that, you need to set up a Context Provider which wraps your entire application.
```tsx
// app/layout.tsx
"use client";
import "./globals.css";
import { SessionProvider } from "next-auth/react";
export default function RootLayout({
children,
}: {
children: React.ReactNode;
}) {
return (
{children}
);
}
```
The `SessionProvider` will allow you to access the session state from any Client component in the application.
You can access the session state using the `useSession` hook from `next-auth`. Here is a sample for a Login Button:
```tsx
"use Client";
import { signIn, signOut, useSession } from "next-auth/react";
export default function LoginButton() {
const { data: session } = useSession();
if (session) {
return (
Signed in as {session.user?.name} using {session.user?.email}
);
}
return (
Not signed in
);
}
```
With this, our Auth system is in place. Now let's begin the server side routes
to store comments in the Redis database.
## Setting up Redis Database
1. Head to [Upstash](https://console.upstash.com/) and create a Redis Database.
2. Choose a region close to your users and opt for TLS encryption.
3. Install `@upstash/redis` package.
```sh
pnpm install @upstash/redis
```
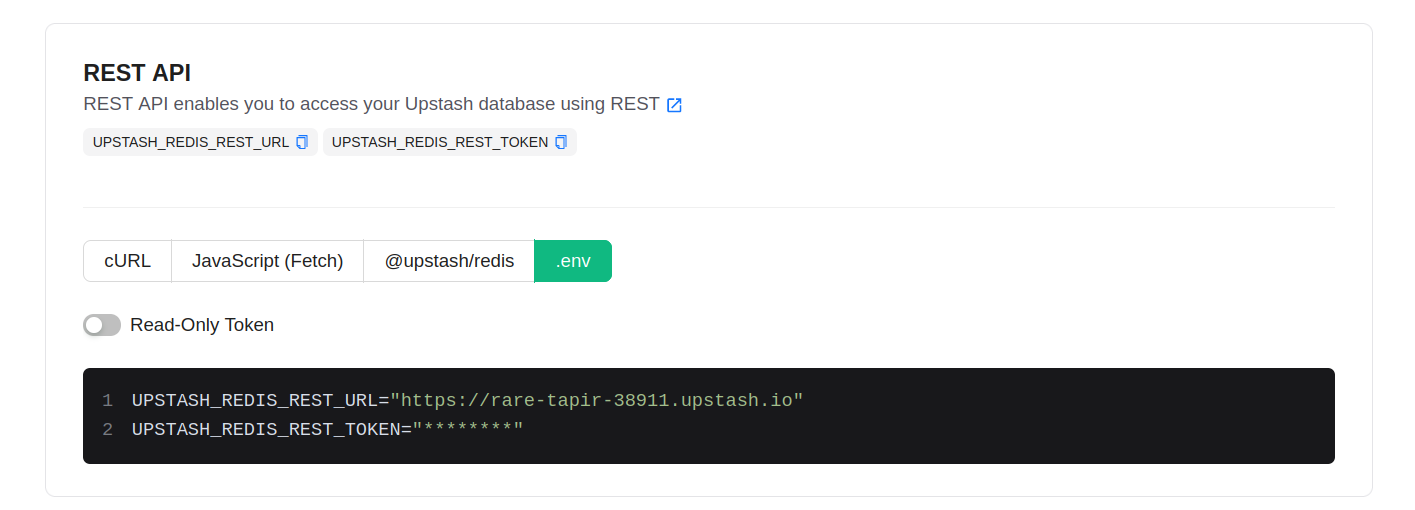
4. Copy these tokens in your `.env.local`.
Lets write our API endpoints now in this directory structure:
```
.
├── app
│ ├── api
│ │ ├── auth
│ │ │ └── [...nextauth]
│ │ │ └── route.ts
│ │ ├── comment
│ │ │ ├── delete
│ │ │ │ └── route.ts
│ │ │ ├── get
│ │ │ │ └── route.ts
│ │ │ └── post
│ │ │ └── route.ts
│ │ └── lib
│ │ ├── getUser.ts
│ │ └── redis.ts
```
1. Create a Redis Client Instance
```ts
// app/api/lib/redis.ts
import { Redis } from "@upstash/redis";
/*
This tries to load UPSTASH_REDIS_REST_URL
and UPSTASH_REDIS_REST_TOKEN from your environment
using process.env
*/
const redis = Redis.fromEnv();
export default redis;
```
That was it. Our Redis Client is now set up and all that is left is to set up the API
routes for it in our application.
We will be using [Redis Lists](https://redis.io/docs/data-types/lists/) for storing the
comments. They can act as a stack so the most recent comment is displayed at the top. Sure,
we can also implement the sorting logic client side but when Redis already provides this data stucture,
let's use it.
You can see the entire code [here](https://github.com/JDeepD/NextJS13-Comment/tree/main/app/api/comment). Here is the gist of it:
1. Create a comment: `redis.lpush(referer, comment)`. This will push the comment in list
having the key `referer`
2. Get all comments `redis.lrange(referer, 0, -1)`
3. Delete a comment `redis.lrem(referer, 0, comment)`. This will delete all occurrences of `comment` in the list with the key `referer`.
Our API is now in place. Let's get to integrating the frontend with the backend.
## Setting up the Client Side
It isn't that difficult. We just need to hit those endpoints we just created using `fetch`.
We will be using a library called `swr` for caching and revalidation of comments. But feel
free to use other libraries like React Query for it.
We make a `useComment()` hook which will have `onSubmit()` and `onDelete()` handlers
for making requests.
```ts
"use client";
import { useState } from "react";
import type { Comment } from "@/app/interfaces/interfaces";
import useSWR from "swr";
const fetcher = (url: string) => fetch(url).then((res) => res.json());
const useComment = () => {
const [text, setText] = useState("");
const { data: comments, mutate } = useSWR(
"/api/comment/get",
fetcher,
{
fallbackData: [],
},
);
const onSubmit = async (e: React.FormEvent) => {
e.preventDefault();
try {
await fetch("/api/comment/post", {
method: "POST",
body: JSON.stringify({ text }),
headers: {
"Content-Type": "application/json",
},
});
setText("");
await mutate();
} catch (error) {
console.log(error);
}
};
const onDelete = async (comment: Comment) => {
try {
await fetch("/api/comment/delete", {
method: "POST",
body: JSON.stringify({ comment }),
headers: {
"Content-Type": "application/json",
},
});
await mutate();
} catch (error) {
console.log(error);
}
};
return { text, setText, comments, onSubmit, onDelete };
};
export default useComment;
```
Now our Comment section is done. We are able to fetch, post and delete comments. Next steps would be to create the components for Comment box and comments list. [Here is a complete sample](https://github.com/JDeepD/NextJS13-Comment)